One Piece Chimney Or No Chimney (RP3, RP4, RP5, RP6, RP10, RP11 and RP12)
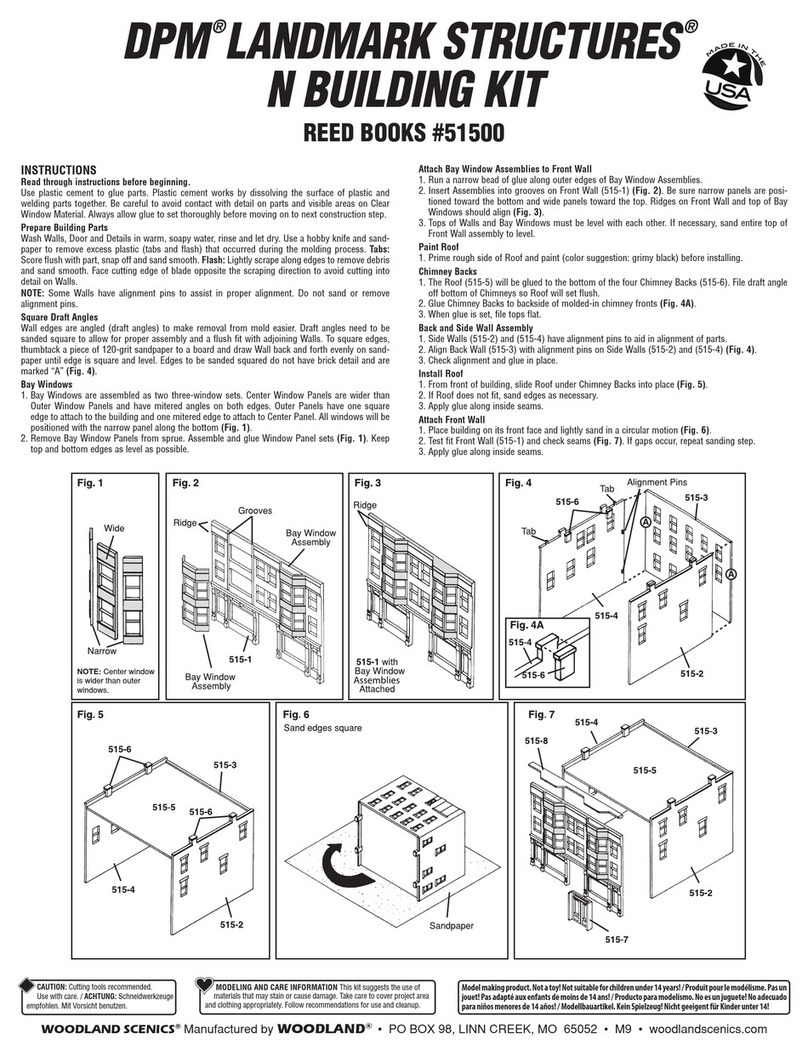
If your building has separate chimneys, glue square .080 x .080 inch styrene plastic roof support
strips to backs of walls prior to installing roof. Cut roof support strips to lengths that are shorter than
lengths of walls (Fig. 7). If the walls in your kit are different heights, be sure strips are glued so that
roof will be below top of lowest wall. As a general rule you will glue strip about 1/8" down from top
of lowest wall (usually the back wall) and about 1/4" down from top of mid-height walls (usually side
walls). Glue strips on front wall so they are even with strips on other walls. The distance down from
the top that you glue roof supports is not critical. Some roofs are level and some will slope front to
back. Be sure they are placed even with each other so roof will lie reasonably flat. Glue roof to top of
roof support strips. Glue chimney to top of roof.
3-dimensional effect for the sign decals
A. Apply appropriate Dry Transfer Decals and paper
signs (suggested list above) to surface of scrap styrene
plastic, left over from roofs.
B. Using a hobby knife, carefully cut out plastic-
backed signs as close to the edges as possible
(Fig. 1a).
C. Blacken white edges of plastic backing with a
black marker (Fig. 1b).
D. Glue sign to desired building (Fig. 1c).
CANOPY INSTRUCTIONS
Paint canopies the color of your choice and let
them dry. Cut carefully around canopies using a
sharp hobby knife. Remove bottoms of canopies
(Fig. 4). Sand, trim and
test fit canopies. Touch up
bottom of canopies before
attaching.
Glue parts to Rosie’s and
Dad’s (Fig. 5).
ROOF INSTRUCTIONS
Dyden #1 (RP13) building has special directions for roof installation. NOTE: To assemble gable roof, see #201 Roof Assembly Instructions
(enclosed in Dyden #1 individual building package). The illustration of the roof assembly 201-4 wall and 201-2 wall are opposite of building
assembly illustration.
For the rest of the kits, proceed as follows. Measure inside dimensions of roof opening(s). Draw measurements on cardboard, then cut out and
test fit cardboard. Make changes in cardboard roof as required until it fits well. Trace cardboard roof on styrene roof sheet and cut out by scoring
with hobby knife along straightedge and snapping off excess plastic. Test fit and make adjustments with hobby knife. (Save scrap roof material for
signs.) Paint roof a flat black such as Floquil “Grimy Black.” Glue in place according to type of chimney your kit has (see below).
Molded In Chimney (RP1, RP2, RP7, RP8, RP9, RP14, RP15)
If your building has chimney(s) molded in as part of wall, insert roof from bottom of building and glue to bottom of chimney(s). Kits include
square .080 x .080 inch styrene plastic strips to make roof supports (Fig. 6). Cut strips for supports. For small buildings (RP1, RP7, and RP15),
roof support strips on two opposite walls will do. For large buildings (RP2, RP8, RP9, and RP14), you will need to put a support strip on every
wall. Place each strip under roof so it fits flush to underside of roof and to inside of wall where roof and wall meet. Glue to both the underside of
roof and to wall.
NOTE: In striving for authenticity in our Dry
Transfer Decals, some detail has been lost
In the process of reducing life-sized signs for
reproduction in HO scale. This is not a misprint,
rather an effect of the reduction. See the entire
line of Woodland Scenics Dry Transfers and
castings at your favorite hobby shop.
Fig. 1a Fig. 1b Fig. 1c
GENERAL INSTRUCTIONS FOR WHITE METAL CASTINGS
The River Pass Building Kits contains more than 200 white
metal castings. These details add life to your layout and make
it more than a set of buildings. They are easy to assemble,
paint and place. Follow these instructions for preparing the
castings. Refer to box photos for some general placement
ideas.
PREPARATION OF METAL CASTINGS
Remove parting lines, flash and stems with a hobby knife
(i.e., X-Acto), diagonal cutters (i.e., Fiskars), sandpaper or
file. Test fit castings. Note: Castings bend easily and should
be handled carefully. Straighten bent or warped castings.
Wash all metal castings in soapy water to remove residue
caused by molding process. Rinse and allow parts to dry. Plan ahead. It is often easier to paint certain castings before assembly. We recommend
using a primer coat and then painting castings with a high quality, flat paint. If you paint first, scrape paint from glue points before gluing. Touch
up paint, if necessary, after assembly. Glue castings together with a fast-setting epoxy or cyanoacrylate, such as “Super Glue” (a thick, gap-filling
cyanoacrylate is recommended).
Fig. 5
Rosie’s
RP9
Fig. 11
Fig. 11a
Fig. 13
OPTIONAL IDEA
To complete the illusion that the building is occupied, place black paper (included in this kit) diagonally from corner to corner inside
building to block light from entering (see cutting diagram below).
#RP1
BIG
DEAL
PAWN
4
½
''
3
¼
'' 4''
4
¼
''
#RP5
MAINSTREET
APTS. #2
#RP6
RIVER PASS
APTS. #2
4''
3
¼
''
4
¼
'
3
¼
''
#RP15
DAD’S MUSEUM
4
½
''
6
¼
''
#RP2
RIVER PASS
VOLUNTEER FIRE DEPT.
3
¾
''
7
¾
''
#RP4
DYDEN #3
3
¼
''
5
½
''
#RP10
DON’S HARDWARE
4
½
''
5''
#RP11
PATRIOT APPLIANCE
8
½
''
6''
#RP12
RIVER’S HOTEL
Tape two pieces of black paper together for River’s Hotel
3
¾
''
5
¼
''
#RP9
ROSIE’S
4
½
''
4
½
''
#RP14
MERLS DRY GOODS
4
¼
''
3
¼
''
#RP3
MARGARET’S
MARKET/BOOT
REPAIR
3
½
''
4
¾
''
#RP8
FLOYD’S BARBER SHOP/
BINDER BOOK SHOP
3''
3
¼
''
#RP7
DYDEN
#2
6
½
''
5
½
''
#RP7
DYDEN #2
1
½
''
1
½
''
#RP13
DYDEN #1
Fig. 15
TRAILER FISHING DOCK BILLBOARD
FENCE CONSTRUCTION (read entire instruction before beginning)
• With light strokes, trim one 1/32" thick fence material to two inches wide, using a straightedge and X-Acto knife (Drawing A). The strips should
fall apart. If not, roll between fingers to separate.
• Tape fence template plan to a flat surface.
• Carefully align strips of fence rail on one template
(stagger joints as indicated). Tape in position on
template. Don’t cover posts on template. Using
3/64" thick fence material strips, cut posts to length
indicated on template. Align posts as indicated and
using a fast setting epoxy or cyanoacrylate, glue
railings at railing joints (allow glue to dry). Repeat
for other four fence sections.
• Cut two remaining 1/32" fence material into 7/8"
pickets (Drawing B). Carefully remove fences from
templates, turn over, and randomly glue pickets.
When dry, trim bottom of pickets (Drawing C).
Refer to box photo for suggested fence placement.
Building placement and available space will
determine the length of fence. Adjust to fit your area.
• Save scrap to board up windows on buildings
and to create junk piles.
Big Deal Pawn
We have supplied a good awning and a torn awning, so that you may decide whether to make Big Deal Pawn look occupied, or give it an abandoned
look. If you like the abandoned look, use the scrap from the wooden fence to create a boarded up look. Glue the boards onto the front door and a few
of the windows (Fig. 12a). We also supplied newspaper print to glue to the inside of the front windows to add to the abandoned look.
SIGN INSTALLATION
Six of the buildings have large signs. Using sign frame as a guide, trace frame on to printed paper signs. Cut and trim sign to fit sign frame. Glue cut signs
to the metal sign castings, using any white glue. Merls Dry Goods (Fig. 10) and Dad’s Museum signs (Fig. 11) are glued to the building as shown in the
illustration, with cyanoacrylate. Big Deal Pawn (Fig. 12), Don’s Hardware (Fig. 13), Patriot Appliance (Fig. 14) and Boot Repair (Fig. 15) will need to have
holes drilled into the side of the building before gluing the signs to the building with cyanoacrylate. Refer to illustrations for placement of the signs.
Dad’s Museum has a two-piece hanging sign (part #52 and #53). Glue #52 to the top of #53 and attach to the building (Fig. 11). There are three signs
exactly the same. Trim one of the sign’s posts and glue to the top of the roof (Fig. 11a). The other two can be used as road signs.
cut
cut
cut
cut
cut
/8"/8"
cut
cut
2"
FENCE MATERIAL
Drawing A
FENCE PICKETS
Drawing C
Section A
Section B
Section D
Section C
Section E
FENCE TEMPLATE
FENCE TEMPLATE
Stagger Joints
Rails
Rails
Posts Rails
Rails
Posts
Posts
Gate
Trim off before installing on layout.
Posts
Drawing B
Part #52
Part
#53
Part #1 Part #5
Part #2
Part #104
Part #105
Part #103
Part #32
Part #30
Part #33 Part #34
Part #31
Part #3
Part #4
ASSEMBLE FLAG
Carefully cut out the flag of your
choice with a sharp hobby knife.
Fold in half and coat joining faces with
white glue. Wrap around the 3" wire
provided (Fig. 8).
Hold each end of flag (Fig. 9) and
push toward the center to make a
“waving flag.”
Fig. 9
Dad’s
RP15
Fig. 6
Support
strip
Side wall
Assembled
chimney
Front wall
MOLDED IN CHIMNEY
Fig. 7
Support
strip
Roof in
from top
Side wall Front wall
ONE PIECE CHIMNEY
Fig. 10
Fig. 14
Fig. 12 occupied abandoned
Plastic-backed Signs
It is best to back the following signs with the scrap
styrene plastic left over from making the roofs of
your buildings:
• road and traffic signs
• railroad crossings
• firehouse shield
• River’s Hotel
• Dyden #3
• Margaret’s
• Clabber Girl
• Groceries
• Ice
• Home on the Range
• Modern Electric
Cookery
• Showroom
• Dry Goods House
Fig. 4
Bottom
Fig. 8
glue
Fig. 12a
