wtw photolab S12 User manual

OPERATING MANUAL
ba77048e01 02/2014
photoLab®S12
PHOTOMETER

2ba77048e01 02/2014
photoLab®S12
Scope of delivery •Photometer
•Power pack
•Product documentation
For the most recent version of the manual, please visit
www.WTW.com.
Copyright © 2016 Xylem Analytics Germany GmbH
Printed in Germany.

Contents
ba77048e01 02/2014 3
Overview . . . . . . . . . . . . . . . . . . . . . . . . . . . . . . . . 4
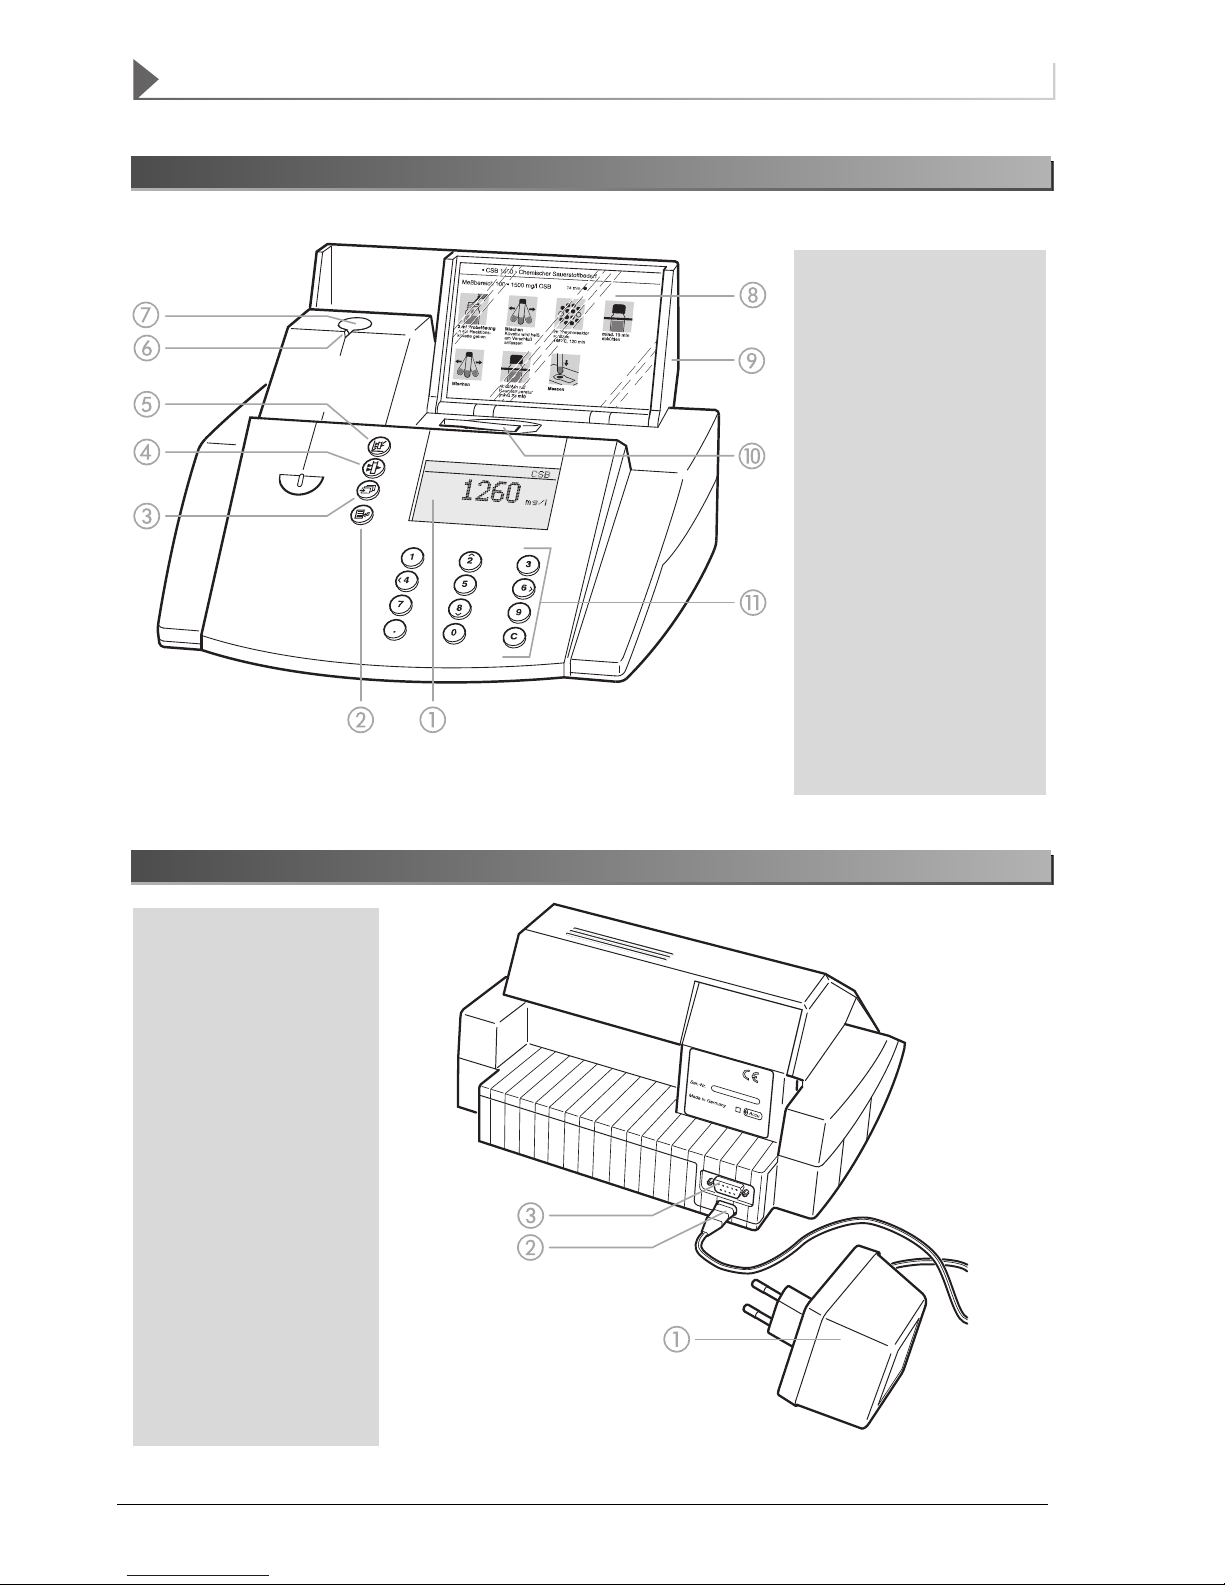
Description of the operating elements . . . . . . . . . . . . 4
Identifying the connectors . . . . . . . . . . . . . . . . . . . . . 4
Selecting and calling up the menu items . . . . . . . . . . 5
Safety . . . . . . . . . . . . . . . . . . . . . . . . . . . . . . . . . . . 6
Authorized use . . . . . . . . . . . . . . . . . . . . . . . . . . . . . . 6
General instructions . . . . . . . . . . . . . . . . . . . . . . . . . . 6
Labeling of notes . . . . . . . . . . . . . . . . . . . . . . . 6
Dangers of disregarding the safety instructions 6
Qualification of the personnel . . . . . . . . . . . . . . 6
Technical state of the meter . . . . . . . . . . . . . . . 7
Commissioning . . . . . . . . . . . . . . . . . . . . . . . . . 8
Preparing the photometer . . . . . . . . . . . . . . . . . . . . . 8
Switching on the photometer . . . . . . . . . . . . . . . . . . . 8
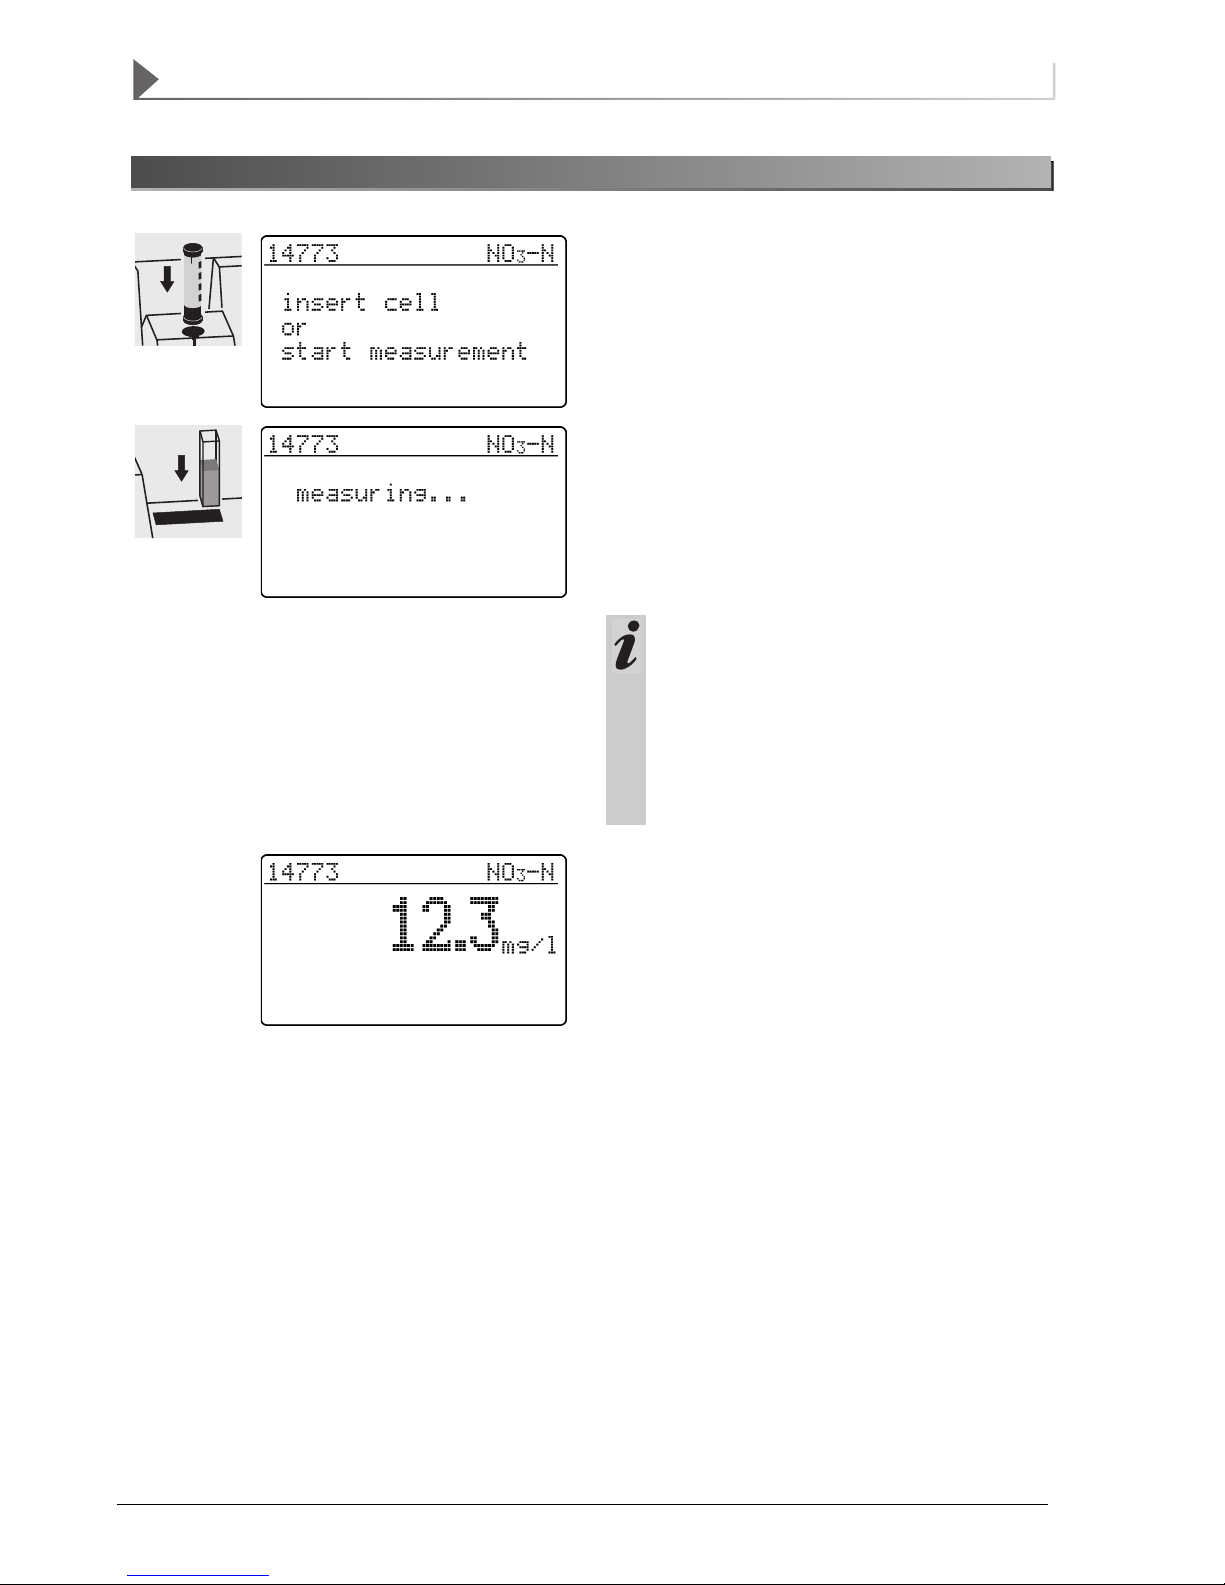
Measuring the concentration . . . . . . . . . . . . 9
Measuring using cell tests . . . . . . . . . . . . . . . . . . . . . 9
Measuring using reagent tests . . . . . . . . . . . . . . . . 10
Zero adjustment . . . . . . . . . . . . . . . . . . . . . . . . 11
Meter Setup . . . . . . . . . . . . . . . . . . . . . . . . . . . . 13
Selecting the language . . . . . . . . . . . . . . . . . . . . . . 13
Setting the date/time . . . . . . . . . . . . . . . . . . . . . . . . 14
Maintenance, cleaning, disposal . . . . . . . 15
Maintenance - Changing the lamp . . . . . . . . . . . . . . 15
Cleaning - Actions to take if a cell is broken . . . . . . 15
Disposal . . . . . . . . . . . . . . . . . . . . . . . . . . . . . . . . . . 16
What to do if… . . . . . . . . . . . . . . . . . . . . . . . . . 17

Overview
4ba77048e01 02/2014
1
Description of the operating elements
aDisplay
bMenu call/Enter key
cScroll key
dAbsorbance
measurement key
eConcentration
measurement key
fNotch for cell alignment
gRound cell shaft
hStorage space for
analysis regulations
(short form)
iCover with integrated on/
off switch
jRectangular cell shaft
kKeypad: numeric keypad,
cursor function, erase,
comma
Identifying the connectors
aPower pack
bConnection for power
pack
cRS 232 interface

Overview
ba77048e01 02/2014 5
– To switch on the photometer, open the cover.
– Press 1.
The following display appears:
Example:
The documentation menu item is preselected in the
setup menu (z).
Select a menu item, e. g. meter setup:
–Press
3
or 28.
The following display appears:
The meter setup menu item is preselected (z).
– Call up the meter setup submenu by pressing 1
.
The required menu item is
–Select
3
or 28
– Call up 1.
Selection lists:
– Changes to the settings are accepted after
confirmation by pressing 1
– Current settings are marked by "S".
– Change to other configuration levels by
Selecting the menu item, return
Pressing 1
– Scrolling with 3or 28.
Character input:
– via the numeric keypad or by using 3,
the character to be input is shown in reverse video.
– Confirm each input with 1.
Selecting and calling up the menu items

Safety
6ba77048e01 02/2014
2
This operating manual contains basic instructions to
be followed in the commissioning, operation and
maintenance of the meter. Consequently, all
responsible personnel must read this operating
manual before working with the meter.
The operating manual must always be available in the
vicinity of the meter.
Authorized use
The photometer is authorized exclusively for
analyzing substances in water and aqueous solutions
using round cells or rectangular cells (special optical
glass).
Observe the technical specifications of the cells
according to chapter TECHNICAL DATA, in the
FUNCTIONAL DESCRIPTION document [on CD-ROM].
Any other use is considered unauthorized.
General instructions
The photometer is constructed and tested according
to the EN 61010-1 safety regulations for electronic
measuring instruments. It left the factory in a safe and
secure technical condition.
The smooth functioning and operational safety of the
photometer can only be guaranteed under the climatic
conditions specified in chapter TECHNICAL DATA, in the
FUNCTIONAL DESCRIPTION document [on CD-ROM] of
this operating manual.
Opening the photometer or adjustment, maintenance
and repair work must only be performed by personnel
authorized by the manufacturer.
The only exceptions to this are the activities described
in chapter MAINTENANCE, CLEANING, DISPOSAL. Non-
compliance results in the loss of warranty claims.
Follow the points listed below when operating the
photometer:
Follow local safety and accident prevention
regulations.
Observe the enclosed instructions concerning
reagents and accessories.
Observe the regulations when dealing with
dangerous substances.
Follow the operating instructions at the workplace.
Use only original spare parts.
Labeling of notes
indicates notes that you must read – for
your own safety, the safety of others and to
protect your meter from being damaged.
indicates notes that draw your attention to
special features.
Dangers of disregarding the safety instructions
Disregarding the safety instructions can adversely
affect the safety of both the user and the environment
as well as the equipment.
Non-compliance with the safety instructions will result
in the loss of any warranty claims.
Qualification of the personnel
The personnel responsible for the commissioning,
operation and maintenance must have the necessary
qualifications for this work. If the personnel do not
have the required skills they have to be instructed.
Furthermore, it must be ensured that the personnel
read and completely understand the present operating
manual.

Safety
ba77048e01 02/2014 7
Technical state of the meter
It is the responsibility of the operator to continuously
observe the overall technical condition (externally
recognizable deficits and damage as well as
alterations to the operational behavior) of the meter.
If safe operation is no longer possible, the equipment
must be taken out of service and secured against
inadvertent operation.
Safe operation is no longer possible if
the equipment has been damaged in transport
the equipment has been stored under adverse
conditions for a lengthy period of time
the equipment is visibly damaged
the equipment no longer operates as prescribed.
If you are in any doubt, please contact the supplier of
the photometer.

Commissioning
8ba77048e01 02/2014
– To switch on the photometer, open the cover.
The photometer performs a check (Self-Check) of the
entire system and then switches automatically to the
concentration measuring mode.
Self-check of the photometer
Automatic change to the measuring mode,
concentration
3
The photometer operates at an environmental
temperature of +5 °C to +40 °C. During transport from
cold to warm surroundings, condensation can form
resulting in the malfunction of the meter.
Before putting the photometer into service, wait until it
has adapted to the new environmental conditions
(see also chapter TECHNICAL DATA, in the FUNCTIONAL
DESCRIPTION document [on CD-ROM]).
Preparing the photometer
– Place the photometer on a hard, flat surface and
protect it against intensive light and heat.
Line operation
– Plug the original power pack into the socket on the
photometer
– Plug the power pack into the line socket
– Switch on the photometer (open the cover).
Battery operation
– Charge the battery for approx. 5 hours before the
initial commissioning. To do this:
Plug the original power pack into the socket on
the photometer
Plug the power pack into the line socket and
then the battery will be charged.
During battery operation or when the meter is at a
standstill for longer periods of time, the battery runs
down. This can result in your photometer no longer
being ready for operation.
When the following symbol is displayed, charge the
battery:
Switching on the photometer
After approx.
5 s:

Measuring the concentration
ba77048e01 02/2014 9
– Call up the concentration measuring mode by
actuating 4.
Measuring mode, concentration
– Insert the round cell with barcode into the round cell
shaft until it clicks into place.
Align the line mark to the notch of the photometer.
The photometer reads the barcode of the round cell
and automatically selects the relevant method.
The measured value appears on the display.
If the select method menu is displayed, align the
line mark of the round cell or AutoSelector to the
notch of the photometer.
4
Measuring using cell tests
After approx.
2s:

Measuring the concentration
10 ba77048e01 02/2014
– Insert the AutoSelector into the round cell shaft.
Align the line mark to the notch of the photometer.
The photometer reads the barcode and automatically
selects the relevant method.
– Insert the rectangular cell (vertically, to the right of
the slot). The measurement starts automatically.
Observe the position mark at the cell shaft.
If the select method menu is displayed, insert the
corresponding AutoSelector into the round cell
shaft.
If the "cell type" query appears,
select the relevant rectangular cell (10 mm, 20
mm, 50 mm) with 3or 28,
confirm with 1.
The measured value appears on the display.
Measuring using reagent tests
After approx.
2s:

Zero adjustment
ba77048e01 02/2014 11
5
Zero adjustment is necessary
after changing the lamp
after the error message, PhotoCheck (AQA1)
occurs
on initial commissioning
if the photometer was mechanically stressed, e.g.
percussion, transport
if the ambient temperature changed by more than
5 °C since the last zero adjustment
at least every six months.
When performing the zero adjustment with a round
cell observe the following points:
Only use a clean, scratch-free round cell with
distilled water. A prepared zero cell is provided with
your photometer. In addition, a prepared zero cell
is contained in the scope of delivery of the
PhotoCheck (article 14693).
If the round cell is visibly contaminated, or at least
every 24 months, clean and refill it (minimum filling
level 20 mm). Then check the cell for scratches.
When performing the zero adjustment with a
rectangular cell observe the following points:
With rectangular cells, the adjustment must be
made using the same cell type (manufacturer) as
for the measurement. This is important because
glass of different manufacturers has different
absorption behavior. When changing the cell type
always repeat the zero adjustment with the new
type.
Clean the rectangular cell before performing the
zero adjustment and fill it with distilled water
(minimum filling level 20 mm).
For measurement, always insert rectangular cells
in the cell shaft with the same orientation as during
the zero adjustment (e.g. cell labeling always on
the left side).

Zero adjustment
12 ba77048e01 02/2014
Only perform the zero adjustment against
distilled water in an optically perfect cell.
– Press 1
–Inthesetup menu, call up the meter setup submenu.
The following display appears:
– Call up the zero adjustment submenu with 3or
28.
– Insert a cell with distilled water.
The message, measuring..., appears on the display.
Successful zero adjustment for the 10 mm rectangular
cell.
The zero adjustment must be performed
separately for each cell type.
After approx.
2s:

Meter Setup
ba77048e01 02/2014 13
– To switch on the photometer, open the cover.
– Press 1
– In the setup menu, call up the meter setup submenu.
The following display appears:
This chapter describes the following functions of the
meter setup menu:
select language
set date/time
The following languages are stored in the photometer:
This is the order in which the available
languages appear in the select language menu.
The languages are listed in the language of the
respective country in the photometer.
When Russkij is selected as the language, the
Cyrillic alphabet is used for the user guidance.
Method designation and ID numbers are
always displayed in Latin script.
For output to the RS 232 C interface, Cyrillic
characters are converted to Latin characters
according to GOST.
– Call up the select language menu item.
– Select a language, e.g. Deutsch
– Confirm with 1
–Pressthe1key again:
Return to the meter setup submenu.
The displays appear in German.
6
Selecting the language
Deutsch (German)
English
Français (French)
Italiano (Italian)
Português (Portuguese)
Polski (Polish)
Dansk (Danish)
Svenska (Swedish)
Español (Spanish)
Nederlands (Dutch)
Indonesia (Indonesian)
Ceština (Czech)
Magyar (Hungarian)
Russkij (Russian)
Türkçe (Turkish)
Brasil (Brasilian)

Meter Setup
14 ba77048e01 02/2014
– Call up the set date/time menu item.
– Input the date via the numeric keypad
– Confirm with 1
– Input the time via the numeric keypad
– Confirm with 1.
Setting the date/time

Maintenance, cleaning, disposal
ba77048e01 02/2014 15
Maintenance - Changing the lamp
– Switch off the photometer and disconnect it from
the power line
– Carefully turn up the photometer and park it safely
– Screw off the lamp cover on the underside of the
photometer
Let the lamp of the photometer cool down.
– Pull out the plug a
– Unscrew the screw b
– Remove the lamp with its holder cby pulling it
gently upwards
Do not touch the new light bulb of the
photometer.
– Insert a new preset lamp and screw it tight using
the screw b
– Connect the plug aof the new lamp
– Screw the lamp cover on again
– Set up the photometer again and connect it to the
power line
– Press and hold 3
– Switch on the meter (open the cover) and after the
following display appears, release 3:
– Press 1
– Perform zero adjustment according to chapter
ZERO ADJUSTMENT.
Cleaning - Actions to take if a cell is broken
Do not rotate the photometer to pour out
the liquid!
The photometer has a draining mechanism under the
cell shaft that, when operated correctly, prevents any
liquid coming into contact with electronic components.
– Switch off the photometer (close the cover) and
disconnect it from the line power
– Let the liquid drain off
– Carefully remove any pieces of glass,
e.g.
using
tweezers
– Carefully clean the cell shaft with a damp, lint-free
cloth
– Let the cell shaft dry
After it is dry, check the photometer:
– Perform a photometer monitoring (see section
PHOTOMETER MONITORING (AQA1), in the
FUNCTIONAL DESCRIPTION document [on CD-
ROM]).

Maintenance, cleaning, disposal
16 ba77048e01 02/2014
The measuring instrument is sent out in a protective
transport packing.
We recommend: Keep the packing material in case you
have to send the measuring instrument back for service.
The original packing prevents the measuring instrument
from being damaged during transport.
Dispose of the measuring instrument as electronic
waste at an appropriate collection point. It is illegal to
dispose of it in household refuse.
Within the European Union, the batteries are removed
at a specialized treatment center at the instrument's end
of life. The instruments are taken to one of those
specialized treatment centers via the recycling system
set up for this purpose.
Disposal
Packing
Measuring instrument

What to do if…
ba77048e01 02/2014 17
The display remains blank
when switched on
Connect the photometer to the line power via the power pack.
In the case of battery operation: Battery empty, charging required (approx. 5h);
line operation is possible without restrictions during charging time.
appears Battery nearly empty. Charging required (see chapter COMMISSIONING).
Date/time is lost when
switched off
The backup battery of the real time clock is empty and has to be replaced.
Send the photometer to the service department for this.
Password forgotten Inform the service department.
Photometer does not react The connected printer is off line. Switch on the printer or pull out the interface
cable.
Error messages:
remove cell The message remove cell appears on the display although no cell is inserted.
Clean the cell shaft with a damp, lint-free cloth.
If the error message still appears, return the photometer to the service
department.
lamp defective Replace the lamp (see chapter MAINTENANCE, CLEANING, DISPOSAL).
no zero adjustment No zero adjustment is stored in the meter for the cell. Perform zero adjustment
(see chapter ZERO ADJUSTMENT).
cell error The rectangular cell is inserted incorrectly, or two cells are inserted. Insert the
cell correctly.
cell invalid
A cell type that is not allowed for the selected method was selected, e. g. a round
cell for the reagent test.
method invalid No data is stored in the photometer for the selected method. Update method
data (see chapter UPDATING METHOD DATA, in the FUNCTIONAL DESCRIPTION
document [on CD-ROM]).
wrong method During a difference measurement, the method was changed between the first
and second measurement. During a difference measurement, the method
must remain identical.
E_0 Hardware error: Send the photometer to the service department.
E_1, E_2 or E_3 Replace the lamp (see chapter MAINTENANCE, CLEANING, DISPOSAL). If the error
message remains, send the meter to the service department.

What to do if…
18 ba77048e01 02/2014


What can Xylem do for you?
We're a global team unified in a common purpose: creating innovative solutions to
meet our world's water needs. Developing new technologies that will improve the way
water is used, conserved, and re-used in the future is central to our work. We move,
treat, analyze, and return water to the environment, and we help people use water
efficiently, in their homes, buildings, factories and farms. In more than 150 countries, we
have strong, long-standing relationships with customers who know us for our powerful
combination of leading product brands and applications expertise, backed by a legacy
of innovation.
Xylem Analytics Germany GmbH
Dr.-Karl-Slevogt-Str. 1
82362 Weilheim
Germany
Xylem Analytics Germany
Sales GmbH & Co. KG
WTW
Dr.-Karl-Slevogt-Str. 1
82362 Weilheim
Germany
Tel.:
Fax:
E-Mail
Internet:
+49 881 183-325
+49 881 183-414
www.WTW.com
Service address:
®
For more information on how Xylem can help you, go to xyleminc.com.
Other manuals for photolab S12
2
Table of contents
Other wtw Measuring Instrument manuals

wtw
wtw PhotoLab S12-A User manual

wtw
wtw Turb 555 User manual

wtw
wtw Multi 3430 User manual

wtw
wtw PhotoLab S6 User manual

wtw
wtw Oxi 197i User manual

wtw
wtw Multi 350i User manual

wtw
wtw inoLab Oxi Level 2 User manual

wtw
wtw OxiTop Control OC 110 User manual

wtw
wtw LR 325/01 User manual

wtw
wtw Cond 3300i User manual