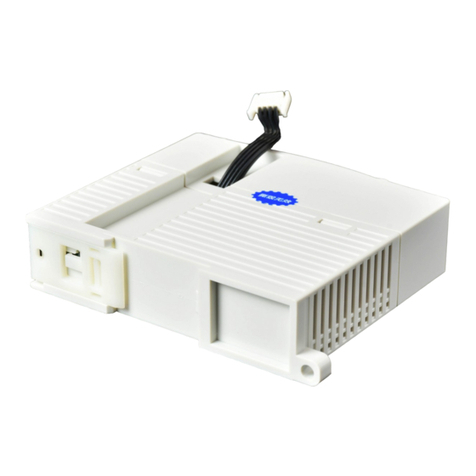
XD-NES-ED
Fast manual
Thanks for purchasing XINJE XD series PLC and extension module. This manual will
introduce the electric features and using method of XD series extension ED module. Please
read this manual carefully before using the products, make sure the wiring operation is
safe.
XD series communication ED module features:
XD series communication ED module is used to extend RS232 or RS485 port
XD-NES-ED can be used as the left extension module of XD series PLC, but
for RS232 and RS485, only can use one of them.
XD-NES-ED is chip design, small size.
Safety precautions
Control system design attentions
Dangerous!
Make sure design the safety circuit, to ensure that the control system can still work
safety when the external power supply cut off or PLC broken.
Make sure set emergency braking circuit, protection circuit, interlock circuit of
forward-reverse running in PLC external circuit and upper-lower limit switch to
prevent from machine damage.
In order to make the equipment safe operation, please design external protection
circuit for important output signal.
PLC CPU will close all the output when detecting the system error; the output will
lose control when the PLC circuit has problem. Please design suitable external control
circuit to ensure the device working normally.
If the PLC relay or transistor unit is broken, the output cannot be ON or OFF.
The PLC is designed for indoor environment, the lightning protection must be
installed in the power supply system to avoid PLC and other device damage.
Installation and wiring attentions
Dangerous!
Do not use the PLC in the following environment: dust, soot, corrosive gases,
flammable gas, high temperature, condensation, vibration, impact, lightning, fire.
Do not let the metal scrap and wire head drop into the ventilation hole of PLC,
otherwise it will cause fire or error operation.
Do not cover the ventilation hole of PLC, otherwise it will cause fire, error operation.
The I/O wiring must be fixed enough, otherwise the bad contactor will cause fault.
Attention!
It can use external power supply for extension module DC24V power.
Please use shield cable for high frequency I/O wiring to avoid interference.
Run and maintenance
Dangerous!
Please connect all the cable include PLC, extension module and BD board after
shutting down the power supply.
Please operate as the manual for online operation, forced output, RUN, STOP.
Attention!
Please discard the product as industrial waste.
Make sure cut off the power supply when installing or uninstalling the extension card.
Product information
Naming rule
XD–NES - ED
①②③
①Product series XD:XD series extension ED module
②Communication type S:RS232 communication ED module
E:RS485 communication ED module
③Extension type ED:extension ED module
Basic parameters
XD series PLC can connect XD-NES-ED module.
Table 1:XD series extension communication ED module specification
Install inside the XD series PLC directly
Product appearance
Product structure
XD-NES-ED
Each part name:
The LED lights when the ED module has power
supply
The LED lights when the ED module communication
port works well
Product dimension and installation
Installation
Do not install the module in below environment:
Direct sunlight
Environment temperature out of range 0-50℃
Environment humidity out of range 35%-85% RH
Condensation as severe changes in temperature
Corrosive gas and flammable gas
Dust, iron filing, salt, fume
Vibration and impact
Spray oil, water and medicine
Strong magnetic field and strong electric field
XD series extension ED module can be installed in com3 port of XD series PLC.
Note: please cut off the power before operation!
TYPE:XDM-32T4-E
DATE:20120701
SN:201207011525
Xinje Electronic Co.,Ltd
COM3
Product dimension (unit: mm)
XD series extension ED module dimension is shown as below:
Electric design reference
Configuration mode
XD series communication ED module needs to use XD/EPProV3.4 and up version or
XINJEConfig tool to cofigure the parameters.
For Modbus communication, please use XD/EPProV3.4 and up version or XINJEConfig
tool to cofigure the parameters. For X-NET communication, please use XINJEConfig tool
to cofigure the parameters.
● use XD/EPProV3.4 and up version to configure the parameters:
Click configure/PLC comm port settings.
Click add/modbus communication:
Choose com3, other parameters please set as you need. Then click write to PLC. Please cut
the PLC power and power on again to make the parameters effective.
● XNET Config tool can configure the parameters of ED module, the following is the
configuration method:
XINJEConfig installation
Double click the file XnetSetup.exe, then follow the guide to finish the installation.
XINJEConfig using steps
There are two PLC model XD3-32T-E communicates with each other through
XD-NES-ED (X-NET communication).
Note: before configuration, please connect PLC with PC through USB cable which is the
HMI donwload cable.
The USB cable needs to install USB driver, please use the file VirtualCOMSetUp.exe to
install the driver.
1. open the XINJE Config tool
2. click config/find device, it will show below window:


