XM GEX-XMP3-C User manual

User Guide

2 3
Table of Contents
Quick Start
Introduction . . . . . . . . . . . . . . . . . 4
Features . . . . . . . . . . . . . . . . . . . . . . . . . . . . . . . 5
About XM. . . . . . . . . . . . . . . . . . . . . . . . . . . . . . 6
Safety Instructions . . . . . . . . . . . . . . . . . . . . . 7
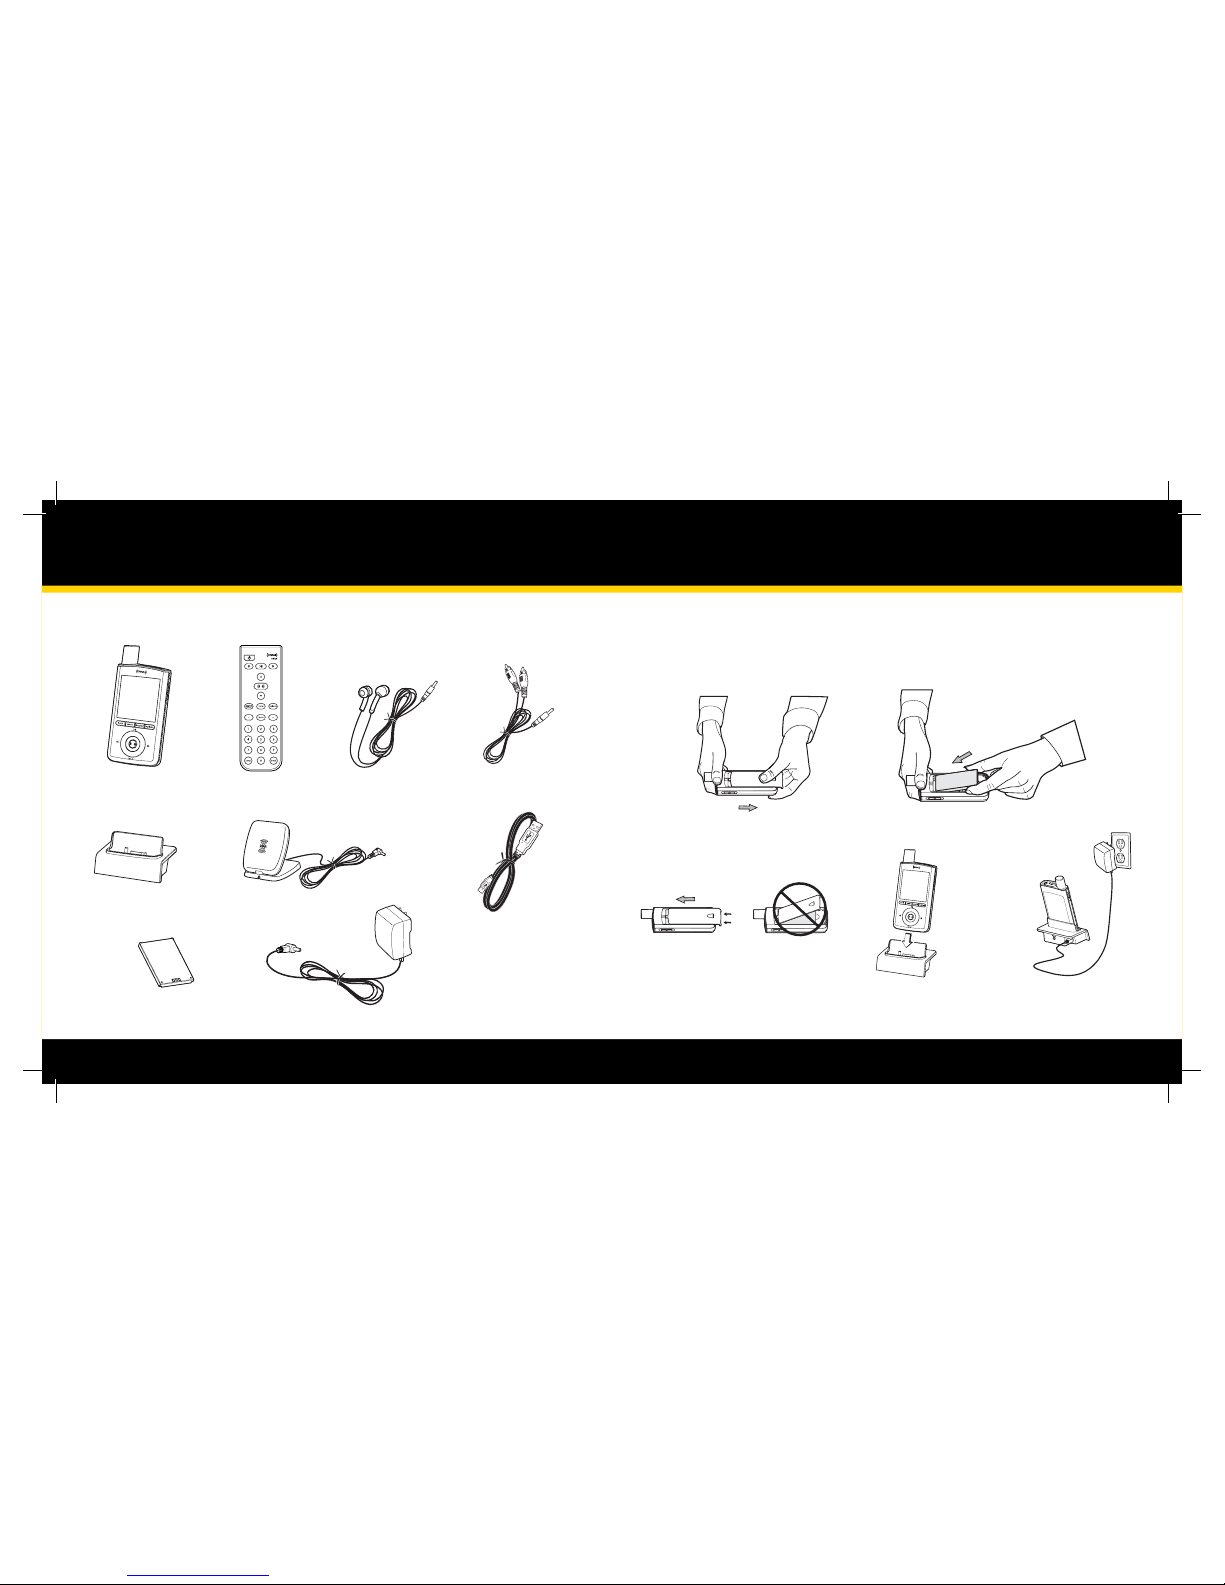
What’s in the Box?. . . . . . . . . . . . . . . . . . . . . . 12
Charging the Battery.. . . . . . . . . . . . . . . . . . . 13
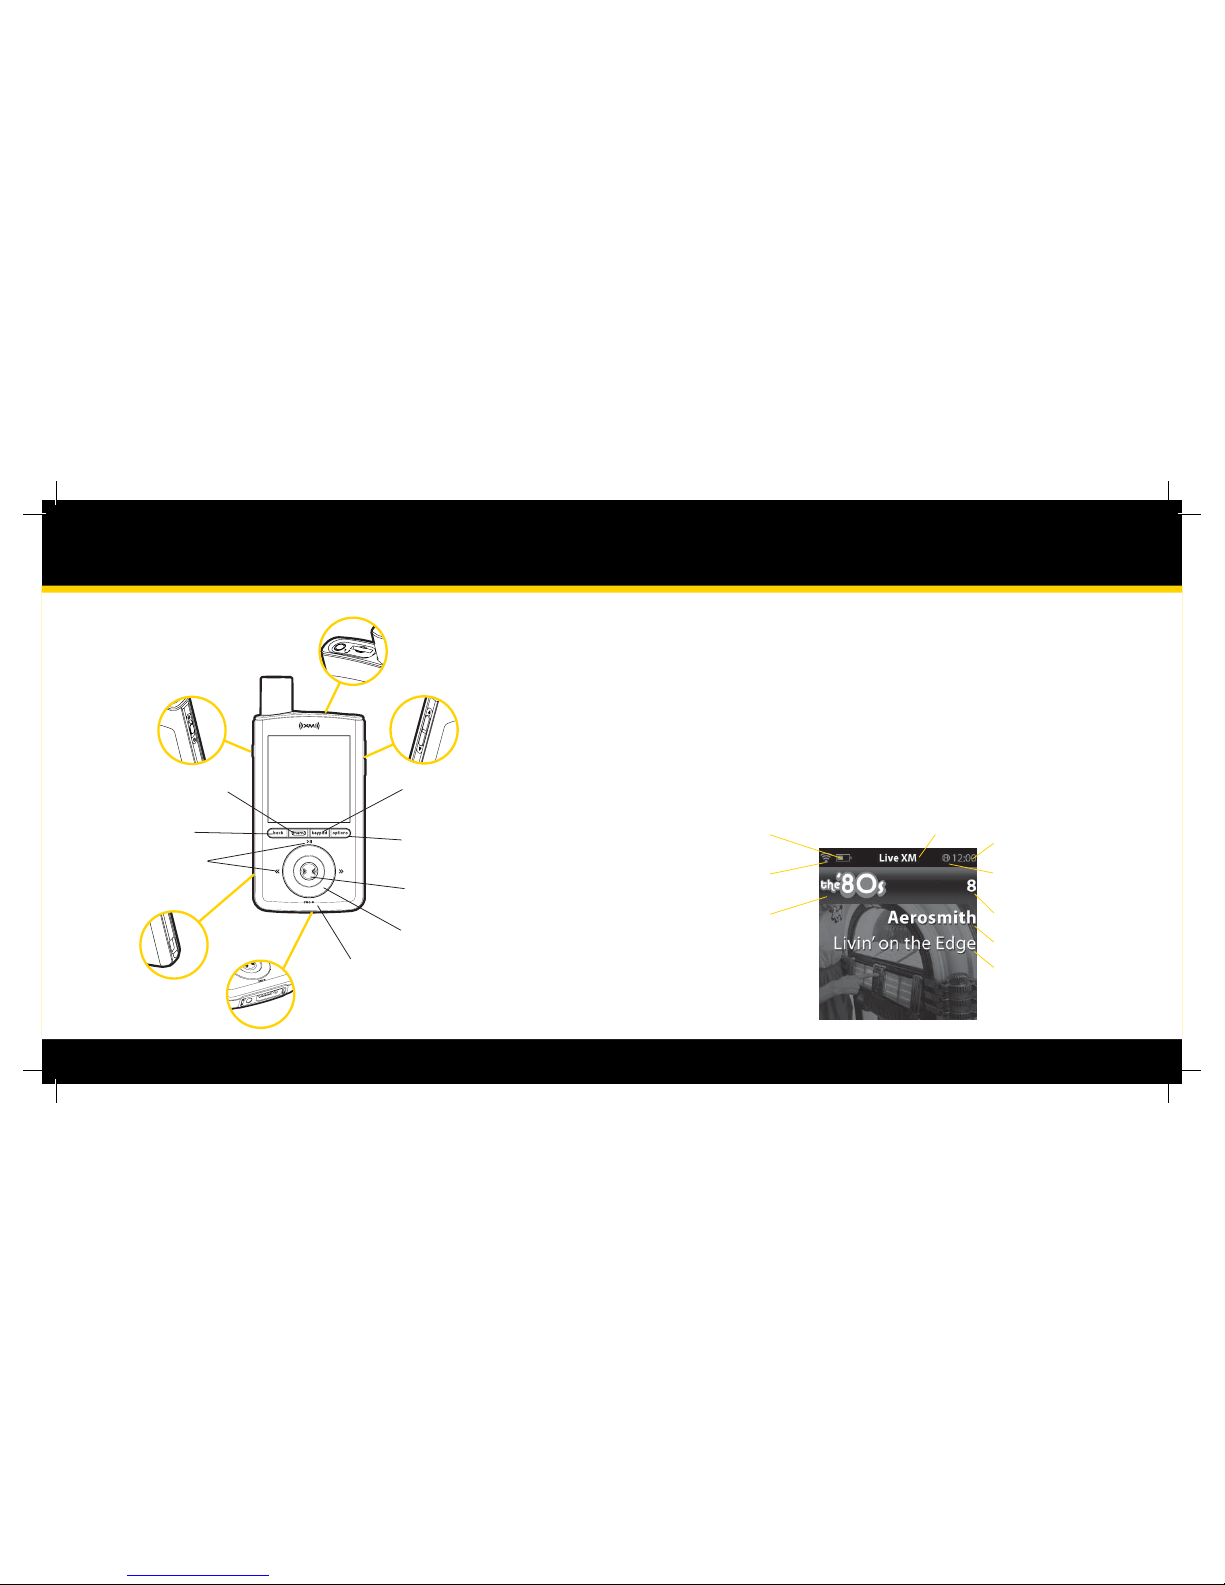
XMp3 Radio Controls. . . . . . . . . . . . . . . . . . . 14
Display. . . . . . . . . . . . . . . . . . . . . . . . . . . . . . . . . 15
Additional Symbols.. . . . . . . . . . . . . . . . . . . . 16
Remote Control Functions. . . . . . . . . . . . . . 18
MicroSD Memory Card.. . . . . . . . . . . . . . . . . 19
Using this Guide. . . . . . . . . . . . . . . . . . . . . . . . 20
Setup . . . . . . . . . . . . . . . . . . . . . . .21
Setup for Home or Oce . . . . . . . . . . . . . . . 22
While Traveling. . . . . . . . . . . . . . . . . . . . . . . . . 24
Activation . . . . . . . . . . . . . . . . . . .25
Subscribing to XM . . . . . . . . . . . . . . . . . . . . . 26
Using your XMp3 Radio . . . . . . .27
Live XM. . . . . . . . . . . . . . . . . . . . . . . . . . . . . . . . 28
Pause and Replay Live XM . . . . . . . . . . . . . . 31
Recording XM. . . . . . . . . . . . . . . . . . . . . . . . . . 32
Auto Recording . . . . . . . . . . . . . . . . . . . . . . . . 33
Listening to Recorded Content . . . . . . . . . 34
Program Guide. . . . . . . . . . . . . . . . . . . . . . . . . 36
Bookmarks. . . . . . . . . . . . . . . . . . . . . . . . . . . . . 36
Playlists. . . . . . . . . . . . . . . . . . . . . . . . . . . . . . . . 37
TuneSelect and GameSelect . . . . . . . . . . . . 39
Info Extras . . . . . . . . . . . . . . . . . . . . . . . . . . . . . 41
Using Your XMp3 Radio with a PC . .43
System Requirements . . . . . . . . . . . . . . . . . . 44
Setup and Installation. . . . . . . . . . . . . . . . . .45
My Music.. . . . . . . . . . . . . . . . . . . . . . . . . . . . . .46
Record XM. . . . . . . . . . . . . . . . . . . . . . . . . . . . .47
Bookmarks. . . . . . . . . . . . . . . . . . . . . . . . . . . . .48
napster.com. . . . . . . . . . . . . . . . . . . . . . . . . . . .49
My Books.. . . . . . . . . . . . . . . . . . . . . . . . . . . . . .50
audible.com/xm . . . . . . . . . . . . . . . . . . . . . . .51
Info. . . . . . . . . . . . . . . . . . . . . . . . . . . . . . . . . . . .52
Disconnecting XMp3 from a PC . . . . . . . .53
Settings . . . . . . . . . . . . . . . . . . . . .54
EQ Settings . . . . . . . . . . . . . . . . . . . . . . . . . . . . 55
Change Display . . . . . . . . . . . . . . . . . . . . . . . . 55
Edit Alerts . . . . . . . . . . . . . . . . . . . . . . . . . . . . . 56
Info Extras . . . . . . . . . . . . . . . . . . . . . . . . . . . . . 56
Channel Access . . . . . . . . . . . . . . . . . . . . . . . . 57
Auto Recordings . . . . . . . . . . . . . . . . . . . . . . . 58
Line Out Level . . . . . . . . . . . . . . . . . . . . . . . . . 58
Antenna Aiming . . . . . . . . . . . . . . . . . . . . . . . 59
Clock and Sleep Timer. . . . . . . . . . . . . . . . . . 60
Restoring Factory Defaults . . . . . . . . . . . . . 60
Memory Usage. . . . . . . . . . . . . . . . . . . . . . . . . 61
Troubleshooting. . . . . . . . . . . . . .62
Other Information . . . . . . . . . . . .67
Product Registration . . . . . . . . . . . . . . . . . . . 68
XMp3 Radio Customer Service
Information. . . . . . . . . . . . . . . . . . . . . . . . . . . . 68
Product Specications. . . . . . . . . . . . . . . . . . 69
Patent Information. . . . . . . . . . . . . . . . . . . . . 71
FCC and IC Statement . . . . . . . . . . . . . . . . . . 72
Warranty. . . . . . . . . . . . . . . . . . . . . . . . . . . . . . . 73
Quick Start
Charge the battery (page 13).
Set up your XMp3 radio (page 21).
Activate your XM subscription online at www.xmradio.ca/activate
or by calling 1-877-438-9677 (page 25).
Press the menu button. You should see this screen:
1.
2.
3.
4.

4 5
Introduction
Features
The XMp3: Record What You Love, Listen When You Want!™
Live or recorded XM content at your ngertips. Spin the wheel to quickly
tune to your favourite XM channels.
Have to step away for a few minutes? Pause and replay up to 30 minutes
of XM programming.
Record up to 5 channels simultaneously, so you’ll always have something
to listen to. Schedule a recording time, or let the XMp3 radio learn your
listening habits and automatically record your favourite channels for you.
Find out what’s playing now or in the future with XM’s programming
guide.
TuneSelect and GameSelect nds your favourite artists or sports events on
any XM channel.
Upload MP3 les, WMA tracks, and Audible.com books from your PC. Manage
your collection and playlists with the XM2go Music Manager software.
Store MP3 or WMA les on a removable microSD memory card (sold
separately).
•
•
•
•
•
•
•
Introduction

6 7
Safety Instructions
IMPORTANT! Always read and understand all the instructions to avoid injury to yourself and/or
damage to your device. XM Satellite Radio claims no responsibility for damage from data loss
due to breakdown, repair or other causes.
DO NOT:
Expose to extreme temperatures, i.e. above 140°F (60°C) or below -4°F (-20°C).
Expose to moisture. Do not use the radio near or in water. Don’t touch the radio with
wet hands.
Let any foreign matter spill into the radio.
Store in dusty areas.
Expose to chemicals such as benzene, thinners, liquid or aerosol cleaners.
Expose to direct sunlight, re, ame, or other heat sources for a prolonged period.
Try to repair or disassemble the radio yourself. Opening the case, power adapter, or
home stand may cause electric shock.
Drop, hit, or bend your radio.
Place heavy objects on your radio.
DO:
Use only the approved power adapter. The power adapter plug should
match the outlet.
Insert the power adapter plug all the way into the outlet. Be careful not to
overload the outlet with too many electrical devices, and keep metallic
•
•
•
•
•
•
•
•
•
•
•
About XM
XM is North America’s number one satellite radio company. Broadcasting live daily from
studios in Washington, DC, New York City, Chicago, the Country Music Hall of Fame in Nashville,
Toronto, and Montreal, XM’s 2008 lineup includes 130 digital channels of choice from coast
to coast: commercial-free music, premier sports, news, talk radio, comedy, children’s and
entertainment programming; and the most advanced trac and weather information.
XM, the leader in satellite-delivered entertainment and data services for the automobile market
through partnerships with General Motors, Honda, Hyundai, Nissan, Porsche, Subaru, Suzuki,
and Toyota, is available in 140 dierent vehicle models for 2008. XM’s industry-leading products
are available at consumer electronics retailers nationwide. For more information about XM
hardware, programming, and partnerships, please visit http://www.xmradio.ca.
Introduction

8 9
objects away from the power plugs.
Stay aware of your surroundings when enjoying your XMp3 radio. If you’re a
pedestrian, keep your eyes and ears open. If you’re driving, keep your eyes
on the road and your hands on the wheel. Not doing so can result in
personal injury, death, and/or damage to your device, accessories, and/or to
your vehicle or other property.
Place your XMp3 radio where it won’t interfere with your vehicle’s safety
features, such as airbags. Failing to correctly place the device may result in
injury to you and others if it becomes detached during an accident and/or
obstructs the deployment of an airbag.
Environmental Information
Follow local guidelines for waste disposal when discarding packaging,
batteries, and electronic appliances. The battery type is Lithium-Ion
(Li-Ion) and should be disposed of properly.
•
•
•
Introduction
Protect Your Ears and Yourself
Always follow trac safety directions. Do not use earbuds or headphones
while operating a bicycle, automobile, or motorcycle. Not only is it
dangerous, it may be illegal.
Make sure the earbud or headphone cable does not get in the way of your arms
or other surrounding objects while you’re walking or exercising.
Maintain a moderate volume when walking or exercising. Always be aware of
what is happening around you.
Using earbuds or headphones for a long time and/or at high volume can cause
serious damage to your hearing. If you hear ringing in your ears, STOP listening
immediately.
Sound can be deceiving. Over time, your hearing“comfort level” adapts to higher and higher
volumes; what sounds “normal”may be dangerously loud.
TO ESTABLISH A SAFE LEVEL: Start the volume control at a low setting. Slowly increase the
volume until you can hear comfortably, without distortion, and still be aware of your surroundings.
ONCE YOU ESTABLISH A COMFORTABLE SOUND LEVEL:
Leave the volume at that level; do not increase it over time.
Pioneer and the Consumer Electronics Association recommend that you avoid prolonged
exposure to excessive noise. Sustained sound levels above 85 decibels can be dangerous without
•
•
•
•

10 11
hearing protection. (For reference, a garbage disposal or loud shouting at 3 feet are about 80
decibels; a food blender or gas lawn blower at 3 feet are around 90 decibels.)
Pioneer disclaims all liability for hearing loss, bodily injury, or property damage as a result of
use or misuse of this product.
Important battery information
Your XMp3 radio’s battery should be charged before you use the radio. The amount of
charge is indicated by the battery level meter in your XMp3 radio’s display. When you’re
charging the battery you will see . When the battery is exhausted you will see a red
battery icon.
When you use your XMp3 radio for the rst time, charge the battery until the battery icon
turns green. Then use your XMp3 radio until the battery is exhausted. This charge/discharge
cycle calibrates the battery level meter so that it accurately reports the state of the battery.
Batteries gradually wear down and require longer charging times. When a battery no longer
holds its charge, you should purchase a new battery. Always use authorized batteries and
power adapters. Replacement batteries and power adapters can be ordered online at
www.xmradio.ca/accessories.
To prevent injuring yourself or your XMp3 radio, do not disassemble, crush, or puncture the
battery. Never allow metal to touch the battery terminals.
Your XMp3 radio’s rechargeable battery should be disposed of properly and may need to be
Introduction
recycled. Contact your local recycler for details. Never dispose of batteries in a re or in water as
they may explode.
To insert or remove the battery see page 13 for more information.

12 13
What’s in the Box?
Introduction
XMp3 Radio Remote Control
Home Stand
Battery
USB Cable
XM Home Antenna
AC Power Adapter
Also Included:
User Guide and Getting the
Most From your XM Radio
Guide
Earbuds RCA Audio Cable
Charging the Battery
The battery comes from the factory with a small amount of charge. Charge the battery for
at least 8 hours before using your XMp3 radio for the rst time, or if you have not used it for
several months.
1. Open battery
compartment.
2. Insert the battery into the XMp3 radio.
3. Carefully replace the battery
door, sliding in place.
4. Connect the XMp3 radio
to the home stand.
5. Plug the power adapter
into the home stand and
to a wall socket.

14 15
XMp3 Radio Controls
Introduction
Power/Hold Switch
Slide down to turn on
or off, slide up to lock
controls.
30-Minute Replay
Pause and replay up to
30 minutes of live XM
Record
Record a song or a channel
- also schedule recording and
set channel to auto record.
XM Button/Select
Press to confirm selections.
Control Wheel
Give it a spin!
Back
Return to previous
screen.
Menu
Go to My Music Library,
access advanced features
and configuration options
or info extras information.
Keypad
Enter channel numbers.
Options
TuneSelect, bookmarks, add channel to
favourites, set channel to auto recording,
and view programs for channel.
Headphone Jack
and microSD Card
Slot
Volume/Mute
USB Jack
Universal
Connector
The functions of the controls may change depending on what you’re doing at the time. In
general, remember that:
Turning the wheel highlights dierent icons or moves up or down a list. Press
the XM button to select the highlighted item.
The back button brings you to the previous screen.
If you’re lost, press the back button several times until you get to an XM
channel or the song you’re listening to. Pressing and holding the back
button will do the same thing.
Display
•
•
•
Battery Level
Indicates that you are
listening to live or recorded
content
Clock
Indicates that the power
switch is set in the “hold”
position
Channel Number
Artist Name
Song Title
Antenna Strength
Channel Name

16 17
Introduction
Additional symbols
Live XM
My Music Library
Auto Recordings
Settings
Battery Charging
Battery Charged (green)
Battery Low (red)
Hold - controls locked. To unlock, slide the power switch
down to the middle position
Mute – to unmute, press both volume up and volume down
buttons at the same time
Repeat
Shuffle
MP3 or WMA song loaded onto the microSD card
microSD card is in the device, has been scanned and is safe to
be removed (green)
Song included on a playlist
MP3 or WMA song loaded onto the microSD card that has
been added to a playlist
TuneSelect set to alert on artist’s name
TuneSelect set to alert on song title
XM signal strength
MicroSD card is being read. Do not eject the microSD card
until this icon disappears (red)
GameSelect set to alert and channel added to channel list (see
channel skip/add)
Scheduled recording via“View Programs” or “XM Highlights”
Schedule to Alert via “View Programs” or “XM Highlights”
Scheduled recording via“Schedule Recording”

18 19
Introduction
Remote Control Functions
30-Minute Replay Buttons
Pause and replay up to 30
minutes of live XM content.
Power Button
Record
Record a song or channel.
Arrow Buttons
Select menu entries,
change channels.
Options
TuneSelect, bookmarks, add
channel to favourites, set
channel to auto record, and
view programs for channel.
XM Button/Select
Press to conrm selections.
Back
Return to previous screen.
Press and hold to return
to the previous channel.
Jump
Switches between current
channel and previous channel.
Menu
Go to My Music Library,
access advanced features
and conguration options
or info extras information.
Number Keys
Enter a channel directly. + and -
Change channels or control
volume for audio system
(sold separately).
Mute
Silences live, saved songs,
and replayed XM content.
MicroSD Memory Card
Turn your XMp3 radio o before inserting or removing the microSD memory card (sold
separately at www.xmradio.ca/microsd or at your local retailer).
To insert the card press it down until it clicks into place. To remove it, press down and it will
eject. Do not remove the card if you see this symbol in red on the display.
NOTE! A microSD card is for your library of MP3s and WMAs, you cannot store any
recorded XM content on your microSD card.
WARNING! Do not remove microSD Card during scanning.
Be sure you insert the microSD
card correctly.

20 21
Setup
Using this Guide
Throughout this guide, you will see instructions such as Select menu →Settings →Change
Display →Brightness. This tells you to do the following:
Press the menu button.
Turn the wheel clockwise until the Settings Icon is highlighted.
Press the XM button to select Settings.
Turn the wheel to get to Change Display, press the XM button again to select.
Press the XM button to toggle through the brightness choices.
1.
2.
3.
4.
5.
Introduction

22 23
Setup for Home or Office
Insert your XMp3 radio into the home stand.
Connect the power adapter, audio cable,
and XM home antenna.
Connect your XMp3 radio to your home or office audio
system.
1.
2.
3.
antenna
Setup
antenna
The XM home antenna plugs
into the jack labeled antenna.
line out
The audio cable plugs
into the line out jack.
5V DC
The home power adapter
plugs into the 5V DC jack.
Place the XM home antenna in or near
a south facing window for optimal
indoor reception.
To optimize signal reception, you
may mount the XM home antenna
outdoors, facing south.
Outdoors
Outdoors
4.
5.
South

24 25
While Traveling
You can connect the power adapter directly to your XMp3 radio.
Activation
Setup

26 27
Subscribing to XM
Before you can listen to any of XM’s 130 channels, you must rst activate your XMp3 radio.
Make sure your XMp3 radio is receiving the XM signal in live mode so that you
can hear the audio on Channel 1.
Make a note of your XM Radio ID. You can find it:
• On XM Channel 0
• On the rear package label
• On the label inside of the battery compartment
NOTE! The XM Radio ID does not use the letters I, O, S, or F.
Activate your service:
• Online: Go to www.xmradio.ca/activate
OR
• By phone: Call 1-877-GET-XMSR (1-877-438-9677)
When your service is activated, your XMp3 radio will receive all
channels. This usually takes 10 to 15 minutes, but may take up to an
hour. Your XMp3 radio must remain on until activated.
If you have not yet activated your XMp3 radio and it is not receiving a signal, the radio may
show a Product Demo on its display. The demo disappears when you activate the radio.
1.
2.
3.
4.
Activation
Using Your XMp3 Radio

28 29
Using your XMp3 Radio
Live XM
NOTE! Be sure to listen to live XM for at least 8 hours in a 30-day period.
This authenticates your XM subscription and ensures you continue to enjoy your live and
recorded XM programs.
Selecting Channels
Turn on your XMp3 radio. Subscribe to XM (page 26) if you haven’t done so
already.
If you see Live XM at the top of the display, skip to the step 3. Otherwise,
press the menu button. Turn the wheel to highlight the yellow live XM
icon, then press the XM button to select it.
Turn the wheel to highlight All Channels. Press the XM button to select it. You
should see a list of XM channels.
Turn the wheel to scroll through the channel list.
When the channel you want to listen to is highlighted, press the XM
button to select it.
- OR -
Press keypad on your XMp3 radio. You’ll see a numeric keypad appear on
the screen.
1.
2.
3.
4.
5.
1.
Turn the wheel to highlight a digit corresponding to the channel number that you
want to listen to. Press the XM button to select that digit. Repeat for all the digits of
that channel number.
When you’ve entered a valid channel number, your XMp3 radio will tune to that
channel within 2 seconds.
- OR -
Press the keys on the remote that correspond to the channel number.
2.
3.

30 31
Categories
XM channels are organized into channel categories, or genres, such as“Rock,”“Jazz,” or “News.”To
nd a channel by category:
Select menu →Live XM →All Categories.
You’ll see a list of all the XM categories. Turn the wheel to highlight a
category, then press the XM button to select it.
You’ll now see a list of all channels within that category. Use the wheel and
XM button to tune to your desired channel.
To briefly listen to each channel in a category, select “Scan (category name)” then
press the XM button.
Favourite Channels
You can save up to 99 of your favourite channels in an easily accessible list.
While you’re tuned to a channel, press options.
Select Add to Favourites.
To listen to your favourite channels:
Press menu.
Spin the wheel to highlight the live XM icon. Press the XM button to select it.
Highlight and select Favourite Channels.
1.
2.
3.
4.
1.
2.
1.
2.
3.
Using your XMp3 Radio
You should see a list of your favourite channels. Turn the wheel to highlight the
desired channel then press the XM button to select it.
To remove a channel from your“Favourites” list:
Tune to that channel.
Select options →Remove Favourite.
Pause and Replay Live XM
Need to take a phone call or step away for a few minutes?
Now you can, and you won’t have to miss a second of live XM
– simply pause by pressing the button and you can walk
away up to 30 minutes. Press the button to resume playing.
To repeat the song you just heard or the song you are currently
listening to press If More than 5 seconds into the next song
press twice
Turn the wheel to see a list of songs that you missed, from
newest to oldest. Press the or buttons to skip to the
previous or next song in the list. You can also press and hold the
or buttons to rewind or fast-forward through individual
songs.
4.
1.
2.

32 33
To return to live XM select menu → All Channels✌ or All Categories, or Favourite Channels.
You can also press several times or enter the channel number using the keypad or from the
replay list select Go to Live XM.
You won’t be able to record a song that is paused or being replayed. Your scheduled recording
and auto-recording sessions take place as normal.
Recording XM
Your XMp3 radio gives you more ways to record up to 100 hours of your favourite XM content.
Push a button to immediately record the song or channel that you’re currently listening to.
Or schedule a recording session by setting the date, time, and channel. You can also schedule
recording sessions using the XM2go® Music Manager application. Lastly, your XMp3 radio
automatically records content from the channels you listen to the most – so you’ll always have
something to hear.
To record a song or channel immediately:
While listening to a song press the rec button, which is the bottom portion of the
wheel.
Select Record song (which records just that one song) or Record channel
(which records the channel up to 6 hours, or until you tell it to stop).
TIP! Try pressing and holding the rec button. This records a single song immediately. Up to
10 hours of individual songs can be recorded.
To schedule a recording session for the future:
1.
2.
Using your XMp3 Radio
Select rec →Schedule Recording or Menu →Live XM →Schedule
Recording.
Use the wheel and XM button to enter the date, start time, end time, and
channel.
Select OK when done.
You can use the same method to edit or delete an existing recording session. You can also use the
XM2go Music Manager to create, edit, and delete recording sessions.
Your XMp3 radio can record up to 5 separate channels at the same time.
NOTE! The priority for recordings is as follows: (1) individual song, (2) channel
recording, (3) scheduled recordings, and (4) auto recordings
Auto Recording
Your XMp3 radio learns your listening habits and automatically records up to 30 hours of XM
programming from the ve channels you listen to most frequently. To automatically record
programs in this manner, make sure that:
XMp3 radio is docked and is plugged into AC or vehicle power.
XMp3 radio can receive an XM signal.
You can also turn all auto-recording o by selecting menu →Settings →Auto Recording, press the
XM button to toggle between O and On.
1.
2.
3.
•
•

34 35
To designate a specic channel to be auto-recorded:
Tune to that channel.
Select rec →Set to Auto Record. You can designate up to 5 channels in this manner.
To remove channels from the auto-record list, select rec →Remove Auto Rec.
Listening to Recorded Content
Recorded XM, MP3 and WMA les, audiobooks – they’re all in one place.
Select menu →My Music Library.
Choose Recorded XM, MP3s and WMAs, or My Books.
If you choose Recorded XM, you’ll see this
screen:
1.
2.
1.
2.
3.
Using your XMp3 Radio
You can view all songs in your library of recorded XM content, or sort by
artist, category, channel name, and so on. You’ll see similar menus when
you view your library of MP3/WMA files or audiobooks.
As you listen to recorded music or audiobooks, try pressing options. Depending on the type
of content, you will nd options to add the songs or artist to your TuneSelect list (XM content
only), repeat songs, shue songs, add them to playlists, or see more information about the
track (if available).
Wondering how to get MP3/WMA les and audiobooks onto your XMp3 radio? You can upload
MP3/WMA les from your PC directly to your XMp3 radio using a USB cable and the XM2go
Music Manager.
You can also store MP3/WMA les directly on a microSD memory card. When you view the
library of MP3/WMA les on XMp3 radio, these types of les are indicated by this symbol:
Try to store most of your MP3/WMA les on the microSD card. This lets your XMp3 use more of
its internal memory to hold recorded XM content.
Your XMp3 radio will inform you when its memory is full. To continue recording XM content,
delete some songs. To delete songs:
Select menu →My Music Library →Recorded XM.
Choose any method to display a list of songs.
Highlight a song.
Select options →Delete.
4.
1.
2.
3.
4.

36 37
Program Guide
To see what will be playing on a particular channel:
While listening to live XM, select options →View Programs.
You will see a list of programs that will be playing on that
channel.
If you then highlight a program and select it, you can see
information about that program, schedule to record it, or
set an alert that will notify you when the program starts.
Looking for an interesting program but don’t know quite what you want? Select menu →Live XM
→XM Highlights. You’ll see a list of the best programs across select XM channels for the next few
days.
Bookmarks
Use XMp3 radio’s “bookmarks” to remember artist and title information of interesting songs.
To bookmark a song that is currently playing, simply select options → Bookmark Song.
You can then view these bookmarks at a later time using the XM2go Music Manager application on
your PC. The XM2go Music Manager also makes it easy for you to purchase the songs that you’ve
bookmarked. You can purchase the songs from napster.com.
Using your XMp3 Radio
Playlists
You can create one or more custom lists, called playlists. A playlist is simply a collection of
recorded tracks that play in a certain order. Create a “morning commute” playlist, a “workout”
playlist, a “best of”playlist, and more. And yes, the same song can appear on more than one
playlist.
While listening to recorded XM or MP3/WMA files, select options →Add to
Playlist.
Choose to add the song to an existing playlist or to a new playlist. To create a
new playlist, select New Playlist. You will see an alphabetic keyboard that allows
you to spell the name of the playlist.
NOTE! You cannot make playlists using both MP3/WMA files and XM recorded
content.
1.
2.
Turn the control
wheel to highlight a
letter; press the XM
button to select it.
Shift displays lower-case
characters and other
symbols.
Select Enter when you’re
done spelling the name.
Playlist name
Correct errors using the
Back key.
Exit cancels the operation
without creating the playlist
name.

38 39
To delete a playlist:
Select menu →My Music Library → Recorded XM or menu →My
Music Library →MP3s and WMAs.
Select Playlists.
Highlight a playlist name and select options →Delete.
To remove songs from a playlist:
Select menu →My Music Library →Recorded XM or menu →My Music
Library →MP3s and WMAs.
Select Playlists.
Select a playlist name and highlight a song within that playlist.
Select options →Remove from Playlist
A playlist may hold only one of these content types:
Recorded XM content
MP3/WMA les uploaded to your XMp3 radio using a PC
MP3/WMA les stored on the microSD card
You cannot create a playlist that, for example, mixes recorded XM content with MP3 les.
1.
2.
3.
1.
2.
3.
4.
•
•
•
Using your XMp3 Radio
TuneSelect and GameSelect
TuneSelect nds your favourite artists or songs and alerts you whenever they are being played on
any XM channel. You can save up to 30 songs or artists.
When you hear one of your favourite songs or artists, select options →
TuneSelect Song or options →TuneSelect Artist. Your XMp3 radio
remembers the song title or artist name.
When any song or artist on your TuneSelect list is being played on any other XM
channel, your XMp3 radio alerts you with a short beep and by displaying
information about that song, artist, and channel.
Press the XM button to change channels and hear that song or artist. If you don’t do
anything, the alert will go away after 6 seconds.
You can do the same thing with sports games; just select options →GameSelect.
Your XMp3 radio might nd more than one TuneSelect or GameSelect entry; in that case, you’ll be
able to choose which one to listen to by turning the wheel.
To edit your TuneSelect list:
Select menu →Settings → Edit Alerts.
Select Edit TuneSelect.
You will see a list of TuneSelect entries.
To change the type of alert, highlight that entry and press the XM button.
Toggle between Alert On Artist or Alert On Song, choose Do Not Alert or Delete.
1.
2.
3.
1.
2.
3.
4.
This manual suits for next models
1
Table of contents
Other XM Radio manuals