XO Vision XOD1840BTNAVI User manual

SLIDEDOWN INDASH MONITOR
English Version

00
2
Contents
DVD
1Before You Start
Installation
Common Operations
Important Safeguards 4
About this manual 4
Precautions 5
Maintenance 6
Location & function of the controls 7
Remote control 9
Specifications 11
Wiring Connections 12
Install the Unit 13
To Select Source by Menu 15
Reset the Unit 15
Turning the Unit On/Off 15
Volume Control 15
Setting the Sound Characteristics 15
EQ Setting 15
Turning Loudness On/Off 16
Eject a Disc 16
Insert a SD Card 16
Angle Setting 16
Mute Function 16
Night Mode 16
Mode Selector 16
Infrared Sensor 16
Double Function 16
Playing a DVD 22
Stop the Playback 22
Selecting Tracks Fast 22
Number Buttons 22
Repeat Playing 22
Pause the Playback 22
Skip backward/forward/
23
System Switch 23
Slow Motion Playback 23
Increase Picture Size 23
On Screen Display 23
Setting the Playback Time 23
Changing the Viewing Angle 23
Changing Audio Language 24
Changing the Subtitle Language 24
Selecting Menu 24
DVD Setup Menu 24
F.F/F.REW the
Playback
5Main Menu
Main Menu Setup 17
Video Setup 17
Audio Setup 18
Source Setup 18
System Adjust 18
1
2
3
5
4
6MP3/SD
Playing a MP3/SD Disc 31
Selecting Tracks Fast 31
Repeat Playing 31
Number Buttons 31
Selecting the MP3/SD Track 31
Stop Playing 32
Pause the Playback 32
Skip Backward/Forward/F.F/F.REW the
Playback 32
Playing Tracks at Random 32
Exit a SD Card 32
Playing a VCD/CD Disc 33
Selecting Tracks Fast 33
Repeat Playing 33
Playing Tracks at Random 33
Number Buttons 34
Stop Playing 34
VCD/CD
7

Pause the Playback 34
Skip Backward/Forward/F.F/F.REW the
Playback 34
System Switch 34
Slow Motion Playback 34
Increase Picture Size 34
On Screen Display 35
Setting the Playback Time 35
Selecting Channel 35
PBC selector 35
Program playing 35
MP4/DIVX
Basic Operation of MP4 36
Number Buttons 36
Stop the Playback 36
Pause the Playback 36
On Screen Display 36
Setting the Playback Time 37
Selecting Track Fast 37
Skip Backward/Forward/F.F/F.REW the
Playback 37
Increase the size of the picture 37
37
37
Changing Audio Language
Changing the Subtitle Language
8
10 AUX
AUX Touch Screen Menu 41
TV Touch Screen Menu 42
TV Station Selector 1 42
TV Station Selector 2 42
Frequency Searching 42
Seek Stations Automatically 42
11 TV (optional)
12 Bluetooth Mode
Bluetooth Operational Interface 43
Using a Bluetooth Wireless connection 43
Pairing Your Unit and Bluetooth Phone 43
Pairing in Handsfree Mode 43
Cellphone Pairing Mode 44
Bluetooth Connection and Disconnection 44
Using the Unit as a Handsfree Device 44
Last Number Dialing 44
To Dial by Cellphone 44
To Dial by the Unit 45
Using the Unit as Bluetooth Music 45
Audio Transfer between The Unit and
Phone 45
Additional Information
Simple Troubleshooting Guide 46
14
00
3
Contents
Tuner
9
Band Selector 38
Manual/Automatic Tuning 38
DX/LOC Selector 38
Selecting The stored Station 38
MO/ST Selector 39
Scanning/Memorizing Stations
Automatically 39
Number Buttons 39
On Screen Display 40
Goto FREQ 40
GPS Operation
13
Function of Normal Icons 46
Select Mode and Trace Mode 47
Address Searching 48
POI Searching 49
Map Searching 49
Recent Searching 50
Bookmarks Address 51
Recent Used Address 51
Trips 52
Presets Address 52
Change General Setting 53
Map Setting 53
Route Setting 54
Change Volume 54
Navigation 55
Menu Selector 55
Stopovers 56

IMPORTANT SAFEGUARDS About this manual
Be sure to connect the color coded leads
according to the diagram. Incorrect con-
nections may cause the unit to malfunct-
,
ion or damage the vehicle s electrical sy-
stem.
Be sure to connect the speaker (-) leads
to the speaker (-) terminal. Never conn-
ect the left and right channel speaker c-
ables each other or to the vehicle body.
Make sure all the connections are comp-
letely correct before turning on your unit.
When replacing the fuse(s), the replace-
ment must be of the same amperage as
shown on the fuse holder.
Do not block vents or radiator panels. B-
locking them will cause heat to build up
inside and may result in fire.
This unit features a number of sophisti-
cated functions ensuring superior
operation. All the functions have been
designed for the easiest possible use,
but many are not self-explanatory. This
manual will help you understand the
functions and operations of the unit.
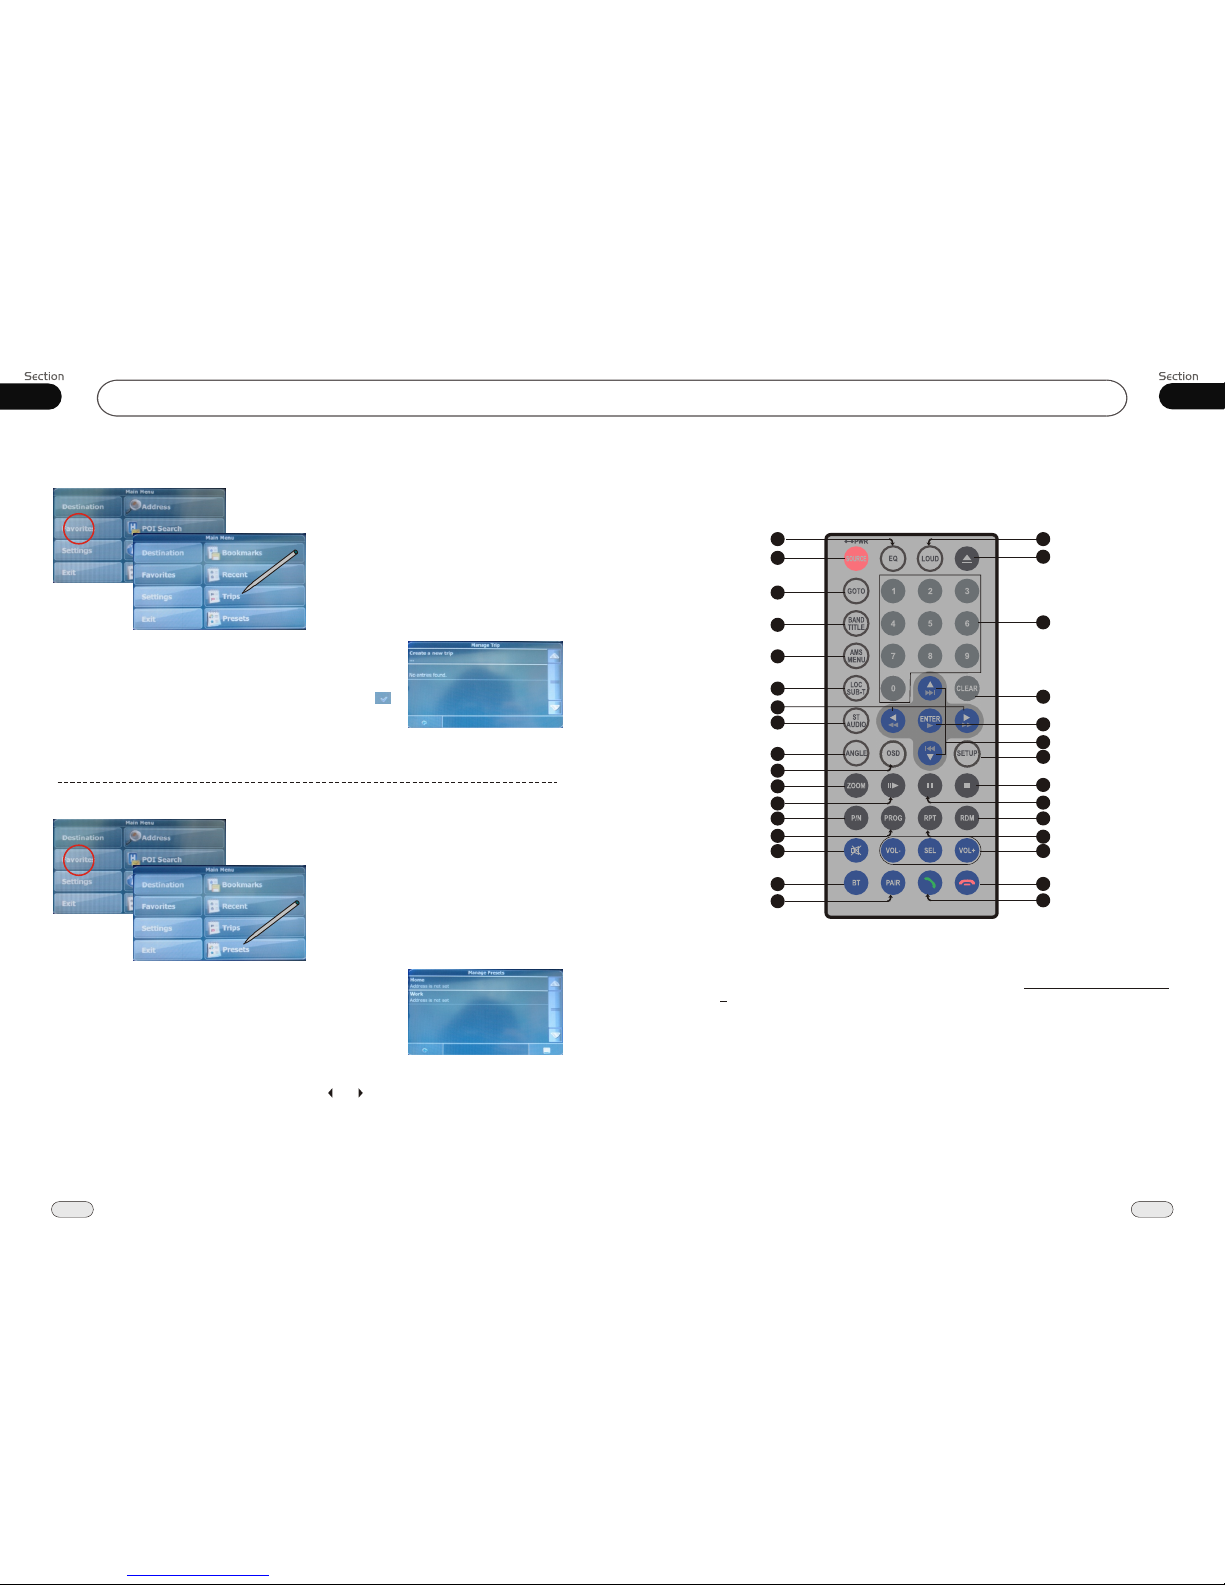
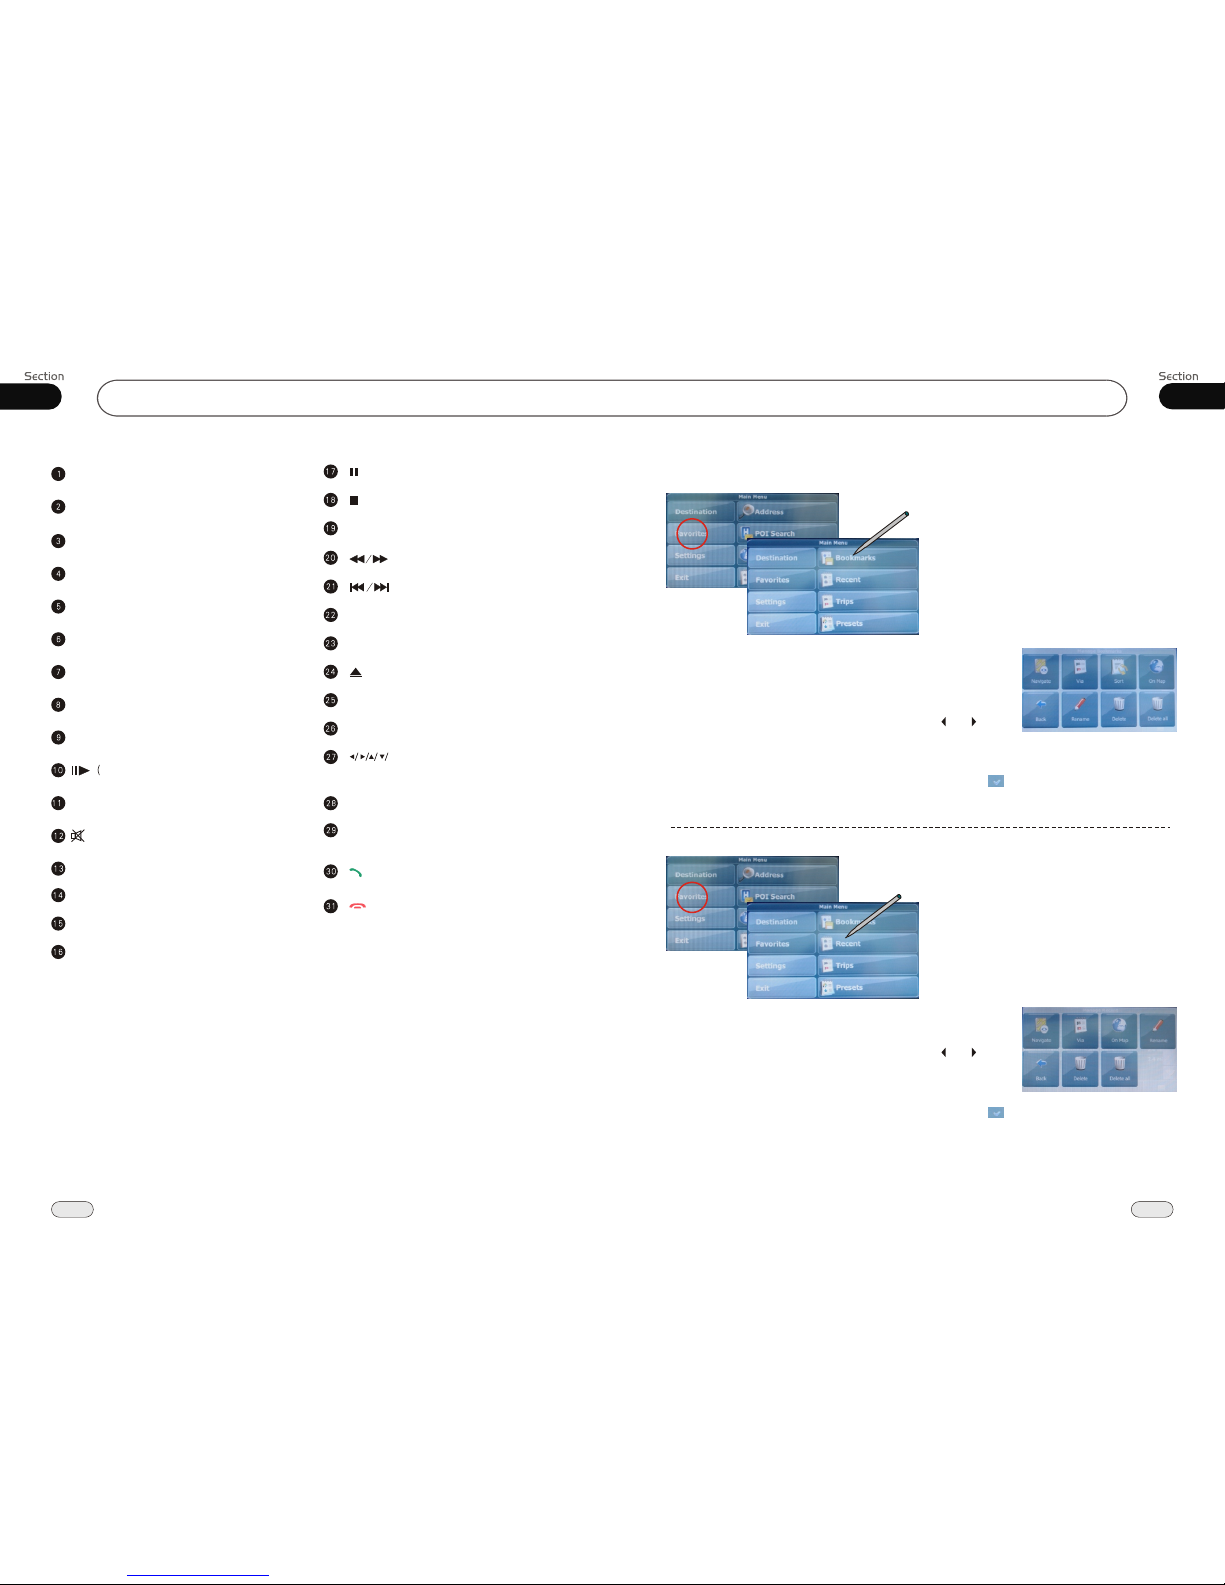
This manual main explains remote
control operation. However, in
addition to those functions related with
DVD/VCD/CD/MP3/MP4/SD operation
that can only be operated by the remote
control, there are also functions can be
operated by the buttons provided for the
main unit.
To
nstall the unit in an apt pl-
ace.
lest the driver distrack his attention
from, please i
Using the unit after starting the engine,
otherwise
the electric energy of battery was
used up.
the unit can not be started, be-
cause
The unit must be screened from direct
sunlight, or the
will be wasting for the high temperature.
electric energy of battery
Do not use the unit in extreme high tem-
perature or such low temperature condi-
tions, and also avoid humidity and direct
sunlight.
Take care of the magnetism of the unit.
Do no put the credit card, cassette or w-
atch around the unit, or they would be
broken or some information in them lose.
To lest disturb the video frequency, keep
far away from the unit when using your
phone.
Do not put the remote under high
temperature or where the sun strikes it,
or else the control remote can not work
normally.
control
12
1
2
3
4
5
6
7
8
9
10
11
14
57
01
4
Before You Start Additional Information
Simple Troubleshooting Guide
No power. Check and make sure whether the fuse is blown,
replace with the proper value if necessary.
Some errors occur in
LCD or no function
pressing the button.
the
when
Unable to receive stations.
Poor effect on receiving a
station.
CDs cannot be loaded.
Sound skips.
No images.
Images skip.
Press RESET button.
Check and make sure whether the antenna is
inserted or the antenna is properly connected, if
not, insert the antenna or connect it properly.
Antenna may not be the proper length. Make sure
the antenna is fully extended; if broken, replace
the antenna with a new one.
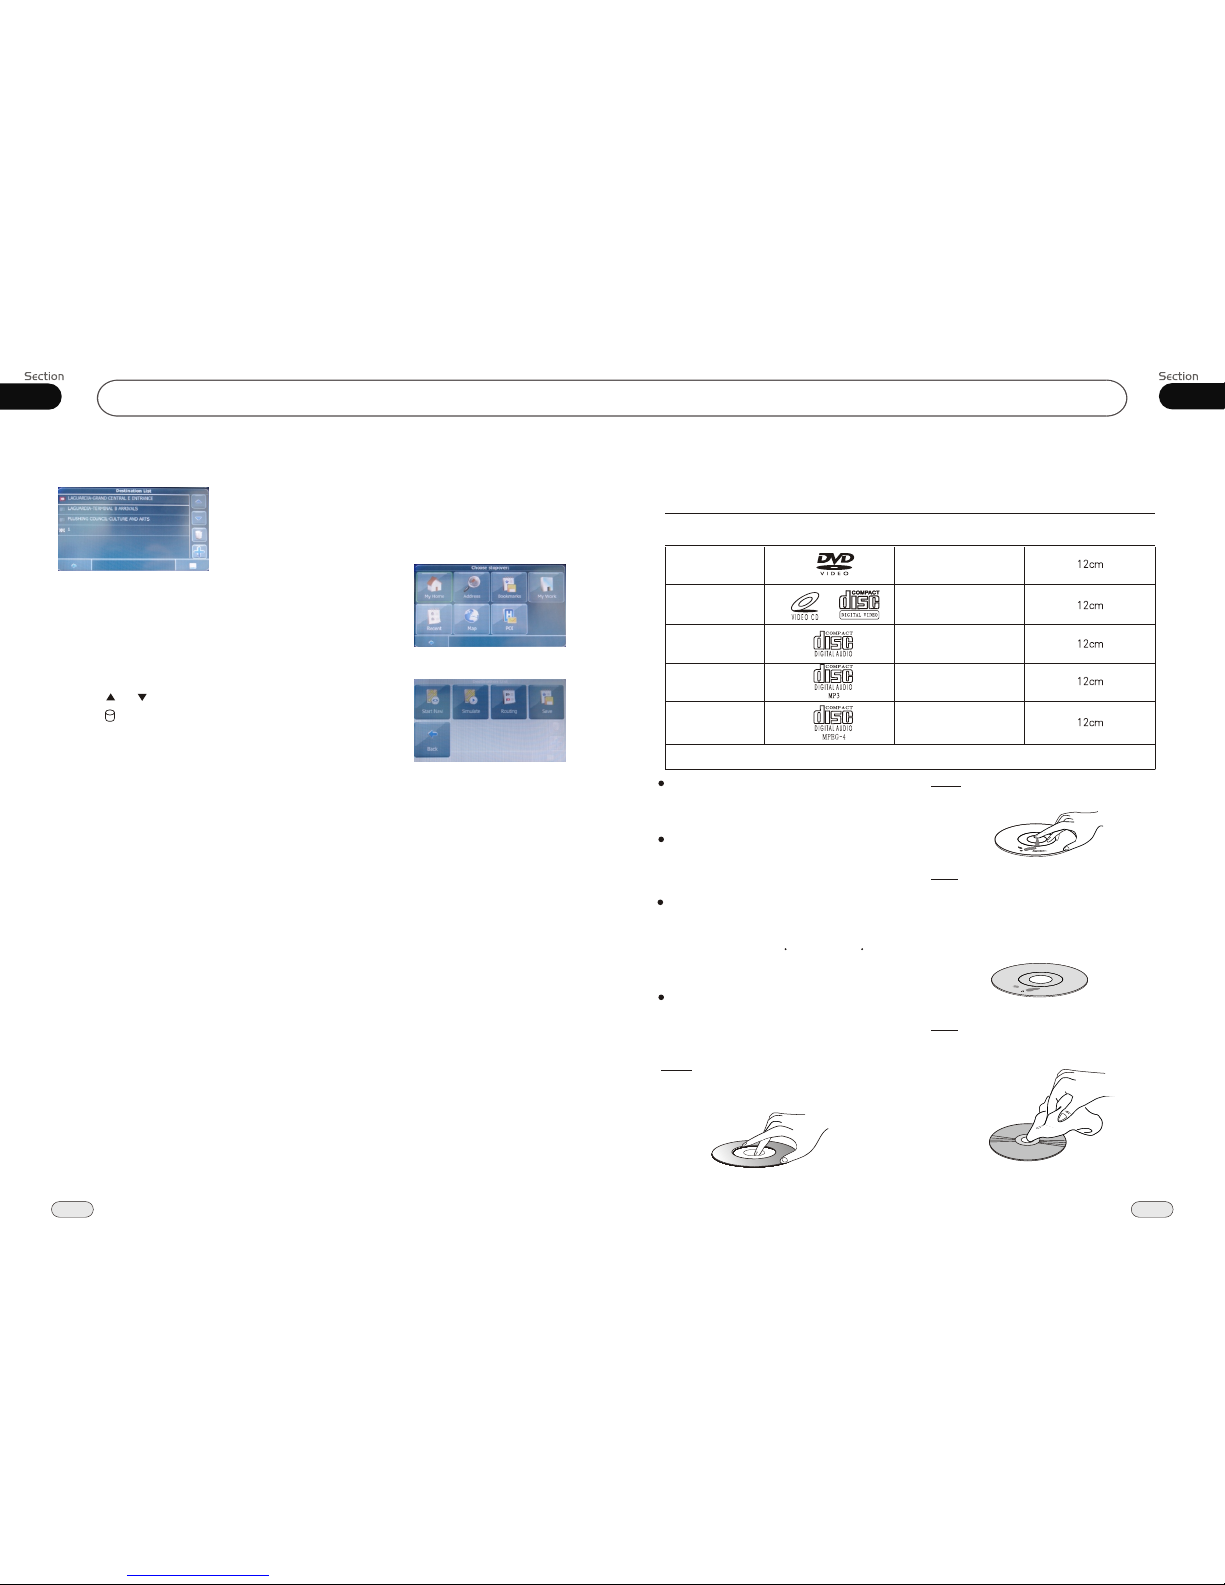
A CD is loaded in the mechanism.
The CD is dirty or damaged.
The Video line from main unit to the TV is not
connected properly.
Improper setting of the color system. Set the color
system according to the
connected television.
to PAL or NTSC
.
.
.
Note:
If any of the problem persist after check list had been made, consult your nearest service dealer. Never
attempt to disassemble your unit by yourself.
The following checklist might helped to solve the problems which you meet when using
the unit. Please double check and make sure if the connection and the procedure of
the operation is properly before using the checklist .below
Problem Cause/Solution
.
.
.
.
.
The antenna is poorly grounded, check and make
sure the antenna is properly grounded at its
mounting location.
.
Due to continuous product improvement, the operations
are subject to run the model.

Type of disc
VCD
MP3
CD
NOTE: The unit is compatible with VCD1.0/2.0/3.0 version and DVCD disc.
DVD
Handle the disc by its edge to keep
the disc clean, and do not touch
the surface.
Do not attempt to modify the unit,
modifying the unit may cause an
accident.
Stop the vehicle before carrying
out any operation that could
interfere with your driving.
Do not work in extremely high or
low temperature. Be sure the
temperature inside the vehicle
is between +60 C and -10 C
before turning on your unit .
To enjoy optimum sound and
images while playing, handle the
discs as follows:
Do not use your CDs with paste residue
or ink attached.
Do not use CDs with labels or stickers
attached, which may leave a sticky residue
while beginning to peel off.
(Shown as the picture)
Clean the discs with an optional clean-
ing cloth. Wipe each disc from the center out.
(Shown as the picture)
PRECAUTIONS
This unit can play the following discs only:
Label on the disc Recorded material
Sound and moving
pictures
Sound and moving
pictures
Sound only
Sound only
Size of disc
MPEG-4
Sound and moving
pictures
01
5
Before You Start
13
56
GPS Operation
Stopovers
In this section, you can plan your routes and stopovers in
advance.
(Picture A-5)
(Picture A-5-1)
Press Via or Edit stopover to open searching the destination
and stopover menu as Picture A-5.
* Press one of the stopover in Picture A-5 directly, the
information of it will be shown on map.
(Picture A-5-2)
* Press + to add stopover, then Picture A-5-1 will be open,
you can set your desired stopover according as the way
shows on the screen.
* Press or to select the stopover in the list.
* Press to delete your selection, once you select a route, you
have several choices. Press the selector and press the enter
icon.
* Press Start Navi to go to navigate.
* Press Simulate to analog navigation.
* Press Routing to set route as the system has.
* Press Save to save places on a journey.
* Press Back to go back to the previous menu.
During navigating or simulating, press Waylist to show the summary route from begins to
ends. Press one of summaries, there will be shown on map.

13
55
Before You Start
01
6
Replacing the Fuse
Make sure the amperage matches the
specified value when replacing the fu-
ses. If the fuse is blown, check the po-
wer connection and replace with a n-
ew one. If the same problem occurs,
it would be subjected to the malfun-
ction. In such cases, please consult
to the nearest service dealer.
When the range of the operation of t-
he card remote control becomes short
or no functions while operating. Rep-
lace the lithium battery with a new b-
utton cell (CR2025). Make sure the b-
attery polarity before replace.
Precautions on Using Lithium
Battery
Always keep the lithium battery beyond
children s reach. In case
swallowed, see a doctor immediately.
Cleaning the battery with a dry cloth,
to ensure its perfect connected.
Make sure the proper polarity when
loading with the battery.
To prevent short circuit, do not use
metal tweezer to clip the battery.
Gently pull out the Battery Holder while
pressing the Stopper.
Put the button-type battery with mark(+)
upward into the Battery Holder.
Replacing the Battery
Insert the Battery Holder into the Remote
Control.
!
Maintenance
Warning
Never use the fuse with the rated
amperage more than that supplied to
your unit, otherwise it will damage the
unit.
Warning!
Improper handle with the battery may
lead to explosion.
It cannot be charged , disassembled or
thrown into a fire.
!
GPS Operation
Navigation
This section describes the function of the navigation.The device powerful performance is
using sound control or 3D mean to lead you know the shortest and the longest distance
between A and B.
Next junction
Zoom in
Direction
Route
Stop navigation Menu icon
Compass
Speed
Current time
Move icon
Moving to next distance
Zoom out
On the navigation screen as
left, the route will be shown
in blue, and the white arrow
will indicate the direction of
your next turning.
Crosshairs can identify your
current position. When you
come up to a turn or other
directions ,you will hear a
sound instruction at the proper
time.
Navigation Screen
(Picture A-4)
* In this condition, you can get the navigation information on by pressing info box.
* In this option, You can choose the street whose height is known (like 0.5KM) and the sel-
ective route. Press on icon when anticipant distance is shown on screen. The device will
give former route up and reschedule a new route.
Menu Selector
In the condition of navigation, you can set menu as Picture
A-4 by pressing Menu icon.
Current Road
The nearest
GPS position
General run
* Alt.route : With this option, you can choose to block the
calculated route for a given distance (e.g., 0.5 km) and
force an alternative route. Simply tap on the icon which
shows the desired distance. Your route will be recalculated,
and the previous route will be discarded for the given distance.
* Press Waylist for the route of begins to ends.
* Press Save to save the current position to bookmarks address.
* Press Volume to adjust the audio, turn to page 51 for details.
* Press Search to search the place where you want to go by POI, such as gas station, turn to
page 46 for details.
* Press Settings to set items as follows:
Press Map Setting to change map setup, more information on page 50.
Press Route Setting to change route setup, more information on page 51.
Press General Setting to general setup, more information on page 50.
* Press Add to go back to map and add new distant.

01
7
Before You Start
13
54
Location of the Controls
Front Panel
The Base
GPS Operation
Route Settings
In the condition of Picture A-3, press Route Settings icon to
show route setup menu as Picture A-3-3. You can set the
corresponding maps due to actual case.
In the condition of Picture A-3-3, press Fast icon to choose
corresponding vehicles according to the actual case(rapido,
local, bicycle, truck, motorcycle, walk, motor scooter).
(Picture A-3-3)
*
Fast: If you want to drive rapidly in freeway, choosing the best route.
*
Slow: If you want to drive slowly in freeway, please choose this item to cut down the
options of the best rapid driving.
*
Bicycle: Indicates the section of highway which forcycling in and which forbidden
cycling in.
*
Motorcycle: Indicates the section of highway which for motor cycling in and which
forbidden motor cycling in.
*
Scooter: Indicates the section of highway which for riding in and which for bidden riding in.
*
Truck: Indicates the section of highway which for truck in and which forbidden truck in .
*
Passerby: Indicates road for passerby. Including all lanes and walkways of the street.
Change Volume
In the condition of Picture A-3, press Volume icon to adjust
volume as Picture A-3-4 shown. You can set corresponding
sound level due to actual situation.
(Picture A-3-4)
* Press -to decrease the volume level;
* Press +to increase it;
* Press Mute to shut down it.
10
9
11
12345678
12

13
Before You Start
01
53
8
REMOTE Infrared Sensor
+/ -
SRC/PWR
During waiting mode, brief press it to turn on
the unit; during working status, brief press it
to select radio mode or playback mode/hold
and press it to turn the unit on or off.
Disc Loading Slot
[ ]/[ ] (Previous Track/Next Track/Adjust
Frequency) Button
SEL/NAV Button
MUTE Button
Briefly press it to mute; keep press it to
switch to the night mode.
Briefly press it to select the function; keep
press it to activate the double function.
Press +/- to increase or decrease the volume,
and press them to adjust functions of the SEL
button.
Press and hold REL, and then press +/- to
adjust angle.
REL Button
Press it to slidedown the monitor, then you
can insert or eject a disc or a SD card.
Press and hold it, the monitor shows ANGLE,
then press +/- to adjust angle.
Press it to set the unit to initial status.
RESET Button
Press REL first before you load the disc.
Press it to eject a disc.
(Eject) Button
SD Card Slot
GPS Operation
(Picture A-1)
In the interface of Picture A-1, press
Settings to open a menu as Picture A-3.
There are general settings, map settings,
route settings and volume adjustment.
Change General Settings
In the condition of Picture A-3,press General
Settings icon to show the general setup menu
as Picture A-3-1. You can set the language,
time, mile on map.
General Settings
(Picture A-3)
* Press Language to select your local country, and select the
language you need to display on map.
* Press Miles to select kilometre or mile.
(Picture A-3-1)
Map Settings
* Press Info Layer to select the icon displayed on map, if you want it to
disappear, press to cancel.
* Press Day to set the mode as: day, night or auto.
* Press Maps to select the different edition.
* Press 3D to select 3D or 2D mode.
* Press Set Time to select the time district.
* Press About to show the current edition.
* Press Track Up to set orientation way, to select Track Up goes to more accurately when
navigates, to select North Up, the index will always point at north.
In the condition of Picture A-3, press Map Settings icon to
show the map setup menu as Picture A-3-2. You can set the
info layer, display mode, map edition, 3D mode and orientation.
(Picture A-3-2)
In the condition of Picture A-3-2:
Navigation SD Card Slot

01
9
Before You Start
52
13
Remote Control
Tips:
For more information as to replacing battery, please refer to Replacing the Battery
on page 6.
GPS Operation
(Picture A-1)
In the interface of Picture A-1, press
Favorites to open a menu as Picture A-2.
Now you can search a stored place by
favorites. This menu may find out some
common used addresses in quicker ways.
Trips
Trips
In the condition of Picture A-2,press Trips
icon to show the trips address list as Picture
A-2-3. Press the desired address to open
editing submenu.
(Picture A-2)
* Press Navigate to enter navigation, turn to page 52 for details.
* Press Edit stopovers to set stopover, turn to page 53 for
details.
* Press Back to go back to the previous menu.
(Picture A-2-3)
(Picture A-1)
In the interface of Picture A-1, press
Favorites to open a menu as Picture A-2.
Now you can search a stored place by
favorites. This menu may find out some
common used addresses in quicker ways.
Presets Address
Presets Address
In the condition of Picture A-2,press
Presets icon to show the presets address
list as Picture A-2-4. Press the desired
address to open an editing menu.
(Picture A-2)
* Press Navigate to enter navigation, turn to page 52 for details.
* Press Via to set stopover, turn to page 53 for details.
* Press Edit to get into the editing menu, in this menu there are:
* Press On Map to show the point on map, press or to show the previous or next presets
address information, and also can play other common operation.
* Press Back to go back to the previous menu.
(Picture A-2-4)
* Press Rename to rename the address name again, press to
save it.
* Press Delete to delete the current bookmarks address.
* Press Delete all to delete all of bookmarks addresses.
* Press Delete to delete the current presets address.
* Press Delete all to delete all of presets addresses.
Press Back to go back to the previous menu;
Press Address to search addresses, turn to page 45 for details;
Press GPS Position to get into GPS navigation;
Press Recent to search recent used addresses, turn to page 48 for details.
1
2
3
4
5
7
20
6
8
9
10
11
12
13
14
15
16
17
18
19
21
22
23
24
25
26
27
28 31
29 30

13
51
Before You Start
10
01
SOURCE/PWR
AMS/MENU
BAND/TITLE
LOC/SUB -T
ST/AUDIO
OSD
Slow Forward/Reward)
ANGLE
PROG(Program playing)
RPT(Repeat Playing)
Mute
RDM (Playing Tracks at Random)
P/N (SystemAdjusting)
ZOOM
LOUD(traffic alarm/loudness)
GOTO (playing time/track)
SETUP
(F.R/F.F)
CLEAR
0~9( Number) Buttons
(Eject Button)
(Stop Playing)
(Pause/Play)
EQ(alternative frequency/equalizer)
(Previous/Next Track)
VOL+/VOL-/SEL
ENTER
(Left/Right/Up/Down
ENTER)
BT (bluetooth mode)Button
PAIR
During bluetooth, pressit to pair.
(Dial,last phone,answer aphone)
(Hang up/refuse aphone)
GPS Operation
(Picture A-1)
In the interface of Picture A-1, press
Favorites to open a menu as Picture A-2.
Now you can search a stored place by
favorites. This menu may find out some
common used addresses in quicker ways.
Bookmarks Address
Bookmark Address
In the condition of Picture A-2,press
Bookmarks icon to show the bookmarks
address list stored. Press the desired book-
marks address to open editing submenu.
(Picture A-2)
* Press Navigate to enter navigation, turn to page 53 for details.
* Press Via to set stopover, turn to page 54 for details.
* Press Sort to go back to and select the bookmark address
again.
* Press On Map to show the point on map, press or to
show the previous or next bookmark address information,
and also can play other common operation.
* Press Back to go back to the previous menu.
(Picture A-2-1)
(Picture A-1)
In the interface of Picture A-1, press
Favorites to open a menu as Picture A-2.
Now you can search a stored place by
favorites. This menu may find out some
common used addresses in quicker ways.
Recent Used Address
Recent Used Address
In the condition of Picture A-2,press
Recent icon to show the recent used
address list. Press the desired address to
open an editing menu as Picture A-2-2.
(Picture A-2)
* Press Navigate to enter navigation, turn to page 52 for details.
* Press Via to set stopover, turn to page 54 for details.
* Press On Map to show the point on map, press or to
show the previous or next used address information,
and also can play other common operation.
* Press Back to go back to the previous menu.
(Picture A-2-2)
* Press Rename to rename the address name again, press to save it.
* Press Delete to delete the current bookmarks address.
* Press Delete all to delete all of bookmarks addresses.
* Press Delete to delete the current used address.
* Press Delete all to delete all of used addresses.
* Press Rename to rename the address name again, press to save it.

01
11
Before You Start
50
13
AM Tuner Section
VCD/CD Player Section
522-1620(KHz)
(Europe)
530-1710 (KHz)
(U.S.A.)
450KHz
28dBuV
VCD Signal System AUTO/PAL/NTSC
General
FM Section
87.5-108(MHz)
(Europe)
87.5-107.9(MHz)
(U.S.A.)
10.7MHz
10dBuV
60dB
30dB 1KHz
40-12KHz
Note:
Due to continuous product improve-
ment, specifications and design are
subject to change without prior notice.
Specifications
Power Requirement 14.4V DC
(11-16V allowable)
Load Impedance
7dB
Bass 100Hz
Treble 10KHz
Tone Controls
Approx.172 x 178 x100
mm (d/w/h)
Dimensions
Approx.3.5kgWeight
Mounting
Dimensions
Approx.158 x183x112
mm (d/w/h)
Tuning Range
IF Range
Usable Sensitivity
(-30dB)
Signal-to-noise Ratio
Stereo Separation
Frequency Response
Frequency Range
IF Range
Usable Sensitivity
(-20dB)
60dB
Signal-to-noise Ratio
60dB(1KHz)Separation
0.3%
Distortion
DVD Player Section
60dB
Dynamic Range
60dB
Signal-to-Noise Ratio
Number of channel 2 channels
Max.Power Output 45W X 4
DVD Signal System AUTO/PAL/NTSC
40Hz to 16KHz
Frequency Response
(Optional)
(Optional)
GPS Operation
In the interface of Picture A-1, press Recent to
open a menu of position recently used as Picture
A-1-5. This menu can search the position recently
used in a quicker way.
Recent Searching
In the condition of Picture A-1-5, press to
select items upwards, press to downwards
selection.
(Picture A-1-5)
When this picture is shown on maps, press the name of the place or press icon to open
the submenu for editing. Then:
Picture A-1
* Press Navigate to enter navigation, turn to page 52 for
details.
* Press Via to set stopover, turn to page 53 for details.
* Press Save to save the address , turn to page 48 for details.
* Press On Map to show the point on map, press or
to show the previous or next used address information,
and also can play other common operation.
* Press Back to go back to the previous menu.

13
49
Installation
02
12
2
3
4
4
Wiring Connection
AUX Audio Input (Black Line with red
and white head)
AUX Video Input (Black Line with
yellow head)
Rear Video (Dark Grey with
yellow head)
Front RCA L/R (Dark Grey line with
red & white head)
Rear RCA L/R (Light Grey line with
red & white head)
Reversing Signal Input (Brown Line with
yellow head)
TV Antenna
(Optional)
The brown wire is connected with brake signal; for safety, the programs can be seen on the monitor
after braking the car, but the menu and RCA output are free of it.
If you do not want to use this function, connect it with the negative pole.
Do not connect the pink wire to the battery,otherwise it will use up the power of battery.
Note:
*
1
Reverse Gear Orange
Red
Yellow
Black
Ignition Key
Battery +
Ground
Rear L
Speaker
Front L
Speaker
Green/Black
Green
White/Black
White
Brown
Pink
Violet/Black
Blue
Violet
Grey/Black
Grey
Parking Brake
Lamp In
Antenna
power +
Rear R
Speaker
Front R
Speaker
4
1Output Plug(Male) Install Screw Holds
2
Output Socket(Female)
+
-
+
-
+
-
+
-
Black Ground
3Tuner Receptor (optional)
GPS Operation
POI Searching
(Picture A-1-3)
In the interface of Picture A-1, press POI Search
to open a menu as Picture A-1-3. Now you can
search a place by POI search.
In the condition of Picture A-1-3 ,there are 8
POI types for searching. So you can select type that
you need, and the display will show a sub directory.
Press POI type or that you need to open the
position and show it on maps in the list of the
subdirectory.
In the interface of Picture A-1, press MAP to
open a GPS search interface as Picture A-1-4.
To zoom out, zoom in or move the cursor to point
to a place. After selecting a point, press to
edit menu.
Map Searching
(Picture A-1-4)
Picture A-1
You can edit menu in this mode.
* Press Navigate to enter navigation, turn to page 52 for
details.
* Press Via to set stopover, turn to page 53 for details.
* Press Save to save the address , turn to page 48 for details.
* Press On Map to show the point, press or to display
the previous current POI address or next one, and also can play other common operation.
* Press Description to show the idiographic information. Such as address, telephone number,
fax number and so on, press or to display the previous current POI address or next
one.
Picture A-1
You can edit menu in this mode.
* Press Navigate to enter navigation, turn to page 52 for
details.
* Press Via to set stopover, turn to page 53 for details.
* Press Save to save the address , turn to page 48 for details.
* Press Search to search a place by POI.
* Press Back to go back to the previous menu.
* Press Map Setting to set map, turn to page 50 for details.
GPS Antenna

02
13
48
13 Installation
Installation Method DIN Front-Mount
11
Bend these claws
outward for a tight fit,
if necessary.
To support the unit
Fire Wall
Installation Method
2
Push in the unit
Select a position where the screw holes of
the mounting bracket lied with the car and
the of the main unit
fitted), and at 2 pla-
ces on each fasten them to the car.
supp
screw holes become aligned
(are tighten the screws (see
side). And then
Installation using the screw holes at
sides of the unit.the
Dashboard or
Console
Bracket supplied
to your car
112112
183183
GPS Operation
Address Searching In the interface of Picture A-1, press Address to
open a menu as Picture A-1-1. Now you can search
a place by address.
(Picture A-1)
Country/ State Setup
In the interface of Picture A-1-1, press State/Prov
icon to show the country/state list on current map,
and you can choose someone that you need.
(Picture A-1-1)
City Setup
In the interface of Picture A-1-1, press City icon to open a
small keyboard as Picture A-1-2, to input the city name you
searching for.
If you only remember some letters or
some words of the city name, input them, then press
icon to search for the city name that contains those letters or
words by itself, and you only need to choose the name in list.
(Picture A-1-2)
Zip Code Setup
In the interface of Picture A-1-1, press Zip code icon to open a small keyboard , to input
the code of city or town that searching for.
You can input the code directly if you have known it. At that time, the city or town of that
zip code can be shown in City title(showing is gray, and can not be set).
Street/Number Setup
In the interface of Picture A-1-1, press Street icon to open a small keyboard as
Picture A-1-2, to input a name of the street that searching for.
Otherwise you can press NO. to open a small number keyboard, and input the street number
for searching.
When the address was found, press to open the editing menu.
* In the small keyboard, press icon to change into a number keyboard; press icon it means
special character; press icon to change into a letter keyboard.
* When you keyboard something, press icon it means blank, press <- icon it means deleting.
* In the course of operating, when the current list and the icon are gray, it means can not be operated
in this condition.
Note:
* Press Navigate to enter navigation, turn to page 52 for details.
* Press Via to set stopover, turn to page 53 for details.
* Press Save to save the address , turn to page 48 for details.
* Press On Map to show the point and be operated on map.
* Press Back to go back to the previous status.

13
4714
02 Installation
Detach the Unit
1.Take out the Outer Trim Frame.
Detach the front panel before disassembl-
ing the unit.
2.Insert the keys supplied to the unit at
both sides of the unit (shown as illustrated)
until they click. Pulling the keys makes it
possible to remove the unit from the dashboard.
Main Parts List
Mounting Sleeve x1 Rear Mounting Bolt x1 Harness Rubber x1
Keys x 2
Outer Trim Frame x 1 Connecting Wire x1 Steel Bar x 1
£p
4 Screws
M 5 x 5
£p
5 Screws
M 5 x 20
£p
GPS Operation
Speed
Time
Compass
Menu icon
The next place
Zoom Out
Cursor
Zoom In
Select Mode and Trace Mode
Select Mode and Track Mode are two essential elements. In a trace mode, maps show
current local place, speed and so on due to actual position(GPS position).
* To touch maps directly by hand or pen, the cursor can be shown
* If you want to magnify or shorten maps, please press +icon or -icon
* Press compass icon on left at the bottom of maps to adjust location
Go back to
General run
Run
Distant from next
crossing
The current place
Signal

03
15
Common Operations
46
13
Setting the Sound Characteristics
Repeatedly press SEL button to select
the mode in the following order:desired
* Pressing +/- and SEL on the head unit also
performs the same function.
14
After selecting the desired mode, you
adjust the current level by pressing
.
can
VOL
buttons
14
Notes:
The function of SEL/VOL+/VOL- on remote
control is the same as SEL/+/- on the head
unit, respectively.
*
TREBL
BALAN
FADE
BASS
VOL
To Select Source by Menu
In any mode, press SRC, BACK/ in
the monitor, the following menu will appear:
Press it to select your desired item, and press
SEL to enter into the main menu.
If you want to navigation, press NAVI; if it
did not enter into, that means the unit does
not include the function.
In any mode, press BACK to return to this
menu, press BACK again to return to the
previous mode.
* If the font display in cyan, that means there is
not have this function.
Note:
Reset the Unit
Operating the unit for the first time or after
replacing the car battery, you must reset
the unit.
Notes:
* When ome errors occur on the
also press RESET
it will
s display, you can
button to resume to normal,
and erase the clock setting and some me-
morized functions.
* This function can only be operated by the
head unit.
Remove the front panel at first, and then
Press RESET button in the panel w
object, (such as a ball
the unit to initial status.
ith
a pointed point pen)
to set
8
Press VOL+ button to increase sou-
nd level and press VOL- button to decr-
ease sound level.
the
the
Volume Control
* Pressing +/- or VOL+/- in the
monitor performs the same function.
on the head unit
Turning the Unit On/Off
During waiting status, briefly press PWR
button to turn on the unit, during working
status, hold and press it to turn off or turn on
the unit.
1
* Pressing SRC/PWR button on the head unit
also performs the same function.
Note:
14
14
Note:
* This function is operated by using the remote
control only.
EQ Setting
Repeatedly pressing button to choose
the following modes turn:
EQ
in
While listening to the popular music, classic
music or rock music, you select the co-
rresponding preset modes to adjust the sou-
nd quality ing EQ button.
can
perfectly by us 26
3
Note:
26
The default setting is OFF.
OFF
CLAS
ROCK
POP
GPS Operation
Function of Normal Icons
Icon Name Function
Open a menu with various options.Menu Icon
Back Icon Go back to the above menu.
Add Icon Press it to add information.
Search Icon Search a list and open it.
Enter Icon Confirm selectors and input information.
Up Icon Press it to select previous operation.
Down Icon Press it to select next operation.
Delete Icon Delete function.

12
45
Common Operations
16
03
¼òµ¥¹ÊÕÏÅųýÖ¸ÄÏ
Turning Loudness On/Off
Press and hold activate
loud function. You can this button to
increase the low quency, which can im-
prove sensi ty for ears. Press it again
to quit this function.
LOUD button
press
fre
tivi your
25
Note:
¼òµ¥¹ÊÕÏÅųýÖ¸ÄÏ
Eject a Disc
Press REL after turning the unit on , then
insert a disc when the TFT slanted, press
to eject a disc. Or TFT will return to the
initial status.
Note:
* Pressing on the remote control or in
the monitor performs the same function.
Angle Setting
* when adjusting the monitor angle, please press
this button, or the monitor would be broken.
7
Notes:
* This function is operated by the head unit only.
This function is operated by using the remote
control only.
*
Briefly pressing MUTE on the head unit also
performs the same function.
Note:
*
Press button to shut off sound
output, and appears on the LCD.
Press it again to resume to previous volume
level.
the
Mute Function
12
Mode Selector
* Briefly Press SRC on the head unit also
performs the same function.
Note:
Repeatedly briefly press SOURCE button
to select the different modes available.
1
Receptor on the head unit for the card
remote control.
Infrared Sensor:
4
Because of the unit character, the display is
different from the different angle. You can
adjust the desired angle.
Press and hold REL till ANGLE appears
in the monitor, the press +to adjust
monitor backward by definite angle, press -
to adjust it forward.
¼òµ¥¹ÊÕÏÅųýÖ¸ÄÏ
Night Mode
Hold and press MUTE button to enter
the night mode, press it again to switch to
the normal mode.
3
Note:
¼òµ¥¹ÊÕÏÅųýÖ¸ÄÏ
Insert a SD Card
Press REL after turning the unit on, then
insert a common SD card into SD slot when
the TFT slanted, And the programs in the
card will be played.
* This function is operated by the head unit only.
6
To Dial by the Unit
when cellphone is connected, press to
input the call number, then press
to dial, DIAL OK appears, when the call is
pick up, and it appears PICK UP.
23
Note:
* Press CLEAR or in the monitor to
delete wrong inputs.
22
Using the Unit as Bluetooth
Music
During bluetooth mode, the musics on the
cellphone switch to the unit for play.
To select music fast: press to play
the previous track, press to play nex tone.
Pause play: press to pause play.
Stop play: press to stop play, and
press the PLAY to return to the beginning
of the current track.
21
Note:
17
18
* This function is operated by using the remote
control only.
30
Audio Transfer between the Unit
and Phone
Press to change the conversation from
the unit to the cellphone.
Note:
* The function will be cause to be disconnected
bluetooth link for Nokia phones, but you do
not worry just press button while private
conversation with Nokia phones,then switch
back to the unit automatically.
6
6
8
* Some of phone can just switch the audio from
the unit to the phone.
* Press and performs the same function.
12
Bluetooth Mode
Except for navigation, press and hold
REL/NAV to activate the double function,
it means that the current radio or playing is
on, press it to switch to navigation status.
Press and hold it again to shut this function,
back to the previous status.
Double Function
5

04
17
Main Menu
44
12
Set up Main Menu
When the unit is on, the monitor will display
the menu as follows:
Hold and press SETUP on the remote control
or MENU on the head unit, or press MENU
in the monitor to enter the menu as follows:
* Press and hold SETUP or press MENU on
the head unit to set up this menu; press them
in the monitor to select the option.
This menu includes , ,
SOURCE, SYSTEM, EXIT. Press them in
the monitor to set the desired status.
VIDEO AUDIO
Note:
AUDIO
SYSTEM
SOURCE
VIDEO
EXIT
EXIT
EXIT
SHARP
1.Video Adjust
After selecting VIDEO, the sub menu will
appear as follows:
In this menu you can adjust ,
COLOR, TINT, BRIGHT, .
CONTRAST
PICTURE
Picture Adjust
Press PICTURE in this menu, it will appear
as follows:
Press and to adjust the size, then
press SAVE to save the setup, press EXIT
to exit this menu.
Note:
* Adjusting the other options perform the same
operation.
* Press in the monitor also performs the
same function.
Cellphone Pairing Mode
1. Browse your cellphone menu and find
the connectivity or Bluetooth connection
section.
2. Select search for a new handsfree device
function and allow the phone to find the
mobile.
(Different cellphone has different blue-
tooth menu, please refer to your phone
manul.)
3. When CAR A/V DEVICE appears, select
this item.
( if it can not be connected, please refer
to mobile manual, and connect it again.)
4. To input the password, the password is:
1234.
5. Press the connect with the Handsfree
option on your cellphone, and CON-
NECT appears.
Bluetooth Connection and
Disconnection
When established bluetooth connection
between this unit and the cellphone, bluetooth
icon on the display appears in red.
Press PAIR to turn off bluetooth con-
nection, and appears in blue.
Press , PAIR SUCCESS appears on the
display, then display shows CONNECT
when bluetooth connected; display shows
PAIRING TIME OUT, when bluetooth
disconnected.
29
29
Note:
* Please keep the phone battery is full of power,
or else the bluetooth connection will be disturbed.
* To ensure connection succeed
----Please delete menu of cellphone with bluetooth.
----Please reset the unit and cellphone.
----Please reset every step of pairing.
* Disconnect after paring
----Please pair the phone in manual.
For example: pairing fixture cellphone connect.
Using the Unit as a Handsfree
Device
When the unit is ringing, then it appears
call from and the phone number ID******
*****on the dialing,
To accept call: Press to answer a call,
PICK UP appears on the display.
To reject call: Press to reject a call,
REJECT appears on the display.
To end call: Press to end call, and
HANG UP appears on the display.
Note:
* Some of cellphones do not support reject
call during bluetooth mode.
* Press and performs the same function.
30
31
Last Number Dialing
Press button to pick up a call, and
then PICK UP appears on the display
during conversation.
Note:
To Dial by Cellphone
1. The unit activated automatically when you
make a call by cellphone, and DIAL OK
appears.
2. When you receive a call, PICK UP appears
on the display.
30
* Press performs the same function.
* To dail the number of the unit in the car
only.
* Press in the monitor to turn off the
bluetooth function.
7
Bluetooth Mode
87.50M 87.50M
107.90M
106.10M98.10M
90.10M
FM1 P . CH:1 87.50MHz

12
43
Main Menu
18
04
3.Source Adjust
In the main menu, press SOURCE in the
monitor, the sub menu will appear as follows:
You can adjust all of the items to ON or
OFF, press the corresponding button to set.
If one of them was set OFF, that function
is null. For example, to set the TV OFF,
press SOURCE can not activate reception
of a radio. But can not set the current play-
back OFF.
4.System Adjust
After selecting SYSTEM, the sub menu will
appear as follows:
In this menu you can adjust CLOCK
SYSTEM, KEY BEEP and so on.
2.Audio Adjust
After selecting AUDIO, the sub menu will
appear as follows:
You can adjust VOLUME, BALANCE, FAD
BASS, TREBLE, For example, press FAD,
the setting menu will appear as follow:
Press and to adjust the desired FAD
level, press EXIT to exit this menu.
Note:
* Adjusting the other options perform the same
operation.
CLOCK SYS
KEY BEEP
MONI FLEX
EXIT
EXIT
FADE F4
VOLUME
BALANCE
BASS
FAD
TREBLE
EXIT
OFFONON
ON ON OFF
Note:
* If the item can not be set "ON", then this model
does not contain this function.
Bluetooth Operational Interface
Press BT or BLUET in the following
interface to open the bluetooth operational
interface:
28
Dail, re-dial, answer a phone.
Hang up, refuse a phone.
Number Show
PAIR
C (clear)
8
POWER
Press it to turn on or turn off the bluetooth function.
To input the phone number.
Number Buttons
BACK
9
Using a Bluetooth Wireless
Connection
The device can be dialed wirelessly in
bluetooth status. Before using the bluetooth
function, please turn on your cellphone blue-
tooth function.
Pairing Your Unit and Bluetooth
Phone
The device supports handsfree profile,
headset profile, A2DP( Audio Advanced
Distribution profile)and AVRCP(Audio
Video Remote Control profile). Follow
the pairing instruction for the first time
use, after that the unit will connect auto-
matically.
Note:
* To provide the best sound without or little
distorted sound(the cellphone or network
brings).
* Full duplex conversation.
* Bluetooth ver2.0 compliant.
* Please dial-up the device before connecting
bluetooth.
Pairing in Handsfree Mode
1. Press PAIR, PAIRING shows on the
screen and is blinking.
2. To get into CELLPHONE CONNECTION
to search fixtures;
3. If the cellphone has connected,PAIR
SUCCESS appears and then CONNECT
in order, will from blue to red.
29
Note:
* Press in the monitor also performs the
same function.
ACH (audio change)
Note:
* Some of phone can just switch the audio from
the unit to the phon.
Bluetooth Mode

04
19
Main Menu
11
42
Clock System
Press CLOCK SYSTEM in the monitor to
set 12 HOUR or 24 HOUR in this menu.
Key Beep
In this menu you can adjust KEY BEEP,
press it in the monitor and select ON or OFF,
the default setting is ON, it means when you
press the keys, they sounded.
Next Setup
Press to display the menu follows, press
to display the previous one.
Setting REVERSE POLA in this menu.
The signal is +12V when you back a car,
please press BATTERY in the monitor; if
the signal is 0V, please press GROUND.
Reverse Pola
Press to display the menu follows, press
to display the previous one.
AMS Fullup
In this menu to set the modes of AMS. When
the setup is ON, the presettable stations are
full, no new s is allowed. When you select
OFF, it will searching continually.
CLOCK SYS
KEY BEEP
MONI FLEX
EXIT
CLOCK SYS
KEY BEEP
MONI FLEX
EXIT
EXIT
EXIT
EXIT
EXIT
LOCAL AREA
LOCAL
GOTO FREQ
TV (optional)
TV Station Selector 1
23
Press on the remote control to select
the TV stations, press 1 to 9 button to
select the stations directly; to select
more than 10 station, firstly press
GOTO button, then press the correspon-
ding number.
2
Press in the monitor also performs the
same function.
Note:
*
1
TV Station Selector 2
Press on the remote control to
select the TV stations upwards, press
to select stations downwards.
Press in the monitor also perform the
same function.
Note:
*
2
27
Frequency Searching
Briefly press to select the frequency
upwards, press to select downwards.
Note:
*
27
Seek Stations Automatically
Press AMS to seek stations automatically.
Press AUTO in the monitor also preforms the
same function.
Note:
*
4
1 to 30 stations can be selected by the unit.
*
* Press CLEAR to clear the mistake input.
22
Press SRC to switch to the TV mode:
TV Touch Screen Menu
----
00
889977
445566
332211
1
2
3
89
4
5
6
7
Station Selector
To select 1 to 30 stations. To touch the
numbers in the monitor to select 1~9 station
directly. Press -- at first, then press the
corresponding Number to select more than
10~30.
VOL+/VOL-
To increase or decrease the volume.
STEP
To adjust clearer image.
ANT
Press it to select the left or right antenna.
SETUP
The following menu:
CH-/CH+
To select the station degressively or increse
by degrees.
You can adjust the following items:
SOUND: M/N, B/G,I,D/K
BAND: V-L, V-H, UHF
MODE: PAL/NTSC/SECAM
MANU-:select the frequency downwards
MANU+:select the frequency upwards
AUTO:select the frequency automatically
7
MODE SELECTOR
8
PRESET STATIONS
To show all of stations in .
9
FREQUENCY
To show the TV frequency.
Press / on the head unit or MANU+/-
in the monitor also preforms the same function.

10
41
Main Menu
20
04
Local Area
You can select EUROPE or USAor OIRT
to search the stations quickly by your
current area.
Local
In this menu to search the LOCAL stations,
when selected ON, the strong signal local
stations can be received, when selected OFF,
the week signal out-of-town stations may
be received.
Goto FREQ
To select ON, you can using GOTO button
on the remote control to select a station s
frequency directly in radio mode.
EXIT
LOCAL AREA
LOCAL
GOTO FREQ
EUROPE
U.S.A
EXIT
LOCAL AREA
LOCAL
GOTO FREQ
EXIT
LOCAL AREA
LOCAL
GOTO FREQ
AV SET
Press SRC to switch to the AUX mode:
AUX Touch Screen Menu
For more details to adjust AUDIO, VIDEO and
SYSTEM (Auto 1: PAL, NTSC, SECAM),
(Auto 2: PAL-M, PAL-N). To adjust AUDIO and
VIDEO please refer to pages 17 to 18.
To decrease the volume
To increase the volume
AV SET
EXIT
In AUX mode, select AV SET:
Mode selector
AUX
Table of contents
Other XO Vision Car Video System manuals

XO Vision
XO Vision XOD1742BT User manual

XO Vision
XO Vision XOD1740BT User manual

XO Vision
XO Vision XOD1752BT User manual

XO Vision
XO Vision X403BT User manual

XO Vision
XO Vision X358 User manual

XO Vision
XO Vision XOD1752BT User manual

XO Vision
XO Vision XOD1730 User manual

XO Vision
XO Vision XOD1911 User manual

XO Vision
XO Vision X355NAV User manual

XO Vision
XO Vision XO1915BT User manual