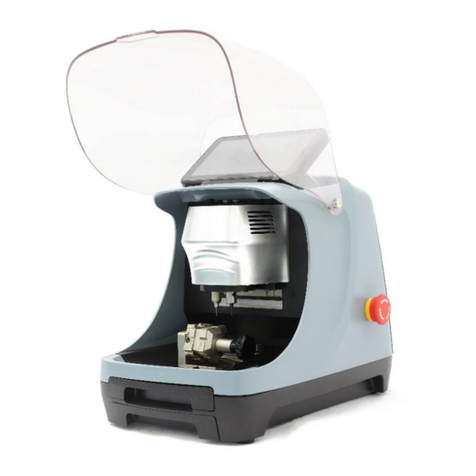
Xtool AnyCut KNC91 User manual

Shenzhen Xtooltech Intelligent Co., LTD
User Manual
AnyCut KNC91 Key Cutting Machine
Version 1.0
Revise date 2023/01

I
Please read this user manual carefully before using Anycut KNC91 Key Cutting Machine, referred to as the “KNC91”
throughout this document. When reading the manual, please pay attention to the words “Note” or “Caution” and read them
carefully for appropriate operation. Due to technical updates, software update, etc., some of the pictures shown on the
manual might not be fully accurate. Product images and description only for reference purpose, so please see the subject
produce.
OPERATION INSTRUCTIONS
⚫Make sure that the machine is operated under a safe environment.
⚫Wear a pair of goggles that matches the ANSI safety standards during operation.
⚫Keep away from children.
⚫Avoid using compressed air or any blower of any kind to clean the machine.
⚫Avoid contact of any kind with the machine during operation.
⚫Always pay attention to the machine during operation.
⚫Do not attempt to dissemble the machine or fiddling with the Li-iON battery inside.
⚫Disconnect the power supply to the machine prior to storage.
⚫Avoid humid/greasy/dusty area and keep the machine away from heat and never expose it to direct sunlight.
⚫Only operate the machine on a leveled bench.
⚫Keep the machine dry and clean at all times。
⚫SHUT DOWN THE POWER IMMEDIATELY if any abnormalities are detected.
MAINTENANCE TIPS
⚫Always keep clean from any debris in order to maintain the performance and the precision of the machine!
⚫Avoid using oil or chemical based products to clean any part of the machine as it may damage or corrode parts!
⚫Always check the fastener of the key cutting machine and make sure they are tight as they should be!
⚫Replace and Adjust parts that is worn or damaged on time.
⚫We suggest a through monthly check of the performance and status of the machine.
AFTERSALES-SERVICES
XTOOL strives to provide best-in-class support!
Tel: +86 755 21670995 or +86 755 86267858 (China)
Official Website: www.xtooltech.com | www2.xtooltech.com (Alternate sites)
Alert!!!: Please read the operation instructions below carefully prior tousage. Improper operation will cause
damage or even death to you and to the machine!
2.

i
CONTENT
OPERATION INSTRUCTIONS ............................................................................................................................ I
MAINTENANCE TIPS.......................................................................................................................................... I
AFTERSALES-SERVICES .................................................................................................................................. I
CONTENT ............................................................................................................................................................ I
1. GENERAL INTRODUCTION..................................................................................................................... 3
Main Units........................................................................................................................................................................3
Device Specifications.......................................................................................................................................................5
Packing List .....................................................................................................................................................................5
2. GETTING STARTED................................................................................................................................. 5
Remove Protection Frame...............................................................................................................................................5
Install Probe & Cutter.......................................................................................................................................................6
Install Jaw........................................................................................................................................................................6
Battery Charging..............................................................................................................................................................7
ON/OFF Switch................................................................................................................................................................7
Machine Calibration.........................................................................................................................................................7
3. OPERATIONS ........................................................................................................................................... 8
Cut Keys By Codes..........................................................................................................................................................8
Select BY Manufacturer...................................................................................................................................................9
Select BY Key Profile.....................................................................................................................................................10
Select Chinese Key Profiles...........................................................................................................................................10
Special Keys..................................................................................................................................................................10
Key Cutting Menu ..........................................................................................................................................................11
Key Cutting For Special Keys........................................................................................................................................ 13
Cutting keys with multiple sides.....................................................................................................................................13
Tips on Cutting Keys......................................................................................................................................................17
All Keys Lost Search......................................................................................................................................................18

ii
Customize Key Profile....................................................................................................................................................19
Trace Duplication...........................................................................................................................................................22
4. CALIBRATION & TESTS........................................................................................................................ 22
Device Information.........................................................................................................................................................22
Motor Tests....................................................................................................................................................................23
Cutter Height Adjustments.............................................................................................................................................24
Conductivity Test ...........................................................................................................................................................24
Origin point Adjustment..................................................................................................................................................25
Motor Precision Calibration............................................................................................................................................25
5. SETTINGS............................................................................................................................................... 25
Screen ANGLE sETTING ..............................................................................................................................................25
Language.......................................................................................................................................................................25
Wifi Settings...................................................................................................................................................................25
Screen Brightness Setting .............................................................................................................................................25
Updates .........................................................................................................................................................................25
6. WARRANTY & SERVICES..................................................................................................................... 26
7. APPENDIX............................................................................................................................................... 27
Trademarks....................................................................................................................................................................27
Copyright .......................................................................................................................................................................27

3
1. GENERAL INTRODUCTION
Anycut KNC91 Key Cutting Machine (referred to as the “KNC91” in the rest of the manual) is a CNC key cutting machine
with integrated key database. It finds the bitings on the keys and cut out the keys from the key blanks. KNC91 can also
perform these functions:
•Cut Keys by Codes
•All-keys-lost Searching
•Missing Bitings Query
•Customize Key Profile
•Parameter Adjustments
•Trace Duplication
•Etc.…
MAIN UNITS
•KNC91
1: 7-inch touch screen 2: Protective cover 3: Probe mount 4: Cutter mount 5: Bench / Jaw mount
6: Jaw locking screw 7: Dust tray

4
•Jaws
There are 5 jaws that are adapted with KNC91. Here are their introductions.
Jaw K1: Used for edge cut keys.
e.g.: Toyota / Mazda / Nissan / etc.
Jaw K2: Used for inner groove keys, external groove keys and high-security
edge cut keys.
e.g.: VW / BMW / GM / Ford for inner groove keys; Mercedes for external
groove keys and Honda / Subaru for high-security side cutting keys.
This jaw has different sides; please refer to the machine for selecting sides.
Jaw K3_FO21 (optional): Specialized for Ford FO21 Tibbe keys.
K3_FO21 must be used together with jaw K2/K4.
Jaw K3_SX9 (optional): Specialized for Peugeot / Citroen SX9 keys.
K3_SX9 must be used together with jaw K2/K4.
Jaw K4 (optional): Used for inner groove keys, external groove keys and all
edge cut keys.
K4 combined all features from jaw K1/K2.
This jaw has different sides; please refer to the machine for selecting sides.

5
DEVICE SPECIFICATIONS
PACKING LIST
Main Unit
Anycut KNC91
Battery Pack
Cutter / Probe
1.0mm Probe (Φ1.0 x Φ6 x 40L ) x2
1.5mm Cutter (Φ1.0 x Φ6 x 37L)
2.5mm Cutter (Φ2.5 x Φ6 x 37L)
2.5mm Extended Cutter (Φ2.5 x Φ6 x 45L)
Calibration Block
Jaw
Jaw K1
Jaw K2
Tools
Brush
2.5mm Hex Wrench (Type-T)
2.5mm Hex Wrench (Type-L)
4.0mm Hex Wrench
Adapters
Power Adapter
US Power Cable
Others
Screws x6
Quick Guide
Packing List
Certification Card
2. GETTING STARTED
REMOVE PROTECTION FRAME
Caution: The protection frame is a metal piece that protects the machine from damage when delivering. DO
NOT turn on the machine before you remove this protection frame.
To remove the frame:

6
INSTALL PROBE & CUTTER
1) Lift up the protection cover. Spin the right cylinder inside the cover until the screw hole is right in front of you.
2) Use the hex wrench to loosen the screws on the cylinders.
3) Take out the probe. Push it inside the slot of the left cylinder, until you can't push it further. Then tighten the screw of the
left cylinder.
4) Take out the cutter you need (1.5/2.0/2.5mm). Make sure the flat side of the cutter is on the same direction of the screw
hole and push it inside the slot of the right cylinder. Make sure the tip of the cutter is 3~5mm lower than the probe. Then
tighten the screw of the right cylinder.
5) Every time after installing probe or cutter, please turn on the machine, go to settings and calibrate the probe and the
cutter.
6) To take out (or exchange) the cutter or probe, turn off the machine, loosen the locking screw and pull out them. When
pulling the cutter, take on a pair of gloves to avoid scraping your hands.
INSTALL JAW
1) Use the hex wrench to loosen the locking screw on the bench;
2) Take out the jaw, slide it inside the slot of the bench from the right side of the bench;
3) When the jaw is slided inside the bench, tighten the locking screw to lock the jaw from moving.
To uninstall the jaw, loosen the screw and slide the current jaw out. Then you can replace it with a new one.
1. Take the hex wrenches that come with the machine,
remove the screws that fixed the frame and pull the
frame out.
2. After that, take 2 screws that come with the
machine. Put them into the probe & cutter mounts and
replacing the screws that fixed the frame. Also install
the locking screw at the bottom back on the bench.

7
BATTERY CHARGING
The charging socket is on the back of the machine. When charging, make sure the flat side of the socket is on the top. DO
NOT plug it in with wrong directions.
ON/OFF SWITCH
The on/off switch is located on the right side of the machine (if the front of the machine is positioned in front of you).
The on/off switch also acts as an "EMERGENCY SWITCH" to immediately stop and halt all cutting process should any
situation arise that require you to do so.
PUSH the switch if you need to turn the machine off
MACHINE CALIBRATION
Caution: Calibration must be done before first usage, or every time you replaced with a new probe or cutter.
To do the calibrations, go to “Machine Calibration” menu and select “Cutter Height Adjustment”.
When the process is done, loosen the screw on the left and move the probe until it touches the jaw. Then click “Next” again
to finish calibration.
After calibration, you need to select the cutter that you have installed on the machine. Please select the correct one or it will
affect the precision of the machine. We suggest to use 1.5mm cutter on daily cutting projects.

8
3. OPERATIONS
KNC91 have lots of methods for you to find the key you want and cut it. Here we will be introducing some of the methods
from the main menu.
CUT KEYS BY CODES
This allows you to cut the keys via recognizing key bitings. To do that, select “Cutting Keys” menu.
Here you can select:
⚫Select by Manufacturer: Find your keys by selecting your vehicle model.
⚫Select by Key Profile: Find your keys by selecting the key profile that you want to cut.
⚫Select Chinese Key Profile: Find your keys by selecting a vehicle model that is a brand from China. The menus inside
works the same as “Select by Manufacturer”
⚫Special Keys: Cut some special keys that are made by different materials (plastic, aluminum) or thinner keys.

9
SELECT BY MANUFACTURER
You can find the manufacturer from the menus from the left. Click the keyboard on the right to filter the keywords and help
you find the manufacturers more easily.
From here you can select the model and model year for your car. Sometimes there are menus with the same models and
model years but different ISNs. Please select the menu by your actual needs.

10
SELECT BY KEY PROFILE
You can choose the keys here by the key profile. The profile will be showing onthe left, helping you find the one that matches
the key blank. Click the keyboard on the right to filter the keywords and help you find the profile more easily.
After select the profile, you also need to check the bitings and cutting depth of the key. These info can be easily found on
the key, or by measuring the cylinder. You will need to select the vehicle manufacturer also, but not by the exact models.
SELECT CHINESE KEY PROFILES
Key profiles on Chinese car models might not be the same as others. In such cases, we have divided the menus for Chinese
models only. The way to select the key is the same as “Select by manufacturer” menu; select your car and continue.
SPECIAL KEYS
Keys made by special materials (non-conductive) need an alternative way to detect the keys. The way to select those keys
are the same as “Select by key profile” menu; Please follow the instructions on cutting those keys –the process are different
with normal keys.

11
KEY CUTTING MENU
After selecting the key, for most of the times, this menu will show up:
1) Shows the current key shape based on the codes that you entered or decoded by learning.
2) By turning on expert mode, you can do minor adjustments to each biting.
3) Turn this switch on to show reference line on the key profile.
4) Enter code to manage the bitings on the key. Press the arrows on the right to change different positions.
5) Adjust cutting depth (thickness) of the key.
6) Show which jaw and which side of the jaw should be used, and how the key (or key blank) should be installed on the
jaw. Click the picture to show more detailed information, like the default key thickness, cutter size, etc.
7) Here are some commands that you can do with the machine:
a. Start: Cut keys by the bitings that shown on the left. Usually this button is divided into 2 parts –Initial processing
and Secondary processing. When you cut this key for the first time, please select initial processing. If not,
please select secondary processing for accuracy.
b. Learn: This function lets the machine read the key bitings of the original key by putting the key inside the jaw. The
learning process will detect all the bitings on the key and show them on the left.
c. Fill (Cut Progressioning): Use this menuin some situations when there are some bitings on thekey are unknown.
Leave a “?” on the missing bitings first and click this button so the machine will search andshow all possible results

12
on the screen. Click one of the results and the bitings will be shown on the left. We suggest having no more than
2 missing bitings to cut the correct keys within minimum tries.
d. Parameters: This menu will only show up when you turned on Expert Mode. Click this button to modify the
parameters on the cutting process, like the cutting depth and the groove thickness.
Note: Unless otherwise specified, all length units on the machine are 0.01mm. E.g.: 380 shown on
machine is actually 3.80mm.
e. Learning Details: This menu will only show up after you finished learning. Click this button and the machine will
show the details of the learnt key and the differences between the set cutting depth and the actual measured data.

13
f. Query: If you don’t have any keys on your hand but you have codes on the cylinder, this will be an easy way to
find the key biting. For more information, please check “All keys lost search” menu which works the same.
KEY CUTTING FOR SPECIAL KEYS
For some non-conductive and alternative keys, the cutting process and the selected menu are different. Please try “Special
keys” menu and follow the instructions shown on the screen. Pay attention to those keys:
⚫HU66 Plastic Keys for Volkswagen
⚫HU101 Aluminum Keys for Land Rover / Volvo
⚫TOY2 Keys (Thin) for Toyota / Lexus
CUTTING KEYS WITH MULTIPLE SIDES
There are also some special keys (like FO21 Tibbe keys / SX9 keys / HU162T keys) with bitings on multiple sides.
Processing those keys require additional steps, and FO21 / SX9 keys need specialized jaw for cutting them.

14
FO21 Key Blanks SX9 Key Blanks HU162T Key Blanks
To cut those keys, go to “Select by Key Profile” and choose these keys, or go to “Select by Car Manufacturers” and select
the vehicle model which are using these keys. In the following sections, we will be discussing how to cut those keys.
1) FO21 keys:
First, follow the instructions on the screen and install the key blank and the jaw K3_FO21.
Caution: Jaw K3 (FO21/SX9) must be installed on Jaw K2 or K4, Side A. To avoid cutter collision, do not
pull down the protection cover, and do not use the extended cutter.
When you are all set, click OK and go to key modification page.

15
Enter the biting codes and start cutting. When cutting, you need to rotate the key to specific locations in order to cut the
bitings on different side of the key.
2) SX9 keys:
First, follow the instructions on the screen and install the key blank and the jaw K3_SX9.

16
Enter the biting codes and start cutting. When cutting, you need to rotate the key to cut the bitings on another side of the
key.
3) Volkswagen HU162T keys:
HU162T keys got 3 sides. When you select the menu, this screen will appear.

17
Enter the codes for 3 sides, or start learning to get the codes.
We will start from cutting side A. To do that, align the key blank to jaw K2/K4, side A, line 1. This process is the same as
cutting normal inner groove keys.
When side A is done and side B/C needs to be processed, find another HU162T key blank and clamp both on jaw K2/K4,
side A, line 1 (see picture below). The key that needs to be cut should be side upwards.
Make sure the keys are clamped tightly on the jaw. Click OK to start processing.
TIPS ON CUTTING KEYS
1) KNC91 requires biting codes to cut the keys. Other than learning, filling or searching codes from our database, you can
also recognize the codes by eye-checking the original key, or by picking the lock using specific tools.
2) Sometimes there are some tips (materials that haven’t been cut) on the key after cutting. We suggest using a file to trim
the keys after that.
3) Make sure the key is clamped flatly on the clamp, avoid tilting the key.
4) Make sure you are selecting the correct cutter size before cutting, and the machine must be well calibrated before
operations.
5) Use the brush to clean the jaw, probe, cutter and bench every time you finished cutting.

18
ALL KEYS LOST SEARCH
This function is used when you don’t have any keys on your hand but you have the key codes. Key codes can be printed on
a tag when the car is handed to owners from a dealership. Our database can translate the key codes into biting codes, and
this is how you can do it.
Click “All-keys-lost search” on the main screen, then select the manufacturer.
After that, enter the code shown on the tag. All possible codes will be shown on the bottom-left corner of the screen.
Enter the code on the tag, and the key profile and the bitings will automatically show up. You can directly cut the key after
that.
The Query menu inside the cutting menu works the same by entering the key codes. KNC91 will search for the bitings that
matches the key code and show it on the screen.
Table of contents
Other Xtool Cutter manuals