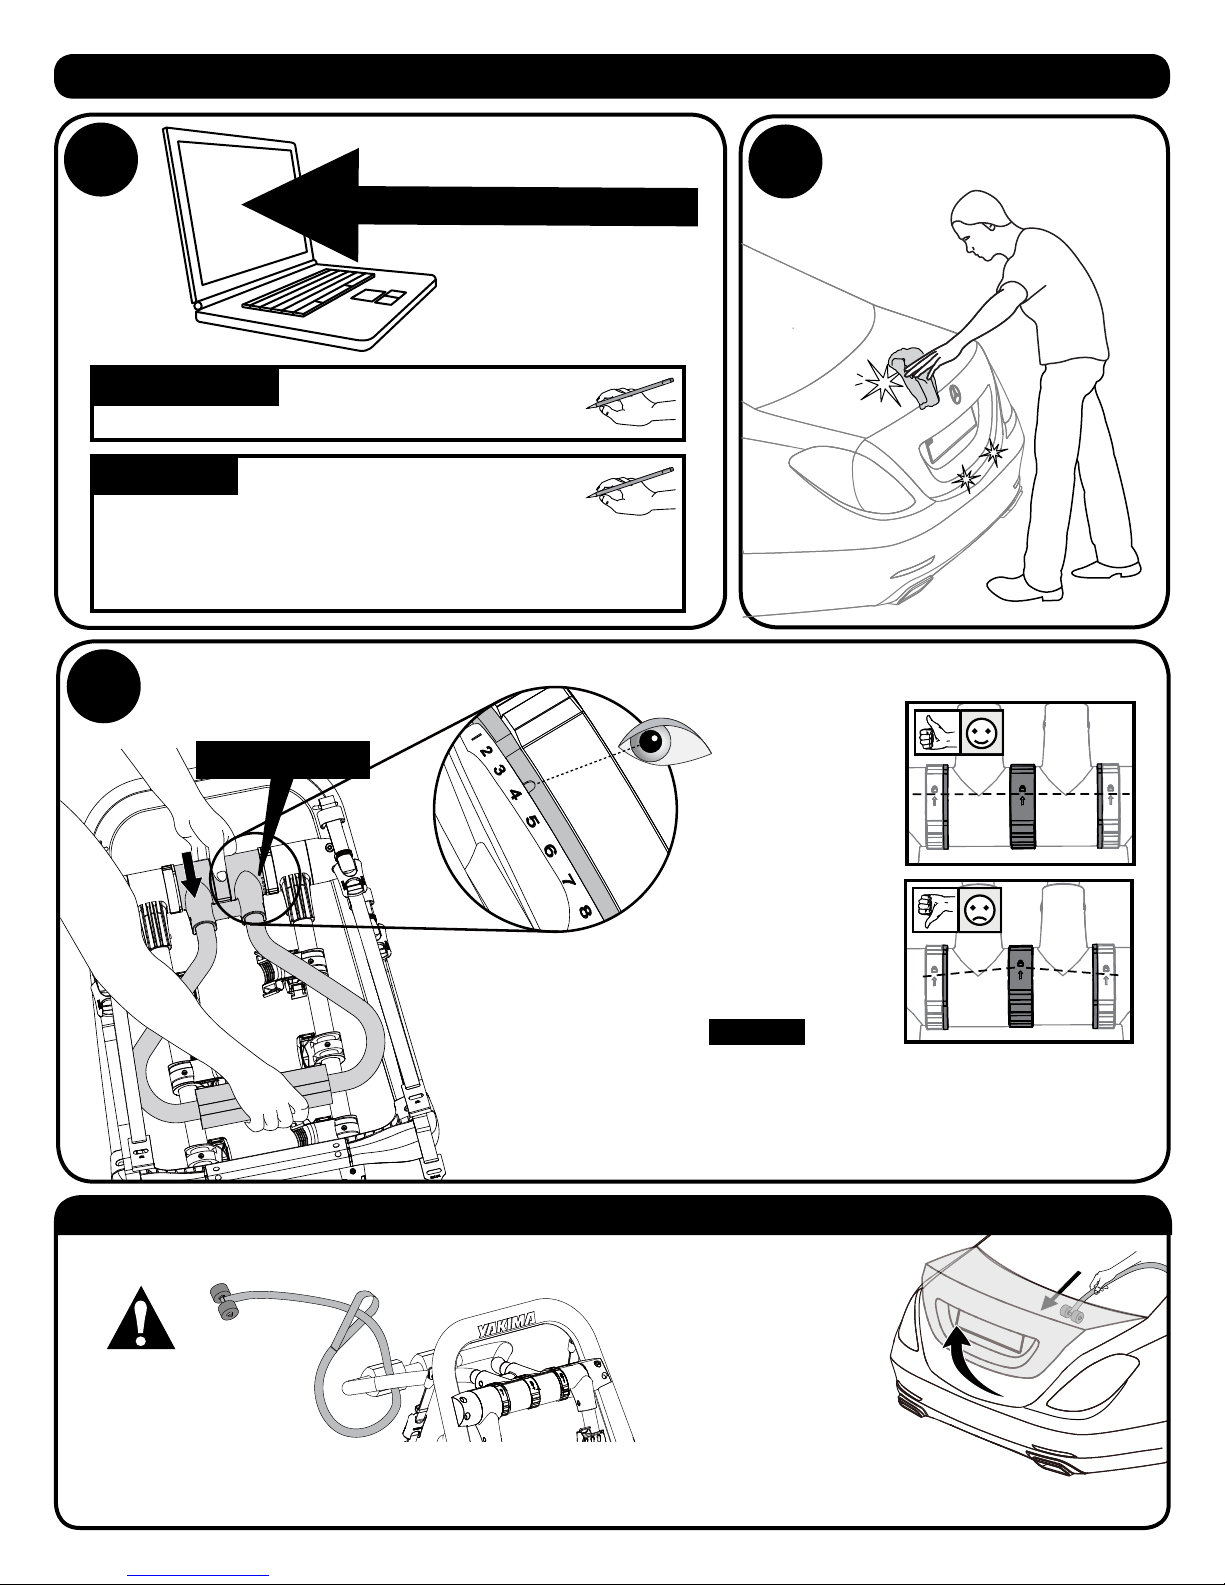
Yakima FullBack User manual

BOTTOM
BOTTOM
PURCHASE
SEPARATELY:
TubeTop
Required for bikes with
step-through/Ladies
frames or bikes with
slanted top tubes.
Part #8002531
1035059C-1/42
FullBackTM
CONTENTS
9X
1X
1X
1X
2X 3X
6X
1X
1X
1X
1X
1X
PURCHASE
SEPARATELY:
TubeTopTM
Required for bikes with step-
through/Ladies frames or
bikes with slanted top tubes.
Part #8002531
FullBack (2 Bike)
35 lbs / 15.9 kg max per bike.
70 lbs / 31.75 kg total.
FullBack (3 Bike)
30 lbs / 13.6 kg max per bike.
90 lbs / 40.8 kg total.

3
1035059C-2/42
12
INSTALLATION
HUB SETTING
Clean the vehicle
FIT NOTES
HUB SETTING
•Rotate the center dial toward the
unlock icon and raise the upper
frame arm.
•Set its position to the HUB SETTING you
determined in step 1.
•Ensure that the center dial returns to
the aligned position.
•Ensure that the upper frame arm is
locked into the correct position.
OPTIONAL Install trunk security
strap.
Open trunk or hatch.
Insert anchor end of
trunk security strap
through opening
between trunk or hatch
and the vehicle. Be sure
strap is between the
hinges of trunk or hatch.
Close the trunk or hatch.
Wicking of
moisture
into the
vehicle may
occur in wet
conditions.
Thread strap end of trunk security strap
around frame, and insert anchor end of trunk
security strap through loop as shown.
Set the hub

4
5
1035059C-3/42
Upper Frame:
•The position is relative to the lower frame and will depend
on vehicle shape.
•Any contact with a spoiler is not acceptable
Lower Frame:
•LOWER SUPPORT FRAME LOCATION IS EXTREMELY
IMPORTANT IN SUPPORTING THE LOAD!
•A common location is just above the bumper on the
bottom edge of the trunk or hatch.
•Use area with the greatest support.
•Do not place the lower frame on glass, plastic, or thin
metal.
•Many vehicle trunks and liftgates have a large section of
poorly supported metal that will dent under weight.
•Do not place FullBack on vehicle’s emblem.
TO AVOID DAMAGE, ALWAYS POSITION
FULLBACK WHERE DETERMINED BY
YOUR VEHICLE SPECIFIC FIT NOTES .
Position the FullBack
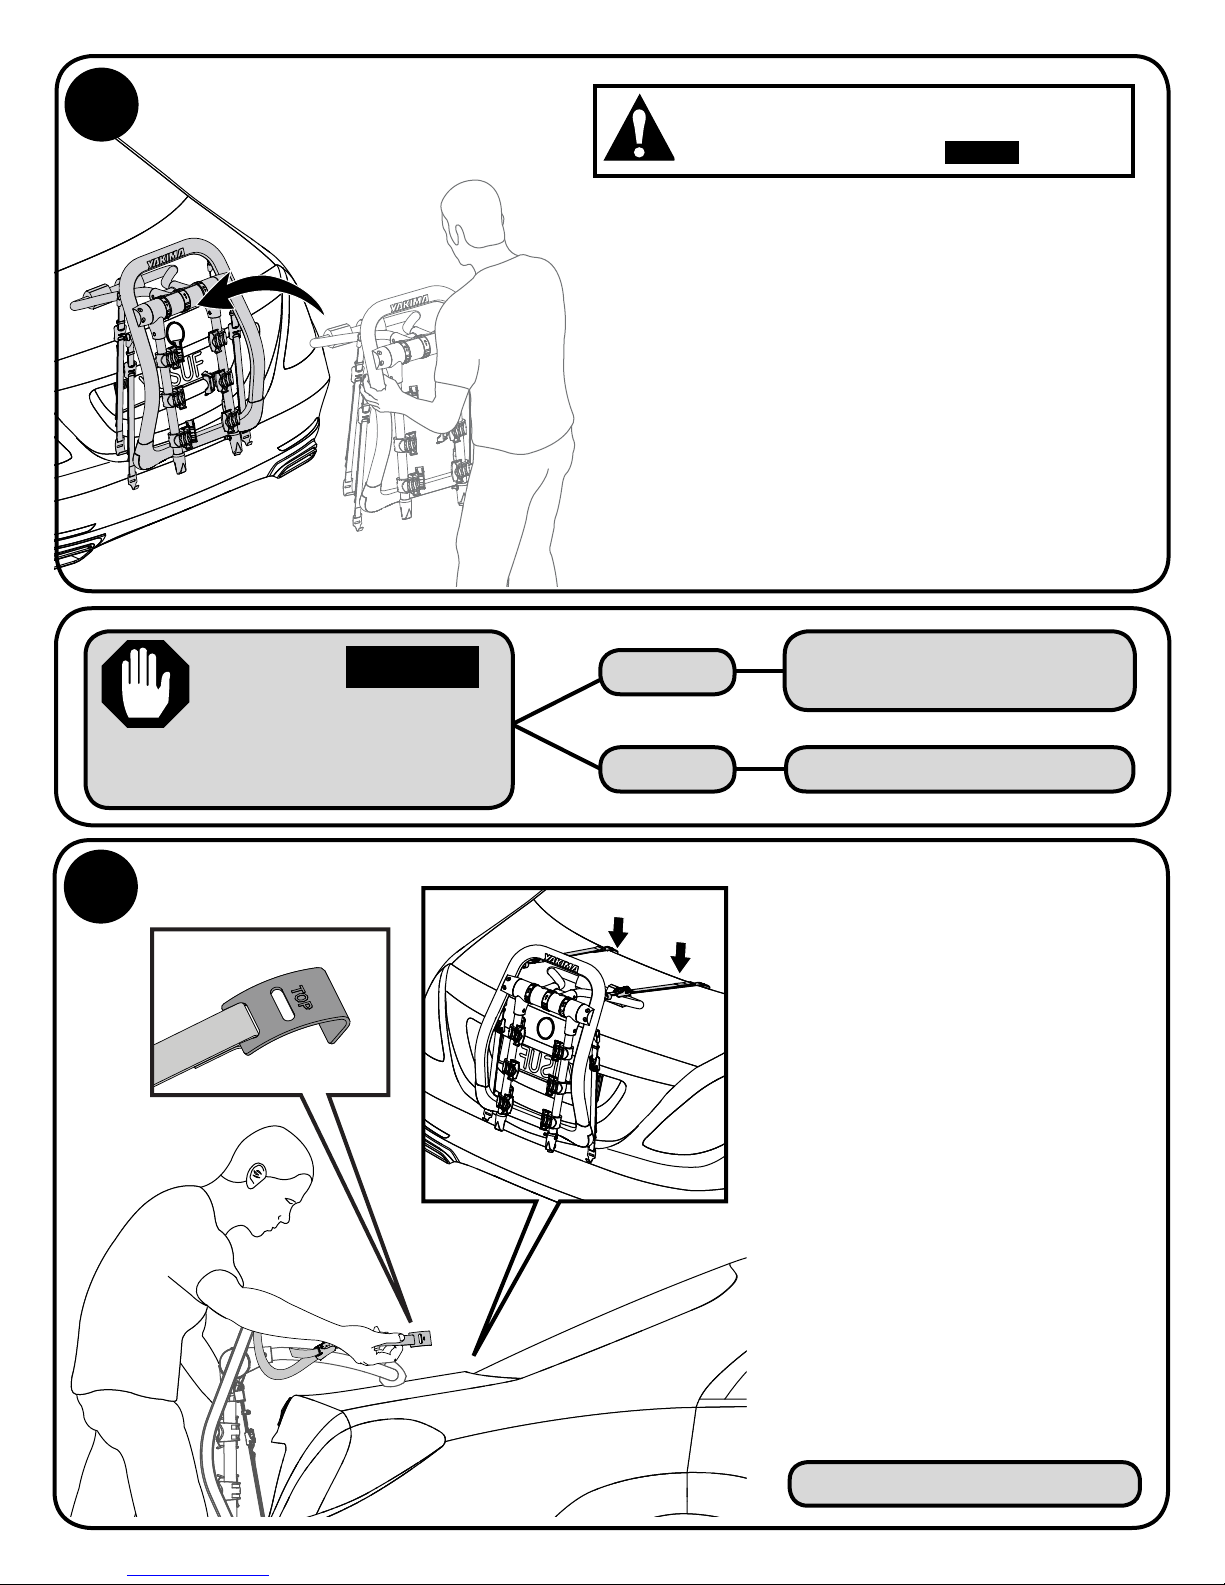
DID YOUR FIT NOTES
INDICATE YOU NEED
TO USE ANCHORS FOR
THE TOP HOOKS?
YES
NO
SKIP STEP 5 AND
PROCEED TO PAGE 4.
PROCEED TO STEP 5.
PROCEED TO PAGE 5.
•Using your body to help support the FullBack
attach both top strap hooks around the top
edge of the trunk lid, hatch lid or rear door.
Tighten top straps until FullBack is held in
place.
•You may need to attach hooks at a wider
section of the seam and then slide them into
their recommended place on the vehicle.
•Straps should be parallel, and no wider than
the body of the FullBack. Route the straps
over the FullBack frame.
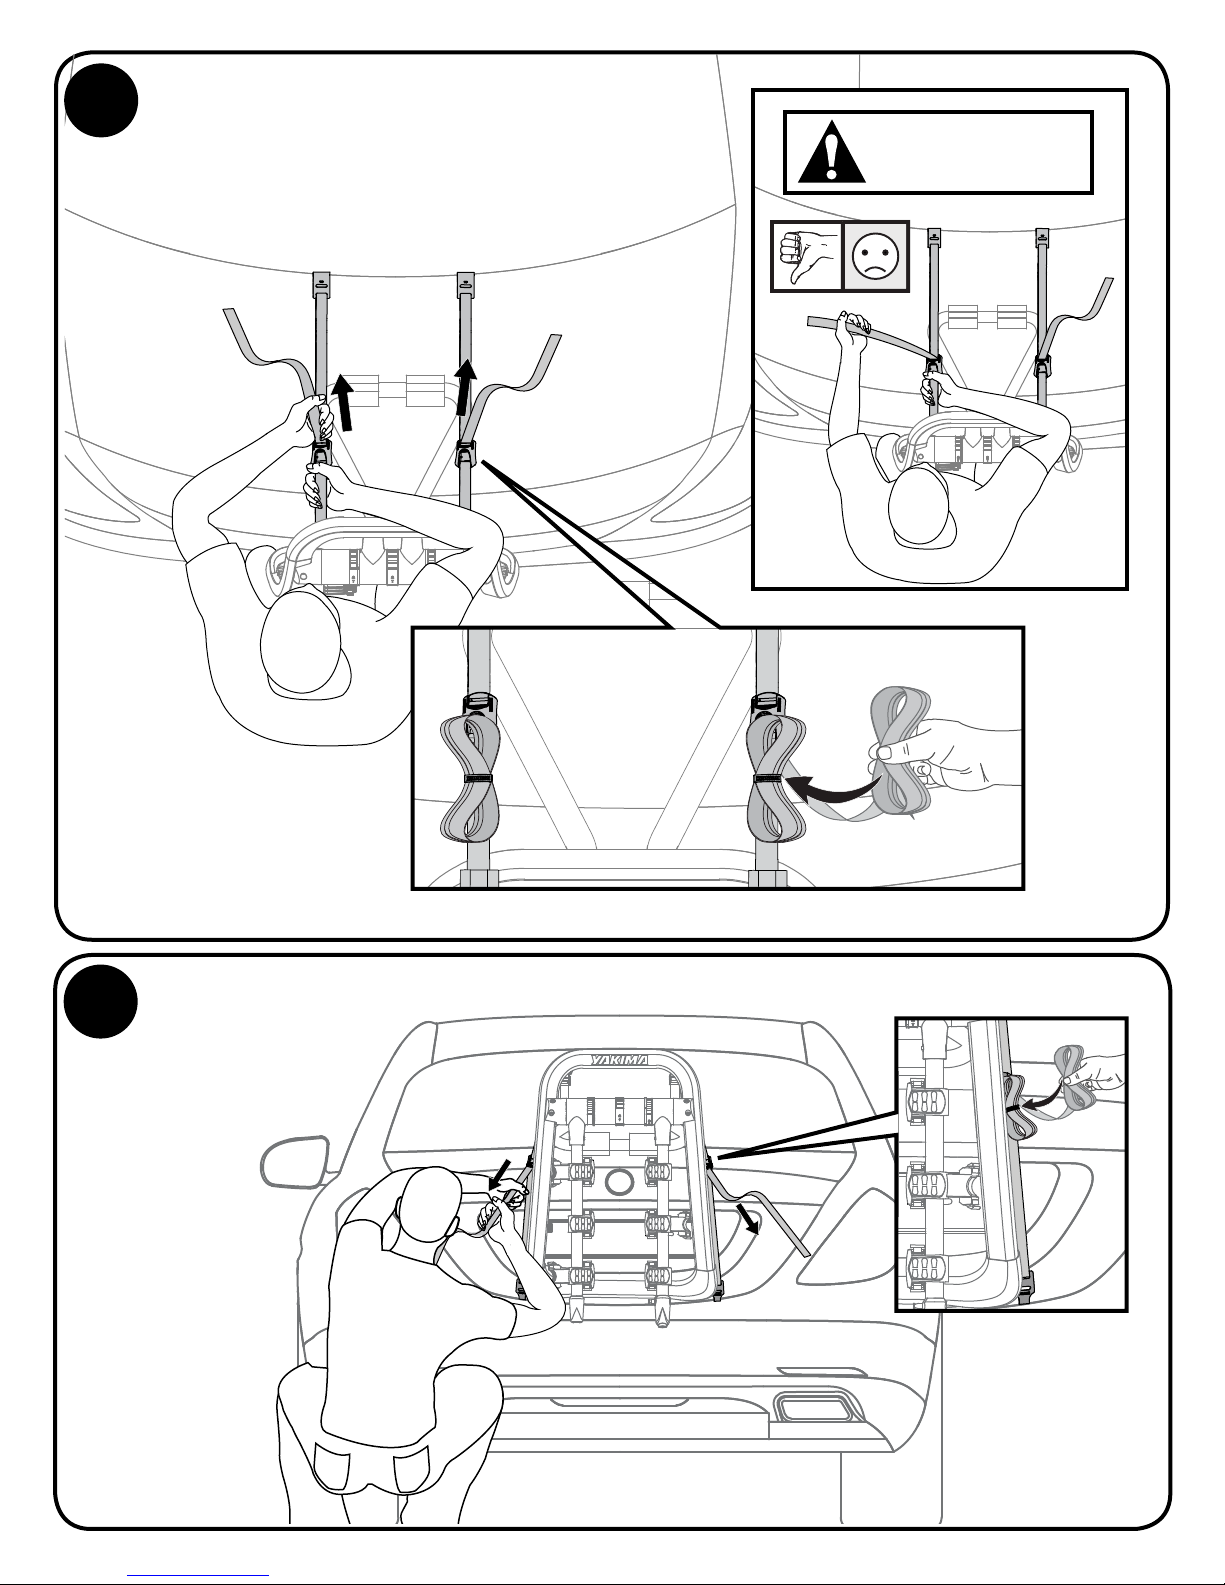
•Not able attach the top hook? Use the anchor
configuration. Follow Anchor installation
instructions on PAGE 4.
•DO NOT ATTACH THE TOP HOOKS TO
PLASTIC OR TO A SPOILER. Use the Anchor
configuration instead. Follow Anchor
installation instructions on PAGE 4.
•DO NOT ATTACH THE TOP HOOKS TO GLASS.
Use the Glass Hatch Hooks (sold separately -
Yakima Part Number 8002612).
•REMOVE HOOKS BEFORE OPENING THE
HATCH OR TRUNK! Opening the hatch
or trunk with hooks installed could cause
damage to the vehicle.
Attach top hooks

1035059C-4/42
B
A
E
D
C
TOP HOOKS: Anchor installation instructions
Confirmed your vehicle does not require
Anchors? Skip this page.
WARNING:
DO NOT REST
THE ANCHORS
AGAINST GLASS.
Make sure the anchor
is free from contact
between hatch door
and vehicle’s frame

6
1035059C-5/42
•Not able to attach the bottom hooks? Use the Anchor
configuration. Follow Anchor installation instructions on page 6.
Attach bottom hooks
•REMOVE HOOKS BEFORE OPENING THE HATCH
OR TRUNK! Opening the hatch or trunk with
hooks installed could cause damage to the
vehicle.
•Acceptable attachment points may include the bottom edge of the trunk, hatch lid or
rear door. Additionally, the tie-down hooks underneath the vehicle or the metal ledge
of the bumper are acceptable. Only attach hooks to areas with sufficient support.
•You may need to attach hooks at a wider section of the seam and then slide
them into their recommended place on the vehicle.
•DO NOT ATTACH THE BOTTOM HOOKS TO PLASTIC OR TO
A SPOILER. Use the Anchor configuration instead. Follow
Anchor installation instructions on page 6.
•DO NOT ATTACH THE BOTTOM HOOKS TO GLASS.
Use the Glass Hatch Hooks (sold separately -
(Yakima Product Number 8002612).
PROCEED TO PAGE 7.
DID YOUR FIT NOTES
INDICATE YOU NEED
TO USE ANCHORS FOR
THE BOTTOM HOOKS?
YES
NO
SKIP STEP 6 AND
PROCEED TO PAGE 6.
PROCEED TO STEP 6.

1035059C-6/42
B
BOTTOM HOOKS: Anchor installation instructions
Confirmed your vehicle does not require
Anchors? Skip this page.
E FD
A
C
G H
BOTTOM HOOKS: Anchor installation instructions
Confirmed your vehicle does not
require Anchors? Skip this page.
REMOVE THE CARRIER FROM THE CAR.
BEFORE CLOSING
THE TRUNK:
Be sure the pads are
free from contact
between trunk door
and vehicle’s frame.

7
8
2X
2X
1035059C-7/42
•Using ample force pull both top straps toward the
front of the vehicle to fully tighten the top straps.
•Store the extra straps
using the rubber strap
storage bands.
Do not pull upper
straps sideways!
Fully Tighten bottom straps
Fully Tighten top straps
•Using ample
force pull both
bottom straps
down toward
the ground to
fully tighten the
bottom straps.
•Store the extra
straps using
the rubber
strap storage
bands.

1035059C-8/42
9
LOADING
10
Grasp the FullBack and
test that it’s securely
fastened to the vehicle
by trying to move it in
all directions. FULLBACK
SHOULD NOT MOVE!
Any Contact
with a spoiler is
unacceptable.
Test installation
Raise the support arms
•Rotate the left and right dials
toward the unlock icon and
raise the support arms.
•Support arms must
be parallel to one
another, and angled
slightly upward.
Ensure that
the left and
right dials
return to
their locked
positions.
•Pull downward on
both support arms
to ensure they are
locked into position.
The lock icons will be
aligned when locked.

1 2
3
1035059C-9/42
12
11
•Each bike requires
three ZipStripsTM.
•Rotate anti-sway cradle against
the seat tube.
•Insert ZipStripsTM into cradles and
push against bike frame until snug.
Secure the bikes
A Yakima TubeTopTM (see cover page) may be required to carry your bike safely.
Bikes should be as level as possible to avoid ground clearance issues and possible ejections.
Failure to load
bikes properly can
result in property
damage, personal
injury, or death.
Alternate bike directions
to avoid interference.
•Always load first bike with
chain away from vehicle.
Load Bikes
Rotate anti-
sway cradles
out of the way
for easier
loading.
•Bikes are to be loaded in the position closest to the vehicle.
•Use Wheel Strap to
secure bike’s front
wheel to its frame.
•Load heaviest bike first.

1035059C-10/42
13
14
Install safety strap.
•Secure loose
strap end.
Now that you’ve installed your
Yakima FullBack take a moment to
enjoy the beverage of your choice.
Use the built in bottle openers to
crack open a cold one!
•Use the safety
strap to secure
bike frames to
FullBack frame.
Lock bikes

1035059C-11/42
UNLOADING
1
3
2
5
4
Remove the ZipStripsTM.
Remove the
safety strap.
Unload the bikes.
Rotate the left and right dials toward
the unlock icon and carefully lower
the support arms.

1
1035059C-12/42
REMOVAL
4
23
5
Press the button on the
buckle and release some
tension from the straps
Carefully remove the
FullBack from the vehicle.
Rotate the center
dial toward the
unlock icon and
fold back the
upper frame arm.
•Unhook the bottom hooks.
•While using your body
to support the FullBack
remove the top hooks.

1035059C-13/42
R8A9N1D
Check strap
tension before
each use, and
while in use check
strap tension often,
tighten with each
new load.
STRAP TENSION
WEIGHT LIMITS
HalfBack (2 Bike)
35 lbs / 15.9 kg max per bike.
70 lbs / 31.75 kg total.
HalfBack (3 Bike)
30 lbs / 13.6 kg max per bike.
90 lbs / 40.8 kg total.
CAUTION! BEFORE EACH USE:
• MAKESUREALLTHREEADJUSTMENTDIALSAREIN
THE LOCKED POSITION.
•CHECKSTRAPTENSIONBEFOREEACHUSE,ANDWHILE
IN USE CHECK STRAP TENSION OFTEN, TIGHTEN
WITH EACH NEW LOAD.
• KEEPBICYCLETIRESANDSTRAPSAWAYFROM
VEHICLE’S EXHAUST.
• NEVERDRIVEOFF-ROADWITHBICYCLESLOADED.
•YOUMUSTTIGHTENSTRAPSAFTERLOADINGBIKES.
• FAILURETOCHECKANDTIGHTENSTRAPSCAN
RESULTINPROPERTYDAMAGE,PERSONALINJURY,
OR DEATH.
• DONOTLETBIKEPEDALSTOUCHTHEVEHICLE.
• REMOVEANYBIKEATTACHMENTSPRIORTO
TRANSPORT.
IMPORTANT GUIDELINES:
•CERTAINAUTOMOTIVEAFTERMARKETPRODUCTS
SUCHASSPOILERS,ANTENNAE,ETC.MAY PREVENT
ATTACHMENT OF THE CARRIER.
•EXCESSIVETIGHTENINGOFTHESTRAPMAYCAUSE
DAMAGE TO SOFTER BODY MATERIALS.
• NOTAPPROVEDFORTANDEMSORRECUMBENTS.
•DONOTINSTALLONTOTRAILERS,CAMPERS,ORRVS.
• NEVEROPENTRUNK/HATCHWITHCARRIER
INSTALLED. OPENING THE HATCH OR TRUNK WITH
CARRIER INSTALLED COULD CAUSE DAMAGE TO
THE VEHICLE.
•REPLACEANYOFTHESTRAPSTHATAPPEARWORN
OR FRAYED (CONTACT YOUR DEALER).
•HALFBACK/FULLBACKMAYNOTWORKONVEHICLES
WITH AUTOMATIC OR POWER LIFT GATES.
IMPORTANT!
Be sure to read all the
warnings and warranty
information contained in
the insert accompanying
these instructions!
FULLBACK WEIGHT
2BikeRack=21lbs(9.5kg)
3BikeRack=23 lbs (10.5kg)

1035059C-14/42
Glass Hatches
•If upper or lower hooks
must attach to glass,
follow instructions to
use Glass Hatch Hooks
(sold separately).
Convertibles
•Do not allow the upper
frame of the carrier to
rest on car convertible
top.
•Do not raise or lower
top while carrier is
installed.
Rear Window Wiper
•Wiper may not be usable while
carrier is installed. Do not allow wiper
to contact any part of this carrier, at
any time.
Vehicles with a Spoiler
•If any part of the carrier contacts the
spoiler, do not use this product.
Spoiler Gap
•SUV’s, vans, and wagons with a
gap between the rear spoiler and
rear window or hatch must route
upper straps under the spoiler when
possible. Do not allow straps to
contact spoiler.
READ THE INSTALLATION CAUTIONS THAT APPLY TO YOUR VEHICLE
MAINTENANCE:
Use a soft cloth with water and mild
detergent to clean plastic parts.
CAUTION
REMOVEHALFBACK/FULLBACKBEFORE
ENTERING AN AUTOMATIC CAR WASH.
RECOMMENDED ACCESSORIES (SOLD SEPARATELY)
YAKIMA 9FT SECURITY CABLE
(YAKIMA PART NUMBER 8007233)
Secures your bikes to your carrier.
YAKIMA TUBETOP TM
(YAKIMA PART NUMBER 8002531)
Recommended for bikes with
slanted, or no bicycle top tubes.
TRUNK SECURITY STRAP
(YAKIMA PART NUMBER 8002623)
Secures your carrier to your vehicle.
GLASS HATCH HOOKSTM
(YAKIMA PART NUMBER 8002612)
Attaching Glass Hatch Hooks to upper
strap will limit load to 2 bikes.
KEEP THESE INSTRUCTIONS!
Tight Seams
•On some vehicles the trunk/hatch
seams may be too tight to easily
insert hooks. Slide hooks from
outside edge of trunk/hatch to
appropriate location. If still to tight,
open trunk/hatch, insert hooks,
and close very carefully to avoid
damage.
•Make sure trunk/hatch is securely
closed before continuing installation.
Soft Attachment Points
•Excessive tightening of the straps
may cause damage to softer body
materials.
Table of contents
Other Yakima Automobile Accessories manuals

Yakima
Yakima LockNLoad Mk2 User manual

Yakima
Yakima Locking EZ Rider User manual

Yakima
Yakima HoldUp Plus2 User manual

Yakima
Yakima K165 User manual

Yakima
Yakima Q10 User manual

Yakima
Yakima Q102 User manual

Yakima
Yakima 8880684 User manual

Yakima
Yakima Control Towers User manual

Yakima
Yakima K152 User manual

Yakima
Yakima LightMate User manual

Yakima
Yakima K674 User manual

Yakima
Yakima KingJoe 2 User manual

Yakima
Yakima 8007144 User manual

Yakima
Yakima K1187 User manual

Yakima
Yakima Whispbar K571W User manual

Yakima
Yakima HITCHSKI YAK-8002418 User manual

Yakima
Yakima SteelHead User manual

Yakima
Yakima 8004093 User manual

Yakima
Yakima Mako Saddles User manual

Yakima
Yakima ReelDeal User manual