manuals.online logo
Brands
  1. Home
  2. •
  3. Brands
  4. •
  5. Yamaha
  6. •
  7. Recording Equipment
  8. •
  9. Yamaha PLG150-DX User manual

Yamaha PLG150-DX User manual

Motif ES & PLG150-DX
Power User Plus Pack:
DX_Nosebleed
64 DX Board Voices and 64 Motif ES Plug-in Voices using that data
PluginAllBulk file (NOSEBLEE.w2b): Load this file through the FILE Type that matches your PLG150-DX
board. That is, PluginAllBulk1 if your PLG150-DX is in slot 1, PluginAllBulk2 if your PLG150-DX is in slot 2
and so on. These are PLG150-DX BOARD Voices for Board bank 035/000
DX SIMULATOR file (DX_NOSE.dxc): Open with the DX Simulator program. Within the Simulator open “DX
EDIT LIST” view. Provided for those curious to see how the Voices were made.
VOICE EDITOR for MOTIF ES file (Nose_s1.w2e); (Nose_s2.w2e); (Nose_s3.w2e): Open the file for your
Slot (S1, S2 or S3) with the Voice Editor for Motif ES or load it directly to the Motif ES via the VOICE EDITOR
File type. Open this file in the Editor to see how the Motif ES parameters were applied to the Board Voices to
make the PLG User Voices.
If you are new to the board see the PLG150-DX GETTING STARTED GUIDE downloadable from the
Motifator.com website: http://files.keyfax.com/download/PLG150DX_Motif.pdf
PLG150-DX Custom User Voice data
The DX synth engine is based on FM or Frequency
Modulation (yes, the same FM that is used for
radio – albeit that FM synthesis takes place mostly
in the audible frequency band – below 20kHz). To
gain an understanding of FM synthesis you have
to appreciate waveforms and how waveform
shapes are perceived by the human ear and brain.
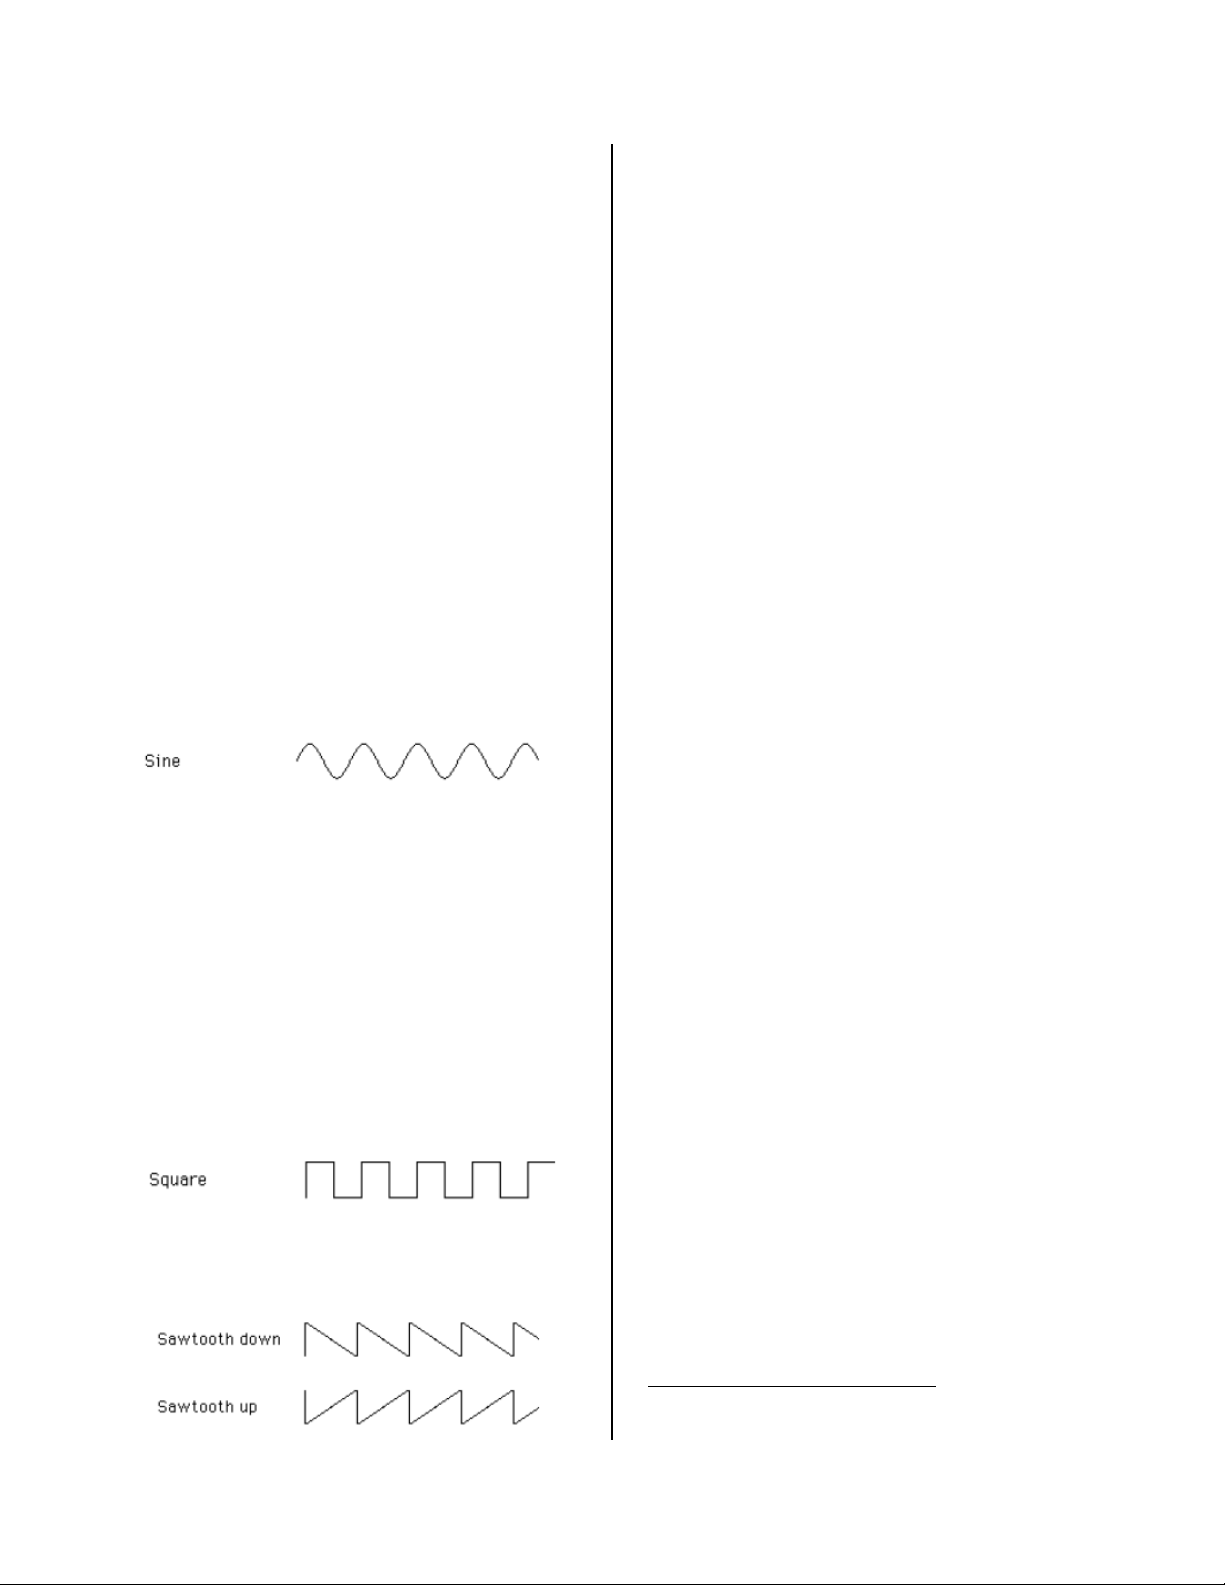
Analog synthesizers began by electronically
creating ‘geometric’ waveforms, i.e., sine waves,
square waves, pulse waves, sawtooth waves etc.
These mathematically ‘perfect’ wave shapes do
not, by themselves, sound like musical
instruments that we know. But with the help of
filters (to remove some harmonics) and envelopes
to shape the sound, you could program some
crude musical instrument emulations. Describing
sound is always difficult it is always best to hear
the examples. But if you know what a sine wave
looks like (and you could not have gotten through
school in America without studying sine waves in
math class) you know that it is a smooth wavy
line that starts at 0, and at 90 degrees reaches
maximum returns to 0 at 180 degrees, then
reaches the lowest point a 270 degrees before
returning to 0 at 360 degrees and repeating.
Getting that math class headache yet?
Too bad they didn’t relate math to sound – it
might have made class much more interesting and
fun (at least for the future musicians, most of
whom were sound asleep). Well, roughly speaking
a sine wave is devoid of harmonics…er,
harmonics are like the fingerprint of the sound.
Your ear and brain use the harmonics of a sound
to identify it. Harmonics explain how you can tell
one person’s speaking voice from another, how
you can tell a trumpet playing A440 from a
trombone playing A440 – the harmonic content is
different. The instrument sounds with the least
amount of harmonic content sound “flute-like” to
our ears (a whistle has very few harmonics), while
a square wave – odd harmonics only – sounds
very much like a clarinet’s tone.
Pulse waves, the narrower they are the more
nasal they sound – oboe sounds are described as
nasal and so are clavinet sounds. Sawtooth wave
shapes give us a variety of sounds, both brass
and strings.
Selecting a waveform on an analog synth would
get you in the ballpark. And from the rough
descriptions I have given you here you could build
instrument emulations. But FM synthesis, as
introduced by the DX7, back in 1983 provided you
with these things called “operators” that only
output sine waves only. What to do? Many people
stopped right there and never explored the vast
sonic capability that lies within FM synthesis. To
make a long complex story short, the operators
were themselves complete little engines that could
influence the harmonic content of each other. The
output of one operator could be applied to the
input of another to create a more complex wave
shape. Like FM technology in radio broadcast
(where it is in the Megahertz range - far beyond
audible waveforms) there are Modulator and
Carrier. In the DX the frequency modulation takes
place at much lower frequencies (the range of
human hearing – so a crystal set is not necessary
to interpret the waveforms). The germ idea was
born when Dr. John Chowning, CCRMA at Stanford
University, was observing a violinist add vibrato to
a string. The bow (horsehair) is dragged across
the string (cat gut) causing the string to vibrate at
a known frequency. At the same time the
musician is applying a Low Frequency Oscillator
(the left hand) varying the length of the vibrating
string (lengthening and shorting the vibrating
area alters the pitch) – what is called applying
vibrato to the string. This LFO is applied at a rate
of a few oscillations per second, while the bow is
causing the string to oscillate at a much higher
rate (perhaps 440 cycles per second = A440).
Well, Dr. Chowning’s idea had to do with “what
if”…what if you sped the vibrato, the modulating
frequency, up into the audible frequency range
20-20,000 cycles per second, what would that do
to the overall response of the instrument? What
influence would that have on the tone/timbre of
the sound? That is how FM synthesis was born.1
The answer was a whole new method of creating
timbres was born.
To get into learning about FM synthesis it
is a good method to start out recreating the
geometric wave shapes we spoke of: sine, square,
pulse, sawtooth. Then you can build on these
familiar sounds and branch out. In FM the
‘Carrier’ is the signal that carries the sound you
hear – it is analogous to the bowed violin string –
its oscillation is audible. The ‘Modulator’ is the
signal that is applied to the carrier to modify the
sound – it is analogous to the vibrato applied by
the musician’s left hand. Although you hear its
effect on the sound, you do not hear the
modulator, directly. You hear its influence on the
1By the way he couldn’t find a musician capable of this
so he decided to do it electronically.
2
carrier. Therefore when you see a diagram of an
FM algorithm, the carriers are always on the
bottom row and the modulators are stacked above
the carrier. Each carrier is audible directly, while
each modulator influences the timbre of the
operator beneath it. Stacks can become quite
complex, but only those operators on the bottom
of the algorithm chart are audible directly. You
can stack modulator on top of modulator and get
very complex tones – as you will hear from this
set. Operators can even modulate themselves
(called a feedback loop) and since output can be
controlled by velocity and other controllers you
have a degree of control over harmonic content
that samples can’t even dream about. So while
samples offer a very accurate wave shape to
start, your ability to manipulate on an organic
level is nil. FM wave shapes are not as emulative
of instruments to start but the behavior and
degree of control over harmonic content is
unprecedented.
In the algorithm above operators 1, 3, 4 and 5 are
Carriers (meaning you can hear their output)
while operators 2 and 6 are Modulators (means
their output is only heard by its affect on the
Carriers to which they are connected. Without the
Modulators each Carrier would sound only a ‘sine
wave’. Operator 6, above, is the feedback
operator (where the signal can get very complex
as it is fed back on itself – generating complex
sidebands).
When you have a simple 2-operator FM stack,
(like operator’s 2 and 1 above) Modulator/Carrier,
and the coarse tuning ratio of each is 1.00 and
the output of the modulator is about at ¾ output
(about 75), you will generate a fairly perfect
sawtooth waveform, 1:1. If you increase the ratio
of the modulator frequency so that it is 2:1 tuning
ratio to the carrier you will generate a square
wave. Any whole integer ratio 3:1, 4:1, 5:1 or
greater will generate an ever-narrowing pulse
wave. If the ratio is a non-whole integer
relationship, you will generate what would be
described as a ‘bell tone’. That is the
fundamentals of FM – of course, it can get very
much more complex (FM is a real form a
synthesis that can be studied at the college level),
with nested feedback loops and interaction
between operators. Filters were unnecessary in
the original FM synthesizer since you were
constructing the harmonic content more directly.
To really get into FM you need to understand side-
band frequencies and Bessel functions but most
FM synthesis can be carried out on an intuitive
basis once you understand the fundamentals.
If none of this interests you, it is okay. You can
just enjoy the sounds. But without much
exaggeration I can say that most of what is
possible with DX-style FM has yet to be explored.
And there are sounds that nothing but DX-style
FM can do. Notice I didn’t say it could do
everything – but there are sounds that nothing
else on the planet can do. It is estimated that
there are some 10,000 useable FM sounds out
there floating around. Some people insist they can
“sample” it – you can’t. Well, of course, you can,
but what you miss is the interaction of the
modulator and carrier within the sound. Each
operator has its own envelope, its own response
to velocity, etc. – this makes what happens within
the FM voice a ‘living’ thing – it is more organic
than can be captured in a simple sample of a
waveform. Envelopes and output indexes can be
influenced on a continuous basis, which in turn
changes the timbre of the sound as you increase
playing intensity – this is what cannot be
sampled. The tremendous success of the DX7
‘back-in-the-day’ was not based on anything more
than musicians thought that the sound was ‘cool’.
Most DX7 owners never programmed an FM Voice
– the least pressed button in the world was the
EDIT button on a DX7. It was way too complicated
– but a good lesson was learned here –
complexity comes in a paltry second to SOUND
when musician’s make up their mind they like
something. (Well, duh, most sax players don’t
have a clue about how a saxophone makes sound
and would be hard pressed to discuss Bernoulli’s
principle and the Graham Non-linear curve, and
just what is hysteresis and the fricative value and
what does it have to do with saxophone tone?)
However, if you want to get involved with
programming and tweaking FM – you will find
your results their own reward. There is an
excellent tutorial on-line at the Yamaha Digital
Music World site – with a number of lessons
taking you through the world of sine waves and
operators – and the first ‘synthesizers’.
Visit the FM Tone Generator Seminar at:
http://www.digitalmusicworld.com/html/hardw
are/SynthsTutorial.asp
3
The VOICES
Many of the sounds here are the full 16-note poly
and some of the sounds are reduced to just 4-
notes of polyphony, and some are mono.
Depending on how you want to use the timbre
you can change this. Listed below are the names
of the Voices and the 4-note poly voices are
identified. These take advantage of the UNISON
POLY function (this parameter double-folds the
sound for a thicker timbre). The UNISON POLY
parameter was added to the FM structure when
the DX7IIFD and the TX802 hit the market in late
1986. These parameters were not available on the
original 1983 first generation of programmable 6-
operator FM synths: DX7, DX5, DX1, TX7, TX816.
If polyphony is an issue for you, navigate to the
DX Simulator’s “EDIT LIST” view - there you will
find the UNISON Switch. Set this to OFF and you
will have 16 note polyphony on the sound. For
those of you wanting more polyphony for the FM
sounds, you can add a second or third PLG150-DX
board to your host and activate the POLY EXPAND
function found in the Motif ES’s UTILITY mode/ F6
PLUG/ SF1 Status. The UNISON POLY mode is
about timbre – many of the sounds are musical
effects and polyphony is not such a big issue.
Because of how musical sounds and ‘stuff’2are
generated in the DX engine, the programmers
would use a 2-operator stack (minimum) to
generate a complex tone. This is why an item like
the TX-Rack became so popular at over $4,000 –
it could be expanded to house eight DX7 modules
called TF1s – that’s eight 6-operator engines. The
TX816 original Voices sets, (and Yamaha only did
one or two official Voice sets), had great detail.
There was a Rhodes sound that had 24 different
sound components, including the knock of the
hammer, the tine, the tone bar, the ‘fling’ of the
felt, etc. It was a real shame – but most recording
studios owned TX816s and no one ever did any
programming beyond stacking a sound eight
times (which really only made it louder). Then
they would compound their lunacy by detuning
each module up or down a tuning increment – this
‘bad’ programming accounted for most of the DX
Rhodes sounds you hear on records from the ‘80’s
– poorly utilized and was mainly responsible for
the misconception that you had to layer sounds
because FM was thin. Not necessarily so! What
was done in the original TX816 programs was the
additional TF1 modules were used for details
2“Stuff” is a word that was adopted by the early
programmers of FM to describe a noise or artifact that
accompanies the creation of a musical tone. It’s the
acoustic noise inside a Clavinet as the hammer releases,
it’s the quill falling back on a harpsichord, it’s the finger
noise on the acoustic guitar string, etc.
(knocks, and noises…i.e., the “stuff”). Oh well. So
many were sold that it was inevitable that it would
be misunderstood.
If you add a second or third DX board and
you turn the POLY EXPAND parameter to ON, the
boards will combine and follow the board Voice
selected by the lowest numbered slot. For
example you place a DX board in slots 1 and 2,
you will now have 32 notes of polyphony and you
will use the PLG1 Voice mode button to select
Voices. POLY EXPAND is just what it says – it
allows you to expand the polyphony. If you want
to layer sounds to get more complexity you would
leave each 16-note engine as a separate synth
and program them separately.
These sounds were derived from the
Yamaha LoopFactory DX200 and were
reprogrammed for use in the Motif ES.
The LOAD:
As is the way with the Yamaha synth engine plug-
in boards you have two files. One is the custom
PLG150-DX Board Voices that will load into the
board’s own user RAM bank (035/000), and the
second is the Motif ES level Plugin Voices that I
created to show off these sounds. Remember the
DX7 had no effects processor of its own (they
didn’t exist back in that day, circa 1983-88), so
the Motif ES level PLUG-IN VOICES use the
custom DX board data as the waveform but frame
them with the powerful functions and effect
processing of the Motif ES. Truly the best of both
worlds – I have provided both the “PluginAllBulk”
for the three possible slots (.w2b/.w3b) – load
through the type for your board’s slot; an
additional file that can be opened in the DX
Simulator for those interested in exploring
deeper into FM programming (.dxc). This contains
the same data but allows you to see the edit
parameters – provided strictly for those that want
to learn more about FM synthesis. Plus, of course,
the Motif ES level Voice data in a VOICE EDITOR
For MOTIF ES file (.w7e/.w8e) provided.
• Copy the .w2b/w3b bulk files to a
SmartMedia card and if you are not
running the VOICE EDTIOR, copy the
.w7e/w8e files to the card as well;
Parameters you should know about:
Note Shift:
If you wish to note shift any of the PLUG-IN
Voices, you will find the NOTE SHIFT parameter
for a PLG150 sound by:
Press EDIT
Press Track 1 to select Element Edit
Press F1 OSC
Press SF5 OTHER
4
Overall Velocity Curve:
Because of the dynamic response of FM to velocity
and the potential for overly bright sounds on
extreme velocity, you may wish to tailor the
velocity curve of the PLG150-DX to mimic the
original DX7. To do this navigate to the PLUG-IN
board parameters:
Press UTILITY
Press F6 PLUG
Press the SF “NATIVE” button that corresponds to
the slot you have the PLG150-DX installed. Set
the VelCurve to DX7.
Bank Select: From Voice mode press the PLG
button that contains your PLG150-DX board, then
use the F2 Bank option to select among the
banks. If you have loaded the data properly you
should see data in the Board bank (035/000) and
in the PLG_USR bank. The first sound in both
cases will be “Cp: Nosebleed”. The 035/000 Board
bank will be without the host’s effects applied. The
Voice in the PLG_USR bank will have effects.
Poly/Mono Mode: You can change any of the
sounds to mono mode either at the Element level
(in the DX Simulator) or from the Plug-in Voice
level. To do this at the Plug-in Voice level:
-Press EDIT
-Press COMMON to select overall parameters
-Press F1 General
-Press SF2 PlyMode (polyphony mode)
BOARD VOICES
Select Bank 035/000 to hear the raw PLG150-DX
Board Voice Elements (without effects).
PLUG-IN VOICES
Select the PLGxUSR bank to hear the completed
Plugin Voices (where ‘x’ is the slot of your
PLG150-DX) with effects.
Nosebleed Voice Bank
1 Nosebleed: Algorithm 5 –
A favorite for sounds with complex attacks and
very different sustains. This algorithm more than
any other was a favorite for the classic electric
piano sound of the original DX7. Each two-
operator stack was responsible for a different part
of the sound. Operators 1, 3 and 5 are sounding
(carriers) and 2, 4 and 6 are modifiers
(modulators). Here the complex tuning of a bell
tone is emulated. This hard mallet sound is very
characteristic of the FM – as one early reviewer of
the DX7 said… it is very easy to make bell sounds
with FM…well yes, any relationship other than
whole integer ratios between operators will render
a bell tone (that is physics). Note the tuning of
the operators: 0.825, 4.11, 2.80, 4.00, 2.00 and
3.48. On the Motif ES parameter side, the
INSERTION EFFECTS are the AUTO PAN and
AMBIENCE. (Hint: to view the Motif ES level
programming, press the INFORMATION button
from the main Voice screen. Bypass the
INSERTION EFFECT to hear the basic FM tone.
2 KlingKlang: Algorithm 7 –
The name says it all here. This is another big bell
tone with a fixed frequency component at
operator 4, which contributes the knock or thump
of the klanger at 371.5Hz.
3 Swimming: Algorithm 26 –
Musical Effect: Operators 1, 2 and 3 make up the
cool bass tone, while 4, 5 and 6 are the piercing
effect. This is one of those sounds you can use as
a bass (if played with a good amount of velocity)
or a sound effect (when played lightly).
4 Ethnectric: Algorithm 14
Two stacks 1-2, and the complex 3, 4, 5, 6 with
Op4 modulated by both 5 and 6. This has a
distinctive wooden tone with mallet. Bypass the
Motif ES Effects to hear just the FM sound. The
arpeggio and the Tempo Delays are added at the
Motif ES level.
5
5 Percussive: Algorithm 10
…This sound is very similar to the Ethnectric
sound but is much more ‘synthy’ sounding. They
both are good sound sounds. The effects are
again added at the Motif ES level (host).
Please explore the rest of these sounds and how
they are made. Experiment…FM is a very powerful
form of synthesis that has really no limits.
Here is a list of the FM Voices. They are 16-note
poly (if you have a single PLG150-DX) unless
otherwise noted. The UNISON POLY and UNSION
MONO Voices use the DX7IIFD engines ability to
fold over on itself for thicker richer sounds.
1. Cp: Nosebleed Unison Poly 4
2. Cp: KlingKlang Unison Poly 4
3. Me: Swimming
4. Co: Ethnectric
5. Co; Percussive
6. Se: Skirmish
7. Se: Still DX Unison Poly 4
8. Me: Stomper Unison Poly 4
9. Se: Wreath AT Unison Poly 4
10. Ba: Subculture
11. Sc: Ni-Chi-B Unison Mono
12. Sc: KAGERO
13. Se: Warp
14. Se: Energie Unison Poly 4
15. Ld: Clokker Unison Poly 4
16. Se: GB Trance Unison Mono
17. Kb: Hypnotic
18. Sc: RaggaGab Unison Poly 4
19. Ld: Nose Dive
20. Se: Sink Unison Poly 4
21. Cp: Logi Drum
22. Me: Bombay Mono
23. Cp; Oaz Unison Poly 4
24. Kb: BrasilDr
25. Cp: Asiara
26. Sc: Acid Pulse
27. Sc: Elec Pulse
28. Cp: Dredzs Unison Mono
29. Me: Elec Rez Mono
30. Me: Night Lite
31. Ba: Orbo Fuzz Unison Poly 4
32. Se: Big Up Unison Poly 4
33. Ld: Drenched Mono
34. Se: TunaMooger Mono
35. Se: Digi Touch Mono
36. Me: Floaty Unison Poly 4
37. Sc: Cyanine
38. Cp: PingPong
39. Ba: Mini Jim
40. Ba: Distcore
41. Ld: Hardcore
42. Me: HouseParty
43. Sc: Ibiza
44. Me: Sand
45. Me: ChimeNoise
46. Kb: Deep Beat
47. Se: Full House
48. Kb: E-Salsa
49. Se: ScreamRibn
50. Se: FJA
51. Se: Minimal At
52. Sc: Voodoo Key
53. Ba: Oskylaytor
54. Se: Stupid
55. Ba: Solo Bass
56. Ld: Saw FB
57. Ld: Badass
58. Ld: Quid
59. Ld: Reeper
60. Ld: Scratches
61. Ld: Fuzz Line
62. Sc: House Dog
63. Pd: FreeGroove
64. Ld: Life Line Mono
Using the PLG150-DX while in Multi Mode
The DX Simulator is the Voice Editor for the
PLG150-DX. An important thing to realize is that
the DX Board is designed to reside in a wide
variety of Yamaha products (Motif, Motif Rack,
S90, S80, CS6x, CS6R, MU-series, etc) – so
although the “VOICE EDITOR for MOTIF ES” can
edit PLG sounds at the Motif ES Voice level, the
DX Simulator actually deals with Board Voice
itself. The “VOICE EDITOR for MOTIF ES” is a
Motif ES editor – it can edit a Motif ES Voice
whether that Voice is pointing to a sampled
waveform or an FM waveform. It applies Motif ES
parameters to the waveform on the
oscillator/wave screen.
• Press EDIT
• Press Track 1 to select Element edit
• Press F1 OSC
• Press SF1 WAVE
It is on that screen where the Motif ES Voice
points to either a sampled wave (preset or user)
or to a PLG150 Board waveform (preset or user).
The DX SIMULATOR allows you to edit the User
bank of the PLG150-DX Board. The DX Board has
many preset banks and one User bank (035/000).
The DX SIMULATOR is a specific editor for the
035/000 bank. And like most Voice editors it
works while the host product is in Voice mode. But
let’s say you want to tweak a PLG150-DX sound
while the Motif ES is in a multi-timbral setup. This
is possible if you tell your computer where to find
it. Here is what you need to know:
6
• If you are working with the PLG150-DX while
in Voice mode, your MIDI interface will
address the board as a part of the host
product. So you would address it on the first
port, PORT 1. It will not matter the PORT
assignment of the PLG150 Boards – as long as
you are in VOICE mode all Motif ES Voices are
addressed on the internal Motif ES Port
assignment, which is fixed at PORT 1.
• When addressing the Motif ES from an
external MIDI sequencer (MIXING mode), it is
common practice to set the PLG150 Boards on
a separate Port from the host product. The
Motif ES is fixed at Port 1 and often Port 2 is
used to communicate with the PLG150 Boards
(this allows them to be addressed on separate
MIDI channels from the internal Parts thus
breaking the 16 MIDI channel limit). This will
be true whether you are using USB-MIDI or
mLAN-MIDI as the interface for your
sequencer.
• In order to address the Plugin Part while the
Motif ES is in Song / Pattern MIXING mode,
engineering has come up with a method to
address the boards by slot and channel
assignment. In the DX Simulator Setup you
can select a parameter called the “Part No.”
(Part number). By setting the Part No.
parameter and MIDI channel you will be able
to address the PLG150-DX while the unit is in
a multi-timbral setup – allowing you to tweak
the sound in context of the music it will be
used. The Part Number assignment is
accomplished as follows:
o Slot 1 = Part 16
o Slot 2 = Part 15
o Slot 3 = Part 14
USB
Typical setting for when the using the Motif ES as
the host and USB as the MIDI interface… MIDI IN
is set to “Yamaha USB IN 0-1” – MIDI OUT is set
to “Yamaha USB OUT 0-2” (the PLG150 boards
are set to be communicated to via PORT 2 in the
Motif ES. The PLG150-DX in this example is in Slot
1 (Part No. = 16), and is assigned MIDI channel
1.
MLAN16E: Below is a typical setup for a Motif ES
containing an mLAN16E as the MIDI interface and
the PLG150 boards on Port 2; the PLG150-DX
board is installed in Slot 1 thus the Part No. = 16.
mLAN SYSTEM: Below is a typical setup for a
large mLAN System where the 01X and Motif ES
are both configured as MIDI interfaces (the 01X
reserves the first 8 Ports into the computer and
the Motif ES takes over at IN Port 9; the computer
sends OUT to the 01X on five MIDI Ports (1-5)
and Port 6 goes to the internal Motif ES/ while the
second Motif ES Port, Port 7 goes to the PLG150
boards… Again the PLG150-DX is in Slot 1 (Part
No. = 16), and the MIDI channel is channel 1.
Phil Clendeninn
Senior Product Specialist
Technology Products
©Yamaha Corporation of America
7

Other manuals for PLG150-DX

3

Other Yamaha Recording Equipment manuals

Yamaha TG300 User manual

Yamaha

Yamaha TG300 User manual

Yamaha Digital Sound Projector YSP-900 User manual

Yamaha

Yamaha Digital Sound Projector YSP-900 User manual

Yamaha LC3 Music lab User manual

Yamaha

Yamaha LC3 Music lab User manual

Yamaha YPC-1 User manual

Yamaha

Yamaha YPC-1 User manual

Yamaha TG100 User manual

Yamaha

Yamaha TG100 User manual

Yamaha MT44D User manual

Yamaha

Yamaha MT44D User manual

Yamaha GQ1031C User manual

Yamaha

Yamaha GQ1031C User manual

Yamaha RSio64-D User manual

Yamaha

Yamaha RSio64-D User manual

Yamaha QY 300 Instruction Manual

Yamaha

Yamaha QY 300 Instruction Manual

Yamaha 02R User manual

Yamaha

Yamaha 02R User manual

Yamaha CDR-HD1500HDD User manual

Yamaha

Yamaha CDR-HD1500HDD User manual

Yamaha E1010 User manual

Yamaha

Yamaha E1010 User manual

Yamaha O2R User manual

Yamaha

Yamaha O2R User manual

Yamaha SMM5000 User manual

Yamaha

Yamaha SMM5000 User manual

Yamaha TX-81Z User manual

Yamaha

Yamaha TX-81Z User manual

Yamaha MT44D User manual

Yamaha

Yamaha MT44D User manual

Yamaha POCKETRAK 2G - 2 GB Digital Player User manual

Yamaha

Yamaha POCKETRAK 2G - 2 GB Digital Player User manual

Yamaha D1030 User manual

Yamaha

Yamaha D1030 User manual

Yamaha ACU16-C User manual

Yamaha

Yamaha ACU16-C User manual

Yamaha FX900 User manual

Yamaha

Yamaha FX900 User manual

Yamaha FX500B User manual

Yamaha

Yamaha FX500B User manual

Yamaha VL70-m Product guide

Yamaha

Yamaha VL70-m Product guide

Yamaha EME-1 User manual

Yamaha

Yamaha EME-1 User manual

Yamaha E1010 User manual

Yamaha

Yamaha E1010 User manual

Popular Recording Equipment manuals by other brands

JK Audio BlueDriver-M3 Connect applications

JK Audio

JK Audio BlueDriver-M3 Connect applications

Vimar LINEA 30495.x manual

Vimar

Vimar LINEA 30495.x manual

Episode EA-MR-SSVC-6 owner's manual

Episode

Episode EA-MR-SSVC-6 owner's manual

TractorTunes RMT installation manual

TractorTunes

TractorTunes RMT installation manual

Genelec 9301B operating manual

Genelec

Genelec 9301B operating manual

Nav TV W205-H Kit manual

Nav TV

Nav TV W205-H Kit manual

Lexicon PCM NATIVE owner's manual

Lexicon

Lexicon PCM NATIVE owner's manual

DSM omnicabsim user manual

DSM

DSM omnicabsim user manual

Toshiba HWS-IFAIP01U-E 0-10V installation manual

Toshiba

Toshiba HWS-IFAIP01U-E 0-10V installation manual

Roland Mobile UA user manual

Roland

Roland Mobile UA user manual

Opvimus IF-722ETH operating instructions

Opvimus

Opvimus IF-722ETH operating instructions

Roland V-Studio VS-20 owner's manual

Roland

Roland V-Studio VS-20 owner's manual

Epson Connect-It SD-DSETHC brochure

Epson

Epson Connect-It SD-DSETHC brochure

Stahl 9176 Series operating instructions

Stahl

Stahl 9176 Series operating instructions

JLCooper Electronics Nuage Surround Panner user manual

JLCooper Electronics

JLCooper Electronics Nuage Surround Panner user manual

AMX NetLinx Custom Panel Interface NXP-CPI16 Operation/reference guide

AMX

AMX NetLinx Custom Panel Interface NXP-CPI16 Operation/reference guide

Tsyklon Labs Plitka BTN Mashr Build instructions

Tsyklon Labs

Tsyklon Labs Plitka BTN Mashr Build instructions

Novation Launchkey user manual

Novation

Novation Launchkey user manual

manuals.online logo
manuals.online logoBrands
  • About & Mission
  • Contact us
  • Privacy Policy
  • Terms and Conditions

Copyright 2025 Manuals.Online. All Rights Reserved.