Yamaha TNR-e User manual

TNR-e Quick Guide 1
Contents
Introduction . . . . . . . . . . . . . . . . . . . . . . . . . . . . . . . . . . . . . . . 2
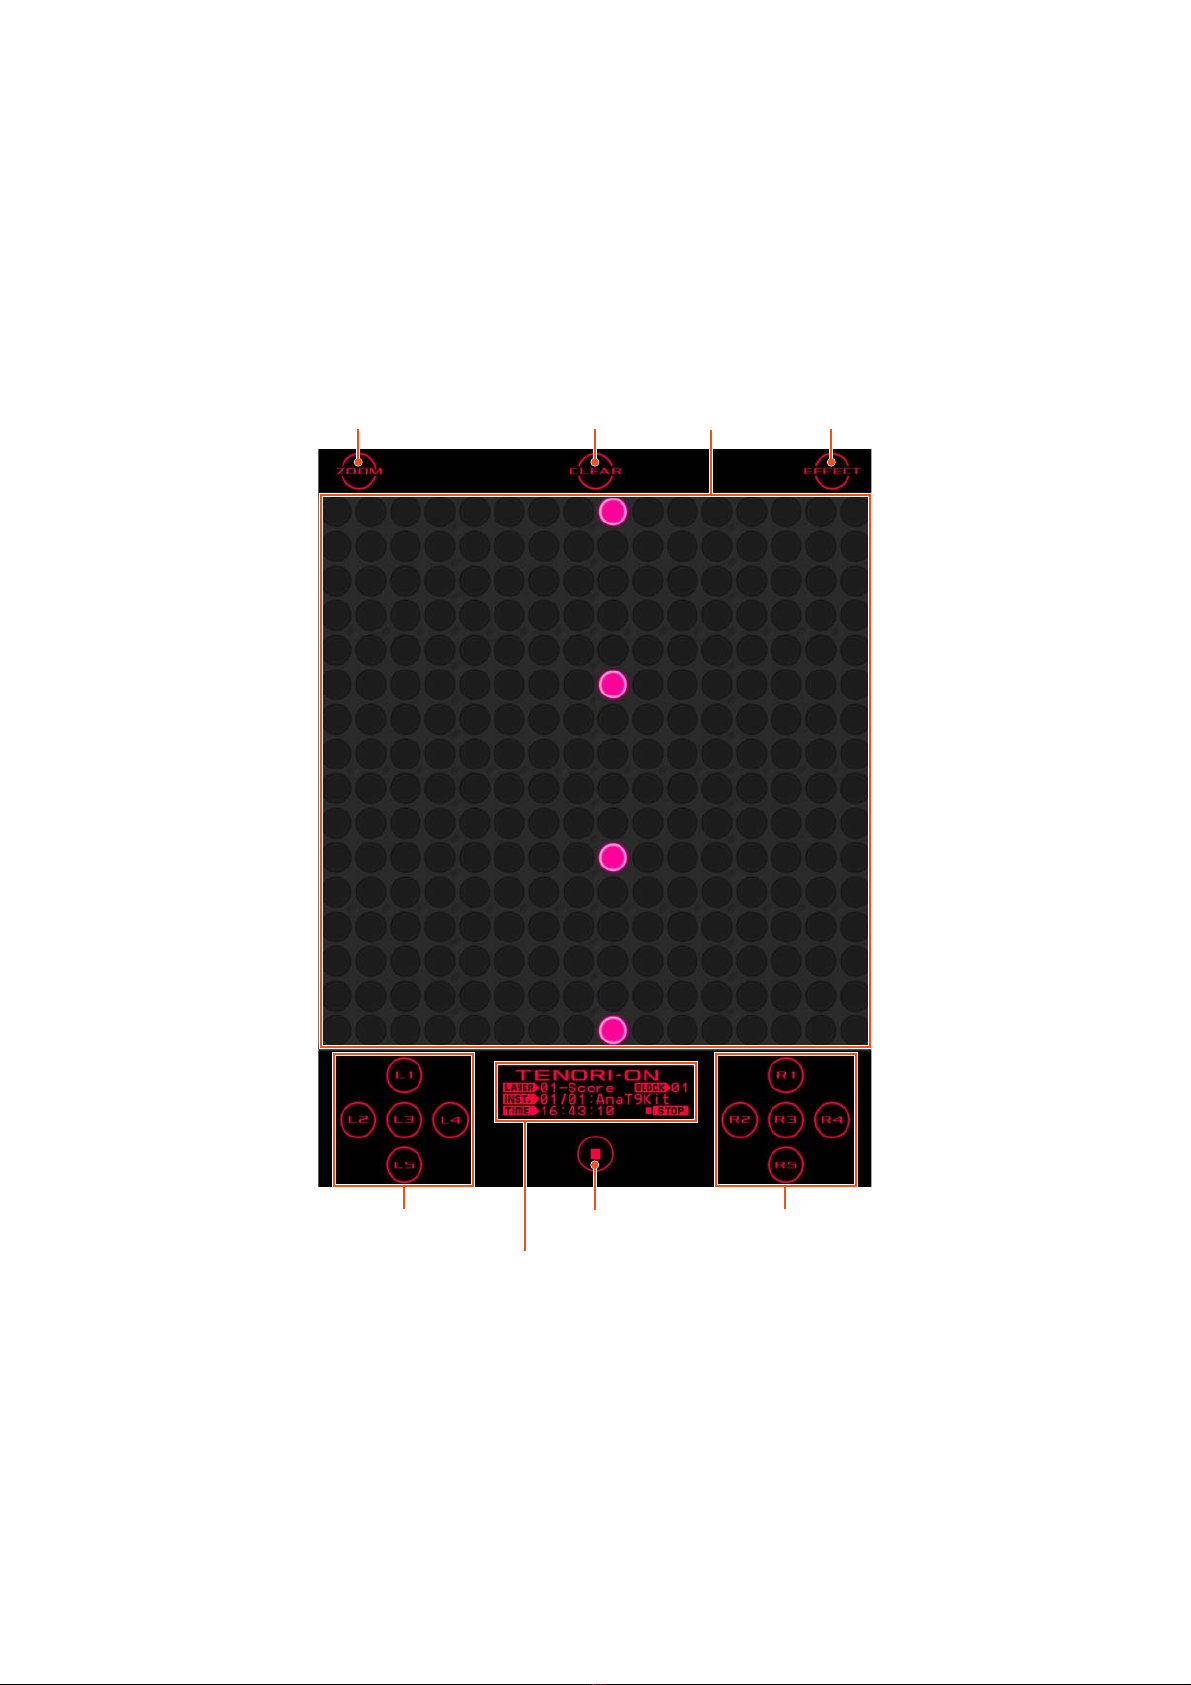
Controls . . . . . . . . . . . . . . . . . . . . . . . . . . . . . . . . . . . . . . . . . . 2
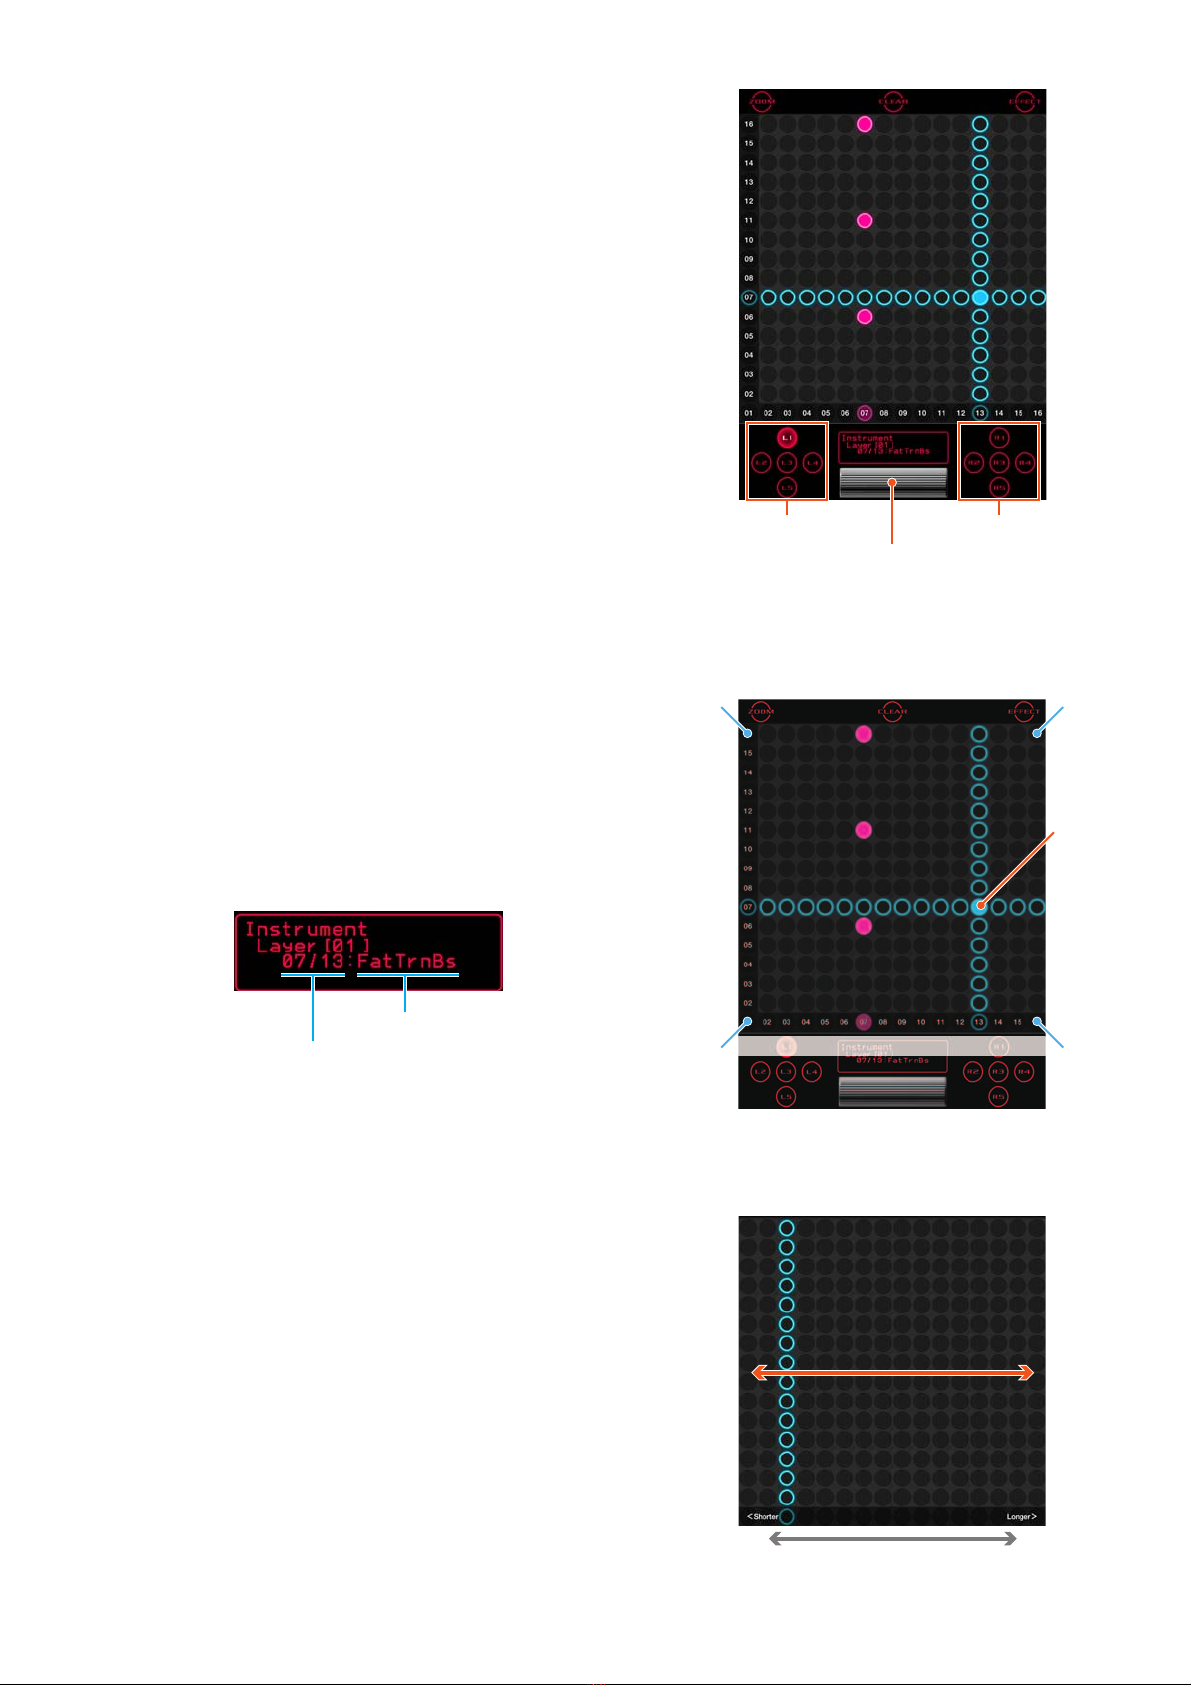
Basic Operation: Score Mode . . . . . . . . . . . . . . . . . . . . . . . . 3
Function Buttons . . . . . . . . . . . . . . . . . . . . . . . . . . . . . . . . . . . 5
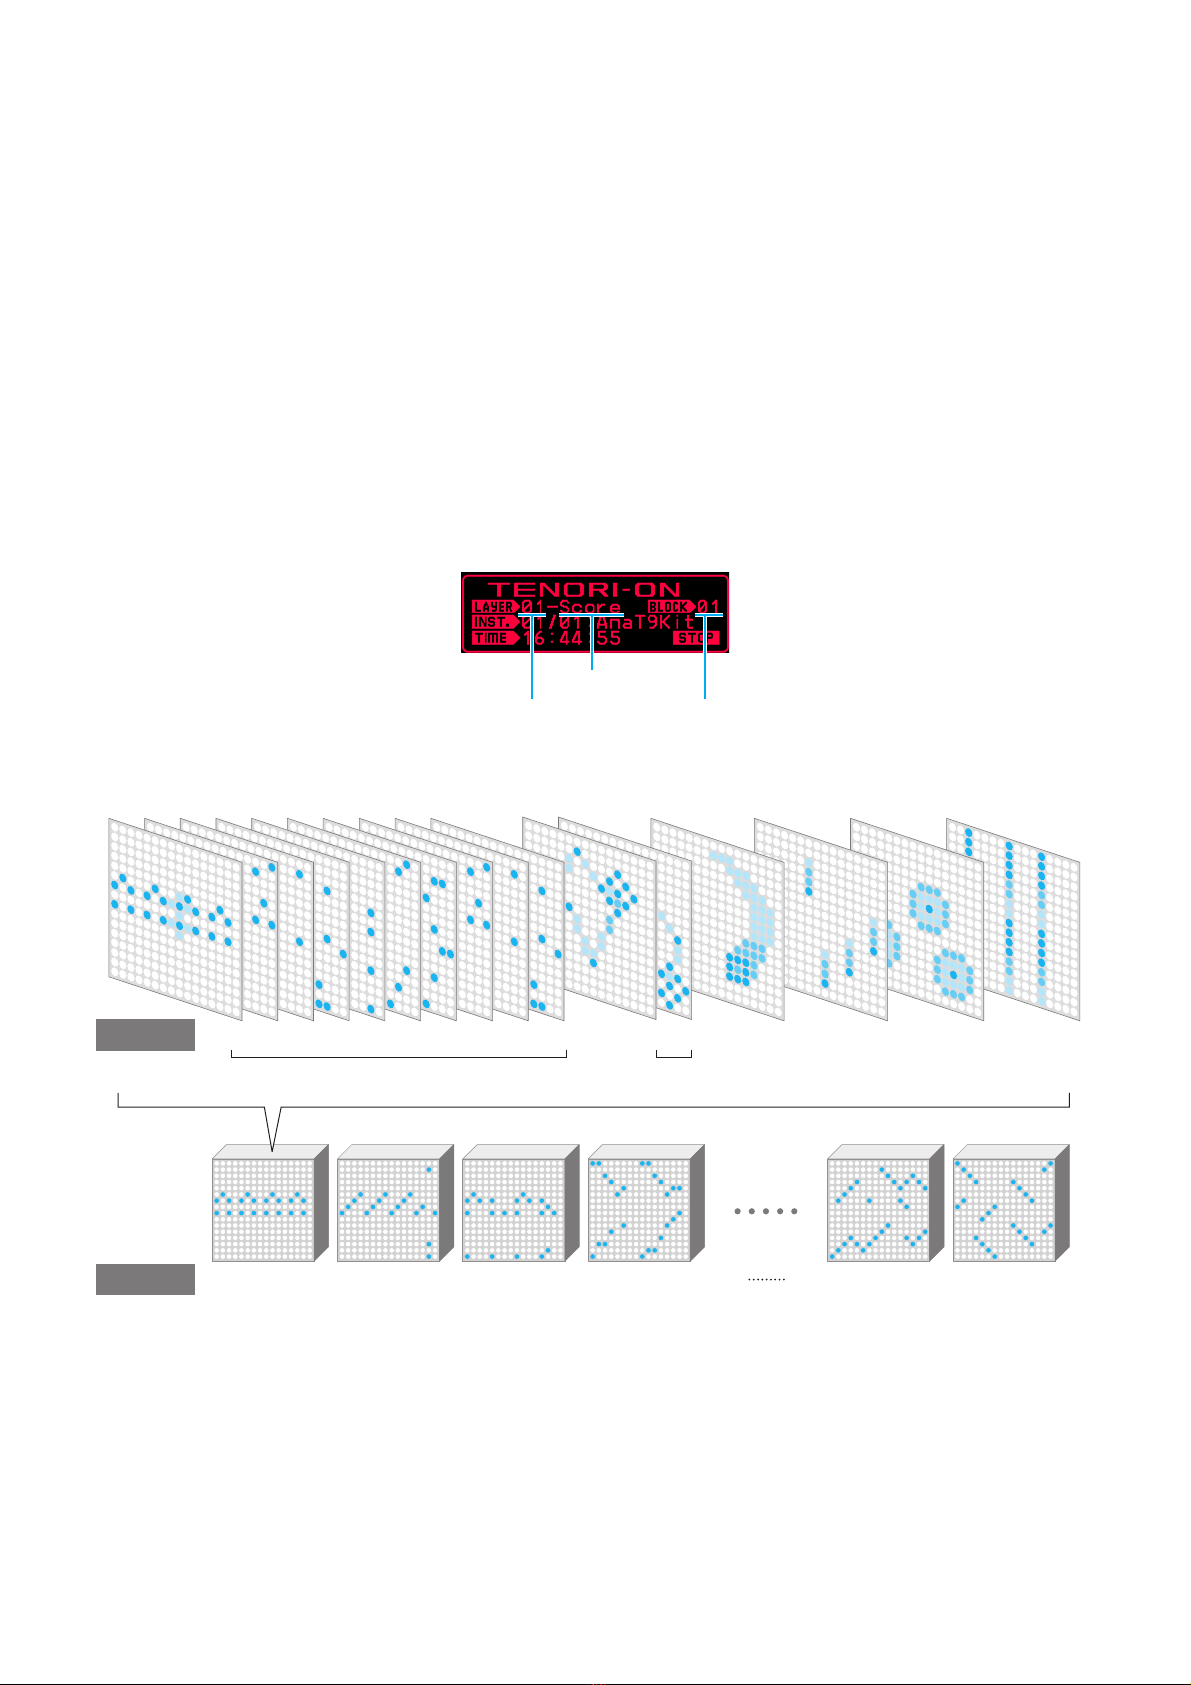
Layers and the Performance Modes . . . . . . . . . . . . . . . . . . . 8
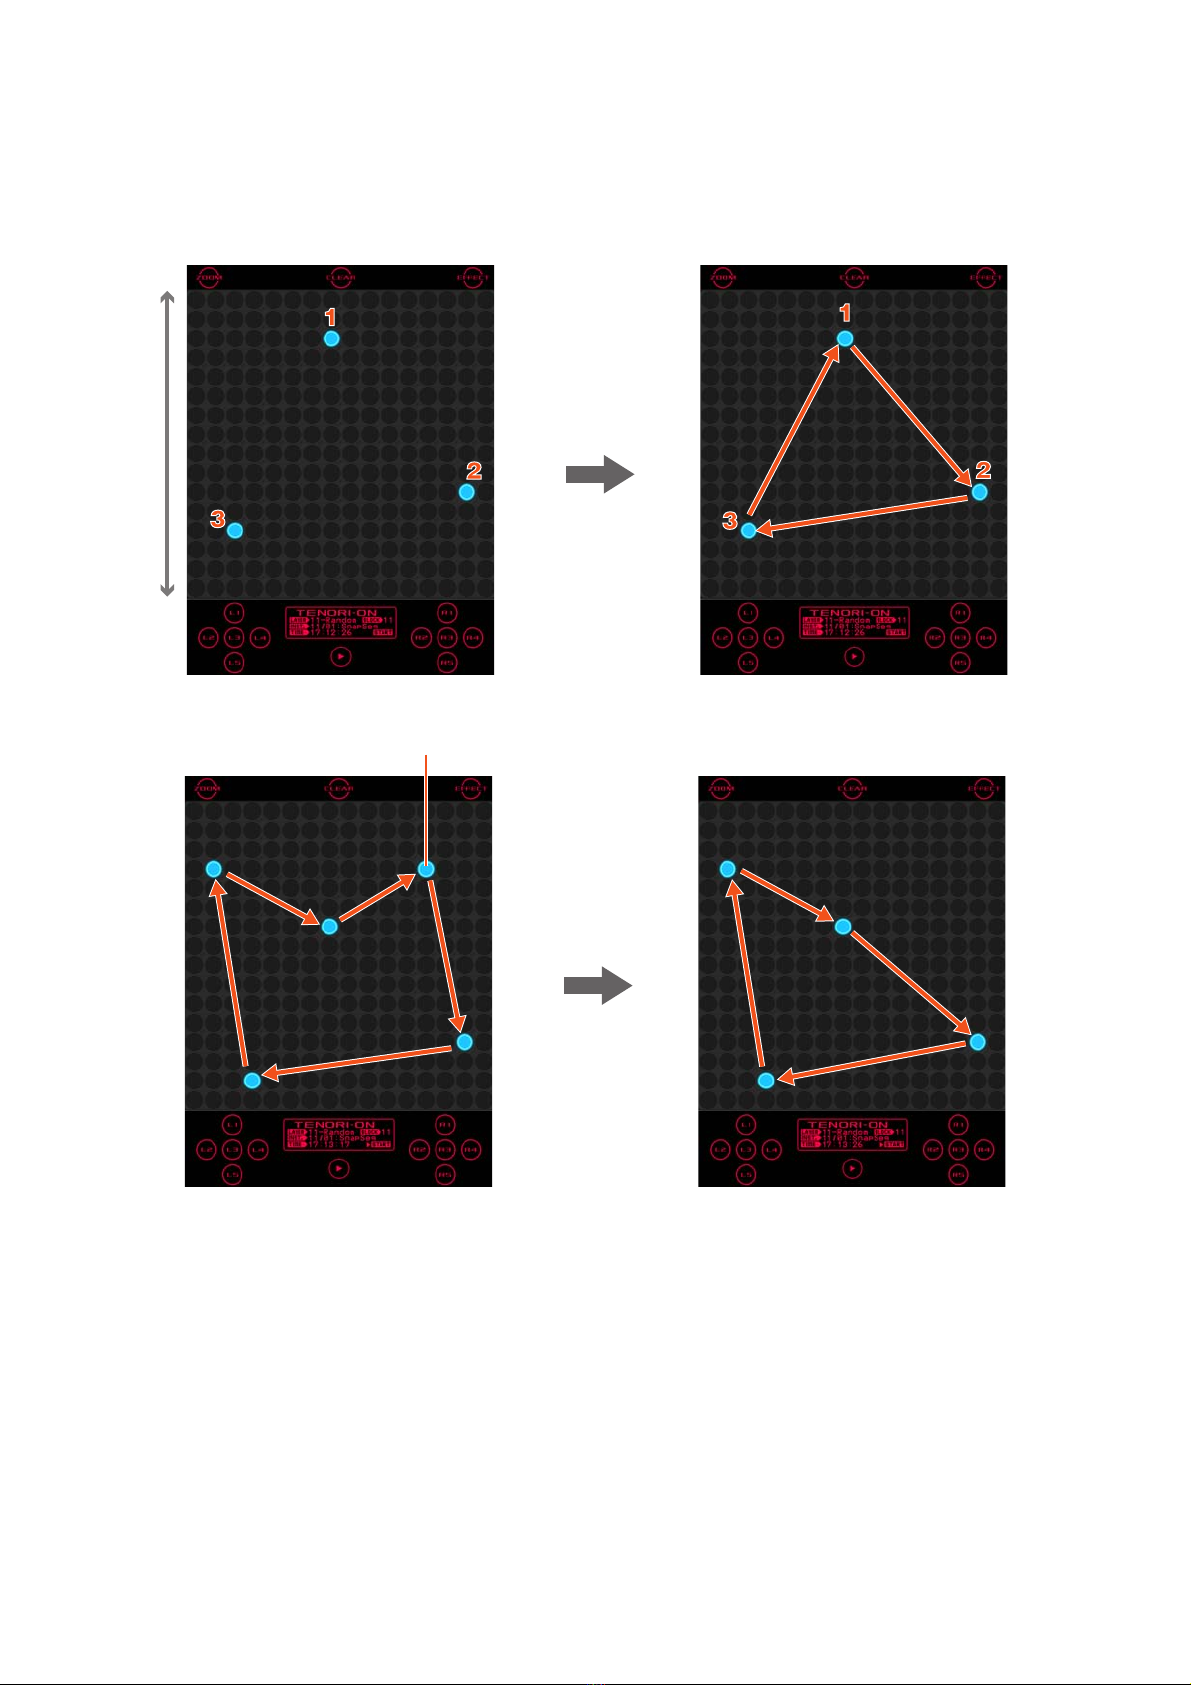
Random Mode Performance. . . . . . . . . . . . . . . . . . . . . . . . . 10
Draw Mode Performance. . . . . . . . . . . . . . . . . . . . . . . . . . . . 11
Bounce Mode Performance . . . . . . . . . . . . . . . . . . . . . . . . . 12
Push Mode Performance. . . . . . . . . . . . . . . . . . . . . . . . . . . . 12
Solo Mode Performance . . . . . . . . . . . . . . . . . . . . . . . . . . . . 13
Using Blocks . . . . . . . . . . . . . . . . . . . . . . . . . . . . . . . . . . . . . 14
Effect Control. . . . . . . . . . . . . . . . . . . . . . . . . . . . . . . . . . . . . 16
Using the Menu . . . . . . . . . . . . . . . . . . . . . . . . . . . . . . . . . . . 17
Menu List . . . . . . . . . . . . . . . . . . . . . . . . . . . . . . . . . . . . . . . . 18
Play Menu . . . . . . . . . . . . . . . . . . . . . . . . . . . . . . . . . . . . . . . . 18
Layer Menu . . . . . . . . . . . . . . . . . . . . . . . . . . . . . . . . . . . . . . . 19
Edit Menu. . . . . . . . . . . . . . . . . . . . . . . . . . . . . . . . . . . . . . . . . 20
Preference Menu . . . . . . . . . . . . . . . . . . . . . . . . . . . . . . . . . . . 20
File Menu . . . . . . . . . . . . . . . . . . . . . . . . . . . . . . . . . . . . . . . . . 22
Effect Menu . . . . . . . . . . . . . . . . . . . . . . . . . . . . . . . . . . . . . . . 24
Interior Menu . . . . . . . . . . . . . . . . . . . . . . . . . . . . . . . . . . . . . . 24
System Menu . . . . . . . . . . . . . . . . . . . . . . . . . . . . . . . . . . . . . . 24
Recording Menu. . . . . . . . . . . . . . . . . . . . . . . . . . . . . . . . . . . . 26
Session Menu . . . . . . . . . . . . . . . . . . . . . . . . . . . . . . . . . . . . . 27
iPhone/iPad <–> Computer (iTunes) File Transfer . . . . . . . 28
Multiplayer Session. . . . . . . . . . . . . . . . . . . . . . . . . . . . . . . . 28
Showing LED buttons in an external display . . . . . . . . . . . 29
• Copying of the commercially available music sequence data and/or digital audio files is strictly prohibited except for your personal use.
• The software and this owner’s manual are exclusive copyrights of Yamaha Corporation.
• Copying of the software or reproduction of this manual in whole or in part by any means is expressly forbidden without the written consent of
the manufacturer.
• Yamaha makes no representations or warranties with regard to the use of the software and documentation and cannot be held responsible for
the results of the use of this manual and the software.
• The screen displays as illustrated in this Owner’s Manual are for instructional purposes, and may appear somewhat different from the screens
which appear on your device.
• Apple, Mac and Macintosh, iPhone, iPad, iTunes are trademarks of Apple Inc., registered in the U.S. and other countries.
• The company names and product names in this Owner’s Manual are the trademarks or registered trademarks of their respective companies.
© 2013 Yamaha Corporation. All rights reserved.
TNR-e Quick Guide

Introduction
TNR-e Quick Guide 2
Introduction
TNR-e is an iPhone/iPad application for creating electronic music. It was developed by Yamaha based on both its popular
TENORI-ON device and the TNR-i iPhone/iPad application.
TNR-e has a wide variety of new, exciting sounds and functions specifically for use in electronic music, and lets you enjoy the
highly intuitive, “visible” musical world of the TENORI-ON on your iPhone/iPad.
This Quick Guide covers the basic operations of the TNR-e. If you want to know more detailed information about this application,
please read the TENORI-ON manual, available from the following URL.
http://www.global.yamaha.com/tenori-on/downloads/
Controls
[ZOOM] button
While holding the [ZOOM] button, you can execute the following display operations.
• To zoom in: With your thumb and index finger apart on the display, “pinch” them together.
• To zoom out: With your thumb and index finger together on the display, move them apart.
• To scroll: Run your finger laterally or horizontally on the display.
Double-tapping the [ZOOM] button is equivalent to holding it. Holding is canceled by tapping the button again.
[EFFECT] button
Tap this to call up the XY Pad window (page 16). In the window, you can control the Master Effect and modulate the sound in many dynamic
ways.
Tapping this button again while the XY Pad is displayed closes the window.
The “L” function buttons
[L1] button
[L2] button
[L3] button
[L4] button
[L5] button
[CLEAR] button LED buttons
Display
[START/STOP]
button
The “R” function buttons
[R1] button
[R2] button
[R3] button
[R4] button
[R5] button
[ZOOM] button [EFFECT] button

Basic Operation: Score Mode
TNR-e Quick Guide 3
Basic Operation: Score Mode
TNR-e “Modes”
The TNR-e 16 x 16 LED button matrix is simultaneously a performance
input controller and display. By operating and interacting with LED
buttons and the light they produce you gain access to the TNR-e’s
numerous performance capabilities.
The TNR-e provides six different performance and sound/light modes
for broad performance versatility, and these modes can be combined
and used simultaneously for rich, complex musical expression.
The Score Mode
The Score mode is the basic TNR-e performance mode. In this mode
the TNR-e interface functions like a musical “score” on which you can
write the notes to be played in one musical measure via the 16 x 16
LED button matrix. The time axis of the score proceeds from left to right
(the horizontal axis), beginning at the left edge of the matrix and then
looping back to the beginning once the right edge of the matrix is
reached. The vertical axis corresponds to the pitch of the notes played.
If more than one note is entered on the same vertical line, for example,
those notes will be played simultaneously as an interval or chord. The
maximum number of notes or intervals/chords that can be entered
horizontally is 16, but within that range the number and playback
speed can be set as required, allowing the creation of complex
groupings when multiple Score-Mode layers are combined.
Performance in the Score Mode
Tap an LED button to play the sound assigned to it. At the same time
the lights will flash outward from the played sound. If you hold the LED
button a bit longer it will remain lit and will become an active note that
will play repeatedly. Touch and hold an active note to de-activate it.
The loop indicator will be continuously cycling from the left to right
edge of the LED button matrix. Active notes will play when the loop
indicator coincides with their positions on the matrix.
Tap the [CLEAR] button to de-activate all active notes of the current layer.
D
C
B
A
G
F
E
D
C
B
A
G
F
E
D
C
Time
Pitch
High
Low
Loop indicator Active note
Loop indicator
Active notes will play and flash when
the loop indicator passes over them.
The six modes
•Scoremode
• Random mode
• Draw mode
• Bounce mode
• Push mode
•Solomode

Basic Operation: Score Mode
TNR-e Quick Guide 4
Touch and hold
[R4] button
Drag the dial
Layer volume
Master volume
Increase volume
Decrease volume
Master Volume Adjustment
To adjust the overall volume of the TNR-e, drag the jog dial while
holding the [R4] function button. The volume setting will appear in the
Display.
Pausing Loop Playback
Tap the [START/STOP] while the highlighted “STOP” indicator in the
lower right corner of the Display is shown to temporarily pause loop
playback.
The loop indicator will stop at the position at which the [START/STOP]
is tapped, and the highlighted “STOP” indicator will change to
“START.” Tap the [START/STOP] a second time and loop playback will
resume from the point at which it was paused.
[START/STOP] button
Current loop indicator

Function Buttons
TNR-e Quick Guide 5
Function Buttons
Functions
By holding one of the ten function buttons of the TNR-e and operating
the LED buttons you can change voices, change octaves, and apply a
variety of effects and variations to your performance.
This unique visual/tactile interface has been specifically designed to
allow intuitive, instantaneous operation of a variety of functions.
Double-tapping the Function button is equivalent to holding it.
[L1] + LED buttons Changing Voices
You can select any voice from the 256 voices available in one quick
operation. When you touch and hold the [L1] button, vertical and
horizontal lines will light on the matrix, and the button at their
intersection corresponds to the currently selected voice. If you tap a
different LED button while these crossed lines are showing the
intersection will move to that button and the corresponding voice will
be selected.
The Voice number and name will appear in the Display. The Voice number
corresponds to the vertical and horizontal button numbers.
TNR-e has 253 Preset Voices and 3 User Voices.
[L2] + LED buttons Changing Note Length
Sets the length of the notes from the time they are triggered to the time
they decay to silence (the gate time).
While holding the [L2] button, slide your finger horizontally over the
matrix to move the lit vertical line to the desired setting. Moving the line
to the right increases the note length.
Not available in the Push Mode.
The “L” function buttons The “R” function buttons
Touching the [L1] – [L5] or [R1] – [R5] function
buttons will call up the jog dial. You can use this jog
dial to set the value of the current function.
07/13
16/1616/01
01/1601/01
16
15
14
13
12
11
10
09
08
07
06
05
04
03
02
01
01 02 03 04 05 06 07 08 09 10 11 12 13 14 15 16
Matrix with voice number 07/13 selected.
Voice number (vertical/horizontal position)
Voice name
LongerShorter

Function Buttons
TNR-e Quick Guide 6
[L3] + LED buttons Changing Octaves
Sets the playback pitch in octave increments.
While holding the [L3] button, slide your finger vertically over the matrix
to move the lit horizontal line to the desired octave.
[L4] + LED buttons Changing Loop Points
Sets the loop playback range in the Score Mode.
While holding the [L4] button, slide your finger horizontally over upper
half of the matrix to move the loop start point indicator to the desired
point, and slide your finger horizontally over lower half of the matrix to
move the loop end point indicator to the desired point, as required.
In the Random Mode this function sets the rotation direction and speed.
Not available in the Draw, Bounce, Push and Solo Modes.
[L5] + LED buttons Changing Loop Speed
Sets the loop playback speed (the duration of the beats).
Four settings are available, set via the leftmost four columns on the
matrix: quarter notes, eighth notes, sixteenth notes, and thirty-second
notes.
While holding the [L5] button, tap a button in the corresponding
column.
Not available in the Push Mode.
[R1] + LED buttons Switching Layers
Switches to a different layer.
While holding the [R1] button, slide your finger vertically over the matrix
to move the lit horizontal line to the desired layer.
Moving the line to the lowest row selects layer 01, the next row up is
layer 02, then layer 03, and so on up to layer 16.
+5
-5
16
01
Layer

Function Buttons
TNR-e Quick Guide 7
[R2] + LED buttons Changing Tempo
Sets the playback tempo (BPM).
While holding the [R2] button, slide your finger horizontally over the
matrix to move the lit vertical line to the desired tempo setting. Moving
the line to the right produces faster tempos.
[R3] + LED buttons Transposition
Adjusts the playback pitch in semitone increments.
While holding the [R3] button, slide your finger vertically over the matrix
to move the lit horizontal line to the desired pitch.
[R4] + LED buttons
Changing the Layer Volume
Displays the individual volume settings of all 16 layers, and allows the
volume of each layer to be adjusted as required to create the ideal
“mix” between layers.
Each row of LED buttons corresponds to a layer, beginning with layer
01 at the bottom row.
While holding the [R4] button, slide your finger horizontally over the row
corresponding to the layer you want to adjust to set the volume as
required. Each LED button row corresponds to a layer (01 – 16 from
bottom to top), and the horizontal axis corresponds to volume level
with volume increasing towards the right (the leftmost setting
corresponds to “0” volume).
You can also use the jog dial to set the overall (Master) volume (the Master
volume setting will appear in the Display).
[R5] + LED buttons Switching Blocks
Switches to a different block.
While holding the [R5] button, slide your finger horizontally over the
matrix to move the lit vertical line to the desired block.
Moving the line to the leftmost column selects block 01, the next
column to the right is block 02, then block 03, and so on up to block
16.
You can copy the contents of the current block to another block.
FasterSlower
+8
-7
Higher
Lower
16
01
Layer
Higher
volume
Lower
volume
16
01
Block

Layers and the Performance Modes
TNR-e Quick Guide 8
Layers and the Performance Modes
Layers
TNR-e layers can be thought of as “performance parts” or “recording tracks.” The TNR-e has a total of 16 layers.
Separate notes and voices can be assigned to each layer, and all layers can be played together in synchronization.
The 16 layers are divided into six performance mode groups as shown in the illustration below. The six modes have different
note entry methods and operation. Up to 16 layers created using different modes can be combined for rich, complex musical
expression.
Blocks
One complete set of 16 layers is called a “block.” The TNR-e can store up to 16 programmed blocks (16-layer groups) in
memory, and you can switch from block to block instantly during performance.
You could, for example, create a musical composition in one block, then copy that composition to another block and edit it to
create a variation of the original composition. Or you can load a number of previously-created compositions into separate blocks
and switch between them to create variation during playback.
When you switch between layers or blocks, the current layer number, performance mode, and block number will appear in the Display.
Tap the [CLEAR] button to clear all active notes from all layers and blocks.
Layer number
Performance mode
Block number
01 02 03 04
05 06 070201 03 04 08 09 10 11 12 13 14 15 16
15 16
Layers
Blocks
Performance mode: Score mode Random
mode
Draw
mode
Bounce
mode
Push
mode
Solo
mode

Layers and the Performance Modes
TNR-e Quick Guide 9
In the initial state, the six performance modes are assigned to the 16 layers as shown in the illustration below.
For example, if you tap any LED button in the eighth row from the bottom (any button in this row will do) while holding the [R1]
function button as shown in the illustration, you will select the first Random mode layer.
16
15
14
13
12
11
10
09
08
07
06
05
04
03
02
01
Layer number Performance mode
Solo mode
Push mode
Bounce mode
Draw mode
Random mode
Score mode
Layer number
Performance mode

Random Mode Performance
TNR-e Quick Guide 10
Random Mode Performance
If you touch an LED button long enough to enter an active note in the Random mode, the active note will play back repeatedly. If
you then enter a few more active notes, the lights will “travel” from note to note, in the order entered, and the active notes will
sound when the traveling light passes over them. The Random mode thus produces a totally different type of loop from the
Score mode.
Pitch
Higher
Lower
Active notes can be individually deactivated by
touching and holding the corresponding LED button.

Draw Mode Performance
TNR-e Quick Guide 11
You can even spin loop-shapes you create in the Random mode by holding the [L4] button and running a finger around the
matrix in the direction and at the speed of the desired spin. The pitches of the notes will change accordingly as the shape spins,
producing loop sound effects. To stop rotation, touch and hold the LED button or double-tap the LED button while holding the
[L4] button.
Draw Mode Performance
In this mode you can tap individual LED buttons or draw lines or curves on the matrix, and those actions will be played back and
repeated. You can keep adding to your “composition” during playback to build up thick sonic textures.
In the Draw mode you cannot clear only a part of the performance. The entire layer can be cleared by tapping the [CLEAR]
button.
Holding the [L4] button

Bounce Mode Performance (Layer 14) / Push Mode Performance (Layer 15)
TNR-e Quick Guide 12
Bounce Mode Performance
Tap an LED button and the light will “drop” from that button, bounce back from the bottom of the matrix, and repeat. The
corresponding note will sound when the light bounces at the bottom row. The higher the entry point, the longer the interval
between the sound. In the Bounce mode the pitches are arranged horizontally, like a piano, with the lowest pitch on the left and
the highest on the right.
Bouncing can be individually stopped in any column by simply tapping the lowest LED button in that column.
Push Mode Performance
In this mode if you touch and hold an LED button the sound of the corresponding note will begin to change gradually while the
flashing surrounding that button gets brighter and wider. If the button is held briefly the note and flashing will stop when you
release it, but if you hold the button for longer the note and flashing will continue even after the button is released.
Pitch
Stop a note by tapping
the central LED button.

Solo Mode Performance
TNR-e Quick Guide 13
Solo Mode Performance
Touch an LED button and the corresponding note will repeat until the button is released. In the Solo mode the pitches are
arranged horizontally, like a piano. You can change the interval between repeats by touching or sliding your finger to a lower
(longer) or higher (shorter) LED button in the column. If you touch the lowest LED button in a column the note will sound once
without any repeats.
If you turn the Quantize function ON, note timing in the Solo Mode will be synchronized to the Score Mode, making it easy to
play solos with rhythm matching that of a background playing in the Score Mode layers. Refer to “Quantize” in the TENORI-ON
Manual.
Pitch

Using Blocks
TNR-e Quick Guide 14
Using Blocks
Some Ideas for Using Blocks
You can leave the current composition in memory while copying it to other blocks where it can be edited to create variations that
you can switch between at any time. You could also create totally different compositions in different blocks, and then switch
between them in real time for interesting, varied performances.
Switching Between Blocks
You can switch between blocks simply by holding the [R5] function button and tapping an LED button in the column
corresponding to the block you want to switch to.
16
01
01 02 03 04 15 16
Blocks
Block
Holding the
[R5] button

Using Blocks
TNR-e Quick Guide 15
Copying from Block to Block
You can copy either a single layer to a different block, or all layers from the current block to another block.
• Copying via the LED Buttons
1. Select the layer or block you want to copy.
2. Touch and hold the [R5] function button. The currently playing block will be displayed.
To Copy a Single Layer:
While still holding the [R5] button, tap the lowest LED button in the lit column (the LEDs in the column will shine brighter), and
then tap an LED button in the column corresponding to the block you want to copy to. The current layer from the source block
will be copied to the same layer in the destination block.
To Copy All Layers:
While still holding the [R5] button, tap the lowest LED button in the lit column twice (the LEDs in the column will shine brighter
each time the button is tapped), and then touch an LED button in the column corresponding to the block you want to copy to. All
layers from the source block will be copied to the destination block.
Tap the lowest LED button in the lit column
Only the selected layer is copied.
Double-tap the lowest LED button in the lit column
All layers are copied (the entire block).
Holding the [R5] button Holding the [R5] button
Tap an LED
button in the
column
corresponding
to the block you
want to copy to.

Effect Control
TNR-e Quick Guide 16
Effect Control
Tapping the [EFFECT] button calls up the Effect control display.
Touch or drag the XY Pad to turn the active Effect on.
The correspondence between each Effect type’s parameter and the location on the XY Pad is shown below.
Touching two points on the XY Pad (for example, with the index fingers on your left and right hands) cycles continuously
between the two values/parameters.
The speed of the cycle can be specified by the [MOTION] button.
When the lock switch is set to on, the effect continues even after you release your fingers from the display; when the lock switch
is set to off, the effect stops when you release your fingers.
[MOTION] button
Lock switch
XY Pad
Tap this to activate the Master Effect.
Tapping both the left and right buttons at the
same time activates the two Master Effects
simultaneously.
Sliding the button calls up the Effect list and
lets you select the Master Effect type.
Cutoff
High Pass
Filter
LowPass
Filter
Resonance
Decimation
Dry/Wet
C.Freq, M.Ratio, M.Index, LPF Freq
OSC.Vol, LPF Resonance
LFO Freq
Dry/Wet
Delay Time
8th 16th 64th
128th
32nd
Feedback
Loop Length
2nd 8th
64th16th4th
Low
Solo
Mid
Solo
High
Solo
Low
Mute
Mid
Mute
High
Mute
32nd
Dry/Wet
FILTER DECIMATOR DELAY
NOISE LOOPER ISOLATOR
FLANGER
128th

Using the Menu
TNR-e Quick Guide 17
Using the Menu
About the Menu
In addition to the wide range of control available via the function and LED buttons, a number of detailed settings can be made
via the TNR-e menu, including tempo, clock display, file save/load and many more.
Basic Menu Operation
1. Tap the Display section at the bottom to call up the Top Menu.
2. Tap the desired menu item to call up the corresponding menu.
From the Menu display, you can execute the desired function or edit the desired parameter value. To exit from the Menu display,
tap [Done] or any section outside the menu area.

Menu List
TNR-e Quick Guide 18
Menu List
Regarding menu items marked with an asterisk (*), refer to the TENORI-ON Manual PDF at the following URL.
http://www.global.yamaha.com/tenori-on/downloads/
Play Menu
Parameters that apply to all layers and blocks.
Master Tempo* Sets the master tempo.
Master Scale* Sets the master scale.
The “Major Pentatonic” and “User” scales are provided in the TNR-e, in addition to the scales of the
hardware TENORI-ON.
Master Transpose* Sets the transposition.
Master Loop Speed* Sets the loop speed (beat duration) for all layers.
Master Loop Point* Sets the loop range for all layers.
Reset Loop Timing Resets the playback position to the beginning of the loop.
You can reset loop timing by holding the [L4] and tap the [R1] .
Mute Mutes sound output.
You can control Mute on/off by holding the [R4] and tap the [L1] .
Swing Rate Sets the “swing” feel.
Produces a “swing” feel by shifting the timing of the back beats. The smaller the rate, the shorter the
repeat interval with the previous LED button. A setting of “0” produces no swing.
This function applies to Score mode layers only.
When using a swing feel, changing the loop's point and speed, and inputting the performance
data into layers other than Score mode, etc., may shift the timing between layers.
Range ..................-23 – 0 – +23
Default ................0
LED buttons.........No display
Color Sets the color of the active note LED.
Range ..................White, Blue, Purple, Pink, Red, Orange, Green, Blue Green
Function Color Sets the color of the function LED.
You can select the LED color which is shown when the function button [L1] – [R5] is touched.
Range ..................White, Blue, Purple, Pink, Red, Orange, Green, Blue Green
Indicator Color Sets the color of the loop indicator.
Range ..................White, Blue, Purple, Pink, Red, Orange, Green, Blue Green
Brightness Adjusts the brightness of the LED buttons
Move the slider rightward to increase brightness and leftward to lower it.

Menu List
TNR-e Quick Guide 19
Layer Menu
Parameters that apply to the currently selected layer.
Sound Select Selects internal sound of TNR-e (Internal) or external sound of Inter-App Audio application
(Instrument App).
Instrument* Selects the Voice.
When Sound Select is set to ‘Internal.’
Tap the “Instrument” in the menu to call up the
Voice list. Scroll through the list by dragging,
then select the desired Voice by tapping.
User Voices are assigned to [01/16], [02/16],
[03/16] on the Voice map.
When Sound Select is set to ‘Instrument
App.’
The display shows the [i] button and the name
of selected Instrument App. When Instrument
App is not selected, ‘Not assigned’ is shown
instead of the name. Tapping the name or ‘Not
assigned’ calls up the Instrument App list
where you can select your favorite Instrument
App. Tapping the [i] button calls up the editor
window of the selected Instrument App.
Volume* Sets the layer volume.
Loop Speed* Sets the loop speed.
Sound Length* Sets the gate time.
Panpot* Sets the stereo position of the sound.
Animation* Specifies the light animation.
Animation Direction Specifies the light animation.
Sets the motion direction of the light animation to “Expand” or “Shrink.”
Play Mode Specifies the performance mode of the layer.
Range ..................Score, Random, Draw, Bounce, Push, Solo
Voice map

Menu List
TNR-e Quick Guide 20
Edit Menu
Data edit functions such as copy, clear, and reset.
After executing the Edit function, the button indication will change to [Undo]. If you tap [Undo], you can undo the last executed function.
[Undo] itself will be canceled when you execute any of the following operations.
• Executing another function in the Edit Menu.
• Closing the Menu.
• Exiting from the Edit Menu.
• Keeping [Undo] active without conducting any operations for longer than fifteen seconds.
Preference Menu
Initial settings that apply to the entire instrument.
Copy this Block* Copies the current block to another one.
Tap this menu item to call up the corresponding display. Set the destination block number then tap
[Copy] to execute this function.
Clear this Block* Clears the active notes for the current blocks.
Tap [Clear] in the Menu to execute the function.
Copy this Layer* Copies the layer.
Tap this menu item to call up the corresponding display. Set the destination Block number and Layer
number, then tap [Copy] to execute this function.
Clear this Layer* Clears the active notes for the current layer.
Tap [Clear] in the Menu to execute the function.
Clear All Blocks* Clears the active notes from all blocks (all layers).
Tap [Clear] in the Menu to execute the function.
Reset All Blocks* Resets all blocks (all layers).
Tap [Reset] in the Menu to execute the function.
Quantize* Synchronizes Solo mode note timing with the Score mode.
Push Sensitivity* Sets LED-button touch time for note activation.
Master Tuning* Master tuning for the internal voices (MIDI tone generator).
Local Control* Turns internal tone generator output ON or OFF.
Synchronize* Synchronizes multiple instruments.
Loop Indicator* Displays or hides the loop indicator.
User Scale Setting Note Allows you to create your own scale.
Assigns a note name (such as C#3, A5, etc.) to
each of the 16 scale note numbers.
Use the created scale by selecting the User by
“Main Menu” > “Play Menu” > “Master Scale.”
Scale note number Note name
The selected scale note number is represented
as the vertical axis of LED buttons on the Score/
Random/Draw mode and the horizontal axis of
LED buttons on the Bounce/Push/Solo mode.
Table of contents
Other Yamaha Synthesizer manuals

Yamaha
Yamaha CS2x Instruction Manual

Yamaha
Yamaha MM6 Setup guide

Yamaha
Yamaha SY-2 User manual

Yamaha
Yamaha Electone HS User manual

Yamaha
Yamaha CS15D User manual

Yamaha
Yamaha B200 User manual

Yamaha
Yamaha S03 voice editor User manual

Yamaha
Yamaha MOX8 User manual

Yamaha
Yamaha MX61 User manual

Yamaha
Yamaha MX61 User manual

Yamaha
Yamaha DX27 User manual

Yamaha
Yamaha PF-1000 User manual

Yamaha
Yamaha CS-70M User manual

Yamaha
Yamaha PortaTone PSR-260 User manual

Yamaha
Yamaha S90 User manual

Yamaha
Yamaha PortaTone PSR-41 User manual

Yamaha
Yamaha DX7s User manual

Yamaha
Yamaha YFP-70 User manual

Yamaha
Yamaha VP1 Quick start guide

Yamaha
Yamaha PF-15 User manual