manuals.online logo
Brands
  1. Home
  2. •
  3. Brands
  4. •
  5. Yoshimura
  6. •
  7. Bicycle Accessories
  8. •
  9. Yoshimura 070BG118010 User manual

Yoshimura 070BG118010 User manual

Other Yoshimura Bicycle Accessories manuals

Yoshimura 070BG126501 User manual

Yoshimura

Yoshimura 070BG126501 User manual

Yoshimura DH35-45-PW User manual

Yoshimura

Yoshimura DH35-45-PW User manual

Popular Bicycle Accessories manuals by other brands

Galeo Galeo user guide

Galeo

Galeo Galeo user guide

Shimano DURA-ACE FC-R9100 Dealer's manual

Shimano

Shimano DURA-ACE FC-R9100 Dealer's manual

BAFANG BT C01.340.UART Customer's manual

BAFANG

BAFANG BT C01.340.UART Customer's manual

Minshine T154 Series manual

Minshine

Minshine T154 Series manual

Cateye TRIPLE SHOT PRO HL-EL830RC instruction manual

Cateye

Cateye TRIPLE SHOT PRO HL-EL830RC instruction manual

Navad Trail 200 Quick manual guide

Navad

Navad Trail 200 Quick manual guide

Specialized Elite CylcoComputer user manual

Specialized

Specialized Elite CylcoComputer user manual

Sigma BC 16.16 manual

Sigma

Sigma BC 16.16 manual

Playcore Dero Setbacks installation instructions

Playcore

Playcore Dero Setbacks installation instructions

VDO Cyclecomputing x3dw instruction manual

VDO Cyclecomputing

VDO Cyclecomputing x3dw instruction manual

Cateye RAPID X2 manual

Cateye

Cateye RAPID X2 manual

buratti meccanica Clorofilla Trail Use and maintenance manual

buratti meccanica

buratti meccanica Clorofilla Trail Use and maintenance manual

Shimano SG-8R20 Service instructions

Shimano

Shimano SG-8R20 Service instructions

BOB YAK owner's manual

BOB

BOB YAK owner's manual

APLIC 303303/20190717TW012 user manual

APLIC

APLIC 303303/20190717TW012 user manual

Polini HI-SPEED E-BIKE quick start guide

Polini

Polini HI-SPEED E-BIKE quick start guide

SRAM AXS BlipBox user manual

SRAM

SRAM AXS BlipBox user manual

Shimano FD-RX810 Dealer's manual

Shimano

Shimano FD-RX810 Dealer's manual

manuals.online logo
manuals.online logoBrands
  • About & Mission
  • Contact us
  • Privacy Policy
  • Terms and Conditions

Copyright 2025 Manuals.Online. All Rights Reserved.

RESEARCH&DEVELOPMENT OF AMERICA, INC.
www.yoshimura-rd.com
FENDER ELIMINATOR KIT
070BG118010
Suzuki GSX-S750
5420 DANIELS STREET STE A, CHINO CA., 91710 · (800) 634-9166 · (909) 628-4722 · FAX (909) 591-2198
THIS PRODUCT IS NOT DOT APPROVED.
Yoshimura R&D of America, Inc. is not liable or responsible for any resulting event caused by the
installation of this product. Check with local laws and regulations for compliance prior to
installation and use. This product is not intended for use on public highways.
! !
2
*** The Yoshimura Universal Turn Signal Bracket Kit is to be used with aftermarket stud-mounted turn signals and is sold separately.
No. Item Description Qty.
1 11801-FEBKT-A Fender Eliminator Bracket 1
2 11801-FEBKT-B Fender Eliminator Bracket Spacer 1
3 070BG-LH-K LED License Plate Light 1
4 070BG-LPF License Plate Frame 1
5 11100-TSB-L Left Turn Signal Bracket 1
6 11100-TSB-R Right Turn Signal Bracket 1
7 M4X6BHS 4mm X 6mm Button Head Screw 2
8 M6X14BHS 6mm X 14mm Button Head Screw 2
9 M6X16BHS 6mm X 16mm Button Head Screw 2
10 6MMWASHER 6mm Washer 4
11 6MMLN 6mm Nylon Lock Nut 4
** 94785-01-ND Butt Connectors 2
** 17029 Yoshimura Sticker Kit 1
*** 070BGUNVTBKT
Optional Parts
Universal Turn Signal Bracket Kit
Assembly Diagram
1
2
3
4
5
6
7
8
9
10
11
1. Remove passenger seat.
2. Remove left and right rear seat covers.
3. Remove rear upper cowl to access license plate
light and turn signal connectors.
4. Locate and disconnect license plate light and
turn signal connectors.
5. While securely supporting the stock fender
assembly, remove the four bolts securing the
fender assembly to the frame. Carefully remove
the stock fender assembly making sure not to
damage the connectors in the process.
6. Disassemble the stock fender assembly and
remove the left and right turn signals.
7. Cut the stock license plate light connector from
the stock fender assembly. Be sure to cut at
least a 6” section of wire from the connector.
Removal
Installation
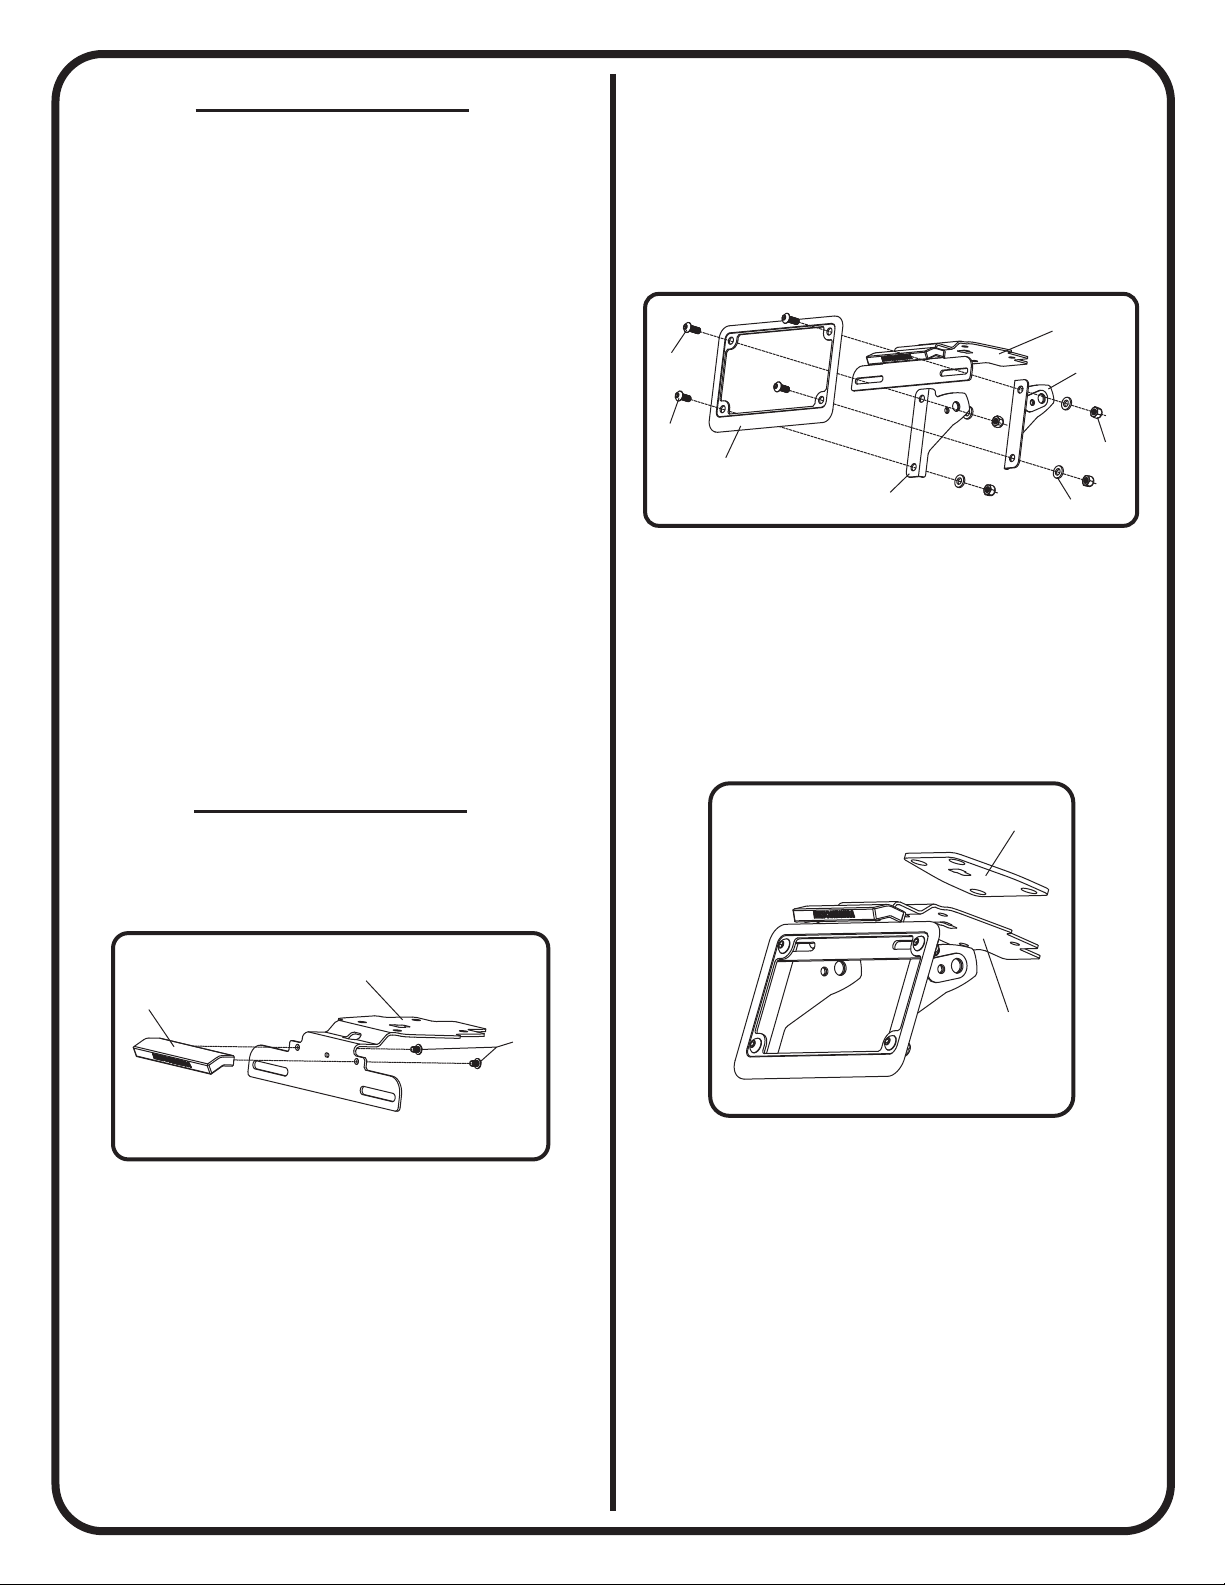
1. Install (No. 3) 070BG-LH-K, Yoshimura license
plate light onto (No. 1) 11801-FEBKT-A,
Yoshimura fender eliminator bracket using
(No. 7) M4X6BHS, 4mm button head screws.
2. Using the 94785-01-ND butt connectors
supplied in the kit, connect the Yoshimura
license plate light wires to the stock license
plate light wires as follows:
Red -to- Brown
Black -to- Black/White
3. Using the stock hardware, install left and right
turn signals onto (No. 5,6) 11100-TSB-L/R,
left and right turn signal brackets.
4. Assemble and install (No. 4) 070BP-LPF,
license plate frame and (No. 5,6) 11100-TSB-
L/R, turn signal brackets to (No. 1) 11801-
FEBKT-A, fender eliminator bracket using
(No. 8,9) M6X14BHS & M6X16BHS,
6mm screws, (No. 10) 6MMWASHER,
6mm washer and (No. 11) 6MMLN, 6mm nylon
lock nut as shown.
5. Route license plate light and turn signal wires
through the hole in (No. 1) 11801-FEBKT-A,
fender eliminator bracket and (No. 2) 11801-
FEBKT-B, fender eliminator bracket spacer and
through undertail. Install the stock fender bolts
from the bottom and secure (No. 1,2) 11801-
FEBKT-A & 11801-FEBKT-B, assembled
fender eliminator to frame. Torque bolts to
factory specification.
6. Route wires in stock location and re-connect
license plate light and turn signal connectors.
7. Re-install rear upper cowl and the left and right
rear seat covers.
8. Re-install passenger seat.
9. Check for proper function of license plate light,
turn signals, brake light, and that all brackets
and components are secure prior to riding.
3
7
10
1
3
8
6
2
4
1
5
9
11
1