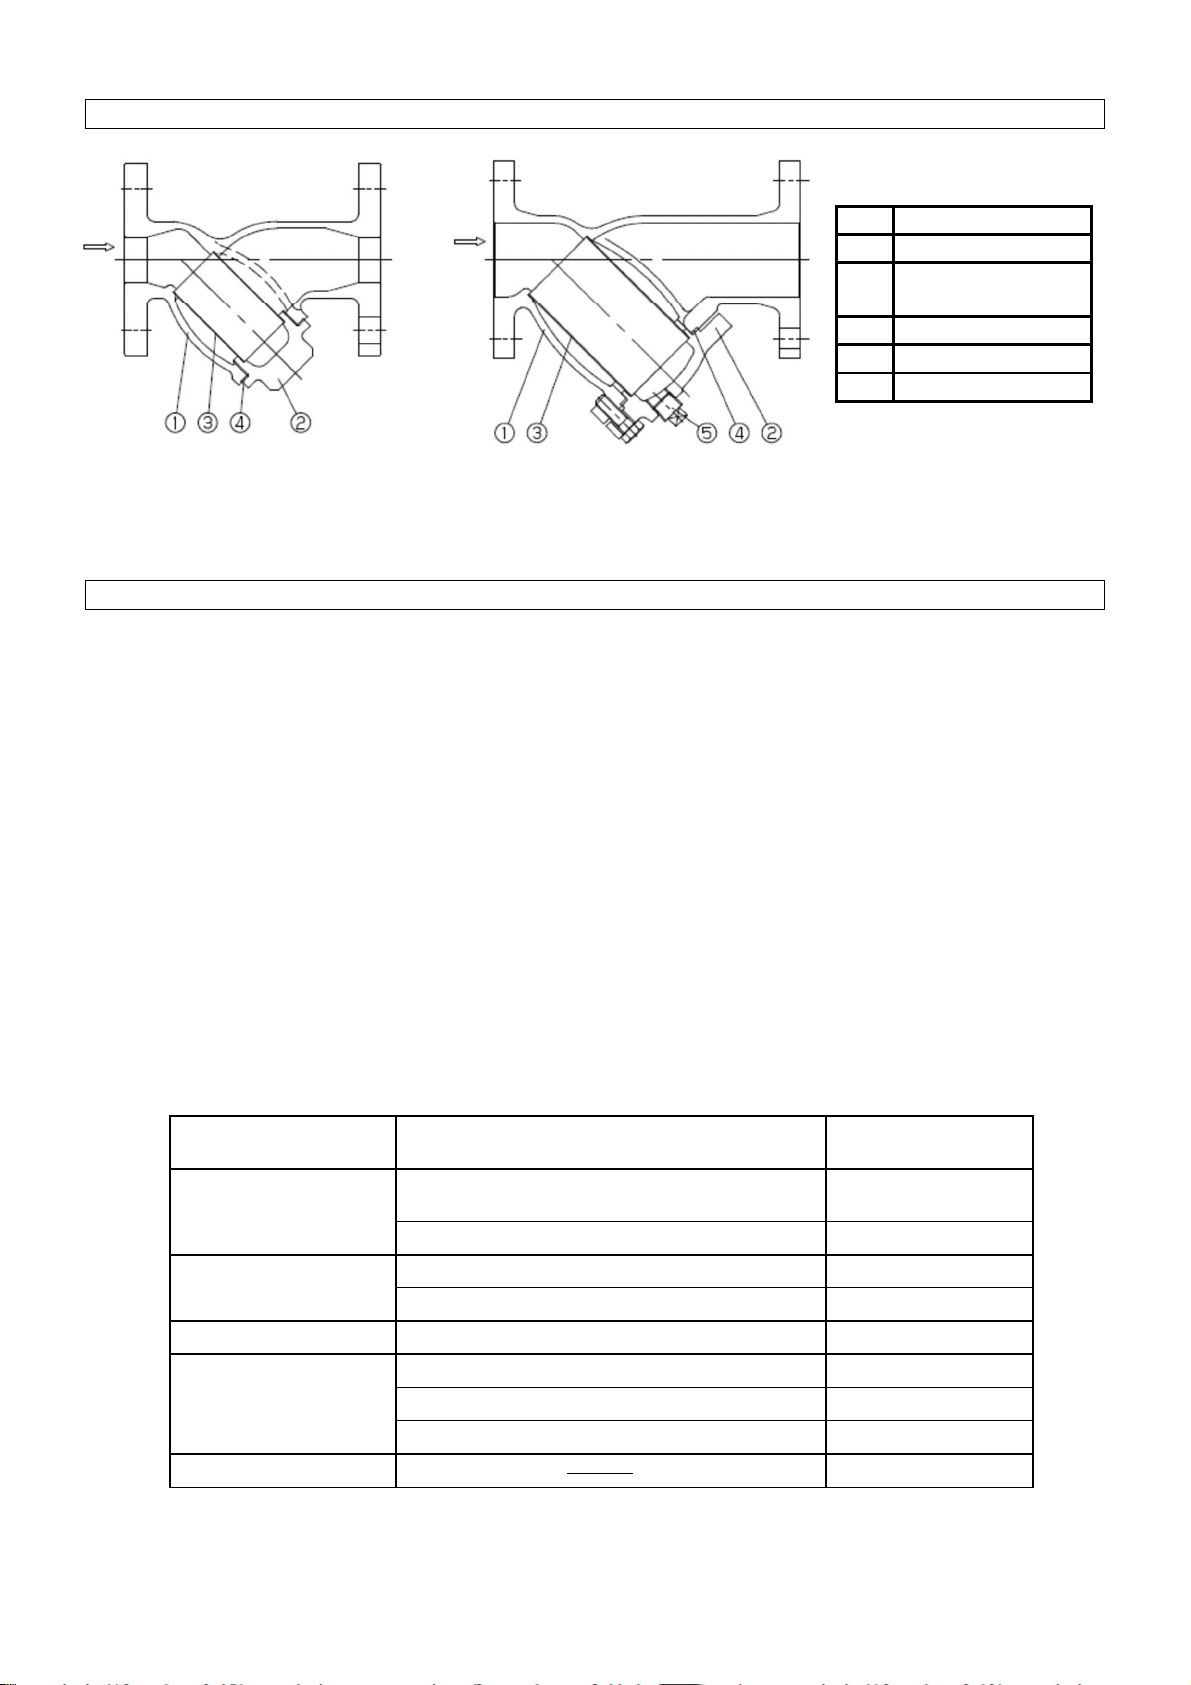
Yoshitake SY-8 User manual

■ EP D T -0 4 8 ■
MODEL SY-8
STRAINER
PRODUCT MANUAL
.
Thank you very much for choosing the Yoshitake’s product. To ensure the correct and safe use of the product,
please read this manual before use. This manual shall be kept with care for future references.
The symbols used in this manual have the following meanings.
Warning
This symbol indicates a potentially hazardous situation that, if not avoided,
could result in death or serious injury.
Caution
This symbol indicates a hazardous situation that, if not avoided, may result in
minor or moderate injury or may result in only property damage.
Table of Contents
1. Specifications··························································· 1
2. Dimensions······························································ 1
3. Operation ································································ 2
4. Nominal Size Selection
4.1 Selection of nominal size········································ 2
4.2 Selection of nominal pipe size ································· 2
4.3 Pressure Loss Chart ············································· 3
5. Maintenance
5.1 Precaution for installation ······································· 4
5.2 Precaution for operation········································· 4
6. Disassembly, Cleaning and Reassembly
6.1 Precaution for disassembly and inspection ················· 5
6.2 Precaution for reassembly ······································ 5
7. Piping Example························································· 5
Warranty Information

1
■ EP D T-0 4 8 ■
1
. Specifications
Application Steam, Air, Cold and hot water, Other non-dangerous fluids
Max. pressure 1.0 MPa
Max. temperature 150 °C (250 °C ) *
Material
Body Cast stainless steel
Screen Stainless steel
Gasket PTFE *
Screen Perforations
15A to 100A = φ2.5 - 7.21 holes/cm
2
125A to 150A = φ6
-
2.05 holes/cm
2
Mesh Standard 80 mesh
Connection JIS 10K FF flanged
*
If the temperature is over 150 °C, another material is used for the gasket. Please contact us.
Available with JIS 20K Flanged (Up to 50A).
Available with 20 to 100 mesh screens.
2
. Dimensions
(mm)
Nominal
size L H
1
ds ls Plug Weight
(kg)
15A
125 54 20 35 ------ 1.8
20A
1
40
68
25
50
-
-----
2
.4
25A
160
81
32
60
-
-----
3
.7
32A
18
0
92
40
70
-
-----
4
.2
40A
190
104
45
75
-
-----
5
.9
50A
220 117 56 90 ------ 8.1
65A
270 162 73 125 R 1/2 13.2
80A
290 185 88 130 R 1/2
17.2
100A
350 222 108 180 R 1/2
26.0
125A
39
0
280
140
200
R 3/4
3
4.0
150A
44
0
318
160
225
R 3/4
6
0.0
15
A
-
50A
65A - 150A

2
■ EP D T -0 48 ■
3
. Operation
No.
Parts Name
1
Body
2 Cap (15A-50A)
Cover
(65A
-
150A)
3
Screen
4
Gasket
5
Plug
Dust, scale, and other foreign substances which flow into the inlet side of the strainer are removed by
the screen [3].
4. Nominal Size Selection
To make the best use of the strainer and satisfy the operating requirements to the maximum,
take notice of the following.
4.1 Selection of nominal size
Select a strainer of the same nominal size as that of the pipe (nominal size of piping = nominal size
of strainer). Note that using a strainer of a smaller nominal size increases the pressure loss of the
strainer and may result in the pressure fallen below the specified level at the inlet side of the
equipment.
4.2 Selection of nominal pipe size
When selecting an appropriate nominal pipe size, it is necessary to consider fluid type, maximum
flow rate, permissible pressure loss, costs of piping and equipment, etc.
If the nominal pipe size is smaller, the costs of piping and equipment decreases while the pressure
loss through the pipe increases to generate disturbances, possibly resulting in pipe wear, noise
and/or vibration. If the nominal pipe size is too large, not only the costs of piping and equipment but
also the thermal loss increases.
As a reference, the standard flow velocity is specified in the Japanese Industrial Standards (JIS) as
a guide to select an appropriate nominal pipe size. See the following table.
<<Standard flow velocity>>
Fluid Remarks Standard flow
velocity
Saturated steam
Auxiliary piping for vacuum or small-
diameter piping
15 m/s [10-20]
Large-diameter piping 30 m/s [20-40]
Superheated steam
Piping diameter: approx. Φ75 –Φ250 40 m/s [30-50]
Piping of high-grade material 70 m/s [65-80]
Inlet of steam coil 0.3-0.7 MPa 30 m/s [25-30]
Air
Higher pressure: 1.0 MPa or more 20 m/s [20-25]
Lower pressure 15 m/s [5-15]
Extremely low pressure: 0.1 MPa or less 10 m/s [3-10]
Water, Oil 2 m/s [2- 4]
* The above table is based on the requirements in JIS F 7101 “Shipbuilding - Pipes
of machinery - standard velocity of flow”.
15A - 50A 65A - 150A

3
■ EP D T -0 48 ■
4.3 Pressure Loss Chart
[Screen]
15A to 100A = φ2.5 - 7.21 holes/cm
2
Mesh = 80 mesh
125A to 150A = φ6 - 2.05 holes/cm
2
Mesh = 80 mesh
Nominal
size
ΔP: Pressure loss MPa
V : Flow rate L/min.

4
■ EP D T -0 48 ■
5
. Maintenance
5.1 Precaution for installation
Caution
1. When installing, check the direction of the product so that the fluid flowing and the arrow marked on
the product are in the same direction.
* Setting the product in wrong directions prevents the product from performing as intended.
2. When installing, secure the space to remove the screen.
* Failure to follow this notice hampers cleaning of the screen.
3. Do not apply excessive load, torque or vibration to the product.
* Failure to follow this notice may result in fluid leakage.
4. Do not apply excessive load, torque or vibration to the product.
* The foreign matter corresponding to the specified mesh size may not be completely caught
constitutionally.
1. Clogging inside the product can be known from the differential pressure measured, when pressure
gauges are installed in upstream and downstream of the product. [See Fig. 1 in “7. Piping
Example.”]
2. The product shall be installed with its cap or cover faced downward.
* If drainage or similar problem occurs in a steam line, incline the product to the position at which
the cap or cover is kept horizontally.
3. If the product can only be installed to run the fluid from the bottom to the top, make sure to install a
blow valve in order to remove the scale accumulated at the bottom of the riser pipe. [See Fig. 2 in
“7. Piping Example.”]
4.When the fluid is steam, connect piping so that the cap or cover faces sideways in order to minimize
the pooling of drain. [See Fig. 3 in “7. Piping Example.”]
5.2 Precaution for operation
Warning
1. When the product is used for hot fluid, do not touch the product with bare hands.
* Failure to follow this notice may result in scalds or injury.
2. Do not retighten the cap or cover after leading fluid into the product.
* Failure to follow this notice may damage the gasket and cause outside leakage.
* Failure to follow this notice may result in scalds or injury.
Caution
1. Use the product under a maximum pressure loss below 0.1 MPa. Periodically clean the screen.
* Failure to follow this notice may damage the screen.

5
■ EP D T -0 48 ■
6. Disassembly, Cleaning and Reassembly
Excessive amount of foreign substances inside the product reduces filtration area and
hampers fluid flow. If the product is kept for such condition, the screen is damaged and
results in adverse effect on the piping system due to excessive pressure difference.
6.1 Precaution for disassembly and inspection
Warning
1. Completely discharge the pressure inside of the product, piping and equipment prior to disassembly
and inspection. When fluid is hot, cool down the product.
* Failure to follow this notice may result in scalds or injury due to the residual pressure.
1. After checking the pressure gauge to make certain there is no pressure inside the body [1], remove
the cap or cover [2] and screen [3]. Clean up the screen [3] by compressed air or water.
6.2 Precaution for reassembly
Caution
1. Clean the gasket contact surfaces of both the body and the cap or cover.
* Improper cleaning may cause fluid leakage at the gasket resulting in scalds or injury.
2.
When installing caps and bolts, apply anti-galling agent to the threads.
*
If you do not apply anti
-
galling agent, you may not be able to remove the cap and bolt.
1. After cleaning the gasket contact surfaces of both the body [1] and the cap or cover [2], attach a
new gasket [4] to the cap or cover [2], and then attach the cleaned screen [3] into the groove on the
cap or cover [2]. Install the assembly (cap or cover [2], gasket [4], and screen [3]) to the body [1].
7. Piping Example
Fig. 1
Blow
Fig. 2
Fig. 3

2015.8
PDD-046e
Warranty Information
1. Limited warranty
This product has been manufactured using highly-advanced techniques and subjected to
strict quality control. Please be sure to use the product in accordance with instructions on
the manual and the label attached to it.
Yoshitake warrants the product to be free from any defects in material and workmanship
under normal usage for a period of one year from the date of receipt by the original user, but
no longer than 24 months from the date of shipment from Yoshitake’s factory.
2. Parts supply after product discontinuation
This product may be subject to discontinuation or change for improvement without any prior
notice. After the discontinuation of the product, Yoshitake supplies the repair parts for 5
years otherwise individually agreed.
3. This warranty does not cover the damage due to any of below:
(1) Valve seat leakage or malfunction caused by foreign substances inside piping.
(2) Improper handling or misuse.
(3) Improper supply conditions such as abnormal water pressure/quality.
(4) Water scale or freezing.
(5) Trouble with power/air supply.
(6) Any alteration made by other than Yoshitake.
(7) Use under severe conditions deviating from the design specifications
(
e.g. in case of corrosion due to outdoor use).
(8) Fire, flood, earthquake, thunder and other natural disasters.
(9) Consumable parts such as O-ring, gasket, diaphragm and etc.
Yoshitake is not liable for any damage or loss caused by malfunction or defect of the product.
INTERNATIONAL DEPT.
955-5, Miyamae, Irukadeshinden, Komaki, Aichi, 485-0084, Japan
Phone: +81-568-75-4432 Fax: +81-568-75-4763
E-mail: Intntl@yoshitake.co.jp
Table of contents
Other Yoshitake Industrial Equipment manuals

Yoshitake
Yoshitake TRAP STAR TSF-10 User manual

Yoshitake
Yoshitake DS-1 User manual

Yoshitake
Yoshitake Trap Star TSF-8AT User manual

Yoshitake
Yoshitake TRAP STAR TSF-10CF User manual

Yoshitake
Yoshitake TRAP STAR TSF-8 User manual

Yoshitake
Yoshitake SU-50 User manual

Yoshitake
Yoshitake PG-2 User manual

Yoshitake
Yoshitake SY-20-10 User manual

Yoshitake
Yoshitake Trap Star TSF-13 User manual

Yoshitake
Yoshitake TRAP STAR TSF-12 Series User manual