Zeal ACT8000R User manual

PROFESSIONAL TYMPANIC THERMOMETERS
Instructions for Use
Established 1888
ZEAL
The Clinicians choice
Innovation, Quality and Service since 1888
Model ACT8000R Ward Base Station
Model ACT8000 Cradle Case

Established 1888
ZEAL
The Clinicians choice
2
INDEX
INTRODUCTION PAGE 3
GENERAL INFORMATION PAGE 4
BODY TEMPERATURE PAGE 5
MEASUREMENT TIPS PAGE 6
PACKAGING CONTENTS PAGE 7
THE THERMOMETER PARTS PAGE 8
STORAGE CRADLE PARTS MODEL ACT8000 PAGE 9
BASE STATION PARTS MODEL ACT8000R PAGE 10
INSTALLING AND REPLACING THE BATTERIES PAGE 11
SETTING UP THE STORAGE CRADLE MODEL ACT8000 PAGE 12
HOW TO INSTALL A BOX OF PROBE COVERS INTO THE
CRADLE DISPENSER MODEL ACT8000
PAGE 12
SETTING UP THE BASE STATION MODEL ACT8000R PAGES 13 - 14
HOW TO INSTALL A BOX OF PROBE COVERS INTO THE
DISPENSERS MODEL ACT8000R
PAGE 15
HOW TO FIT AND EJECT THE PROBE COVERS FROM
THE THERMOMETER
PAGE 16
HOW TO USE THE THERMOMETER PAGE 17
TAKING A TEMPERATURE MEASUREMENT PAGE 18
TURNING THE THERMOMETER OFF PAGE 18
HOW TO RECALL THE 10 STORED MEMORIES PAGE 19
CHANGING THE DISPLAY FROM °C TO °F PAGE 19
USING THE DISPLAY BACK LIGHT PAGE 20
PROBE HEAD PROTECTOR, MODEL ACT8000R ONLY PAGE 20
CLEANING THE THERMOMETER AND ACCESSORIES PAGE 21
TROUBLE SHOOTING GUIDE PAGE 22
SPECIFICATIONS, CALIBRATION PAGE 23
INFORMATION/WARRANTY PAGE 24
OTHER ZEAL CLINICAL PRODUCTS PAGE 25
THERMOMETER QUICK START GUIDE - REFER TO PAGE NUMBERS IN RED FIRST

Your Zeal Tympanic Thermometer has been specically designed
for professional use. It provides a fast 1 second, safe and accurate,
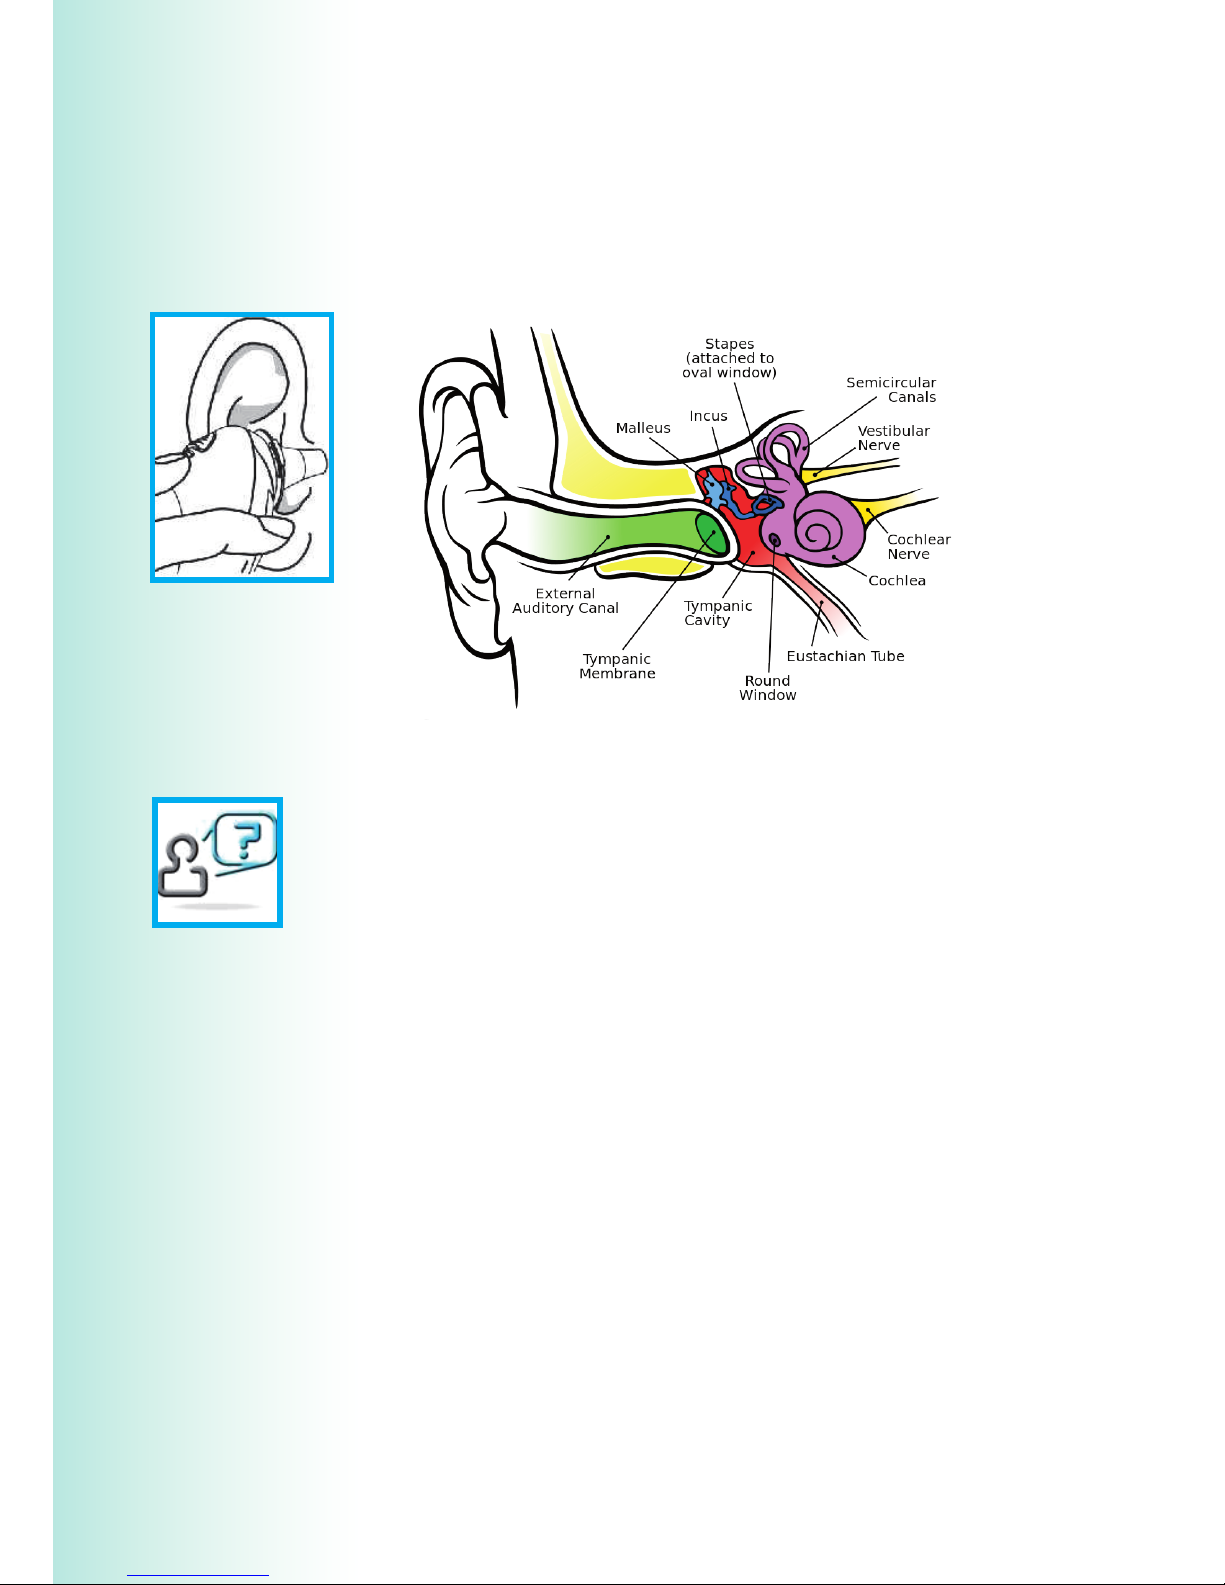
body temperature measurement from the human ear.
The special shape of the thermometer probe will help to avoid
damage to the tympanic membrane by insertion too far into the
ear canal.
The thermometer features `hands - free´ probe cover application and removal to
help reduce cross contamination by HAI’s (healthcare acquired infections).
As with all thermometers, correct use and technique is
essential for obtaining accurate temperature assessments.
Therefore, please read these instructions carefully, and
thoroughly, before using the product.
Important
• Operating environment: the thermometer is designed to
be used in an ambient temperature of +10°C to +40°C
or +50°F to +104°F and 25% to 95% RH.
• To ensure accurate assessments it is important to keep
the probe lens clean, dry, and free from defects. To project
the thermometer always return it to the storage cradle after use.
• This thermometer should only be used with genuine Zeal probe
covers MedACCU2010.
• To avoid inaccurate readings and prevent cross contamination
always attach a new, clean probe cover for each temperature
measurement. Please check the probe cover before use to ensure
that it is not damaged.
• If by accident the thermometer has been used without a probe
cover attached, clean the lens before next use - see section on
cleaning the product, page 21.
Zeal Professional Tympanic Thermometers conform with all the
requirements of European Standard EN 12470-5 and ASTM E 1965-98.
!
MODELS ACT8000 AND ACT8000R
3

4
Numerous clinical studies have recognised that the ear
is an excellent site for temperature measurement as it reects
the body’s true core temperature. Human body temperature is
regulated by the Hypothalamus in the brain which shares the
same blood supply as the Tympanic Membrane (ear drum).
Variations in the core body temperature can usually be observed
more quickly at the tympanic membrane than at other sites, such
as the mouth (oral), under arm (axilla), or the Rectum.
• It is the ideal place for the temperature measurement of babies
over 3 months, children, and the elderly.
• The Zeal thermometer will give an accurate, reading in
approximately 1 second.
• It is easy and convenient to use in the ear canal.
• The “hands free” probe cover application and removal will help
to avoid cross infections (HAI’s).
WHY MEASURE TEMPERATURE FROM THE EAR ?

Normal Body Temperatures by Patient Age
Site 0 - 2 Years 3- 10 Years 11 - 65 Years Over 65
Ear 36.3 - 38˚C 36.1 - 37.7˚C 35.8 - 37.6˚C 35.7 - 37.5˚C
Oral 35.3 - 37.5˚C 36.7 - 37.8˚C 35.7 - 36.9˚C
Axilla (armpit) 34.7 - 37.2˚C 35.8 - 36.6˚C 35.1 - 36.8˚C 35.5 - 36.3˚C
Rectal 36.6 - 38˚C 36.5 - 38˚C 37 - 38.1˚C 36.1 - 37.3˚C
Body Core 36.3 - 37.7˚C 36.3 - 37.7˚C 36.7 - 37.8˚C 35.8 - 37.1˚C
BODY TEMPERATURE
It is important to recognise that a ‘normal’ body temperature is a
‘range’of temperatures that vary with the patient’s age and the
measurement site. Therefore, measurements from different sites
should not be directly compared, even if taken at the same time.
Normal Body Ranges by Site
Ear 35.7 - 37.9˚C
Oral 35.5 - 37.5˚C
Axilla (armpit) 34.7 - 37.3˚C
Rectal 36.2 - 38˚C
The normal temperature range of a person tends to decrease with
age. The table below demonstrates the range of normal body
temperatures corresponding with age, at the dierent measurement
sites.
The range of ‘normal’ diers between people and is inuenced by
many things such as activity, time of the day, age, stress, medical
condition and gender.
Always try to take temperatures from the same ear and wait at
least two minutes between assessments. ( Repeatedly inserting a
probe at room temperature into a patient’s ear will cause the ear to
cool down resulting in lower readings).
Be aware of temperature variations between dierent ears, especially
if the temperature is not within the patient’s clinical prole. Record
which ear is used to take the assessment.
Established 1888
ZEAL
The Clinicians choice
!
5

TEMPERATURE MEASURING TIPS
► Do not use the thermometer in an ear that shows signs of blood,
drainage, or injury, in the external auditory canal.
►The ear must be free from all obstructions in order to take an
accurate measurement.
►Normal Cerumen (ear wax) will not aect the reading accuracy,
unless it is compacted.
►Tympanic thermometers should not be used on the ear of a patient
suering from an ear infection such as Otitis Media, use the healthy ear
instead.
►Always use the untreated ear if medication has previously been
applied to the ear canal.
►For patients wearing hearing aids or plugs, remove the object
20 minutes prior to taking a temperature measurement.
► Other factors may aect correct ear temperature measurements,
particularly when a patient has:
• been lying on their side, please take the temperature from the
upper exposed ear.
•If a patient has had their ears covered, been exposed to hot,
or cold temperatures, has recently ingested food or drink,
been in energetic exercise, swimming or bathing - wait at least
20 minutes prior to taking a temperature measurement.
6

Established 1888
ZEAL
The Clinicians choice
PACKAGING CONTENTS MODEL ACT8000R with tray base station
►Zeal ACT8000R Rechargeable Tympanic Ear Thermometer.
►Base Station Tray, (with built-in charger, probe cover dispenser, storage
slots for digital oral thermometer and sheathes).
►Base Station Tray Wall Mounting Bracket with fixing screws.
►Box of 200 MedACCU2010 Probe Covers.
►1 Portable probe cover dispenser (holds box of 20 covers).
►This Instruction Booklet.
►2 Rechargeable batteries.
►UK 3 pin AC/DC Power Adaptor .
PACKAGING CONTENTS MODEL ACT8000 with cradle storage unit)
►Zeal ACT8000 Tympanic Ear Thermometer
►Protective Cradle Storage Unit (with built-in probe cover dispenser).
►Box of 20 MedACCU2010 Probe Covers
►This Instruction Booklet
►2 Alkaline AAA batteries
7

Please fully familiarize yourself with the thermometer and its
working parts
PROBE HEAD PROBE LENS
LCD DISPLAY
ON/OFF
BUTTON
SCAN BUTTON
MEASUREMENT INDICATOR LIGHT
PROBE COVER EJECTOR
BUTTON
BATTERY COMPARTMENT
COVER
PROBE COVER
SENSOR
THE TYMPANIC EAR THERMOMETER PARTS
MODELS ACT8000 AND ACT8000R
BATTERY CHARGING TERMINALS
MODEL ACT8000R ONLY
8

9
STORAGE CRADLE PARTS MODEL ACT8000
Established 1888
ZEAL
The Clinicians choice
STORAGE CRADLE THERMOMETER SUPPORT
BOX OF PROBE COVERS FITTED ONTO THE CRADLE DISPENSER

BASE STATION PARTS MODEL ACT8000R
TRAY BASE
WALL MOUNTING
BRACKET
BOX OF PROBE COVERS
CONTAINS 10 x BOXES
OF 20
THERMOMETER CHARGING
POSITION
FIXED PROBE COVER
DISPENSER
PORTABLE PROBE COVER
DISPENSER
POWER INPUT FOR
AC/DC ADAPTOR
STORAGE AREAS FOR ZEAL
ORAL DIGITAL, THERMOMETER
AND SHEATHES POWER CHARGING
INDICATOR LIGHT
Please fully familiarize yourself with the thermometer and its
working parts
10

Hole for battery
set induction bolt
Battery set induction bolt
Established 1888
ZEAL
The Clinicians choice
MODEL ACT8000 THERMOMETER
The ACT8000 thermometer uses 2 AAA alkaline
batteries.
When the batteries get low, a small black battery
symbol appears on the lower right side of the
display indicating that they should be replaced.
To replace the batteries:
1. Slide the cover o by pushing on the notch at
the top of the battery cover.
2. Remove the old batteries, insert 2 new AAA
batteries into the compartment ensuring to
match the indicated polarity symbols.
3. Replace the battery compartment cover.
The thermometer can take up to 3000 measurements
on new fully charged batteries.
MODEL ACT8000R BASE STATION
The ACT8000R thermometer uses 2 rechargeable
batteries.
When the batteries get low, a small black battery
symbol appears on the lower right side of the
display indicating that they should be recharged.
The thermometer should be kept on the base when
not in use to ensure that the batteries are charged.
The approximate battery charging time from
completely drained to fully charged is 7 hours.
If the batteries get old and unable to hold a charge,
replace them with a new battery set.
1. Slide the cover o by pushing on the notch at
the top of the battery cover.
2. Remove the old batteries, insert 2 new AAA
rechargeable batteries into the compartment
ensuring to locate the induction bolt of the battery
set into the hole in the battery compartment.
Ensure to match the indicated polarity symbols.
3. Replace the battery compartment cover.
INSTALLING/REPLACING THE BATTERIES
11

12
HOW TO INSTALL THE BOX OF PROBE
COVERS INTO THE CRADLE DISPENSER
Insert the bottom of a new probe cover box onto the
top of the dispenser arms with the opening tab at
the top, facing forward. Do not open the top tab/lid
of the probe cover box. The probe cover box should
be pushed down gently, but rmly, over the dispenser
arms until the arms penetrate into the inside base
of the box. In view of the special design of the probe
cover box, the tab/lid of the box will automatically
open when inserted onto the dispenser arms. The
probe cover box goes down when a probe cover is
attached to the thermometer and the next probe
cover rises, ready for use.
SETTING UP THE STORAGE CRADLE MODEL ACT8000
REMOVING AND PUTTING BACK THE THERMOMETER
Hold and push down on the thermometer releasing the top
of the probe head from the cradle, then pick up the
thermometer. The probe cover box, if installed, swings forward
ready for use. To return, put the base of the thermometer
back onto the thermometer support, gently push down and
swing the probe head under the top of the cradle, releasing
your hand from the thermometer automatically stores it in
the protective cradle.
BOX OF PROBE COVERS
THERMOMETER SUPPORT
STORAGE CRADLE
DISPENSER ARMS

Established 1888
ZEAL
The Clinicians choice
SETTING UP THE BASE STATION MODEL ACT8000R
1. The wall mounting bracket,
is supplied with 4 plastic
xing plugs, 4 screws and a
template for guidance.
2. Please select a convenient position in the ward,
near a power socket, so that the supplied AC/DC
mains adaptor can be plugged in.
Use the template as a guide for making the xing
holes. Ensure the bracket is level, at a suitable
height, and securely installed.
3. Secure the 4 circular recessed
hollows at the bottom of the
tray onto the 4 raised lugs of
the wall mounting bracket.
13

4. Plug the AC/DC power adaptor into the AC mains power supply outlet
(110V - 240VAC) and connect the other end to the power input socket,
located at the right side of the tray, towards the back.
6. The power charge indicator light,
located at the front right of the
tray, indicates the current charging
mode. An orange light indicates
that the thermometer is charging.
A green light indicates that the
thermometer is fully charged (the
green light also comes on if the
thermometer is not on the base).
Power Indicator Light
5. Placing the thermometer on the base not only protects the thermometer,
it also ensures that it is always charged, and ready for use. The ACT8000R
can be put on the tray for charging at any time, it is supplied with rechargeable
alkaline batteries that do not have a ‘memory eect’.
SETTING UP THE BASE STATION MODEL ACT8000R
14

Established 1888
ZEAL
The Clinicians choice
THE LARGE BOX OF 200 PROBE COVERS
Open the inner box lid and carefully remove the
entire top portion of the box along the perforated
score, taking care not to rip the box base.
Place the box containing the ten smaller boxes of
20 probe covers in the grooved portion of the tray
base ready for installation into the dispensers.
HOW TO INSTALL THE BOX OF PROBE
COVERS INTO THE DISPENSERS
The boxes of 20 probe covers t into the xed and
portable dispensers in the same way. Insert the
bottom of a new box of probe covers onto the top
of the dispenser arms with the opening tab at the
top, facing forward. Do not open the top tab/lid
of the probe cover box. The probe cover box
should be pushed down gently, but rmly, over
the dispenser arms until the arms penetrate into
the inside base of the box. The opening on the
top of probe-cover box and the U-form gap of the
probe-cover dispenser must be in the same direction as
shown. In view of the special design of the probe
cover box, the tab/lid of the box will automatically
open when inserted onto the dispenser arms. The
probe cover box goes down when a probe cover is
attached to the thermometer and the next probe
cover rises, ready for use.
SETTING UP THE BASE STATION MODEL ACT8000R
15
BOX OF PROBE COVERS
PORTABLE DISPENSER
‘U’ FORM GAP

16
HOW TO FIT THE PROBE COVERS
Open the lid on the box of probe covers. Insert
the thermometer probe tip into the top cover and
push down gently. An audible “click” will be heard
when the probe cover is secured on the probe.
The thermometer is now ready to be used.
The Zeal ACT8000 thermometer features a probe
cover sensor. The thermometer will not operate if
a probe cover has not been applied.
If a probe cover has not been tted, or correctly
positioned, a ashing probe icon will appear on
the display to alert you.
HOW TO EJECT THE USED PROBE COVER
After measurement eject the used probe cover
(press the EJECT button) and put on a new,
clean cover.
Please ensure that the used probe covers are disposed
of safely and hygienically.
FITTING THE PROBE COVERS TO
MODELS ACT8000 AND ACT8000R

Established 1888
ZEAL
The Clinicians choice
HOW TO USE YOUR THERMOMETER
1. Apply a new, clean probe cover. The thermometer
features a `hands - free´ probe cover application and
removal to help avoid cross contamination by HAI’s
(healthcare acquired infections).
2. Press and release the ON/OFF button. The thermometer
will make an audible“beep”and perform a brief self - test
when all the display indicators will be shown.
3. Following a satisfactory self - test the Okay “ok” symbol
will be displayed.
4. The thermometer display will then show three short
dashes with a ashing °C (or °F) indicating that the
thermometer is ready to take a measurement.
USING THE THERMOMETER
MODELS ACT8000 AND ACT8000R
17

18
TAKING A MEASUREMENT
Gently insert the probe into the ear canal and press the
“SCAN” button while keeping the probe snugly in place.
If the probe has been correctly inserted into the ear canal
for the full measuring cycle, an audible beep will signal
the end of the measuring process. At the same time the
Measurement Indicator Light will illuminate for
approximately 1 second. The thermometer senses that
an accurate measurement has been taken and shows the
result on the LCD display.
To ensure an accurate reading, gently pull the ear back
to straighten the ear canal and snugly position the
probe into the ear canal, aiming towards the membrane
of the eardrum.
For children over 3 months and under 2 years old:
> Pull the ear straight back.
For children over 2 years old and adults:
> Pull the ear straight up and back.
The Zeal tympanic thermometer turns o automatically
after about 60 seconds of non use. It can also be turned
o manually by pressing the ON/OFF button.
TURNING THE THERMOMETER OFF
USING THE THERMOMETER
MODELS ACT8000 AND ACT8000R

The thermometer automatically stores the last 10
measurements taken into its memory. The latest
temperature taken is displayed rst when recalled from
the memory. To recall a temperature from the memory,
turn the thermometer o, then press and hold down the
ON/OFF button for approximately 2 seconds. A ashing
‘01’ will appear with a small ‘M’ at the lower right of the
display. The temperature value of this memory is shown
on the display for 2 seconds. If the ON/OFF button is
pressed again before the 2 seconds are up, the next
memory‘02’temperature is displayed. Repeat this process
to see all of the 10 stored temperatures; otherwise the
thermometer returns to the normal measuring mode.
Remember that the latest measurements taken are
displayed rst when recalled from the memory.
CHANGING DISPLAY FROM °C TO °F
Your Zeal thermometer can display in either degrees
Celsius (°C) or degrees Fahrenheit (°F). It is preset to
display Celsius (°C).
To switch to Fahrenheit, press the ON/OFF button twice,
one right after another. Hold the second press down for
about 2 seconds until the symbol“°F” (or “°C”) appears,
with a beep, on the display. Releasing the on/o button
returns the thermometer to the measuring mode. Repeat
the procedure to change back to Celsius.
MEMORY MODE
USING THE THERMOMETER
MODELS ACT8000 AND ACT8000R
19
Established 1888
ZEAL
The Clinicians choice

BACK LIGHT FOR READING INTHE DARK
The thermometer has a back light function. The back
light appears automatically when the unit is turned
on and remains alight until the unit is ready for taking
a measurement. The back light also appears when
the thermometer is switched between °C and °F, and
when the 10 stored measurements in the memory are
recalled.
To read the display in low light conditions, when the
measurement has nished being taken, press the
ON/OFF button and hold it down for more than one
second to turn on the back light. The back light will go
out when the ON/OFF button is released and the ear
thermometer turns o at the same time.
20
USING THE THERMOMETER
MODELS ACT8000 AND ACT8000R
The Probe-head protector is designed to help protect
the probe head from damage. Please cover the probe
head with the probe-head protector when the ear
thermometer is not in use.
The protector can be removed by hand, or released by
pressing the probe cover ejector button
PROBE HEAD PROTECTOR
MODEL ACT8000R ONLY
This manual suits for next models
1
Table of contents