ZEHUS BIKE+ User manual

BIKE+ all in one
User manual

This page was intentionally left blank

3
Read all safety warnings and all instructions. Failure to follow the warnings and instruc-
tions may result in serious injury.
Save all safety warnings and instructions for future reference.
o DO NOT open the unit yourself. BIKE+ all in one is maintenance-free and must
be repaired only by qualied experts and only with original spare parts. Any
unauthorized attempt to open the unit will void warranty claims.
o DO NOT make any modication to BIKE+ all in one and DO NOT remove the
anti-rotational plates from your bike. This would yield to an incorrect behavior by
your bike and it may result in serious injury.
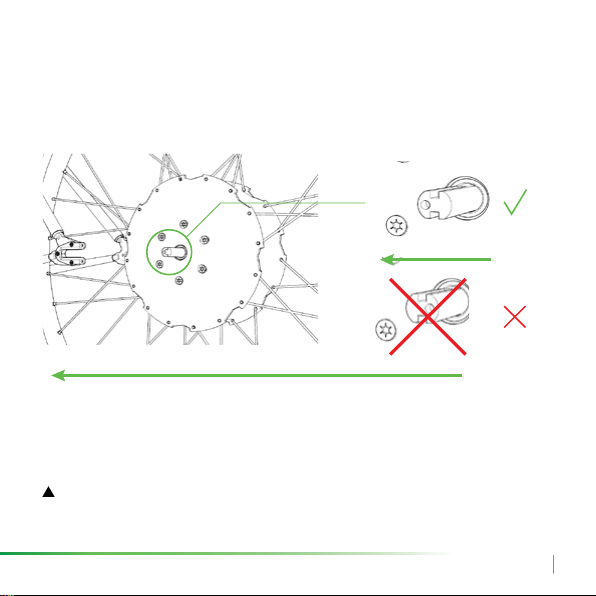
o DO NOT use the bike without the protection covers for the charging connector
(see Figure 1). Warranty is void if the bike is being used without protecting the
connector.
o Please observe all national regulations on registering and using e-bikes.
o The term“battery pack” refers to an internal part of the BIKE+ all in one system. DO
NOT try to access the battery pack.
o BIKE+ all in one must not be subjected to direct mechanical impacts.There is a
risk that the battery pack and the electronics will be damaged.
o Protect the BIKE+ all in one system against severe heat, re and immersing into
water. Danger of re and explosion.
o Vapors can escape in case of damage or improper use of the BIKE+ all in one.
Avoid contacts with those vapors, as they can irritate the respiratory system.
o Charge the battery pack only with original Zehus battery charger. Damage can
occur while using non-original charging devices.
Safety Notes

4
o IF your BIKE+ all in one has a 6-pin connector (see Figure 1),please be careful to
insert the 6-pin charger plug in the 6-pin connector in the proper way.Otherwise
short circuits can occur. Warranty is void if charger is not inserted correctly. Do not
short circuit the pinout of the charging connector.
o Keep the battery charger away from rain or moisture. Keep the battery charger
clean. Danger of electric shock
o Do not charge the battery near ammable surfaces. Risk of re.
o Before any charging operation, check the battery charger status (cable, plug,
connectors). If any damage is detected, DO NOT use the charger and contact a
qualied retailer.
o Do not operate the battery charger on ammable surfaces.
o Vapors can escape in case of damage or improper use of the charger. Avoid
contacts with those vapors, as they can irritate the respiratory system.
o Keep the charger out of children reach.
o Please read this manual carefully
Figure 1: 6-pin charging connector (1) and protection cover (2)
I2

5
1. Getting started with BIKE+ all in one
1.1 Intended use
BIKE+ all in one is intended to be used exclusively with the bike which was sold with. Any
attempt to mount BIKE+ all in one on another bike will void warranty claims.
BIKE+ all in one is not permitted for competition and race use.
1.2 Initial operation
BIKE+ all in one can only be activated when the battery state of charge is sufcient. In
order to check the battery state of charge of your BIKE+ all in one please refer to 5.
1.3 Turning on the system
BIKE+ all in one turns on automatically when the rear wheel reaches a speed higher
than 5 km/h. Thus,to turn on BIKE+ all in one just start pedaling your bike as usual or spin
the wheel while you lift the bike, as explained in Figure 2 .
I
2
3
Figure 2: in order to turn on BIKE+ all in one, lift the bike (1), push the
pedal (2) such that the rear wheel reaches at least 5 km/h (3).

6
1.4 Turning off the system
BIKE+ all in one automatically turns off when no activities are detected within 2 minutes,
in order to reduce the idle battery use. In order to manually turn off BIKE+ all in one, lean
the bike vertically or horizontally, as explained in Figure 3
!
WHEN A SMARTPHONE IS CONNECTED: if the bike is leant,BIKE+ all in one will be de-ac-
tivated (for BIKE+ all in one activation see 2.1). In any case the system will stay active for
10 minutes.
Figure 3: lean the bike to turn off BIKE+ all in one
DeutschDeutsch
or

7
2. Riding BIKE+ all in one
!
it is recommended to gather rst experience with BIKE+ all in one away from roads
with heavy trafc.
BIKE+ all in one is an advanced powertrain for e-bikes that helps you in reducing your ped-
aling effort.The system is compliant to the EU laws on Electric Pedal Assisted biCycle (EPAC).
2.1 BIKE+ all in one activation procedure (see Figure 4)
When BIKE+ all in one is turned on, the motor assistance is not yet activated for safety rea-
sons. In order to activate the motor assistance, you must perform all the following steps:
1. Ride the bike and reach 8 km/h
2. Pedal backwards per 3 revolutions continuously
!
The bike will slow down while performing the step 2, due to the regenerative braking
function (see 2.2).
2.1 Motor assistance
The motor assists the rider up to 25 km/h (depending on the selected power mode - see
5.5 on page 20) and with a maximum power of 250W just if you are pedaling. As soon
as you stop pedaling, the motor will stop pushing.
x3
> 8 km/h!
Figure 4: BIKE+ all in one activation procedure

8
The generated power depends on several factors including the bike speed,the pedaling
speed and the road slope, depending on the selected power mode.
The default power mode of BIKE+ all in one is the “turbo” mode. For instructions on how
to change the power mode please refer to 5.1 and 5.4.
2.2 Regenerative braking (KERS)
BIKE+ all in one features a regenerative braking function; this allows you to slow down
the bicycle using the electric motor as a generator recharging the batteries thanks to
the integrated Kinetic Energy Recuperation System (KERS).In order to activate the regen-
erative braking you need to pedal backwards. As soon as you stop pedaling, the motor
will stop braking.
!
CAUTION: Regenerative braking DOES NOT substitute safety mechanical brakes.Please
do NOT remove the mechanical brakes from your bike.
!
CAUTION: Regenerative braking WILL NOT BE AVAILABLE when your BIKE+ all in one is
fully charged.
assist
regen
Figure 5: motor assistance and regenerative braking

9
2.3 Charging BIKE+ all in one (see Figure 6)
To charge BIKE+ all in one, simply remove the protection cap from the charging connec-
tor (I) and plug in the Zehus charger (2).Then connect the Zehus charger to a power
outlet (110~240 V).
The charging time is approximately 3 hours for a complete charge.While BIKE+ all in one
is charging the charger LED must turn RED. When BIKE+ all in one is completely charged,
the charger LED turns GREEN (3).
!
NOTE: when the charger gets disconnected from the bike, BIKE+ all in one will turn off.
I2 3
100%
Figure 6: charging BIKE+ all in one
2.4 Change gears or tires on BIKE+ all in one
Although BIKE+ all in one is intended to be used as a single speed hub, you can decide
to change the sprocket or the crankset. If you change one or more of these components
by yourself, BIKE+ all in one performance could be not optimal. Please contact our sup-
port using the bitride app, in order to update your bike rmware with your new gear set.
Whenever you change tire size (e.g. from 700x23c to 700x35c), please contact our sup-
port to update your bike rmware. Otherwise the displayed speed will not be correct.

10
2.5 Correct mounting of BIKE+ all in one on the bike
Since BIKE+ all in one has a slope sensor inside, it is important to insert it into the rear fork
with the right direction.The front of the hub is marked with a small pin drilled on the left
shaft. Locate the pin as explained in the next gures. If the hub is not mounted correctly
you will receive a warning when connecting with the app (see 5.7),
2.6 Careful handling of the bike
Please observe the operating storage temperature of BIKE+ all in one. Protect the
charging connector from impacts that can damage it. Components can be damaged
if exposed to extreme temperatures.
!
CAUTION: ALWAYS seal the connector on BIKE+ all in one with the proper protection
cap (5) before riding. Using BIKE+ all in one without the protection cap will void the war-
ranty.
BIKE DIRECTION

11
3. Using a Smartphone with your BIKE+ all in one
In order to access all the functionalities of BIKE+ all in one, you would have to connect a
smartphone through the bitride-my bike app.
3.1 What is the bitride-my bike app?
The bitride app helps you to act smarter during the everyday mobility; bitride also allows
you to connect to a variety of devices via Bluetooth, including your BIKE+ all in one.
3.2 Which devices does the bitride-my bike app support?
Devices with Android 4.2.3 or newer are supported;iPhone 4s,iPhone 5, iPhone 5s,iPhone
5c, iPhone 6, iPhone 6+ are also supported.
!
NOTE: please check with your smartphone manufacturer if your device has compati-
bility issues with Bluetooth 2.3.
3.3 How do you get the bitride-my bike app?
You can download the bitride-my bike app from the Google Play store (for Android devic-
es) or from the Apple store by searching for “bitride” or by using the links below.
iPhone AndroidTM
https://goo.gl/yo1axUhttps://goo.gl/ryvMuY

12
3.4 How much is the bitride-my bike app?
The bitride-my bike app is available for free.
3.5 How do you install the bitride app?
Depending on your mobile device, go either to the Apple Store or to Google Play and
search for “bitride” in the search dialog. The detailed procedure is listed below.
On iPhone:
o Open App Store
o Tap the search icon
o Enter “bitride” in the search eld
o Select bitride-my bike in the search results
o Follow the standard installation procedure
o Register with a valid e-mail address
On Android:
o Open Google Play
o Tap the search icon
o Enter “bitride” in the search eld
o Select bitride-my bike in the search results
o Follow the standard installation procedure
o Register with a valid e-mail address
3.6 Connecting bitride to your BIKE+ all in one
!
NOTE: bitride-my bike connects trough Bluetooth to your BIKE+ all in one.When rst con-
necting to a factory reset BIKE+ all in one, the name of the device will be Bikep-XXXX,
where XXXX is a number.
!
NOTE: In order to register a BIKE+ all in one the app bitride-my bike needs to access a
stable internet connection and it requires geolocation
Once your BIKE+ all in one is turned on (see 1.3), you can connect bitride-my bike to the

13
bike. Depending on your mobile device the procedure may change.
On iPhone:
o Open the Bluetooth settings screen
o Tap your BIKE+ all in one name
o Wait for connection
o Launch bitride-my bike
o Select your device from the list
!
NOTE: If you have an iPhone bitride-my bike will auto-connect to your BIKE+ all in one
I
BluetoothSettings
Bikep-3D25
ÜÖká ÖÜí Ü~ïâ
Bluetooth
detectable as “iPhone ZEHUS”
DEVICES
after the rst time the device is paired.
On Android:
o Launch bitride
o Allow the app to Enable your Bluetooth
o Tap your BIKE+ all in one name
o Wait for pairing and connection
2

14
3.7 BIKE+ registration (rst use)
!
NOTE: It is highly recommended to perform BIKE+ all in one registration. If you do not
register your BIKE+ all in one you will just be able to use it with the “turbo” power mode
(for more power modes see 5.5)
In order to use your BIKE+ all in one together with bitride, you need to register it using your
bitride app. By registering to bitride you will be able to:
o change your BIKE+ all in one name
o change your BIKE+ all in one power modes
o access to online fault diagnosis
o access to remote Maintenance
o access to remote anti-theft service
Enable
2
I

15
Please provide:
o a valid bike name for your BIKE+ all in one
o a valid e-mail address: a validation code will be sent to you in order to complete
the registration
o a 4-digit PIN code that you set as security for your BIKE+ all in one
!
NOTE: the bike name will change at the rst reboot of the bike.
!
INTERNET CONNECTION NEEDED to perform the registration
internet
connection
Safari 100%8:08AM
Bike name
Bike name
PIN
DEVICE REGISTRATION
Done
Choose a name
for your bike and a PIN
of 4 digit.
Safari 100%8:08 AM
In order to register your BIKE+ all in one please ll in the registration form in the app
welcome screen:

16
4.bitride-my bike HMI for BIKE+ all in one
bitride-my bike has different sections, each of the ones is accessible through the ham-
burger menu on the top left of the screen.
The available sections are:
o Ride
o Map
o Prole
o My devices
o Support
o Maintenance (this section needs remote authorization by Zehus support)
To access the “ride”section tap the hamburger menu on the upper left side of the screen
and select RIDE.To access the online dashboard please connect to your BIKE+ all in one
by following the instructions in 3.6.
5.Using the ride section
The ride section within bitride-my bike displays the following information (see Figure 7):
o Bike SPEED [Km/h] or [mi/h]
o Total ODO [Km] or [mi]
o Partial ODO [km] or [mi]
o Road slope [%]
o Motor Power [W]
o State of charge of the battery [%]
o Active power mode (see 5.5)
In this section you can:
o Change the power mode on the go: swipe the icon left / right to change BIKE+ all
in one power mode
o Reset Trip distance: touch and hold for 3 seconds on the trip information to reset it

17
o Change displayed information between actual slope and total distance: tap on
the displayed value to change between the two information.
o Access the ride settings (see 5.1 and following)
o Disconnect from the device: hold the button to disconnect
Slope indicator
TOTAL km on the bike
Tap to change displayed info
Slope
-2
Access the dashboard
settings
Choose power mode:
swipe left/right to change
the power mode
Battery charge
Bike speed
App menu
Disconnected from
device
PARTIAL distance
Warning icons
Figure 7: bitride ride section when connected to BIKE+ all in one*
Motor Power info
*app appearance can differ from the one displayed on this manual

18
5.1 Using the ride settings (Figure 8)
In this sub-section you can select the desired power mode (see also 5.4,5.5), the amount
of regenerative brake (KERS) and the units you prefer to display speed and distance.
Furthermore, you can perform the factory reset of your bike by sliding the factory reset
icon on the right side of your screen.
For any modication performed in this screen the bike must not be moving (speed must
be 0 km/h).
POWER MODE
Factory reset Slope Calibration
Save
Kers
min max
Bike +
Safari 100%8:08 AM
KERS value
BIKE+ all in one
Power modes
BIKE+ all in one Power modes:
Figure 8: Ride settings section and power modes icons
Save and back
Slope calibration
Factory reset
Back without
saving BIKE +
e - BIKE
RANGE 1/2/3
MODE OFF
TURBO

19
3 sec!
0 km/h! 0˚!
%
BIKE+
Trip
Slope
%
POWER MODE
Factory reset Slope Calibration
Save
Kers
min max
Bike +
Safari 100%8:08 AM
5.2 Calibrate the slope sensor on your BIKE+ all in one
BIKE+ all in one features an advanced slope sensor that is very important to obtain the
correct and pleasant behavior while using some of the power modes (see 5.5).
!
NOTE: please check the calibration of the slope sensor carefully at the rst connection.
A wrong calibration could lead to a non-correct and unpleasant behavior of your bike.
In order to calibrate the slope sensor, please place your bike on a at surface (0% slope).
Then tap “slope calibration” and insert your PIN number. when prompted. This will start
the calibration procedure. Please refer to Figure 8 and Figure 9 for further information.
Figure 9: Calibration procedure
!
CAUTION: please DO NOT MOVE the bike during the calibration procedure! Errors may
occur if the bike is moved or inclined during the process.

20
5.3 Performing a factory reset on BIKE+ all in one
In order to perform a factory reset on your BIKE+ all in one, please tap the hyperlink “fac-
tory reset” on the dashboard menu. The app will ask you to insert the PIN of your bike to
perform the factory reset.
This procedure will reset the bike name, the bike PIN and the e-mail associated with your
BIKE+ all in one.
5.4 Change BIKE+ all in one power modes on the go
It is possible to switch between different power modes on the go by swiping up and down
the power mode information box in the dashboard screen (see Figure 7)
5.5 BIKE+ all in one power modes
Your BIKE+ all in one let you choose among different power modes. Each power mode
has a different assistance factor and a different pedaling range.
There are 7 available power modes: turbo, e-bike, range 1, range 2, range 3, BIKE+ and
OFF. Here you can nd a detailed description of BIKE+ all in one power modes:
o turbo (Figure 10): this power mode is a regular pedelec (or Electric Pedal Assisted
biCylce).The motor assists you up to 25 km/h and with a maximum power of 250
W, depending on the speed of the bike and on the effort on the pedals. With this
power mode you can cover up to 35 km*.
o e-bike (Figure 11): this power mode is a regular pedelec (or Electric Pedal Assisted
biCylce). The motor assistance is softer than the turbo mode and the maximum
power is slightly lower than 250W.
o range 1 (Figure 12): this power mode is Hybrid: BIKE+ helps you when you ride at
lower speed and during accelerations, while it recover energy while you are ped-
aling at higher constant speed. This power mode is sensitive to the road slope:
running uphill will lead the motor to assist up to 250W, while running downhill will
lead the motor to generate up to 500W automatically.This power mode allow your
range to increase up to 55 km*.
Other manuals for BIKE+
1
This manual suits for next models
1
Table of contents
Other ZEHUS Bicycle manuals