manuals.online logo
Brands
  1. Home
  2. •
  3. Brands
  4. •
  5. Huffy
  6. •
  7. Bicycle
  8. •
  9. Huffy Minnie Lights & Sound User manual

Huffy Minnie Lights & Sound User manual

WARNING:
ALWAYS WEAR YOUR HELMET WHEN RIDING THIS PRODUCT!
AVERTISSEMENT:
TOUJOURS PORTER UN CASQUE EN UTILISANT CE PRODUIT
SIEMPRE LLEVE PUESTO SU CASCO MONTANDO ESTE
PRODUCTO
자전거를 탈 때는 항상 헬멧을 착용하십시오!
Consumer Service Contact Information
Información de Contacto de Servicio de Contacto
Renseignements de Contact de Service de Consommateur
USA / CANADA
TEL: 1 800 872 2453
service@huffy.com
Australia
Hunters Products Pty. Ltd.
TEL: 1 800 632 792
India
Action Bikes Pvt. Ltd.
+91-11-26503874
[email protected]
UK / Ireland
TEL: 44 (0) 0844 335 0511
support@huffy.biz
Japan
店への返却
China
返回商店
Korea
반환을 저장
Chile
DXB Consumo Masivo S.A.
TEL: (562) 661-1800
FAX: (562)738-9702
[email protected]
Peru
DXB Peru
TEL: (511)421-0707
[email protected]
GCC Countries
Toy Magic
TEL: +9714 3414591
[email protected]
ﺍﻝﻡﻭﺯﻉ: ﺵﺭﻙﺓ ﺕﻭﻱ ﻡﺍﺝﻱﻙ
+9714 3414591: ﺹ.ﺏ. 894 / ﺩﺏﻱ - ﺍ.ﻉ.ﻡ
– ﻩﺍﺕﻑ
MEXICO
TEL: 01-800-1 HUFFY 1
service@huffy.com
Belgium
Terugkeer naar de winkel
S Africa
Emotion Cycling (Pty) Ltd
+27 11 262 6512
[email protected]
US_INTL Helmet-Contact_091812_i0010
Check www.Huffy.com for the current contact information
www.Huffy.com para comprobar la información de contacto actual
Vérifier www.Huffy.com pour les informations de contact actuelles
Owner’s Manual
for Minnie
Lights & Sound
Trike
Please read and fully understand this
manual before operation.
Save this manual for future reference.
This manual contains important safety,
assembly, operation and maintenance
information.
H L&S Trike EN 092512 m0021
Copyright Huffy Corporation 2012
2
An adult must fold and unfold the product each me
Use only under adult supervision
Read and follow the instrucons in this manual completely
The rider must always wear proper protecve gear including a cpsc ap-
proved helmet while operang the product
If you have a problem with this product please call Customer Service -
see Consumer Service contact info.
Safety Information
PLEASE READ AND FULLY UNDERSTAND THIS OWNERS MANUAL BEFORE OPERATING
THE PRODUCT
KEEP THIS MANUAL FOR FUTURE REFERENCE
This symbol is important. It is the WARNING symbol. The warning symbol pre-
cedes safety instrucons. Make sure the child understands these instrucons. Failure
to follow these instrucons may result in injury to the rider or to others.
WARNING TO AVOID SERIOUS INJURY:
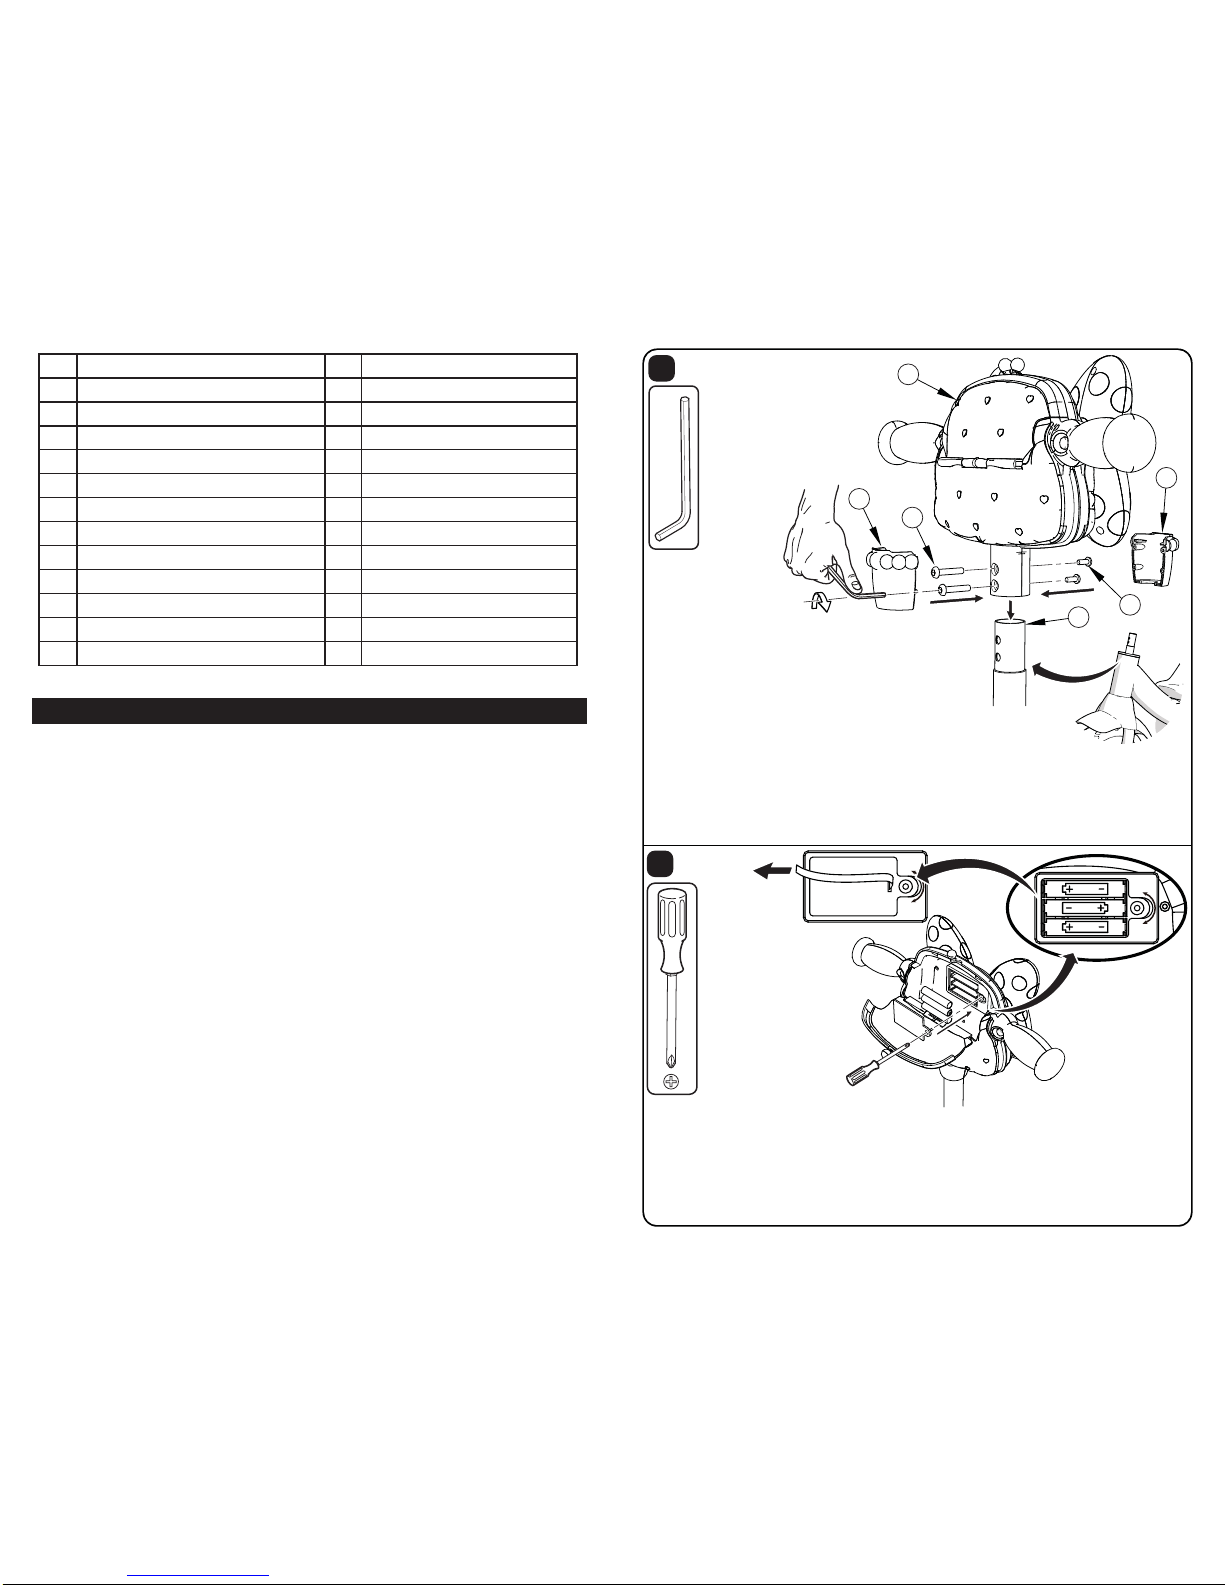
• An adult must unfold and fold this product
• Connuous adult supervision is required.
• This product should only be used by persons 3 years and up.
• Never ride with more than one person. Maximum weight is 27kg. (60 lbs).
• Do not allow a child to ride in the rear plasc bin.
• Maximum weight for the rear plasc bin is 2.3kg. (5 lbs). Excessive weight in the
rear bin may cause a hazardous or unstable condion.
• Do not allow a child to ride without a properly fied helmet that complies with
US - CPSC 16 CFR 1203, with the chinstrap securely fastened.
• Do not allow a child to ride without shoes.
• Do not allow a child to ride the product at dusk, at night or at mes of limited
visibility.
• Never use near motor vehicles. Do not allow a child to ride on streets or alleys.
• Do not allow a child to ride offroad, on grass or wet surfaces.
• Do not allow a child to ride on sloped driveways or hills.
• Do not allow a child to ride near steps.
• Do not allow a child to ride near swimming pool areas, or other bodies of water.
7
Huffy Corporation Limited Warranty
Part or model specificaons are subject to change without noce.
This Limited Warranty is the only warranty for this product. There are no express war-
ranes. The only uses for this product are described in this manual. Warranty registra-
on is not required. This limited warranty extends only to the original consumer and is
not transferable.
What does this Limited Warranty cover?
This Limited Warranty covers all parts of the product.
What must you do to keep the Limited Warranty in effect?
This Limited Warranty is effecve only if:
• the product is completely and correctly assembled;
• the product is used under normal condions for its intended purpose (see “Warn-
ings” for excluded acvies);
• the product receives all necessary maintenance and adjustments.
What is not covered by this Limited Warranty?
This product is designed for recreaonal use only. This Limited Warranty does not
cover normal wear and tear, normal maintenance items, or any damage, failure, or
loss that is caused by improper assembly, maintenance, adjustment, storage, or use.
This Limited Warranty is void if the product is ever:
• used for stunt riding, jumping, acrobacs, or similar acvity;
• ridden by more than one person at a me, or the weight limit is exceeded;
• used in a manner contrary to the instrucons in this manual.
How long does this Limited Warranty Last?
All components are warranted for 90 days from the date of purchase.
What will the manufacturer do?
The manufacturer will replace, without charge to you, any component found to be
defecve. The original owner must pay all labor and transportaon charges associated
with the repair or warranty work.
How do you get service?
Phone Consumer Service - 1.800.872.2453
What rights do you have?
This Limited Warranty gives you specific legal rights. You may also have other rights
which vary from state to state.
C
Thumb
Button
Thumb
Button
6
Operaon:
• Push the buons with your thumbs
to acvate the L&S.
• Repeat pushing the buons to cycle
through the various light and sound
WARNINGS:
• Baery replacement is to be conducted by an adult.
• Dispose of baeries properly. Do not dispose of baeries in fire, baeries
may explode or leak. Check local regulaons for proper baery disposal.
• Non-rechargeable baeries are not to be recharged.
• Different types of baeries or new and used baeries are not to be mixed.
• Only baeries of the same or equivalent type as recommended are to be
used.
• Baeries are to be inserted with the correct polarity.
• Keep the unit from geng wet.
• The baery supply terminals are not to be short-circuited.
• Rechargeable baeries are to be removed from the unit before being
charged.
• Rechargeable baeries are only to be charged under adult supervision.
This unit produces flashing lights and light paerns. Although rare, it is possible for
children to be suscepble to photosensive seizures when exposed to certain flashing
lights or light paerns. It is important that parents monitor their children while playing
with this unit. To reduce exposure to such potenal, play in a well-lit area and keep an
appropriate distance from the flashing lights.
Parents must assess whether their child’s capabilies, development and coordinaon
is appropriate for use of this unit.
features.
If there are problems with operaon – ensure the baeries are not low and they are
properly installed.
To reset the unit - remove the baeries and re-install.
3
• Always comply with local laws and regulaons.
• For use on smooth paved surfaces only.
• Understand all operang procedures before use.
• Do not tow or pull any objects with the product.
• Do not push or pull a child riding on the product.
• Replace worn or broken parts immediately.
• Handlebar hand grips and tube end plugs should be replaced if damaged, as bare
tube ends have been known to cause injury. It is parcularly important that bicy-
cles and tricycles used by children are checked regularly to ensure that adequate
protecon for the ends of the handlebars are in place.
• Not suitable for children under 3 years as foam pieces may break offand pose a
choking hazard.
• Replacement forks must have the same rake and tube inner diameter as the origi-
nal product.
If you have any quesons regarding the operaon of this product,
please refer to this owners manual
or call Customer Service - see Consumer Service contact info.
Assembly & Adjustment Instructions
10
11
20
16
15
14
18
19
2
5
1
6
7
12
9
8
13
4
3
17
15
Assembly Exploded View
4
No. Descripon No. Descripon
1Frame 13 Pedal, Le
2Seat 14 Axle
3Screw (x2) 15 Washer (x4)
4Washer (x4) 16 Rear Wheel (x2)
5Nut (x2) 17 Locking Cap
6Fender 18 Plasc Bin
7Fork 19 Screw
8Front Wheel 20 Lock Buon
9Screw (x2) 21 Lights & Sound Unit
10 Washer (x2) 22 Screw (x2)
11 Nut (x2) 23 Cap Nut (x2)
12 Pedal, Right 24 Covers
Assembly
1. Assemble Seat (2) to Frame (1) as shown in Assembly View
2. Insert Screws (3) and Washers (4) into Seat and through Frame.
3. insert Washers (4) and Nuts (5) onto Screws and ghten securely.
To Unfold the Product:
1. Push the lock buon (20) located on the right side of the unit, under the seat. This
releases the folding mechanism spring-loaded latch.
2. Pull the rear axle away from the front axle unl the unit starts to unfold.
3. Gently push down on the seat unl the folding mechanism latches into place.
4. Ensure the folding mechanism is latched by gently pulling upward on the seat.
To Fold the Product:
1. Push the lock buon (20) located on the right side of the unit, under the seat. This
releases the folding mechanism spring-loaded latch.
2. Gently lion the seat unl the unit starts to fold.
3. Push the front and rear axles together unl the folding mechanism latches into
the folded posion.
4. Ensure the folding mechanism is latched by gently pushing downward on the seat.
A
B
6551 Cen
Centerville O MADE IN CHINA
CLOSE
OPEN
$$$/5
9
$$$/5
9
$$$/5
9
CLOSE
OPEN
22
21
24
24
23
7
5
Lights & Sound (L&S) Assembly:
Assembly hardware is located in the parts bag with
the product.
1. Locate the L&S (21) on the Fork Stem (7) with
(supplied)
Baery Replacement:
Baeries: DC 1.5V, AAA (included). The unit requires 3 baeries.
1. Open the door on the rear of the unit.
2. Loosen the baery compartment cover screw to remove the cover.
3. Insert baeries in the orientaon shown inside the compartment.
4. Re-install the compartment cover and ghten the screw.
Remove Pull
Tab for baery
operaon
control buons toward the rider.
2. Align the holes in the stem with those in the L&S.
3. Insert and ghten the Screws (22) and Cap Nuts (23) using the tool supplied.
4. Ensure hardware is secure so that it will not come loose.
5. Be careful not to over-ghten the hardware. This can damage the L&S and strip
the threads in the hardware. Recommended torque is 88in-lbs (10Nm).
6. Snap the front and back covers (24) over the installed hardware.

Other Huffy Bicycle manuals

Huffy cruiser User manual

Huffy

Huffy cruiser User manual

Huffy Mountain Bikes User manual

Huffy

Huffy Mountain Bikes User manual

Huffy Coaster Brake Bicycles User manual

Huffy

Huffy Coaster Brake Bicycles User manual

Huffy Slider User manual

Huffy

Huffy Slider User manual

Huffy coaster User manual

Huffy

Huffy coaster User manual

Huffy freewheel User manual

Huffy

Huffy freewheel User manual

Huffy 700c User manual

Huffy

Huffy 700c User manual

Huffy BMX User manual

Huffy

Huffy BMX User manual

Huffy Green Machine User manual

Huffy

Huffy Green Machine User manual

Huffy Green Machine User manual

Huffy

Huffy Green Machine User manual

Huffy Mountain Bikes User manual

Huffy

Huffy Mountain Bikes User manual

Huffy CLASSIC TRIKE User manual

Huffy

Huffy CLASSIC TRIKE User manual

Huffy BMX bicycles User manual

Huffy

Huffy BMX bicycles User manual

Huffy KD58C-LCD User manual

Huffy

Huffy KD58C-LCD User manual

Huffy Green Machine User manual

Huffy

Huffy Green Machine User manual

Huffy CLASSIC TRIKE User manual

Huffy

Huffy CLASSIC TRIKE User manual

Huffy cruiser User manual

Huffy

Huffy cruiser User manual

Huffy 1C4880-A01 User manual

Huffy

Huffy 1C4880-A01 User manual

Huffy Kids Ride-On User manual

Huffy

Huffy Kids Ride-On User manual

Huffy m0743 User manual

Huffy

Huffy m0743 User manual

Huffy coaster User manual

Huffy

Huffy coaster User manual

Huffy Multi-Speed Comfort Bicycles User manual

Huffy

Huffy Multi-Speed Comfort Bicycles User manual

Huffy Folding Trike User manual

Huffy

Huffy Folding Trike User manual

Huffy Cruiser Bicycles User manual

Huffy

Huffy Cruiser Bicycles User manual

Popular Bicycle manuals by other brands

Durabike BKE101 eazi-rider operating instructions

Durabike

Durabike BKE101 eazi-rider operating instructions

Scott SOLACE 2023 manual

Scott

Scott SOLACE 2023 manual

Scott Plazma 4 owner's manual

Scott

Scott Plazma 4 owner's manual

Rotwild R.T750 HT Series manual

Rotwild

Rotwild R.T750 HT Series manual

AMPD LIL RIPPA user manual

AMPD

AMPD LIL RIPPA user manual

Trek Domane SL Service manual

Trek

Trek Domane SL Service manual

Currie tech IZIP Assembly guide

Currie tech

Currie tech IZIP Assembly guide

Eleglide Coozy user manual

Eleglide

Eleglide Coozy user manual

I-GO ERO user manual

I-GO

I-GO ERO user manual

Rose electronics BACKROAD owner's manual

Rose electronics

Rose electronics BACKROAD owner's manual

MYVELO CF20 instruction manual

MYVELO

MYVELO CF20 instruction manual

Giant BELLA datasheet

Giant

Giant BELLA datasheet

Johnny Loco Cargo Coupe Assembly manual

Johnny Loco

Johnny Loco Cargo Coupe Assembly manual

Specialized LEVO SL Series user manual

Specialized

Specialized LEVO SL Series user manual

USAC STERNER BIKE user manual

USAC

USAC STERNER BIKE user manual

Santana Tandem Assembly and Disassembly

Santana

Santana Tandem Assembly and Disassembly

CRUSSIS BAFANG user manual

CRUSSIS

CRUSSIS BAFANG user manual

FAFREES FF20 Polar user manual

FAFREES

FAFREES FF20 Polar user manual

manuals.online logo
manuals.online logoBrands
  • About & Mission
  • Contact us
  • Privacy Policy
  • Terms and Conditions

Copyright 2025 Manuals.Online. All Rights Reserved.