manuals.online logo
Brands
  1. Home
  2. •
  3. Brands
  4. •
  5. ZERO GRAVITY
  6. •
  7. Massager
  8. •
  9. ZERO GRAVITY RK7801 User manual

ZERO GRAVITY RK7801 User manual

Popular Massager manuals by other brands

Kogan KAULTMSGUNA user guide

Kogan

Kogan KAULTMSGUNA user guide

HoMedics Hydragel HG-22-2EU instruction manual

HoMedics

HoMedics Hydragel HG-22-2EU instruction manual

Livoo DOS200 user manual

Livoo

Livoo DOS200 user manual

DAY Useful Everyday 73464 instruction manual

DAY Useful Everyday

DAY Useful Everyday 73464 instruction manual

Zimmer enPulsPro user manual

Zimmer

Zimmer enPulsPro user manual

Daga MA-3500 instruction manual

Daga

Daga MA-3500 instruction manual

ELEEELS P2 instruction manual

ELEEELS

ELEEELS P2 instruction manual

Beurer MG 190 Instructions for use

Beurer

Beurer MG 190 Instructions for use

Panasonic EP790-C1 Service manual

Panasonic

Panasonic EP790-C1 Service manual

Adler AD 2167 user manual

Adler

Adler AD 2167 user manual

Taurus Wellness TW-MC-M Assembly and operating instructions

Taurus

Taurus Wellness TW-MC-M Assembly and operating instructions

Infinity Syner-D Circadian Assembly guide

Infinity

Infinity Syner-D Circadian Assembly guide

Hydas LH-095 instruction manual

Hydas

Hydas LH-095 instruction manual

AEG FM 5567 instruction manual

AEG

AEG FM 5567 instruction manual

OBH Nordica Shiatus Tunes manual

OBH Nordica

OBH Nordica Shiatus Tunes manual

Medisana MM 825 user manual

Medisana

Medisana MM 825 user manual

SOLAC Therma Hydro Instructions for use

SOLAC

SOLAC Therma Hydro Instructions for use

Invacare Texas user manual

Invacare

Invacare Texas user manual

manuals.online logo
manuals.online logoBrands
  • About & Mission
  • Contact us
  • Privacy Policy
  • Terms and Conditions

Copyright 2025 Manuals.Online. All Rights Reserved.

RK7801RK7801
Please reading “Safety Instructions”before using to keep it safe.
Operating Manual
Elegant Zero gravity Massage Chair
171 7
252 5
262 6
RK7801RK7801
11
5
6
15
212 1
232 3
242 4
77
8
99
Elegant Zero gravity Massage Chair
Features
1. New unique 3D massage machine can press shoulder. The massage machine can
effect rolling, percussion, compression, kneading and over 10 mix massage on neck,
shoulder, back, waist and buttock, which can meet the acupoint and relieve fatigue.
Body detect function makes the chair fit for people in different height .
2. Zero-gravity position. The back and seat can be adjusted together, the leg can be
adjusted single, arms and back are moving together. The chair can keep massaging
on arms no matter the chair in which angle.
3. Arms cover can be opened/closed easily and support air pressure massage on hands
and upper arms.
4.Air pressure massage on buttocks. You can choose your favorite massage mode to
effect squeezing massage.
5.Air bags in legs cover your legs and feet to do squeezing massage on legs and feet,
which is tender and promotes your blood circulation.
6. The foot can extended in 20cm.
7. Novel air pressure massage program meets the ergonomic concept, which makes
your sitting comfortable and gets the right, comfortable and appropriate massage.
The air bags in seat and waist can stretch, turning your body and twist your waist.
Elegant Zero gravity Massage Chair
We reserve the right for design modification. It is subject to change without
notice. The pictures in this manual are for reference. Please refer to the
actual product.
ContentContent
Preparation
Safety Instruction
External parts name
Internal parts name
Mechanical parts view
Mechanical parts list
Installation
Installation illustration
Operation
The adjustment before massage
How to use remote control
Operating manual and features instruction
Process after massage
Maintenance
Cleaning and maintenance
Others
Troubleshooting analysis
Technical parameter
Please keep the manual in safe place for future reference
Warning
Fire and electric
shock
Accident
Fire and electric
shock
1 2
Safety Instruction
Preparation
People who are
not suitable to
use the chair
Accident / Injury
Safety Instruction
Preparation
▲
Please read this manual carefully for installation to operate the massage chair in correct way.
“Safety Instruction”is provided in both warning and caution for important safety information
Warning This sign indicates “warning of causing possible death, hurt to body”.
Caution This sign indicates “caution of causing possible hurt, damage to things”.
Symbol meaning
This sign indicates “forbidden behavior”
This sign indicates self disassembly
is forbidden”
“
This sign indicates “must follow instruction
to operate”
This sign indicates “correct operation
way for cable”
This sign indicates “correct operation way for cable”
▲
3 4
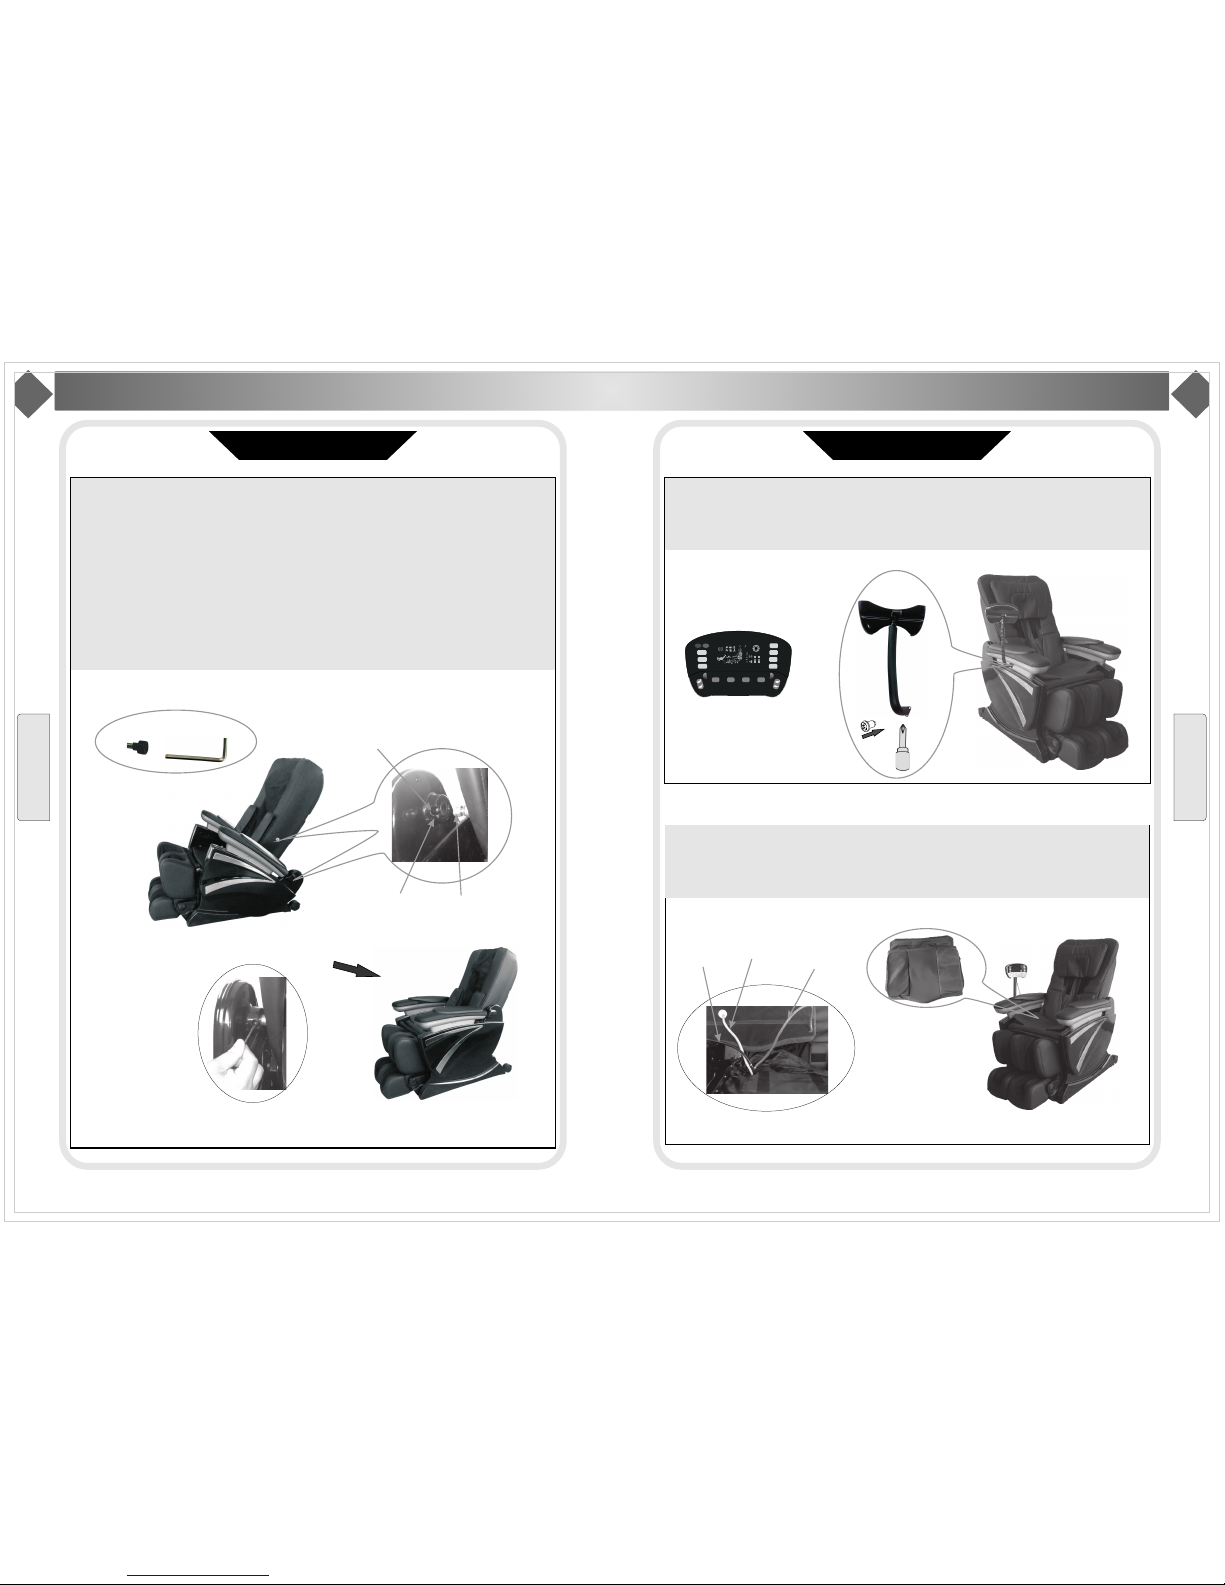
Grounding Instruction
Replace fuse
When the fuse is burned out, please turn off the switch and
unplug the power. Opening the lid covered the fuse which is
located in the switch box. Using a same size fuse to replace
the old one, then cover the lid. Or you can find a electrician
to replace the fuse.
Earth wire is allowed
to near these place
Gas pipe: probably cause explosion or fire.
Phone wire and lightning rod: probably cause electric shock
and fire when thundering.
Water pipe: earth wire is useless where there are plastics
Caution
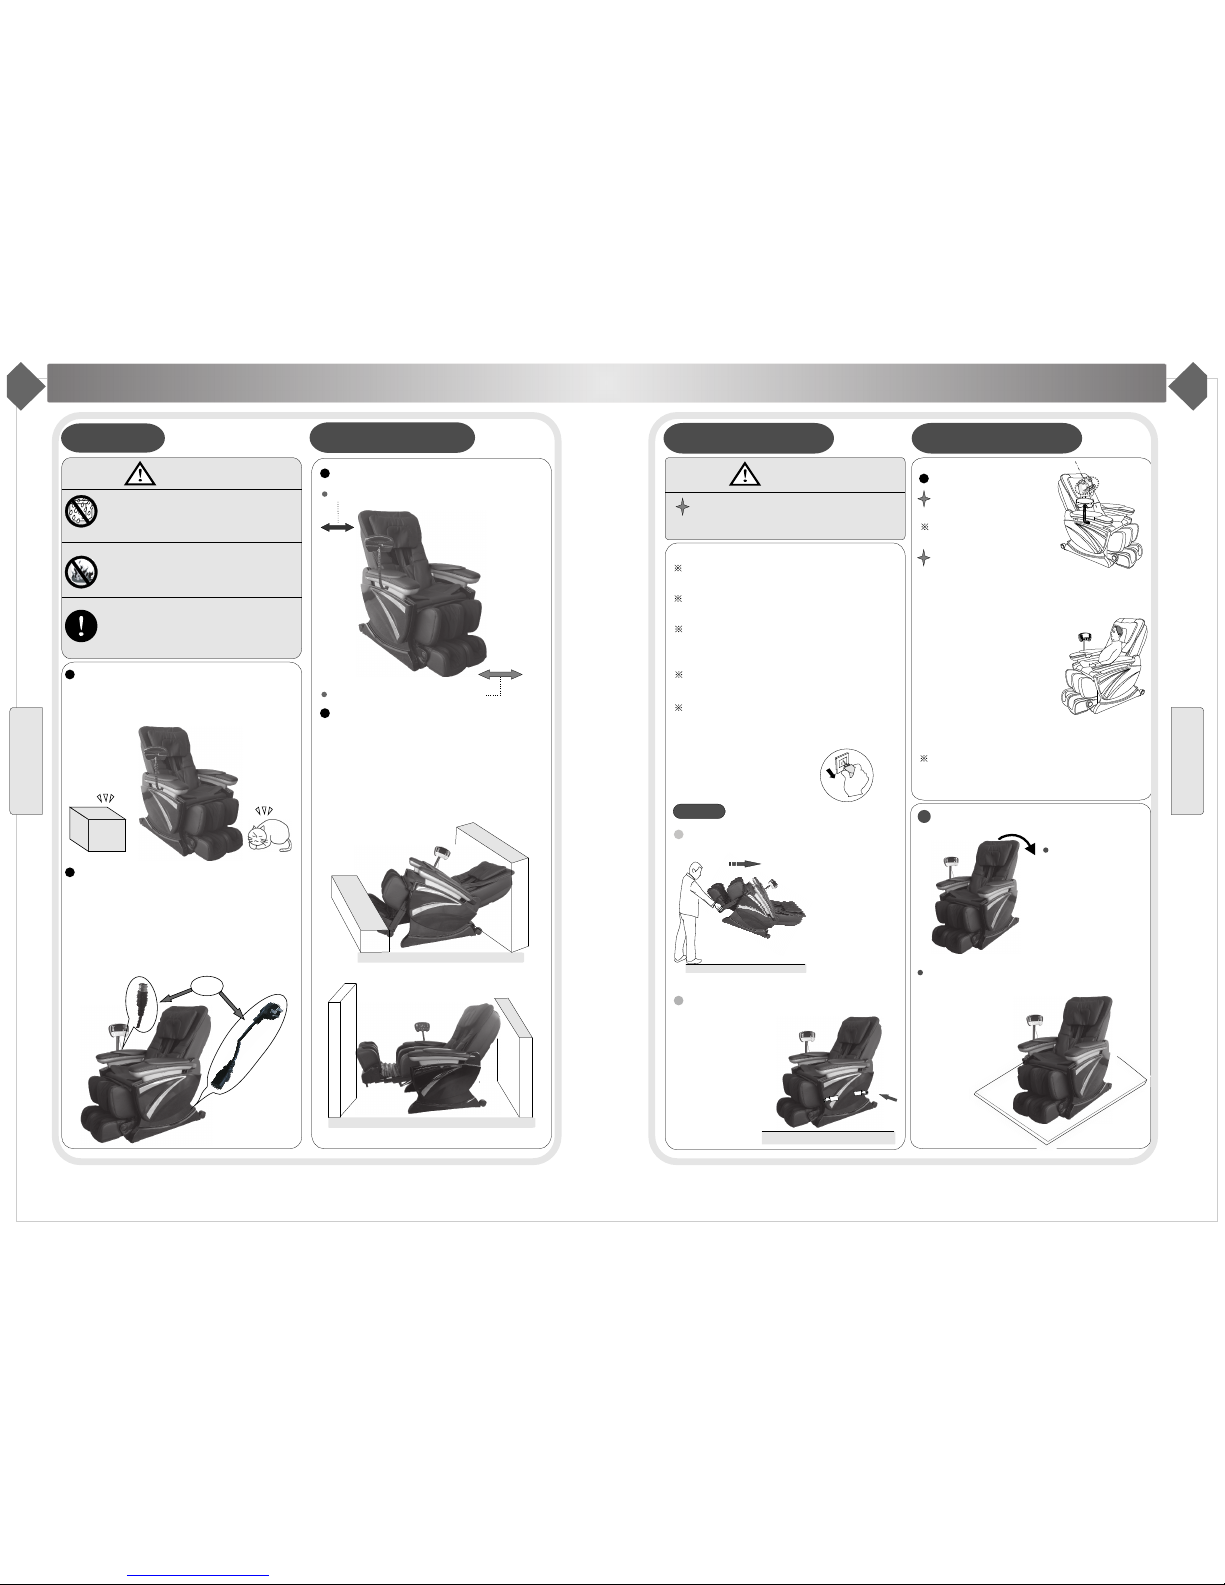
Please operate the chair in a flat or level place.
Position the chair 40cm from the wall to allow for
sufficient space to recline up and down.
The maximum suggested operating time is 20mins. 5mins
for each position beginning with the slight-step massage.
A long continuous massage in the same position may cause
an uncomfortable feeling
Before sitting on the chair to avoid injury please inspect
everything to confirm that the massage heads are in the
correct position.
Please make sure that the power switch is at the “OFF”
position before inserting the plug into the socket.
Turn off all controls before removing plug from outlet.
Make sure the plug completely insert into the socket
Checking whether any damage on wire no water, rubbish
on wire.
Installing earth wire in correct way. The plug must be
inserted into socket with earth connect.
The earth connect couldn't be
bendor cut off.
Don't press with hands or step on the massage heads
with feet.
Don't put hands between the working massage heads.
Don't put hands or feet in the gap of mechanical parts.
Don't drop or embed anything into the slot of massage chair.
Don't stand or sit or put anything on the backrest, armrest
or leg-rest.
Don't stand on the chair during operation.
Don't move the chair during operation.
Don't pull out the plug or turn off the power during operation.
Don't put your hands or head between leg-rest when in
reclining position.
Don't use the massage chair while wearing hair curlers.
Don't sit or press on the backrest when the chair is in
reclining position.
Don't massage on exposed skin or with thin clothes. It may
cause skin ache.
Keep the chair away from heat, wet, sharp things and
corrosive, inflammable, explosive environment.
To use electric blanket or other heating products on the
chair is forbidden
Keep chair away from stove or other warming products.
Don't put the chair under the sun or other high temper-
ature place.
Don't use the chair outside.
To avoid fade, discolor on uphol-
stery or hardened, deterioratedon
PU.
To avoid accidents or injury
To avoid electric shock when
any leakage or damage.
To reduce shortcircuits and any
firehazard.
To avoid the accident when turn
on the power
To avoid accidental injury
Too longtime massageis badfor
yourbody.
To make sure the back lying.
To avoid sudden falling.
Please don't use or store the chair in the wet environment like near
the swimming pool, or bathroom.
Keep the chair and remote control dry all the time
Don't use the chair when your body is wet.
Make sure to install the earth wire in correct way
(Incorrect install way may cause electric shock. If you don't know
how to install, please find a professional electrician)
Don't use plug adapter
(Iftheenclosedplugdoesn'tmatchwithsocket,pleasedon'tchange
theplugbyyourselfandfindaprofessionalelectriciantoinstalla
matchedsocket.)
Unplug the power before cleaning the chair.
Unplug the power after using the chair.
Unplug the power when any damage on the power.
Hold the plug to unplug the power but not try to pull the wire to
unplug the power.
Please turn off the power switch and unplug thepower after massaging.
Unplug the power immediately when electricity goes off.
To avoid damage or accidents
when power goes back.
To avoid accidents
To avoid electric shock or fire
harzard.
To avoid electric shock.
To avoid leakage or electric
shock.
Safety Instruction
Safety Instruction
Caution
Preparation
Preparation
The chair is equipped with a cord having an grounding conductor.
The plug must be plugged into an appropriate socket that is properly
installed and matched with the plug.
5 6
External parts name
External parts
VFD remote control
Holder
Upper right arm
Lower right arm
Seat cushion
Legs
Feet
Pillow
Back cushion
Backrest
Upper left arm
Lower left arm
Back caster
Preparation
VFD remote control
Switch
Power box
Internal parts name
Internal parts
Massage head
Air bags on waist
Air bags on arms
Side air bags on seat
Front air bags on seat
Air bags on leg
Air bags on feet
Air bags on sole
Preparation
7 8
11
1
1
1
1
1
1
1
1
1
1
1
1
2
3
4
5
7
10
11
13
12
14
15
16
18
17
19
20
21
22
1
1
1
1
1
2
22
1
2
3
4
5
6
7
89
10
11
12
13
14
15
16
17
18
19 20
21
1
6
8
9
1
1
Lower left arm assembly
Upper left arm assembly
Left cover
Seat Assembly
Air box
Right cover
Leg assembly
Leg actuator
Back actuator
Lower right arm assembly
Upper right arm assembly
Remote control holder
VFD remote control
Seat cushion assembly
Pillow
Back cushion
Plastic parts on back
Back frame assembly
RK07 massage machine
Back cover
Power box assembly
Mechanical parts view
Mechanical explosive view
Mechanical parts list
No. Name Q’ty No. Name
Castor assembly
Q’ty
Preparation
Preparation
910
Installation illustration
Installation(1)
Step 1.Take out chair
Take out these parts from packaging box: chair body, cushion, pillow, left/right arms, remote control
holder, cables, etc. It need 2 people to take the chair body out. Catching the metal frame( point out in
below picture) and take the main body out from box slowly.
Catch here to take out.
Back cushion
Main body
Pillow
Seat cushion
VFD remote control
Remote control holder Cable
2. Taking two arms from arms box. Catching two sides of the arms and take them out slowly.
left arm right arm
Installation
Installation Illustration
Installation(2)
Step2. Setting the main body
Raising up the back to 120 degree, you could hear a click sound, it means back and buckle of
seat connect well.
Step3. Install lower arms
(1) Unloading the screwM6*16(4pcs) on seat metal frame. Connect the tubes on main body and lower
arm(Purple tube connect with purple one, and black with black); Inserting the rotating shaft in lower arm
into the cap in seat frame; Then, moving the lower arm to make the ledger plate aligns with the holes in
seat metal frame and fix with with screws(4pcs M6*16).
ScrewM6*16
Tube connector Tube should be in front
Ledger plate
Tube
Lower rotating shaft
arm
The parts in circle is connector
between arms and seat
Backledger plate and whole
Rotating shaft and cap
Tube connector
Frontledgerp
late andhole
Installation
On/off
Timing
Mechanical
Massage
Pressure
Massage
ZERO-G
Stop
Shoulder
Wast
Intensity
Fatigue
recovery
Pain
relieving
Comfortable
mood
Demo
Auto Custom
Returning...Bodydetecting...
Overall
Shoulder
Back
Waist
Point
Width
Speed
3D
Strength
Volume
11 12
Notice: (Disassembling arms)
Disassembling arms: Unscrewing the screw which fixes the arm rotating shaft cap and back
rotating shaft with inner hexagon spanner; Moving the seat cushion and then moving the front/
back cover, unscrewing the screws (M6*16). Plugging off the air tubes. Taking off the arms with
two hands.
Installation Illustration
Installation (3)
Step 3.Install lower arms
(2) Unscrewing the screw in the shaft cap, moving the lower arm to make the rotating shaft cap
align with shaft rotating in back, then connect them well. Using inner hexag on spanner to screw
the screw into the lower arm screw hole(as picture).(3) Repeat above step to install another arm.
Installation
Screw Inner hexagon
spanner
Screw hole
Lower arm shaft
rotating cap
Shaft rotating in back
Using inner hexagon
spanner connect the
back shaft rotating
and arm shaft rotating
cap
Finishing the arm installation
Step 4. Install remote control holder and insert remote control
Using three screws(M5*16), three 5 spring shim to fix the remote control to right upper arm, then
insert the remote control into the bracket and fix the remote control cables to the buckle at the end
of the arm.
ф
Remote control
Remote
control
holder
and
bracket
Step 5. Connect seat air tube
Connect the air tubes in seat cushion and seat frame as color (black with black, purple with purple,
gray with gray, brown with brown). Then stick the snap fastener together.
Black air tube Gray air tube
Brown air tube
Seat cushion
Installation Illustration
Installation (4)
Installation
On/off
Tmng
Mechanical
Massage
Pressure
Massage
ZERO-G
Stop
Shoulder
Wast
Intensity
Fatigue
recovery
Pain
relieving
Comfortable
mood
Demo
Auto Custom
Returning...Bodydetecting...
Overall
Shoulder
Back
Waist
Point
Width
Speed
3D
Strength
Volume
13 14
b
a
1
2
3
1
2
3
4
4
Back cushion
Pillow
Finishing the installation of massage chair.
Step 6. Sorting out the zipper and snap fastener
Connect the back cushion, pillow with back.
Kind suggestion
When you sit on the chair, make the bottom of pillow and ear in same line, then connect it with back
in this position. It will make body detection function more correct to get better massage.
Installation Illustration
Installation (5)
Installation
Connect pillow
and back with
snap fastener
Back
Connect back
and back cushion
with zipper
Pillow
Back
cushion
Back cushion
Installation Illustration
Installation (6)
Step 7. Work after installation
After installation, please work as below:
Insert the plug of remote control and power
into the power box in bottom(as picture)
a hole is for remote control
b hole is for power plug
Insert the other end of power plug into
the outlet.
Turn on the power switch.
(Power switch “0/1”, 1 means on.)
Using remoter control to choose massage
program to enjoy the massage.
Installation
On/off
Timing
Mechanical
Massage
Pressure
Massage
ZERO-G
Stop
Shoulder
Wast
Intensity
Fatigue
recovery
Pain
relieving
Comfortable
mood
Demo
Auto Custom
Returning...Bodydetecting...
Overall
Shoulder
Back
Waist
Point
Width
Speed
3D
Strength
Volume
15 16
22
The adjustment before massage
Caution
Environment
Checking environment
Don’t use near swimming pool or bath
room and other wet place to avoid lea-
kage and electric shock.
Don’t use under sunlight or near stove
and other heating place to avoid upho-
lstery deteriorated.
Please using chair in flat place to avoid
chair falling or noise or other unneces-
sary trouble.
Checking areas before chair
Checking the area when back and leg extended,
make sure no people, pet or other things.
Checking power cable, plug
(1) Cleaning the dust on plug on time.
(using dry cloth).
(2) No damage, re-do, bend, stretch, tie or
press with heavy thing(especially can’tbe
pressed by the chair) on power cable.
Check
Space size for using the chair
At least 40cm from back to wall.
At least 40cm in front of the leg.
Checking surroundings
When back reclining, leg reclining, leg
extended and moving seat, pay attention
to:
(1)Checking any person or things in every
direction.
(2)Checking the space size.
Operation
The adjustment before massage
How to move massage chair
Adjustment before massage
Caution
Don’t move chair when it’s working to avoid
accidents or damage
How to move
Binding the cables and put in the seat to avoid
damage when moving.
If you plump the chair, it may damage the inner
parts of the chair.
Don’t use the castor if the floor is wooden or
other easy damaged material. It will need 2
or more persons lift the chair.
Don’t shake the leg, or it may cause damage
on the chair.
Make sure unplug the power and plug can’t
touch the floor(It’s better to
let the chair in standing
status to avoid theback
crashing the floor)
Normally
One person lift the leg to the limited position
and continuing to make
the gravity falls on the
castor, Then pushing
chair to destin-
ationand set it
down.
11
Two persons hold the two arms,
lift and moving the chair
to destination.
Before adjustment
Please make surethe ma-
ssage headin right position,
then sit down(to avoid ma-
ssage roller hit you head)
Shoulder testing
When test shoulder height, if can’t find
the shoulder, the chair has acquiescent
height.
Right position: Your back
cling to the chair back, the
head cling to the pillow.
During testing, the massa-
ge roller goes up and down
to test yourbody, then the
roller stretch out to goes up
to test shoulder, it can test
your shoulder automatically.
Avoid testing out wrong shoulder position,
which makes you can’t get good massage.
Operation
Kind suggestion
When you feel the
intensity isn’t strong,
take off the pillow or
cushion.
Because the chair is heavy, it may ruin
your floor in long time setting.
Please put a blanket or
other soft things to
protect your floor.