Zest LUXLINE Z2316 User manual

LUXLINE
LUXLINE
Strength equipment
SERVICE
AND
MAINTAINENCE MANUAL
MAY 2011

2
To ensure that your Zest equipment provides the user a safe and opti-
mal functionality and is kept in pristine condition, it is vital to establish a
“Daily quick function & maintenance inspection in 11 steps”.
This inspection is quick and easy to follow:
DAILY QUICK FUNCTION & MAINTENANCE CHECK
where applicable
See
page
1
Inspect for loose nuts and bolts - tighten as required
3
2
Check the ease of functioning of the pull-pin or other methods of ad-
justing distances or angle positions.
3
3
Check alignment of the weight plates by inserting the weight stack
pin in random positions.
3
4
Check the operating smoothness of the weight-stack by lifting the
stack a few times to its highest position.
3
5
Check the free movement before the weight-stack is lifted if more
then 15mm cable tension should be adjusted.
4
6
Inspect the cable for kinks, damaged or worn outer sheath and ex-
posed cable wire (including all connection points).
With any visual damage replace cable immediately.
4
7
Check the upholstery for dirt, rips and tears - clean at least twice a
day.
5
8
Inspect handgrips for wear and tear - replace as necessary. 5
9
Check the bushes for wear or excess friction by performing the exer-
cise
5
10
Ensure the readability of all instruction cards and warning labels, re-
place if necessary.
6
11
Inspect the overall cleanliness of the unit, check also for scratches
and corrosion.
6
Overview typical LUXLINE units and their parts 7-8
Warranty 9
Annex: Cable & Upholstery Specification Form 10-11

3
2
Check the ease of functioning of the pull-pin
or other methods of adjusting
PULL-PIN ADJUSTMENT:
The spring loaded pin should click in any location
hole without force.
In failing to do so, unscrew the knurled cap, re-
place pin if bent. Replace spring if damaged then lightly grease the entire pin before
returning into the housing. Should the up or down movement be difficult remove any
burr which may have been formed around the location holes with
a smooth file.
PULL-TWIST ADJUSTMENT
If force is required to twist and lock this adjustment in a differ-
ent position, a burr may have been formed on the slot groove.
Remove the stud and lift the shaft out of its casing, the burr
can now easily filed away with a smooth file.
3
Check alignment of the weight plates by inserting
the weight stack pin in random positions
The alignment might be out if the unit has recently
been moved and/or is not level. Check and level the
weight-stack support by placing spacers under the
legs. Once level, insert the selector pin in the lowest
plate, lift the whole stack and drop +/- 100mm
4
Check the operating smoothness of the weight-
stack by lifting the weight a few times to its highest
position
If any shuddering occurs wipe the guide rods clean over
their entire length and then lubricate with a light coat of
medium weight automotive engine oil
It is also important to check that there is lateral move-
ment of the guide bars, if tight then lower the two bushes
slightly until the grommets above the bush and the guide
bars are able to move freely.
Burr
?
1
Inspect for loose nuts and bolts - tighten as required
Bolts and nuts are secured with a spring washer, it is however essential (from a
safety point of view) to ensure all bolts and nuts are tightened.
Support
Bush
Guide

4
5
Check the cable slack before the weight-stack is lifted, if more then 15mm,
cable should be adjusted
Cable Bolt adjustment.
Fine adjustment can then be done by turning the cable
bolt on the weight-stack down to reduce the free move-
ment.
If the bolt cannot be turned down enough, turn the bolt up
until 15mm thread is visible.
Adjust the cable now on the other end by undoing the two
grub screws on the cam then slide the cable further
through the bush to reduce the free movement and, re-
tighten.
If necessary do a final adjustment by turning the bolt on the weight-stack down.
Cable Eye adjustment.
To reduce the cable slack, first turn down the nylon lock
and un-hook the cable, loosen the lock nut on top of the
weight stack and turn the eye bolt further down into the
weight-stack, hook the cable back in the eye
bolt and check if the free movement is <15mm,
If correct tighten the locknut and turn the nylon cable
lock back against the eye bolt.
Note: Replace cable when the other end has a crimped on Thimble
Bolt
Locknut
Locknut
Nylon lock
6
Inspect the cable for kinks, damaged or worn outer sheath and exposed ca-
ble wire. With any visual damage replace cable immediately
Each new LUXLINE unit is supplied with an extra cable which can easily replace the
worn or damaged cable. However, since we strive to improve our hand built units,
the cable length may vary from unit to unit. Therefore, it is strongly advised to re-
order a new cable immediately by sending the worn cable with the unit’s serial num-
ber to us. This way the unit’s “out of order” is minimised.
For the older units (without the extra cable) it is advisable to order two cables one to
replace the old and one as a future spare.
Please complete the annex “Cable Specification form” and send this to us immedi-
ately.

5
7
Check the upholstery for dirt, rips and tears - Clean at least twice a day.
To keep the upholstery clean, free from perspiration, body oils and salts is not that
simple. The success formula is using our specially developed ZEST surface cleaner
on the upholstery right from the beginning and once cleaned a ZEST sheen is ap-
plied to create a barrier between the body fluids and the vinyl.
ZEST surface cleaner
This cleaner has been designed for surfaces containing grease, oils and stubborn
dirt. Zest Surface Cleaner is a detergent and solvent based all-in-one and complies
well above all SABS 1344 requirements.
Cleaning (warm water):
HEAVY duty dilute 1:10
MEDIUM duty dilute 1:50
LIGHT duty dilute 1: 200
Wipe down soiled upholstery with a soft damp cloth. Follow up by wiping away any
residual cleaning solution with a well rinsed clean cloth.
Protection:
To further restore its lustre and create a barrier between the body fluids and the vi-
nyl apply a light coat of ZEST sheen on a clean damp cloth.
Do not use! Alcohol, acetone or organic solvents for cleaning
Replacement:
Should the upholstery and/or pads require replacement, kindly complete the annex
“Upholstery Specification form” and send this with your order to us.
8
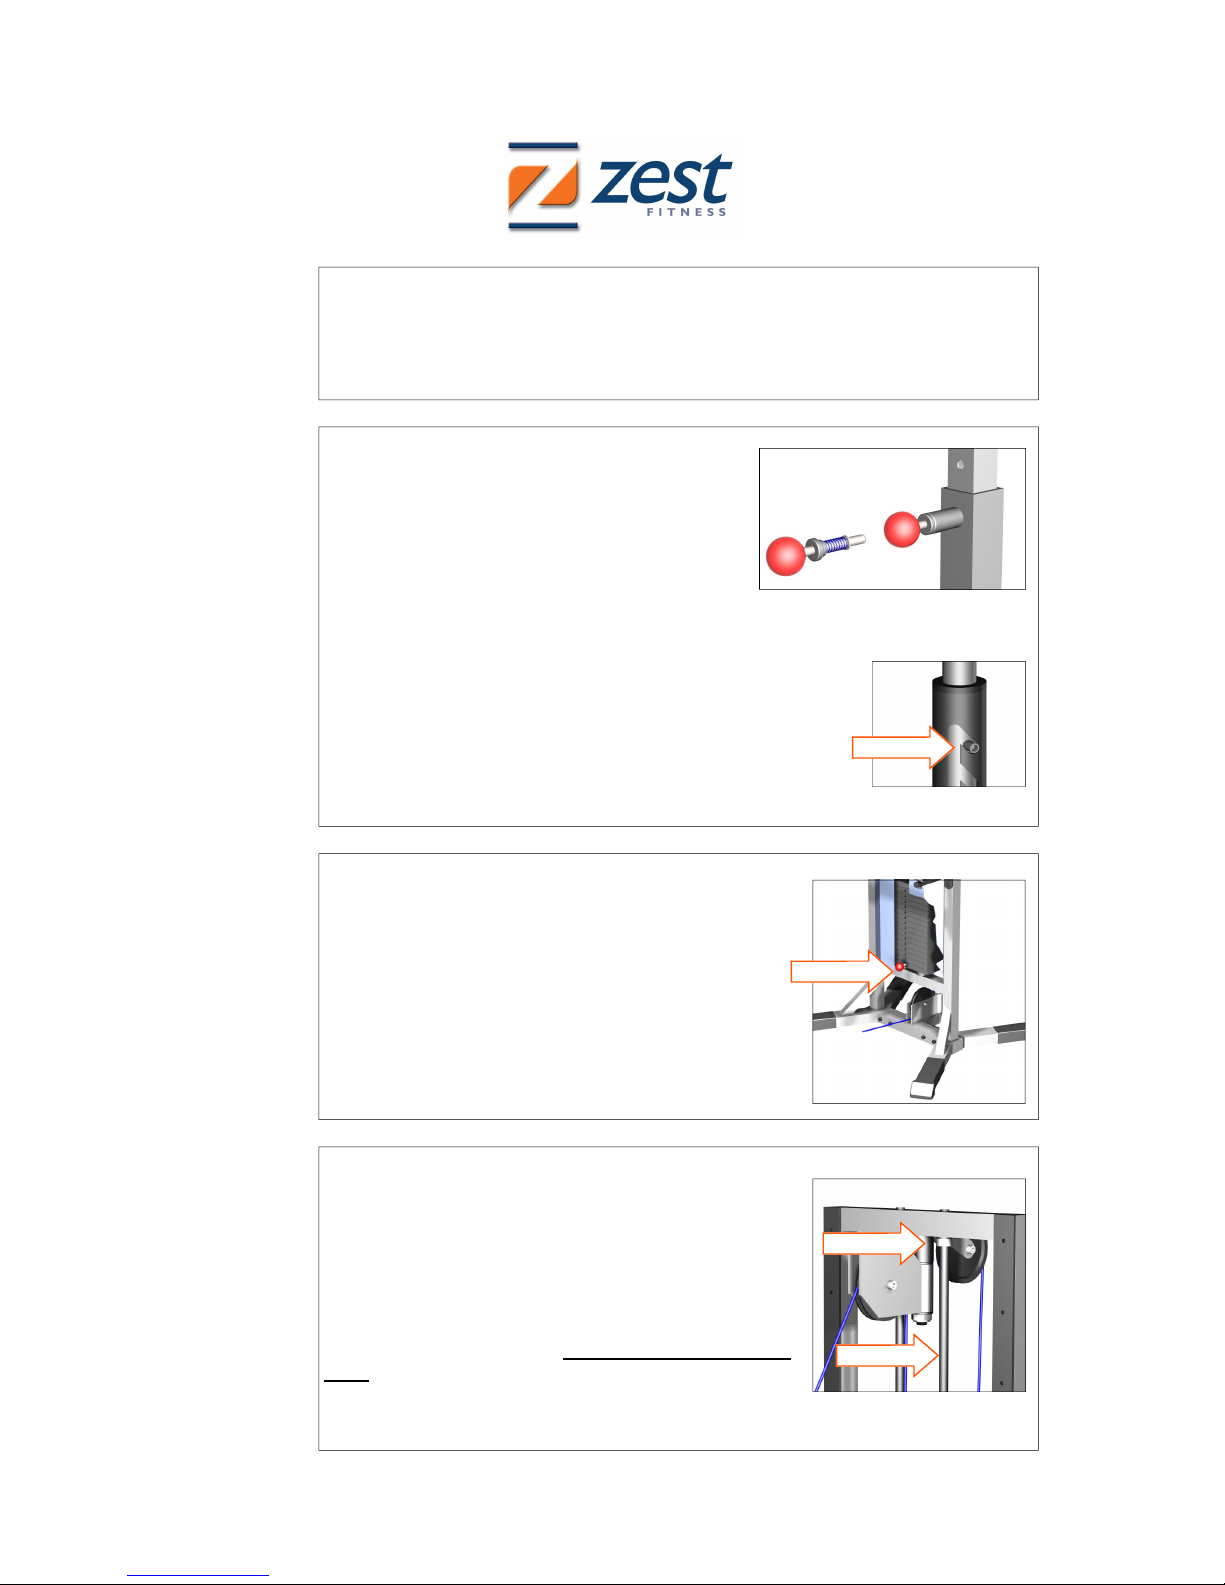
Inspect handgrips for wear or damage and replace as necessary
When replacing hand-grips, check the length and cut the new hand grip with a hobby
knife according to size, before sliding them back on. Ensure the handle bar is clean
and free of any lubricant
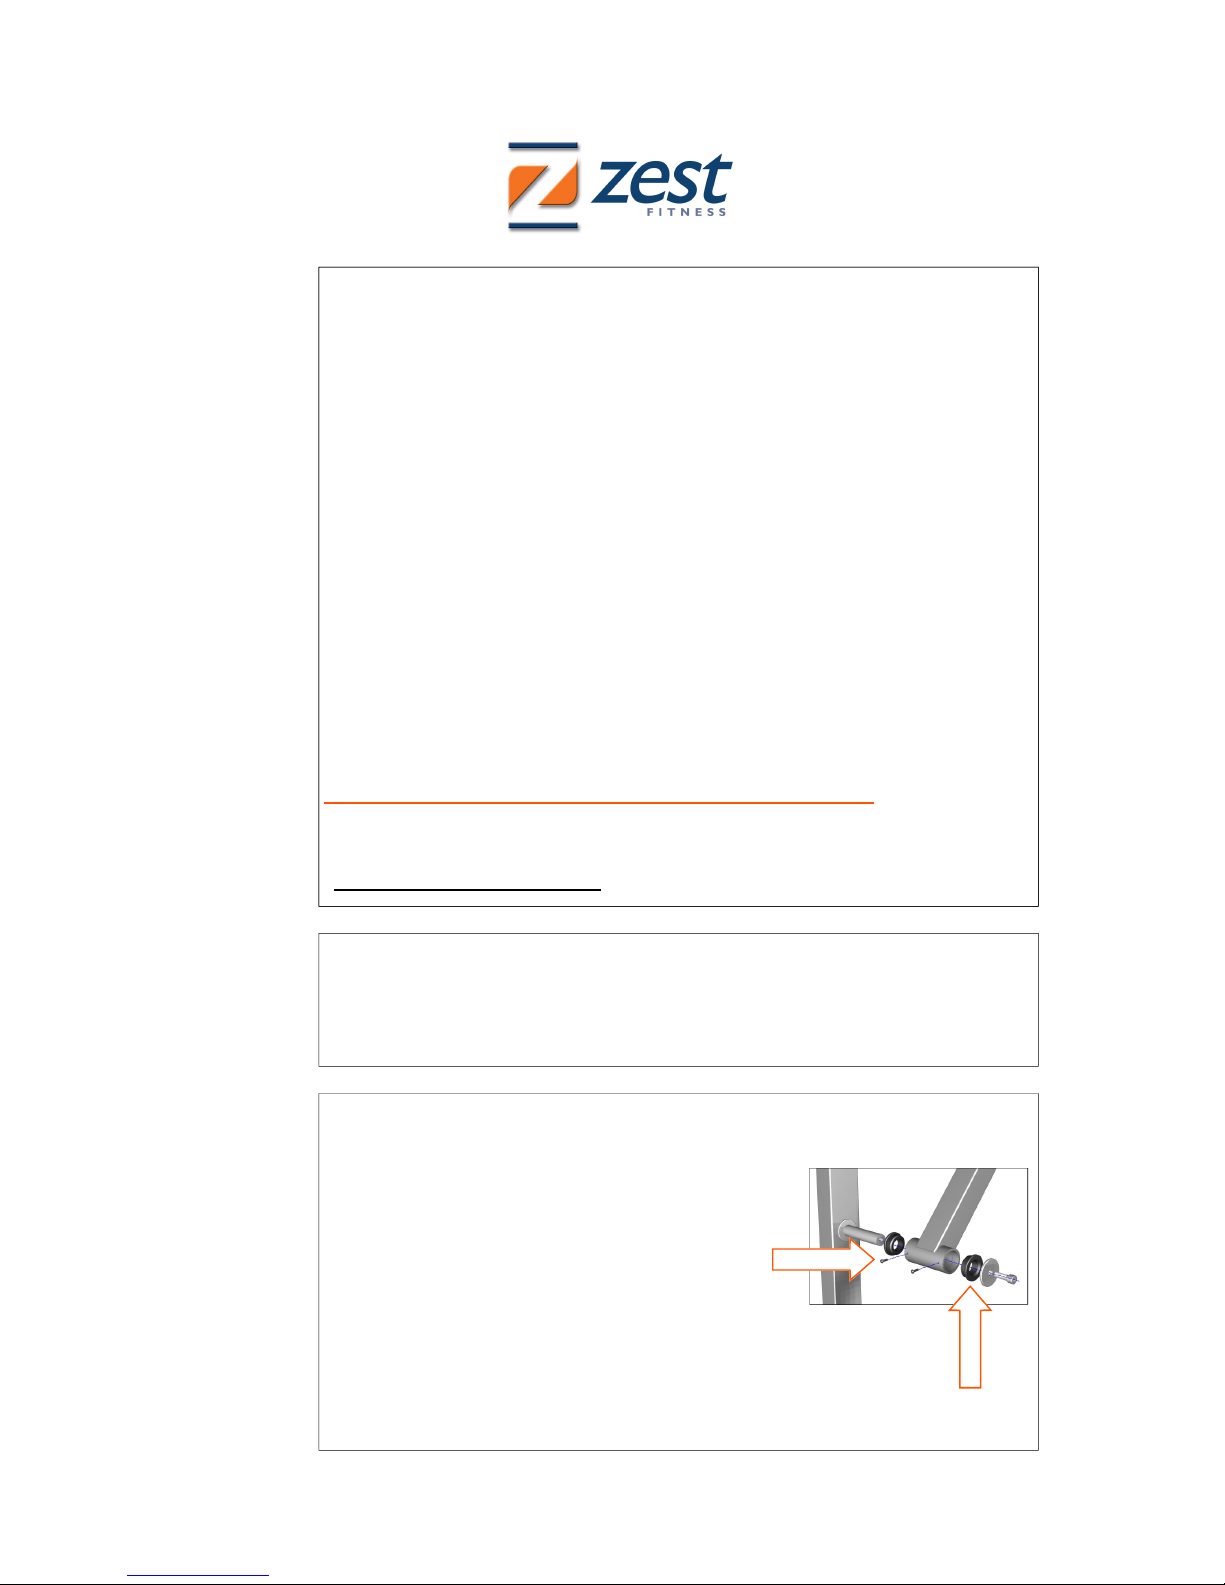
9
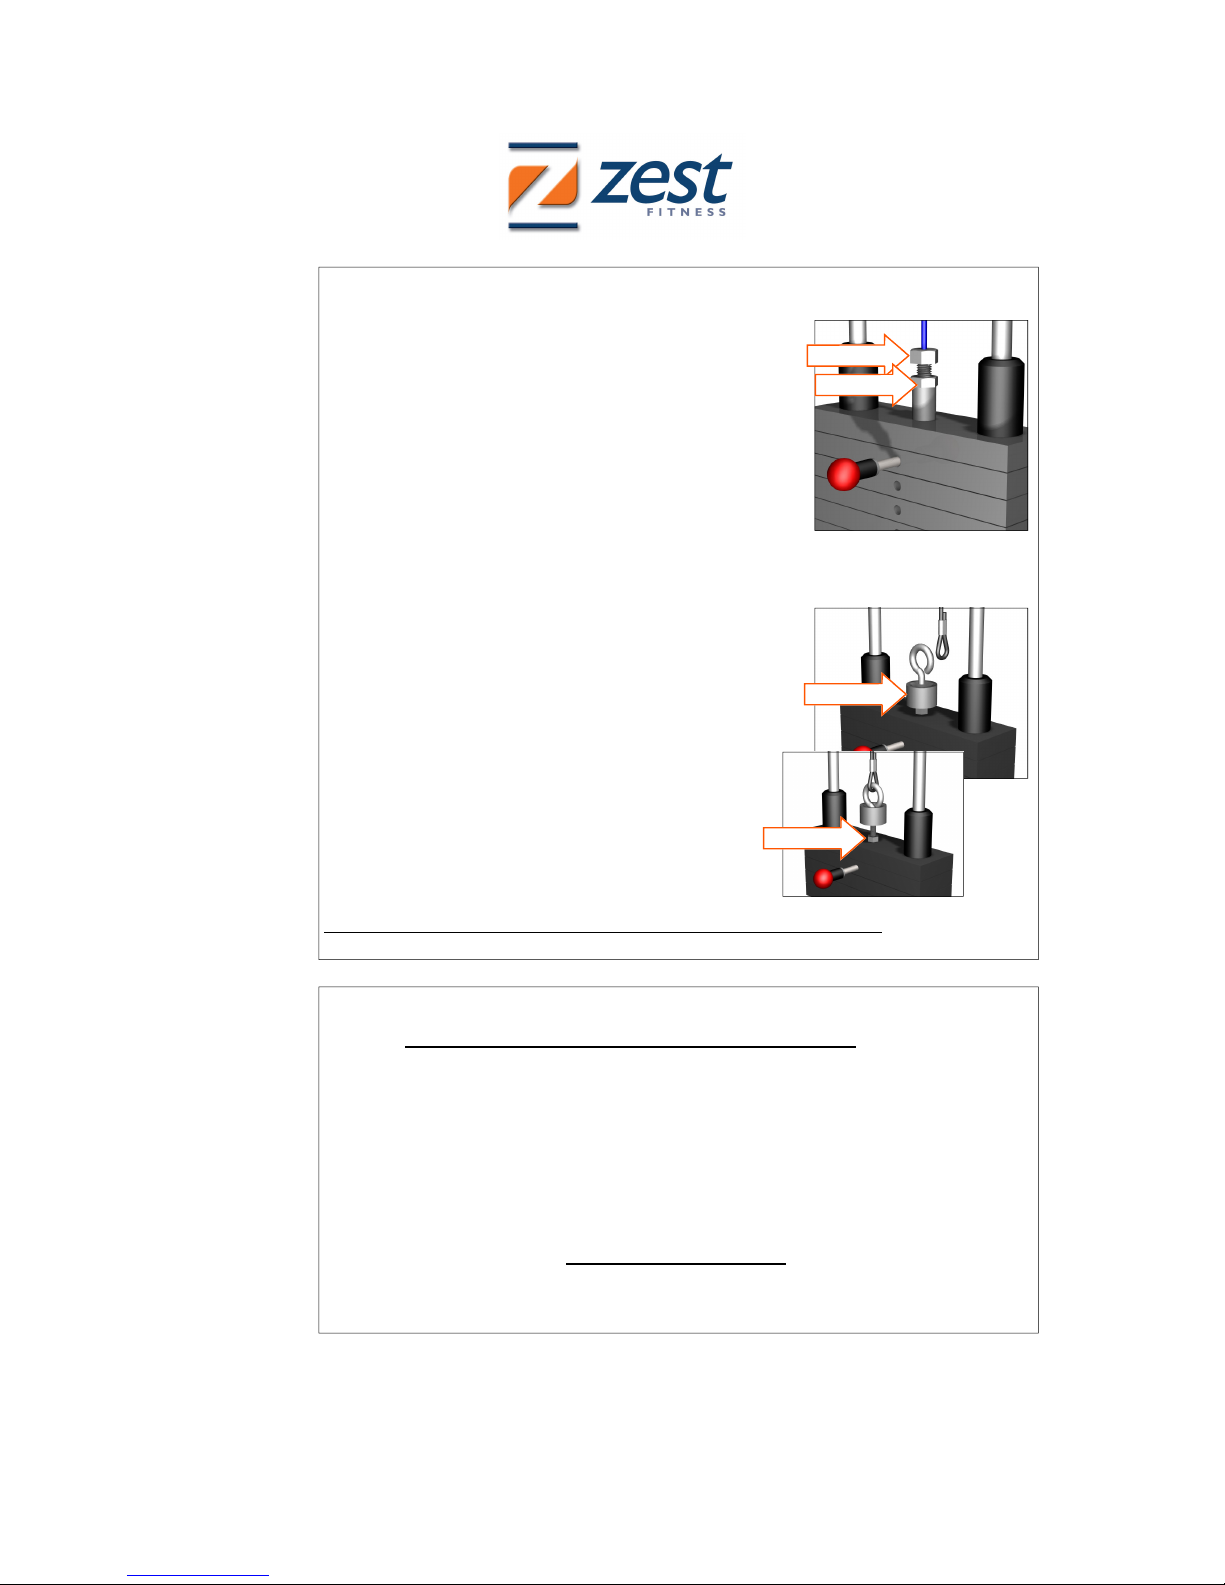
Check the bushes for wear or excess friction by actually doing an exercise
If any rotating bushes are tight or squeaking, lubricate
with a drop of light engine oil. In a rare event a glass rein-
forced nylon bush can be replaced by removing the shaft
and the brass lock pin from the bush housing before
the bush is pulled out. When the bush has been re-
placed re-drill the pin hole 2.8mm and replace the
brass pin.
Older models may not have a brass lock pin in this event
we advice to knock in a brass lock pin by drilling a 2.8mm hole, 10 mm
from housing’s edge into the housing and bush. This is to ensure that the
new bush will not rotate in it’s housing.
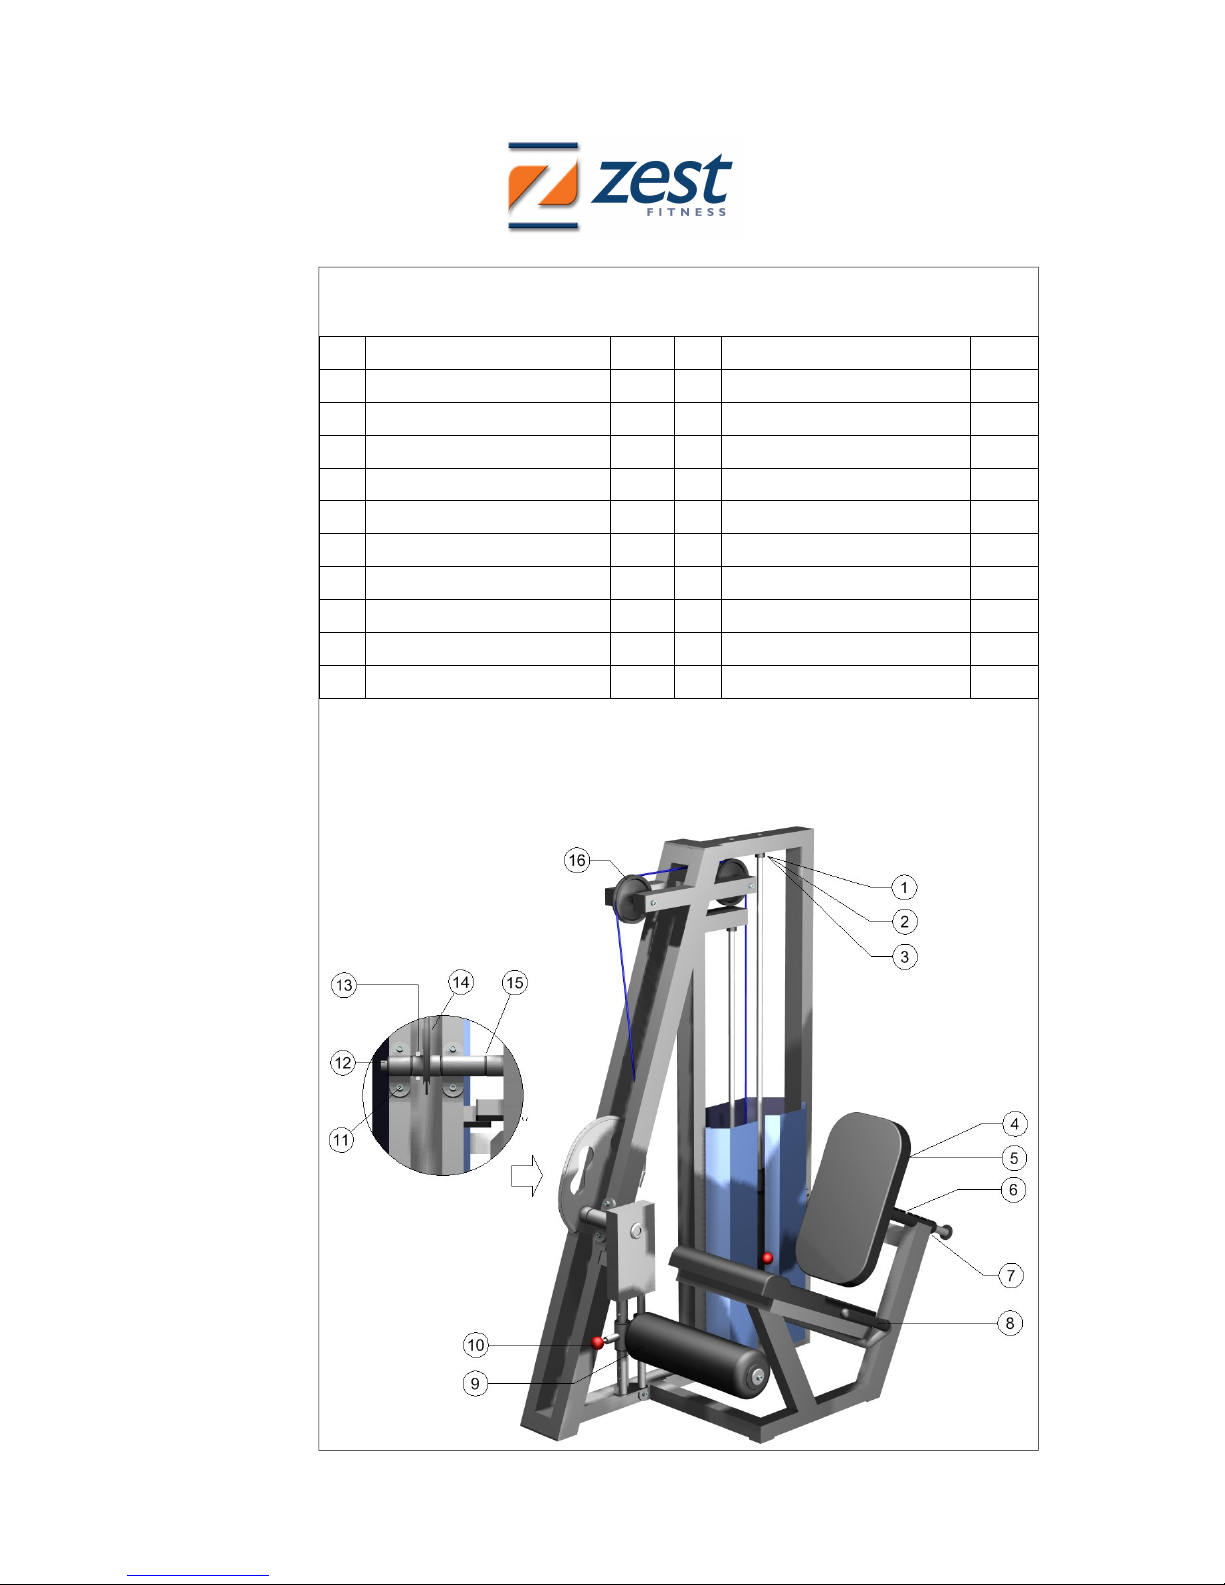
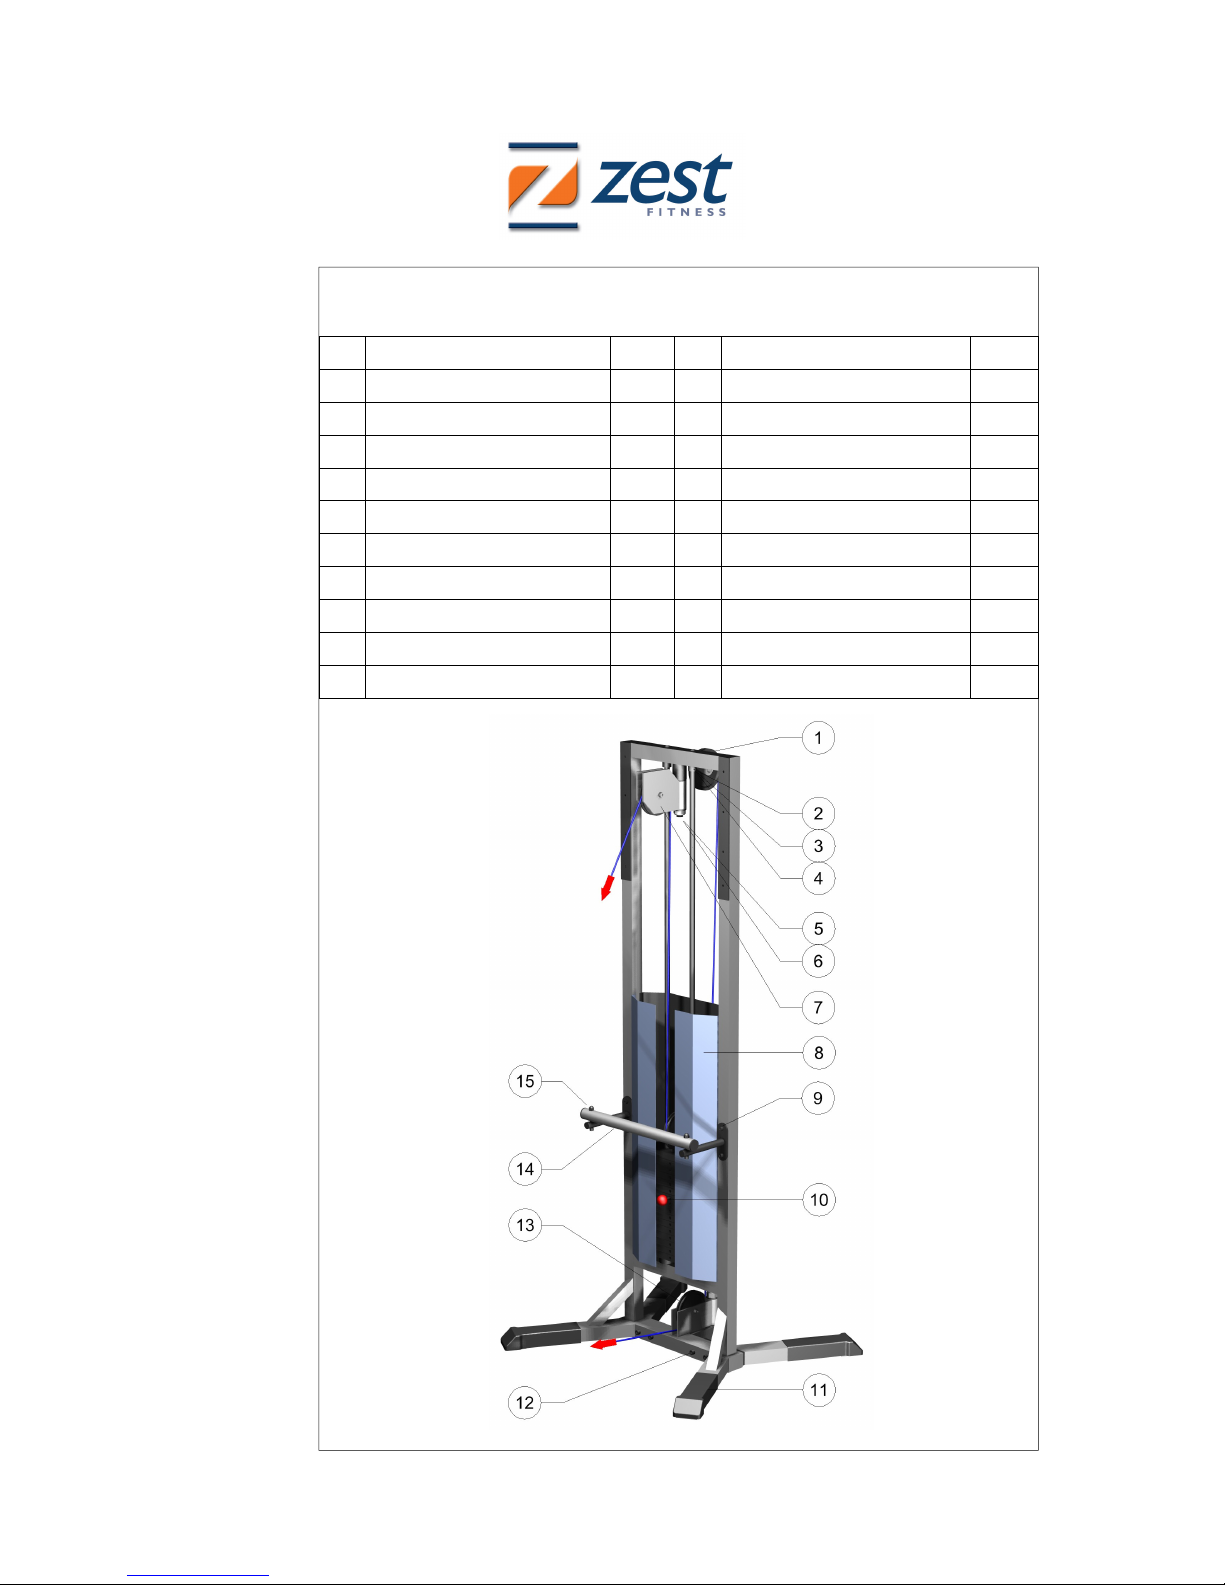
See also the general overview of the typical LUXLINE units (page 7 and 8).
Bush
Brass pin
7
Check the upholstery for dirt, rips and tears - Clean at least twice a day.
To keep the upholstery clean, free from perspiration, body oils and salts is not that
simple. The success formula is using our specially developed ZEST surface cleaner
on the upholstery right from the beginning and once cleaned a ZEST sheen is ap-
plied to create a barrier between the body fluids and the vinyl.
ZEST surface cleaner
This cleaner has been designed for surfaces containing grease, oils and stubborn
dirt. Zest Surface Cleaner is a detergent and solvent based all-in-one and complies
well above all SABS 1344 requirements.
Cleaning (warm water):
HEAVY duty dilute 1:10
MEDIUM duty dilute 1:50
LIGHT duty dilute 1: 200
Wipe down soiled upholstery with a soft damp cloth. Follow up by wiping away any
residual cleaning solution with a well rinsed clean cloth.
Protection:
To further restore its lustre and create a barrier between the body fluids and the vi-
nyl apply a light coat of ZEST sheen on a clean damp cloth.
Do not use! Alcohol, acetone or organic solvents for cleaning
Replacement:
Should the upholstery and/or pads require replacement, kindly complete the annex
“Upholstery Specification form” and send this with your order to us.

6
10
Ensure the readability of all Instruction cards and warning labels,
replace as necessary
From a safety, user responsibility and instruction point of view the
instruction card and Warning label must always be readable - the in-
formation for usage is vital for the exercise and illustrates how the unit
should be operated.
11
Inspect the overall cleanliness of the unit, check also for scratches and
corrosion
Perspiration salts are highly corrosive and will leach into any microscopic opening in
even the most impenetrable paint finishes.
Addressing any signs of paint damage or corrosion when and if they first appear will
greatly increase the longevity of your equipment and enhance the overall appear-
ance.
Equipment should always be dry and cleaned at least once a week.
As with the upholstery here again the success formula is using our specially devel-
oped ZEST surface cleaner on all painted surfaces right from the beginning and
once cleaned a ZEST wax emulsion is applied, this creates a thin layer of durable
wax on the surface to protect it against perspiration salts and make the removal of
skiff marks easier.
Cleaning (warm water):
HEAVY duty dilute 1:10
MEDIUM duty 1:50
LIGHT duty 1: 200
Wipe down the painted surface with a soft damp cloth until the surface is clean, fol-
low up by wiping away any residual cleaning solution with a well rinsed damp clean
cloth.
Protection:
To further protect the now cleaned surface and maintain its lustre a light coat of a
1:10 solution of ZEST wax emulsion must be applied on a damp cloth followed with
light rub using micro fibre or towelling.
Do not use! Alcohol, acetone, organic solvents or scouring pads for cleaning
Touch up paint is available for any sign of corrosion or to cover any deeper scratches
contact Zest Service to order.
As a side note - Exposure to extensive water vapour, chlorine and/or bromide can
adversely affect the finish of the units.

7
12
Schematic overview indicating the replaceable parts of a LUXLINE Z2316
Item Description Ref no. Item Description Ref no.
1 Grommet 18 I/D 11 M10 S/Steel Dome nut
2 Collar S/Steel 32/20 x 15 12 Collar S/Steel 36/25 x 15
3 M8 x 8 mm Grub screw 13 Tapere steel pin (on cam)
4 M8 x 25 Allen cap screw 14 M10x10 Grub screw (on cam)
5 M8 Flat washer 15 Nylon bush 49/25/25 x 17.5
6 M10 Stu (lift & twist a juster) 16 Pulley assembly
7 Nylon bush 42/35/25 x 22.5
8 PVC han grips
9 Roller pa 150 ia x 500
10 Pull-pin (replacement kit)
Note:
To replace the nylon bushes (15) firstly remove the tapered pin (13)
by carefully tapping with a hammer the thin end to loosen it, then
remove the collar (12) and pull-out the shaft. The bushes can now be
replaced (See also ref. 9 on page 5)

8
12
Schematic overview indicating the replaceable parts of a LUXLINE Z2205
Item Description Ref no. Item Description Ref no.
1 Pulley assembly 11 Feet covers
2 Grommet 18 I/D 12 M10x100 Allen cap + Dome nut
3 Collar S/Steel 32/20 x 25 13 Swivel pulley (bottom)
4 M8 x 8 mm Grub screw 14 Han rail
5 M24 Lock nut 15
6 Nylon bush 42/35/25 x 22.5
7 Swivel pulley (top)
8 Cage panels (set)
9 M10 x 65 Allen cap + Dome nut
10 Weight selector pin

9
WARRANTY
• The basic framework of our new LUXLINE equipment carries a warranty
against breakage for a period of 10 (ten) years.
• Dumbbells / EZ Bars and loose Weight plates are warranted against breakage
for a period of 1 (one) year.
• All non-frame fixtures and moving parts are warranted against defective work-
manship and/or materials for a period of 1 (one) year.
• Parts subject to normal wear and tear are not included in the warranty. These
include plastic coated cables, handgrips and other rubber items, nylon bushes,
bearings, foot covers, pin cords and upholstery.
• The powder coating is warranted for a period of 3 (three) years. Damaged and
the consequential corrosion thereof caused by scraping, chipping and abrasive
cleaning is not covered by the warranty.
• Our warranty shall be null and void if the equipment is not used for its intended
purpose, mishandled and/or abused.
• All warranty will be null and void in the event of a repair or a modification being
executed by any technical service without the written prior authorisation of
Zest Manufacturing (Pty) Ltd.
Notice:
The information contained in this manual is subject to change without notice.
Zest Manufacturing (Pty) Ltd. shall not be liable for errors contained herein or for inci-
dental or consequential damages in connection with furnishing performance, or use
of this manual.
No part of this manual may be photocopied, reproduced or translated to another lan-
guage without the prior written consent of Zest Manufacturing (Pty) Ltd.

10
Zest Manufacturing (Pty) Ltd trading as Zest Fitness
5 Celie Road
Retreat
7945
Cape Town
PO Box 236
Steenberg
7947
South Africa
T +27 (0)21 701 3203
F +27 (0)21 701 3225
www.zestfitness.com
CABLE SPECIFICATION FORM
Please supply the following information with your purchase order and fax to 021 701 3225
Cable can not be supplied unless all relevant information is received
Complete the following details:
Company :_______________________ Order placed by : ______________________
Fax no. :_______________________ Tel. no. :_______________________
Cable type
(A)(B)(C)(D)
Quantity
Model No.
(ZP)
Serial / Asset
No.
Weight stack
(kg)
Cable length
(mm)
(A)
(B)
(C)
(D)
Form completed by :
____________________________
Date: _______________________
Please note:
1. The physical length of the existing cable should be accurately measured as illustrated
below.
2. There are 4 cable types (A), (B), (C) and (D) and should be clearly indicated.
3. The Model and serial / asset no. can be found on the plate on the base of the unit.
4. Any cable supplied by Zest as per given specification that is found to be incorrect on
delivery will be at the cost to the client.

11
Zest Manufacturing (Pty) Ltd trading as Zest Fitness
5 Celie Road
Retreat
7945
Cape Town
PO Box 236
Steenberg
7947
South Africa
T +27 (0)21 701 3203
F +27 (0)21 701 3225
www.zestfitness.com
UPHOLSTERY SPECIFICATION FORM
Please supply the following information with your purchase order and fax to 021 701 3225
Upholstery can not be supplied unless all relevant information is received
Description Colour
Width
(mm)
Model No.
(ZP)
Serial/Asset
No.
Length
(mm)
Customer signature: ____________________________
Date: ____________________________
Complete the following details:
Customer :_______________________ Order placed by :_______________________
Fax no. :_______________________ Tel. no. :_______________________
Since we strife to improve our hand build units, the position of the fixing holes may vary
from unit to unit, for this reason all upholstery parts will be supplied without nut inserts.
However the upholstered part will come with an easy to follow instruction, special designed
nut inserts, M8 x 35 cap screws, washers and a Brad pointed 11 dia. drill bit.
Please note:
1. State a brief description of the part such as: Backrest, Seat, Arm support, etc.
2. The physical length and width of the existing part.
3. The Model and serial / asset no. can be found on the plate on the base of the unit.
4. Any upholstered part supplied by Zest as per given specification that is found to be
incorrect on delivery will be at the cost to the client.
This manual suits for next models
1
Table of contents
Other Zest Fitness Equipment manuals
Popular Fitness Equipment manuals by other brands

Spirit Commercial
Spirit Commercial ST800FT owner's manual

Keiser
Keiser INFINITY 003020BP Operation manual

Hoist Fitness
Hoist Fitness 880-3D Assembly instructions

ParaBody
ParaBody 880 user guide

SCENAR-COSMODIC
SCENAR-COSMODIC EX715Ag user guide

ShoulderSphere
ShoulderSphere ShoulderSphere Instructions for use