ZKTeco ZL700 User manual
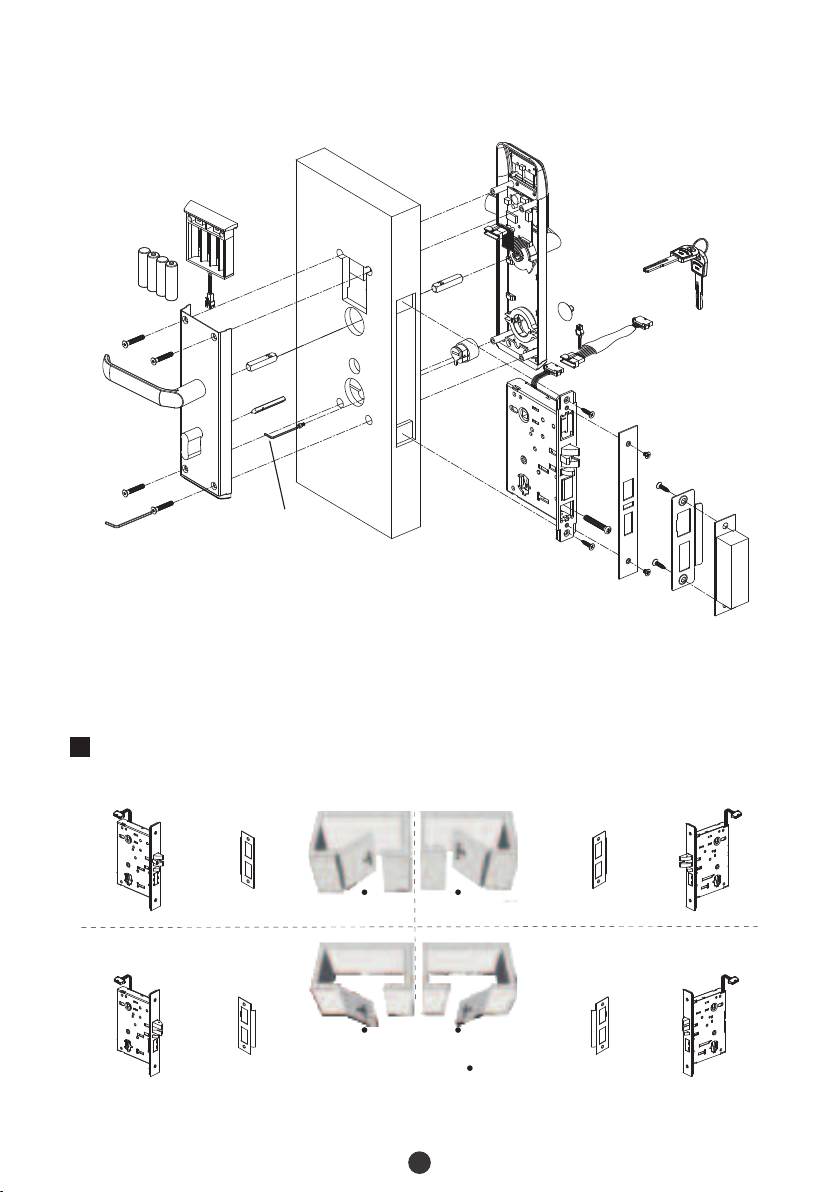
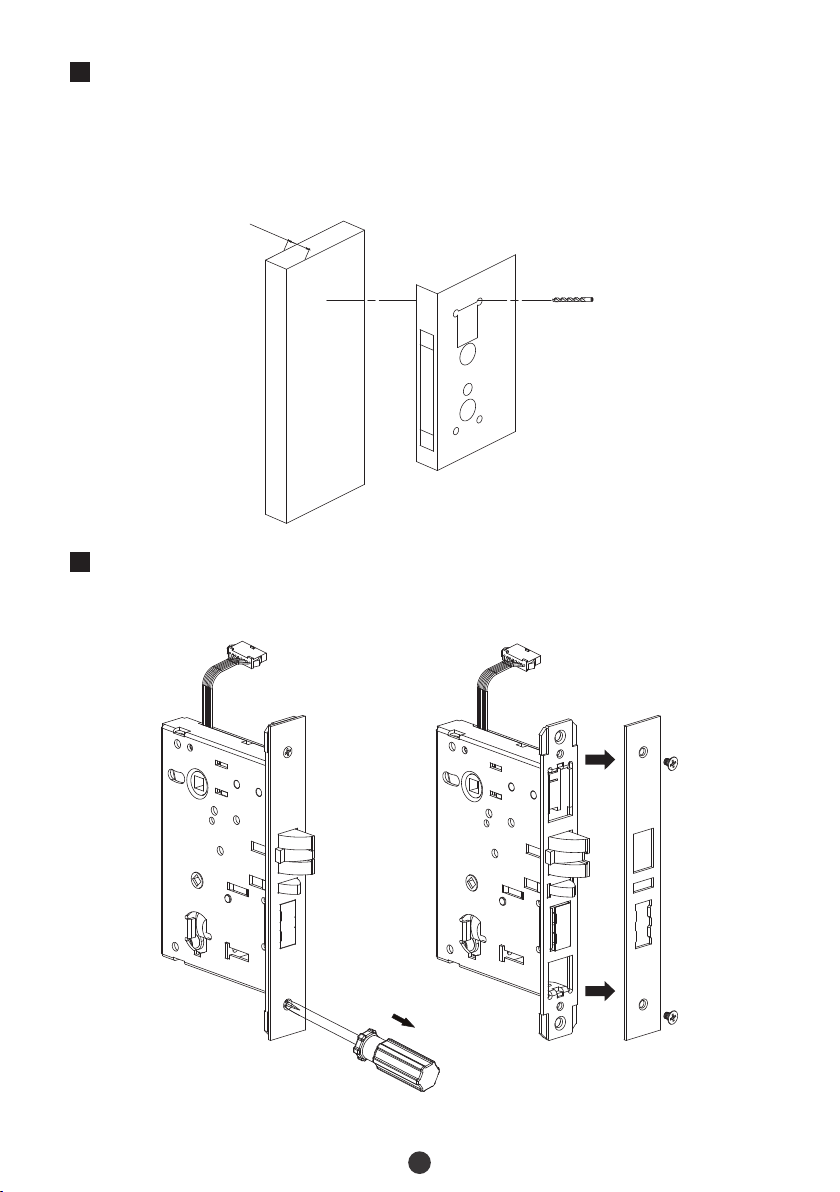
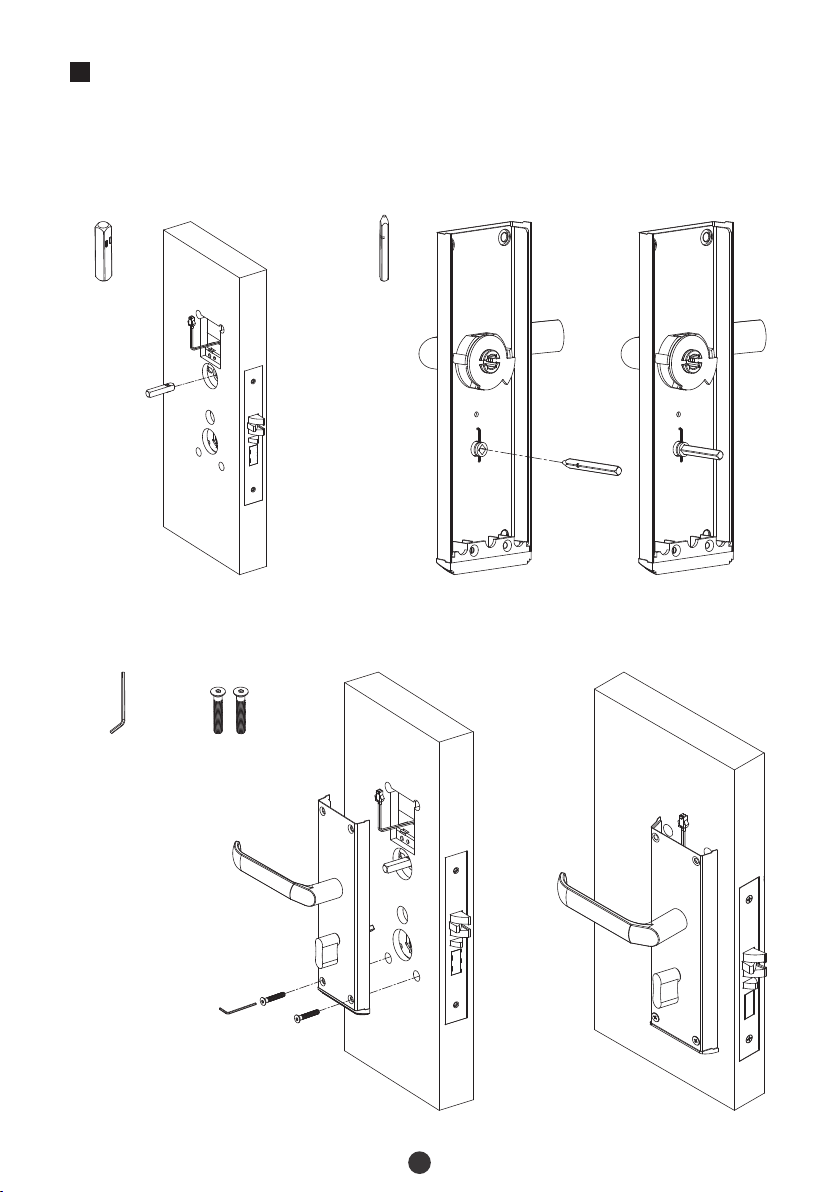
A new lock is defined as always in open mode until it is locked once by a IC card.Please register an authorized card, a time sync card, and a room card initially for the new lock.The lock is equipped with keys for manual unlocking. Remove the keys from the package and keep them in a safe place.To power on the lock, four alkaline AA batteries (not included) are required. Non-alkaline and rechargeable batteries ARE NOT RECOMMENDED.Do not remove the batteries when the lock is in working state.When the battery power is low, the lock will beep to remind the user to replace the batteries. Make sure not to mix up the polarities while replacing the batteries.Avoid contact with corrosive substances. Do not hang any object on the handle.The built-in software manages the operation of access cards. Please refer the software user manual.
1.
2.
3.4.5.6.7.8.For further queries, please contact the seller.Important Notes

Table of ContentsPacking List.....................................................................................................................1Installation Diagram.......................................................................................................2Installation Procedure....................................................................................................21. Check Opening Direction.......................................................................................................................22. Drill Holes on the Door.............................................................................................................................33. Remove the Guide Plate..........................................................................................................................34. Installing Mortise.......................................................................................................................................45. Installing Outdoor Unit............................................................................................................................56. Installing Indoor Unit...............................................................................................................................67. Installing Strike Plate and Box...............................................................................................................78. Test the Lock by Mechanical Key.........................................................................................................8

Packing List1ABABScrew EScrew BScrew CScrew DMortiseCylinderBattery BoxIndoor UnitOutdoor UnitStrike Plate and BoxSpindleHex WrenchKeysVacuum SuckerScrew ATransfer CableNote: This type of lock is suitable for a door thickness of 36 mm to 55 mm. If the door is thicker than 55 mm, this lock will not be suitable. Please contact the sales person for queries.

2Installation DiagramInstallation Procedure1Check Opening DirectionScrew EHex Wrench BIndoor UnitScrew EBattery (not include)Battery Box
Spindle ASpindle B
Hex Wrench A
Screw D
Spindle A
Cylinder
Mortise
Screw C
Screw BScrew AScrew BScrew AScrew BKeysTransfer CableVacuum SuckerOutdoor UnitDoorStrike Plate and BoxPerson LocationLeft InwardRight InwardLeft OutwardRight OutwardMortiseStrike PlateStrike PlateMortiseMortiseStrike PlateStrike PlateMortiseNote: Please install the Mortise and Strike Plate according to the above illustration.

32Drill Holes on the Door Paste the Installation Template at the desired handle height.Mark for the holes to be drilled and drill the marked places.1)2)3Remove the Guide PlateUnscrew the Screw A and remove the Guide Plate.
36 to 55 mm
Installation Template

Screw B44Installing MortiseMake sure the side of Mortise without circle points is toward outdoor, then insert the Mortise into the drilled hole, secure it with Screw B.Make sure the Cylinder toward Outdoor Unit, secure Cylinder with Screw C and Screw D by Hex Wrench A.Secure the guide plate with Screw A, make sure the cable toward Outdoor Unit.1)2)3)Note: Screw C has been secured in the Mortise before delivery.Hex Wrench AScrew DScrew AScrew CCylinder

55Installing Outdoor UnitConnect 6 PIN end of Transfer Cable with Mortise cable.Insert a Spindle A into the clutch toward Outdoor Unit.Attach the Outdoor Unit to the door by connecting 8 PIN end of Transfer Cable with mainboard on the drilled holes. 1)2)3)

66Installing Indoor UnitInsert another Spindle A into clutch toward Indoor Unit, and insert the Spindle B into turn knob.Secure the below of Indoor Unit with 2 Screw E.1)2)Spindle ASpindle BScrew EHex Wrench B

7Connect the cable of Battery Box with Transfer Cable, put in 4 Alkaline AA batteries, and insert the Battery Box into Indoor Unit.Secure the Battery Box and Indoor Unit with 2 Screw E.3)4)Screw EHex Wrench B7Installing Strike Plate and BoxMake sure that the Strike Box is aligned with the latch bolt. Then, use the Installation Template to drill holes. Align the Strike Plate and Box with the drilled holes and secure them with Screw B. 1)2)Screw B
131mm89.5mm*29.5mm
4mm27mm

88Test the Lock by Mechanical KeyRemove the cover on the key hole with the Vacuum Sucker.Insert the key into the Cylinder and rotate it by 90°, then rotate down the handle to open the door, it means normal.1)2)KeysVacuum Sucker

Cerradura Hotelera de Estándar Americano de 5 PestillosVersión: 1.0Modelo: ZL700Guía de InstalaciónEspañol

La cerradura por estándar se encuentra en modo siempre abierto hasta que se bloquee una vez con una tarjeta IC.Registre una tarjeta autorizada, una tarjeta de sincronización de hora y una tarjeta de habitación inicialmente para la nueva cerradura.La cerradura está equipada con llaves para desbloqueo manual. Saque las llaves del paquete y guárdelas en un lugar seguro.Para encender la cerradura, se requieren cuatro pilas alcalinas AA (no incluidas). NO SE RECOMIENDAN pilas recargables y no alcalinas.No quite las baterías cuando la cerradura esté en funcionamiento.Cuando la carga de la batería es baja, la cerradura emitirá un pitido para recordarle al usuario que debe reemplazar las baterías. Asegúrese de no mezclar las polaridades al reemplazar las baterías.Evite el contacto con sustancias corrosivas. No cuelgue ningún objeto de la manija.El software integrado gestiona el funcionamiento de las tarjetas de acceso. Consulte el manual del usuario del software.
1.
2.
3.4.5.6.7.8.Para más consultas, póngase en contacto con el vendedor. Precauciones

Tabla de ContenidoContenido.......................................................................................................................1Diagrama de Instalación................................................................................................2 Proceso de Instalación...................................................................................................21. Dirección de Apertura..............................................................................................................................22. Realice los Agujeros en la Puerta..........................................................................................................33. Remueva la Placa Guía.............................................................................................................................34. Instalación del Mortaja............................................................................................................................45. Instalación de la Unidad Interior...........................................................................................................56. Instalación de la Unidad Interior...........................................................................................................67. Instalación de la Placa de Contrachapa..............................................................................................78. Pruebe la Cerradura con la Llave Mecanica.......................................................................................8

1Nota: Esta cerradura es apta para un grosor de puerta de 36 mm a 55 mm. Si la puerta es ms gruesa de 55mm, esta cerradura no es apta para su proyecto. Por favor contacte a suagende de ventas.ContenidoABAB Unidad Exterior Unidad InteriorCilindroCaja de Baterías Mortaja PernoCable de transferenciaPlaca de Caja Contrachapa Llave Mecánica Llave Hexágonal Tornillo A Tornillo B Tornillo C Tornillo D Tornillo EVentosa de Succin

1Nota: Por favor instale el mortaja y la placa de contrachapa de acuerdo a esta ilustracin.Diagrama de Instalación Unidad Exterior
Cilindro
Caja de Baterías Mortaja Tornillo A Tornillo B Tornillo B Tornillo APlaca de Caja Contrachapa Tornillo BCable de transferenciaLlave Mecánica Llave Hexágonal A
Tornillo D
Perno B Perno A
Llave Hexágonal B Tornillo E Unidad InteriorVentosa de Succin
Perno A
Tornillo ELa puertaBaterías(no incluidas) Proceso de InstalaciónDirección de Apertura MortajaPlaca de ContrachapaPlaca de Contrachapa Mortaja MortajaPlaca de ContrachapaPlaca de Contrachapa MortajaPosición del UsuarioInterior IzquierdaInterior DerechaExterior IzquierdaExterior Derecha
Tornillo C
2

2Coloque la plantilla de instalación a la altura deseada de la manija.Marque los agujeros a perforar y perfore los lugares marcados.1)2)3Remueva la Placa GuíaDesatornille el tornillo D y retire la placa guía.
36 to 55 mm
Realice los Agujeros en la Puerta
Plantilla de Instalación
3

44Instalación del MortajaAsegúrese de que el lado de la mortaja sin los puntos circulares esté hacia el exterior, luego inserte la mortaja en el orificio perforado y fíjela con el tornillo B.Asegúrese de que el cilindro esté orientado hacia la unidad exterior, asegure el cilindro con el tornillo C y el tornillo D con la llave hexágonal A.Asegure la placa guía con el Tornillo A, asegúrese de que el cable apunta hacia la Unidad Exterior.1)2)3)Nota: El tornillo C se ha asegurado en la mortaja antes de la entrega. Tornillo C Tornillo BCilindro Llave Hexagonal A Tornillo D Tornillo A

55Instalación de la Unidad InteriorConecte el extremo de 6 pines del cable de transferencia con el cable de Mortaja.Inserte un eje A en el embrague hacia la unidad exterior.Fije la unidad exterior a la puerta conectando el extremo de 8 pines del cable de transferencia con la placa principal en los orificios perforados.1)2)3)Cable de transferencia

66Inserte otro eje A en el embrague hacia la unidad interior e inserte el eje B en el pomo giratorio.Asegure la parte inferior de la unidad interior con 2 tornillos E.1)2)Instalación de la Unidad Interior Perno A Tornillo E Llave Hexagonal B Perno B
Table of contents
Languages:
Other ZKTeco Door Lock manuals

ZKTeco
ZKTeco AL30 Series User manual

ZKTeco
ZKTeco L9000 User manual

ZKTeco
ZKTeco AL10B User manual

ZKTeco
ZKTeco LH3600 User manual

ZKTeco
ZKTeco LH6000 User manual

ZKTeco
ZKTeco ML200 Series User manual

ZKTeco
ZKTeco HBL400 User manual

ZKTeco
ZKTeco L4000 User manual

ZKTeco
ZKTeco LH4000 User manual

ZKTeco
ZKTeco ZL400 User manual

ZKTeco
ZKTeco ZL500 User manual

ZKTeco
ZKTeco AL-130 Series User manual

ZKTeco
ZKTeco DL30B User manual

ZKTeco
ZKTeco ML300 Series User manual

ZKTeco
ZKTeco AL10DB User manual

ZKTeco
ZKTeco L5000 User manual

ZKTeco
ZKTeco AL30 Series User manual

ZKTeco
ZKTeco TL400B User manual

ZKTeco
ZKTeco ML10 Series User manual

ZKTeco
ZKTeco ZL600 User manual