AGB OPERA iControl User manual

Alban Giacomo spa
ISTRUZIONI DI MONTAGGIO / ASSEMBLY INSTRUCTIONS
Alban Giacomo Spa
Via A. De Gasperi, 75 - 36060 Romano d’Ezzelino (VI) - Italy
1309 - CPR - 0414 DoP n. 00104 19
EN 14846:2008 3 X 8 D 0 J 2 0 1
Chiusura automatica / Self-closing ability
Forza di chiusura / Closing force ≤15 N
Forza di ritorno dello scrocco / Return force of the latch ≥2,5 N
Durabilità dell’azione di chiusura automatica / Durability of self-closing action
Durabilità del meccanismo dello scrocco / Durabillity of latch action 200000 cicli / cycles
120 N carico / load
Capacità di mantenere la porta chiusa, e non contribuire alla propagazione del fuoco
Ability to maintain the door in closed position, and not contribute to the spread of fire
Resistenza a carico laterale sullo scrocco / Resistance to side load on latch bolt ≤3 kN
Idoneità all’utilizzo su porte tagliafuoco/antifumo / Suitability for use on fire/smoke doors.
Test report fuoco 18/18155-1842 12/03/19 Applus laboratories porta ad anta singola in legno
con due cerniere con rif. “X503”. / Test report no. 18/18155-1842 12/03/19 Applus laboratories.
Two hinged timber single leaf doors with reference “X503”.
Grado D / Grade D:
60 min.
Controllo delle sostanze pericolose / Control of dangerous substances
Presenza di sostanze dannose / Presence of dangerous substances nessuna / none
Sicurezza - funzione elettronica / Security - electrical function
Funzione elettronica / Electrical function
Manipolazione elettronica / Electrical manipulation
Grado 0 / Grade 0
Grado 1 / Grade 1
Serratura da utilizzare su porte di compartimentazione al fuoco/antifumo
Lock to be used on fire and/or smoke control doors

2ISTRUZIONI DI MONTAGGIO / ASSEMBLY INSTRUCTIONS - (V.3)
Schema di foratura - incontro / Milling diagram - striker
16 3
3
49 35,5147
280
R.7,5
R.7,5
R.7,5
16 33
2919,5
22
23
23
3
40,5
10
X
Schema di foratura - serratura / Milling diagram - lock
ø20
38
ø20
17
8
38
100
225 24,624,6
274,2
70 26
R.9
R.9 (X= 18)
R.11 (X= 22)
256,2 (X=18)
252,2 (X=22)
207 =
3
Altezza maniglia / Handle height
67 85 55
207
ø8
ø8
=
Frontale 18/22
Forend 18/22
Cavità interna 18
Internal groove 18
*Foroidoneoaldiametrodelleboccoleodellevitipassantidellemaniglie.
* Hole suitable for bushing diameter or through screws of handles.
* *

3ISTRUZIONI DI MONTAGGIO / ASSEMBLY INSTRUCTIONS - (V.3)
Strumenti necessari per il montaggio / Necessary tools for assembly
2,5 mm
Composizione sistema / System components
D3,5x20 mm
Kit serratura / Lock kit
M4x40 mm
M4x50 mm
Porta batteria / Battery holder Cover / Cover
M4x60 mm
D4x50 mm
D4x55 mm
D4x60 mm
D4x70 mm
M4
VITI
LEGNO
SCREWS
FOR WOOD
VITI
METRICHE
METRIC
SCREWS

4ISTRUZIONI DI MONTAGGIO / ASSEMBLY INSTRUCTIONS - (V.3)
Montaggio / Assembly
9÷24 V
AC / DC
click
NC
NO
C
1
Verde
Green
Marrone
Bianco
Brown
White
Contatti retrosegnalatore
(opzionale)
Signal system contacts
(optional)
23

5ISTRUZIONI DI MONTAGGIO / ASSEMBLY INSTRUCTIONS - (V.3)
4
Formula per il calcolo della misura XX del cilindro
Formula for calculation of XX cylinder measure
0+4 Max. 5,5
XX min.
A+P*+L-5 XX max.
A+P*+L-1 XX
A+P*+0,5
5
10
xx
A
L
P*
5
NB. Per ordinare il mezzo cilindro fare
riferimento al Listino Generale AGB.
Note. To order the half cylinder, please make
reference to the AGB general price list.
*Se presente *If present

6ISTRUZIONI DI MONTAGGIO / ASSEMBLY INSTRUCTIONS - (V.3)
Utilizzo rosette AGB
Use the AGB escutcheons
Spessore porta
Door thickness
Y=40÷42
M4x40 mm
ø4x50 mm
Y=42÷45 ø4x55 mm
Y=45÷47
Y=47÷50 ø4x60 mm
Y=50÷52
M4x50 mm
Y=52÷55 ø4x65 mm*
Y=55÷57
Y=57÷60 ø4x70 mm
Y=60÷62
M4x60 mm
Y=62÷65 ø4(4,5)x75 mm*
Y=65÷67
Y=67÷70 ø4(4,5)x80 mm*
Y=70÷72
M4x70 mm*
Y=72÷75 ø4 (4,5) x85 mm*
Y=75÷77
Y=77÷80 ø4 (4,5) x90 mm*
Y=80÷82
M4x80 mm*
Y=82÷85 ø4 (4,5) x95 mm*
Y=85÷87
Y=87÷90 ø4(4,5) x100 mm*
* Non incluse / * Not included
Y
6A
Y
Y
6B
Utilizzo rosette in commercio / Use the escutcheons in the market
Spessore porta
Door thickness Y=40÷50 Y=50÷60 Y=60÷70 Y=70÷80 Y=80÷85
2 x M4x40 mm 2 x M4x50 mm 2 x M4x60 mm 2 x M4x70 mm* 2 x M4x80 mm*
* Non incluse / * Not included

7ISTRUZIONI DI MONTAGGIO / ASSEMBLY INSTRUCTIONS - (V.3)
8
7
x3
910
click

8ISTRUZIONI DI MONTAGGIO / ASSEMBLY INSTRUCTIONS - (V.3)
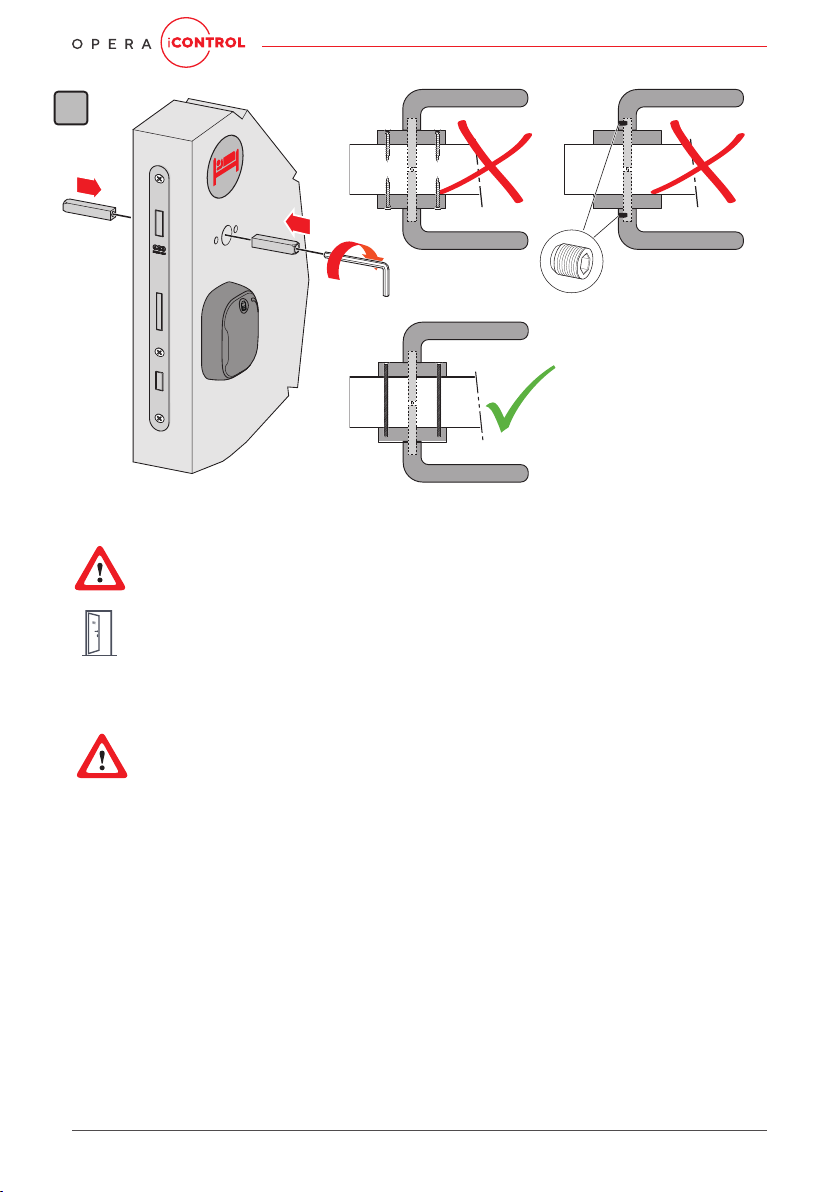
NB. E’ necessario l’utilizzo
di maniglia con impugnatura
solidale alla rosetta e viti
passanti.
Note. It is necessary to use the
handle with suitable grip for the
washer and through screws.
11
Dopo dieci impulsi dati con serratura ed incontro
non allineati viene meno il dialogo tra serratura ed
incontro; per ripristinare il corretto funzionamento
del sistema è necessario effettuare la procedura
di allineamento come descritto al paragrafo
“Manutenzione”. La stessa procedura è da
effettuarsi in caso di sostituzione dell’incontro.
After ten impulses where lock and striker are not
aligned, the connection between lock and striker could
be damaged; to set the correct system functioning, i t is
necessary to repeat the procedure of lock inizialitation
as indicated in the paragraph “Maintenance”. The same
procedure has to be done in case of striker replacing.
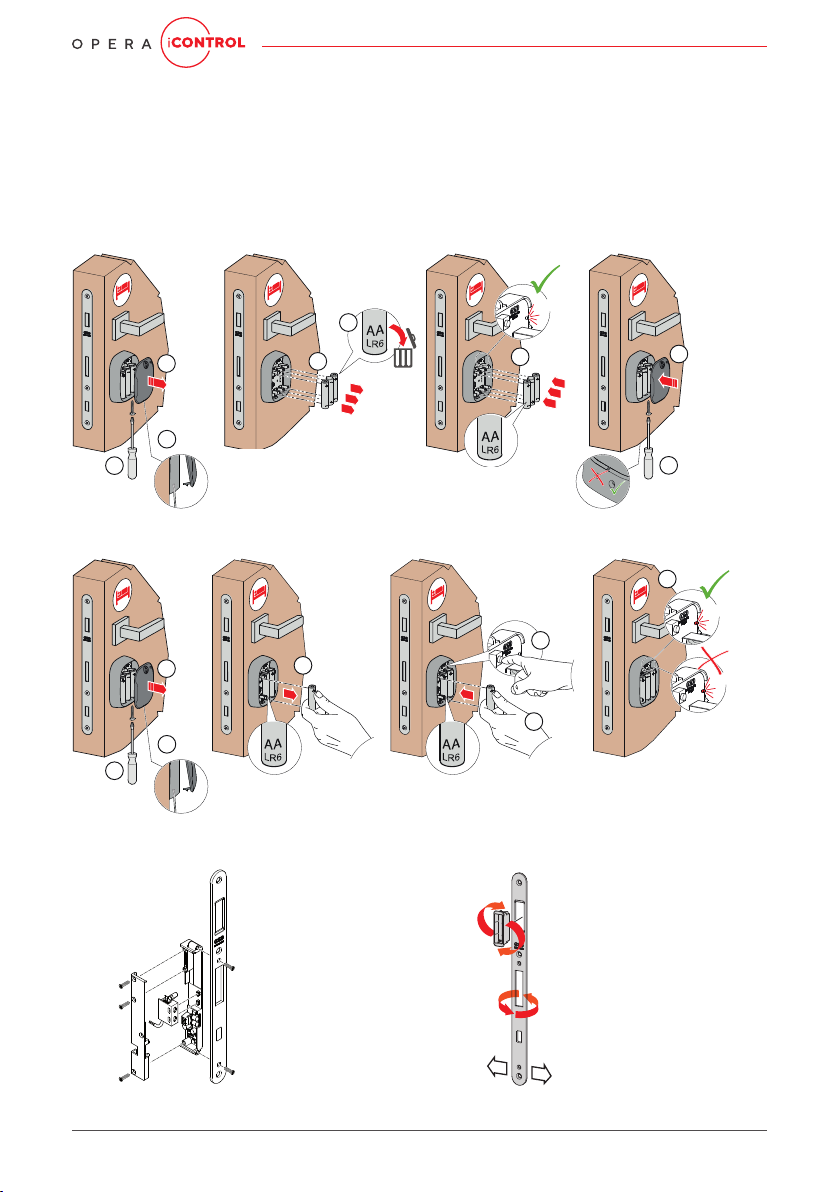
All’acquisto, la maniglia è sbloccata da entrambi i lati.
When you buy the handle, it is unlocked in both sides.
Il primo impulso aziona il motore e blocca la maniglia sul
lato corridoio.
The first approach acts the motor and blocks the
handle on the hallway side.

9ISTRUZIONI DI MONTAGGIO / ASSEMBLY INSTRUCTIONS - (V.3)
Campi di applicazione / Application fields
2÷4
-10 / +55 C°
32÷100
(44÷63)*
32÷100
(44÷63)*
2÷4
max
200
max
200
AB
min. max.
A16 mm 55 mm
B16 mm 55 mm
A+B = 100 mm max.
* Con le viti incluse nel kit / * With the screws included in kit.

10 ISTRUZIONI DI MONTAGGIO / ASSEMBLY INSTRUCTIONS - (V.3)
Manutenzione / Maintenance
Pulizia: Pulire con un panno morbido asciutto. Non usare prodotti abrasivi o a base di solventi.
Cleaning: Clean using a soft dry cloth. Do not use abrasive or solvent-based products.
Sostituzione batterie: 3 batterie 1.5V AA (LR6)
Batteries replacement: 3 batteries 1.5V AA (LR6)
c
a
b
d
e
f
x3
g
h
Procedura di riallineamento / Procedure of realignment
c
a
b
d
e
f
x10
x3
g
±1,5 mm
Aggiunta retrosegnalatore.
Signal system addition.
Regolazione di pressione.
Pressure adjustment.

11ISTRUZIONI DI MONTAGGIO / ASSEMBLY INSTRUCTIONS - (V.3)
Avvertenze / Warnings
1
Le caratteristiche di sicurezza di questo prodotto sono
essenziali per la sua conformità alla norma EN 14846.
Nessuna modifica di qualsiasi tipo, diversi da quelle
descritte in queste istruzioni, è consentita.
The safety features of this product are essential to its
compliance with EN 14846. No modification of any
kind, other than those described in these instructions,
is allowed.
2
I seguenti elementi sono stati testati ed approvati per
l’utilizzo con la serratura elettronica Opera iControl:
- Mezzo cilindro di sicurezza AGB
- Quadro sdoppiato AGB, B59901.XX.XX
- Connettore, B61010.03.01
These elements have been tested and approved for use
with the electronic lock Opera iControl:
- Security half cylinder AGB
- Split spindle AGB, code B59901.XX.XX
- Connector, code B61010.03.01
3Questa serratura elettronica non è adatta all’utilizzo su
porte a doppia azione.
This electronic lock is not intended for use on double
action doors.
4Prima di installare la serratura elettronica, assicurarsi
che la porta sia incernierata correttamente e non ci siano
ostacoli alla rotazione della porta.
Before fitting the electronic lock to a door, the door
should be checked to ensure correct hanging and free-
dom from binding.
5Assicurarsi che le guarnizioni montate sulla porta non
inibiscano il corretto funzionamento della serratura.
Take care that any seal or weather-stripping fitted to the
complete door assembly does not inhibit the correct lock
operation.
6
Durante l’installazione è necessario seguire attenta-
mente le istruzioni di fissaggio. Queste istruzioni, e le
istruzioni di manutenzione, devono essere consegnate
dall’installatore all’utilizzatore.
The fastening instructions must be carefully followed
during installation. These instructions and any mainte-
nance instruction must be passed on by the installer to
the user.
7
Dove la serratura elettronica debba essere montata su
porte a doppia anta a battente e dispositivi di autochiu-
sura, deve essere montato un dispositivo per il coordina-
mento della chiusura della porta in conformità alla norma
EN 1158, per assicurare la corretta sequenza di chiusura
delle ante. Ciò è particolarmente importante per le porte
resistenti al fuoco / fumo.
Where the electronic lock is to be fitted to double door-
sets with rebated meeting stiles and self-closing devices,
a door coordinator device in accordance with EN 1158
needs to be fitted to ensure the correct closing sequence
of the doors. This is particularly important with regard to
fire/smoke resistant door assemblies.
8Tutti i componenti indicati per l’installazione devono
essere applicati per assicurare la conformità alla Norma
Europea EN 14846.
All components specified for the installation shall be
fitted in order to ensure compliance with the European
Standard EN 14846.
9
Con la presente Alban Giacomo SpA dichiara che questo
apparecchio è conforme ai requisiti essenziali ed alle
altre disposizioni pertinenti stabilite dalla direttiva 1999/5/
CE. La dichiarazione di conformità può essere consultata
al sito: www.agb.it
By means of the present, Alban Giacomo SpA declares
that this equipment fulfills the essential requirements and
any other applicable disposition of the directive 1999/5/
CE. The declaration of conformity can be found at the
internet address: www.agb.it

Z90030.14.11 - (V.3) - 02.20 - Communications Dept. - Printed in Italy
Alban Giacomo spa
Via A. De Gasperi, 75
36060 Romano d’Ezzelino (VI) Italy
+39 0424 832 832
Table of contents
Other AGB Door Lock manuals
Popular Door Lock manuals by other brands

Assa Abloy
Assa Abloy Corbin Russwin EcoFlex NAC Series Installation and wiring instructions

Häfele
Häfele StealthLock 237.56.350 Mounting instructions

Assa Abloy
Assa Abloy MSL sFlipLock standard Assembly and operating instructions

Schlage
Schlage KC9000-LG installation manual

Kaba Mas
Kaba Mas DKX-10 installation guide

Assa Abloy
Assa Abloy 179B S4 Mounting instruction