Zodiac ALPHA iQ iAquaLink CONTROL User manual

Instruc ons for installa on and use - English
Electric robo c cleaner
Transla on of the original instruc ons in french
H0655700.A - 2019/09 - EC1102A
More documents on:
www.zodiac.com
ALPHA™ iQ EN

1
WARNINGS
GENERAL WARNINGS
• Failure to respect the warnings may cause serious damage to the pool equipment or cause serious injury, even death.
• Only a person qualifi ed in the technical fi elds concerned (electricity, hydraulics or refrigera on) is authorised to perform any servicing or repairs
to the appliance. The qualifi ed technician working on the appliance must use/wear personal protec ve equipment (such as safety goggles and
protec ve gloves, etc.) in order to reduce the risk of injury occurring when working on the appliance.
• Before handling the machine, ensure that power is switched off and isolated from the power supply.
• The appliance is intended to be used with pools for a specifi c purpose; it must not be used for any purpose other than that for which it was
designed.
• This appliance is not intended for use by persons (including children) with reduced physical, sensory or mental capabili es or lack of experience
and knowledge, unless they have been given supervision or instruc on concerning use of the appliance by a person responsible for their safety.
• Keep the appliance out of the reach of children.
• The appliance must be installed according to the manufacturer’s instruc ons and in compliance with local standards. The installer is responsible
for installing the appliance and for compliance with na onal installa on regula ons. Under no circumstances may the manufacturer be held
liable in the event of failure to comply with applicable local installa on standards.
• For any work other than the simple user maintenance described in this manual, the product should be referred to a qualifi ed professional.
• Incorrect installa on and/or use may cause serious damage to property or serious injuries (possibly causing death).
• All equipment, even postage and packing paid, travels at the risks and perils of the recipient. The la er shall issue reserves in wri ng on the
carrier's delivery slip if damage is detected, caused during transport (confi rma on to be sent to the carrier within 48 hours by registered le er).
• If the appliance suff ers a malfunc on, do not try to repair it yourself; instead contact a qualifi ed technician.
• Refer to the warranty condi ons for details of the permi ed water balance values for opera ng the appliance.
• Deac va ng, elimina ng or by-passing any of the safety mechanisms integrated into the appliance shall automa cally void the warranty, in
addi on to the use of spare parts manufactured by unauthorised third-party manufacturers.
• Do not spray insec cide or any other chemical (infl ammable or non-infl ammable) in the direc on of the appliance, as this may damage the body
and cause a fi re.
• Do not touch the fan or moving parts and do not place any objects or your fi ngers in the vicinity of the moving parts during opera on of the
appliance. Moving parts can cause serious injury or even death.
WARNINGS ASSOCIATED WITH ELECTRICAL APPLIANCES
• The electrical supply to the appliance must be protected by a dedicated 30 mA diff eren al residual current protec on device (RCD), complying
with the standards and regula ons in force in the country in which it is installed.
• Do not use any extension lead when connec ng the appliance; connect the appliance directly to a suitable power supply circuit outlet.
• Before carrying out any opera ons, check that:
- The required input voltage indicated on the appliance ra ng plate corresponds with the mains supply voltage;
- The mains supply service is compa ble with the power requirements of the appliance and is properly grounded;
- The plug (where applicable) is compa ble with for the socket.
• In the event of abnormal opera on or the release of odours from the appliance, turn it off immediately, unplug it from its power supply and
contact a professional.
• Before any access to the appliance for service or maintenance, ensure that it is switched off and completely disconnected from the power
supply. Furthermore, in addi on to confi rming that the hea ng priority (where applicable) is deac vated, ensure that any other equipment or
accessories connected to the appliance are also disconnected from the power supply circuit.
• Do not disconnect and reconnect the appliance to the power supply when in opera on.
• Do not pull on the power cord to disconnect it from the power supply.
• If the power cord is damaged, it must be replaced only by the manufacturer or an authorized representa ve or repair facility.
• Do not perform maintenance or servicing opera ons on the appliance with wet hands or if the appliance is wet.
• Before connec ng the appliance to the source of supply, ensure that the terminal block or supply socket to which the appliance will be connected
is in good condi on and is not damaged or corroded in any way.
• For any component or sub-assembly containing a ba ery: do not recharge or dismantle the ba ery, or throw it into a fi re. Do not expose it to
high temperatures or direct sunlight.
• In stormy weather, disconnect the appliance from the power supply to prevent it from suff ering lightning damage.
• Do not immerse the appliance in water (with the excep on of cleaners) or mud.
SPECIFIC FEATURES APPLICABLE TO "Pool cleaners"
• The cleaner is designed to properly operate in pool water with a temperature of between 15°C and 35°C.
• To avoid possible injury and damage to the cleaner, do not operate the cleaner out of the water.
• In order to prevent possible injury, bathing is prohibited when your cleaner is in the pool.
• Do not use the cleaner during shock chlorina on.
• Do not leave the cleaner una ended for an extended period.
WARNING ON THE USE OF A CLEANER IN A POOL WITH A VINYL SURFACE:
• Before installing your new cleaner, carefully inspect the lining of your pool. If the liner has eroded in some areas, or if you no ce gravel, folds,
roots or corrosion caused by metal on the inner surface of the liner, or if you no ce that the support (bo om and walls) is damaged, do not install
the cleaner before performing the necessary repairs or before replacing the liner using a qualifi ed professional. The manufacturer cannot be held
liable in any way for damage caused to the liner.
• The surface of certain vinyl pa erned surfaces can wear rapidly and the pa erns disappear on contact from objects such as cleaning brushes,
toys, infl atable buoys, chlorine distributors and automa c pool cleaners. The decora on on some vinyl surfaces can be scratched or worn by basic
fric on such as through the use of a pool brush. The colours of certain pa erns can also be erased during use or when in contact with objects
in the pool. The erased pa erns, wear or scratching of vinyl surfaces are not the liability of the manufacturer of the pool cleaner and are not
covered by the limited warranty.
Recycling
This symbol means that your appliance should not be disposed of with other rubbish. It will be selec vely collected for the
purpose of reuse, recycling or transforma on. If it contains any substances that may be harmful to the environment, these will
be eliminated or neutralised.
Contact your retailer for recycling informa on.

2
CONTENTS
❶ Specifi ca ons 3
1.1 I Package contents 3
1.2 I Cleaner func ons 4
1.3 I Technical specifi ca ons and marking 5
❷ Installa on 6
2.1 I Set-up 6
2.2 l Assembling the caddy 7
❸ General use 8
3.1 I Opera ng principle 8
3.2 I Pool prepara on 8
3.3 I Immersing the cleaner in the pool water 8
3.4 I Electrical supply connec ons 9
3.5 I Star ng and stopping a cleaning cycle 10
❹ Control using the iAquaLink™ app 12
4.1 I Connec ng to the iAquaLink™ app 12
4.2 I iAquaLink™ control 14
❺ Maintenance 16
5.1 I Cleaning the cleaner 16
5.2 I Cleaning the fi lter 16
5.3 I Cleaning the propeller 17
5.4 I Replacing the brushes 18
5.5 I Changing the tyres 19
❻ Troubleshoo ng 20
6.1 I Appliance behaviour 20
6.2 I Error codes 21
6.3 I Troubleshoo ng the connec on to the iAquaLink™ app 22
• Before you do anything with the device, it is vital that you read this installa on and user manual, as well as the
"warnings and warranty" booklet delivered with the device. Failure to do so may result in material damage or
serious or fatal injury and will invalidate the warranty.
• Keep these documents for future reference and pass them on throughout the device's service life.
• Distribu ng or modifying this document in any way without authorisa on from Zodiac® is prohibited.
• Zodiac® is constantly developing its products to improve their quality; therefore, the informa on contained in this
document may be modifi ed without no ce.
Tip: to make it easier to contact your dealer
Write down your retailer's contact details to help you fi nd them more easily and fi ll in the "product" informa on on the
back of the manual; your dealer will ask you for this informa on.
EN

3
❶ Specifi ca ons
1.1 I Package contents
(x2)
(x2)
(x2)
(x2)
RA 6300 iQ - RA 6370 iQ - RA 6500 iQ - RA 6570 iQ - RA 6700 iQ
ACleaner + fl oa ng cable
BControl unit
C Caddy kit
D
60µ very fi ne debris fi lter
200µ large debris fi lter
100µ fi ne debris fi lte
EProtec ve cover
: Supplied : Available as an op on
4
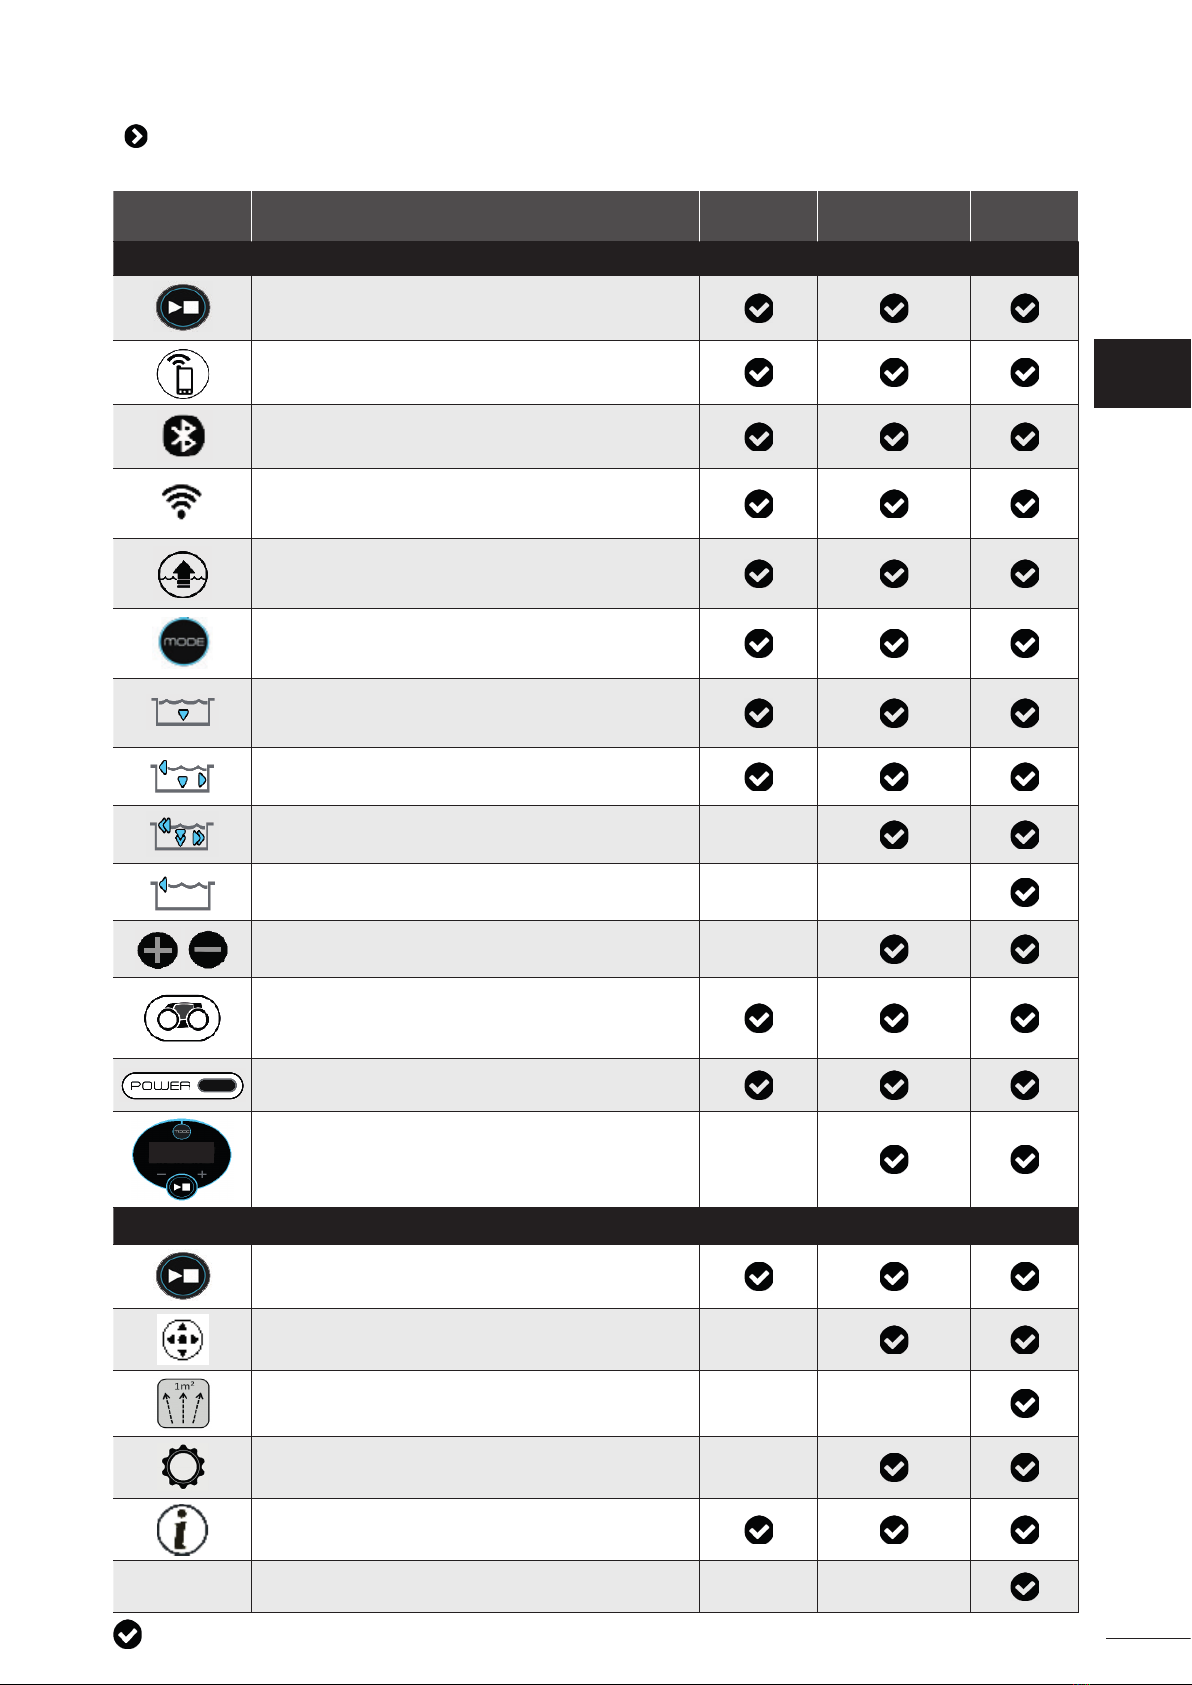
1.2 I Cleaner func ons
Symbol Designa on RA 6300 iQ -
RA 6370 iQ RA 6500 iQ -
RA 6570 iQ RA 6700 iQ
Control unit :
Start/Stop the appliance
Ini ate iAquaLink™ Control connec on
Bluetooth™ connec on status
Wi-Fi connec on status
Remove from pool mode «Li System»
Select a cleaning mode
Quick mode (quick cleaning of the Bo om only)
Smart mode (op mised cleaning of Bo om + sides +
water line)
Ultra mode (Intensive Bo om + sides + water line
cleaning)
Waterline only mode
Increase or reduce the cleaning me
(+/- 15 minutes)
« Full fi lter» indicator
Informa on LED
Er : 03 Error code or message display
Smartphone via the iAquaLink™ app:
Start-up, shutdown and monitoring the cleaning cycle
Remote control mode
«Spot Cleaning» mode (1m² around the cleaner)
Cleaning cycle programming on 7 days
Informa on
°C/°F Water temperature display
: Available
EN

5
1.3 I Technical specifi ca ons and marking
1.3.1 Technical specifi ca ons
RA 6300 iQ - RA 6370 iQ- RA 6500 iQ -
RA 6570 iQ RA 6700 iQ
Control unit supply voltage
220-240 V ac, 50 Hz,
short circuit-proof safety isola ng type*
Cleaner supply voltage 30 V dc
Maximum absorbed power 150 W
Cable length 18 m 21 m
Cleaner dimensions (L x W x H) 43 x 48 x 27 cm
Package dimensions (L x W x H) 56 x 56 x 46 cm
Cleaner weight 10.2 kg
Packed weight 21 kg 22.3 kg
Frequency band 2.412 GHz - 2.484 GHz
Radio output power +20 dBm
* This cleaner u lizes a double-insulated construc on. An appliance which uses such construc on is one that has been
designed in such a way that it does not require an earth/ground connec on between the appliance and its power
supply. This type of construc on helps mi gate exposure of the user to poten ally hazardous electrical condi ons
without relying on an earthed (grounded) metal enclosure. It incorporates the use of two layers of insula ng material
surrounding the live electrical parts or by using reinforced insula on. Through the use of this type of double-insulated
construc on, this cleaner does not u lized or require a grounded (three-prong) cord/plug.
1.3.2 Marking
: Filter access hatch lock
: Brushes
: Tyres
: Transport and removal from pool handle
: Front drive wheels
: Rear drive wheels
: Floa ng cable
: Sensor aerea (in accordance to the
model)

6
❷ Installa on
2.1 I Set-up
3.5 Meters Minimum
: Control unit
: Caddy
: Cleaner
: Floa ng cable
: Plug
: Mains cable
: "iAquaLink™" Wi-Fi
remote control
EN

7
2.2 l Assembling the caddy
• Tool-less assembly
Tighten the
nut loosely
(x2)
(x2)
(x2)
Finish
ghtening
the nut

8
❸ General use
3.1 I Opera ng principle
The cleaner is independent of the fi ltra on system and can therefore operate autonomously. It just simply needs to be
connected to the mains power supply.
It fi nds the best route to move around and clean the areas of the pool for which it has been designed (depending on the
model: bo om, walls, water line). Debris is collected and held in the cleaner's fi lter.
The cleaner may be operated using one of the following methods:
- The control box, included with the robo c cleaner system,
- A smartphone or tablet which is compa ble with the iAquaLink™ applica on (see "❹ Control using the iAquaLink™
app").
3.2 I Pool prepara on
• This product is intended to be used in pools which are permanently installed. Do not use it in
pools which may be dismantled. A permanent pool one which is built into the ground or on
the ground and cannot be easily dismantled and stored.
• The device must operate in pool water of the following quality:
Water temperature Between 15°C and 35°C
pH Between 6.8 and 7.6
Chlorine < 3 mg per L
• When the pool is dirty, especially when commissioning, remove the larger debris using a net in order to op mise the
device's performance.
• Remove any thermometers, toys and other objects that might damage the device.
3.3 I Immersing the cleaner in the pool water
• Roll out the full length of the cable alongside the pool to prevent it from becoming entangled during immersion (see
image ).
• Posi on yourself halfway along the length of the pool before immersing the cleaner (see image ). This will op mise
the cleaner's movements and reduce tangling in the cable.
• Lower the cleaner ver cally into the water (see image ).
• Move it slightly in all direc ons so that any air trapped in it can escape (see image ).
• It is essen al that the device sinks on its own and se les on the pool bo om. When it is immersed, the cleaner draws
the length of cable it needs into the pool (see image ).
Recommended entry point
not recommended
EN

9
3.4 I Electrical supply connec ons
To prevent risk of electrocu on, fi re, or serious injury, be sure to adhere to the following:
• The use of an electrical extension cord is prohibited when connec ng the control unit.
• Make sure that the socket is easily accessible at all mes and is protected from rain or splashes.
• The control box is splash-proof but must not be immeresed in water or any liquid. It must not
be installed in a fl oodable area; keep it at least 3.5 metres away from the edge of the pool and
avoid exposing it to direct sunlight.
• Posi on the control unit close to the socket.
• Unscrew the protec ve cap (see image ).
• Connect the fl oa ng cable to the control unit and lock it into place by turning it clockwise (risk of damage to the
fl oa ng cable) (seeimage , ).
• Make sure that the connector is fully pushed in so that no water can get in (see image ).
• Connect the mains cable (see image ). The control unit should only be connected to a power outlet protected by a
30mA maximum, Residual Current Device (RCD) (if in doubt contact a qualifi ed technician).
Table of contents
Other Zodiac Vacuum Cleaner manuals

Zodiac
Zodiac RE 42 Series User manual

Zodiac
Zodiac RV 5480 iQ User manual

Zodiac
Zodiac Duo-X iAquaLink CONTROL DX4050 iQ User manual

Zodiac
Zodiac ARCO ARCOMAX User manual

Zodiac
Zodiac INDIGO User manual

Zodiac
Zodiac VortraX TRX 7500 iQ User manual

Zodiac
Zodiac CX40 User manual

Zodiac
Zodiac vortex 2 User manual

Zodiac
Zodiac VORTEX-PRO VX40 User manual

Zodiac
Zodiac RE 42 Series User manual


