Zomoss DZS02 User manual

ZOMOSS DZS02 Installation Guide
Detect door orientation
(Step 8-9)
Install the physical lock
(Step 1-7)
Change the default master code
(See Quick Set Up)
Customize setting
(See Quick Set Up)
Installation Overview
1
2
3
4
Read this manual carefully before installing and operating!
Important tips to ensure a successful installation:
* Always reset the lock after installation.
* Change the default master code before programming.
* Do not load batteries until lock is completely installed.

Latch
Battery Cover Interior Assembly
Screws
Latch & Strike
Screws
Mounting Plate
Screws
Strike Exterior Assembly Mounting Plate Interior Assembly
Reset Tool
A
F G x 2 H x 4 I x 2 K x 1
J x 1
B C D E
TOOL REQUIRED:
STEP
Installation
Contents
Prepare the door and check dimensions
USE OF A POWERED
SCREWDRIVER IS
NOT RECOMMENDED
A
H
H
C
Micro USB
Power Port
B
D
E
G
I
J
F
1
backset
60 or 70 mm
2-3/8" or 2-3/4"
t
35 mmto 50 mm
1-3/8" o 2"
54 mm
2-1/8"
1"
25 mm

Hold the latch in front of the door
hole, with the latch face flush
against the door edge.
Is the slotted hole centered in the door hole?
Slotted hole is
NOT centered.
Slotted hole is centered.
Rotate and pull the latch
as shown to extend latch.
NO
YES
.Noadjustment is required
Proceedto next step.
2Determine backset and adjust the latch
Do not overtighten screws.
Actual Size
Chiseled
Install the latch
3
STEP
1
1
φ2-3/4"
(70mm)
2
2

4
STEP Install strike and test alignment
IMPORTANT: Make sure hole in
door frame is drilled a minimum
of 1" (25 mm) deep.
1. With the door closed, use
a flat-head screwdriver to
test if deadbolt works
smoothly.
2. Check alignment between
the latch and the strike,
making sure when the
deadbolt is extended, it is
going into the bolt hole and
not hitting the deadbolt
strike or door frame.
H
B
A5Install exterior assembly
STEP
IMPORTANT: Keep metal tailpiece horizontal.
1. Before installation, make sure the latch
is fully retracted (in the unlocked position) .
2. Route the cable below the latch.
unlocked

IMPORTANT: Do not load batteries until lock is completely
installed.
6
STEP
Secure the mounting plate with the screws I.
Do not overtighten screws.
Press the battery cover and pull the
cover up.
Remove battery cover
B
5
STEP

Install interior
assembly
A7
STEP
B7
STEP
Insert the cable connector to
the socket. Push the connector
in firmly until it is completely
seated.
Rotate the thumbturn and
keep it in a vertical position.
Make sure the latch is still
fully retracted (unlocked).
Vertical
unlocked
C
7
STEP
IMPORTANT: Test the thumbturn
for smooth rotation.
If thumbturn doesn’t rotate:
(a) Repeat step 7B, making sure the
thumbturn is vertical with bolt retracted;
(b) Rotate it with much more strength.
Attach Interior assembly to Mounting
Plate and tighten 3 screws.
Actual Size

Press the Reset button first
and keep holding it while
you place the 4th battery
Do not release
the reset button
keep holding the reset button,
until the latch bolt extends.
Door handing
STEP
8A
STEP
8B
reset
bu on
While the door is OPENED and UNLOCKED
(latch retracted), load 3 AA batteries into
the battery compartment.
IMPORTANT: Always run this step after installation.
The motor will not operate before completing the step.
IMPORTANT: If the latch doesn’t extend within 10 seconds, repeat
step 7B and 8A, making sure the thumbturn is always vertical and
latch is always retracted.
unlocked
Ver cal
It’s a factory reset to detect left-hand or
right-hand door orientation.
NOTE:
For best results, use new, non-rechargeable
Alkaline batteries only. Do not mix old and
new batteries.

Test the lock
STEP
9
Unlock
Hit any button to activate keypad
Lock
Press and hold any button for 2 seconds.
Enter default master code 12345678
Hit once
Test with the door open to avoid an accidental lockout.
How to Use
C.
LOCK & UNLOCK from inside
Rotate dial knob to locked and unlocked position
B. LOCK the door from outside
Auto Lock Mode
The bolt will automatically extend
in 30 seconds after unlocking.
You need to enable this feature by
programming.
Press any button on keypad
for 2 seconds
Manual Mode
A. UNLOCK the door from outside
Touch and hold the
sensor with your finger.
Hit any button to activate keypad
hit once
enter master code or user code

d. Contain existing code sequence is an existing code
c. Repeat number sequence
b. Backward number sequence
a. Forward number sequence 123456789
12345
6789
222222222
9467
If
Then
and
94 2467
15 9467
B.
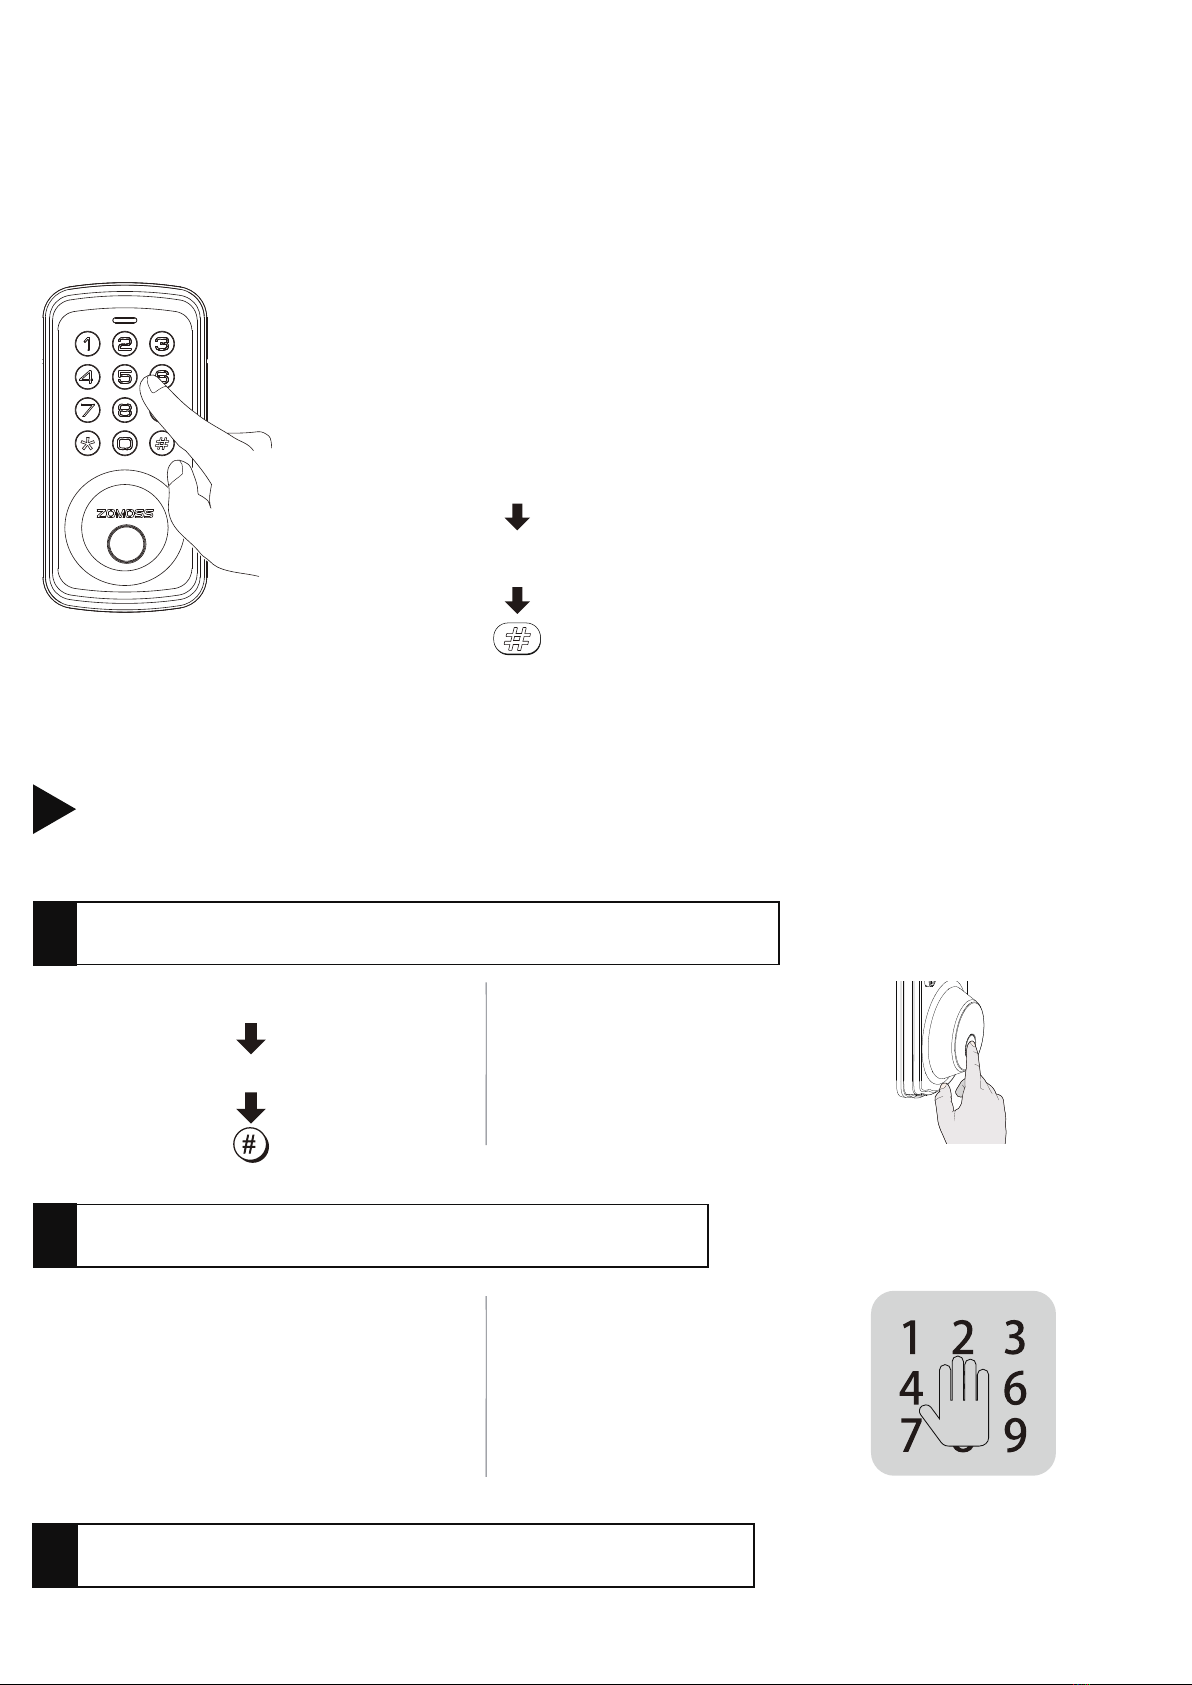
Code is 4-10 digits.
Both master code and user code do not support the following sequence.
Code Format
A.
The default master code is 12345678. This code must be changed
prior to programming the lock.
The Master Code is used for programming and for feature setting.
It will also unlock the lock.
Master Code
Each lock only has one Master Code.
Programming Basic
READ this before proceeding to programming.
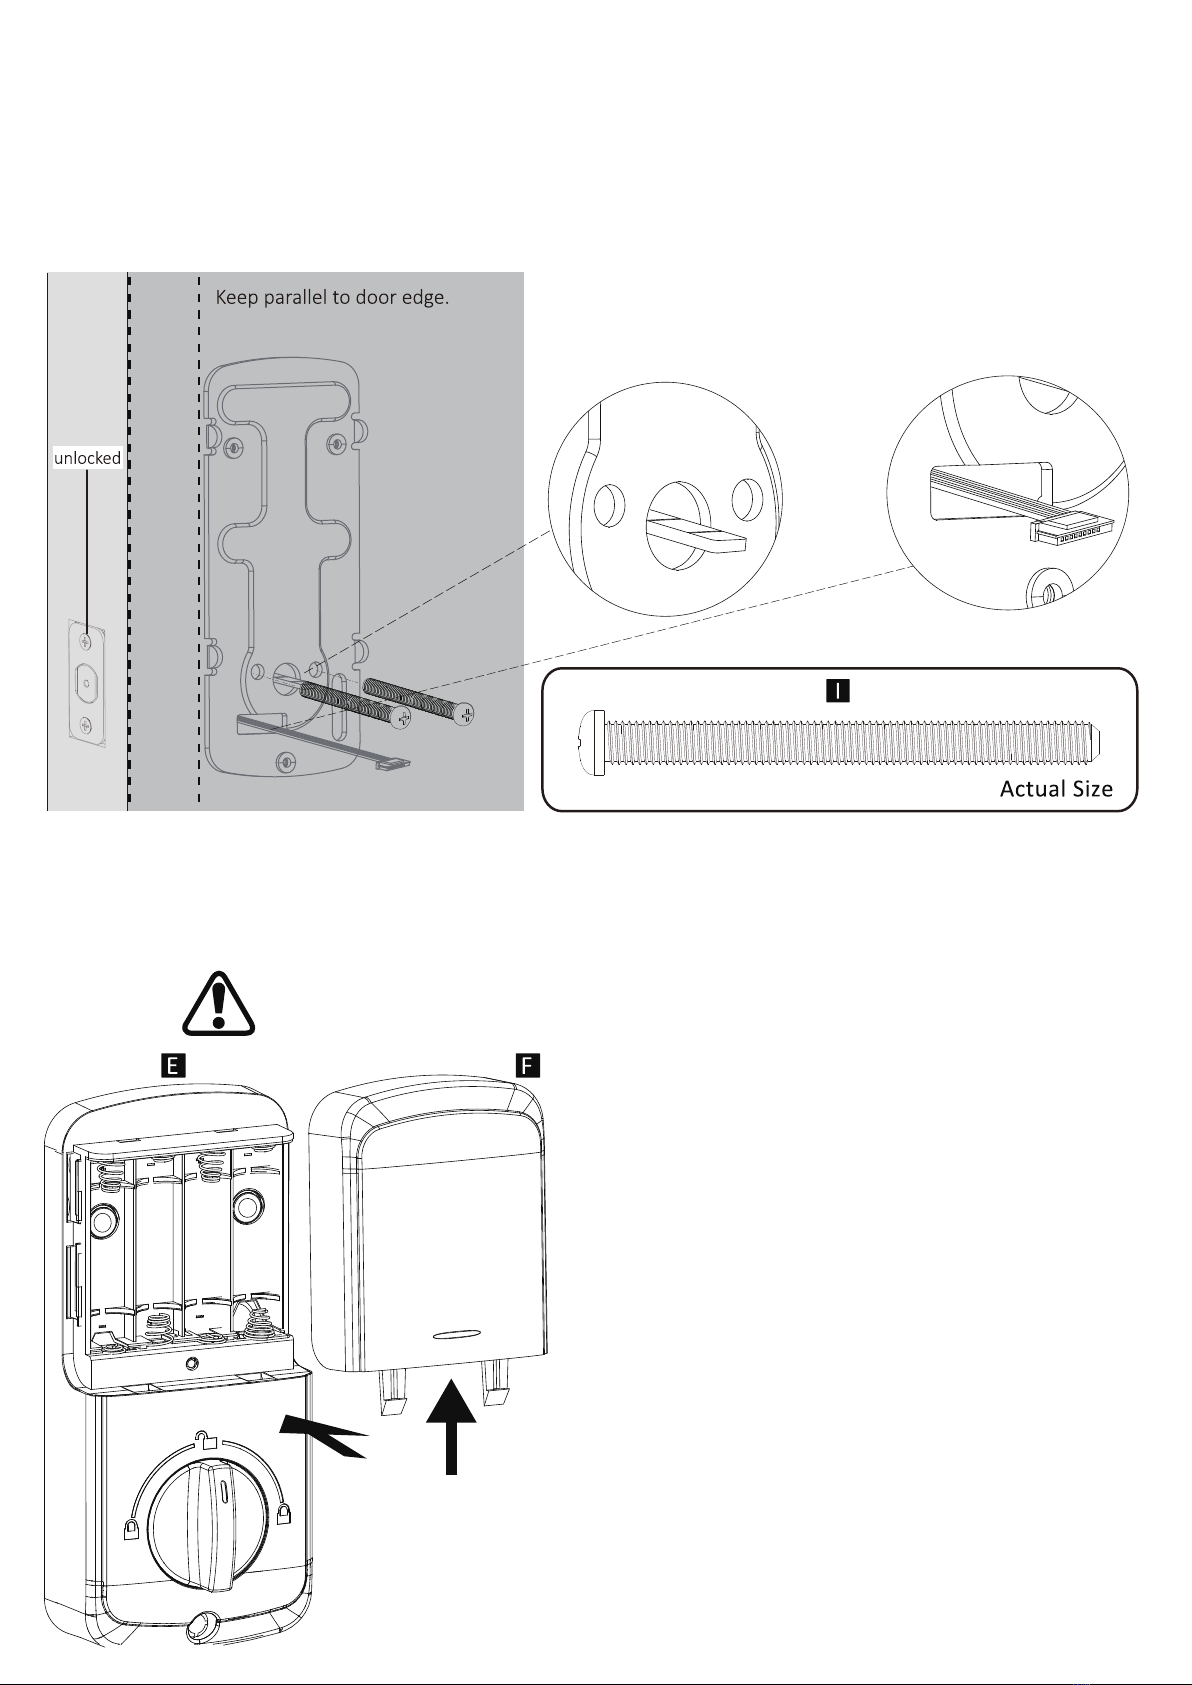
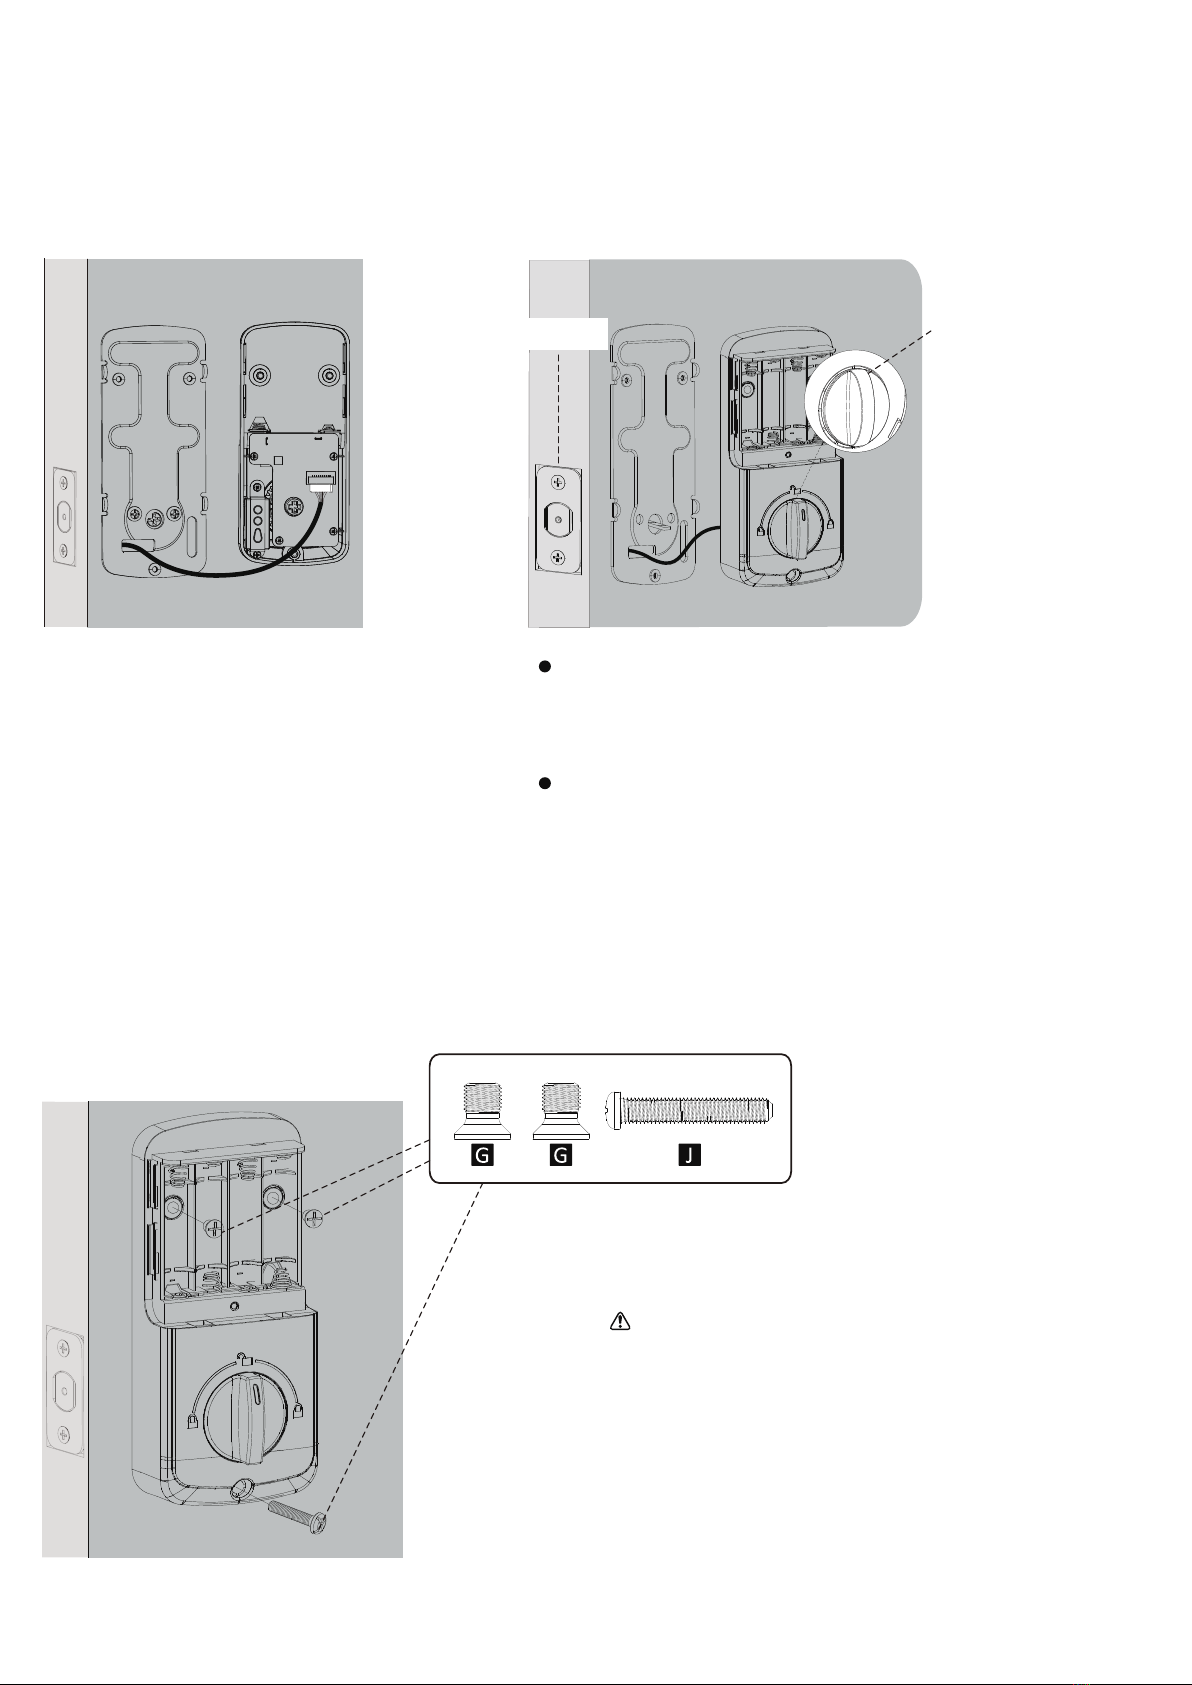
C. Micro USB Power Port
There’s a Micro USB charging port under the exterior keypad.
When locked out, or keypad no response, or dead batteries, use a Micro
USB cable to connect a portable phone charger/power bank, it can supply
power for keypad or reboot keypad.
D. Low Battery Indicator
If you see 10 red flashes after pressing any key or lock and unlock the door,
that's an indication that the batteries need to be replaced soon. Please
replace with 4 new AA alkaline batteries and do not mix old and new batteries.
All settings are retained in the memory when the batteries are removed
and replaced.

F. Wrong Entry Limit
After 10 unsuccessful attempts at entering an unauthorized PIN code
or fingerprint, the unit will shut down for 3 minutes.
715 59472 48176
password
Random digits
E. Unlock with Fake code
User can prevent pin code exposure from strangers by entering random
digits before or after pin code.
C.Delete User Code
Master Code Unwanted User Code
You can register 20 fingerprints by this step.
Add User Fingerprint
4
Master Code Scan Fingerprint 5 Times
D
.
B.
You can create 20 sets user codes by this step.
Add User Code
Enter the New User Code Again
Master Code New User Code
Enter New Master Code Again
Current Master Code
Quick Set Up
IMPORTANT: Hit next key within 10 seconds during programming,
otherwise green light goes off then you have to start over.
A. Change Master Code
The default Master Code is 12345678. It is required that you change it
to a code of your own before programming.
New Master Code

The beep sounds when pressing keypad can be muted. But you will still
hear motor turning and programming sound.
Enable Silent Mode
26
Master Code
.G
F. Disable Silent Mode
6 1
Master Code
I. Disable Auto Lock
72
Master Code
L.
You can set the Auto Lock time delay betweem 10 and 99 seconds.
Set Auto Lock Time Delay
Master Code
0
Duration Time(10-99)
J.
A security feature for you when you are leaving your home for vacation.
It will restrict all user codes, fingerprints and inside knob until master code is
entered on keypad, otherwise the lock will sound an alarm with red flash light.
Vacation Mode
8
Master Code
K.
This code can only be used once and is automatically deleted when used.
Add One-Time Code
9
Master Code One-Time Code
Enter One-Time Code Again
H.
Automatically locks the deadbolt 30 seconds after unlocking.
This feature is off by default.
Enable Auto Lock
7 1
Master Code
E.Delete User Fingerprint
5
Master Code Scan Unwanted Fingerprint 1 Time

Factory Default Settings
Troubleshooting
Solution
Refers to
The inside thumbturn can not be rotated
manually.
The keypad doesn't respond when
touched (no lights are visible and no
beeping is heard) .
The keypad light never goes off.
Deadbolt does not lock/extend when
pressing any key for 2 seconds.
Deadbolt does not unlock/retract when
entering codes plus # .
Deadbolt does not unlock/retract when
holding fingerprint sensor.
Deadbolt locks/extends when entering
codes plus #.
Deadbolt locks/extends when holding
fingerprint sensor.
Deadbolt unlocks/retracts when pressing
any key for 2 seconds.
The latch bolt doesn't FULLY extend or
retract, unless turn the knob manually.
When attempting to LOCK or UNLOCK
the deadbolt electronically, the latch goes
in and out for a few times.
What if batteries are dead, and I'm
locked out.
How to know it's time to change
batteries?
L
L
L
S
R
Using
When
C D R
C D
N O A
H J
C D E F
G P Q
C D E F
G J P Q
I A H J
A H J
A B
Solution
Refers to
L
K
C
H
H
H
Lock will not memorize programmed
settings, have to reprogram many times.
I can’t rotate the inside thumb
turnpiece to the direction I want.
The lock doesn’t work on the left-hand
door or right-hand door.
The latch extends then retracts.
The latch retracts.
The latch does not extend but I do
hear the motor trying to turn.
The latch does not extend and
no motor sound.
I lost all the preset codes after door
handing.
Cannot be programmed.
Unable to program master code.
Unable to program user code.
Unable to add fingerprints.
I forgot my master code.
I want to delete someone's fingerprint,
but the person is not here.
I want to delete a user code,
but don't remember the code.
When
Installing
Reset
Program
A B
C M
C M
C M
C M N
A C D
C D E
F G H Q
C D E
F G Q
A H J

Check unlocking process again. Please do not long hold the button.
Hit any button to activate keypad, then enter codes, finally hit # once.
The latch and strike are misaligned, causing the latch to bind.
Step 1: Adjust the position of the strike plate on latch bolt.
Step 2: Make sure you reset the lock with the door opened.
Solutions
Slightly loosen the screws(H & I) that secure the latch bolt and exterior keypad.
Confirm the thumb turnpiece is vertical with latch bolt retracted. If not, following instruction to reinstall and reset the lock.
Add much more strength to rotate the thumb turn piece.
Residual charge of internal electronic components. If there is residual charge within the lock, this will consume the charge.
Disconnect all batteries. Press and release any key on keypad and keep the batteries disconnected for at least 5 minutes.
Make sure the end of latch bolt doesn't touch the wood in the door hole. Enlarge the door hole for latch bolt.
Check if latch bolt is in good condition, not broken.
Repeat (Step 8) for factory reset. Make sure reset it properly. Once the reset is completed, all codes, fingerprints and settings will be erased;
the master code will return to the default value (12345678). You need to restart program.
Remove and re-install the whole lock, reset the lock again. During installation and reset:
Step 1: Always keep latch bolt retracted.
Step 2: Inside thumb turnpiece must be vertical pointing to unlock sign.
Door handing is the same as factory reset. Your lock has restored to factory default. Re-program your codes. (See Quick Set Up)
Step 1: Press the next button within 10 seconds.
Step 2: Check if the current master code you entered is correct.
Step 3: If master code is default 12345678, you must change master code to your own at first; you can't use 12345678 to create user
codes, or program other settings. (See Quick Set Up)
Step 4: Enter a new code in correct format and within 4 to 10 digits long. (See Programming Basic)
Step 1: Clean your finger to ensure it is not wet, moisty, or dirty.
Step 2: Kindly check if the fingerprint scanner has any liquid or dirt and clean it with a dry cloth.
Step 3: Make sure this finger hasn't been registered.
Touch and hold the fingerprint sensor for about 1 to 2 seconds.
Disassemble the lock off the door. Re-assemble lock without securing screws and mounting plate on hand. Then reset the lock on hand,
and test locking and unlocking. This can test if lock is defective itself.
There's a micro-usb charging port under the exterior keypad. Use a Micro USB cable to connect a portable phone charger to supply
power for keypad. But note that this is not to charge the batteries.
When batteries are in low power, you'll see 10 flash red lights after pressing any key on keypad.
Step 1: Make sure the bolt hole on the door frame is at least 1 inch deep so the bolt fully extends.
Step 2: Check if the door closes properly. Make sure when the deadbolt is extended, it is going into the bolt hole and not hitting the
deadbolt strike or door frame.
Step 3: Check for loose door hinges.
Step 1: Make sure the cable is properly seated when connecting.
Step 2: Make sure the batteries are placed properly.
Step 3: Change another 4 fresh AA alkaline batteries. Do not mix old and new batteries.
* If none of the above resolves your issue, please contact us at support
AA
B
C
D
E
F
G
H
I
J
K
L
M
N
O
P
Q
R
S
Table of contents
Other Zomoss Door Lock manuals