Zoo Med BETTA LIGHT BL-30E User manual

S
A
V
E
Y
O
U
R
F
I
S
H
S
A
V
E
Y
O
U
R
F
I
S
H
S
S
AAA
AAA
A
A
VVV
V
V
V
A
VVV
A
V
A
V
A
E
YYY
YYY
Y
Y
O
O
UUU
U
U
R
F
F
I
I
S
S
H
Drip Loop
TEST
C16
FIGURE 1
1
INSTRUCTIONS ITEM# BL-30E
INSTRUCTIONS ENGLISH
Congratulations on your purchase of Zoo Med’s BETTA LIGHT™! Please read the following
instructions carefully. If you have any questions regarding these instructions or the proper
calling (888) 496-6633 (US and Canada only). Customers in other countries, please call (805)
542-9988.
FEATURES:
• Long-lasting LED bulbs: up to 50,000 hours!
• Perfect for use with all Zoo Med Designer Nano House and Nano Condo Aquariums.
• Can be used with a timer for automatic lighting control.
IMPORTANT SAFETY NOTICE!
To reduce the risk of fire, injury, or electric shock, read and follow these instructions
prior to installing or operating this heater. Save these instructions for future reference.
SAFETY INSTRUCTIONS:
• Carefully examine the light fixture and the power cord for signs of damage or defect. If
the Betta Light fixture appears to be damaged or defective, DO NOT use! Contact Zoo
Med’s customer service department for replacement within the specified period accord-
ing to the terms of the warranty.
• Carefully inspect the power cord insulation and plug to be sure that there are no cuts or
exposed wires. DO NOT splice, repair, or modify the power cord in any way. Inspect the
power cord, plug, and light fixture periodically for damage.
• CAUTION: The plastic housing must be located outside of the aquarium. Do not place
the plastic housing inside of the aquarium.
• CAUTION must be taken when using electrical appliances near water. To reduce the
risk of electric shock, be sure that the light fixture is unplugged during any of the
following situations:
- Unplug when installing the light fixture on your aquarium.
- Unplug when performing aquarium maintenance.
- Unplug before placing your hand(s) in the water of the aquarium. Be sure that your
hands are completely dry before plugging the light fixture into an appropriate grounded
outlet.
- Unplug when not in use.
• When unplugging, grasp the plug to prevent damage to the power cord. Never pull on
the power cord to unplug the light fixture.
• For indoor use only.
• For use with aquariums only (including fish bowls and fish tanks).
• Closely supervise children and pets (other than your aquarium inhabitants) when they
are near the aquarium.
• DO NOT alter or modify this product.
• Contact an electrician if you are unsure about the electrical connection.
• This unit has no user-serviceable parts. Do not attempt to repair this product yourself.
Return to Zoo Med for inspection and repair.
DRIP LOOP: This light fixture must be used near a grounded receptacle with a “drip loop” (see
figure 1). For safety, the receptacle should have a Residual Current Device or Residual Current
Circuit Breaker with Overload Protection (RCD or RCBO). The drip loop will prevent water from
running along the power cord and getting the plug or wall receptacle wet. To create a drip loop,
be sure that a portion of the power cord is lower than the level of the wall receptacle as shown
in figure 1. If you are unsure about the electrical supply and connection, contact a qualified
licensed electrician. If for any reason the plug or wall receptacle gets wet, do not grasp or
unplug the power cord until after the power has been switched off at the main fuse or circuit
breaker.
INSTALLATION ON ZOO MED’S DESIGNER NANO
HOUSE & NANO CONDO AQUARIUMS:
CAUTION: Do not plug in the
BETTA LIGHT™
fixture until after completing the following steps.
1. Loosen the two plastic screws on the housing, taking care not to completely remove
them.
2. Place the hook located on the plastic housing over the back edge of the opening in the
top of the Nano House or Nano Condo aquarium.
3. CAUTION: The plastic housing goes on the outside of the aquarium!
4. Carefully tighten the screws to secure the Betta Light fixture to the aquarium.
5. Plug the fixture into a grounded outlet and turn the fixture on using the switch on the
side of the plastic housing.
INSTALLATION ON FISH BOWLS
AND OTHER SMALL AQUARIUMS:
CAUTION: Do not plug in the Betta Light fixture until after completing the following steps.
CAUTION: If using adhesive, failure of the adhesive can allow the fixture to fall into the water of
the aquarium. DO NOT place your hands in an aquarium if the light fixture falls in the water.
1. If possible, use the hook located on the plastic housing as described above for the Zoo
Med Nano House and Nano Condo Aquariums.
2. If the hook cannot be used, secure the plastic housing to the outside back wall of the
fish bowl or aquarium using an appropriate adhesive or hook and loop fastener like Vel-
cro®. Be sure that the adhesive used is appropriate for the surfaces that it is sticking to
in order to prevent the fixture from falling into the water. Velcro®is recommended as it
will allow for removal of the fixture during aquarium maintenance. CAUTION: Failure of
the adhesive can allow the fixture to fall into the water of the aquarium. DO NOT place
your hands in an aquarium if the light fixture falls in the water. Regularly inspect the
adhesive and replace if needed. If you are unsure about the installation, do not install
the light fixture on your aquarium.
3. Periodically check to be sure that the adhesive is securely attached to both surfaces of
the aquarium and the light fixture. Replace if necessary.
4. Plug the fixture into a grounded outlet and turn the fixture on using the switch on the
side of the plastic housing.
WARRANTY:
Zoo Med Laboratories, Inc. (Zoo Med) warrants each BETTA LIGHT™ to be free of defects in
material and workmanship under normal use and service for one year from the date of pur-
chase. The obligation under this warranty is limited to the repair or replacement, at Zoo Med’s
discretion, of the product or any part thereof, when the product (including the original sales
receipt), is returned to Zoo Med, freight prepaid. No claim shall be allowed under this warranty
if, in the opinion of Zoo Med, the BETTA LIGHT™ has been subject to accident or improper
usage, including but not limited to: water damage, improper storage, accidental dropping, etc.
This warranty is in lieu of all other warranties and representations expressed or implied. Please
include your receipt, full name, address, phone number, and email address along with a note
explaining failure when sending any product back to Zoo Med. Please allow 4 to 6 weeks for
repair or replacement. Please ALWAYS contact Zoo Med Europe by phone or email, BEFORE
returning any product.
ZOO MED EUROPA
C/O DHL Euronet
Klaus-Michael Kühnelaan 13
ENA23 Zone 1 nr. 1620
2440 Geel, Belgium
e-mail: [email protected]
www.zoomed.eu
Look for these other fine ZOO MED Betta
products at a quality pet store near you:
Ceramic
Betta Log
Floating Betta
Exercise Mirror Betta Bed Leaf
Hammock Betta H2O
Conditioner
Floating Betta Log

2
S
A
V
E
Y
O
U
R
F
I
S
H
S
A
V
E
Y
O
U
R
F
I
S
H
S
S
AAA
AAA
A
A
VVV
V
V
V
A
VVV
A
V
A
V
A
E
YYY
YYY
Y
Y
O
O
UUU
U
U
R
F
F
I
I
S
S
H
INSTRUCTIONS ITEM# BL-30E
GEBRAUCHSANWEISUNG DEUTSCH
Herzlichen Glückwunsch und vielen Dank zum Kauf des Zoo Med´s BETTA LIGHT™! Lesen
Sie sich folgende Anweisungen sorgfältig durch und bewahren Sie diese auf. Bei Fragen,
Problemen oder benötigter Hilfe steht Ihnen unser Kundensupport unter [email protected] zur
Verfügung.
EIGENSCHAFTEN:
• Langlebige LED Lampe: halt bis zu 50,000 Stunden!
• Perfekt für Zoo Med´s Designer Nano House und Nano Condo Aquarien.
• Kann mit einer Zeitschaltuhr verwendet werden.
SICHERHEITSANWEISUNG!
Lesen Sie bitte vor dem Gebrauch die Sicherheitsanweisung durch, um das Risiko von
Feuer, Verletzungen und elektrischen Schlägen zu verhindern. Bewahren Sie diese bitte auf.
SICHERHEITSANWEISUNG:
• Vergewissern Sie sich das die Lampe und das Stromkabel keine Schäden haben. Ver-
wenden Sie die Lampe unter keinen Umständen wenn diese beschädigt ist. Reklamie-
ren Sie die Lampe bei Ihrem Fachhändler.
• Prüfen Sie das Kabel und den Stecker auf mögliche Fehler. Modifizieren oder reparieren
Sie das Produkt niemals.
•
ACHTUNG:
Das Kunststoffgehäuse muss außerhalb des Aquariums angebracht werden,
niemals innerhalb.
• Mit elektrischen Produkten sollten Sie immer vorsichtig in der Nähe von Wasser sein.
Um das Risiko eines elektrischen Schlages zu verringern sollten Sie unter folgenden
Umständen die Lampe von Stromnetz nehmen:
- Beim Installieren der Lampe am Aquarium.
- Bei der Reinigung des Aquariums.
- Bevor Sie Ihre Hände in das Wasser tauchen. Vergewissern Sie sich das Ihre Hände
komplett trocken sind bevor Sie die Lampe in Betrieb nehmen.
- Wenn die Lampe nicht verwendet wird.
• Ziehen Sie niemals am Kabel um die Lampe vom Stromnetz zu nehmen, ziehen Sie
vorsichtig am Stecker.
• Nur für den Gebrauch im Haus geeignet.
• Nur für Aquarien geeignet.
• Beaufsichtigen Sie Ihre Kinder und Haustiere (außer die Aquarienbewohner) wenn sich
diese in der Nähe des Aquariums aufhalten.
• NIEMALS modifizieren oder reparieren.
• Kontaktieren Sie einen qualifizierten Elektriker bei Unsicherheit über den Anschluss.
• Dieses Produkt hat keine auswechselbaren Teile. Versuchen Sie nicht es zu reparieren.
SICHERHEITSSCHLAUFE: Das Betta Light sollte mit einer “Sicherheitsschlaufe” (Abbildung
1) verwendet werden. Die Schlaufe wird verhindern das Wasser an dem Stromkabel entlang
zur Steckdose gelangt. Um eine Sicherheitsschleife zu kreieren, muss dafür gesorgt werden
dass ein Teil des Stromkabels niedriger ist als die Steckdose, wie in Abbildung 1 gezeigt wird.
Bei Unsicherheit über den Stromanschluss raten wir zu einem qualifizierten Elektriker. Im Falle
das der Stecker nass wird, bitte diesen nicht berühren oder versuchen auszustecken bevor die
entsprechende Sicherung oder der Hauptschalter ausgeschaltet sind.
INSTALATION AUF ZOO MED`S DESIGNER NANO
HOUSE & CONDO AQUARIEN:
ACHTUNG:
Befolgen Sie erst die folgenden Schritte bevor Sie die Lampe in Betrieb nehmen.
1. Lössen Sie die beiden Plastikschrauben am Gehäuse, achten Sie darauf das Sie diese
nicht zu weit rausschrauben.
2. Platzieren Sie den Hacken des Betta Lights über den Rand des Zoo Med Nano
Aquariums.
3.
ACHTUNG:
Das Gehäuse muss außerhalb des Aquariums befestigt sein.
4. Ziehen Sie vorsichtig die Plastikschrauben an um das Betta Light zu befestigen.
5. Stecken Sie den Stecker in eine Steckdose und schalten Sie die Lampe ein. Der
Schalter befindet sich an der Seite des Gehäuses.
INSTALATION AUF NANO AQUARIEN
UND ANDEREN FISCHBEHÄLTERN:
ACHTUNG:
Befolgen Sie erst die folgenden Schritte bevor Sie die Lampe in Betrieb nehmen.
ACHTUNG:
Verwenden Sie keinen Klebstoff um die Lampe am Aquarium zu befestigen. Sollte
die Lampe ins Wasser fallen, nehmen Sie diese erst vom Stromnetz bevor Sie ins Wasser
greifen.
1. Verwenden Sie nach Möglichkeit den am Gehäuse befindlichen Hacken des Betta Lights
zur Befestigung und Sicherung.
2. Sichern Sie das Gehäuse der Lampe zusätzlich mit den Plastikschrauben an der
äußeren Aquarienwand.
3. Prüfen Sie regelmäßig die Befestigung, nehmen Sie die Lampe bei der Reinigung des
Aquariums ab.
4. Die Lampe sollte in einer geerdeten Steckdose betrieben werden.
GARANTIE:
Zoo Med Laboratories, Inc. (Zoo Med) gewährleistet bei normalem Gebrauch ein Jahr Garantie
auf Material und Funktion des BETTA LIGHT™. Diese Verpflichtung der Garantie beinhaltet den
Umtausch oder die Reparatur, nach Zoo Med´s Ermessen, des Produktes oder der Einzelteile,
wenn das Produkt, einschliesslich Original-Kaufbeleg, frachtfrei zu Zoo Med geschickt wird.
Eine Garantie wird nicht gewährleistet wenn der BETTA LIGHT™ nachweislich Schaden durch
ungeeignete Handhabung oder Nutzung, falsche Lagerung oder Wasserschaden erlitten hat.
Diese Garantie gilt vor allen anderen Zusicherungen, Gewährleistungen und Garantien. Bitte
unbedingt den Kaufbeleg, Adresse, Telefonnummer und Email Adresse mit einer kurzen Be-
schreibung des Problems mit schicken. Das Garantieverfahren kann zwischen 4 und 6 Wochen
dauern. Bei Unsicherheit fragen Sie bitte Ihren Fachhändler. Bitte UNBEDINGT mit Zoo Med
KONTAKT aufnehmen BEVOR Sie Reklamationen zusenden.
ZOO MED EUROPA
C/O DHL Euronet
Klaus-Michael Kühnelaan 13
ENA23 Zone 1 nr. 1620
2440 Geel, Belgium
e-mail: [email protected]
www.zoomed.eu
Sicherheitsschlaufe
TEST
C16
ABBILDUNG 1
Fragen Sie Ihren Fachhändler nach diesen
weiteren tollen ZOO MED Betta Produkten:
Ceramic
Betta Log
Mirco-floating
Betta Food Pellets
Floating Betta
Exercise Mirror
Betta Banquet
Time Release Food
Designer Nano Condo or House
• 2 Größen
• 5 Farben
• 4 Formen
Aqua Accenst Aquarium
Substrate
• 6 Farben
Betta Bed Leaf
Hammock
Bettatherm
Bowl Heater
Betta H2O
Conditioner
Bettamatic
Automatic Feeder
Floating Betta Log
Betta Dial-a-treat
3 Nutritious Foods

Anneau
d’écoulement
TEST
C16
FIGURE 1
3
S
A
V
E
Y
O
U
R
F
I
S
H
S
A
V
E
Y
O
U
R
F
I
S
H
S
S
AAA
AAA
A
A
VVV
V
V
V
A
VVV
A
V
A
V
A
E
YYY
YYY
Y
Y
O
O
UUU
U
U
R
F
F
I
I
S
S
H
INSTRUCTIONS ITEM# BL-30E
INSTRUCTIONS FRANÇAIS
Félicitations pour votre achat de cette lampe BETTA LIGHT™ de Zoo Med ! Veuillez lire atten-
tivement ces instructions. Si vous avez des questions concernant ces instructions ou la bonne
utilisation de cet article, veuillez contacter notre service après-vente à l’adresse info@zoomed.
com ou en appelant le (888) 496-6633 (USA
et Canada uniquement). Pour les clients dans d’autres
pays, veuillez appeler (805) 542-9988.
CARACTÉRISTIQUES :
• Ampoules LED longue durée : jusqu’à 50 000 heures !
• Parfait pour une utilisation avec tous les aquariums design Nano House et Nano Condo
de Zoo Med.
• Utilisation possible avec un temporisateur pour un contrôle automatique de l’éclairage.
REMARQUES DE SÉCURITÉ IMPORTANTES !
Afin de réduire les risques d’incendie, de blessure ou d’électrocution, veuillez lire et
respecter ces instructions avant toute installation ou utilisation de ce chauffage. Con-
servez ces instructions pour toute référence future.
INSTRUCTIONS DE SÉCURITÉ :
• Vérifiez minutieusement le bloc lampe et le cordon d’alimentation pour toute trace de
dommage ou de défaut. Si la lampe Betta Light semble abîmée ou défectueuse, NE
L’UTILISEZ PAS ! Contactez le service après-vente de Zoo Med pour un remplacement
au cours de la période spécifiée dans la garantie.
• Inspectez minutieusement le cordon d’alimentation et la prise pour vous assurer qu’il
n’y a pas de coupure ni de fils exposés. Veillez à NE PAS épisser, réparer ni modi-
fier le cordon électrique de quelque manière que ce soit. Inspectez périodiquement le
cordon d’alimentation, la prise et les accessoires afin de vous assurer qu’ils ne sont pas
endommagés.
• Avertissement : Le boîtier en plastique doit être placé en dehors de l’aquarium. Ne pas
placer le boîtier en plastique à l’intérieur de l’aquarium.
• Faites attention lors de l’utilisation d’équipements électriques à proximité d’eau. Afin
de réduire les risques d’électrocution, veillez à ce que la lampe soit débranchée dans
les cas suivants :
- Lors de l’installation de la lampe dans l’aquarium.
- Lors de l’entretien de l’aquarium.
- Avant de placer les mains dans l’eau de l’aquarium. Veillez à ce que vos mains soient
complètement sèches avant de brancher la lampe à une prise appropriée avec mise à
la terre.
- Lorsque la lampe n’est pas utilisée.
• Lorsque vous débranchez la lampe, prenez la prise et tirez afin de ne pas endommager
le cordon d’alimentation. Ne tirez jamais sur le cordon d’alimentation pour débrancher
la lampe.
• Pour un usage à l’intérieur uniquement.
• Pour un usage avec des aquariums uniquement (y compris les aquariums ronds ou les
grands réservoirs).
• Surveillez étroitement les enfants et les animaux domestiques lorsqu’ils sont à proximité
de l’aquarium.
• NE PAS changer ni modifier ce produit.
• Veuillez contacter un électricien si vous n’êtes pas sûr des branchements électriques.
Cette unité ne comporte aucun élément réparable par l’utilisateur. Ne tentez pas de
réparer ce produit vous-même. Renvoyez-le à Zoo Med pour tout contrôle et réparation.
BOUCLE D’ÉGOUTTAGE : Utilisez cette lampe à côté d’une prise avec une fiche de terre et «
une boucle d’égouttage » (voir figure 1). Pour des raisons de sécurité, la prise doit disposer
d’un disjoncteur différentiel ou d’un coupe-circuit différentiel avec protection contre les
surcharges. La boucle d’égouttage empêchera tout écoulement d’eau le long du cordon
d’alimentation et évitera de mouiller la fiche du cordon d’alimentation ou la prise murale.
Pour créer une boucle d’égouttage, assurez-vous que le niveau d’une partie du cordon
d’alimentation est plus bas que la prise illustrée à la figure 1. Si vous n’êtes pas certain
de l’alimentation électrique et de la connexion, contactez un électricien professionnel
qualifié. Si, quelle qu’en soit la raison, la fiche du cordon d’alimentation ou la prise murale
est humide, ne prenez pas la fiche dans la main et ne débranchez pas le cordon tant que
l’électricité n’a pas été coupée au fusible ou au disjoncteur principal.
INSTALLATION SUR LES AQUARIUMS DESIGN
NANO HOUSE ET NANO CONDO DE ZOO MED :
AVERTISSEMENT :
Ne branchez pas le bloc Betta Light tant que les étapes suivantes n’auront
pas été réalisées.
1. Desserrez les deux vis en plastique du boîtier en veillant à ne pas les retirer complètement.
2. Placez le crochet situé sur le boîtier en plastique au-dessus du bord arrière de
l’ouverture en haut de l’aquarium Nano House ou Nano Condo.
3. Avertissement : Le boîtier en plastique doit être placé en dehors de l’aquarium !
4. Serrez soigneusement les vis qui maintiennent les blocs Betta Light à l’aquarium.
5. Branchez la lampe à une prise avec fiche de terre et mettez la lampe sous tension à
l’aide de l’interrupteur placé sur le côté du boîtier.
INSTALLATION SUR UN AQUARIUM ROND
OU D’AUTRES PETITS AQUARIUMS :
AVERTISSEMENT :
Ne branchez pas le bloc Betta Light tant que les étapes suivantes n’auront
pas été réalisées.
AVERTISSEMENT :
Si vous utilisez un adhésif, toute défaillance de cet adhésif peut entraîner la
chute du dispositif dans l’eau de l’aquarium. NE METTEZ PAS les mains dans l’eau si la lampe
tombe dans l’eau.
1. Si possible, utilisez le crochet situé sur le boîtier en plastique de la manière décrite ci-
dessous pour les aquariums Nano House et Nano Condo de Zoo Med.
2. S’il est impossible d’utiliser le crochet, fixer le boîtier en plastique à la partie extérieure
de la paroi arrière de l’aquarium à l’aide d’un adhésif approprié ou d’une fixation
comme du Velcro®. Assurez-vous que l’adhésif utilisé est approprié pour les surfaces
d’utilisation afin d’éviter que la lampe ne tombe dans l’eau. Le Velcro®est recom-
mandé, car il permet de retirer la lampe pendant l’entretien de l’aquarium. Avertisse-
ment : Toute défaillance de l’adhésif peut entraîner la chute du dispositif dans l’eau
de l’aquarium. NE METTEZ PAS les mains dans l’eau si la lampe tombe dans l’eau.
Contrôlez régulièrement l’adhésif et remplacez-le si nécessaire. Si vous n’êtes pas
certain de l’installation, ne montez pas la lampe sur l’aquarium.
3. Vérifiez régulièrement que l’adhésif est bien maintenu sur la surface de l’aquarium et la
lampe. Remplacez-le si nécessaire.
4. Branchez la lampe à une prise avec fiche de terre et mettez la lampe sous tension à
l’aide de l’interrupteur placé sur le côté du boîtier.
GARANTIE :
Zoo Med Laboratories, Inc. (Zoo Med) garantit que chaque BETTA LIGHT™ est fourni sans vice
de matière ou de fabrication dans des conditions normales d’utilisation et d’entretien pendant
un an à compter de la date d’achat. L’obligation prévue par la présente garantie est limitée à
la réparation ou au remplacement, à la discrétion de Zoo Med, du produit ou de ses pièces,
si le produit est retourné (inclus ticket de caisse original) à Zoo Med, port prépayé. Aucune
réclamation ne sera acceptée dans le cadre de la présente garantie si, de l’avis de Zoo Med, le
BETTA LIGHT™ a subi un accident ou été soumis à un usage inapproprié, comprenant sans y
être limité : dommages dus à l’eau, stockage inapproprié, chute accidentelle, etc. La présente
garantie annule et remplace toutes les autres garanties et représentations explicites ou
implicites. Veuillez inclure votre reçu, votre nom complet, votre adresse et numéro de téléphone
et votre e-mail, ainsi qu’une note expliquant le défaut, lors du retour de tout produit à Zoo med.
La réparation ou le remplacement nécessite un délai de 4 à 6 semaines. Prions de bien vouloir
prendre contact avec Zoo Med Europe par téléphone ou e-mail AVANT de renvoyer un produit.
ZOO MED EUROPA
C/O DHL Euronet
Klaus-Michael Kühnelaan 13
ENA23 Zone 1 nr. 1620
2440 Geel, Belgium
e-mail: [email protected]
www.zoomed.eu

4
S
A
V
E
Y
O
U
R
F
I
S
H
S
A
V
E
Y
O
U
R
F
I
S
H
S
S
AAA
AAA
A
A
VVV
V
V
V
A
VVV
A
V
A
V
A
E
YYY
YYY
Y
Y
O
O
UUU
U
U
R
F
F
I
I
S
S
H
INSTRUCTIONS ITEM# BL-30E
INSTRUCCIONES: ESPAÑOL
Felicidades por su compra de BETTA LIGHT™! Lea las siguientes instrucciones cuidadosa-
mente. Si tiene preguntas sobre estas instrucciones o el uso adecuado de este artículo,
o llamando al (888) 496-6633 (Estado Unidos y Canadá únicamente). Clientes en otros países
favor de llamar al (805) 542-9988.
CARACTERISTICAS:
• Luces de LED de larga duración: hasta 50,000 horas!
• Perfecto para uso con las peceras Nano House y Nano Condos de Zoo Med.
• Puede ser utilizado con un reloj para controlar la iluminación.
AVISO IMPORTANTE DE SEGURIDAD!
Para reducir el riesgo por incendio, lesión o descarga eléctrica, lea y siga estas instruc-
ciones antes de instalar u operar este calentador. Guarde estas instrucciones para
referencia futura.
INSTRUCCIONES DE SEGURIDAD:
• Cuidadosamente examine la lámpara y el cable eléctrico para asegurar que no tenga
daños. No utilice la lámpara si esta dañaday o defectuosa. Contacte al departamento
de servicio a cliente de Zoo Med para un remplazo de acuerdo con los términos y
periodo de garantía.
• Cuidadosamente examine el cable eléctrico y el enchufe para asegurarse que no tenga
cortaduras o alambres expuestos. No corte, repare o modifique el cable eléctrico. Perió-
dicamente inspeccione el cable eléctrico, el enchufe y el calentador por daño.
•
PRECAUCIÓN:
todas las partes de esta lámpara deben estas fuera de la pecera. No
coloque dentro de la pecera.
• Debe tener precaución cuando utilice aparatos eléctricos cerca del agua. Para reducir
el riesgo por descarga eléctrica asegúrese que la lámpara esté desconectado durante
cualquiera de las siguientes situaciones:
- Desconecte cuando esté instalando la lámpara.
- Desconecte antes de dar mantenimiento.
- Desconecte antes de meter sus manos al agua de su pecera. Asegúrese de que sus
manos estén secas antes de conectar el calentador a la electricidad.
- Desconecte cuario no se este utilizado.
• Cuando desenchufe el calentador, detenga el enchufe para prevenir daño al cable.
Nunca jale del cable para desenchufar el calentador.
• Para uso en interiores únicamente.
• Para uso en peceras y acuarios únicamente.
• Supervise cuidadosamente a los niños y a las mascotas (que no habitan en la pecera)
mientras estén cerca a este calentador.
• NO altere o modifique este producto.
• Contacte a un electricista si no está seguro de la conexión eléctrica.
• Este aparato no contiene piezas reparables. No intente reparar este producto. Regréselo
a Zoo Med para inspección y reparación.
BUCLE ANTIHUMEDAD: Este aparato debe ser conectado utilizando un “bucle antihume-
dad” (ver Figura 1). Para seguridad el receptáculo debe tener protección al circuito principal
(Residual Current Device or Residual Current Circuit Breaker with Overload Protection). El bucle
antihumedad prevendrá que el agua corra a través del cable y entre al receptor eléctrico.
Para hacer el bucle antihumedad, asegure que una parte del cable esté más bajo que el nivel
del receptor eléctrico como se muestra en la Figura 1. Si no está seguro de la conexión y el
suministro eléctrico, contacte a un electricista calificado. Si por algún motivo el enchufe o el
receptor eléctrico se mojan, no toque o desconecte el cable hasta que la corriente eléctrica
este apagada en el circuito principal.
INSTALACIÓN EN LAS PECERAS NANO HOUSE Y
NANO CONDO DE ZOO MED:
PRECAUCIÓN: No enchufe la lámpara hasta haber terminado los siguientes pasos.
1. Afloje los dos tornillos de plástico de la cubierta de plástico, teniendo cuidado de no
sacarlos totalmente.
2. Coloque el gancho situado en la cubierta de plástico sobre el borde posterior de la aber-
tura en la parte superior de la pecera Nano House o Nano Condo.
3.
PRECAUCIÓN:
¡La cubierta de plástico se coloca por fuera de la pecera!
4. Cuidadosamente apriete los tornillos para fijar la lámpara a la pecera.
5. Enchufe la lámpara a un enchufe aislado y encienda la lámpara utilizado el botón de
encendido/apagado a un lado de la cubierta de plástico.
INSTALACIÓN A OTRAS PECERAS PEQUEÑAS:
PRECAUCIÓN:
No enchufe la lámpara hasta haber terminado los siguientes pasos.
PRECAUCIÓN:
Si utiliza adhesivo, el adhesivo puede fallar y permitir que la lámpara caiga al
agua. No introduzca sus manos al agua si la lámpara llegara a caer al agua.
1. De ser posible utilice el gancho situado en la cubierta de plástico como se describe
anteriormente para las peceras Nano House y Nano Condo de Zoo Med.
2. Si el gancho no se puede utilizar, asegure la cubierta de plástico a la parte posterior de
la pecera utilizando adhesivo apropiado o Velcro®. Asegure que el adhesivo se a ap-
ropiado para las superficie que va a pegar para prevenir que la lámpara caiga al agua.
Se recomienda utilizar Velcro® ya que permite el quitar la lámpara mientras limpia la
pecera.
PRECAUCIÓN:
El fallo del adhesivo puede permitir que la lámpara caiga al agua.
No introduzca sus manos a la pecera si la lámpara caen en la pecera. Inspeccione regu-
larmente el adhesivo y remplázalo de ser necesario. Si no esta seguro de la instalación,
no instale la lámpara a su pecera.
3. Periódicamente verifique que el adhesivo este sujeto a las dos superficie. Remplázalo
de ser necesario.
4. Conecte la lámpara a un enchufe aislado y encienda la lámpara utilizando el botón de
encendido/apagado.
GARANTÍA:
Zoo Med Laboratories, Inc. (Zoo Med) garantiza que cada BETTA LIGHT™, está libre de
defectos de material y mano de obra bajo uso y servicio normales durante 12 meses de la
fecha de compra. La obligación bajo esta garantía está limitada a la reparación o sustitución,
al criterio de Zoo Med, del producto o cualquier pieza del mismo, siempre que el producto sea
devuelto a Zoo Med con flete prepagado. No se permitirán reclamaciones bajo esta garantía sí,
en opinión de Zoo Med, el BETTA LIGHT™ ha estado sujeto a accidentes o uso inadecuado,
incluyendo sin limitación: daños por agua, almacenaje incorrecto, caída accidental, etc. Esta
garantía es válida en lugar de cualquier otra garantía y representaciones expresas o implícitas.
Sírvase incluir su recibo, nombre completo, dirección, número de teléfono y dirección de correo
electrónico, junto con una nota explicativa del fallo o avería, al enviar el producto a Zoo Med.
Conceda de 4 a 6 semanas para la reparación o sustitución del producto. Por favor, consulte
siempre con Zoo Med Europa a través de teléfono o correo electrónico, antes de devolver
cualquier producto.
ZOO MED EUROPA
C/O DHL Euronet
Klaus-Michael Kühnelaan 13
ENA23 Zone 1 nr. 1620
2440 Geel, Belgium
e-mail: [email protected]
www.zoomed.eu
Bucle
antihumedad
TEST
C16
FIGURA 1
Busque estas otros productos Zoo Med
en su tienda de mascota mas cercana:
Ceramic
Betta Log
Floating Betta
Exercise Mirror Betta Bed Leaf
Hammock Betta H2O
Conditioner
Floating Betta Log

Druppellus
TEST
C16
FIGUUR 1
5
S
A
V
E
Y
O
U
R
F
I
S
H
S
A
V
E
Y
O
U
R
F
I
S
H
S
S
AAA
AAA
A
A
VVV
V
V
V
A
VVV
A
V
A
V
A
E
YYY
YYY
Y
Y
O
O
UUU
U
U
R
F
F
I
I
S
S
H
INSTRUCTIONS ITEM# BL-30E
GEBRUIKSAANWIJZING: NEDERLANDS
Gefeliciteerd met uw aankoop van Zoo Med’s BETTA LIGHT™! Lees de hierna volgende
instructies zorgvuldig. Hebt u vragen over deze instructies of de juiste toepassing van het
apparaat? Neem dan contact op met de afdeling klantenservice via [email protected] of bel
(888) 496-6633 (alleen VS en Canada). Klanten uit andere landen kunnen bellen met (805)
542-9988.
EIGENSCHAPPEN:
• LED-peertjes met lange levensduur: tot 50.000 uur!
• Perfect voor gebruik met alle Zoo Med Designer Nano House en Nano Condo Aquaria.
• Kan worden gebruikt in combinatie met een timer voor automatische lichtcontrole.
BELANGRIJKE VEILIGHEIDSMEDEDELING!
Lees deze instructies voor het installeren of bedienen van de armatuur om het risico
op brand, letsel of elektrische schok te verlagen. Bewaar de instructies om er in de
toekomst op te kunnen terugvallen.
VEILIGHEIDSINSTRUCTIES:
• Onderzoek het lamparmatuur en de elektriciteitskabel zorgvuldig op tekenen van schade
of defect. Als de BETTA LIGHT™ armatuur beschadigd of defect lijkt, gebruik hem dan
NIET! Neem contact op met de Zoo Med klantenservice voor vervanging binnen de in de
voorwaarden vastgestelde garantietermijn.
• Inspecteer de isolatie van de elektriciteitskabel zorgvuldig om er zeker van te zijn dat
deze niet is beschadigd en dat er geen kabels blootliggen. Splits, repareer of verander
NIETS aan de elektriciteitskabel. Inspecteer de elektriciteitskabel, stekker en lamparma-
tuur regelmatig op schade.
• WAARSCHUWING: De plastic behuizing dient buiten het aquarium te worden geplaatst.
Plaats de plastic behuizing niet aan de binnenzijde van het aquarium.
• Wees voorzichtig met het gebruik van elektrische apparaten in de buurt van water. Om
het risico op elektrische schok te verlagen, zorg ervoor dat het lamparmatuur tijdens
een van de volgende situaties niet is verbonden aan een stroomtoevoer:
- Wanneer u het lamparmatuur installeert op uw aquarium.
- Wanneer u onderhoud aan uw aquarium pleegt.
- Voor u uw hand(en) in het aquariumwater doet. Zorg dat uw handen volledig droog zijn
voor u het lamparmatuur aansluit op een correct geaarde elektriciteitstoevoer.
- Wanneer niet in gebruik, afsluiten van de elektriciteitstoevoer.
• Sluit de elektriciteitstoevoer af door de stekker vast te pakken en uit de wandcontact-
doos te verwijderen om schade aan de elektriciteitskabel te voorkomen. Trek in geen
geval aan de elektriciteitskabel om het lamparmatuur af te sluiten van de elektriciteit-
stoevoer.
• Uitsluitend voor gebruik binnenshuis.
• Uitsluitend voor gebruik in combinatie met aquaria (inclusief vissenkommen).
• Houd kinderen en huisdieren (de bewoners van het aquarium uitgezonderd) goed in de
gaten wanneer zij zich in de buurt van het aquarium bevinden.
• Verander NIETS aan dit product.
• Neem contact op met een elektricien als u twijfelt over de aansluiting van de elektricit-
eit.
• Deze unit heeft geen onderdelen die door de gebruiker kunnen worden onderhouden.
Probeer dit product niet eigenhandig te repareren. Stuur het voor inspectie en reparatie
retour naar Zoo Med.
DRUPPELLUS: Deze lamparmatuur dient te worden gebruikt in combinatie met een gegronde
wandcontactdoos met een “druppellus” (zie figuur 1). Om veiligheidsredenen is het vereist dat
de wandcontactdoos is uitgerust met een aardlekschakelaar. De druppellus voorkomt dat er
water langs de elektriciteitskabel loopt en de stekker of wandcontactdoos nat wordt. Leg een
druppellus aan door een deel van de elektriciteitskabel lager te laten hangen dan het niveau
van de wandcontactdoos, zoals te zien op figuur 1. Als u niet zeker bent van de elektriciteitsto-
evoer en de verbinding, neem dan contact op met een gekwalificeerd elektricien. Als de stekker
of de wandcontactdoos om enige reden nat wordt, pak de elektriciteitskabel dan niet vast en
sluit deze niet af van de elektriciteitstoevoer voor de stroom is afgesloten.
INSTALLATIE OP ZOO MED’S DESIGNER NANO
HOUSE & NANO CONDO AQUARIA:
WAARSCHUWING:
Sluit de BETTA LIGHT™ armatuur niet aan tot u de volgende stappen hebt
doorlopen.
1. Draai de twee plastic schroeven op de behuizing los, en let op dat u ze niet volledig
verwijdert.
2. Plaats de haak op de plastic behuizing over de achterzijde van de opening in de boven-
zijde van het Nano House of Nano Condo aquarium.
3.
WAARSCHUWING:
De plastic behuizing komt aan de buitenzijde van het aquarium!
4. Draai de schroeven zorgvuldig vast om de Betta Light armatuur vast te zetten aan het
aquarium.
5. Sluit de stekker aan op een geaarde wandcontactdoos en schakel deze in door middel
van de knop aan de zijkant van de plastic behuizing.
INSTALLATIE OP EEN VISSENKOM OF
ANDER KLEIN AQUARIUM:
WAARSCHUWING:
Sluit de BETTA LIGHT™ armatuur niet aan tot u de volgende stappen hebt
doorlopen.
WAARSCHUWING:
Gebruikt u plakband? Wanneer het loslaat kan het armatuur in het water
vallen. Plaats uw handen NIET in het aquarium als de lichtarmatuur in het water valt.
1. Gebruik wanneer mogelijk de haak op de plastic behuizing over de achterzijde van de
opening in de bovenzijde, zoals bovenstaand beschreven voor het Nano House of Nano
Condo aquarium.
2. Als de haak niet kan worden bevestigd, plaats de plastic behuizing dan aan de buitenste
achterwand van een vissenkom of aquarium door middel van een gepaste plakcon-
structie of haak-en lussluiting zoals Velcro®. Controleer of het gebruikte plakmateriaal
geschikt is voor de betreffende oppervlakken, zodat het armatuur niet in het water valt.
Velcro®wordt aangeraden aangezien dit kan worden verwijderd voor onderhoud aan
het aquarium.
WAARSCHUWING:
Door het loslaten van het plakband kan het armatuur in
het aquariumwater vallen. Plaats uw handen NIET in het aquarium als de lichtarmatuur
in het water valt. Inspecteer het plakband regelmatig en vervang het wanneer nodig. Als
u twijfelt aan de installatie, monteer het lamparmatuur dan niet op uw aquarium.
3. Controleer regelmatig of het plakband stevig vast zit aan beide oppervlakken van het
aquarium en aan het lamparmatuur. Wanneer nodig vervangen.
4. Sluit de stekker aan op een geaarde wandcontactdoos en schakel deze in door middel
van de knop aan de zijkant de plastic behuizing.
GARANTIE:
Zoo Med Laboratories, Inc. (Zoo Med) garandeert dat elke BETTA LIGHT™ vrij is van defecten
in materiaal en fabricage, (bij normaal gebruik en onderhoud gedurende 1 jaar vanaf de datum
van aankoop). Het naleven van deze garantie is beperkt tot het repareren of vervangen (naar
Zoo Med’s goeddunken) van het product of de onderdelen ervan, indien het volledige product
(inclusief het originele aankoopbewijs) teruggestuurd word naar Zoo Med (franco/portvrij). Geen
enkele vordering is ontvankelijk onder deze garantie als, naar mening van Zoo Med, de BETTA
LIGHT™ door verkeerd gebruik of ongeval, inclusief maar niet uitsluitend: Waterschade,
verkeerde opslag, breuk door vallen, etc. Deze garantie vervangt alle andere garanties en verk-
laringen geuit of geïmpliceerd. Gelieve steeds de rekening van aankoop, uw volledige naam,
uw adres, uw telefoonnummer en e-mailadres, samen met een verklaring van het probleem
bij te voegen wanneer u het product naar Zoo Med terugstuurt. Gelieve een periode van 4 tot 6
weken te accepteren voor een herstelling of vervanging. Neem steeds CONTACT op via telefoon
of email met Zoo Med Europe, ALVORENS een product terug te sturen.
ZOO MED EUROPA
C/O DHL Euronet
Klaus-Michael Kühnelaan 13
ENA23 Zone 1 nr. 1620
2440 Geel, Belgium
e-mail: [email protected]
www.zoomed.eu

Curva di
gocciolamento
TEST
C16
FIGURA 1
6
S
A
V
E
Y
O
U
R
F
I
S
H
S
A
V
E
Y
O
U
R
F
I
S
H
S
S
AAA
AAA
A
A
VVV
V
V
V
A
VVV
A
V
A
V
A
E
YYY
YYY
Y
Y
O
O
UUU
U
U
R
F
F
I
I
S
S
H
INSTRUCTIONS ITEM# BL-30E
ISTRUZIONI: ITALIANO
Complimenti per avere acquistato una BETTA LIGHT™ della ZOO MED ! Vi preghiamo di
leggere con attenzione le istruzioni riportate qui di seguito. Se avete domande relative a
queste istruzioni o al buon uso di questo articolo siete pregati di contattare il nostro reparto di
6633 (solo da USA e Canada). Per i Clienti in altri Paesi si prega di chiamare il (805) 542-9988.
CARATTERISTICHE:
• Lampadine LED di lunga durata: fino a 50 000 ore !
• Perfetto per l’uso con tutti gli acquari di marca Nano House e Nano Condo di Zoo Med.
• Si può impiegare con un temporizzatore per il controllo automatico della accensione.
AVVISO IMPORTANTE SULLA SICUREZZA!
Per fare diminuire il rischio di incendio, di infortunio o di scossa elettrica leggete e
seguite queste istruzioni prima di installare o di fare funzionare questo apparecchio di
riscaldamento. Conservate queste istruzioni per il futuro utilizzo.
ISTRUZIONI SULLA SICUREZZA:
• Esaminate con attenzione l’impianto di luce e il cavo di alimentazione elettrica alla
ricerca di eventuali segni di danno o difetto. Se sembra che l’impianto Betta Light sia
danneggiato o difettoso
NON
usatelo ! Contattate il reparto di assistenza alla Clientela
della Zoo Med per la sostituzione entro il lasso di tempo specificato in conformità con i
termini della garanzia.
• Ispezionate attentamente l’isolamento del cavo di alimentazione elettrica e la spina per
assicurarvi che non vi siano né tagli, né fili esposti.
NON
congiungete, riparate o mod-
ificate in alcun modo il cavo di alimentazione elettrica. Ispezionate periodicamente il
cavo di alimentazione elettrica, la spina e l’impianto di luce per determinare l’eventuale
presenza di danno.
•
ATTENZIONE:
L’alloggiamento di plastica deve essere posizionato al di fuori
dell’acquario. Non posizionate l’alloggiamento di plastica all’interno dell’acquario.
• Si deve esercitare attenzione quando si impiegano apparecchiature elettriche in
prossimità di acqua. Per fare diminuire il rischio di scossa elettrica assicuratevi che
l’impianto di luce sia staccato nel corso di una qualsiasi delle seguenti situazioni:
- Staccate durante l’installazione dell’impianto di luce sul vostro acquario.
- Staccate durante l’esecuzione di manutenzione sull’acquario.
- Staccate prima di immergere una mano o le mani nell’acqua dell’acquario. Assicurat-
evi che le mani siano completamente asciutte prima di attaccare l’impianto di luce a
una presa collegata a terra appropriata.
- Staccate quando l’impianto non è in uso.
• Quando staccate afferrate la spina per evitare di danneggiare il cavo di alimentazione
elettrica. Non esercitate mai trazione sul cavo di alimentazione elettrica per staccare
l’impianto di luce.
• Esclusivamente per un uso all’interno.
• Esclusivamente per un uso in acquari (comprendenti vasi per pesciolini e vasche di
vetro per pesci).
• Vigilate attentamente su bambini e animali domestici (che non siano gli abitanti
dell’acquario) quando questi si trovino nelle vicinanze dell’acquario.
• NON alterate o modificate questo prodotto.
• Contattate un elettricista se in dubbio sul collegamento elettrico.
• Questo dispositivo è privo di parti riparabili dall’utente. Non tentate di riparare voi stessi
questo prodotto. Restituite alla Zoo Med per l’ispezione e la riparazione.
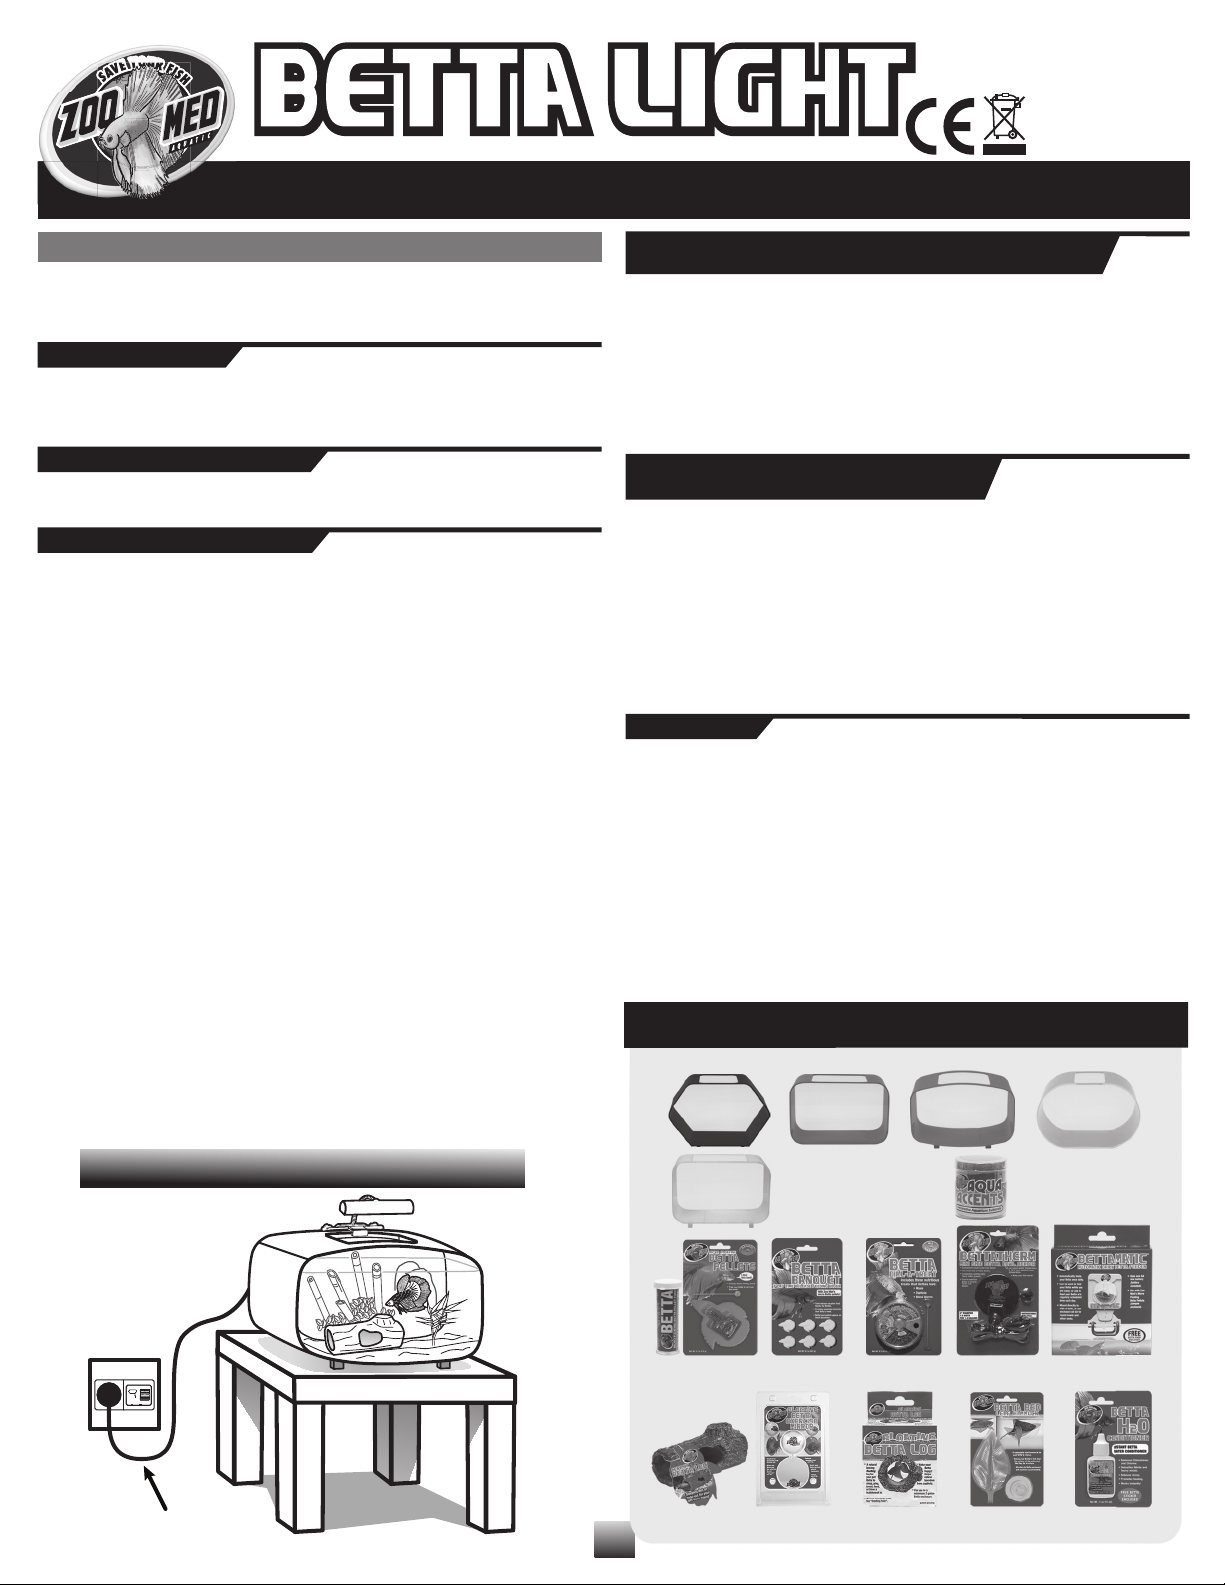
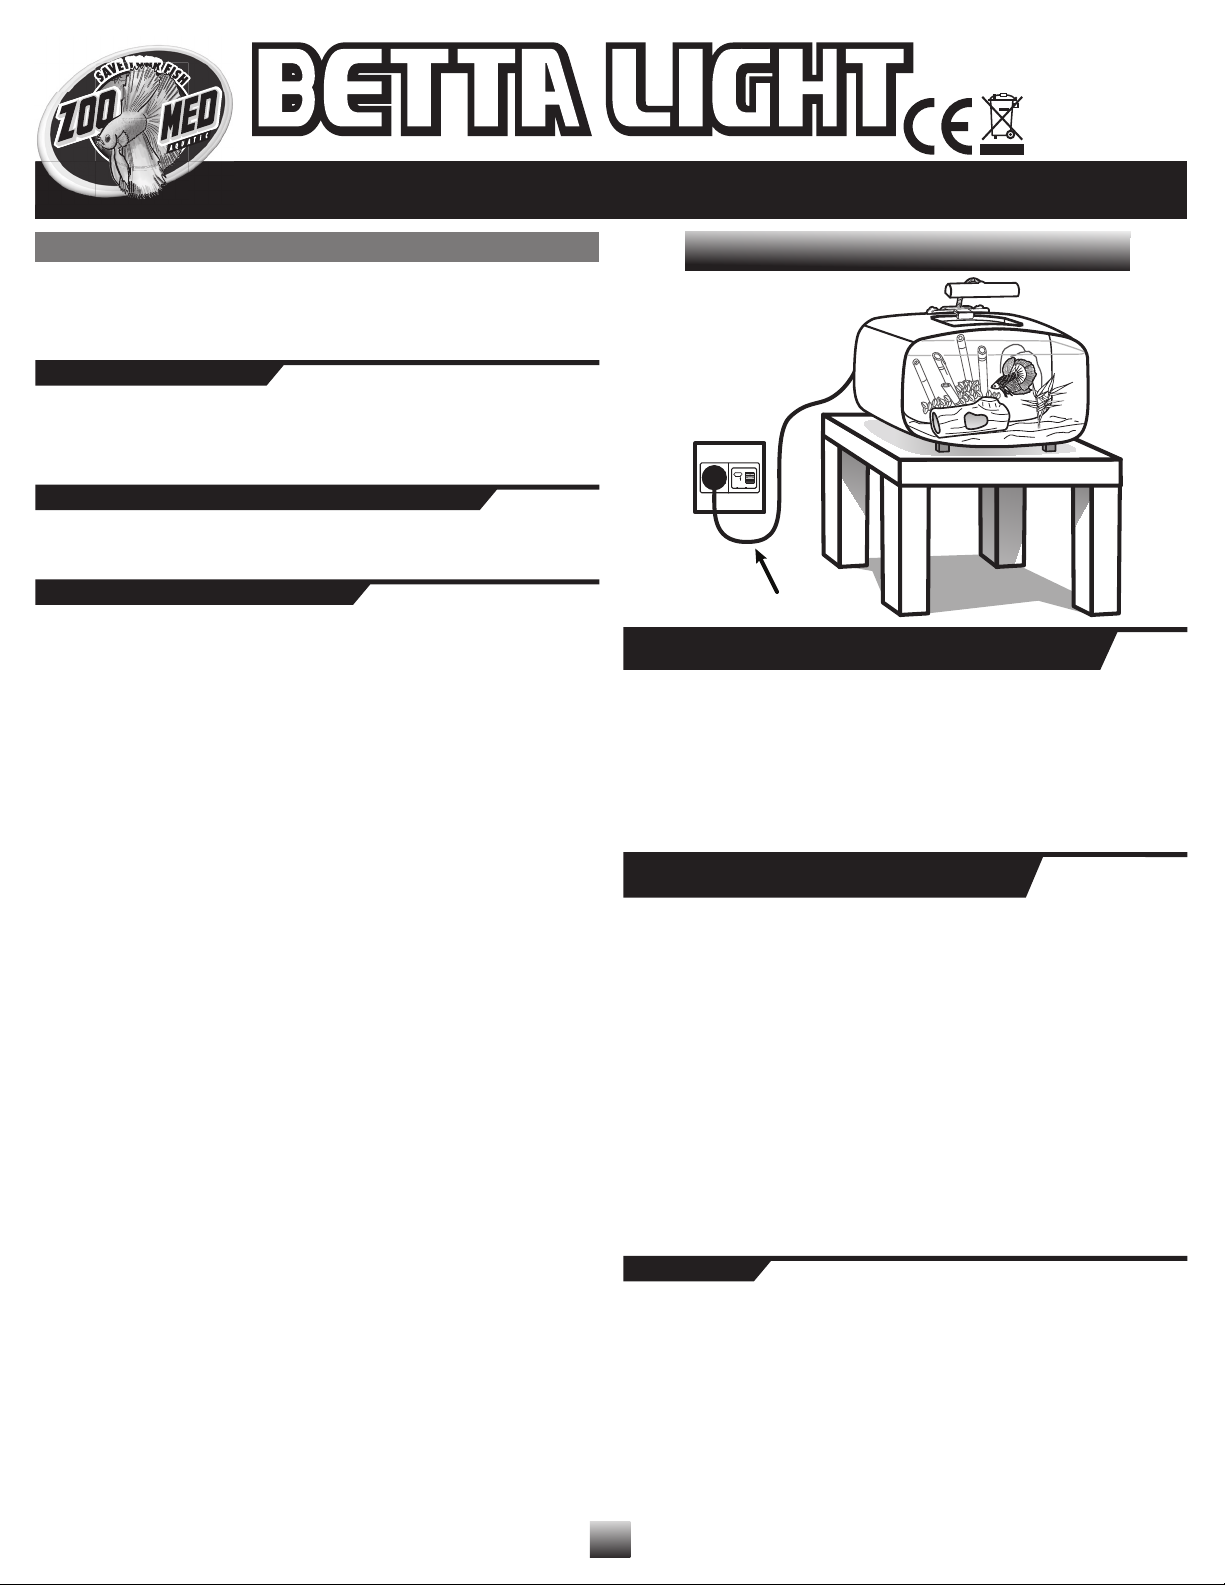
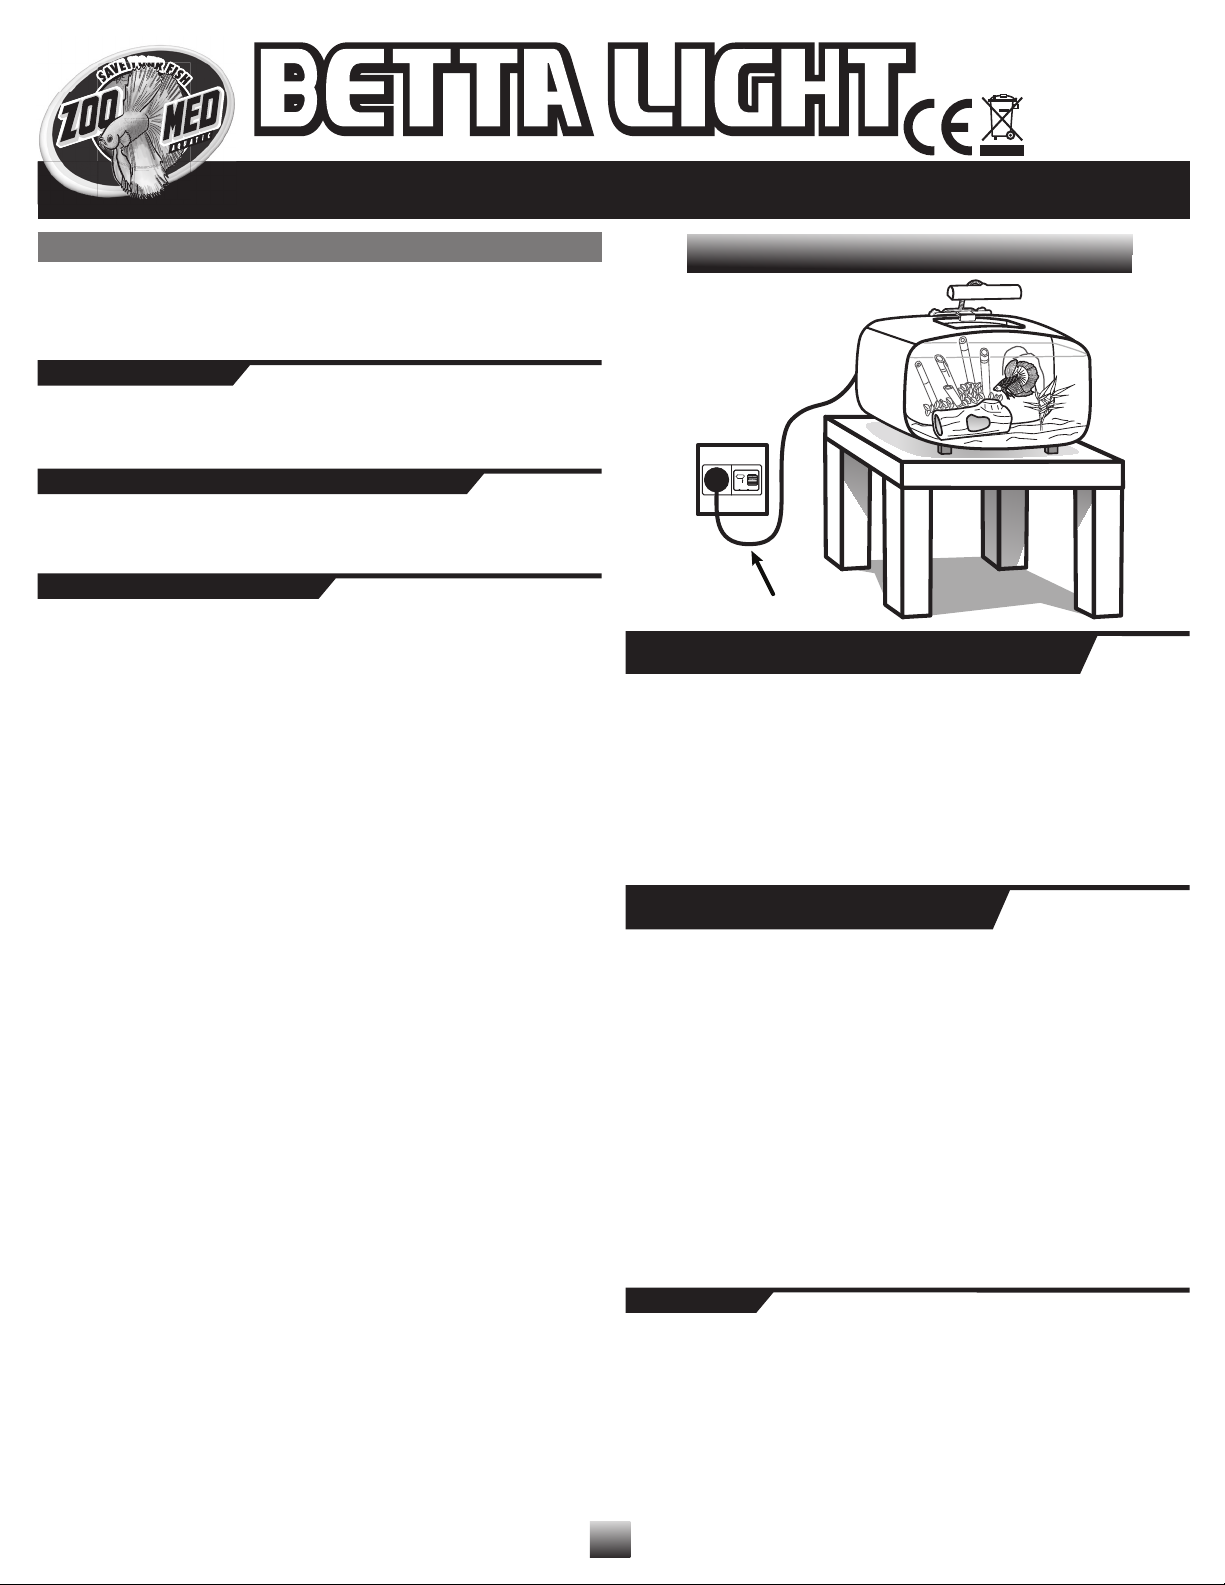
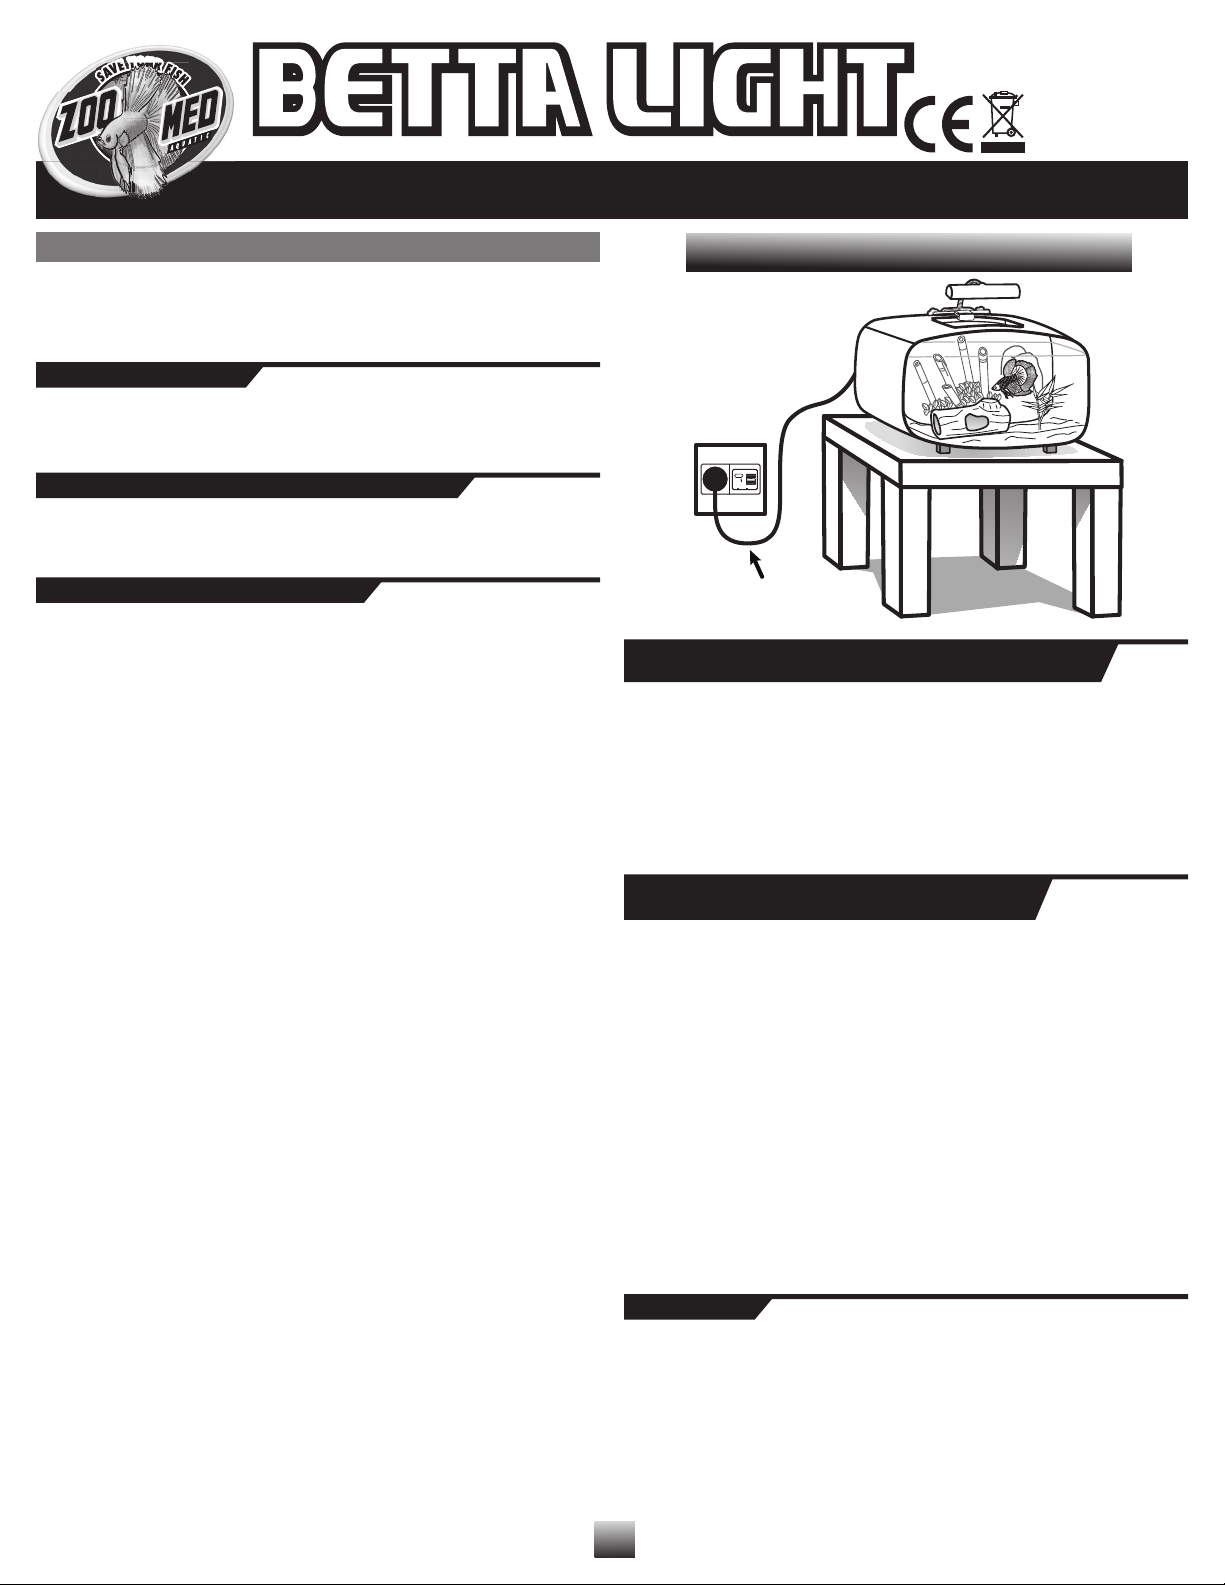
CURVA DI GOCCIOLAMENTO: Questo impianto di luce deve essere impiegato vicino a una
presa con scarico a terra con una “curva di gocciolamento” (si veda la figura 1). Per motivi di
sicurezza la presa dovrebbe presentare un Dispositivo per la corrente residua o un Interruttore
per la corrente residua con protezione da sovraccarico (RCD o RCBO). La curva di gocciolamen-
to impedirà all’acqua di scorrere lungo il cavo di alimentazione elettrica e di bagnare la spina o
la presa a muro. Per creare una curva di gocciolamento assicuratevi che una porzione del cavo
di alimentazione elettrica si trovi al di sotto del livello della presa a muro, come illustrato nella
figura 1. Se in dubbio sull’alimentazione e sul collegamento elettrici contattate un elettricista
autorizzato qualificato. Se per qualunque ragione la spina o la presa a muro si bagna non affer-
rate, né staccate il cavo di alimentazione elettrica fino a dopo che si è spenta l’alimentazione
elettrica in corrispondenza del fusibile o dell’interruttore principale.
INSTALLAZIONE SU ACQUARI DI MARCA ANO
HOUSE & NANO CONDO DI ZOO MED:
ATTENZIONE: Non attaccate l’impianto Betta Light fino a dopo avere completato le seguenti fasi.
1. Allentate le due viti di plastica presenti sull’alloggiamento, facendo attenzione a non
rimuoverle del tutto.
2. Posizionate il gancio ubicato sull’alloggiamento di plastica al di sopra del bordo posteri-
ore dell’apertura nella parte superiore dell’acquario Nano House o Nano Condo.
3.
ATTENZIONE:
L’involucro di plastica va al di fuori dell’acquario !
4. Serrate le viti con attenzione per fissare l’impianto Betta Light all’acquario.
5. Attaccate l’impianto in una presa con scarico a terra e accenderlo usando l’interruttore
su un fianco dell’alloggiamento di plastica.
INSTALLAZIONE SU VASI PER PESCIOLINI
E SU ALTRI PICCOLI ACQUARI:
ATTENZIONE:
Non attaccate l’impianto Betta Light fino a dopo avere compiuto le seguenti fasi.
ATTENZIONE:
Se si usa adesivo, il cedimento dell’adesivo può far cadere il dispositivo
nell’acqua dell’acquario.
NON
mettete le mani in un acquario se il dispositivo di luce è caduto
in acqua.
1. Se possibile usate il gancio posizionato sull’alloggiamento di plastica, come descritto
sopra relativamente agli acquari Zoo Med Nano House e Nano Condo.
2. Se non potete impiegare il gancio fissate l’alloggiamento di plastica sulla parete
posteriore esterna del vaso per pesciolini o dell’acquario usando un adesivo appropriato
o una chiusura a “cappio e gancio” come il Velcro®. Assicuratevi che l’adesivo usato sia
appropriato alle superfici alle quali è attaccato al fine di impedire all’impianto di cadere
in acqua. Il Velcro® è consigliato poiché permetterà la rimozione dell’impianto nel corso
del periodo di manutenzione dell’acquario.
ATTENZIONE:
Il cedimento dell’adesivo può
far cadere il dispositivo nell’acqua dell’acquario.
NON
mettete le mani in un acquario se
l’impianto di luce è caduto in acqua. Ispezionate regolarmente l’adesivo e, se neces-
sario, sostituitelo. Se in dubbio sulla installazione non installate l’impianto di luce sul
vostro acquario.
3. Controllate periodicamente per avere la sicurezza che l’adesivo sia attaccato salda-
mente sia alla superficie dell’acquario, sia a quella dell’impianto di luce. Sostituite, se
necessario.
4. Attaccate l’impianto a una presa con scarico a terra e accenderlo usando l’interruttore
sul fianco dell’alloggiamento di plastica.
GARANZIA:
Zoo Med Laboratories, Inc. (Zoo Med) garantisce che BETTA LIGHT™ è privo di difetti di
materiale o manodopera in condizioni di normale uso ed assistenza per un anno dalla data
d’acquisto. L’obbligo di cui alla presente garanzia è limitato alla riparazione o sostituzione, a
discrezione di Zoo Med, del prodotto o di sue parti, se il prodotto è restituito (incluso ricevuta
d’acquisto) a Zoo Med con trasporto prepagato. Non saranno consentiti ricorsi alla presente
garanzia se, ad opinione di Zoo Med, BETTA LIGHT™ è stato oggetto di incidente o uso impro-
prio, compresi, ma non solo: danni da acqua, conservazione inadeguata, caduta accidentale,
etc. La presente garanzia sostituisce ogni altra garanzia e dichiarazione espressa o implicita.
Alla spedizione di qualsiasi prodotto, accludere prova d’acquisto, nome completo, indirizzo,
numero di telefono ed indirizzo e-mail, insieme ad una nota in cui è spiegato il guasto. Zoo Med
si riserva 4 - 6 settimane per la riparazione o la sostituzione. Si prega di verificare SEMPRE con
Zoo Med Europe, telefonicamente o via e-mail, PRIMA di restituire qualsiasi prodotto.
ZOO MED EUROPA
C/O DHL Euronet
Klaus-Michael Kühnelaan 13
ENA23 Zone 1 nr. 1620
2440 Geel, Belgium
e-mail: [email protected]
www.zoomed.eu
Table of contents
Languages:
Other Zoo Med Aquarium manuals
Popular Aquarium manuals by other brands

Marineland
Marineland Eclipse Three Quick setup guide

D-D The Aquarium Solution
D-D The Aquarium Solution Kamoer FX-STP WIFI user manual

Red Sea
Red Sea R42080 manual

EcoSystem Aquarium
EcoSystem Aquarium MIRACLE MUD PRO Series owner's manual

Aquatronica
Aquatronica ACQ210N-MS instruction manual

Hagen
Hagen Fluval Shaker 18390 Assembly instructions