Zoom F6 User manual

Operation Manual
© 2019 ZOOM CORPORATION
Copying or reprinting this manual in part or in whole without permission is prohibited.
Product names, registered trademarks and company names in this document are the property of their respective companies. All trademarks and regis-
tered trademarks in this document are for identification purposes only and are not intended to infringe on the copyrights of their respective owners.
Proper display is not possible on grayscale devices.
You must read the Usage and Safety Precautions before use.

02
Notes about this Operation Manual
You might need this manual in the future. Always keep it in a place where
you can access it easily. The contents of this document and the specica-
tions of the product could be changed without notice.
◎Windows® is a trademark or registered trademark of Microsoft® Cor-
poration.
◎Mac, macOS, iPad, iPhone and iPod touch are trademarks or registered
trademarks of Apple Inc.
◎The SD, SDHC and SDXC logos are trademarks.
◎The Bluetooth® word mark and logo are registered trademarks of Blue-
tooth® SIG, Inc. and these marks are used under license by Zoom Cor-
poration.
◎Other product names, registered trademarks and company names in
this document are the property of their respective companies.
Note: All trademarks and registered trademarks in this document are for
identication purposes only and are not intended to infringe on the
copyrights of their respective owners.
Recording from copyrighted sources, including CDs, records, tapes, live
performances, video works and broadcasts, without permission of the
copyright holder for any purpose other than personal use is prohibited by
law. Zoom Corporation will not assume any responsibility related to in-
fringements of copyrights.

03
Introduction
Thank you very much for purchasing a ZOOM multitrack eld recorder.
The provides the following features in a compact form.
●Record the quietest and loudest sounds at high quality with
32-bit oat WAV format
The high-quality analog input circuits can handle signals ranging from the
most delicate to a professional maximum level of +24 dBu.
In addition to 16/24-bit WAV recording, 32-bit oat WAV recording, which
does not require input level adjustment, is also supported.
With 32-bit float WAV format, the recording resolution can be retained
even when changing levels greatly after recording.
● Simultaneously record 6 channels and 14 tracks
Up to 14 tracks can be recorded simultaneously, including 16/24-bit WAV
and 32-bit float WAV for Inputs 1–6 along with left and right tracks of a
stereo mix.
● Support for three types of batteries
A USB mobile battery, L battery or AA batteries can be used for power.
● Two remote control options
Wireless control is possible by installing a ZOOM wireless adapter (e.g.
BTA-1) and using the F6 Control iOS app.
Moreover by connecting an F6 Control, which is a mixer-style controller
designed especially for F Series recorders, with a USB cable, 60mm track
faders, LED level meters and various transport buttons can be used for in-
tuitive sound control. Combined with the F6 Control iOS app, iPhones and
iPads can also be used as large meters with excellent visibility.
● Support for SMPTE timecode input and output along with
wireless timecode input
The uses a high-precision oscillator that enables it to independently
generate accurate timecode with a discrepancy of less than 0.5 frames
per 24 hours.
If a BTA-1 dedicated wireless adapter is installed, wireless timecode can
be received from a Timecode Systems UltraSync BLUE and written to re-
corded les.
● Headphone jack with 100mW+100mW maximum output
Clear headphone monitoring is possible using the digital boost function
while sending audio signals to a video camera or other device from the
LINE OUT jack.
● Flexible signal routing also makes mixer use possible
Pre-fader and post-fader signals from inputs 1–6 can be routed to outputs
freely.
● Phantom power supply (+24 V or +48 V)
This can be set for each input separately.
● USB audio interface use with up to 6 ins and 4 outs possible
Use as a 2-in/2-out or 6-in/4-out audio interface (driver required for Win-
dows).
● Output multitrack audio by USB while recording
While recording to the installed SD card, multitrack audio can be sent to
and from a computer by USB with up to 8 inputs (6 inputs + L/R stereo
mix) and 4 outputs.
This enables simultaneous backup recording and Internet live streaming.
● 360º audio
Ambisonic mode enables 360º spatial audio recording using VR mics. De-
coding from Ambisonic format A to format B is supported along with gain
and setting link functions.

04
Contents
Notes about this Operation Manual.........................................................................02
Introduction....................................................................................................................03
Contents .........................................................................................................................04
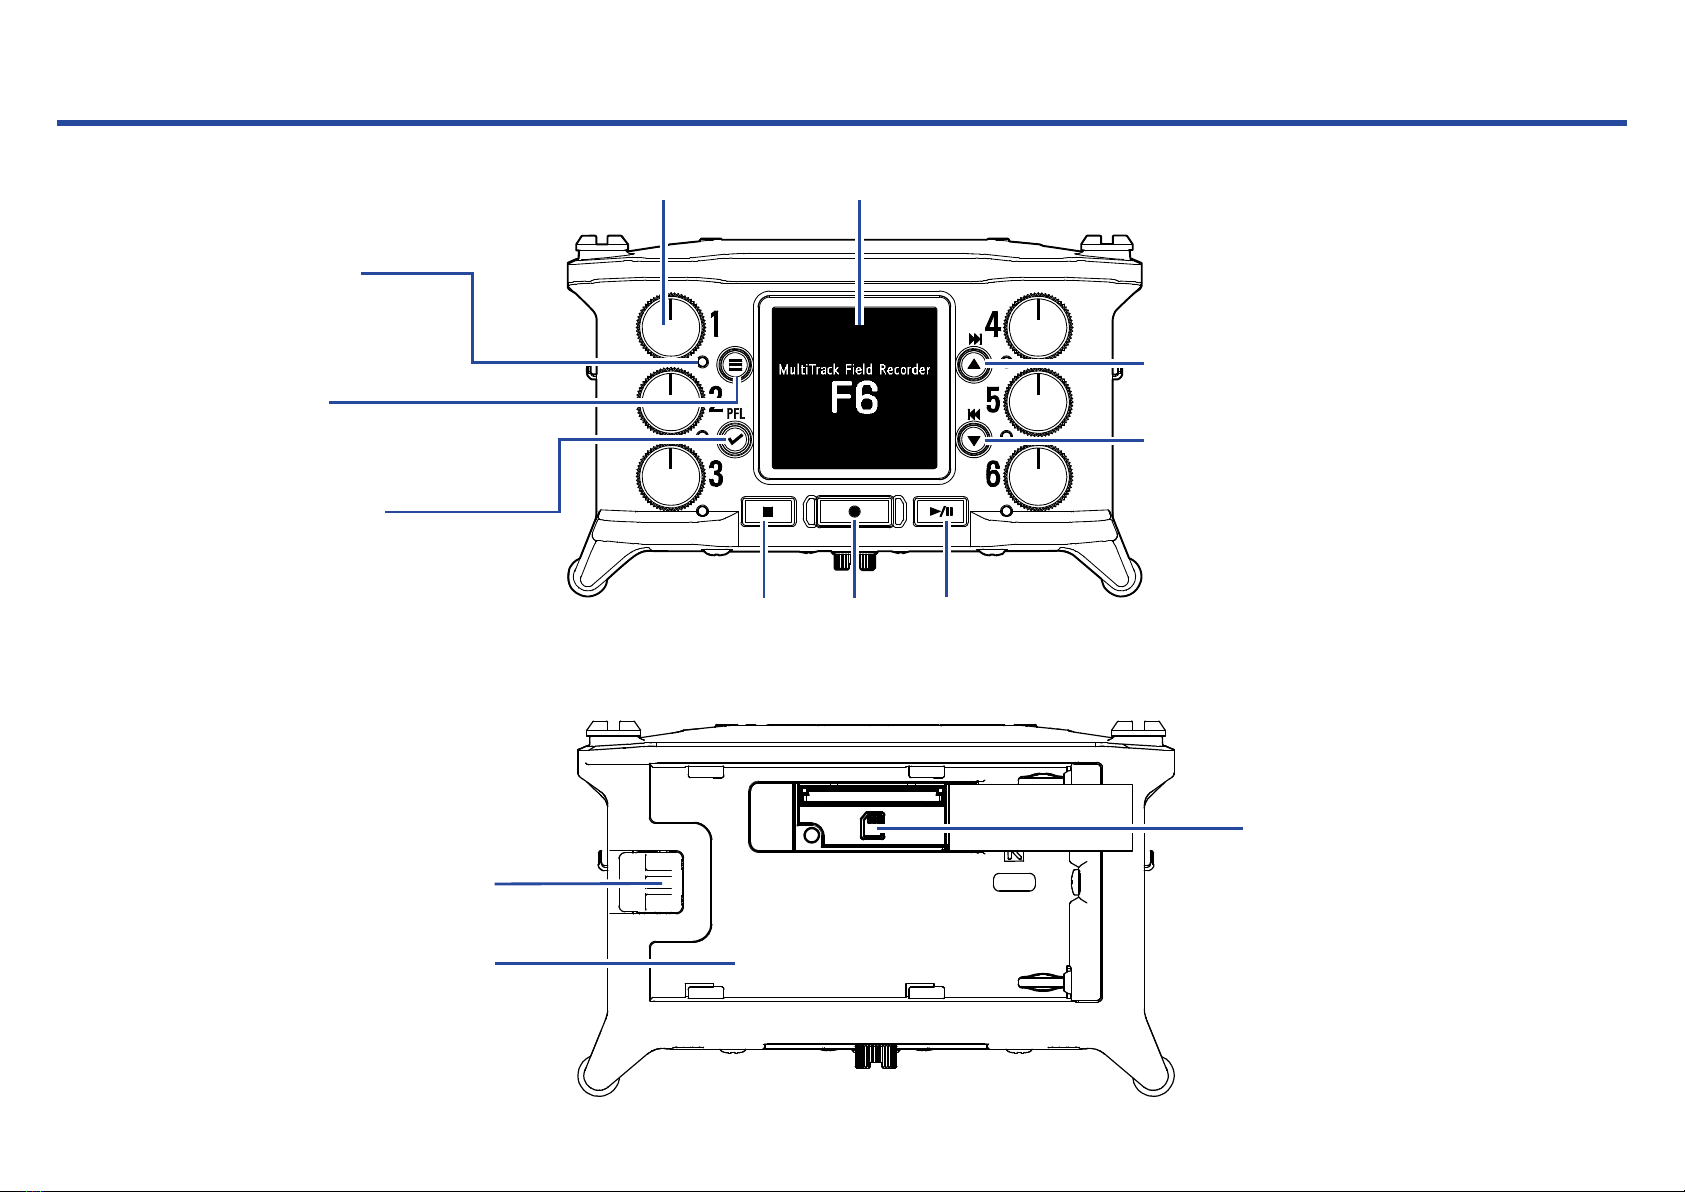
Names of parts .............................................................................................................06
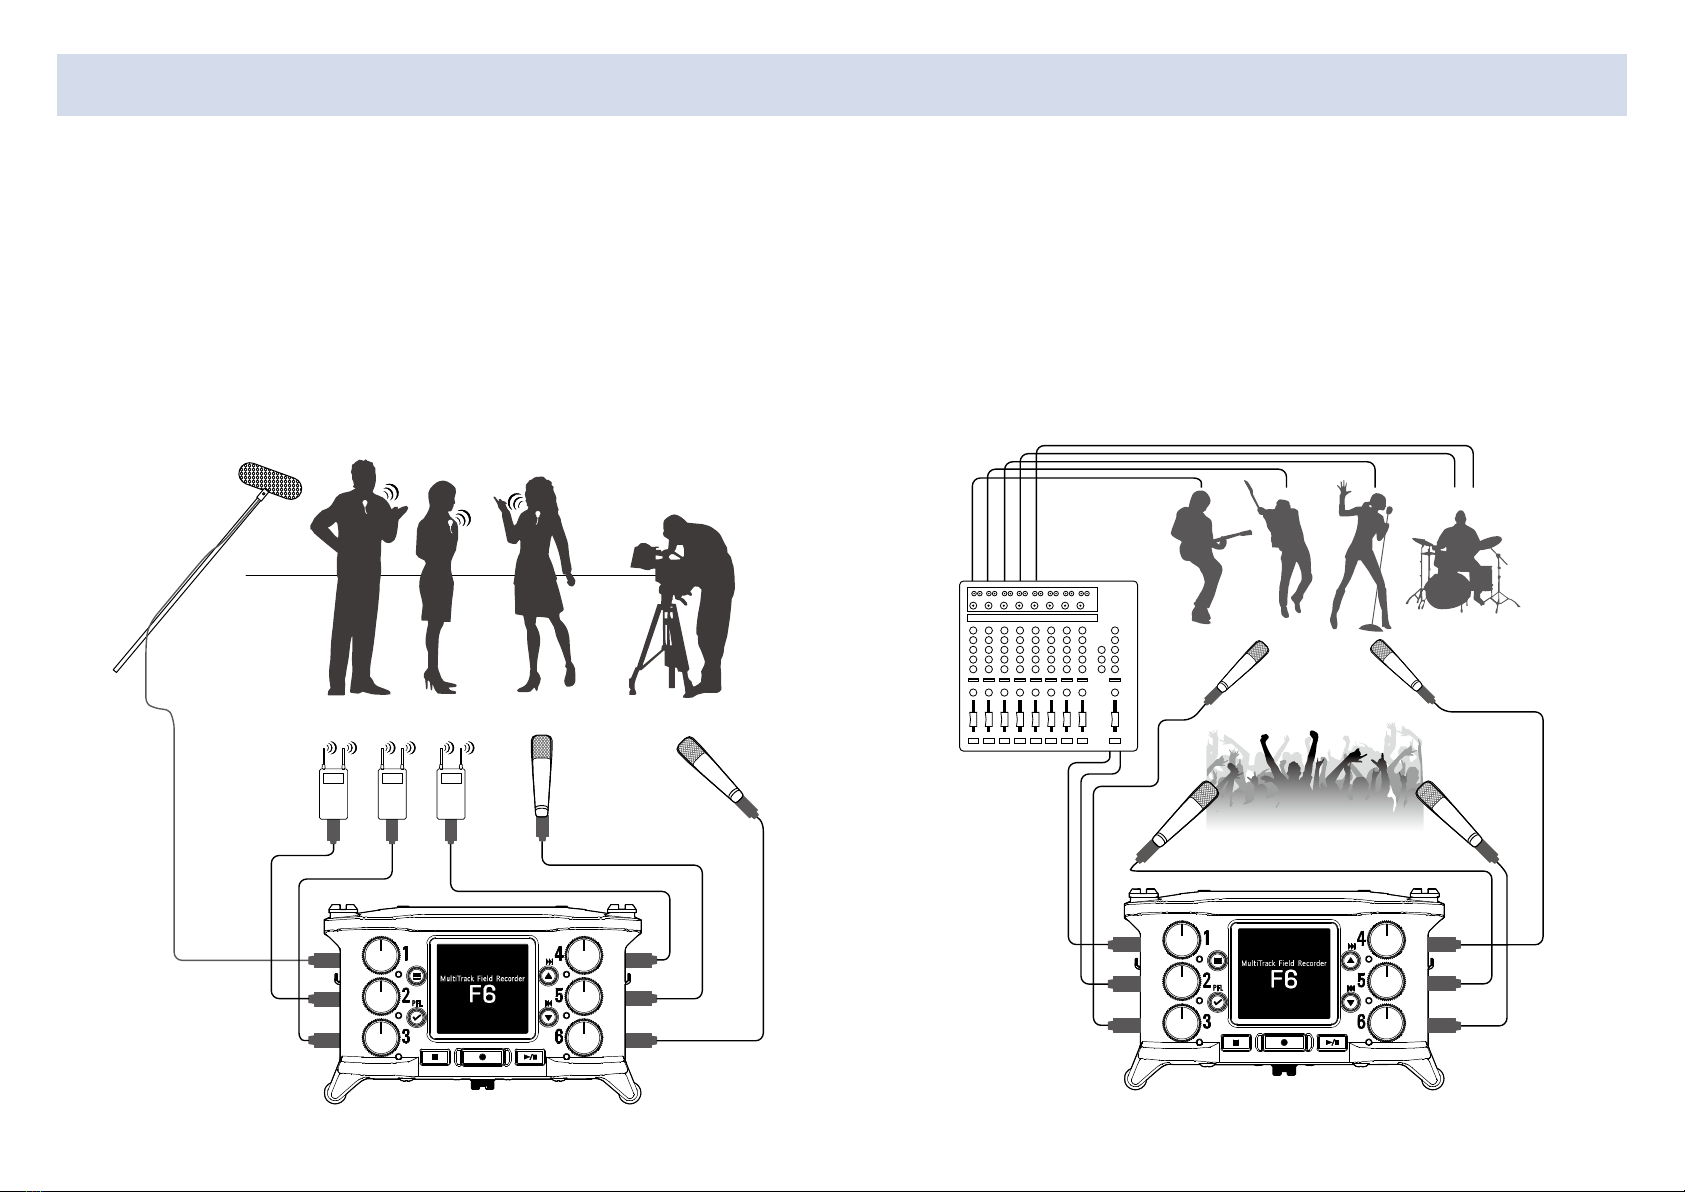
Connecting mics/other devices to Inputs 1–6 .....................................................08
Equipment connection examples ....................................................................................... 09
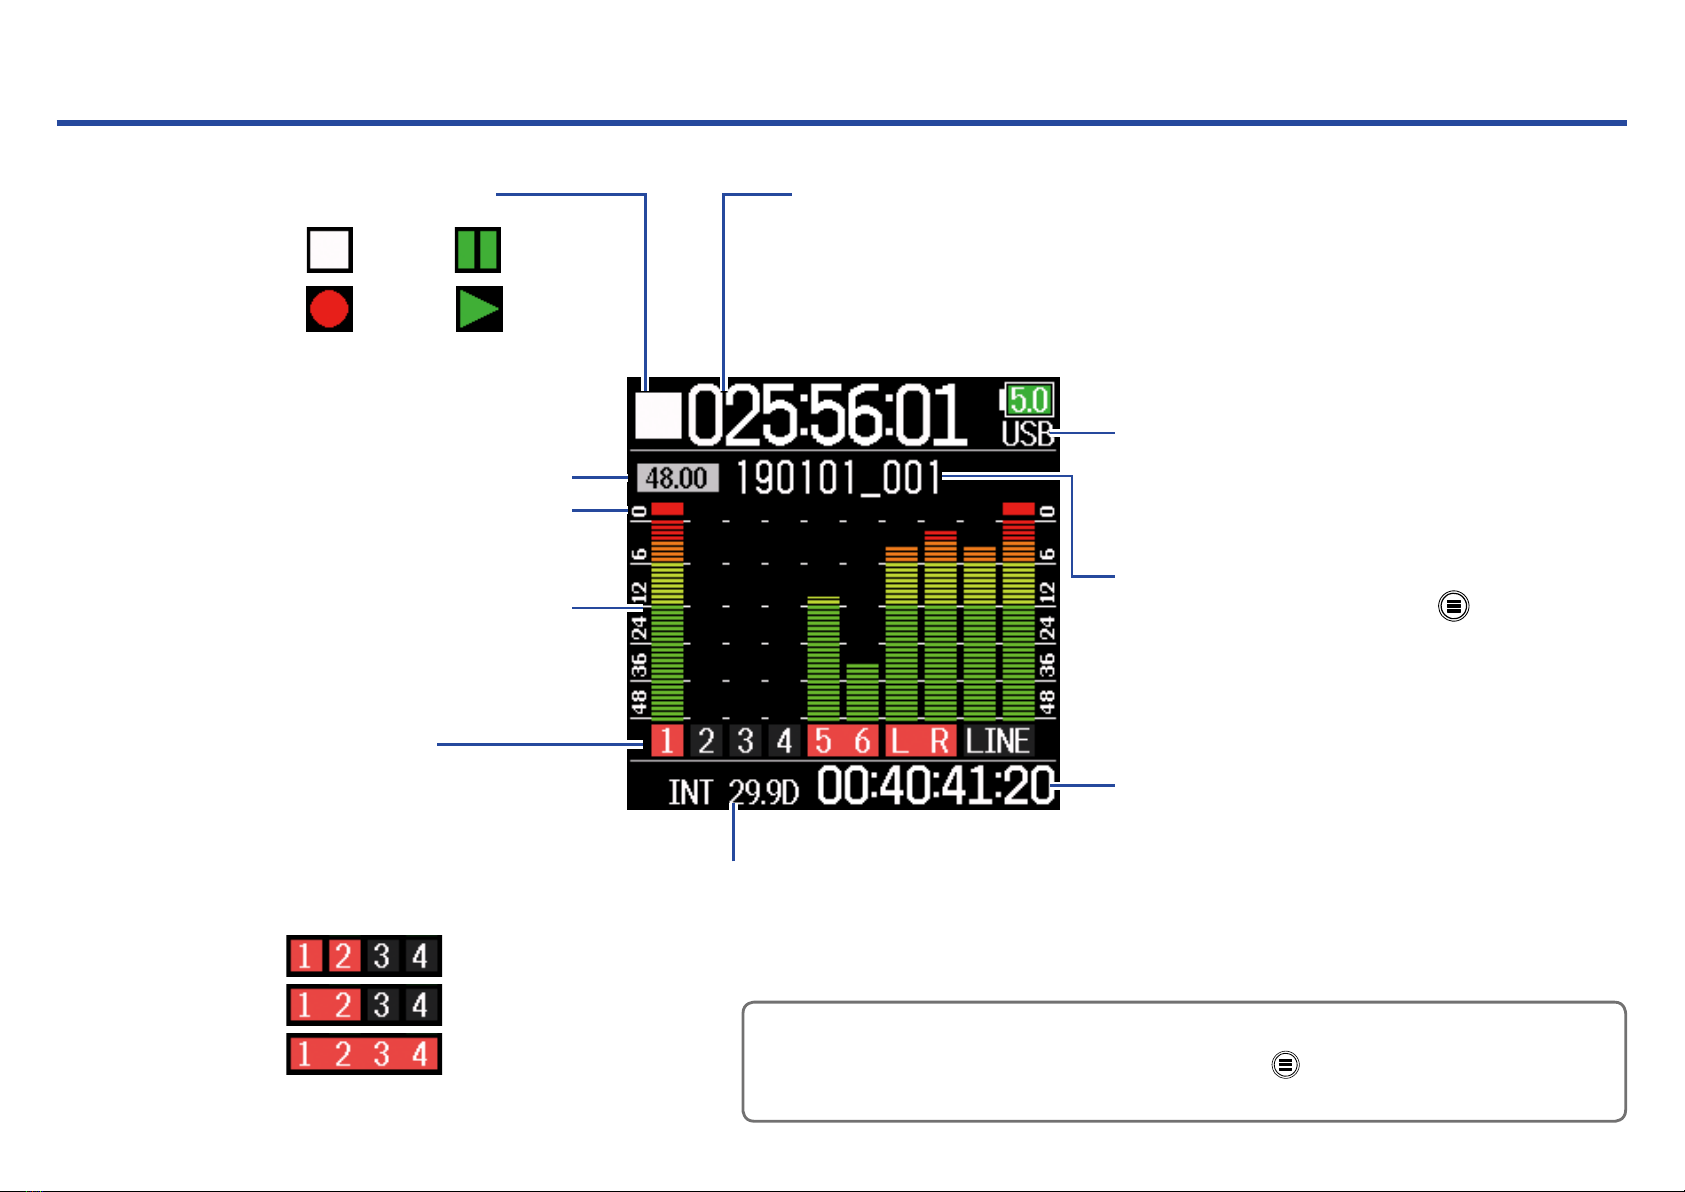
Display overview...........................................................................................................10
Preparations ..................................................................................................................13
Supplying power..................................................................................................................... 13
Loading SD cards................................................................................................................... 15
Turning the power on and off .............................................................................................. 16
Setting the language.............................................................................................................. 17
Setting the date and time ..................................................................................................... 18
Setting the power supply used ............................................................................................ 20
Recording .......................................................................................................................22
Recording process................................................................................................................. 22
Setting the recording le format ......................................................................................... 23
Selecting inputs and adjusting levels................................................................................. 24
Recording................................................................................................................................. 26
Setting the sampling rate...................................................................................................... 27
Setting the recording mode (bit depth).............................................................................. 29
Setting MP3 le bit rate (MP3) ............................................................................................ 31
Setting the LR Track............................................................................................................... 33
Capturing audio before recording starts ........................................................................... 35
Setting the recording time display ...................................................................................... 36
Setting the playback time display ....................................................................................... 38
Folder and le structure........................................................................................................ 40
Move the previously recorded take to the FALSE TAKE folder. ..................................... 42
Recorded take settings...............................................................................................43
Changing the note for the next take recorded.................................................................. 43
Setting and managing recorded scene names ................................................................ 45
Changing the track name of the next take recorded (Track Name)............................. 48
Changing the number of the next take recorded ............................................................. 50
Playback .........................................................................................................................51
Playing recordings.................................................................................................................. 51
Mixing takes ............................................................................................................................ 52
Monitoring the playback signals of specic tracks during playback ........................... 54
Changing the repeat playback setting................................................................................ 56
Take and folder operations ........................................................................................57
Working with takes and folders........................................................................................... 57
Overview of metadata (take information) stored in les................................................ 63
Checking and editing take metadata.................................................................................. 64
Writing a sound report........................................................................................................... 73
Input settings.................................................................................................................76
Adjusting the input signal monitoring balance................................................................. 76
Monitoring the input signals of specied tracks.............................................................. 77
Setting the input source........................................................................................................ 78
Setting the monitoring volume on the PFL screen .......................................................... 80
Cutting low-frequency noise ................................................................................................ 82
Input limiter ............................................................................................................................. 84
Inverting the input phase ...................................................................................................... 90
Changing the phantom power settings ............................................................................. 92
Applying delay to input signals............................................................................................ 94
Linking inputs as a stereo pair............................................................................................. 96
Adjusting multiple track input levels together .................................................................. 98
Changing the automatic mixing setting............................................................................. 99
Setting the Ambisonic format............................................................................................101
Setting the mic position used for Ambisonic recording ...............................................104
Output settings ...........................................................................................................106
Setting signals sent to the headphone output ...............................................................106
Outputting alerts through headphones............................................................................109
Setting the headphone output volume curve..................................................................110
Boosting headphone output to alleviate interference from recorded sound............111
Setting the output level .......................................................................................................113
Applying delay to the output ..............................................................................................115
Output Limiter .......................................................................................................................116
Selecting signals sent to the line outputs........................................................................120

05
Timecode......................................................................................................................122
Timecode overview..............................................................................................................122
Setting timecode ..................................................................................................................124
Setting the automatic timecode recording delay...........................................................133
Setting timecode initialization used at startup...............................................................134
Using USB functions..................................................................................................136
Exchanging data with a computer....................................................................................136
Using as an audio interface................................................................................................138
Using SD card recording and audio interface functions at the same time...............140
Audio interface settings......................................................................................................142
Using an FRC-8 as a controller..........................................................................................143
Setting the type of keyboard connected to the FRC-8 ..................................................145
Setting user keys for the FRC-8.........................................................................................147
Setting the FRC-8 LED brightness.....................................................................................149
Updating the FRC-8 rmware ............................................................................................151
Operating with an iOS device.............................................................................................154
Other settings..............................................................................................................161
Setting the level meter peak hold time.............................................................................161
Setting the LED brightness.................................................................................................162
Making display settings ......................................................................................................164
Setting how marks are added manually..........................................................................167
Setting the buttons held......................................................................................................169
Other functions ...........................................................................................................171
Checking SD card information...........................................................................................171
Testing SD card performance............................................................................................172
Formatting SD cards............................................................................................................175
Checking the Shortcut List.........................................................................................176
Backing up and loading settings...............................................................................177
Restoring default setting values........................................................................................180
Checking the rmware version..........................................................................................181
Updating the rmware.........................................................................................................182
Appendix.......................................................................................................................183
Troubleshooting ...................................................................................................................183
Metadata list .........................................................................................................................185
List of shortcuts ...................................................................................................................189
Block diagrams.....................................................................................................................190
Specications........................................................................................................................197

06
Names of parts
SD card slot
L battery lock button
L battery mount
Track knob Display
PLAY/PAUSE
button
REC
button
STOP
button
Status indicator
Red: Input enabled
Green: Playback track
enabled
Orange: PFL monitoring
Unlit: Input disabled FF/↑button
Home Screen: Select playback take
Menu Screen: Select menu item
MENU button
Home Screen: Open Menu Screen
Menu Screen: Return to previous
screen RWD/↓button
Home Screen: Select playback take
Menu Screen: Select menu item
PFL/ENTER button
Home Screen: Open PFL Screen
Menu Screen: Confirm menu item
■Front
■Back

07
■Left side
Inputs 1–6 TIMECODE IN/OUT
■Right side
Inputs 1–3
USB port LINE OUT jack Zoom wireless adapter (e.g. BTA-1)
Inputs 4–6
Headphone volume
HEADPHONE jack POWER switch
TIMECODE IN/OUT jack
XLR
1:GND
2:HOT
3:COLD
12
3
TRS
TIP: Input to F6
(output from external device)
RING: Output from F6
(input to external device)
SLEEVE: GND
Battery
cover

08
Connecting mics/other devices to Inputs 1–6
Connect dynamic and condenser mics with XLR plugs to Inputs 1–6.
Phantom power (+24 V/+48 V) can be supplied to condenser mics.
(→P.78)
Dynamic mic
(XLR cable)
Condenser mic
(XLR cable)
NOTE
When disconnecting an XLR cable, pull the XLR plug while pushing the con-
nector lock release button.
Connecting line level equipment
Connect XLR cables from keyboards and mixers directly to Inputs 1–6.
Direct input of passive guitars and basses is not supported. Connect
these instruments through a mixer or effects device.
(XLR cable)
Keyboard
(XLR cable)
Mixer
The can record 6 individual tracks that correspond to Inputs 1–6 and a stereo mix of these inputs with left and right tracks.
Mics and the outputs of instruments and audiovisual equipment, for example, can be connected to Inputs 1–6 and recorded to tracks 1–6.
Connecting mics

09
Equipment connection examples
Recording is possible in a variety of situations like these.
While lming
• Input 1: gun mic for main subject sound
• Inputs 2–4: lapel mics for performers
• Inputs 5–6: mics for ambient sound
2
3
14
5
6
Ambient
mics
Pin mics
Gun mic
Pin mics
Concert recording
• Inputs 1–2: line inputs for outputs from mixer
• Inputs 3–4: mics for stage performance
• Inputs 5–6: ambient mics for audience sound
PA mixer
Ambient mics
(Audience voices)
Mics
(Stage performance)
2
3
14
5
6

10
Display overview
Status icons
Stopped
Recording
Paused
Playing back
Recording/playback
sample rate
Clip indicator
Level meter
Track number
Red: Input enabled
Green: Playback track enabled
Gray: Input disabled
Input link settings are shown by
connected adjacent track numbers.
Frame rate
INT: Internal timecode enabled
EXT: External timecode input enabled
Mono
Stereo
Ambisonic
Counter
During recording: Elapsed/remaining recording time
During playback: Elapsed/remaining playback time
Power type and remaining amount
USB: Power supply connected to port
EXT: L battery
AA: AA batteries
Recording/playback timecode
Recording/playback take name
When stopped, press and hold
to show the name that will be
given to the next recorded take.
HINT
•
•When the Home Screen is not open, press and hold to return to the Home Screen.
•
• Some of the screen will appear differently when the recording mode is Float (32 bit).
■Home Screen

11
■Character input screen
Automatic
input button
Operation
indicator
Text box
Keyboard
Press
Press Press
Press
abc #+=
Press
123
*
*
NOTE
•
• The following characters can be used in project names.
•
•(space) ! # $ ' ( ) + , - 0 1 2 3 4 5 6 7 8 9 ; = @ A B C D E F G H I J K L M N O P Q
R S T U V W X Y Z [ ] ^ _ ` a b c d e f g h i j k l m n o p q r s t u v w x y z { }

12
■Editing operations
Move cursor in
text box Use “ ←” and “ →” to move and press
Select characters
(vertical) Press or
Select characters
(horizontal) Press or
Conrm
characters
Move the cursor to the character to input, and
press
Delete characters Move cursor before the character to delete in the
text box, and press
Complete editing Move cursor to "OK" and press
Cancel editing Press
■Automatic input keys
(Date): This automatically inputs the date. Example: 190210
(Time): This automatically inputs the time. Example: 180950
(Scene): This automatically inputs the current scene name.

13
Preparations
Supplying power
Power can be supplied three ways using AA batteries, an L battery or USB.
■Using an L battery
1. Slide the battery in the direction of the arrow while
pressing it toward the recorder.
NOTE
•
•Be careful because the battery case could become loose unexpectedly if
the battery compartment cover screw is not tightened rmly.
•
• Use only one type of batteries (alkaline, NiMH or lithium) at a time.
•
•After loading AA batteries, set "Power Source" to the correct type of bat-
tery. ( →P.20)
•
•If the remaining battery power indicator becomes red, turn the power off
immediately and install new batteries.
■Using AA batteries
1. Loosen the screw in the battery cover on the bottom.
2. Open the battery compartment cover on the bottom,
remove the battery case, and insert 4 AA batteries.
3. Put the case into the compartment.
4. Close the battery cover and tighten the screw.

14
■Using a USB Type-C cable
1. Connect the cable of the dedicated ZOOM AD-17 AC
adapter to the USB port.
2. Plug the dedicated AC adapter into an outlet.
NOTE
•
• A 5V mobile battery (commercially-available) can also be connected.
•
• When connected to a computer, power can be supplied by USB.

15
Loading SD cards
1. Open the SD card slot cover, and insert an SD card.
2. To remove the card: push it further into the slot and
then pull it out.
NOTE
Before using SD cards that have just been purchased or that have been for-
matted on a computer, they must be formatted. To format an SD card, use
Menu > SYSTEM > SD Card > Format.

16
Turning the power on and off
■Turning the power on
1. Press and hold briey.
The ZOOM logo appears and the power turns on.
NOTE
•
•The rst time the power is turned on after purchase, the date/time must
be set ( →P.18). This setting can also be changed later.
•
•If “No Card!” appears on the display, conrm that an SD card is inserted
properly.
•
•If “Card Protected!” appears on the display, the SD card write-protection is
enabled. Slide the lock switch on the SD card to disable write-protection.
•
•If “Invalid Card!” appears on the display, the card is not formatted cor-
rectly. Format the card or use a different card. Formatting SD cards
(→P.175)
■Turning the power off
1. Press and hold briey.
NOTE
Keep pressing it until the ZOOM logo appears on the LCD.

17
Setting the language
1. Press .
2. Use and to select
SYSTEM, and press .
3. Use and to select
Language, and press .
4. Use and to select the
desired language, and press .
NOTE
The rst time the power is turned on after purchase, the language must be
set.
The menu display language can be changed.

18
Setting the date and time
1. Press .
2. Use and to select
SYSTEM, and press .
3. Use and to select
Settings, and press .
4. Use and to select
Date/Time, and press .
▶Continue to one of the following procedures.
Setting the date and time ……………………………………………………… P.19
Setting the date format ………………………………………………………… P.19
NOTE
The rst time the power is turned on after purchase, the date/time must be
set.
The date and time set on the are used when recording les, for example.
The date format (order of year, month and day) can also be set.

19
8. When done setting, use
and to select
Enter, and press .
This completes setting the date and
time.
■Setting the date format
5. Use and to select
Date Format, and press .
6. Use and to select
the format, and press .
Setting Explanation
mm/dd/yy Month, day, year order
dd/mm/yy Day, month, year order
yy/mm/dd Year, month, day order
■Setting the date and time
5. Use and to select Set
Date/Time, and press .
6. Set the date and time
Move cursor or change value:
Use and
Change item value:
Use and to select
the item, and press .
7. The item selected to be
changed appears red.
Use and to change
it, and press .

20
Setting the power supply used
4. Use and to select
Power Source, and press .
1. Press .
2. Use and to select
SYSTEM, and press .
3. Use and to select
Settings, and press .
When using AA batteries, set the battery type so that the amount of remaining power can be shown accurately.
The voltage of each power supply and the remaining battery charge can be checked on this menu page.
Other manuals for F6
4
Table of contents
Other Zoom Voice Recorder manuals