Zoom iQ5 User manual

Operation Manual
© 2013 ZOOM CORPORATION
Copying or reproduction of this document in whole or in part without permission is prohibited.

2
Introduction 3
Copyrights 3
Main Screen 4
Recording5
Playback 8
10
11
Using effects 13
Enabling direct monitoring ( only feature) 16
AUTO GAIN setting ( only feature) 17
Adjusting the DIGITAL MIC GAIN 18
AUTO REC settings 19
23
Transferring recordings to a computer 26
Updating the 27
Locking the controls 28
Other options 29
Contents

3
is a high-performance PCM/AAC recording application that
stereo mic for iOS devices
(hereafter, ) for high-quality stereo recording. In addition, you can use this
and to upload them to SoundCloud. This app can also start and stop recording
automatically in response to the input audio level.
built-in iOS device mics.
iPad, iPhone, iPod, and iPod touch are trademarks of Apple Inc., registered in the
U.S. and other countries.
-
tion purposes only and are not intended to infringe on the copyrights of their re-
Copyrights
Introduction

4
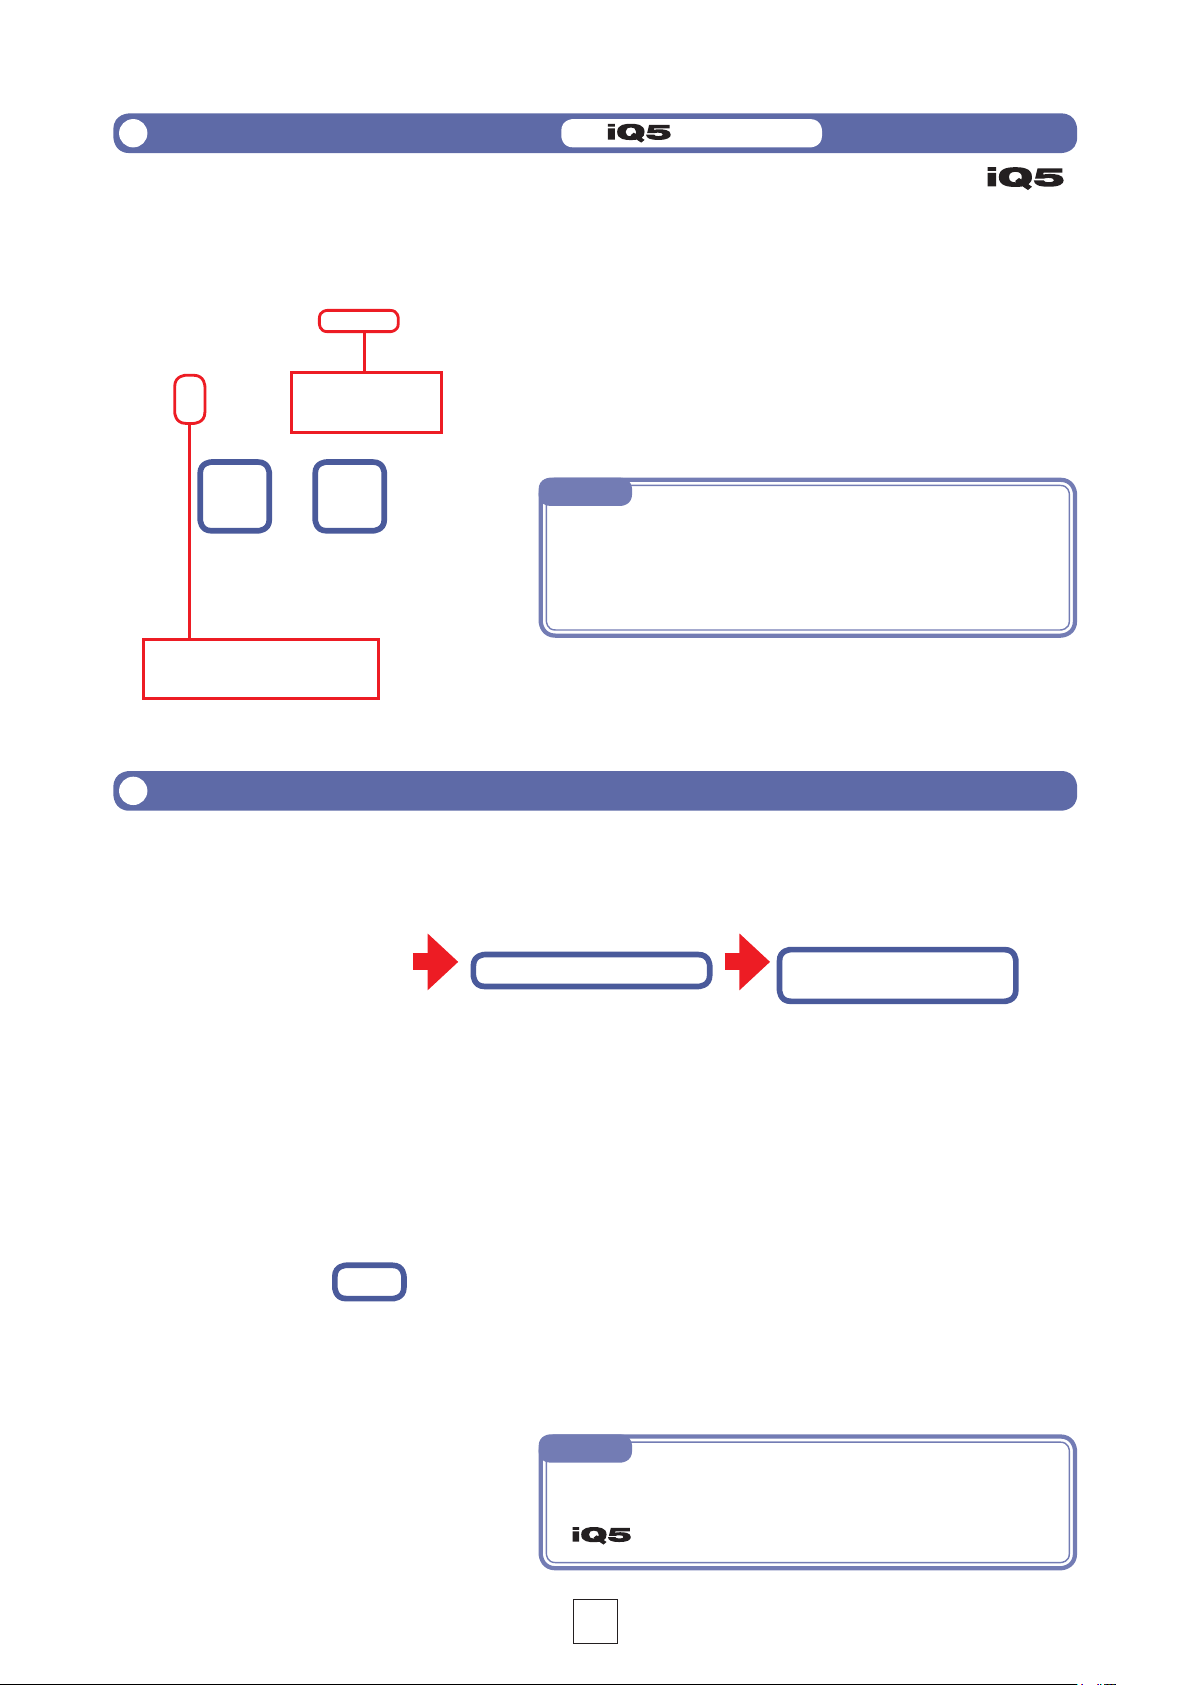
When you start , the Main Screen appears.
Indicators
①
stopped or paused.
②
③ is connected,
appear.
④ →P6)
⑤
the iOS device using the current format.
⑥
played back.
⑦
⑧
Buttons
⑨Stop button
⑩Play button
→P8)
⑪Record button
Touch to start recording. (→P5)
⑫FF/REW buttons
⑬Lock button
Lock to disable the buttons. Un-
lock to enable use of the buttons. (→P28)
⑭Volume adjustment bar
Use to adjust the output volume.
is connected.)
When it appears, the iOS device volume buttons are
disabled.
Menu buttons
⑮EFFECT button
→P13)
⑯SHARE button
→P23)
⑰FILE button
⑱MENU button
Access automatic recording and other settings.
(→P16–22)
Main Screen
⑨
④
①
⑮
⑧
⑥
⑩
②
⑫
⑯
③
⑬
⑭
⑱
⑰
⑤
⑦
⑪
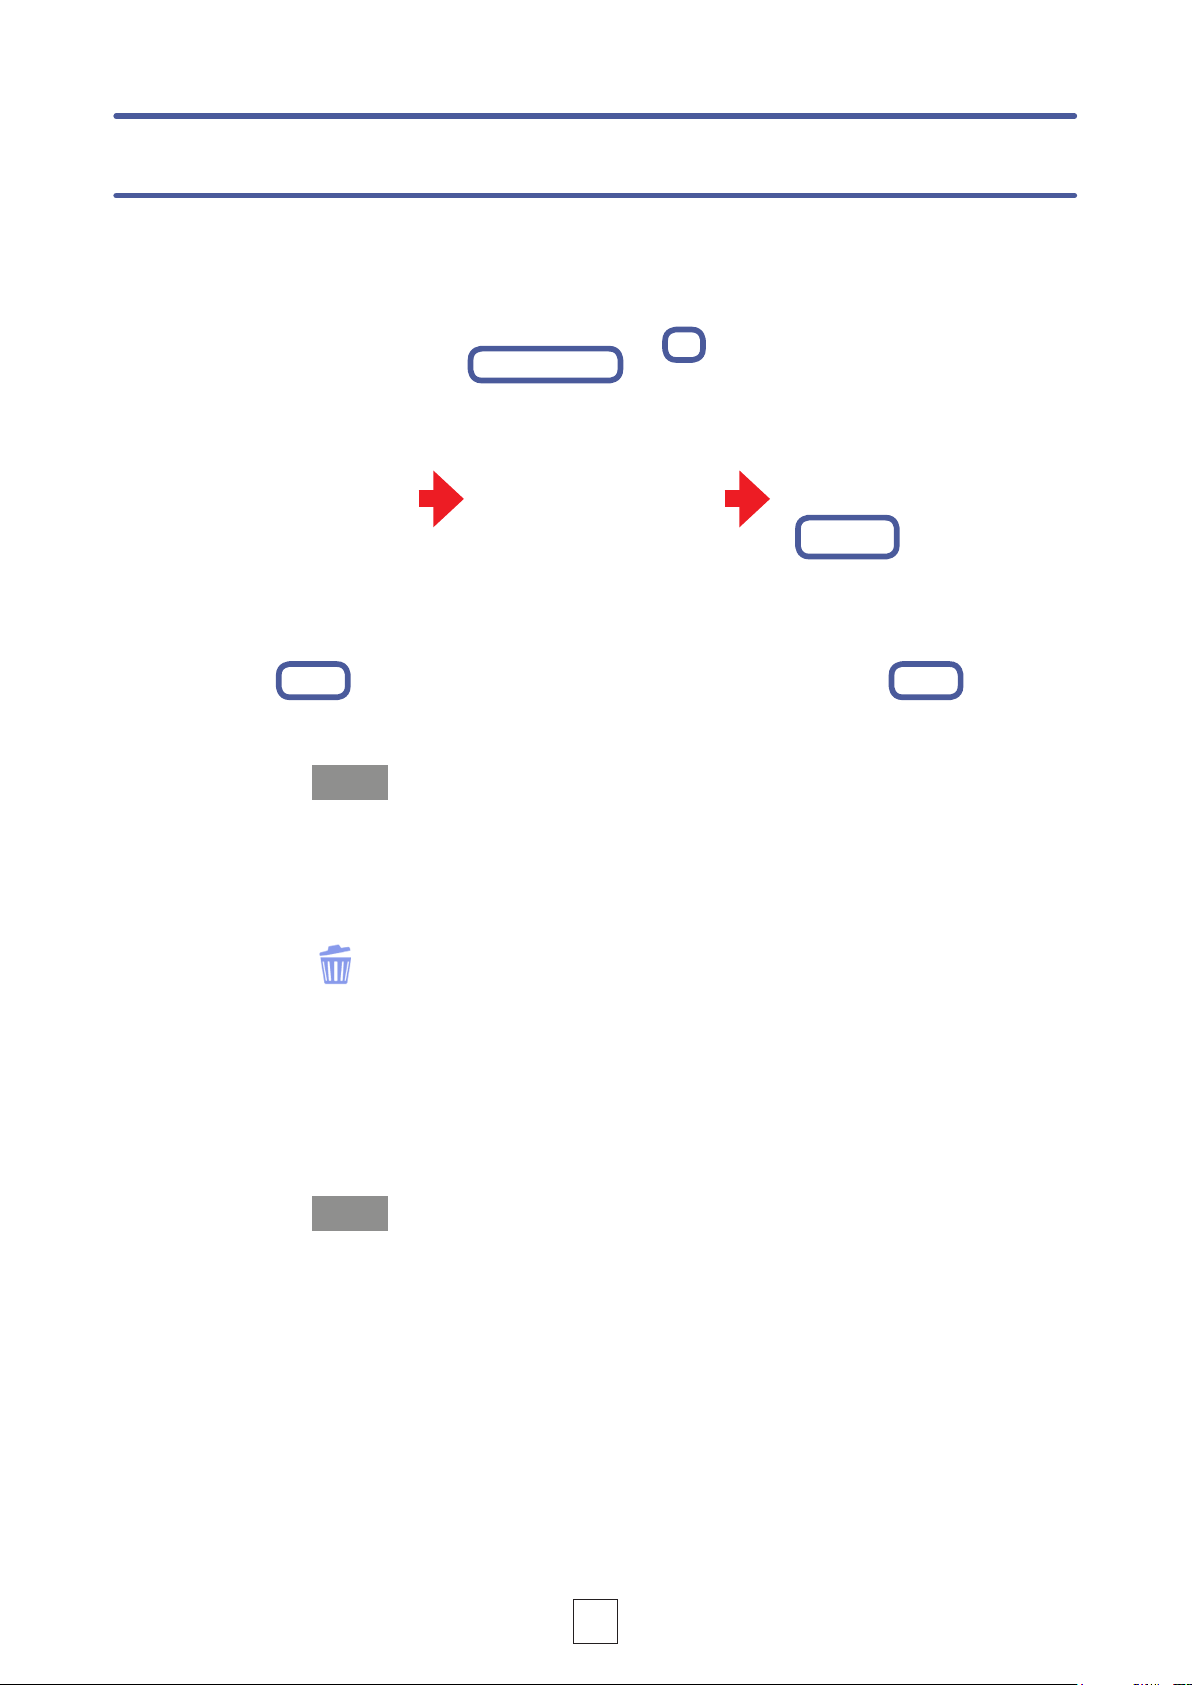
Stereo width adjuster
This adjusts the stereo
playback. (→P7)
Mid-side file playback

5
Use the recording functions of the app.
1. Touch
During recording, becomes red.
2. Touch
Recording stops.
NOTE
, you
can listen to audio that is being recorded.
→P16)
Recording
Pausing recording
Recording
21
1, 2
1. Touch during recording
When paused, blinks red.
2. Touch again
Recording starts again.
Paused

6
3. Touch WAV or AAC
The default setting is WAV.
1. Touch
2. Touch REC FORMAT
NOTE
any gap.
created in the same manner.
-
serving open space on the iOS device.
Setting the recording format
Adjusting the recording level
When using an , use the MIC GAIN control on its side to adjust the recording
level. When using the mic built-in to the iOS device, adjust the DIGITAL MIC GAIN.
(→P18)
1
3
2

7
Setting mid-side monitoring
Using mid-side recording
This app can be used for mid-side recording. To use this function, connect an
2. Touch M-S MONITOR
1. Touch
1. Touch
Input level meters change
from L/R to M/S
NOTE
playback.
NOTE
setting has no effect on the audio heard through the
3. Touch STEREO or M-S
When set to M-S, the mid mic can be monitored through the
left channel and the side mic through the right channel.
only feature
2. Touch
Recording starts.
4. Touch
The Main Screen reappears.
1
2
23
1, 4
M-S appears

8
1. On the Main Screen, use / to show the le you want to play
PlayingbacklesfromtheMainScreen
2. Touch
During playback, lights green.
3. Touch
Playback stops.
Playback
3
1
2
Adjusting the playback level
When using an , slide the volume control.
When not using an , use the iOS device volume buttons.
Slide to adjust the output volume
is
connected)
Touch a point on this bar to start
playback there
Playing
NOTE
volume control is stored in
the
other applications.

9
Pausing playback
1. During playback, touch
When paused, blinks green.
2. Touch again
Playback starts again.
2. Touch the le name on the FILE screen
3. Touch
During playback, appears green.
1. Touch
PlayinglesfromtheFILEscreen
3
1
Scrolling up and
The closer to the
beginning of the list,
1, 2
2
Paused

10
1. Touch
2. Touch the name of the le that you want to delete
4. Touch Continue
Deletingles
1 5
4
23
3. Touch
A “Delete File?” message appears.
5. Touch
The Main Screen reappears.

11
1. Touch
2. Touch the name of the le that you want to divide
3. Touch
Dividingles
1
23
5
4
67

12
5. Touch
4. Slide to the point where you want to divide the le
You can also touch/hold to move the division point.
NOTE
.
. Doing so could
cause loss of data.
6. Touch [Continue]
7. Touch
The Main Screen reappears.

13
1. Select a le on the Main Screen or FILE screen (→P8)
2. Touch
3. Touch EQ, REVERB or MASTERING
5. Touch on the effect setting screen
Using effects
2
6
13 4
5
98
7
4. Make effect settings
6. Touch Save with EFFECT/NORMALIZE

14
7. On the “Save as new le?” message, touch New, Overwrite or
Cancel to select how the le is saved
New
Overwrite
Cancel
8. To optimize the le volume, touch YES on the “Normalize le?”
message.
Touch NO
9. Touch
The Main Screen reappears.
NOTE
. Doing so
could cause loss of data.
NOTE

15
Effect settings
■ EQ (adjust/correct sound quality)
Slide the faders on the frequency bands
to adjust the sound quality.
Touch to
restore sound to its
REVERB
OFF Off
ROOM Simulates the reverberations of a
room
JAZZ CLUB
Simulates the reverberations of a
CONCERT
HALL
Simulates the reverberations of a
concert hall
ARENA
Simulates the reverberations of an
arena
STADIUM
Simulates the reverberations of a
domed stadium
MASTERING
OFF Off
MAXIMIZE
compression
ULTRA
MAXIMIZE
strong compression
CLEAR &
POWER
WIDE
MONO Centers all sound dispersed to
the left or right
■ REVERB (add sound reverberations)
This is OFF by default.
Touch ROOM, JAZZ CLUB, CONCERT
HALL, ARENA or STADIUM.
■ MASTERING (increase impact)
This is OFF by default.
Touch MAXIMIZE, ULTRA MAXIMIZE,
CLEAR & POWER, WIDE or MONO.

16
Enabling direct monitoring only feature
1 4
3
1. Touch
2. Touch DIRECT MONITOR
3. Touch ON or OFF
4. Touch
The Main Screen reappears.
2
NOTE
.
DIGITAL MIC GAIN setting does not affect sound mon-
itored through the . It does affect sound recorded by .
through the

17
1. Touch
2. Touch AUTO GAIN
CONCERT Good for band performances, concerts and other loud situations
SOLO Good for acoustic guitar and similar solo performances
MEETING Good for meetings and other quiet situations
3. Touch CONCERT, SOLO or MEETING
The default setting is SOLO.
NOTE
is stored in the
1 4
3
2
4. Touch
The Main Screen reappears.
When the AUTO GAIN/LIMITERAUTO GAIN, the gain
AUTO GAIN setting.
Setting the AUTO GAIN only feature

18
Adjust the recording level to record quiet sound sources at a higher level and loud
This setting affects the built-in iOS device mic, an
Adjusting the DIGITAL MIC GAIN
1. Touch
3. Slide to adjust the gain (dB)
2. Touch DIGITAL MIC GAIN
1 4
3
2
4. Touch
The Main Screen reappears.

19
The AUTO REC function can be set to start and stop recording automatically.
1. Touch
AUTO REC settings
5. Touch
START LEVEL
2. Touch AUTO REC
You can turn automatic recording ON/OFF and set its start level and stop conditions.
3. Touch ON/OFF, START LEVEL or AUTO STOP
1 4
23
5
4. Touch
The Main Screen reappears.

20
Turning the AUTO REC function ON/OFF
1. Touch ON/OFF on the AUTO REC screen
1. Touch START LEVEL on the AUTO REC screen
2. Touch ON or OFF
When set to ON, “AUTO
2. Slide the to adjust the automatic recording start level
1
1
2
Setting the START LEVEL
Set the level that causes automatic recording to start.
level value
2Slide to adjust the level
Table of contents
Other Zoom Voice Recorder manuals

Zoom
Zoom H4next User manual

Zoom
Zoom H4N User manual

Zoom
Zoom H6 Handy Recorder User manual

Zoom
Zoom F6 User manual

Zoom
Zoom Q2HD User manual

Zoom
Zoom F6 User manual

Zoom
Zoom Handy REcorder H1 User manual

Zoom
Zoom Handy REcorder H1 User manual

Zoom
Zoom F1 Mounting instructions

Zoom
Zoom Handy recorder H2 User manual
Popular Voice Recorder manuals by other brands

Spycentre Security
Spycentre Security 1812 quick start guide

Olympus
Olympus DR 1000 - Directrec Dictation Kit instructions

ASTRO-MED
ASTRO-MED Dash 4u quick start guide

Bones
Bones Milestone 112 manual

Memorex
Memorex MB2059B - Digital Voice Recorder Features

Microchip Technology
Microchip Technology Parrot user guide