Zte ZXMW NR8950 Manual

ZXMWNR8950
DigitalMicrowaveTransmissionSystem
HardwareInstallationGuide
Version:V2.04.02
ZTECORPORATION
No.55,Hi-techRoadSouth,ShenZhen,P .R.China
Postcode:518057
Tel:+86-755-26771900
Fax:+86-755-26770801
URL:http://support.zte.com.cn
E-mail:[email protected]

LEGALINFORMATION
Copyright©2016ZTECORPORATION.
Thecontentsofthisdocumentareprotectedbycopyrightlawsandinternationaltreaties.Anyreproductionor
distributionofthisdocumentoranyportionofthisdocument,inanyformbyanymeans,withoutthepriorwritten
consentofZTECORPORATIONisprohibited.Additionally,thecontentsofthisdocumentareprotectedby
contractualcondentialityobligations.
Allcompany,brandandproductnamesaretradeorservicemarks,orregisteredtradeorservicemarks,ofZTE
CORPORATIONoroftheirrespectiveowners.
Thisdocumentisprovided“asis”,andallexpress,implied,orstatutorywarranties,representationsorconditions
aredisclaimed,includingwithoutlimitationanyimpliedwarrantyofmerchantability,tnessforaparticularpurpose,
titleornon-infringement.ZTECORPORATIONanditslicensorsshallnotbeliablefordamagesresultingfromthe
useoforrelianceontheinformationcontainedherein.
ZTECORPORATIONoritslicensorsmayhavecurrentorpendingintellectualpropertyrightsorapplications
coveringthesubjectmatterofthisdocument.ExceptasexpresslyprovidedinanywrittenlicensebetweenZTE
CORPORATIONanditslicensee,theuserofthisdocumentshallnotacquireanylicensetothesubjectmatter
herein.
ZTECORPORATIONreservestherighttoupgradeormaketechnicalchangetothisproductwithoutfurthernotice.
UsersmayvisittheZTEtechnicalsupportwebsitehttp://support.zte.com.cntoinquireforrelatedinformation.
TheultimaterighttointerpretthisproductresidesinZTECORPORATION.
RevisionHistory
RevisionNo.RevisionDateRevisionReason
R1.12016-01-27lAddedtheinstallationofthe2+0XPICcongurationin“3.2.3
2+0BuckleInstallation”.
lAddedtheInstallationofantennain“AppendixBInstalling
Antenna”.
lAddedtheinstallationandcableconnectionofthePIMDCin
“AppendixD,InstallingthePIMDC”.
lAddedtheInstallationofPSEin“AppendixEInstallingPSE”.
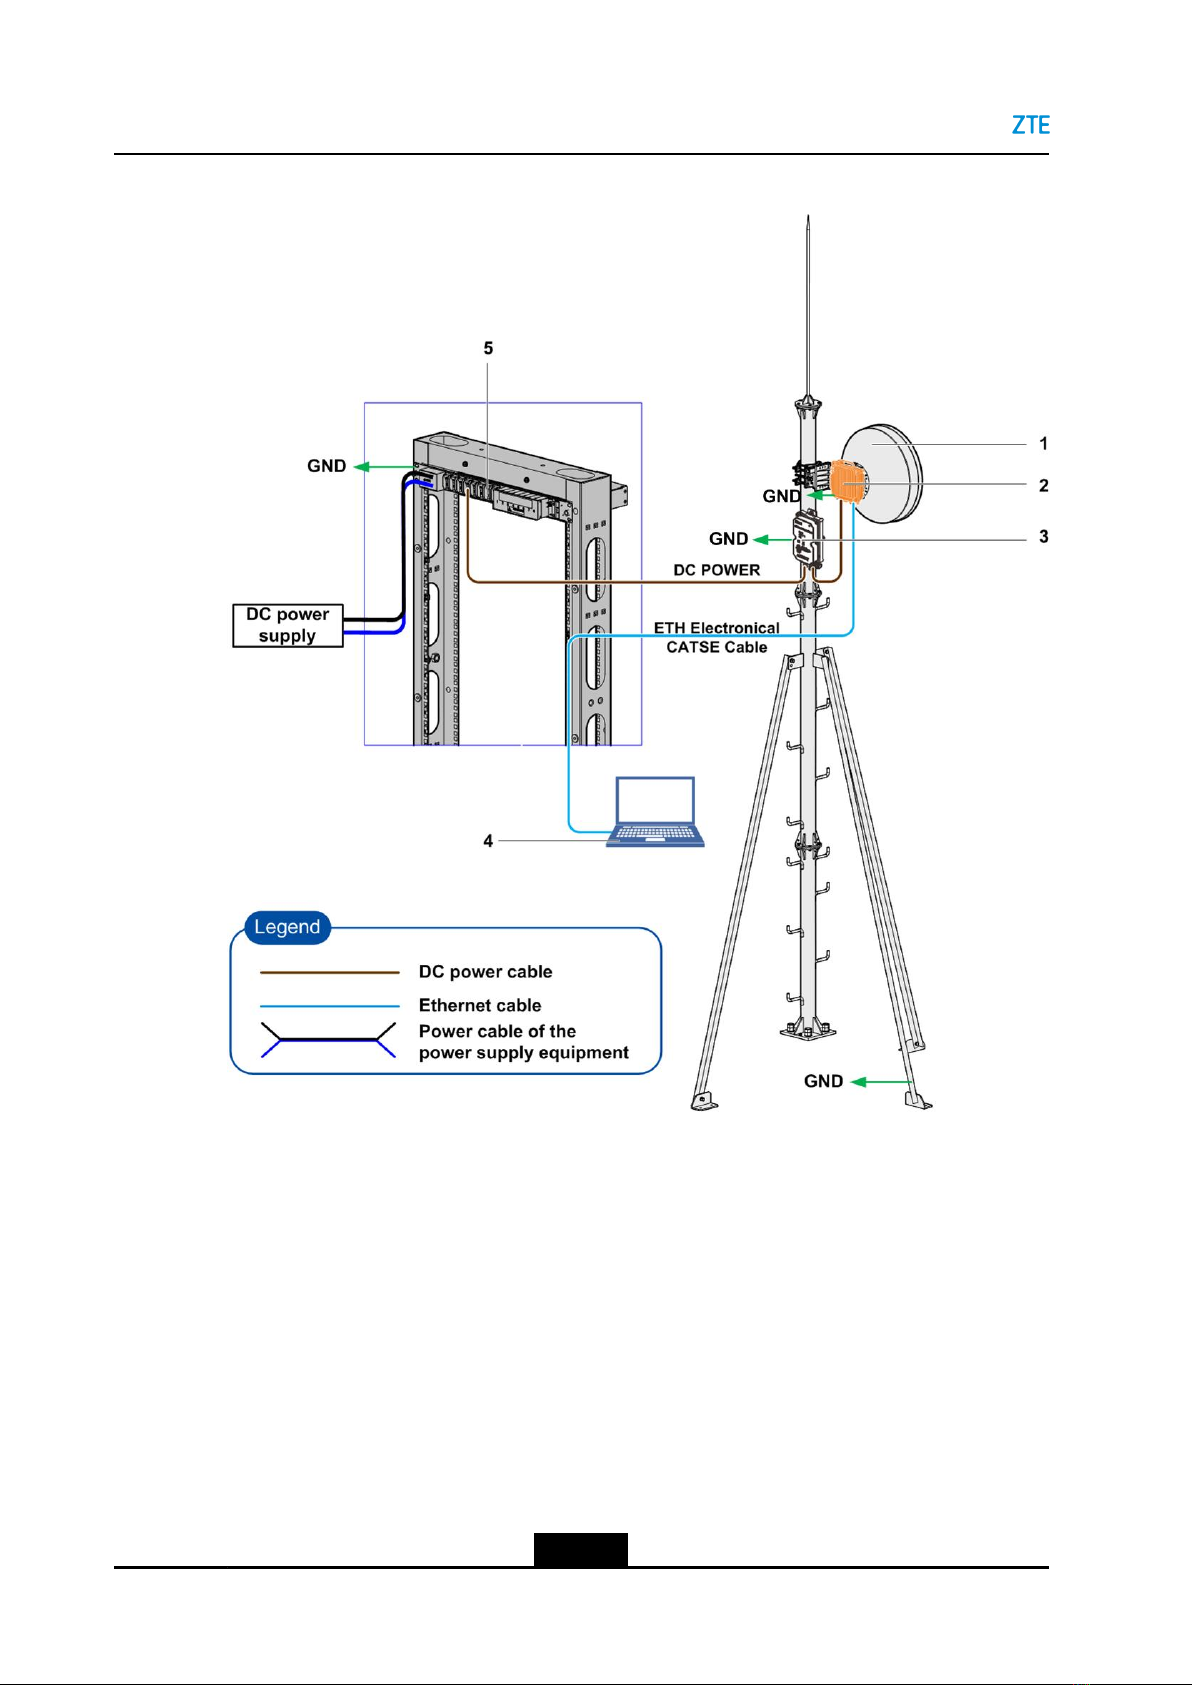
lAddedthecompletedinstallationinthepowercablescenario,
PoEscenario,andACpowersupplyscenarioin“Section1.1
CompletedInstallation”.
lAddedthestepsofmakingthepowercableplugin“Section
3.3InstallingthePowerCable”.
lAddedthewiresequencedescriptionofthe568Bstandard
straightnetworkcablein“Section3.4.1InstallingtheEthernet
Cable”.
lAddedthecross-connectiondescriptionofthe2+2XPIC
HSBprotectioncongurationandthe2+2XPICSD
protectioncongurationin“Section3.6InstallingtheXPIC
Cross-ConnectionCables(Optional)”.
SJ-20151105160201-004|2016-01-27(R1.1)ZTEProprietaryandCondential

RevisionNo.RevisionDateRevisionReason
lAddedstepstoadjusttheXPDvaluein“2.1.32+0Buckle
Installation”.
R1.02015-11-25FirstEdition
SerialNumber:SJ-20151105160201-004
PublishingDate:2016-01-27(R1.1)


Contents
AboutThisManual.........................................................................................I
Chapter1Overview....................................................................................1-1
1.1CompletedInstallation........................................................................................1-1
1.2InstallationFlow.................................................................................................1-4
1.3InstallationPrecautions.......................................................................................1-5
1.4PreparationforToolsandInstruments..................................................................1-6
Chapter2ZXMWNR8950Installation.......................................................2-1
2.1BuckleInstallation..............................................................................................2-3
2.1.11+0BuckleInstallation..............................................................................2-3
2.1.21+1BuckleInstallation..............................................................................2-8
2.1.32+0BuckleInstallation............................................................................2-14
2.2SeparateInstallation.........................................................................................2-21
2.2.11+0SeparateInstallation(Single-Polarization).........................................2-21
2.2.21+1SeparateInstallation(Single-Polarization).........................................2-26
2.2.32+0SeparateInstallation(Dual-Polarization)............................................2-29
2.2.42+2SeparateInstallation(Dual-Polarization)............................................2-33
Chapter3CableInstallation......................................................................3-1
3.1CableInstallationRequirements..........................................................................3-1
3.2InstallingtheProtectiveGroundingCable.............................................................3-2
3.3InstallingthePowerCable..................................................................................3-3
3.4InstallingtheEthernetCable...............................................................................3-5
3.5InstallingtheOpticalFiber...................................................................................3-7
3.6InstallingtheXPICCross-ConnectCables(Optional)............................................3-8
Chapter4InstallationCheck.....................................................................4-1
4.1InstallationCheckfortheZXMWNR8950............................................................4-1
4.2CableInstallationCheck.....................................................................................4-2
Chapter5PowerOnandPowerOff..........................................................5-1
5.1Poweron...........................................................................................................5-1
5.2Poweroff...........................................................................................................5-3
AppendixAAntennaPoleInstallation(Optional)...................................A-1
A.1InstallingthePoleontheRoofofaBuilding.........................................................A-1
A.2InstallingthePoleonanAngleSteelTower.........................................................A-3
I
SJ-20151105160201-004|2016-01-27(R1.1)ZTEProprietaryandCondential

AppendixBInstallingAntenna................................................................B-1
AppendixCAntennaAdjustment(Optional)..........................................C-1
C.1AdjustingthePolarizationModeofanAntenna....................................................C-1
C.2AdjustingtheAntennaAzimuth...........................................................................C-4
C.3AdjustingtheAntennaPitchAngle......................................................................C-5
AppendixDInstallingthePIMDC.............................................................D-1
AppendixEInstallingthePSE..................................................................E-1
Glossary..........................................................................................................I
II
SJ-20151105160201-004|2016-01-27(R1.1)ZTEProprietaryandCondential

AboutThisManual
Purpose
ThismanualdescribesthehardwareinstallationprocedureoftheZXMWNR8950digital
microwavesystem,toguideinstallationengineerstoinstalltheZXMWNR8950correctly,
safelyandincompliancewithspecications.
IntendedAudience
Thismanualisintendedfor:
lEquipmentinstallationengineers
lInstallationsupervisionengineers
lMaintenanceengineers
WhatIsinThisManual
Thismanualcontainsthefollowingchaptersandappendix.
Chapter1,OverviewDescribestheZXMWNR8950hardware
installationow,precautions,andpreparationfor
toolsandinstruments.
Chapter2,ZXMWNR8950InstallationDescribeshowtoinstalltheZXMWNR8950.
Chapter3,CableInstallationDescribeshowtoinstallthecablesoftheZXMW
NR8950.
Chapter4,InstallationCheckDescribesthecheckingprocessaftertheZXMW
NR8950installationiscompleted.
Chapter5,PowerOnandPowerOffDescribeshowtopoweronandpoweroffthe
ZXMWNR8950.
AppendixA,AntennaPoleInstallation(Optional)Describesantennapoleinstallation.
AppendixB,InstallingAntennaDescribesantennainstallation.
AppendixC,AntennaAdjustment(Optional)Describesantennaazimuthadjustment.
AppendixD,InstallingthePIMDCDescribeshowtoinstallthePIMDCandits
cables.
AppendixE,InstallingthePSEDescribeshowtoinstallthePSE.
Conventions
Thismanualusesthefollowingconventions.
I
SJ-20151105160201-004|2016-01-27(R1.1)ZTEProprietaryandCondential

Danger:indicatesanimminentlyhazardoussituation.Failuretocomplycanresultin
deathorseriousinjury,equipmentdamage,orsitebreakdown.
Warning:indicatesapotentiallyhazardoussituation.Failuretocomplycanresultin
seriousinjury,equipmentdamage,orinterruptionofmajorservices.
Caution:indicatesapotentiallyhazardoussituation.Failuretocomplycanresultin
moderateinjury,equipmentdamage,orinterruptionofminorservices.
Note:providesadditionalinformationaboutatopic.
II
SJ-20151105160201-004|2016-01-27(R1.1)ZTEProprietaryandCondential

Chapter1
Overview
TableofContents
CompletedInstallation................................................................................................1-1
InstallationFlow.........................................................................................................1-4
InstallationPrecautions..............................................................................................1-5
PreparationforToolsandInstruments........................................................................1-6
1.1CompletedInstallation
PoweredThroughaPowerCable
IftheZXMWNR8950ispoweredthroughapowercable,itisdirectlyconnectedtotheDC
powersupplyequipmentthroughtheDClightningprotectionmodule(PIMDC),seeFigure
1-1.
1-1
SJ-20151105160201-004|2016-01-27(R1.1)ZTEProprietaryandCondential

ZXMWNR8950HardwareInstallationGuide
Figure1-1CompletedInstallation(PoweredThroughaPowerCable)
1.Antenna
2.NR8950
3.DClightningprotection
module
4.Operatingterminal
5.DCpowersupply
PoweredThroughPoE
InaPoEpowersupplyscenario,theZXMWNR8950isconnectedtothePSEmoduleby
anEthernetcableconnectedtotheEthernetelectricalinterface(GbE1&PoE),seeFigure
1-2.
1-2
SJ-20151105160201-004|2016-01-27(R1.1)ZTEProprietaryandCondential

Chapter1Overview
Figure1-2CompletedInstallation(PoE)
1.NR8950
2.Antenna
3.PESmodule
4.DCpowersupply
5.Operatingterminal
PoweredbyanACPowerSupply
InanACpowersupplyscenario,theAC-DCpowersupplyequipmentisusedtoconvert
theACvoltage(90VAC–290VAC)totheDCvoltage(–54VDC),seeFigure1-3.
1-3
SJ-20151105160201-004|2016-01-27(R1.1)ZTEProprietaryandCondential

ZXMWNR8950HardwareInstallationGuide
Figure1-3CompletedInstallation(ACPowerSupply)
1.Antenna
2.NR8950
3.DClightningprotection
module
4.AC-DCpowersupply
equipment
5.Operatingterminal
6.Photoelectricconverter
(usedforcommissioning)
1.2InstallationFlow
FortheZXMWNR8950installationow,seeFigure1-4.
1-4
SJ-20151105160201-004|2016-01-27(R1.1)ZTEProprietaryandCondential

Chapter1Overview
Figure1-4InstallationFlow
1.3InstallationPrecautions
Thefollowingprecautionsmustbenotedforhardwareinstallation:
lNon-professionalsshouldnotinstallordebugthesystemunlesstheyareinstructed
byprofessionalsonthesite.
lInstallationpersonnelmustbeverycarefulofpersonalsafety,andavoidaccidents
suchaselectricshocksorpersonalinjuryduetofallingobjects.
lToavoideyeinjurycausedbylaserbeams,installationpersonnelmustnotdirectly
lookatthecross-sectionofanyopticalberorthesocketofanopticalterminalduring
theinstallationofopticalbers.
lReplacinganypartoradevicemightresultinunexpecteddangers.Therefore,
replacementofanypartoradevicecanbeimplementedonlyafterauthorizationis
acquired.
lToensureyoursafety,contactZTECorporationifyouhaveanyquestion.
1-5
SJ-20151105160201-004|2016-01-27(R1.1)ZTEProprietaryandCondential

ZXMWNR8950HardwareInstallationGuide
1.4PreparationforToolsandInstruments
PreparetoolsandinstrumentslistedinT able1-1,andusetheminaccordancewiththe
actualrequirements.
Table1-1ToolsandInstruments
NameExampleNameExample
Antistaticwrist
glove
Spanner
WirestripperCrimper
Crystal
connector
crimper
Wire
punchdown
tool
HexwrenchScrewdriver
PlierPaperknife
CrowbarTelescope
1-6
SJ-20151105160201-004|2016-01-27(R1.1)ZTEProprietaryandCondential

Chapter1Overview
NameExampleNameExample
PulleyPVCinsulating
tape
HandleMarkingpen
Waterproof
cement
Hoistingcable
TapeSleeve
MultimeterGrounding
resistance
tester
CompassGPS
1-7
SJ-20151105160201-004|2016-01-27(R1.1)ZTEProprietaryandCondential

ZXMWNR8950HardwareInstallationGuide
Thispageintentionallyleftblank.
1-8
SJ-20151105160201-004|2016-01-27(R1.1)ZTEProprietaryandCondential

Chapter2
ZXMWNR8950Installation
InstallationModes
lInaccordancewithinstallationtypes,theZXMWNR8950installationfallsintotwo
types:buckleinstallationandsplitinstallation.
lInaccordancewiththeconguredamountoftheZXMWNR8950andantenna,the
ZXMWNR8950installationfallsintotwotypes:installationwithacombinerand
installationwithoutanycombiner.
ForZXMWNR8950installationmodes,refertoTable2-1.
Table2-1ZXMWNR8950InstallationModes
InstallationModeSingle-PolarizedAntennaDual-PolarizedAntenna
Without
combiner
Fordetailedinformationofthe
installationprocess,referto“2.1.1
1+0BuckleInstallation”.
- Buckle
installa-
tion
WithcombinerlFordetailedinformationofthe
installationprocess,referto
“2.1.21+1BuckleInstallation”.
lFordetailedinformationof
theinstallationprocess,refer
to“2.1.32+0BuckleInstallation”
-
Without
combiner
Fordetailedinformationofthe
installationprocess,referto
“2.2.11+0SeparateInstallation
(Single-Polarization)”.
Fordetailedinformationofthe
installationprocess,referto
“2.2.32+0SeparateInstallation
(Dual-Polarization)”.
Splitin-
stalla-
tion
WithcombinerFordetailedinformationofthe
installationprocess,referto
“2.2.21+1SeparateInstallation
(Single-Polarization)”.
Fordetailedinformationofthe
installationprocess,referto
“2.2.42+2SeparateInstallation
(Dual-Polarization)”.
AdjustingPolarizationMode
ThisproceduredescribeshowtoadjusttheZXMWNR8950polarizationmodeduringthe
installationprocess.Here,theverticalpolarizationadjustmentisusedasanexample.
1.Loosetheguidescrewsanticlockwise,andremovetheguidepinfromtheguidehole,
seeFigure2-1.
2-1
SJ-20151105160201-004|2016-01-27(R1.1)ZTEProprietaryandCondential

ZXMWNR8950HardwareInstallationGuide
Figure2-1RemovingtheGuidePin
2.Rotatetheguidepin90°clockwise(from“V”to“H”),andplacetheguidepinmarked
with“H”upwards,seeFigure2-2.
Figure2-2AdjustingtheGuidePinDirection
Note:
Duringtheguidepinadjustment,pleasestrictlyperformtherelatedoperationsin
compliancewiththedirectionsmentionedinFigure2-2.
3.Placetheguidepinontheguidehole,andtightentheguidescrewsclockwise,see
Figure2-3.
2-2
SJ-20151105160201-004|2016-01-27(R1.1)ZTEProprietaryandCondential

Chapter2ZXMWNR8950Installation
Figure2-3InstallingtheGuidePin
TableofContents
BuckleInstallation......................................................................................................2-3
SeparateInstallation.................................................................................................2-21
2.1BuckleInstallation
2.1.11+0BuckleInstallation
Fortheinstallationcomponentsandtoolsusedin1+0buckleinstallation,refertoT able
2-2.
2-3
SJ-20151105160201-004|2016-01-27(R1.1)ZTEProprietaryandCondential

ZXMWNR8950HardwareInstallationGuide
Table2-2InstallationComponentsandToolsUsedin1+0BuckleInstallation
Compo-
nent/Tool
Qua-
ntity
Graph
AntennaOne
ZXMW
NR8950
One
Hex
wrench
One
set
LubricantOne-
Prerequisite
TheZXMWNR8950polarizationmodeisthesameasthatoftheantenna.
Steps
1.RemovethewaveguidediaphragmfromtheZXMWNR8950'santennainterface,see
Figure2-4.
2-4
SJ-20151105160201-004|2016-01-27(R1.1)ZTEProprietaryandCondential
Other Zte Microphone System manuals