Zte SPRO User manual

1
WiFi Ufi
MF97W
Quick Start Guide

2
LEGAL INFORMATION
Copyright © 2014 ZTE CORPORATION.
All rights reserved.
No part of this publication may be quoted, reproduced, translated or used
in any form or by any means, electronic or mechanical, including
photocopying and microfilm, without the prior written permission of ZTE
Corporation.
Notice
ZTE Corporation reserves the right to make modifications on print errors
or update specifications in this guide without prior notice.
We offer self-service for our smart terminal device users. Please visit the
ZTE official website (at www.ztedevice.com) for more information on
self-service and supported product models. Information on the website
takes precedence.
Visit http://www.ztedevice.com to download the user manual. Just click
Support > Manuals from the home page and then select your location,
product type, and name to search for related support information.
Disclaimer

3
ZTE Corporation expressly disclaims any liability for faults and damages
caused by unauthorized modifications of the software.
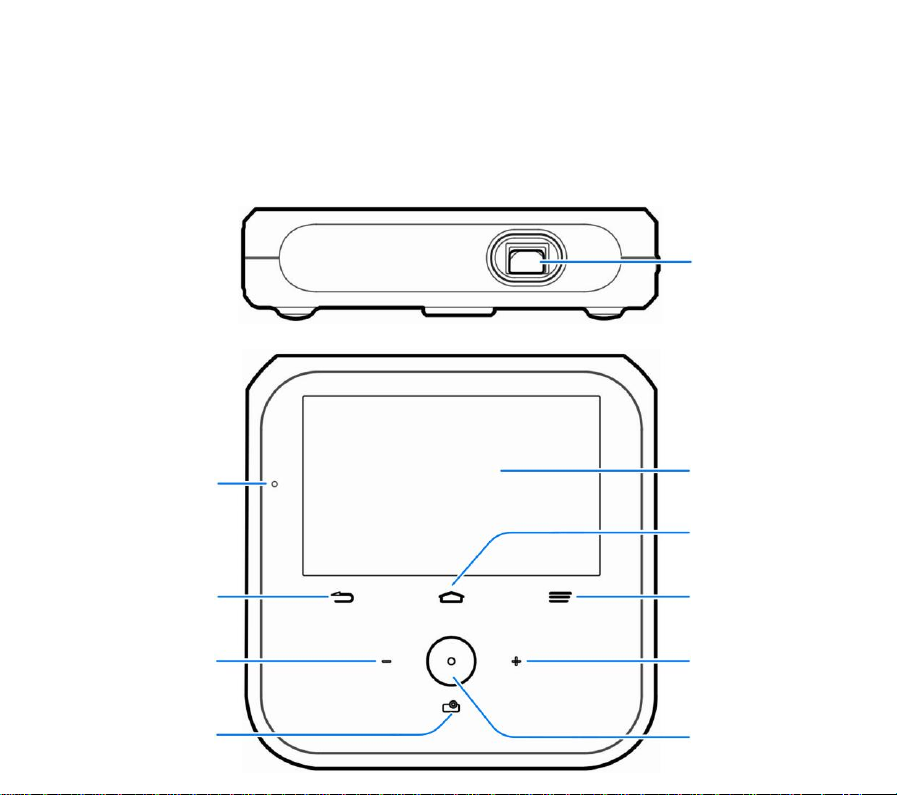
Images and screenshots used in this guide may differ from the actual
product. Content in this guide may differ from the actual product or
software.
Trademarks
ZTE and the ZTE logos are trademarks of the ZTE Corporation.
Google and Android are trademarks of Google, Inc.
The Bluetooth®trademark and logos are owned by the Bluetooth SIG, Inc.
and any use of such trademarks by ZTE Corporation is under license.
microSDHC Logo is a trademark of SD-3C, LLC.
is a trademark of SRS Labs, Inc. TruMedia technology is
incorporated under license from SRS Labs, Inc.
SRS TruMedia™, a feature-rich audio solution tuned specifically for
mobile devices, provides a cinema-like surround headphone performance
with deep, rich bass.
Other trademarks and trade names are the property of their respective
owners.

4
Version No.: R1.0
Edition Time: September 11, 2014
Manual No.:

5
Getting to Know Your spro
Projection
Lens
Touch Screen
Indicator Light
Home Key
Menu Key
Back Key
Volume Up
Key
Volume Down
Key
Projection
Key

6
Sleep/Wake
Up Key
Power Bank
Key
Power Key
microSDHC
Card Slot Cover
Reset Key
Focus Wheel
HDMI Input
Port
USB Jack
Power Socket
Headset Jack

7
Kickstand
Ventilation
Holes
Speaker

8
Projection Lens
Project the display on a surface.
WARNING!
Do not look directly into the projection lens or point the lens toward people
or animals’ eyes when the projector is on as this may cause injury to the
eyes.
Back Key
Touch to go to the previous screen.
Home Key
Touch to return to the home screen from any application or screen.
Touch and hold to see recently used apps.
Menu Key
Touch to get the options for the current screen.
Volume Up/Down Key
Touch or hold to turn the volume up or down.

9
Sleep/Wake Up Key
Touch to turn off or on the screen display.
Projection Key
Touch to turn on or off the projector.
Power Key
Press and hold to enable silent mode or silent mode with vibration,
disable silent mode, power off or restart your spro.
Press to turn off or on the screen display.
Power Bank Key
Press and hold to turn on or off the Power Bank feature which allows you
to charge other devices through your spro.
Reset Key
You can force your spro to restart in situations when it stops responding or
won’t power off normally.
Using the tip of a pen or paperclip, press and hold the Reset Key until
your spro restarts.
Focus Wheel

10
Adjust the focus of the projector.
Ventilation Holes
Exhaust the hot air when the projector is on.
WARNING!
Do not place anything near the ventilation holes as this may cause internal
heat buildup. Do not place your hand near the ventilation holes as this
may cause injury.
Installing the microSDHC™ Card (Not Included)
AmicroSDHC card can be installed or removed while the spro is turned on.
You need to unmount the microSDHC card before removing it.
1. Open the microSDHC card slot cover.

11
2. Hold the microSDHC card with the cut edge oriented as shown below.
Push the card into the card slot until it clicks into position. You may
hear a click when the card clicks into the slot.

12
NOTE:
Some applications may require a microSDHC card to work normally or
may store certain data on it. Therefore, it is recommended that you keep a
microSDHC card installed and not remove or replace it randomly.
3. Close the cover.
NOTE:
To remove the microSDHC card, open the card slot cover, push the card

13
so it clicks out, and then pull it completely out from the slot.
Charging the Battery
Your spro’s battery should have enough power for the spro to turn on. You
should fully charge the battery as soon as possible.
WARNING!
Use only ZTE-approved chargers and cables. The use of unapproved
accessories could damage your spro or cause the battery to explode.
CAUTION:
Do not remove or change the built-in rechargeable battery in your spro by
yourself. The battery can only be changed by ZTE or ZTE authorised
service provider.
1. Plug the AC adapter into the power socket on your spro.
2. Plug the AC adapter into an electrical outlet.

14
3. Disconnect the adapter when the battery is fully charged.
NOTE:
If the battery is extremely low, you may be unable to power on the spro
even when it is being charged. In this case, try again after charging the
spro for at least 20 minutes. Contact the customer service if you still
cannot power on the spro after prolonged charging.
Powering On/Off Your spro
Ensure that the battery is charged.

15
Press and hold the Power Key to turn on your spro.
To turn it off, press and hold the Power Key to open the options menu.
Touch Power off and then touch OK.
Restarting Your spro
If the screen freezes or takes too long to respond, try pressing and holding
the Power Key for about 10 seconds to restart the spro.
NOTE:
You can also press and hold the Reset Key using the tip of a pen or
paperclip until your spro restarts.
Waking Up Your spro
Your spro automatically goes into sleep mode when it is not in use for
some time. The display is turned off to save power and the keys are
locked to prevent accidental operations.
You can wake up your spro by turning on the display and unlocking the
keys.

16
1. Press the Power Key or touch the Sleep/Wake Up Key to turn the
screen on.
2. Touch and hold on the screen.
NOTE:
If you have set an unlock pattern, a PIN or a password for your spro, you’ll
need to draw the pattern, or enter the PIN/password to unlock your spro.
Turning On/Off the Projector
You can use the projector embedded in your spro to project the display
onto large surfaces.
Touch the Projection Key to turn the projector on or off.

17
Using the Touch Screen
Your spro’s touch screen enables you to control actions through a variety
of touch gestures.
Touch
When you want to type using the onscreen keyboard, select items on
the screen such as the application and settings icons, or press the
onscreen buttons, simply touch them with your finger.

18
Touch and Hold
To open the available options for an item (for example, a link in a web
page), touch and hold the item.
Swipe or Slide
To swipe or slide means to quickly drag your finger vertically or
horizontally across the screen.
Drag
To drag, press and hold your finger with some pressure before you
start to move your finger. While dragging, do not release your finger
until you have reached the target position.
Pinch
In some apps (such as Maps, Browser, and Gallery), you can zoom in
and out by placing two fingers on the screen at once and pinching
them together (to zoom out) or spreading them apart (to zoom in).
Rotate the screen
For most screens, you can automatically change the screen
orientation from landscape to portrait by turning the spro sideways.

19
Projecting a File saved in Your spro
You can project a file stored in your spro.
1. Touch the Projection Key to turn on the projector.
2. Open the file you want to project.
3. Adjust the projection distance and place the spro on a flat surface.
NOTE:
For best results, project onto a flat screen at a 90°angle to the floor.
4. Adjust the projector view. You can rotate the focus wheel to adjust the
focus.
When you want to finish the projection, touch the Projector Key to turn off
the projector.
Projecting an HDMI Source
You can project an HDMI source when connecting your spro to a laptop or
TV box.
1. Connect your spro with the laptop or TV box via an HDMI cable (not
included).

20
2. Touch the Projection Keyto turn on the projector.
3. From the home screen, touch .
4. Operate your laptop or TV box to select the content you want to view.
Projecting a File Saved in Your USB Device
You can project a file stored on your USB device such as a USB flash
drive or portable hard drive.
1. Connect your spro with the USB device via the USB jack.
2. Touch the Projection Key to turn on the projector.
3. Touch the Home Key > > File Manager.
4. Touch USB DEVICE to open the file you want to project.
NOTE:
Before connecting your spro with the USB device, slide the status bar
down to open the notification panel and ensure that this option is
not highlighted.
NOTE:
Your spro only supports the portable hard drives with less than 2TB of
Other manuals for SPRO
2
This manual suits for next models
1
Table of contents
Other Zte Projector manuals