10
11
12
13
14
15
16
17
18
EN
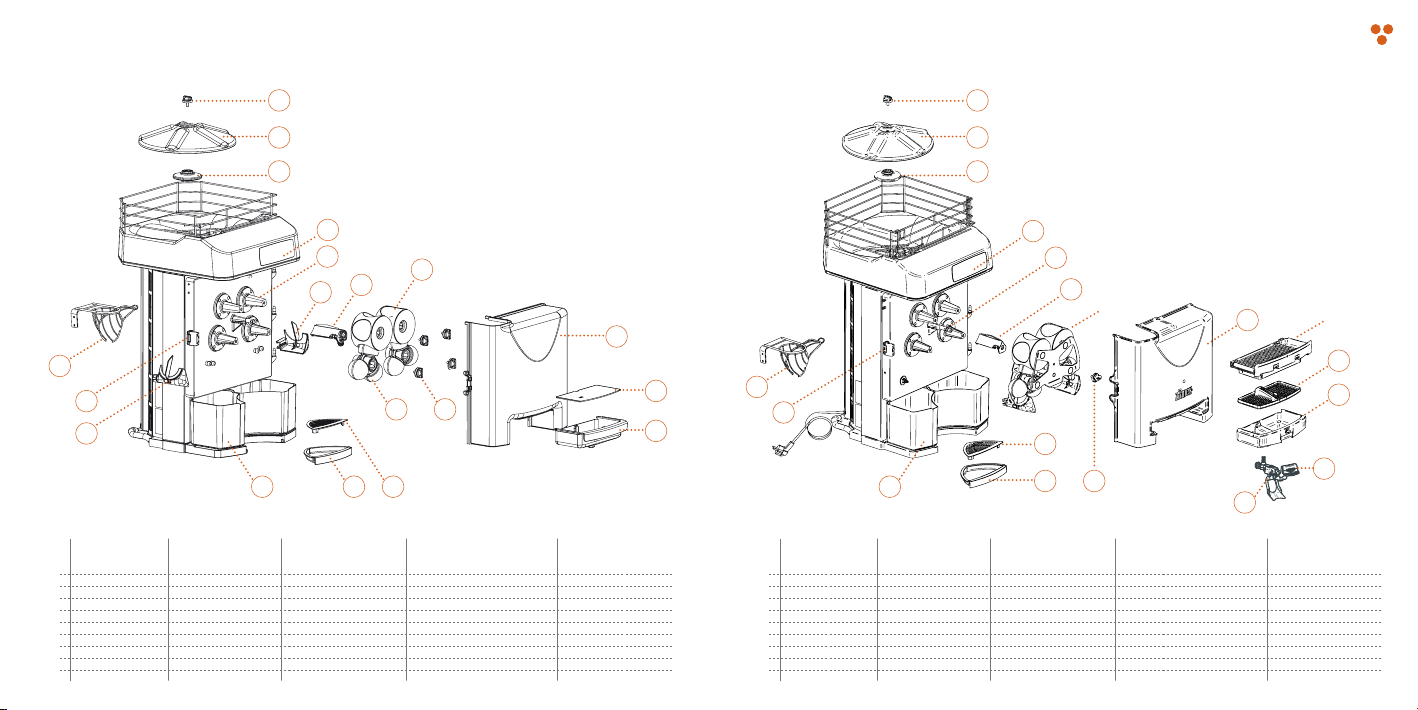
FEEDER TUBE KIT
COVER CATCH
LEFT PEEL EJECTOR
TRAY FILTER
DRIP TRAY
PLASTIC SECURING KNOB
COMPLETE FAUCET KIT
FAUCET BUTTON
SLEEVE
ES
KIT TUBO DE ALIMENTACIÓN
CIERRE CUBIERTA
CUÑA EXTRACTORA IZQUIERDA
FILTRO BANDEJA
BANDEJA GOTEO
VOLANTE PLÁSTICO
KIT GRIFO COMPLETO
PULSADOR GRIFO
CARÁTULA
FR
KIT TUYAU D’ALIMENTATION
FERMETURE BOÎTIER
TAQUET D’EXTRACTION GAUCHE
FILTRE BAC
BAC ANTIGOUTTES
VIS PLASTIQUE
KIT ROBINET COMPLET
LEVIER ROBINET
COUVERCLE
DE
ZUFUHRROHRSATZ
VERSCHLUSSABDECKUNG
ENTSAFTERKEIL LINKS
FILTER TABLETT
TROPFAUFFANGSCHALE
PLASTIKEINSPRITZKNOPF
KOMPLETTER HEBELSATZ
DRUCKHEBEL
ABDECKUNG
IT
KIT TUBO DI ALIMENTAZIONE
CHIUSURA COPERCHIO
CUNEO DI ESTRAZIONE SINISTRO
FILTRO VASCHETTA
VASCHETTA RACCOGLIGOCCE
VOLANTE IN PLASTICA
KIT RUBINETTO COMPLETO
PULSANTE RUBINETTO
CUSTODIA
1
2
3
4
5
6
7
8
9
EN
JUICE CONTAINER
FILTER CONTAINER
ZUMEX COVER
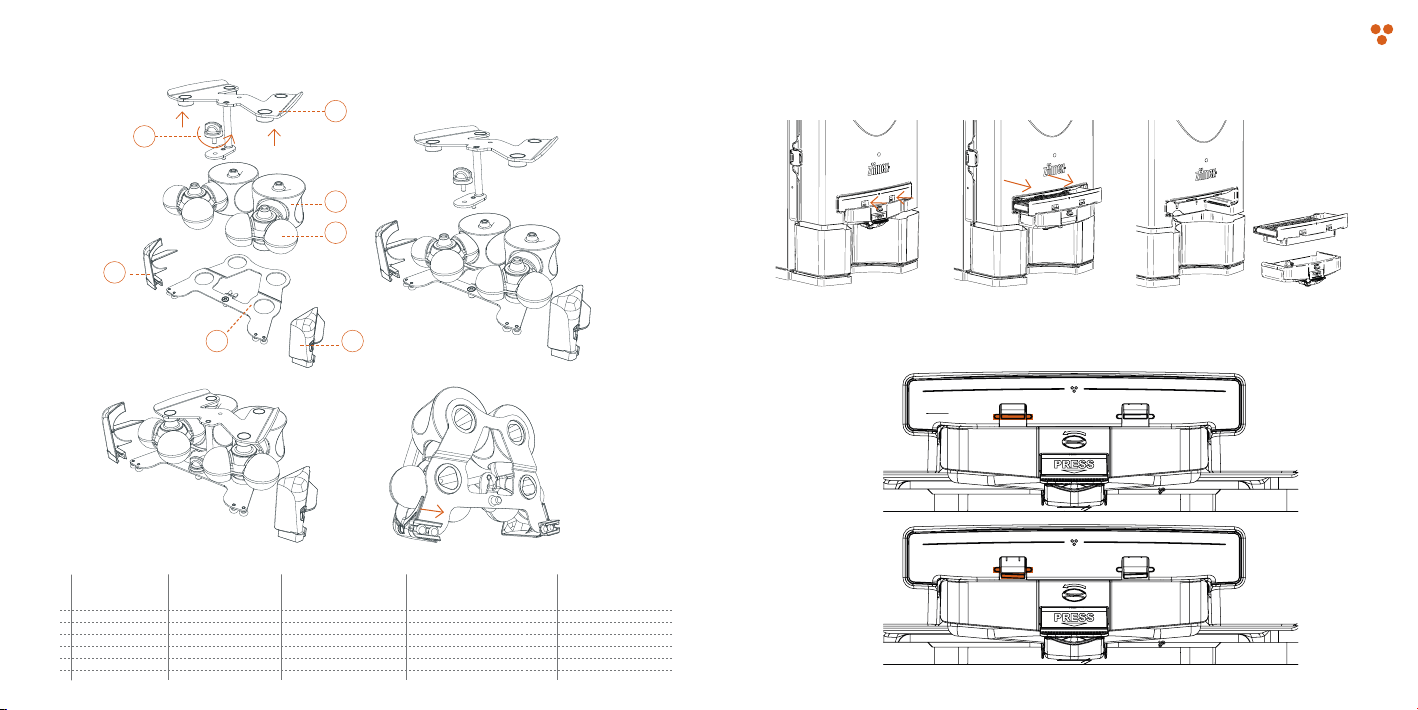
LOWER PRESSING UNIT
UPPER PRESSING UNIT
PEEL BUCKET
RIGHT PEEL EJECTOR
FASTENER SUPPORT CAP
BLADE HOLDER
ES
CUBETA ZUMO
FILTRO CUBETA
CUBIERTA ZUMEX
TAMBOR MACHO
TAMBOR HEMBRA
DEPÓSITO DE CORTEZAS
CUÑA EXTRACTORA DERECHA
TAPÓN SOPORTE RETÉN
PORTACUCHILLAS
FR
RÉSERVOIR PULPE
FILTRE RÉSERVOIR
BOÎTIER ZUMEX
TAMBOUR MÂLE
TAMBOUR FEMELLE
POUBELLE À ÉCORCES
TAQUET D’EXTRACTION DROIT
BOUCHON SUPPORT BAGUE
PORTE-LAMES
DE
SAFTBEHÄLTER
BEHÄLTERFILTER
ZUMEX - ABDECKUNG
TROMMELGEHÄUSE
TROMMELEINSATZ
SCHALENBEHÄLTER
ENTSAFTERKEIL RECHTS
HALTERUNGS- UND DICHTUNGSSTOPFEN
MESSERHALTER
IT
VASCHETTA SUCCO
FILTRO VASCHETTA
INVOLUCRO ZUMEX
TAMBURO MASCHIO
TAMBURO FEMMINA
DEPOSITO DELLE BUCCE
CUNEO DI ESTRAZIONE DESTRO
TAPPO SUPPORTO RISERVA
PORTALAME
Diagrams with Parts: Essential Pro
10
11
613
9
15
Diagrams with Parts: Essential Basic
8
7
654
3
2
1
12
14
10
11 12 613 14 15
16
17
2
3
4
5
7
9
8
18
1