Zumoval Minimax User manual


2018
v0
1
I
IN
ND
DE
EX
X
General information 2
Technical characteristics 2
Declaration of conformity 3
Warranty 4
Warnings 5
Set up of the machine 6
Set up of the stand 7
Cleaning and maintenance
Options 10
Stainless Steel Self Tap 10
Pulp out filter 11
Electronic functioning 12
Machine configuration
12
Standard Option
13
Self tap Option
14
Level detector Option
15
Warnings and emergency stops
16
Problem solving 17
Spare parts 1

2018
v0
2
G
G
E
E
N
N
E
E
R
R
A
A
L
L
I
I
N
N
F
F
O
O
R
R
M
M
A
A
T
T
I
I
O
O
N
N
First off all, we would like to thank you for choosing a new ZUMOVAL orange juice machine and for the trust you have
shown in our products.
For any questions concerning the machine’s usage, please do not hesitate to contact our distributor or ZUMOVAL
directly. We would be more than pleased to answer any questions you may have. Please closely follow the
instructions indicated in this manual, to achieve the maximum performance from your machine.
Before setting up the machine, p ease make sure a peop e authorized to use the machine are fami iar with the
present manua and its content.
Please keep this manual in a dry place, near the machine, so it is accessible for any consultation.
Each and every component of the machine, that are in continuous contact with the juice, fulfil strictly the sanitary
normative, in accordance with the manufacturing country’s legislation.
T
TE
EC
CH
HN
NI
IC
CA
AL
L
C
CA
AR
RA
AC
CT
TE
ER
RI
IS
ST
TI
IC
CS
S
MOTOR-MAX.CONSUME PROD.
ORANGE
SIZE
FEEDER
CAPACITY
WIDTH x DEP
TH x
HIGHT
WEIGH
T
Minimax
230V – 50/60Hz, 0.55kw, 4.1 / 3.7 A
115V – 60Hz, 0.55kw, 8.7 A
15 und. 65-80mm
2,56”-3,15”
6 und. MAX. 33 cm x 45 cm x 74 cm
13” x 17,7” x 29,1” 51 kg
112,4 lbs
Minimatic
6 kg. MAX.
13 lbs. MAX. 33 cm x 45 cm x 93 cm
13” x 17,7” x 31,61” 53 kg
116,8 lbs
Top
28 und.
65-80mm
2,56”-3,15”
18 kg. MAX.
40 lbs. MAX. 62 cm x 50 cm x 99 cm
24,4” x 19,7” x 38,9” 48 kg
105,8 lbs
Basic
6 und. MAX. 62 cm x 43 cm x 70 cm
24,4” x 17,7” x 27,5” 44 kg
97 lbs
BigBasic
75-95mm
2,95”-3,74” 5 und. MAX. 62 cm x 43 cm x 70 cm
24,4” x 17,7” x 27,5” 44 kg
97 lbs
FastTop
45 und. 65-80mm
2,56”-3,15” 18 kg. MAX.
40 lbs. MAX. 62 cm x 50 cm x 99 cm
24,4” x 19,7” x 38,9” 48 kg
105,8 lbs
ELECTRICAL PROTECTION: Overcharge and temperature
SECURITY: Proximity detectors
DEGREE OF PROTECTION: IPx4


2018
v0
4
G
GU
UA
AR
RA
AN
NT
TE
EE
E
Due to high manufacturing standards and strict quality controls, we guarantee the perfect performance of our machines.
This warranty is valid for two years counting from the date of issue of the invoice of sale. In all other countries the
warranty is set by the official distributor but shall not, in any case, be less than 1 year from the date of purchase.
For a valid claim it is necessary to provide this warranty together with proof of purchase.
We guarantee the repair or replacement of any defective part, component or accessory due to manufacturing fault. This
replacement or repair shall take place at one of our authorized workshops.
The transport cost, hand power and other costs arising from repair or replacement will be charged to the customer.
This warranty does not cover: The breakage or weakness of any part or component as a consequence of improper or
inadequate installation, misuse or neglect. Furthermore, we will not be held responsible for damage caused by normal
wear and tear, repair or modification to any part of the machine undertaken by any unauthorised person. To fulfil the
terms of the warranty, all repairs must be performed by our technical department or the official Zumoval distributor.
Any falsification of warranty documentation, or the loss or damage to the machine’s identification plate, will lead to the
present warranty becoming invalid.
In order to go to our Technica Service, it is be indispensab e to mention the seria Nº SERIES of the identification
sticker

2018
v0
5
•It is the responsibi ity of the user to read the enc osed warnings prior to using this machine.
•After removing the packaging, check that equipment is not damaged. If in doubt, do not use it and contact the
company.
•The packaging materials (plastic bags, foam, cork, etc.) should not be left within reach of children, as they are a
potential danger.
•Before assembling the machine, please, make sure there are no pieces left in the packaging.
•The machine needs to have some ventilation around it in order to perform properly.
•Concerning models on a stand, remember to set the brakes on the front wheels in order to prevent unwanted
moving.
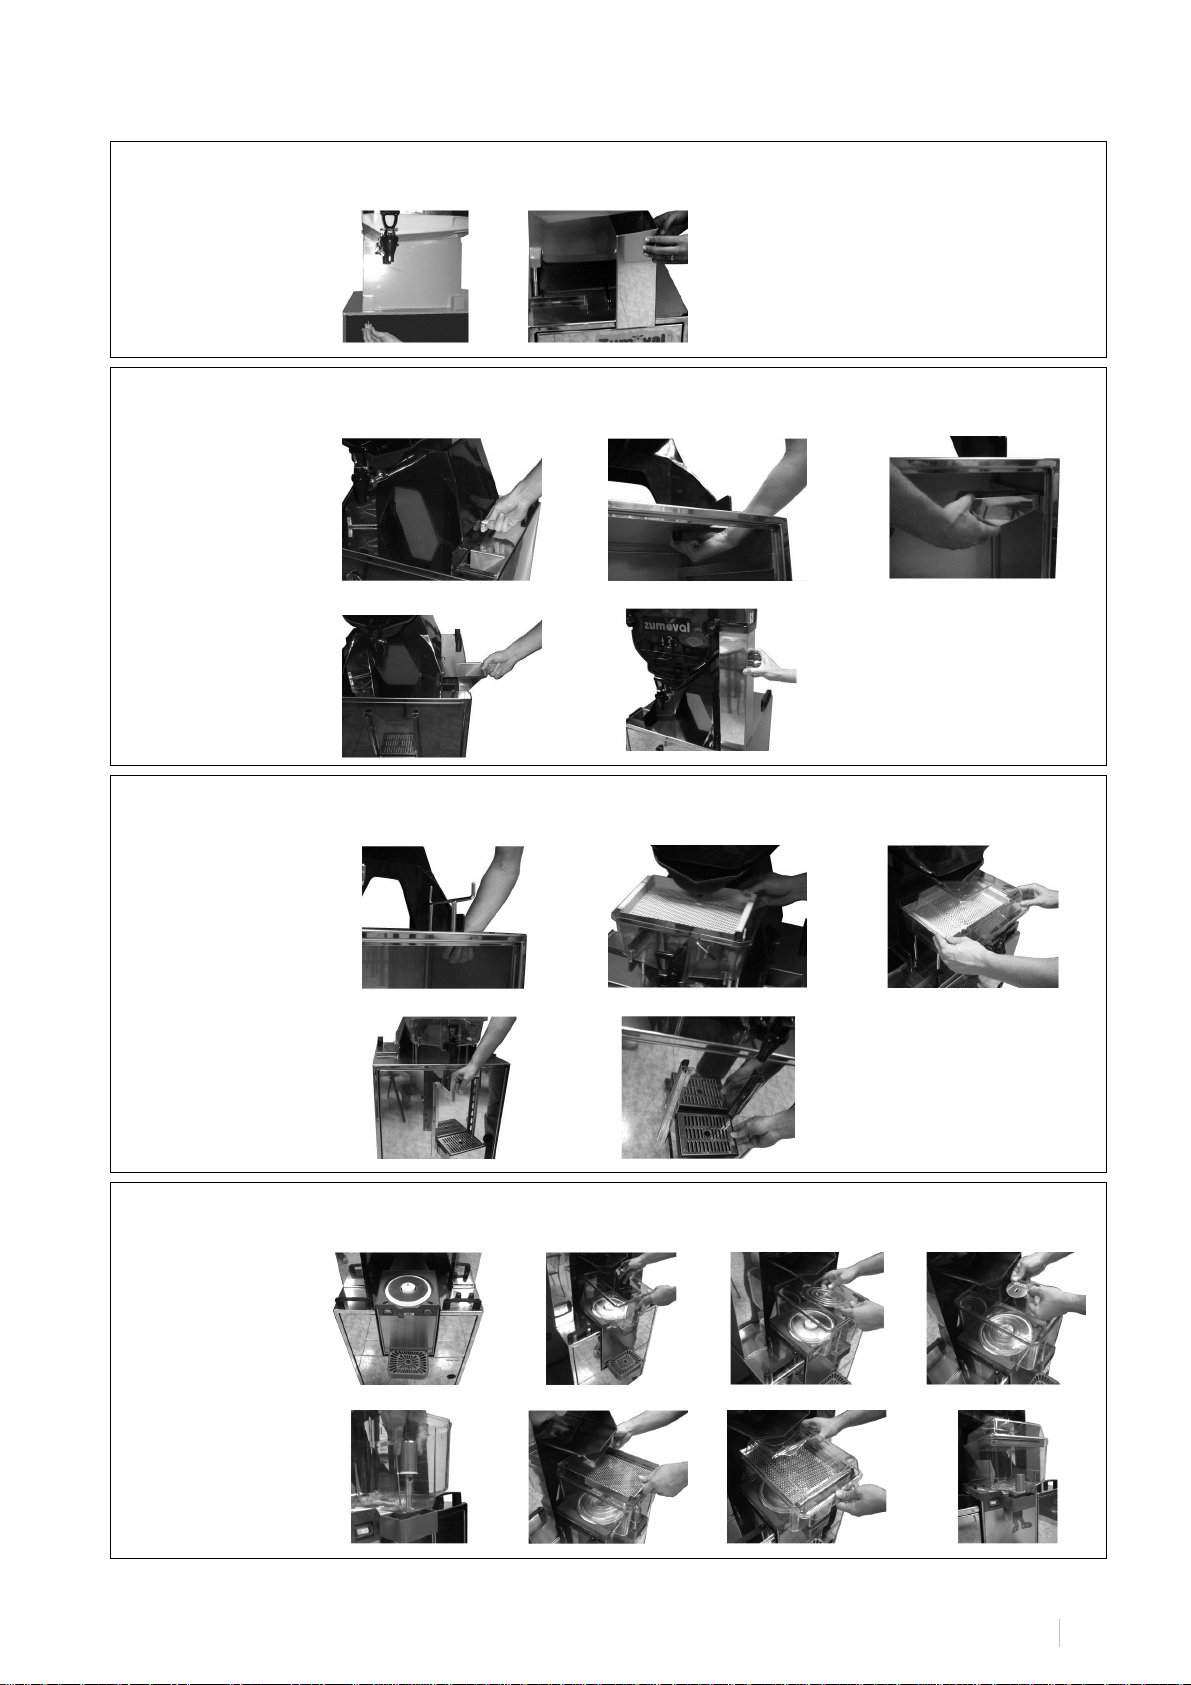
•Before use, clean all the juicing area, SEE CLEANING INSTRUCTIONS.
•DO NOT start the machine running, without making sure that all components are in their correct place of work,
especially the front cover, otherwise the security detector will not allow the machine to run.
•When using the machine, do not touch or access to the moving parts neither by hands nor with any utensils.
•Machine should never be operated by minor or inexperienced staff without supervision.
•Check that the voltage of your outlet is according to voltage stated in technical label on the side of your machine.
Only use power cords with grounding connection.
•Do not use an extension cord. If you decide to do it, it is on your own responsibility, use only extension that is in
good condition and suitable for the power of the machine. The extension cord should be placed so that no one
can pull it or stumble.
•Do not allow the cord to come into contact with hot surfaces.
•Do not put machine next to heat sources.
•To protect against risk of electrical shock and personal injury, do not immerse cord, plug or appliance in water or
any other liquid.
•This product is designed for indoor use, do not expose this appliance to rain or moisture and do not use it
outdoors or with wet hands.
•Always place the machine on a dry, stable and leveled surface.
•To disconnect from the electrical outlet pull the plug gently. Never pull from the cord.
•The use of accessories not recommended by the manufacturer may cause fire, electric shock or injury, always use
original spare parts
THE PROPER SIZE OF ORANGE IN ORDER TO OBTAIN BEST RESULTS IS 65-80MM DIAMETER.
•It is recommended to wash fruit before juice extraction.
•Do not use the machine out of the temperature range: (from -20º to 40ºC).
•The manufacturer dec ines any responsibi ity for damages resu ting from improper, care ess or neg igent use of
equipment, as we as from use by unauthorized persons
W
WA
AR
RN
NI
IN
NG
G

2018
v0
6
S
SE
ET
T
U
UP
P
O
OF
F
T
TH
HE
E
M
MA
AC
CH
HI
IN
NE
E
Minimax
Unscrew the
thumbscrew and place
the feeder tube.
Place the peel bucket
and the juice tray.
Minimatic
Unscrew the
thumbscrew and the
screw of the head
feeder, place the
feeder tube.
Place the peel bucket
and the juice tray.
Top / FastTop
Place the basket,
remove the filter and
the coverscreen. Fit
the feeding tube.
Replace the
coverscreen and the
filter. Finally place the
peel buckets and the
juice tray.
Basic / BigBasic
Remove the filter and
the cover screen,
Place feeder tube,
return the
coverscreen and the
filter and place the
peel buckets.

2018
v0
7
S
SE
ET
T
U
UP
P
O
OF
F
T
TH
HE
E
S
ST
TA
AN
ND
D
Mini stand
Place the machine on
the stand and place
the down tubes.
Se f-service stand
Put the machine on
the stand, place the
ramps and the down
tubes and the juice
tray.
Dispenser stand
Realize the same steps
as for the se f-service
stand.
Place the dispenser
support, place the
dispenser and place
the filter.
Place the juice tray.
Frigo stand
Realize the same steps
of the se f-service
stand.
Place the Caddy as the
images show.

2018
v0
8
C
CL
LE
EA
AN
NI
IN
NG
G
A
AN
ND
D
M
MA
AI
IN
NT
TE
EN
NA
AN
NC
CE
E
Once the juice extraction has been finished, stop the machine
according to the model
Leave the rods of the squeezer double drum in a vertical position
Make sure that the squeezer male parts are horizontal
Unplug the machine from the mains socket.
Remove the juice filter.
Mode o Minimax y Minimatic, Basic, BigBasic and Top:
Empty the peel bucket.
Mode with meta stand: Remove the lateral tubes.
Remove the front cover, moving it
slowly upwards and towards.
Remove the front cover, by
unscrewing the two lateral screws.
Minimax - Minimatic
Remove the positioner, pushing it upwards.
Remove the knife, by unscrewing the knife
screw (Be careful. The knife is sharp). Remove
the squeezer male part, by unscrewing the
screw.
Remove the squeezer drum by unscrewing the
screw. Remove the second squeezer male part.
Remove the ejector.
For the mode s with head feeder:
Take of the turning feeder plate, by
unscrewing the screw

2018
v0
9
Basic – BigBasic – Top – FastTop
Unscrew the five principal screws of the squeezing system parts.
Remove the two squeezing drums, the two
male parts and knifepiece pulling it outwards.
Be careful with this part, because of its cutting
edge.
For the mode s with the upper feeder
component, twist softly the upper metal
basket all the way towards the left and then
gently pull up. Remove the turning dish by
unscrewing the screw towards the right.
Thoroughly clean all parts, and block of the machine with cold water and detergent.
Do not use abrasive nor dissolvent products, since they could harm the compound of the
elements of the machine. Do not clean the machine with water under pressure.
Dry the components of the system and the block of the machine.
Máx. 25ºC

2018
v0
10
O
OP
PT
TI
IO
ON
NS
S
Stain ess Stee se f tap
In order to ensure the perfect hygiene of your orange squeezer, it is necessary to clean the tap periodically. Follow the
instructions according to the diagram.
Follow the depicted instructions.

2018
v0
11
Pu p-Out fi ter
Follow drawing instructions to disassemble the Pulp-Out Filter:
1. Displace the pulp remover until the limit of the filter.
2. Tilt the filter and remove it horizontally.
Follow drawing instructions to disassemble squared stainless steel falling tubes:
1. Once front cover has been removed, remove top squared tubes by displacing, first, vertically and, second,
horizontally.
2. Remove bottom squared tubes by displacing, first, vertically and, second, horizontally.

2018
v0
12
E
E
L
L
E
E
C
C
T
T
R
R
O
O
N
N
I
I
C
C
F
F
U
U
N
N
C
C
T
T
I
I
O
O
N
N
I
I
N
N
G
G
First of all, make sure that feeding tube contains oranges.
PLUG MACHINE INTO A NORMAL MAIN SOCKET WITH EARTH PROTECTION
TURNING ON CONTROL PANEL
CONTROL PANEL PARTS
MACHINE CONFIGURATION
TO ACCEED SETTINGS MENU
With machine in STOP status press and hold for 2 seconds.
SELECTING SETTING TO CONFIGURE
Press and to move between configurable settings. Select a setting to configure by pressing .
CONFIGURATION SETTINGS
*Only available in machines with additional options
2 seconds
Functioning mode
Counter
Vo tage Input (V)
Se ector
Status Area
“Se ector
-
”
button
“Se ector +”
button
“Shower/Home” button
“
Start
”
button
“Stop
”
button
Pee basket capacity: Select quantity of oranges to squeeze before a “Full peel basket” warning is displayed.
If a 0 value is set, warning is not active.
Automatic shower duration*: Select shower cycle duration (in seconds).
Auto-Off Time: By this setting user can configure the no operation time length before machine turns itself
off automatically. If a 0 value is set, Auto-Off is not active.
Auto/Manua Mode*: Select how to start and stop squeezing operation: Automatic Mode (by Self
or Level Detection) or Manual Mode.
Automatic Stop: Machine will stop running after 5 minutes with no oranges detection.
Se ector Activation: This option allows Acti vate/Deactivate Selector functioning.
.

2018
v0
13
FUNCTIONING: STANDARD OPTION
TURNING ON CONTROL DISPLAY
If control display is not ON, press and hold for 2 seconds.
SELECTING SQUEEZING MODE: CONTINUOS OR SELECTOR
Press and to select Squeezing Mode:
If 0 CONTINUOUS MODE IS ACTIVE
If ≠ 0 SELECTOR MODE IS ACTIVE
TO START SQUEEZING
TO STOP SQUEEZING
Machine will stop squeezing if is pressed or if number of oranges set in selector have been squeezed
(Selector Mode).
Further functions:
MAINTENANCE STOP
Maintenance Stop activation: With machine in “Stop” status, press and hold simultaneously and .
Machine will start turning until maintenance position is reached.
INVERTED TURN
Inverted turn activation: With machine in “Stop” status, press and hold simultaneously and .
AUTOMATIC SHOWER (Only for machines including Automatic Shower option)
To start washing: Make sure that any orange is inside squeezing area. To start washing press when
machine is running.
To finish washing: Automatic shower will stop washing when cycle time is completed or when pressing
again.
Important: Machine will immediately stop running if a warning signal is received. See “Warnings and
Emergency stops” section.

2018
v0
14
FUNCTIONING: SELF TAP OPTION
TURNING ON CONTROL DISPLAY
If control display is not ON, press and hold for 2 seconds.
TO START SQUEEZING
With machine in Ready Status (Green led lightning), open Self Tap . .
TO FINISH SQUEEZING
Machine will stop squeezing if Self Tap is closed , if is pressed or if number of oranges set in
selector have been squeezed (Selector Functioning).
Further functions:
MAINTENANCE STOP
Maintenance Stop activation: With machine in “Stop” status, press and hold simultaneously and .
Machine will start turning until maintenance position is reached.
INVERTED TURN
Inverted turn activation: With machine in “Stop” status, press and hold simultaneously and .
AUTOMATIC SHOWER (Only for machines including Automatic Shower option)
To start washing: Make sure that any orange is inside squeezing area. To start washing press when
machine is running.
To finish washing: Automatic shower will stop washing when cycle time is completed or when pressing
again.
SELECTOR FUNCTIONING
Press and to select Squeezing Mode:
If 0 CONTINUOUS MODE IS ACTIVE
If ≠ 0 SELECTOR MODE IS ACTIVE
Important: Machine will immediately stop running if a warning signal is received. See “Warnings and
Emergency stops” section.

2018
v0
15
FUNCTIONING: LEVEL DETECTOR OPTION
TURNING ON CONTROL DISPLAY
If control display is not ON, press and hold for 2 seconds.
LEVEL DETECTOR ACTIVATION
TO START SQUEEZING
Machine will automatically start squeezing when a “Low Level” signal from detector is received.
TO FINISH SQUEEZING
Machine will stop squeezing when a “High Level” signal from detector is received or when is
pressed.
Further functions:
MAINTENANCE STOP
Maintenance Stop activation: With machine in “Stop” status, press and hold simultaneously and
Machine will start turning until maintenance position is reached.
INVERTED TURN
Inverted turn activation: With machine in “Stop” status, press and hold simultaneously and .
AUTOMATIC SHOWER (Only for machines including Automatic Shower option)
To start washing: Make sure that any orange is inside squeezing area. To start washing press when
machine is running.
To finish washing: Automatic shower will stop washing when cycle time is completed or when pressing
again .
Important: Machine will immediately stop running if a warning signal is received. See “Warnings and
Emergency stops” section.

2018
v0
16
WARNINGS AND EMERGENCY STOPS
Warning and Emergency stops are situations that require user attention. These situations can answer to
following causes:
•User security and protection.
•Equipment protection against external factors.
•User attention is required to continue a sequenced operation.
•User attention is required due to machine maintenance.
Once a Warning or Emergency Stop is reached, machine automatically stops and enters “Warning” status. In
this status, red led over “Stop” button will light intermittently and the corresponding warning advice will be
displayed through screen:
WARNING CAUSE ACTIONS
Front cover is not correctly
assembled
Fasten front cover to machine
structure properly
Maintenance stop reached
In case of cleaning, remove juicers
Motor overheating
Check if any piece or part is blocking
or hindering machine turn
Voltage input out of range
Check voltage supply
Control fuse damaged
Replace fuse (10A) on Control board
Full dispenser signal while
automatic shower function is
being executed
Empty dispenser
Orange peel cycle completed
(Peel basket is full)
Empty peel basket
Press “Stop” button to exit from any “Warning” status. If “Warning” cause has been solved machine will enter
“Stopped” status.

2018
v0
17
P
PR
RO
OB
BL
LE
EM
M
S
SO
OL
LV
VI
IN
NG
G
FAILURE POSSIBLE CAUSE SOLUTION
The machine does not operate
Machine unplugged Plug it to socket
No power Check the plug and socket
Transparent cover misplaced Make sure it is well placed
Defective safe detectors Call Customer service
Defective ON / OFF button Call Customer service
Defective electric circuit Call Customer service
The machine is blocked while
squeezing is in progress
Insufficient voltage
Check that the voltage is according
to indicated on the identification
label
Wrong fruit size Check the size of the fruit is as shown
in this manual
The machine stops every few minutes
Insufficient ventilation Check that ventilation gratings are not
covered
Electrical overload Call Customer service
The Positioner is broken or bent Misplaced drum or positioned Make sure the pieces are well placed
The tap is blocked Juice has seeds or excessive pulp Dissemble and clean the tap as
described in the manual
Counter increases counts wrongly Noise or perturbations in electric
Supply
Unplug and plug machine to electric
supply. If problem persists, unplug the
machine and plug again after a few
minutes


Other manuals for Minimax
2
This manual suits for next models
5
Table of contents
Other Zumoval Juicer manuals