Grounding
http://192.168.1.2
User Name: admin
Login Password: 1234
(default)
1234
Login
User Name
Password
admin
WAX510D
http://192.168.1.2
1-b Wired connection
1-b
3
2
2
3
2
3
2
3
2
3
EN
ES
FR
2
3
DE
The wizard appears automatically. Use the wizard to set up your WAX510D. Note:
It takes 1 to 2 minutes to apply your wizard changes. The power LED will blink red
and green alternatively. The power and WiFi LEDs then turn steady green when
the system is ready. Check the Dashboard screen and note down the WAX510D's
IP address in case you need to access it's web configurator again.
Note : The 1.1.1.1 is for initial setup only. It is not usable after the WAX510D is
configured.
Use the WAX510D's new wireless settings (SSID and key) to re-connect to the
WAX510D's WiFi network for Internet access if you change them in the wizard.
Der Assistent erscheint automatisch. Richten Sie den WAX510D mit dem
Assistenten ein. Hinweis: Es dauert 1 bis 2 Minuten, bis der Assistent die
Änderungen übernimmt. Die POWER LED blinkt nun abwechselnd rot und grün.
Wenn das System bereit ist, leuchten die LED-Anzeigen POWER und WiFi (WLAN)
grün. Rufen Sie das Dashboard-Fenster auf, und notieren Sie sich die IP-Adresse
des WAX510D, falls Sie nochmals auf den Web-Konfigurator zugreifen müssen.
Hinweis : 1.1.1.1 kann nur bei der Erstkonfiguration verwendet werden, nicht jedoch,
wenn der WAX510D schon einmal konfiguriert wurde.
Nachdem Sie die WLAN-Einstellungen desWAX510D (SSID und dazugehöriger
Schlüssel) im Assistenten geändert haben, können Sie mit diesen die Verbindung
zum WLAN-Netzwerk des WAX510D und damit zum Internet herstellen.
El asistente aparecerá automáticamente. Utilice el asistente para configurar su
WAX510D. Nota: el asistente tarda entre 1 y 2 minutos en aplicar los cambios. El
LED de alimentación parpadeará en rojo y verde alternativamente. Los LEDs de
alimentación y WiFi se mantendrán en verde fijo cuando el sistema esté listo.
Compruebe la pantalla Dashboard (Panel) y anote la dirección IP del WAX510D
por si necesita acceder de nuevo al configurador web.
Nota : 1.1.1.1 es sólo para la configuración inicial. No se puede usar después de que
el WAX510D haya sido configurado.
Utilice la nueva configuración inalámbrica delWAX510D (SSID y clave) para
volver a conectarse a la red WiFi del WAX510D para acceder a Internet si la ha
cambiado en el asistente.
L'assistant apparaît automatiquement. Utilisez l'assistant pour configurer votre
WAX510D. Remarque : 1 à 2 minutes sont nécessaires pour appliquer les
modifications de l'assistant. Le voyant d'alimentation clignote en rouge et vert
alternativement. Les voyants d'alimentation et WiFi s'allument en vert continu
quand le système est prêt. Consultez l'écran du Tableau de bord et notez
l'adresse IP du WAX510D au cas où vous auriez besoin d'accéder de nouveau à
son configurateur Web.
Remarque : L'adresse 1.1.1.1 est uniquement destinée à la configuration initiale.
Elle n'est pas utilisable une fois que le WAX510D est configuré.
Utilisez les nouveaux paramètres sans fil du WAX510D (SSID et clé) pour
reconnecter le réseau WiFi du WAX510D pour l'accès à Internet si vous les
modifiez dans l'assistant.
La procedura guidata viene visualizzata automaticamente.Utilizzare la
procedura guidata per configurare il WAX510D. Nota: Ci vogliono 1 o 2 minuti per
applicare le modifiche della procedura guidata.Il LED di alimentazione
lampeggia in rosso e verde alternativamente.I LED di alimentazione e WiFi
diventano poi verde fisso quando il sistema è pronto.Controlla lo schermo del
cruscotto e annota l’indirizzo IP del WAX510D per potere accedere in caso di
necessità al configuratore web.
Nota : 1.1.1.1 è solo per la configurazione iniziale.Non è utilizzabile dopo che il
WAX510D sia stato configurato.
Utilizzare le nuove impostazioni wireless del WAX510D (SSID e chiave) per
ri-connettere alla rete WiFi del WAX510D per l'accesso a Internet se li cambiate
nella procedura guidata.
DASHBOARD
Interface Status Summary
XXX X.X.X.X / X.X.X.X
Name IP Addr/Netmask
Wizard setting
WAX510D
Prev Next Cancel
SSID:
PSK
Secret:
XXXXXX
XXXXXX
SSID
SSID (WiFi Network Name):
PSK (WiFi Password):
Note 1
WAX510D
Current IP Address:
Note 2
Wall mounting: Drill two holes for the screw anchors (A), 62.4 mm
apart. Insert the screw anchors into the wall.
Ceiling mounting: Drill two holes for the screw anchors (A), 62.4 mm
or 70.1 mm apart. Insert the screw anchors into the ceiling.
Wandmontage: Bohren Sie die zwei Löcher für die Schraubdübel (A)
in einem Abstand von 62,4 mm. Bringen Sie die Schraubdübel an der
Wand an.
Deckenmontage: Bohren Sie die zwei Löcher für die Schraubdübel
(A) in einem Abstand von 62,4 mm oder 70,1 mm. Bringen Sie die
Schraubdübel an der Decke an.
Montaje en pared: Taladre dos agujeros para los anclajes de tornillo
(A), con 62,4 mm de separación. Inserte los anclajes de tornillo en la
pared.
Montaje en el techo: Taladre dos agujeros para los anclajes de
tornillo (A), con 62,4 mm o 70,1 mm de separación. Inserte los
anclajes de tornillo en el techo.
Montage mural : Percer deux trous à 62,4 mm l'un de l'autre pour les
chevilles (A). Insérer les chevilles dans le mur.
Montage au plafond : Percer deux trous pour les chevilles (A), à 62,4
mm ou 70,1 mm l'une de l'autre. Insérer les chevilles dans le plafond.
Montaggio a parete: Fai due buchi per i sostegni a vite (A), spaziati
di 62,4 mm. Inserisci nel muro i sostegni a vite.
Montaggio a soffitto: Fai due buchi per i sostegni a vite (A), spaziati
di 62,4 mm o di 70,1 mm. Inserisci nel soffitto i sostegni a vite.
Install two mounting screws through the holes on the bracket (B) into
the plugs/anchors to secure the bracket to the wall/ceiling. Make sure
the screws are snugly and securely fastened to the wall/ceiling.
After the bracket is attached to the wall/ceiling, slide the WAX510D
onto the bracket until it clicks into the place.
Bringen Sie zwei Montageschrauben durch die Öffnungen der
Halterung (B) in die Dübel an, um die Halterung an der Wand/Decke zu
befestigen. Stellen Sie sicher, dass die Schrauben fest in der
Wand/Decke befestigt sind.
Nachdem die Halterung an der Wand/Decke befestigt ist, schieben Sie
den WAX510D auf die Halterung, bis er einrastet.
Instale los dos tornillos de montaje a través de los agujeros del
soporte (B) en los tacos o anclajes para fijar el soporte a la pared o
techo. Asegúrese de que los tornillos estén perfectamente apretados y
seguros en la pared o techo.
Una vez que el soporte esté unido a la pared / techo, deslice el
WAX510D sobre el soporte hasta que encaje en su lugar.
Installez deux vis de fixation à travers les trous sur le support (B) dans
les chevilles/ancrages pour fixer le support au mur/plafond. Vérifiez
que les vis sont correctement fixées au mur/plafond et de façon
sécurisée.
Une fois le support fixé au mur/plafond, faire glisser le WAX510D sur le
support jusqu'à ce qu'il s'enclenche.
Inserire due viti per l'installazione attraverso i fori della staffa (B) nei
tasselli/ancoraggi per fissare la staffa alla parete/soffitto. Assicurarsi
che le viti siano saldamente e sicuramente fissate alla parete/soffitto.
Una volta che la staffa è attaccata al muro o al soffitto, fai scorrere il
WAX510D sulla staffa finché non va a posto con un click.
62.4mm
A
A
62.4 or 70.1 mm
EN
ES
FR
DE
Wall / Ceiling Mounting
1-a
1-b
1-a
1-b
1-a
1-b
1-a
1-b
1-a
1-b
2
3
2
3
2
3
2
3
EN
ES
FR
2
3
DE
1-a 1-b
2
3
x2
Unit: mm
25.40
9.00
x2
Unit: mm
20.50
6.50
x2
Unit: mm
25.00
11.80
T-bar Ceiling Mounting
LOCK
OPEN
B
1
2
3
Attach two clips to the ceiling grids as shown.
Install two screws to secure the bracket to the clips.
Slide the WAX510D onto the bracket until it clicks into the place.
Note: Clips (ACCESSORY-ZZ0105F) are sold separately.
Befestigen Sie zwei Clips wie abgebildet an den Deckenrastern.
Befestigen Sie die Halterung mit zwei Schrauben an den Clips.
Schieben Sie den WAX510D auf die Halterung, bis er einrastet.
Hinweis: Clips (ZUBEHÖR-ZZ0105F) sind separat erhältlich.
Fije dos clips a las rejillas del techo como se muestra.
Instale dos tornillos para asegurar el soporte a los clips.
Deslice el WAX510D en el soporte hasta que encaje en su lugar.
Nota: Los clips (ACCESSORY-ZZ0105F) se venden por separado.
Fixer deux clips aux grilles de plafond comme indiqué.
Installer deux vis pour fixer le support aux clips.
Faire glisser le WAX510D sur le support jusqu'à ce qu'il s'enclenche.
Remarque : Les clips (ACCESSORY-ZZ0105F) sont vendus séparément.
Inserisci le due clip nelle barre del soffitto, come in figura.
Usa due viti per attaccare la staffa alle clip.
Fai scorrere il WAX510D sulla staffa finché non va a posto con un click.
Nota: Le clip (ACCESSORY-ZZ0105F) vengono vendute a parte.
1
2
3
1
2
3
1
2
3
1
2
3
1
2
3
EN
ES
FR
DE
Remove the M4 ground screw from the WAX510D’s rear panel as shown.
Secure a green/yellow ground cable (18 AWG or smaller) to the WAX510D’s
rear panel using the M4 ground screw.
Attach the other end of the ground cable to a wall or the ground. Follow
your country’s regulations and safety instructions to electrically ground the
device properly. Qualified service personnel must confirm that the
building’s protective earthing terminal is valid.
Entfernen Sie die M4 Erdungsschraube von der Rückwand des WAX510D wie
abgebildet. Befestigen Sie ein grün/gelbes Erdungskabel (18 AWG oder
kleiner) mit der M4 Erdungsschraube an der Rückwand des WAX510D.
Befestigen Sie das andere Ende des Kabels an der
Bringen Sie das andere Ende des Erdungskabels an einer Wand oder am
Boden an. Befolgen Sie die nationalen Vorschriften und Sicherheitshinweise,
um das Gerät richtig elektrisch zu erden. Qualifiziertes Servicepersonal
muss bestätigen, dass die Schutzerdungsklemme des Gebäudes funktions-
fähig ist.
Retire el tornillo de tierra M4 del panel posterior del WAX510D como se
muestra. Fije un cable de tierra verde/amarillo (18 AWG o más pequeño) al
panel posterior del WAX510D con el tornillo de conexión a tierra M4.
Fije el otro extremo del cable de tierra a una pared o en el suelo. Siga las
regulaciones e instrucciones de seguridad del país para realizar la
conexión a tierra del dispositivo. Un técnico cualificado debe confirmar que
el terminal protector de conexión a tierra del edificio es válido.
Retirez la vis de masse M4 du panneau arrière du WAX510D comme indiqué.
Fixez un câble de masse vert/jaune (18 AWG ou plus petit) au panneau
arrière du WAX510D à l'aide de la vis de mise à la terre M4.
Branchez l'autre extrémité du câble de mise à la terre à un mur ou au sol.
Suivez les règlements de votre pays et les consignes de sécurité pour
mettre l'appareil correctement électriquement à la terre. La validité de la
borne de mise à la terre de protection du bâtiment doit être confirmée par
un personnel qualifié.
Rimuovere la vite di terra M4 dal pannello posteriore del WAX510D come
mostrato. Fissare un cavo di terra verde/giallo (18 AWG o inferiore) al
pannello posteriore del WAX510D utilizzando la vite di terra M4.
Collegare l'altra estremità del cavo di messa a terra alla parete o alla terra.
Applicare le norme del proprio paese e le istruzioni di sicurezza per mettere
a terra elettricamente il dispositivo nel modo corretto. Il personale di
servizio qualificato deve assicurarsi che i morsetti di terra protettivi
dell'edificio siano corretto.
1
2
1
2
1
2
1
2
EN
ES
FR
1
2
DE
LOCK
OPEN
B
1-b
1-b
1-b
1-b
EN
ES
FR
DE
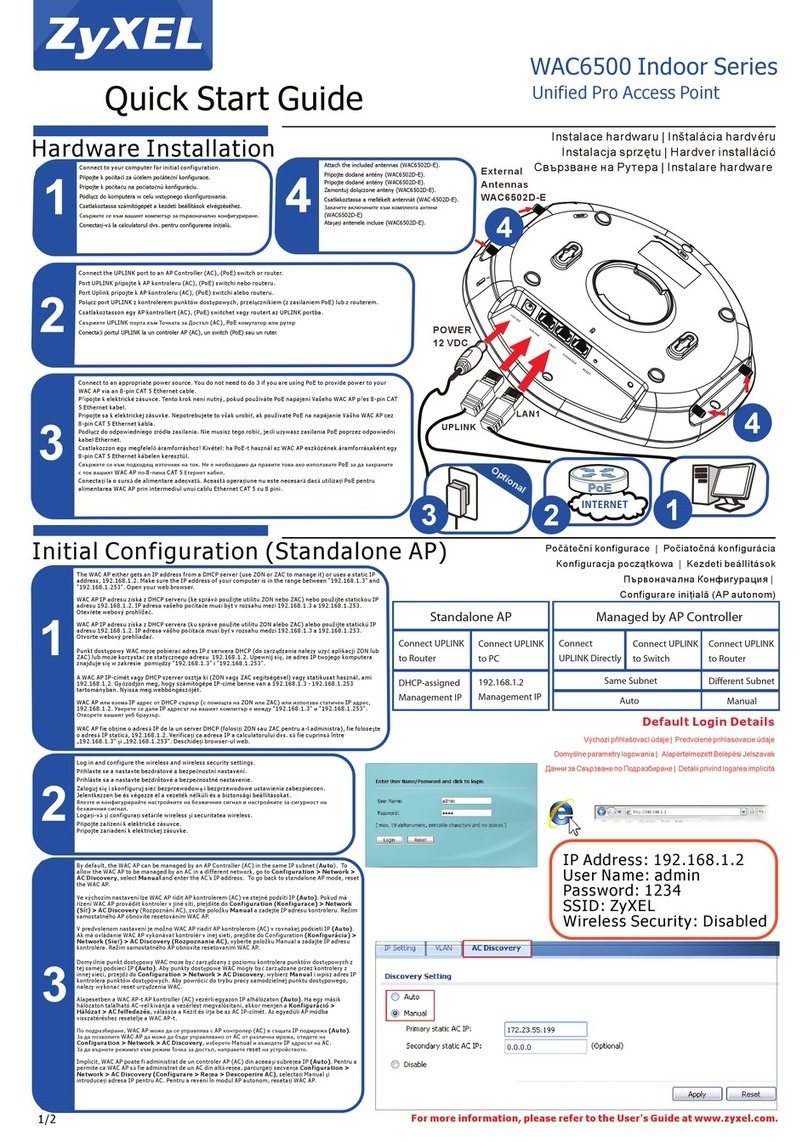
Use an Ethernet cable to connect your computer to the UPLINK port
of the WAX510D through a PoE injector or PoE switch.
Use its DHCP-assigned IP or default static IP address
"http://192.168.1.2" to access the web configurator. Make sure your
computer IP address is in the same subnet as the WAX510D's.
Verwenden Sie ein Ethernet-Kabel, um Ihren Computer über einen
PoE-Injektor oder einen PoE-Switch mit dem UPLINK Port des
WAX510D zu verbinden.
Verwenden Sie die vom DHCP-Server zugewiesene IP-Adresse oder
die statische Standard-IP-Adresse "http://192.168.1.2", um auf den
Web-Konfigurator zuzugreifen. Die IP-Adresse des Computers muss
sich im selben Subnetz befinden wie die des WAX510D.
Use un cable Ethernet para conectar su computadora al puerto
UPLINK de la WAX510D a través de un inyector PoE o un interruptor
PoE.
Utilice su IP DHCP asignada o una dirección IP estática
"http://192.168.1.2" para acceder al configurador web. Compruebe que
la dirección IP del ordenador esté en la misma subred que el
WAX510D.
Utilisez un câble Ethernet pour connecter votre ordinateur au port
UPLINK du WAX510D via un injecteur PoE ou un commutateur PoE.
Utilisez son IP DHCP attribuée ou l'adresse IP statique par défaut
"http://192.168.1.2" pour accéder au configurateur Web. Vérifiez que
l'adresse IP de votre ordinateur se trouve dans le même sous-réseau
que le WAX510D.
Utilizzare un cavo Ethernet per collegare il computer alla porta
UPLINK del WAX510D tramite un iniettore PoE o un interruttore PoE.
Usare l’IP DHCP assegnato o l’indirizzo IP statico predefinito
"http://192.168.1.2" per accedere al configuratore web. Assicurati che
l’indirizzo IP del computer si trovi nella stessa sottorete del WAX510D.
PoE injector
or
PoE switch
IT
IT
IT
IT
IT
IT
