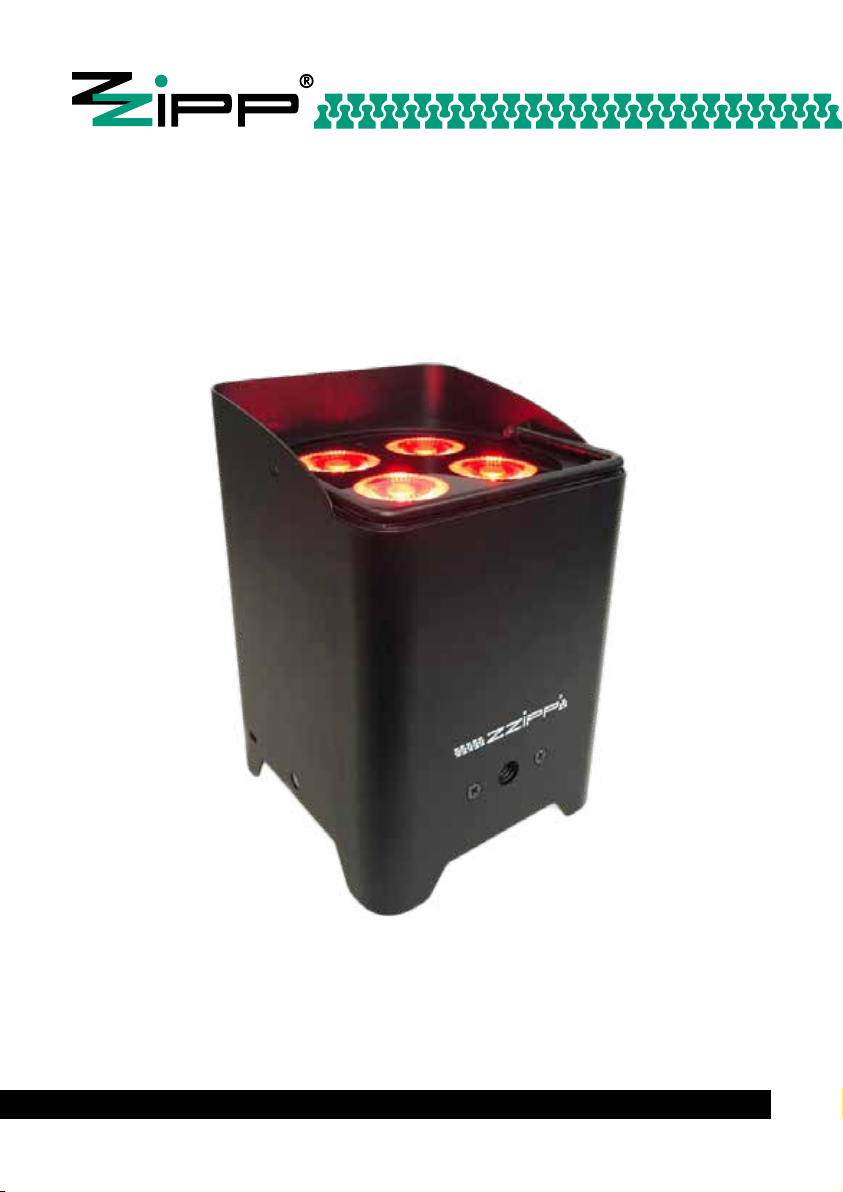
Zzipp ZZLUX410BAT User manual

ZZLUX410BAT
PAR RGBW A BATTERIA RICARICABILE
MANUALE D’USO USER MANUAL

2
Safety Instructions
This product guide contains important information
about the safe installation and use of this product.
Please read and follow these instructions careful-
ly and keep this manual in a safe place for future
reference.
When unpacking check there is no transportation
damage before using the product. In case of any
damage, consult your dealer and do not use the
apparatus.
The product is for indoor use only. Use only in dry
locations. Keep this device away from rain and moi-
sture, excessive heat, humidity and dust. Do not allow
contact with water or any other liquids. The product is
not designed or intended to be mounted directly on to
inflammable surfaces.
The product is only intended for installation, opera-
tion and maintenance by qualified personnel.
The product must be installed in a location with
adequate ventilation, at least 50cm from adjacent
wall surfaces. Be sure that no ventilation slots are
blocked.
Do not directly look into the led. It can cause harm
to your eyes. Do not look at the LEDs with a magni-
fying glass or any other optical instrument that may
concentrate the light output.
Do not attempt to dismantle and/or modify the pro-
duct in any way.
Electrical connection must only be carried out by
qualified personnel.
Before charging the fixture, ensure that the voltage
and frequency of power supply match the power
requirements of the product.
A rechargeable lithium ion battery is built inside this
fixture. Please avoid bumping or plunging, it may
cause fire or explosion. Never store the battery when
fully drained. Always recharge immediately when
empty. Make sure to fully charge all fixtures before
storing them. Partially charged batteries will lose
capacity. Fully recharge every 6 months if not used.
When charging fixtures in flight case, always charge
with the case open. It is recommended to charge at a
temperature between 0°C and 35°C.
Please make sure the battery will be disposed of
properly according to your local law when it runs out
of its life, to protect the environment.
This product is not designed for permanent opera-
tion. Consistent operation breaks will ensure that the
device will serve you for a long time without defects.
If this fixture is operated in any other way other than
the one said in this manual, this device may suffer
damages and thus the warranty becomes void.
Always switch off the fixture when it is not in use or
before cleaning it or before attempting any
maintenance work.
Istruzioni di sicurezza
Questa guida contiene informazioni importanti
sull’installazione e l’uso di questo prodotto. Si prega
di leggere e seguire attentamente queste istruzioni e
conservare questo manuale per riferimenti futuri.
Prima di utilizzare il prodotto, verificare che non vi
siano danni dovuti al trasporto. In tal caso, consultare
il rivenditore e non utilizzare l’apparecchio.
Il prodotto è solo per uso interno. Utilizzare solo in
luoghi asciutti. Tenere questo dispositivo lontano da
pioggia, umidità e calore eccessivo. Non permettere
il contatto con acqua o altri liquidi. Il prodotto non è
progettato o destinato a essere montato direttamente
su superfici infiammabili.
Il prodotto è destinato esclusivamente all’installazio-
ne, al funzionamento e alla manutenzione da parte di
personale qualificato.
Il prodotto deve essere installato in un luogo con
un’adeguata ventilazione, ad almeno 50 cm dalle
superfici. Assicurarsi che nessuna fessura di ventila-
zione sia bloccata.
Non guardare direttamente nel led e non avvicinare
lenti di ingrandimento per concentrarne l’emissione.
Non tentare di smontare e / o modificare il prodotto in
alcun modo.
Il collegamento elettrico deve essere eseguito esclu-
sivamente da personale qualificato.
Prima di caricare l’apparecchiatura, assicurarsi che
la tensione e la frequenza dell’alimentazione corri-
spondano ai requisiti di alimentazione del prodotto.
All’interno di questo apparecchio è integrata una
batteria ricaricabile agli ioni di litio. Si prega di evitare
di urtare o di bagnarla, potrebbe causare un incendio
o un’esplosione. Non riporre mai il prodotto quando
la batteria è completamente scarica. Assicurati di
caricare completamente tutti i proiettori prima di
riporli. Le batterie parzialmente cariche perderanno
capacità. Ricaricare completamente ogni 6 mesi se
non utilizzato.
Quando si caricano gli apparecchi in flightcase,
caricare sempre con l coperchio aperto. Si consiglia
di caricare a una temperatura compresa tra 0 ° C e
35 ° C.
Si prega di smaltire correttamente la batteria a fine
ciclo vitale, per proteggere l’ambiente.
Questo prodotto non è progettato per il funziona-
mento permanente. Le interruzioni di funzionamento
coerenti garantiranno che il dispositivo funzioni per
un lungo periodo senza difetti.
Se il dispositivo viene utilizzato in modo diverso da
quello indicato in questo manuale, ‘apparecchio
potrebbe risentirne, l’utilizzo improprio fa decadere
la garanzia.
Spegnere sempre l’apparecchio quando non è in uso
o prima di seguire la manutenzione ordinaria.

3
Product Overview
ZZLUX410BAT is a battery powered led luminaire with
wireless DMX receiver. This luminaire features 4 su-
per bright RGBW 4-in1 led, and can create unlimited
color changing effects and wide range of color
temperatures.
ZZLUX410BAT luminaire has a rechargeable lithium
battery that can support 5 hours working at led full
color mode. It can work longer time at ECO mode.
The luminaire can continue working 8 hours when
running its built-in programs and around 12 hours
if just run single color. Its battery is fully protected
against overcharging to maximize battery life span.
ZZLUX410BAT uses a very stable wireless DMX
receiver to ensure the best wireless DMX signal. The
fixtures are also fully compatible to infrared remote
control. The IR controller can operate all working
functions.
This highly compact luminaire can be used not only
as an uplighter but also as truss warmer. Its tilt can
manually move 25 degrees when needed. It is abso-
lutely an ideal tool for mobile DJ/Bands, wedding,
exhibitions, ball room and hotel banquet halls etc.
Fixture Elements
1. Led control panel
2. Wireless DMX Indicator
3. M8 hole for safety cord
4. Adjustable tilt support
5. Hole for laptop lock
6. Wireless DMX antenna
7. IR receiver (For remote controller)
8. M10 Threaded hole for clamp
Elementi del dispositivo
1. Pannello di controllo principale
2. Indicatore DMX wireless
3. Foro M8 per cavo di sicurezza
4. Supporto di inclinazione regolabile
5. Foro per blocco laptop
6. Antenna DMX wireless
7. Ricevitore IR (per il controllo dal telecomando)
8. Foro filettato M10 per morsetto
Panoramica del Prodotto
ZZLUX410BAT è un PAR led a batteria con ricevitore
DMX wireless. Questo apparecchio è dotato di 4 led
RGBW 4-in1 ad alta luminosità che possono creare
effetti di variazione del colore illimitati.
ZZLUX410BAT ha una batteria al litio ricaricabile in
grado di supportare 5 ore di lavoro in modalità full
color. Può funzionare più a lungo in modalità ECO.
L’apparecchio può funzionare fino a 8 ore in modalità
programmi integrati e circa 12 ore in modalità singolo
colore. La sua batteria è protetta contro il sovraccari-
co per massimizzarne la durata nel tempo.
ZZLUX410BAT utilizza un ricevitore DMX wireless
molto stabile per garantire le massime prestazioni.
Gli apparecchi sono inoltre dotati di telecomando a
infrarossi che permette di gestire l’apparecchio in
tutte le sue funzioni.
Questo apparecchio estremamente compatto e
versatile può essere usato sia come uplight che
come truss warmer. La sua inclinazione può ssere
variata manualmente fino a 25°. È assolutamente uno
strumento ideale per i dispositivi mobili DJ / gruppi
musicali, matrimoni, mostre, sale da ballo e sale per
banchetti di hotel, ecc.

4
1. Menu To select the programming functions
2. Up Scroll “UP” through the menu increase the
value of the current function
3. Down Scroll “DOWN” through the menu decrease
value of the current function
4. Enter Enter the current menu or confirm the cur-
rent function value
5. Charge Indicator
Yellow flashing – power less than 30%
Red – charge the battery
Green – battery fully charged
6. IR receiver (For receiving control from infrared
remote controller)
7. Wireless DMX Indicator
1. Menu Per selezionare le funzioni di programma-
zione
2. Su scorre l’elenco dei menu verso l’alto / per au-
mentare il valore della funzione corrente
3. Giù scorre l’elenco dei menu verso il basso / per
diminuire il valore della funzione corrente
4. Enter accedere al menu corrente o confermare il
valore della funzione corrente
5. Indicatore di carica
Giallo lampeggiante - inferiore al 30%,
Rosso - ricaricare la batteria
Verde - batteria completamente carica
6. Ricevitore IR (per ricevere il controllo dal teleco-
mando a infrarossi)
7. Indicatore DMX wireless
Display Comandi Display
Fixture connectors Connessioni

5
1. Ground
2. Battery Fuse F5A 250V
3. Power Switch
4. DMX Input
5. DMX Output
6. Fuse F3 15A 250V
7. Power input 100-240V AC 50/60Hz
8. Power output
9. Adjustable tilt support
1. Ground
2. Fusibile della batteria F5A 250V
3. Interruttore di accensione
4. DMX Input
5. DMX Output
6. Fusibile F3 15A 250V
7. Ingresso di alimentazione 100-240V AC 50/60Hz
8. Uscita di alimentazione
9. Supporto per inclinare il faro
Fixture Dimensions Dimensioni

6
Fixture Temperature
Storing the Fixture
Mounting
Battery
Temperatura del dispositivo
Stoccaggio del dispositivo
Montaggio del dispositivo
Batteria
The fixture has temperature protection function. You
can easily check fixture temperature via led
display menu.
When fixture temperature is higher than 65 degrees,
light output will decrease to 80%. When fixture
temperature is higher than 70 degrees, light output
will decrease to 60%. When fixture temperature is
higher than 75 degrees, leds will go off automatically
until temperature comes down to 55 degrees.
Make sure to fully charge all fixtures before storing
them. Partially charged batteries will lose capacity.
Fully recharge every 6 months if not used.
Always remove battery fuse if fixture will be stored for
long time (more than 1 month).
The fixture can be mounted in several orientations.
The fixture has a highly compact housing, and can be
fit inside 300x300mm truss as truss warmer.
The fixture can sit on even and solid floor and work
as an uplight. It also has a built-in adjustable tilt sup-
port. By pushing the tilt support, the fixture tilt can
move up to 25 degrees to wash walls or facades.
Make sure that the fixture is always placed on even
and strong enough surface, and keep it 0.5m away
from projected objects.
The fixture has a M10 threaded hold for clamp, and
can be mounted on truss as truss warmer.
When install the fixture to crossbar or truss, always
use an extra safety cord (not supplied with the
fixture). Users also need to make sure the crossbar is
stable or not moving, and can support a weight
of 35 kg (fixture net weight 3.3kg).
The fixture has a rechargeable lithium battery and
auto-ranging charger built in. Always store the fixtu-
res with full battery.
Battery runtime will decreased time by time,and may
be slightly shorter than predicted due to different
working enviroments.
To charge the fixture battery, plug the power cable
into a local main socket. The auto-ranging charger
has an input to 100-240V AC, 50/60Hz. A normal char-
ging time is about 4-5 hours.
When charging fixtures in flight case, make sure to
keep the case open.
L’apparecchio ha una batteria al litio ricaricabile e
un caricabatterie integrato. La durata della batteria
diminuirà di volta in volta l’autonomia potrebbe esse-
re leggermente inferiore a quella prevista a causa di
condizioni di lavoro diverse.
Per caricare la batteria, inserire il cavo di alimen-
tazione in una presa, il caricatore ha un ingresso a
100-240 V CA, 50/60 Hz. Un normale tempo di ricarica
è di circa 4-5 ore.
Quando si ricaricano le batterie utilizzando il
flightcase assicurarsi che il coperchio rimanga
aperto.
L’apparecchio può essere montato in diversi modi.
L’ alloggiamento è molto compatto e può essere mon-
tato all’interno di un traliccio da 300x300mm.
L’apparecchio può poggiare sul pavimento e fun-
zionare come un uplight. Ha anche un supporto di
inclinazione regolabile incorporato, che può arrivare
fino a 25 gradi per illuminare pareti o facciate.
Accertarsi che l’apparecchio sia sempre posizionato
su una superficie uniforme e resistente e tenerlo a
una distanza di 0,5 m dagli oggetti proiettati.
L’apparecchio ha una boccola filettata M10 per mor-
setti e può essere montato su traliccio.
Quando si installa l’apparecchiatura su traversa
o capriata, utilizzare sempre un cavo di sicurezza
aggiuntivo (non in dotazione). Gli utenti devono anche
assicurarsi che la barra trasversale sia stabile o non
in movimento e che possa supportare un peso
di 35 kg (peso netto del dispositivo 3,3 kg).
Assicurarsi di caricare completamente tutti i proiet-
tori prima di riporli. Le batterie parzialmente cariche
perderanno capacità.
Ricaricare completamente ogni 6 mesi se non si
utilizza.
Rimuovere sempre il fusibile della batteria se l’appa-
recchiatura verrà conservata per lungo tempo (più di
1 mese).
L’apparecchio ha una protezione termica.
È possibile controllare facilmente la temperatura del
faro tramite l’apposito menù.
Quando la temperatura del dispositivo è superiore
a 65°C, la potenza luminosa diminuirà fino all’80%.
Quando la temperatura è superiore a 70°C, l’emissio-
ne luminosa diminuirà al 60%.
Quando la temperatura del dispositivo è
superiore a 75°C , i led si spengono automaticamente
finchè la temperatura scende a 55°C.

7
Battery Fuse
Reset Fixture
Display Protection
Display Indications
Fusibile della batteria
Reset del dispositivo
Spegimento del Display
Segnalazioni del Display
The fixture battery fuse (5A) is removed during
transport for safety reasons. Before switching on your
fixture, please put back the fuse to fuse holder at the
bottom of the fixture.
To reset the fixture to factory default, press “Menu”
and “Enter” buttons at the same time, your fixture
will be reset to factory default immediately.
To clear fixture run time, please press the 4 buttons
at the same time.
Led display turns off automatically after 10 seconds.
Press “Menu” button to activate led display.
In MASTER/SLAVE mode:
When slave fixtures receive DMX signal, the red dot
will keep slow flashing;
When master fixture sends DMX signal, the red dot
will keep fast flashing.
Per ripristinare il dispositivo alle impostazioni
predefinite di fabbrica, premere i pulsanti “Menu”
e “Invio” contemporaneamente l’apparecchiatura
verrà ripristinata immediatamente. Per cancellare la
sequenza di runtime, premere il 4 pulsanti contem-
poraneamente.
Il display si spegne automaticamente dopo 10 secondi
per riattivarlo premere il pulsante “menu”.
In modalità MASTER/SLAVE:
i dispositivi (SLAVE) visualizzeranno sul display un
punto rosso lampeggiante a velocità lenta.
Quando il proiettore (MASTER) invia i comandi di
controllo, sul suo display comparirà un punto rosso
che lampeggia velocemente.
Per motivi di sicurezza durante il trasporto viene
rimosso il fusibile della batteria (5A). Prima di accen-
dere l’apparecchio si prega di reinstallare il fusibile.

8
Menù Navigation Struttura del Menù
Addr
CHAn
FAiL
CoLo
ProG
M-S
Ui Fi
uEr
HoUr
bAtt
ECo
tEMP
ir
d001
d512
4CH
6CH
1 1CH
HoLd
bLAC
AUto
rEd
GrEE
bLUE
uHit
StAt
FAdE
AUto
SoUn
Stro
SLAU
NASt
on
oFF
CLEA
u2.10
0000
C 100
on
oFF
t000
on
oFF
0-255
0-255
0-255
0-255
Co0 1 - Co25
FA0 1 - FA05
SP0 1 - SP09
SE0 1 - SE09
St00 - St 10
Set the DMX address
from 001 to 512
Set the number of DMX channels
Which device should use
4, 6 or 11 channels.
Fixture will go to this running
mode automatically in case
DMX signal fails:
Hold on current mode, Black out,
Auto Run
Manual configuration of indivi-
dual colors from 0 to 255
Firmware version
Fixture run time hh:mm
Battery Level
Fixture Temperature
IR remote control attivation Attivazione del telecomando IR
Temperatura della lampada
Livello di carica della batteria
Tempo di lavoro hh:mm
Versione Firmware
Set the MASTER/SLAVE function
Only works with wired lights
Set the wireless DMX ON/OFF
Erase wireless DMX association
Press ENTER for 5sec
Attiva/disattiva il wireless DMX
Cancella l’associazione DMX
wireless.
Premere ENTER per 5sec
Imposta la funzione MASTER/
SLAVE. Funziona solamente coi
fari cablati tramite cavo DMX
Static Color from 1 to 25
Fading
Speed from slow to fast
Mic sensitivity from high to low
Strobe from slow to fast
Colori statici da 1 a 25
Dissolvenze da 1 a 5
Velocità del cambio colori auto
Sensibilità microfono
Strobo da lento a veloce
Configurazione manuale dei
singoli colori da 0 a 255
Imposta il comportamento che
deve mantenere il faro in caso di
perdita segnale DMX:
Modo corrente, Black out,
Auto Run
Impostazione dell’indirizzo DMX
da 001 a 512
Imposta il numero di canali DMX
Che il dispositivo deve utilizzare
4, 6 o 11 canali.

9
Struttura del Menù DMX Addressing
DMX Requirements
Indirizzamento DMX
Specifiche DMX
Each fixture must be given a DMX address so that
the correct fixture responds to the correct control
signals.
This DMX address is the channel number from which
the fixture starts to “listen” to the digital control
information being sent out from the controller.
This fixture has 3 DMX channel modes, 4, 6 and 11
DMX channel.
To set up fixture DMX starting address, follow the
steps below:
- Switch on the fixture, or press “Menu” and scroll
up/down till appears:
CHAn;
- Press “Enter”, and “Up” or “Down” button to select
4CH or 6CH or 11CH;
- Press “Enter” to confirm your select.
- Press “Menu” repeatedly to come back to:
Addr
- Press “Enter” again to set up DMX address by scrol-
ling “Up”/” Down” button.
- Press “Enter” to save your setting.
Ad ogni apparecchiatura deve essere assegnato un
indirizzo DMX in modo che risponda ai segnali inviati
dal controller.
Questo indirizzo DMX è il numero del canale da cui il
proiettore inizia ad “ascoltare” il controllo digitale
inviatogli.
Questo dispositivo ha 3 modalità DMX:
4, 6 e 11 canali.
Per impostare l’indirizzo DMX del dispositivo,
segui i passaggi seguenti:
- Accendere l’apparecchio, premere “Menu” e scorre-
re su / giù fino al menù:
CHAn
- Premere “Enter” e “Up” o “Down” per selezionare
4CH o 6CH o 11 CH;
- Premere “Invio” per confermare la selezione.
- Premere ripetutamente “Menu” per tornare a:
Addr
- Premere di nuovo “Invio” per impostare l’indirizzo
DMX scorrendo il pulsante “Su” / “Giù”.
- Premere “Invio” per salvare le impostazioni.
Questo dispositivo può essere controllato tramite il
protocollo standard DMX-512. È necessario utilizzare
un connettore XLR standard a 3 pin
per l’input e l’output dei dati.
Assicurarsi di utilizzare un cavo schermato a due
conduttori standard. Il cavo DMX deve essere collega-
to in serie e non può essere diviso.
Per garantire una corretta trasmissione dei dati DMX,
quando si utilizzano diversi dispositivi DMX, provare
a utilizzare il percorso del cavo più corto. L’ordine in
cui le fixture sono collegate in una catena DMX non
influenza l’indirizzamento.
Per esempio, una fixture assegnata a un indirizzo
DMX 1 può essere posizionata ovunque nella linea,
all’inizio, alla fine, o ovunque nel mezzo.
Quando a un proiettore viene assegnato un indirizzo
DMX, il controller DMX lo riconosce e invia i DATI
assegnati all’indirizzo di quella apparecchiatura, in-
dipendentemente da dove è posizionata nella catena
DMX. Per evitare comportamenti irregolari a causa
del rumore elettrico è buona norma terminare la
catena DMX con una resistenza da 120Ω.
Il terminatore è semplicemente un connettore XLR
maschio con una resistenza da 120Ω collegata tra i
pin 2 e 3.
This device can be controlled using the standard
DMX-512 protocol. A standard 3-pin XLR connector
must be used
for data input and output.
Be sure to use a standard shielded two-wire cable.
The DMX cable must be daisy-chained and cannot
to be divided.
To ensure correct transmission of DMX data, when
using different DMX devices, try using the shortest
cable path. The order in which the fixtures are con-
nected in a DMX chain does not affect the addressing.
For example, a fixture assigned to a DMX address 1
can be placed anywhere in the line, at the beginning,
at the end,
or anywhere in the middle.
When a DMX address is assigned to a projector, the
DMX controller recognizes it and sends the DATA
assigned to that device’s address, regardless of whe-
re it is located in the DMX chain. To avoid irregular
behavior due to electrical noise, it is good practice to
terminate the DMX chain with a 120Ω resistance.
The terminator is simply a male XLR connector with a
120Ω resistor connected between pins 2 and 3.

10
DMX Control Mode Tabella Controlli DMX
Channel Mode Channel Function Value
4 Channels
1 Red 0-255
2 Green 0-255
3 Blue 0-255
4 White 0-255
6 Channels
1 Red 0-255
2 Green 0-255
3 Blue 0-255
4 White 0-255
5 Dimmer 0-255
6 Strobe 0-10 no function
11-255 Slow to Fast
11 Channels
1 Red 0-255
2 Green 0-255
3 Blue 0-255
4 White 0-255
5 Dimmer 0-255
6 Strobe 0-10 no function
11-255 Slow to fast
7Color macro TAB.2
8White color Temp. TAB.3
9Preset programs TAB.4
10 Speed 0-255 Slow to Fast
11 Sound Control 0-9 no function
10-255 Sound

11
TAB.2
Color macro
0-10 No function
11-30 R: 100% G: 0-100% B: 0
31-50 R: 100%-0 G: 100% B: 0
51-70 R: 0 G: 100% B: 0-100%
71-90 R: 0 G: 100%-0 B: 100%
91-110 R: 0-100% G: 0 B: 100%
111-130 R: 100% G: 0 B: 100%-0
131-150 R: 100% G: 0-100% B: 0-100%
151-170 R: 100%-0 G: 100%-0 B: 0-100%
171-200 R: 100% G: 100% B: 100%
201-205 White 1
206-210 White 2
211-215 White 3
216-220 White 4
221-225 White 5
226-230 White 6
231-235 White 7
236-240 White 8
241-245 White 9
246-250 White 10
251-255 White 11
White Color
Temperature
0-5 No function
6-25 R: 255 G: 215 B: 076 W: 251
26-50 R: 255 G: 236 B: 095 W: 252
51-75 R: 249 G: 249 B: 108 W: 253
76-100 R: 229 G: 255 B: 125 W: 239
101-125 R: 197 G: 242 B: 133 W: 207
126-150 R: 187 G: 235 B: 136 W: 191
151-175 R: 169 G: 236 B: 148 W: 207
176-200 R: 168 G: 240 B: 156 W: 204
201-225 R: 167 G: 244 B: 165 W: 201
226-250 R: 167 G: 255 B: 183 W: 192
251-255 No function
TAB.3

12
TAB.4
Preset programs
0-10 No function
11-40 RGB Fading
41-70 CMY Fading
71-100 RGBW Fading
101-130 RGBWCMY fading
131-160 RGB Color changing
161-190 CMY Color changing
191-220 RGBW Color changing
221-255 RGBWCMY Color changing
Master/Slave Mode Modo Master/Slave
Through the connection via XLR cable it is possible to
operate the headlights in MASTER / SLAVE mode.
In this mode a lighthouse will function as the main
device and the other lights of the chain will follow its
behavior in sync.
First connect the headlights with 3-pin XLR cables
(not included in the package).
To set up a master device:
Scroll the menu to the item:
M-S
and press ENTER, then select
NASt
and press ENTER to confirm.
To set up a slave device:
Scroll the menu to the item:
M-S
and press ENTER, then select
SLAU
and press ENTER to confirm.
At this point, by acting on the master device, all the
others will follow this behavior synchronously.
The master device can be set to single color, fade,
auto run, sound control and strobe.
Tramite il collegamento via cavo XLR è possibile fare
operare i fari in modalità MASTER/SLAVE.
In questa modalità un faro funzionerà come dispositi-
vo principale e gli altri fari della catena seguiranno in
sincronia il suo comportamento.
Per prima cosa collegare tra di loro i fari con cavi XLR
a 3 pin (non inclusi nella confezione).
Per impostare un dispositivo master:
Scorrere il menù fino alla voce:
M-S
e premere ENTER, a questo punto selezionare
NASt
e premere ENTER per confermare.
Per impostare un dispositivo slave:
Scorrere il menù fino alla voce:
M-S
e premere ENTER, a questo punto selezionare
SLAU
e premere ENTER per confermare.
A questo punto agendo sul dispositivo master tutti gli
altri seguiranno il comportamento di questo in modo
sincrono.
L’apparecchio master può essere impostato su colore
singolo, dissolvenza, auto run, sound control e strobo.

13
Auto Run Mode
Fade Mode
Sound Activated Mode
Modo Auto Run
Modo Dissolvenza
Modo Attivato dal suono
This device has preset color mixing programs.
To activate automatic color change:
Press Menu until the entry:
ProG
and press ENTER, scroll up the menu with the UP key
until:
AUto
and press ENTER, scroll up or down with the UP /
DOWN keys to select the desired color change speed,
press ENTER again to confirm.
This device has preset color mixing programs in
fading
To activate automatic color fading change:
Press Menu until the entry:
ProG
and press ENTER, scroll up the menu with the UP key
until:
FAdE
and press ENTER, scroll up or down with the UP /
DOWN keys to select the desired fade type, press
ENTER again to confirm, at this point we set the fade
speed:
SP0 1
press ENTER again to confirm.
In this operating mode the beacon will activate and
perform a color change to the rhythm of the music.
To activate color change in time to music:
Press Menu until the entry:
ProG
and press ENTER, scroll up the menu with the UP key
until:
SoUn
and press ENTER, scroll up or down with the UP /
DOWN keys to select the sensitivity of the internal
microphone that controls the color changes.
SE0 1
Microphone with maximum sensitivity (even a low
volume of music makes the colors vary).
SE0 9
Microphone at minimum sensitivity (only the most
powerful sounds make the colors vary).
Questo disposittivo ha dei programmi preimpostati di
cambio colore.
Per attivare il cambio colore automatico:
Premere Menù fino alla voce:
ProG
e premere ENTER, scorrere verso l’alto il menu’ con il
tasto UP fino a:
AUto
e premere ENTER, scorrere in alto o in basso con i
tasti UP/DOWN per selezionare la velocità di cambio
colore desiderata, premere nuovamente ENTER per
confermare.
Questo disposittivo ha dei programmi preimpostati di
miscelazione colore in dissolvenza
Per attivare il cambio colore automatico in dissolvenza:
Premere Menù fino alla voce:
ProG
e premere ENTER, scorrere verso l’alto il menu’ con il
tasto UP fino a:
FAdE
e premere ENTER, scorrere in alto o in basso con i
tasti UP/DOWN per selezionare il tipo di dissolvenza
desiderato, premere nuovamente ENTER per con-
fermare, a questo punto impostiamo la velocità della
dissolvenza:
SP0 1
premere ancora una volta ENTER per confermare.
In questa modalità operativa il faro si attiverà ed
eseguirà un cambio colore a ritmo di musica.
Per attivare il cambio colore a tempo di musica:
Premere Menù fino alla voce:
ProG
e premere ENTER, scorrere verso l’alto il menu’ con il
tasto UP fino a:
SoUn
e premere ENTER, scorrere in alto o in basso con
i tasti UP/DOWN per selezionare la sensibilità del
microfono interno che va a comandare i cambi colore.
SE0 1
Microfono al massimo della sensibilità (anche un
volume basso della musica fa variare i colori).
SE0 9
Microfono al minimo della sensibilità (solo i suoni più
potenti fanno variare i colori).

14
Wireless DMX operation Modalità Wireless DMX
This device can be controlled via the wireless DMX
system.
The available controllers are:
ZZDMXLINK200
ZZDMXLINK400
First the transmitter must be associated with the
headlights.
The status of the wireless DMX is indicated by a led
below the headlight control display.
Yellow light on:
Device coupled to the transmitter and which receives
the DMX wireless signal.
Yellow light flashing slowly:
Device coupled to the transmitter but does not receive
control signals.
Yellow light that flashes quickly:
Device not coupled to the transmitter, keeps the
memory of the last coupling.
Yellow light off:
Unpaired device and no memory of previous con-
nections.
Coupling with Transmitter
Turn on the headlight press the menu button until the
display shows:
Ui Fi
press ENTER and press the UP / DOWN buttons
until you see:
on
press ENTER again to confirm.
In this way we have enabled wireless DMX reception
on the lighthouse.
Turn on the transmitter and press the PAIRING
button.
The headlight status LED flashes for 5 sec and then
lights up yellow to indicate correct pairing and recep-
tion of wireless DMX signal.
Decoupling from the transmitter
Press the menu key until the display shows:
Ui Fi
press ENTER and press the UP / DOWN buttons
until you see:
CLEA
press enter for 5 seconds, the LED goes off to indica-
te the correct decoupling with the transmitter.
After switching on, if there is no new transmitter, the
light will connect to the old transmitter automatically,
there is no need to re-pair it.
Questo dispositivo può essere controllato tramite il
sistema DMX wireless.
I controller disponibili sono:
ZZDMXLINK200
ZZDMXLINK400
Per prima cosa il trasmettitore va associato ai fari.
Lo stato del DMX wireless è indicato da un led posto
sotto al display di controllo dei fari.
Luce gialla accesa fissa:
Apparecchio accoppiato al tramettitore e che riceve il
segnale wireless DMX.
Luce gialla che lampeggia lentamente:
Apparecchio accoppiato al trasmettitore ma non
riceve segnali di controllo.
Luce gialla che lampeggia velocemente:
Apparecchio non accoppiato al trasmettitore, mantie-
ne memoria dell’ultimo accoppiamento.
Luce gialla spenta:
Apparecchio non accoppiato e nessuna memoria di
precedenti connessioni.
Accoppiamento con Trasmettitore
Accendere il faro premere il tasto menù fino a visua-
lizzare sul display:
Ui Fi
premere ENTER e premere i pulsanti UP/DOWN
fino a visualizzare:
on
premere nuovamente ENTER per confermare.
In questo modo abbiamo attivato la ricezione wireless
DMX sul faro.
Accendere il trasmettitore e premere il tasto
PAIRING.
Il led di stato del faro lampeggia per 5 sec e poi si
accende di colore giallo ad indicare il corretto accop-
piamento e la ricezione di segnale wireless DMX.
Disaccoppiamento dal trasmettitore
Premere il tasto menù fino a visualizzare sul display:
Ui Fi
premere ENTER e premere i pulsanti UP/DOWN
fino a visualizzare:
CLEA
premere enter per 5 secondi, il led si spegne ad indi-
care il corretto disaccoppiamento con il trasmettitore.
Dopo l’accensione, se non c’è un nuovo trasmettitore,
il faro si collegherà al vecchio trasmettitore automati-
camente, non c’è bisogno di ri-accoppiarlo.

15
Remote Control Telecomando
1 - Activation / blackout button.
2 - UP / DOWN keys to increase or decrease the
selected functions.
3 - Activation of the automatic mode.
4 - Activation of the sound mode, use the arrow
buttons to increase or decrease the sensitivity to the
sound.
5 - Strobe mode activation, use the arrow buttons to
increase or decrease the pulsation speed.
6 - Set the speed for auto and fade modes, use the
arrow buttons to increase or decrease the values.
7 - Set the equipment in MASTER or SLAVE mode.
8 - Activate the fade mode, press the speed button
and then the arrow keys to change the speed.
9 - Set the DMX address of the device, use the arrow
buttons to increase or decrease the address. Press
again to set DMX mode 4, 6 or 11 channels.
10 - Set the device to its maximum brightness.
11 - Activates eco mode (the battery lasts about 30
minutes more using this mode).
12 - Keys for setting static colors, selecting a color
and using the arrow keys you can control the intensity
of the single color. The Amber and Uv keys are not
active.
To activate remote control press the menu button
until displaying:
ir
press ENTER and press the UP / DOWN buttons until
the display shows:
on
Confirm with ENTER
Per attivare il controllo da telecomando premere il
pulsante menù fino a visualizzare:
ir
premere ENTER e agire sui pulsanti UP/DOWN fino a
visualizzare sul display:
on
Confermare con ENTER
1 - Pulsante di attivazione / blackout.
2 - Tasti UP/DOWN per incrementare o diminuire le
funzioni selezionate.
3 - Attivazione della modalità automatica.
4 - Attivazione della modalità sound, agire sui pulsan-
ti freccia per aumentare o diminuire la sensibilità al
suono.
5 - Attivazione della modalità strobo, agire sui pul-
santi freccia per aumentare o diminuire la velocità
della pulsazione.
6 - Imposta la velocità per le modalità auto e fade,
agire sui pulsanti freccia per aumentare o diminuire
i valori.
7 - Imposta l’apparecchiatura in modalità MASTER o
SLAVE.
8 - Attiva la modalità dissolvenza, agire sul pulsante
speed e successivamente sui tasti freccia per variare
la velocità.
9 - Imposta l’indirizzo DMX dell’apparecchio agire
sui pulsanti freccia per incrementare o diminuire
l’indirizzo. Premendo nuovamente si va ad impostare
la modalità DMX 4, 6 o 11 canali.
10 - Imposta il dispositivo al massimo della sua
luminosità.
11 - Attiva l’eco mode (la batteria dura circa 30 min in
più utilizzando questa modalità).
12 - Tasti di impostazione dei colori statici, selezio-
nando un colore e agendo sui tasti freccia si puo’
controllare l’intensità del singolo colore. I tasti Amber
e Uv non sono attivi.
Per abilitare la ricezione del teleco-
mando sul singolo faro premere il
tasto M/S.
Una volta abilitato, il telecomando
potrà gestire le varie funzioni del faro.
Vedere di seguito il dettaglio:
To enable the remote transmission
push the M/S button.
When trasmission is on you can use
the remote for the following function:

16
Maintenance
Specifications
Manutenzione
Specifiche
Periodically check that the mechanical part and the
electrical part are in good condition.
Check that the luminous flux emission lenses are
always clean, if necessary use a soft cloth with glass
cleaner to clean them. During maintenance discon-
nect the power supply, use a vacuum cleaner or
compressed air to remove the dirt that has deposited
inside the body.
Replacing the fuse
The appliance is equipped with 2 fuses:
one of 3.15A power 250V
and one on the 5A 250V battery
For safety reasons during transport the fuse on the
battery has been removed, remember to check the
presence of the fuse before starting to use the light.
If the fuse is replaced, use one with the same cha-
racteristics as the old one.
Power supply: 100-240V AC 50 / 60Hz
Power consumption: 45W
Type of battery: Rechargeable lithium 2600mA 5.2Ah
Charging time: About 5 hours
Duration: 4 hours Full Color
4.5 hours Full Color in eco mode
8 hours with preset
12 hours with single color
Source: 4 x 10W RGBW 4 in 1 LED
Issue: 15 °
Average life: 50000 hours
Controls: DMX, Master / Slave, Sound, IR,
Wireless DMX (sweden solution)
DMX channels: 4, 6, 11
Shell: Metal
Colour: Black
Dimensions: 138 x 144 x 204mm
Weight: 3.3Kg
Operating temperature: -10 ° C - 40 ° C
IP protection: IP20
Passive fanless dissipation, it does not produce any
noise during operation.
Controllare periodicamente che la parte meccanica e
la parte elettrica siano in buono stato.
Controllare che le lenti di emissione del flusso lumi-
noso siano sempre pulite eventualmente utilizzare
un panno morbido con del detergente per vetri per
pulirle. Durante la manutenzione scollegare l’alimen-
tazione, utilizzare un aspirapolvere o aria compressa
per rimuovere lo sporco che si fosse depositato
all’interno della scocca.
Sostituzione del fusibile
L’apparecchio è dotato di 2 fusibili:
uno di potenza 3.15A 250V
e uno sulla batteria 5A 250V
Per motivi di sicurezza durante il trasporto il fusibile
sulla batteria è stato rimosso, ricordarsi di con-
trollare la presenza del fusibile prima di iniziare ad
utilizzare il faro.
Nel caso di sostituzione del fusibile utilizzarne uno
con le stesse caratteristiche di quello vecchio.
Alimentazione: 100-240V AC 50/60Hz
Consumo: 45W
Tipo di batteria: Ricaricabile al litio 2600mA 5.2Ah
Tempo di ricarica: Circa 5 ore
Durata: 4 ore Full Color
4.5 ore Full Color in eco mode
8 ore con preset
12 ore con singolo colore
Sorgente: 4 x 10W RGBW LED 4 in 1
Emissione: 15°
Vita media: 50000 ore
Controlli: DMX, Master/Slave, Sound, IR,
Wireless DMX (sweden solution)
Canali DMX: 4, 6, 11
Scocca: Metallo
Colore: Nero
Dimensioni: 138 x 144 x 204mm
Peso: 3.3Kg
Temp. di esercizio: -10°C - 40°C
Protezione IP: IP20
Dissipazione passiva senza ventole, non produce
alcun rumore durante il funzionamento.

The declaration of conformity in the form
complete can be found at the company:
Zzipp Group S.p.a.
or available online at the site:
zzippgroup.com
Consult the competent authorities for informa-
tion on authorizations or possible restrictions
before using the device.
Zzipp Group S.p.a.
Via Caldevigo 23/d, 35042 Este (PD)
Tel. +39 0429 617888
zzippgroup.com
La dichiarazione di conformità in forma com-
pleta è reperibile presso la società:
Zzipp Group S.p.a.
o disponibile on line al sito:
zzippgroup.com
Consultare le autorità competenti per infor-
mazioni su autorizzazioni o possibili restrizioni
prima di usare il dispositivo.
Table of contents
Other Zzipp Lighting Equipment manuals
Popular Lighting Equipment manuals by other brands

ABD Lighting
ABD Lighting ABD-LO9A user manual

TRADINGZONE
TRADINGZONE Stehlampe Free MPP-SEN installation manual

Chauvet Professional
Chauvet Professional PVP S5 user manual

olympia electronics
olympia electronics OLY-1004/LT/WP installation instructions

thomann
thomann STAIRVILLE LED Vintage Bowl 50 RGBA user manual

Storz
Storz 11301 DE instruction manual