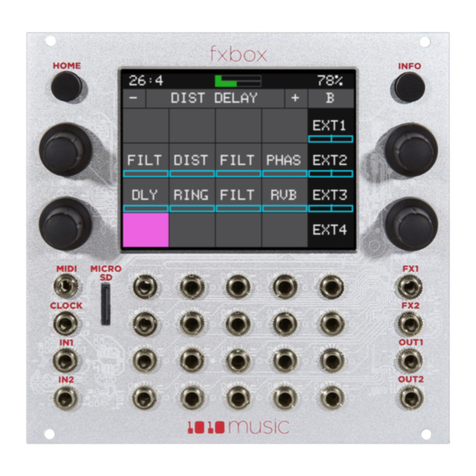
1010music Fxbox v 2.0 User manual

P. 1Fxbox 2.0 User Manual 1/22/19
3:54 PM
v. 2.0 Copyright ©1010music LLC 2019
Fxbox v 2.0 User Manual

P. 2Fxbox 2.0 User Manual 1/22/19
3:54 PM
v. 2.0 Copyright ©1010music LLC 2019
Welcome' 4!
Overview' 5!
Front&Panel&Overview& 5!
Main&Screen&Overview& 6!
Setup'Fxbox' 7!
Choose&an&Orientation& 7!
Rack&Installation& 7!
Connect&an&Input& 8!
Connect&an&Output& 8!
General&Module&Settings& 8!
Working&in&Flipped&Mode& 9!
Effects'Chains'10!
Configure&Inputs&for&Effects&Chains&and&Select&a&Chain&10!
Working'with'Effects'11!
Momentarily&Apply&an&Effect&11!
Trigger&an&Effect&via&Control&Voltage&Signal&11!
Trigger&an&Effect&via&MIDI&Input&11!
Set&an&Effect&to&be&Always&On&12!
Add&or&Change&An&Effect&on&the&Grid&12!
Edit&the&Parameters&of&an&Effect&12!
Use&the&XY&Pad&to&Control&Parameters&12!
Bypass&Effects&13!
Effect&Parameters&13!
Visually&Monitor&the&Effects&16!
Working'with'Presets'17!
Select&a&Preset&17!
Save&a&Preset&17!
Create&a&New&Preset&17!
Rename&a&Preset&18!
Delete&a&Preset&18!
Working'with'the'Step'Sequencer'19!
Start&and&Configure&the&Step&Sequencer&19!
Sequence&an&Effect&19!
Using'External'Signals'to'Modulate'Effects'and'Synchronize'with'Clocks'20!
Use&Control&Voltage&to&Modulate&Effects&20!
Synchronize&the&Effects&to&an&External&Timing&Input&20!
Updating'and'Swapping'Firmware,'Audio'Files'and'Presets'21!
Switch&to&a&New&MicroSD&Card&While&Operating&Fxbox&21!
Backup&Your&Preset&Files&21!
Install&New&Firmware&21!
Reset&fxbox&Presets&to&Factory&Settings&21!
Stay'Up'To'Date'22!
Demonstration&Videos&and&Latest&Docs&22!

P. 3Fxbox 2.0 User Manual 1/22/19
3:54 PM
v. 2.0 Copyright ©1010music LLC 2019
Connect&with&the&1010music&Community&22!
Contact&Us&22!

P. 4Fxbox 2.0 User Manual 1/22/19
3:54 PM
v. 2.0 Copyright ©1010music LLC 2019
Welcome
Welcome to the fxbox 2.0 User Manual. One of the core aspects of creating music with the Eurorack system is tweaking the
sound. Our fxbox module provides numerous audio processing effects together with a configurable effects engine that
enable you to customize the sound in a nearly endless number of combinations.
Fxbox 2.0 provides 16 performance effects with the ability to create two separate chains of stereo effects that feed two pairs
of stereo outputs. You can choose which inputs and effects to include in each chain and the order in which the effects are
applied. You can further tweak each effect by adjusting effect parameters using knobs or on screen X-Y Controls.
In this manual, we will start by giving you an overview of the front panel hardware and the Main screen so you know what
you have to work with. After that, we will set up the module. Next we will quickly discuss basic effects chain management,
effects parameters, muting capabilities and basic preset management. Then we will walk you through how to use the
sequencers and modulators. After that we will cover how to synchronize fxbox with other modules. Finally, we will go into
more depth about preset management tasks and discuss how to upgrade or swap out your firmware.
Fxbox is part of the Series 1 family of 1010music Eurorack modules. This means that you can swap out the firmware on this
module for other Series 1 firmware, currently bitbox and synthbox. Only one set of firmware can be run at a time, but you
are free to swap out firmware as often as you like.
If you would rather get a quick overview of how to use the module, see the Fxbox Quick Start Guide that came with the
module and that is also available online at https://1010music.com/fxbox-documentation.
This manual documents the functionality available in version 2.0 of fxbox. If you have an earlier version of the fxbox
firmware, you can upgrade for free. See Updating and Swapping Firmware, Audio Files and Presets below for the steps to
upgrade. To determine which version of the firmware you are running, press and hold the Home button until you see the
Menu screen shown on the right. The number in the lower right corner is the current version. The screen shot shows
version 2.0.3.
Figure 1: Menu Screen

P. 5Fxbox 2.0 User Manual 1/22/19
3:54 PM
v. 2.0 Copyright ©1010music LLC 2019
Overview
Fxbox is a highly flexible effects processor with an intuitive touch screen interface. You select the combination of effects you
want by choosing which effect is used in each of the 16 effects cells per preset chain. You configure the effects by setting
values for effect parameters, including configuring external modulation of many parameters. There are 2 effects chains per
preset, and you control the routing of the two audio inputs into each of the chains and their respective stereo outputs. Use
the XY pad to control two different aspects of the sound at once. Use the internal step sequencer to create tricked out,
remix style effects. You can create complex layers and builds using the touch screen to isolate the individual effects.
Front Panel Overview
The front panel of fxbox contains a touch screen, control knobs, HOME and INFO buttons, MIDI and CLOCK input jacks,
CV Trigger input jacks, CV Modulator jacks, and 2 pairs of stereo Output Jacks as shown in Figure 1. The jacks in the
right column of CV Triggers serve double duty as EXT5 through EXT8 for use in CV modulation. The INFO and HOME
buttons at the top of the front panel of fxbox are used to navigate the screens. Press INFO to view the information screen
for the current selection. In some cases, you can press INFO more than once to get to deeper information. The HOME
button generally takes you back a screen. If you get lost, you can press HOME until you get back to the Main screen.
The control knobs are used to cycle through options on the screen. When there are several parameters on the screen, use
the control knob closest to a parameter to set its value. You can use the touch screen to select effect cells in the grid, and
touch on-screen buttons to take an action. You can also drag your finger across the screen to use XY positioning to control
effects.
Figure 2: Front Panel Overview

P. 6Fxbox 2.0 User Manual 1/22/19
3:54 PM
v. 2.0 Copyright ©1010music LLC 2019
Main Screen Overview
The fxbox Main screen shows a grid of up to 16 effects that have been selected for the current effects chain. The effects are
applied by the signal processing chain in the order displayed in the grid, starting in the top left corner and moving from left
to right, and top to bottom. Each grid square will show a blue bar across the bottom when that effect is active. The name
above the grid is the name of the currently selected preset. Touch the +and –icons on either side of the preset name to
navigate through the list of presets in alphabetical order, or touch the name of the preset to scroll through the list of presets
and access other preset management features.
The Aor Bbutton to the right of the preset name indicates which effects chain is currently displayed. Touch this letter to
access the Chain Management screen to switch to the other chain or to configure the inputs to the chains. Above the preset
name, in the top left corner is the running clock in the format measure:beat. Reset the measure counter by powering down
the module, stopping the CV clock input for a few seconds, or sending a MIDI Start signal.
To the right of the clock display you will see a bar graph and a percentage. The bar graph represents the levels of the
incoming audio signals: the top bar represents In1, and the bottom bar is In2. When this graph turns red, the signal is
overdriving the system and could result in clipping. The percentage number represents the current processor usage. Fxbox
gives you a lot of flexibility in choosing how to combine the effects to get the sound you want. However, some combinations
could start to overdrive the processor. If this percentage approaches or exceeds 100%, you should consider disabling one or
more effects in order to avoid potential audio glitches.
Down the right side of the Main screen there are three boxes that correspond to the top three external inputs that can be
used as modulation signals. The blue bar at the bottom of these cells shows the current state of the CV input, with 0V at the
middle of the graph. Below these external modulator cells is the Play button that controls the effects sequencer. The CV
input associated with the Play button can be used to trigger playback and can be used as EXT4 for modulation. The CV
inputs for the column of cells just to the left of the EXT1-3 and Play buttons can also be used as modulation signals.
Figure 3: Main Screen Overview

P. 7Fxbox 2.0 User Manual 1/22/19
3:54 PM
v. 2.0 Copyright ©1010music LLC 2019
Setup Fxbox
In this section we will discuss how to install the fxbox module in a Eurorack, insert the microSD card, and configure some
general settings.
Choose an Orientation
Fxbox can be configured so that the user interface will be right side up with either the touchscreen at the top of the module,
or at the bottom. We originally designed the module to run with the touchscreen on the top of the module, and the text on
the faceplate right side up. If you are running the module in a tabletop skiff and want to be able to access the touchscreen
without reaching over the cables, install the module with the touchscreen at the bottom. That means the text on the front
panel will be upside down. (You can purchase a flipped faceplate on our website.) Think about how you want to use the
module and decide on the orientation that will work for your setup. We will talk about how to flip the user interface when we
configure the general module settings.
Note:
•When the user interface is flipped, the alignment of the knobs will be slightly higher than the on screen elements
that they control. However, the general orientation mapping will be correct.
Rack Installation
Fxbox is compatible with a Eurorack that has a +12V power connection and uses the
standard 16-pin ribbon cable to connect to the rack. You should always power down the
Eurorack when connecting new modules. Remove fxbox from the packing material and
attach the ribbon cable to the back of the module. The cable is the same on both ends so
it does not matter which end is inserted into the module. However, the connector must be
in the correct orientation. The connector on the module is keyed so the ribbon cable
won’t fit in the wrong orientation. The correct orientation places the edge of the ribbon
cable with the red line on the left side of the module as shown in Figure 4 to the right.
Next, connect the other end of the ribbon cable to the power supply for your Eurorack.
When connecting to the Eurorack power supply, extra care is needed because not all
power supplies are keyed to ensure correct orientation. The ribbon cable should be
connected to the power supply so that the edge of the ribbon cable with the red line is
aligned with the −12V pins on the power supply bus. When you power up, watch closely to
make sure that the module powers up. If the touch screen doesn’t respond right away, turn
off the rack and confirm the cable orientation. 1010music modules do contain some
protection to prevent burning out the module it may not work indefinitely. Don’t power up yet.
Install the module into your rack using screws in the four corners of the faceplate to mount the module to the rails of your
Eurorack.
Next make sure the microSD card that came with the module is inserted into the Memory Card Slot. Most modules
come with the microSD card already inserted. The card should be inserted with the straight edge closest to the touchscreen.
Now you can power up the rack. The module should start up in less than 10 seconds and you will see the Main screen as
shown in Figure 3: Main Screen Overview above.
Note:
•A microSD card must be inserted into fxbox before you can get started. All presets are stored on the microSD card.
Preset changes are only saved when you choose to save them.
Figure 4: Ribbon Cable
Orientation on Module

P. 8Fxbox 2.0 User Manual 1/22/19
3:54 PM
v. 2.0 Copyright ©1010music LLC 2019
Connect an Input
Fxbox accepts several different forms of input. For now we will set up some basic inputs to get you started. Fxbox requires
an audio input signal to which effects will be applied. Plug a stereo audio signal into IN1 and IN2 using standard TS audio
cables.
If you are going to use a MIDI device to control your fxbox, connect it to the MIDI input on the module.
Note:
•Not all mini TRS MIDI jacks work the same way. You can use mini TRS cables to connect the fxbox MIDI input to the
MIDI output of another 1010music product, or other compatible products. For other products you may need to
use a MIDI adapter. For information about MIDI adapters and compatibility see our blog post at
https://1010music.com/stereo-minijacks-midi-connections-compatibility-guide.
•
You can also use Control Voltage (CV) signals to control the effects. Connect some CV signals from other modules or
devices to one or two CV Trigger jacks in the array of jacks below the touch screen. To get started, connect one input in the
right column of CV Modulator jacks, and another input in one of the first four columns under the touchscreen. Configure
your CV source to send a varying CV signal in the -5V to +5V range.
Connect an Output
In order to hear the sound effects created by your fxbox, you will need to connect the outputs to some speakers. Start by
inserting two mini TS cables to the OUT1 and OUT2 jacks and then connecting the other ends to your mixer or speakers.
General Module Settings
We are just about ready to put fxbox to work, but we should set up a couple of general
module settings first. These settings allow you to control the user interface orientation and
the Global MIDI input channel. To access these settings, press and hold the HOME button
until you see the Menu screen. Touch Settings to display the Settings screen. Use the
Control Knob closest to the parameter to adjust its value.
The Flip UI setting will turn the user interface upside down so you can use the module
with the touchscreen on the bottom. As soon as you change the value for Flip UI, the
user interface will be inverted. This means you will need to change which Control Knob
you use to change it back.
The GlobalMIDI parameter controls which MIDI channel is the default channel used to
control the effects. The default is Channel 10, but you can change it to any channel from 1
to 16. You can also select none to disable use of the MIDI input.
When you are done, press the HOME button twice to go back to the Main screen.
Figure 5: Menu Screen
Figure 6: Settings Screen

P. 9Fxbox 2.0 User Manual 1/22/19
3:54 PM
v. 2.0 Copyright ©1010music LLC 2019
Working in Flipped Mode
When the value for Flip UI is set to ON, the user interface on the touch screen will be inverted. Use this setting when the
module is installed in a rack with the touchscreen on the bottom. When flipped, the firmware adjusts how the buttons,
Control Knobs and CV Trigger jacks are mapped to the user interface. One noteworthy change is that the HOME and
INFO buttons now reverse functions. This is done so that HOME is always on the left and INFO is always on the right. The
alignment of the Control Knobs in this mode is slightly high compared to the parameters on the touch screen. However, the
top left control knob will control the top left parameter, and the lower right control knob will control the lower right
parameter. The CV Trigger inputs are also now mapped to the inverted display. The Input Jacks and Output Jacks maintain
their original assignments. On the Chain Management Screen, the position of Chain A and Chain B are swapped so that
they align to the layout of their related outputs. Figure 7: Inverted Faceplate shows the faceplate labels for an inverted
module. You can purchase a Series 1 inverted faceplate on our website at 1010music.com.
Figure 7: Inverted Faceplate

P. 10 Fxbox 2.0 User Manual 1/22/19
3:54 PM
v. 2.0 Copyright ©1010music LLC 2019
Effects Chains
Fxbox supports two effects chains per preset: Chain A and Chain B. The output of Chain A is routed to Out1 and Out2,
while the Chain B output is routed to FX1 and FX2. You can choose which of the two inputs is sent through each effects
chain.
Configure Inputs for Effects Chains and Select a Chain
Follow these steps to select the inputs for each effect chain:
1. Press HOME to return to the Main screen if needed.
2. Touch the Chain Selection icon (A or B) near the top right corner of the screen. This will display the Chain
Management Screen
3. Touch an input button on the left side of the screen to toggle the input for the corresponding chain. Light blue
inputs are enabled.
4. Touch a chain box to view the effects grid for that chain on the Main screen.
You can route any combination of inputs to the chains. Connect the audio outputs at Out1, Out2, FX1 and FX2 to an
external speaker to hear the results of the effects processing. If you want to monitor the dry signal, send the desired inputs
to a chain, and leave the effects grid for that chain empty.
Figure 8: Chain Management Screen

P. 11 Fxbox 2.0 User Manual 1/22/19
3:54 PM
v. 2.0 Copyright ©1010music LLC 2019
Working with Effects
Fxbox takes audio input from IN1 and IN2, processes the configured effects using two distinct effects chains, and sends
the results of Chain A to OUT1 and OUT2, and the results of Chain B to FX1 and FX2.
When fxbox starts up, the touch screen displays the Main screen with the grid containing up to 16 effects for the selected
preset. The available effects are listed in the table below:
The effects are applied by the signal
processing chain in the order in which they
appear in the grid, from top left, moving
across to the right and then moving across
each subsequent row moving down. You
can add or remove effects on the grid for
each chain.
Effects can be momentarily enabled using
the touch screen, triggered via control
voltage (CV) and MIDI inputs, sequenced
via individual Gate Sequencers, or set to
always on by configuring the parameters for the effect.
Momentarily Apply an Effect
If you want to apply an effect manually, you can do so by touching and holding the cell for that effect on the touch screen.
The effect is applied while you are touching the cell, and stops when you remove your finger.
Trigger an Effect via Control Voltage Signal
You can use an external signal to control when an effect is applied using independent signals for each effect. To do this,
plug a control voltage gate signal into the CV Trigger jack that maps to the effect in the grid. The effect will be applied
when the CV signal goes high, and be turned off when the CV signal goes low.
Trigger an Effect via MIDI Input
You can trigger an effect by plugging a MIDI controller source into the MIDI input jack. The
MIDI input uses a TRS connection compatible with the Arturia BeatStep Pro. Be sure to use
a TRS cable. By default, Fxbox responds to MIDI inputs on MIDI Channel 10. You can select
a different MIDI port on the Settings screen, as described in General Module Settings above.
MIDI inputs for notes 36 to 51 are mapped to the effects in the grid as shown in the
diagram to the right. The Play button is mapped to note 52 and will toggle play mode.
Label
Effect
Uses
Allowed
BTCR
Bit reduction and sample rate reduction
2
CHR
Chorus
2
DIST
Distortion
2
DLY
Delay
2
FILT
Low or High Pass Filter
8
FLNG
Flanger
2
FRZE
Granulator based freeze effect
1
GATE
Clock based gating
2
LOOP
Automated looping, with quantized start and
length
1
PAN
Automated panning
2
PHAS
Phaser
2
PIT
Pitch Shifter
1
RING
Ring modulator
2
RVB
Reverb
1
RVRS
Reverse
1
VNYL
Turntable and similar effects including scratching,
tape stop, and backspin
1
Figure 10: Effects List
48
49
50
51
44
45
46
47
40
41
42
43
36
37
38
39
52
Figure 9:Main Screen

P. 12 Fxbox 2.0 User Manual 1/22/19
3:54 PM
v. 2.0 Copyright ©1010music LLC 2019
Set an Effect to be Always On
Many effects can be configured to always stay on by setting the Trigger parameter for the effect to ON. The steps to edit
effect parameters are outlined below. Please note that not all effects have a Trigger parameter.
Add or Change An Effect on the Grid
You control which effect is used in each cell of the grid.
1. Touch the cell you want to modify. This can be an empty cell or a cell with an
effect loaded. The selected cell will have a pink background.
2. Press the INFO button to view the parameters screen for the effect.
3. In the top left corner, near the grid icon, touch the name of the effect type, which
is (none) for an empty cell. The list of available effect types is displayed. Touch an
effect to select it for this cell.
Note:
•There is a limit to the number of times you can use each effect type per
preset. The number of allowed uses varies based on the computing resources required for that effect
type. Effects that are no longer available are grayed out. See the effects list table above to review how
many times each effect type can be used.
•To delete an effect from a cell, choose the effect type of (none).
Edit the Parameters of an Effect
Each effect in the grid has a set of parameters that control how and when the effect is applied to the input signal. Follow
these steps to edit the parameters for an effect:
1. Touch the cell of the effect in the grid on the Main screen to select it.
2. Push the Info button in the top right corner of the fxbox. You will see parameters specific to that effect, such as
Trigger, Delay and Feedback. Press Info again to access additional pages of parameters if available for that
effect. Here are a few examples:
3. Adjust a parameter by turning the Control Knob next to it. Turn the Control Knob clockwise to increase the
impact of the effect.
Use the XY Pad to Control Parameters
The XY Pad allows you to use touch gestures to control the values of the two parameters on the left side of the first
parameters screen for each effect.
1. Touch the cell of the effect in the grid on the Main screen to select it.
2. Push the Info button to see the first parameters page for that effect.
Figure 11: Effect
Selection Menu
Figure 14: Distortion
Parameters
Figure 12: Delay
Parameters Page 2
Figure 13: Delay
Parameters Page 1

P. 13 Fxbox 2.0 User Manual 1/22/19
3:54 PM
v. 2.0 Copyright ©1010music LLC 2019
3. Touch XYPAD in the top middle of the screen to enable the touch control of the two
left parameters. The XYPAD button will be shaded blue and the parameters screen
background will be black when XY control is enabled.
4. Move your finger left and right to control the top parameter, up and down to control the
bottom parameter. Move right and up to increase the intensity of the effect.
5. Touch XYPAD again or leave the screen to stop the touch control of the parameters.
Bypass Effects
Fxbox allows you to temporarily bypass or mute individual effects by following these steps:
1. While on the Main screen, push the Home button to enter bypass mode. The grid cells will be green.
2. Touch a cell to bypass that effect. The cell will turn red. Touch it again to enable the effect, which will make it
green.
3. Push the Home button to leave bypass mode. A red bar appears over the names of bypassed or disabled effects.
Effect Parameters
The table below describes the parameters for each of the effects.
Label
Effect
Parameter
Settings
Mod
Target?
BTCR
Bit reduction and
sample rate reduction
Frequency
0 to 100% Determines sampling frequency from 187Hz to
48kHz.
Yes
Resolution
0 to 100% Determines output resolution from 1 bit to 24
bits.
Yes
Trigger
ON: the effect is constantly applied.
Gate: effect is triggered via CV input, momentary touch,
MIDI input, or the step sequencer.
No
CHR
Chorus
Amount
0 to 100% Controls the intensity of the effect.
Yes
Trigger
ON: the effect is constantly applied.
Gate: effect is triggered via CV input, momentary touch,
MIDI input, or the step sequencer.
No
DIST
Distortion
Distortion
0 to 100% Amount of distortion.
Yes
Trigger
ON: the effect is constantly applied.
Gate: effect is triggered via CV input, momentary touch,
MIDI input, or the step sequencer.
No
DLY
Delay
Delay
Determines the delay length specified in musical
intervals. The incoming clock or MIDI clock sets the
tempo for this setting.
Yes
Figure 15: XYPAD
Enabled
Figure 16: Bypass Screen
with FILT Muted
Figure 17: Main Screen
with FILT Muted

P. 14 Fxbox 2.0 User Manual 1/22/19
3:54 PM
v. 2.0 Copyright ©1010music LLC 2019
Label
Effect
Parameter
Settings
Mod
Target?
1/64, 1/32, 1/16, 1/8 T, 1/16D, 1/8, 1/4T, 1/8D, 1/4, 1/2T,
1/2, 1 bar
Amount
0 to 100% Determines how much of the delayed signal is
heard in the output.
Yes
Feedback
0 to 100% Determines the amount of regeneration or
echo in the delayed signal.
Yes
Trigger
ON: the effect is constantly applied.
Gate: effect is triggered via CV input, momentary touch,
MIDI input, or the step sequencer.
No
Beat Sync
(new)
The delay time will be a musical multiple of the working
clock when this parameter is set to ON.
No
FILT
Low Pass Filter
Cutoff
0 to 100% Determines the filter cutoff from 20Hz to
22kHz
Yes
Res
0 to 100% Determines the filter resonance.
Yes
Type
LP: Low pass filter
HP: High pass filter
No
Filter
ON: the filter effect is applied.
OFF:the filter effect is not applied.
No
FLNG
Flanger
Rate
0 to 100% Controls the rate at which the effect sweeps
through the full range from 0.1Hz to 10Hz.
Yes
Feedback
0 to 100% Determines the amount of feedback or
intensity of the effect.
No
Trigger
ON: the effect is constantly applied.
Gate: effect is triggered via CV input, momentary touch,
MIDI input, or the step sequencer.
No
FRZE
Granulator based freeze
effect
Speed
-100% to 100% Determines the scanning of the read
position once the effect is held. -100% is reverse at
original speed. 0% is held in place. 100% is scanning
forward at the original speed.
Yes
Spread
128 to 8192 Determines the width or range of the
random area that the grains pull from. Small numbers are
better for short events like drum hits. Big numbers are
better for more steady sounds, like drones.
No
Grain Size
1024, 2048, 4096, 8192 Determines the length of the
individual grains. Small numbers are better for short
events like drum hits. Big numbers are better for tones
and more steady sounds.
No
Grain Count
2 to 8 Determines the number of layers or complexity of
the sound.
No
GATE
Clock based gating
Length
Determines the overall interval for the gate specified in
musical length. The incoming clock or MIDI clock sets the
tempo for this setting.
2 bars, 1 bar, ½, ½T, ¼, ¼T, 1/8 , 1/8 T, 1/16, 1/16 T,
1/32, 1/32 T, 1/64
Yes
Duty Cycle
0 to 100% Determines how much of the audio in the
interval is passed through.
Yes
Quant Size
Determines when the effect will be engaged or
No

P. 15 Fxbox 2.0 User Manual 1/22/19
3:54 PM
v. 2.0 Copyright ©1010music LLC 2019
Label
Effect
Parameter
Settings
Mod
Target?
disengaged as specified in musical length. The incoming
clock or MIDI clock sets the tempo for this setting.
2 bars, 1 bar, ½, ½T, ¼, ¼T, 1/8 , 1/8 T, 1/16, 1/16 T,
1/32, 1/32 T, 1/64
Trigger
ON: the effect is constantly applied.
Gate: effect is triggered via CV input, momentary touch,
MIDI input, or the step sequencer.
No
LOOP
Automated looping,
with quantized start and
length
Length
Determines the duration of the loop specified in musical
length. The incoming clock or MIDI clock sets the tempo
for this setting.
2 bars, 1 bar, ½, ½T, ¼, ¼T, 1/8 , 1/8 T, 1/16, 1/16 T,
1/32, 1/32 T, 1/64
Yes
Quant Size
Determines when the effect will be engaged or
disengaged as specified in musical length. The incoming
clock or MIDI clock sets the tempo for this setting.
2 bars, 1 bar, ½, ½T, ¼, ¼T, 1/8 , 1/8 T, 1/16, 1/16 T,
1/32, 1/32 T, 1/64
No
PAN
Automated panning
Rate
0 to 100% Controls the rate at which the effect sweeps
through the full range from 0.1Hz to 10Hz
Yes
Trigger
ON: the effect is constantly applied.
Gate: effect is triggered via CV input, momentary touch,
MIDI input, or the step sequencer.
No
PHAS
Phaser
Rate
0 to 100% Controls the rate at which the effect sweeps
through the full range from 0.1Hz to 10Hz.
Yes
Feedback
0 to 100% Determines the amount of feedback or
intensity of the effect.
No
Trigger
ON: the effect is constantly applied.
Gate: effect is triggered via CV input, momentary touch,
MIDI input, or the step sequencer.
No
PIT
Pitch Shifter
Pitch
-24 semitones to +24 semitones
Yes
Wet/Dry
Determines how much of the original signal (dry) and
processed signal (wet) are heard. 0 % is fully dry. 50% is
an equal mixture of both. 100% only contains the wet
signal.
No
Trigger
ON: the effect is constantly applied.
Gate: effect is triggered via CV input, momentary touch,
MIDI input, or the step sequencer.
No
RING
Ring modulator
Carrier
0 to 100% Determines the pitch of the carrier signal.
Yes
Amount
0 to 100% Determines the intensity of the modulation.
Yes
Trigger
ON: the effect is constantly applied.
Gate: effect is triggered via CV input, momentary touch,
MIDI input, or the step sequencer.
No
RVB
Reverb
Decay
0 to 100% How long the reverberation will ring out.
Yes
Amount
0 to 100% Determines how much of the reverberation is
heard in the output.
Yes
Predelay
0 to 100% Determines the amount of delay in the signal
before it reaches the reverberation. In real life, this is
related to how close the source is to the walls.
No

P. 16 Fxbox 2.0 User Manual 1/22/19
3:54 PM
v. 2.0 Copyright ©1010music LLC 2019
Label
Effect
Parameter
Settings
Mod
Target?
Trigger
ON: the effect is constantly applied.
Gate: effect is triggered via CV input, momentary touch,
MIDI input, or the step sequencer.
No
RVRS
Reverse
(none)
VNYL
Turntable and similar
effects including
scratching, tape stop,
and backspin
Mode
Tape Stop: a quick ramp down of pitch
Scratch: back and forth scrubbing of the sound
Powerdown: a gradual reduction in speed, eventually
leading to no audio
Backspin: reverse playback with slowdown of the pitch
No
Visually Monitor the Effects
The fxbox changes the display of the grid to show the state of the effects. The table below describes what the icons and
color changes indicate:
User Interface
Example
Description
What it means
Cell highlighted pink
The cell is selected. Pressing the INFO button will
show the details for this cell.
Red bar across the top of the cell
The effect is bypassed and will not be heard
Unfilled blue bar across the bottom of the
cell
The Trigger for the effect is set to On.
Filled blue bar across the bottom of the cell
The effect has been triggered by a CV signal, the Step
Sequencer, or touching it.
Cell highlighted Red or Green
Fxbox is in bypass mode. Red cells are bypassed.
Press the Home button to exit bypass mode.
Blue bar with a vertical line moving across it
at the bottom of an EXT grid cell
A bar graph appears along the bottom of the EXT
grid cells that represents the value of the
corresponding CV input. The middle is zero, max is
+5 Volts, min is -5 Volts.

P. 17 Fxbox 2.0 User Manual 1/22/19
3:54 PM
v. 2.0 Copyright ©1010music LLC 2019
Working with Presets
Presets are sets of configuration parameters for effects that are designed to work together to achieve an overall effect.
Fxbox comes with 50 preconfigured presets and allows you to create your own. Changes you make to a preset are not
saved until you choose to save them. All changes will be lost when you change presets or power down the module unless
you choose to save the changes.
Select a Preset
There are two ways to select a preset. From the Main screen, you can cycle through the
list of presets by touching the –and + buttons on either side of the preset name (JUST
FUN 2 in the Main Screen example shown on the right).
Alternatively, on the Main screen, touch the preset name at the top of the grid (or the
space above it) to display the Presets screen. Select a Preset by scrolling through the list
with any of the control knobs, and then touch the Loadbutton in the top right corner of
the touch screen.
Note:
•Changes you make to a preset’s settings are not automatically
remembered and written to the preset. You must manually save a
preset, otherwise your changes will be lost when you change to a new
preset or power down the module.
•If you want to restore the factory presets, follow the steps in Updating
and Swapping Firmware below
Save a Preset
When you are ready to save your changes to a preset, you have two options: Save to save
over the existing preset, or SaveAs to create a new file that contains the changes to the
preset.
1. Touch the preset name at the top of the grid (or the space above it) to display the
Presets screen.
2. Touch the Edit button to display the Edit Submenu.
3. Touch Save or SaveAs. If you choose Save, the preset changes are saved to the
original preset file and the Main screen is displayed. If you choose SaveAs, the
Preset Naming screen is displayed. Use the on screen keyboard to change the
name of the preset, then touch return in the lower right to save the changes to
the new file.
Create a New Preset
You can create new presets to store your own combinations of effects parameters by following these steps:
1. Push the HOME button to return to the Main screen if needed.
2. Touch the preset name at the top of the grid (or the space above it) to display the Presets screen.
3. Touch the New button at the top of the screen. Fxbox adds a new preset to the bottom of the list with the name
New Preset X, where X is an incremental number.
4. Touch Edit and then Rename to create your own name for the preset.
5. Touch the Load button in the top right corner of the screen to load the newly created preset.
Figure 18: Main Screen
Figure 19: Presets Screen
Figure 20: Edit Submenu

P. 18 Fxbox 2.0 User Manual 1/22/19
3:54 PM
v. 2.0 Copyright ©1010music LLC 2019
Rename a Preset
Here’s how to give a preset a new name:
1. From the Presets screen, touch the Edit button at the top of the screen to
display the Edit submenu.
2. Use a control knob to select the preset you want to rename, and then touch the
Rename button. The fxbox displays a touch screen keyboard you can use to
enter a new name. Touch the return button to save the changes and go back to
the Presets screen.
Delete a Preset
Follow these steps to delete a preset. Warning: there is no undo, and no prompt to ask “are you sure?” So make sure you
are on the correct preset before you use this. If you do accidentally delete a preset, you can reload it from the factory
image or a back up using the steps outlined in Reset fxbox Presets to Factory Settings below.
1. Touch the Edit button at the top of the Presets screen to display the Edit submenu.
2. Use a control knob to select the preset you want to delete, and then touch the Delete button. The preset is
immediately deleted.
Figure 21: Preset Naming
Screen

P. 19 Fxbox 2.0 User Manual 1/22/19
3:54 PM
v. 2.0 Copyright ©1010music LLC 2019
Working with the Step Sequencer
The Step Sequencer creates a recurring pattern that controls when effects are applied. You can have a different pattern for
each effect.
Start and Configure the Step Sequencer
1. On the Main screen, touch the Play button in the lower right corner to start the Step Sequencer if needed.
2. With the Play button selected, push the INFO button to see the Step Sequencer Parameters screen.
3. Use the control knobs to adjust the following parameters:
Parameter
Settings
Sequencer
ON: The Step Sequencer will run constantly
OFF: The Step Sequencer will run in Toggle mode. Start and
stop the Step Sequencer by pressing the Play button on the
Main screen or sending a CV signal to the bottom CV
Modulator jack.Each high signal on the CV input toggles
between Play and Stop mode. An unfilled blue bar appears at
the bottom of the Play cell when the Step Sequencer is
playing.
Length
The length of each step in the sequence.
Values: 2 bars, 1 bar, ½, ½T, ¼, ¼T, 1/8 , 1/8 T, 1/16, 1/16
T, 1/32, 1/32 T, 1/64
Steps
The number of steps in the sequence.
Values: 2 through 32
Quant Size
Determines when the sequencer will be engaged or
disengaged as specified in musical length. The incoming clock
or MIDI clock sets the tempo for this setting.
Values: 2 bars, 1 bar, ½, ½T, ¼, ¼T, 1/8 , 1/8 T, 1/16, 1/16
T, 1/32, 1/32 T, 1/64
Sequence an Effect
1. From the Main screen, select an effect to sequence by touching the grid cell.
2. Push the INFO button twice to display the Step Sequencer screen. A box outline
moves across the grid to represent the currently playing step of the sequencer.
The number of boxes the sequencer moves through is controlled by the Steps
parameter. The time spent in each box is controlled by the Length parameter.
The sequencer starts in the lower left corner, moves across to the right, and then
moves up to the next row.
3. Touch the grid boxes on the screen to enable and disable the gate for the effect
on each step. The effect is enabled for the step when the grid box is highlighted
blue.
4. Repeat steps 1 through 3 for other effects as desired.
On the Main screen, you can see the Step Sequencer in action by watching the blue bars that appear below the effects grid
cells when the sequencer enables the effect. You can have a different step sequence for each preset.
Figure 22: Step
Sequencer Parameters
Screen
Figure 23: Step
Sequencer Screen

P. 20 Fxbox 2.0 User Manual 1/22/19
3:54 PM
v. 2.0 Copyright ©1010music LLC 2019
Using External Signals to Modulate Effects and Synchronize with Clocks
Use Control Voltage to Modulate Effects
Many of the effect parameters can be controlled by external CV inputs in order to vary the effect over time. For example,
you can use EXT1 to control the Pitch parameter of a PIT cell, or EXT8 to vary the Rate of panning. The table in the Effect
Parameters section above shows which parameters are Mod Targets that can be controlled by CV. On the parameter
screens you can easily identify the modulation targets by the three black boxes that appear below them. You can use up to
three different CV signal sources to modulate each parameter. The same signal can be used to modulate multiple
parameters.
To configure modulation for a parameter:
1. From the Main screen, touch the cell you want to modulate.
2. Press INFO until you see the parameter you want to modulate.
3. Touch one of the three black boxes below the parameter to display the Modulation Parameters screen.
4. Use the control knobs to select a value for the Source parameter. This parameter specifies which signal will be used
to control this parameter. Available values are None (no modulation) and EXT1 through EXT8. EXT1 through EXT8
are the CV inputs into the right hand columns of jacks under the screen.
Note:
•The Control Voltage jacks on fxbox map to the EXT modulators as shown in the diagram below:
EXT5
EXT1
EXT6
EXT2
EXT7
EXT3
EXT8
EXT4
5. Use the Control Knobs to select the Amount of modulation that will be applied. This is used to increase or
decrease the amount of impact the modulation will have on this parameter.
6. Press HOME when done to return to the parameter screen. The name of the chosen modulation source will now
appear in the modulation box below the parameter.
Synchronize the Effects to an External Timing Input
Fxbox uses the clock for two things: to control the step sequencer, and to control the timing of effects like Delay and Gate.
To synchronize to an external clock, connect one of the following timing signals to fxbox:
•Connect an external CV clock to the Clock input jack. Fxbox works from a 4 PPQ signal.
•– OR –Connect a TRS MIDI cable to the MIDI input jack.
To restart using a CV clock, stop the external Clock source for at least 2 seconds, and then restart the external Clock
source. Fxbox will interpret this break in the clock as the start of a new sequence. To restart via MIDI, send a MIDI start
command. The current clock timing is shown in the upper left of the Touch Screen as Bars:Beats.
Table of contents
Other 1010music Control Unit manuals
Popular Control Unit manuals by other brands

Intermatic
Intermatic LC4500 Series Instructions for installing

NXP Semiconductors
NXP Semiconductors Digital DNA MSC8102 User Guide and Hardware Detailed Design Description

SIMCom Wireless Solutions
SIMCom Wireless Solutions SIM7600A-H user manual

IDEATEC
IDEATEC POLARIS user guide

Ricoh
Ricoh 411402 - EFI Fiery EB-105EX Controller printing guide

Festo
Festo VIA 03-FB Series Brief description