3G TX-3G01 User manual

3G Video Alarm System
User Manual
For your fully understanding, please read the details of this user manual before using.
If any difference on appearance, please make the object as the standard.If any function
with improvement, maybe without prior informed.

Chapter One: Brief Instruction
Thank you for choosing our high-tech 3 Video Alarm system to secure your family and
property. Please read this manual carefully before you set up this system. This system
integrate advanced microcomputer technology and IC design. Lovely and luxury
appearance, latest technology, high quality and reliable performance will make it the
most amazing device on the market.
Special features: Visual phone function, you can view the live video at any time any
where.
1, This product use the most popular world wide network W-CDMA.
2, If the place has 3 signal, the image is clear and smooth, If there is no 3 signal, the
system will automatically switch to 3 mode.
3, This system has 1CH video camera by itself, lens optional, visual distance is
depending on the lens.
4, Built-in PTZ, 270 degree rotation.
5, Can be monitoring/listening in spot real time,dial in to remotely control the alarm
system or PTZ rotation.
6, It can auto dial 6 groups video/audio alarm phone number, 3 groups MMS alarm
phone number, 3 groups SMS alarm phone number.
7, Through video calling, you can control the PTZ for 270 degree rotation to monitor in
spot by 3 mobile phone.
8, After alarming, we can take photos or recording to TF Flash card (Micro card) (Support
maximam 4 TF Flash card)
9, External speaker is optional to the system, after viewing the video, you can shout to
the thief directly from phone call, dual way talking. (Optional function)
10, Compatible with wireless doorway keyboard.
11, AC power off alarm function: When AC power is shut down suddenly, the built-in
lithium battery can support the video alarm system and PTZ working normally, main host
can choose SMS notice function.
12, Electronic ZOOM function, enlarge & minification up to 6×.It also has brightness
adjustment(high or low) function.
13, Voice indication function: Remotely operation with voice indication for each step.
Friendly interface & suitable for user.
Chapter T o: User Notice
1, Working Elements and Functions
2

Central Panel, which
can receive signal,
recognize, and record
and output alarm
functions etc.
Siren: It has 120Db
output when the system
is triggered.
Intelligent curtain PIR
Motion sensor detects
the movement from
human beings
USB data cable:
Function setting
Door sensor: One
transmitter and one
magnetic part, if the
distance is over 1.5cm
between these two
parts, then it will send
signal to the central
panel.
Smoke detector: it
detects the suspicious
smoke/fire particulates
before fire occurs.
Remote control: arm,
disarm, emergency
alarm
AC Adapter
DC12V 1A
Notices:
1,There are 2 ways for setting our this system: wireless keypad setting or PC setting.
The USB data cable is included in 3 standard package,which is used for connecting PC
to setup the functions of the 3 main host.If buyers would like to operate the system by
wireless keypad, please purchase keypad from our distributors.
2, Please save the USB data cable properly for future upgrade system or after sale
service from factory.
3, After installation finished, users should modify the log in password in immediately to
avoid privacy disclosure.The password won't be too simple.
4, This 3 alarm system can work together with our PIR motion detector,door sensor,gas
leaking detector,fire/smoke detector any kind of alarm accessories from our factory.
5,Please install the alarm accessories by correctly, installation inappropriate will effect
the using result.
6, Please kindly refer the "Disclaimer/Tips" by the end of this user manual.
Chapter Three: Installation
1. Ho to install the central panel
3

(Figure 1: back side connection)
(Figure 2: 3G main host structure)
1:Power slot 2: SM/3 Network
indication LED
3: System state
indication LED
4: USB PC setup
connector
5: RF antenna
connector
6:External speaker 7: external siren 8:T-FLASH card slot
9: USIM card slot 10:Power adapter 11:Connector of
Extension Cable
12: Power plug
13: RF antenna 14: Photoresistor
sensor
15:Camera lens 16:IR night vision
light
17: MIC hole
1st Step: Open the package to check if it is completely and good.(Including main host,power
adapter, keypad, remote controller, wireless sensors & other accessories.)
2nd step: Confirm installation position and prepare for it.
4

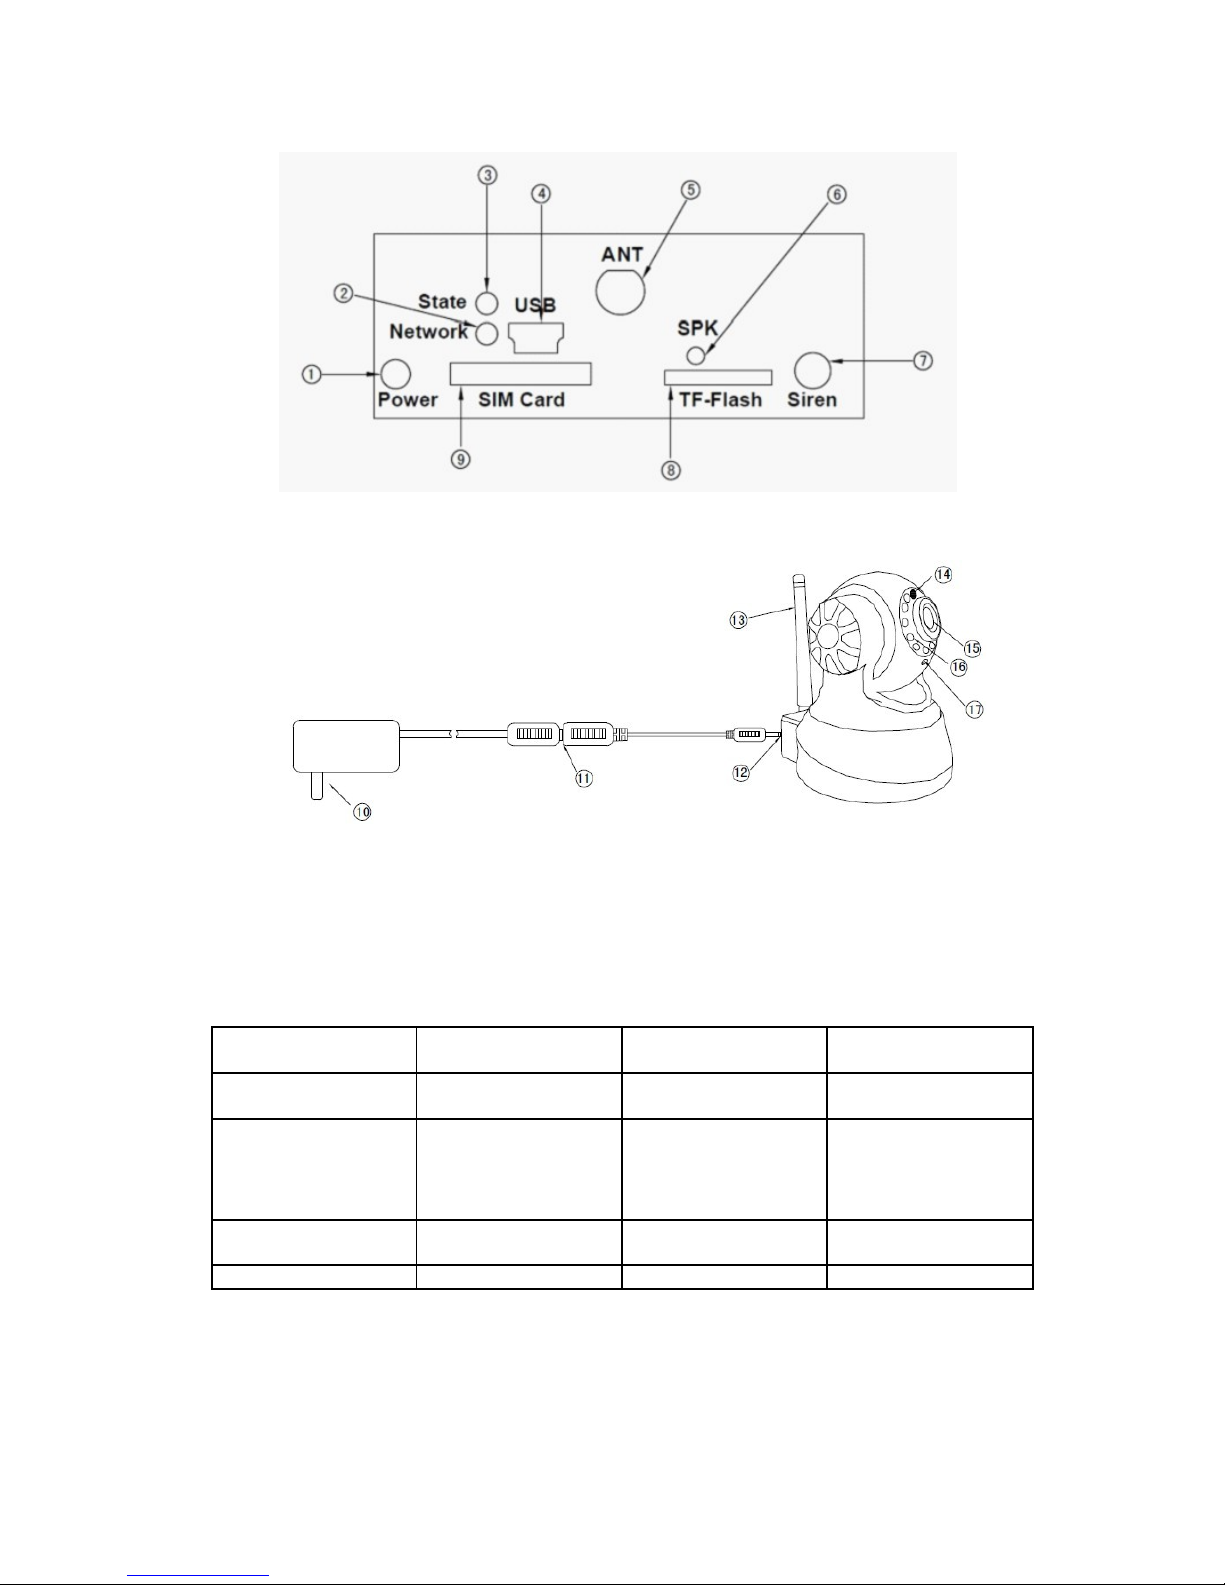
3rd step: Prepare 1pcs W-CDMA SIM card which can be dialed out(pre-charge), insert it into
"SIM Card" slot parallelly. If it needs to connect siren, please plug it into "Siren" slot, if it need
recording, please insert TF Flash card into "TF-Flash" slot, then plug the adapter into "Power"
slot, the main host will make one sound "Beep", built-in PTZ will rotate left-right, enter main
host self-checking status.
4th step: After a while, the main host will make "Beep" continuous sound again,after B sound
finished, it means the main host initialization finished and enter normally standby status. At
this time, the "Network" LED light flash 1 time/second about, it means finding 3 signal
successfully.
Net ork light orking instruction:
a. If the network light is normal on, it indicates no 3 signal or no 3 WCDMA SIM card.
b. If the network light flashes every 1s, it indicates there is SM signal or 3 signal.
State light orking instruction:
a.If state light is normal on, it indicates the main panel is armed.
b.If state light is normal off, it indicates the main panel is disarmed.
c.If state light flashes quickly, it indicates the main panel is alarming.
Main host built-in buzzer indicating instruction:
A. The main panel will make "beep" sound 1 time/s, it means the main host is searching
network and initialization.
B. The main panel will make"beep"sound if you press every key of the remote controller.
C. When using wireless controller to operate the main host, after input the command, the
main host will send out a long "beep" sound, it indicates operation is successful. If main host
makes "beep" for 3 times, it means inputs is wrong or the setting is failed(wrong password).
Back-up battery using instruction: (You can choose one of them before factory)
1)
A.When the SIM card is inserted correctly, it will turn on the built-in battery to support the
main host working.
B.When the SIM card is pulled out, it will turn off the built-in battery.
C.Please pull the SIM card out, then insert it again if you want the main host restart.
2)When Figure 2(12) Power plug is plug out, the built-in battery doesn't work to supply power.
When Figure 2(10) power adapter or Figure 2(11) Connector of Extension Cable is taken out,
or AC power is failure, the built-in battery can continue to work.
IR day/night light orking instruction:
When the light is in dark, the Infrared night-vision lamp will work automatically.
SIM card/T-Flash card insert & pop out instruction:
Insert: Insert SIM card or TF card parally into "SIM Card" slot or "T-Flash card", push it to the
5

most inside, then release is ok.
Pop up: Use finger to press SIM card or T-Flash card, then release, to get the card out of the
system.
2. Ho to install Door/Windo Sensor (Fig 3)
A. Door sensor is consisted of two parts: transmitter part and magnetic part .You can fix them
with screws or adhesive.You need to check the LED side of transmitter part against the
magnetic part . The maximum limit is 15mm between them.
B. If you use the configured adhesive to install the door/window sensor, please make sure the
installation position flat and clean. If you install it on the wooden material, please install with
setscrews.
C. If the door/window sensor’s low power indication light flashes or the transmission distance
is nearer than before, please change the battery (12V, 23A).
Open from right Double open Open from left Slide window
1 2 3 4
3. How to install Motion Detector (PIR)
Firstly peel off the cover, and then fill with the battery. It must be installed 1.6cm off from the
wall, 1.5m to 2.5m high from the ground and face the monitoring area, inner house to avoid
the direct sun light.
Wide-angle motion detector: vertical 55°, horizontal 110°, distance 8m.
Curtain motion detector: vertical 99°, horizontal 20cm thickness, distance 8m.
4. How to install as Leakage Detector
Install it with the distance of 0-4m from the gas source.
B. Inner 0.3m high from the ground if Liquid petroleum gas; inner 0.3m from the ceiling if coal
and natural gas.
C, It takes 3 minutes for preparing work. The red light will be flashing in preparing.
D, User should check and clear it to ensure its effect in normal days.
5. How to install Smoke Detector
Fill the 9V battery firstly, press Test button over 3 seconds, or flow the smoke into the
detectors, it means it works normally when hear “beep” sound. Please install it on the top of
wall or ceiling and do not install it near the door or window.
6

Chapter Four: Function Setting and Program via USB
NOTE: The PC setting soft are CD is included in the 3G standard package, you can
copy all the files into your PC and then set up this soft are and set all the 3G system
functions on PC easily!
4.1 Power on the 3 camera with power adapter, connect the camera to your PC with USB
cable included!
4.2 Double click to set up "System USB driver.exe" and these two
software.
4.3 Click
this software on PC
desktop, press button
" ", it will
show the following interface
" ",
the main host's default
password:"1234", input
"1234" and press OK to
confirm. If the password is
correct, it can connect with
3 main host to do settings.
4.4 Click to set the following host parameters:
7

Here, you can set the following functions:
1) Siren’s hooting time: siren’s hooting time is programmable when 3 system
alarming(00-30 minutes)
If you set 00, it will be mute alarm;
If you set over 30 minutes, the alarm system won’t stop hooting until you disarm the
system.
E.g. by default setting
2) Arm delay time setting: Exit delay time setting: 00-99 seconds
E.g. by default setting
3) Alarm delay time setting: Entry delay time setting: 00-99 seconds
E.g. by default setting
4) Recycle times incorrect: You can set the auto dial times if no person answer the alarm
calling, optional. E.g by default setting
5) MMS photo size (pixles) setting: Can choose 176*144、320*240、640*480, the high
pixle setting, the more clear MMS picture will send. E.g
by default setting
6) Signal mode setting: Can choose "Automatic"( It means 3 signal is in priority if there is
3 signal, when there is no 3 signal, it will automatically switch to 2 mode.) or
"WCDMA Only" 2 modes, when the 3 signal is weak,you can choose WCDMA Only to
optimize. E.g by default setting
7) AC po er failure alarm ON/OFF: if it’s ON, when host AC power failure, the host will
send you SMS to remind you. E.g by default setting
8) Siren accompany sound ON/OFF: if it’s ON, when control the system with remote
8

control, the wired mini siren will make sound "Du...". E.g by
default setting ( It means siren accompany sound with ON.)
9) Arm/Disarm SMS report function ON/OFF: if it’s ON, whether you arm or disarm the
host with remote control, the host will send you SMS notification. E.g
by default setting
10)Use the remote pass ord or not: if you choose password protection,you should input
correct password to check the real time video and remote control the system when you
dial in to it. Without password protection when dial in, it will affect the privacy for the
video. E.g by default setting
11)Flip picture: There are 2 kinds of installation way for this 3 camera system, you can
adjust the picture/image for Forward/Reverse accordingly. e.g
12)Alarm record/picture: When the main host is alarming, it can take photos and record if
there is put in TF Flash card inside already. If you choose to have this function, it will take
3 photos and record for 5s to TF flash card when alarm happens. E.g
13)Start record hen arm: When press button " " on remote controller, the 3 main host
will record to TF Flash card, when press " " on remote controller, the 3 main host stop
recording. Choose this function as follow:" " and SAVE.
14)Signal value: e.g
15)Back to default setting: you can press to back to default setting.
16)Format TF/SD: Press " ", the main host will delete all files content in TF
Flash card.
17)Change pass ords: The 3 main host can be modified password, it is mainly used for
remotely view the video & control the system by password identification. (The default
password: 1234.) If you need to modify it, please refer as below:
18)Clock Sychronization: Click to the interface as below, press "Start" to set the time of 3
main host is sychro as the computer.
9

4.5 Click to set the follo ing alarm phone numbers:
Here, you can set the following alarm phone numbers:
This 3 system support 6 groups of alarm phone numbers including audio phone number or
audio & video phone number, 3 groups SMS notification numbers and 3 groups MMS phone
numbers. Before setting, please Click to obtain the phone number which
already set. Then you can modify each group as below operation:
1) Set alarm audio numbers, you can input phone number directly as above interface shows
you: 13800138000. When system alarming, it will auto dial ordinary audio call to you.
2) Set 3 audio and video alarm phone numbers, you should add the letters 3 in front of
the mobile phone number as above interface shows you: 3 13800138000. When system
alarming, it will auto dial video call to you.
3) Set SMS notification phone numbers, you can input phone number directly as above
interface shows you: 13800138000. When system alarming, it will send you SMS
notification firstly.
10

4) Set MMS phone numbers: The 3 system will send MMS with pictures to the pre-setting
MMS phone number when alarm happen. You can input the MMS phone number as
above interface show you.
After setting, please click to save all the settings.
4.6 Click to program wireless sensors:
This 3 alarm system can match 32pcs alarm accessories totally (PIR-Door sensor-water
detector-gas detector-smoke detector-heat detector,etc.) and up to 5pcs remote controllers.
As above interface shows you, when you program new sensors into 3 system, you should
do it like this:
choose Accessory name choose alarm Modechoose Zone numberClick
Trigger the wireless sensor to send a signal to 3
system3 system send out two BEEPs indicates programing OK.
NOTE:
1) We usually program wireless sensors as above interface shows you:
a. Remote controlEmergency mode01
b. PIRBypass mode02 (Bypass mode, then you can disarm PIR sensors seperately)
c. Door sensorArm mode03
2) Check alarm accessories, showing as below:
11

3) You can delete single remote controls or wireless sensors you have programmed showing
as below:
4) You can delete all remotes you have programmed showing as below:
5) You can delete all sensors you have programmed showing as below:
6) Setting wireless siren's ID:
The main host can work with our company's wireless middle/big size wireless siren, check the
8 digits ID code in the back of the wireless siren, input it as here,e.g:
Click "Press To Set" is OK.
If you would like to close the wireless siren, please input the ID code as 00000000.
4.7 Click to check alarm history records:
This 3 alarm system can only support latest 50pcs alarm history checking. Showing as
below:
12

You can click button to download alarm history records, and you can click
to delete all the alarm history records.
4.8 Arm/Disarm by computer operation:
Click this button
4.9 Click to set arm/disarm time:
1)You can set 3 groups of arm time and 3 groups of disarm time, then the 3 system will
arm/disarm automatically at the specific time. Showing as below:
13

E.g Setting 1st group timing arm/disarm: Every day to arm from 9:00 and disarm until 17:30.
Showing as below:
Press to save setting.
E.g Setting 2nd group timing arm/disarm: Monday to arm from 9:00 and disarm until 18:00.
Showing as below:
Press to save setting.
2)Checking Timed Arm/Disarm infomation, showing as below:
14

4.10 Click to control home appliance control switch: (optional)
This 3 alarm system can remotely control by phone for up to 9CH single trigger,9CH
double trigger, totally 18CH wireless home appliance plug or switch,showing as below:
4.11 Upgrade: When our company has new software/program,our distributor can use for
upgrading file to make the system working better, users do not have the authority to upgrade
by themselves.
Chapter Five: Function Setting and Program via Keypad
Note: Original 4 digits password for all the settings: 1234
1. Coding ireless keypad
Wireless keypad need to match/code with 3 alarm system before using,operate like
this: Press "RESET" button in the bottom of the 3 system, the main host will make a
sound "B" per second,at this moment press "#" on the keypad,the main host will make a
sound of "BB",it means matching/coding successfully.
2. Alarm phone number setting
This system support total 6 alarm phone numbers, video talking and audio talking is optional.
A.Ordinary alarm audio talking number setting:
When main panel is in standby status, input “#(1 ~ 6 )*phone number# ” on the wireless
keypad, main panel will BEEP when you press every key. Two BEEP indicate alarm audio
talking number setting ok.
1~6 means No.1 to No.6 video talking or audio talking alarm phone number.
For example, if your phone number is 13800138000 and you want to set it to be NO.1 alarm
audio talking number, you can input “#1*13800138000#”
B.Alarm video talking number setting:
When main panel is in standby status, input “#(1 ~ 6 )*3*phone number# ” on the wireless
keypad, main panel will BEEP when you press every key. Two BEEP indicate alarm video
talking number setting ok.
1~6 means No.1 to No.6 video talking or audio talking alarm phone number.
For example, if your phone number is 13800138000 and you want to set it to be NO.2 alarm
video talking number, you can input “#2*3*13800138000#”. When alarm happens, you can
have video talking with the 3 video alarm system.
15

C. Alarm SMS number setting
This system support 3 SMS alarm phone numbers.
When main panel is in standby status, input “#0*0(1 ~ 6 )*phone number# ” on the wireless
keypad, main panel will BEEP when you press every key. Two BEEP indicate alarm SMS
number setting ok.(1~6 means No.1 to No.6 alarm SMS number.)
For example, if your phone number is 13800138000 and you want to set it to be the NO.1
alarm D
number, you can input “#0*01+13800138000#”
D. Alarm MMS number setting
This system support 3 MMS alarm phone numbers. When main panel is in standby status,
input “# 0 * (11-13) phone number #” on the wireless keypad, "11-13" stands for 1st group to
3rd group. When you input "11" stand for 1st group, "12" stand for 2nd group."13" stand for 3rd
group. E.g #0*1110010# for setting 1st group MMS phone number.
E. Ho to delete alarm phone numbers
Whether you want to delete alarm audio talking phone number or video talking number, Input
“#(1~ 6 )*# ” on keypad, "1~6" stands for 1st group to 6th group phone number,1 means 1st
group, 2 means 2nd group,etc. E.g if you input "#1*#": Deleting 1st group phone number.
F. Ho to delete SMS phone numbers
Input " # 0 * ( 01 ~ 03 ) # " on keypad, "01~03" stands for 1st group to 3rd group SMS phone
number, 01 means 1st group, 02 means 2nd group,etc. E.g if you input "#0*01#": Deleting 1st
group SMS phone number.
G.Ho to delete MMS phone numbers
Input "# 0 *(11~13)#" on keypad, "11~13" stands for 1st group to 3rd group MMS phone
number, 11 means 1st group, 12 means 2nd group,etc. E.g if you input "#0*11#": Deleting 1st
group MMS phone number.
H. Arm/Disarm short message(SMS) feedback function ON/OFF setting
When main panel is in standby status, input “#9*11#” on the wireless keypad, main panel will
BEEP when you press every key. Two BEEP indicate Arm/Disarm short message(SMS)
feedback function is ON.
If you want to turn OFF this function, you can input “#9*10#”
3. Coding ireless remote controls/sensors
A. Coding ireless remote controls
When main panel is in standby status(Arm or Disarm status), input “#9*90+pass ord+#” on
the wireless keypad, main panel will BEEP when you press every key. Please trigger the
remote control quickly after you input the command. Two BEEP indicate coding ok.
B. Coding ireless sensors
When main panel is in standby status(Arm or Disarm status), input “#9*90+pass ord+zone
number+sensor code+sensor alarm mode code+ # ” on the wireless keypad, main panel
will BEEP when you press every key. Please trigger the sensor quickly after you input the
command. Two BEEP indicate coding ok.
NOTE:
16

1) Zone number: Can be set as 00~99 zone numbers
2) Sensors’ name code: "1" - Remote control, "2" - PIR, "3"- Door sensor, "4" - Smoke
detector, "5" - as detector, "6" - IR beams, "7" - Water sensor, "8" - Heat detector. "9" --
glass breaking sensor, "0" -- other wireless sensors.
3) Sensors’ alarm mode code:
"1" -- Arm(Only in arm status, the sensors will alarm when it is triggered)
"2" -- Bypass(In arm status, the sensors which bypass won't alarm when it is triggered)
"3" -- Disarm (When in disarm status, the sensors won't alarm when it is triggered)
"4" -- Emergency (24hrs monitoring/alarm whether in arm or disarm status)
For example:
Coding remote control: “#9*90+pass ord+#”
Coding PIR: “#9*90+pass ord+02+2+2 + # ” (02 defense zone, Bypass mode, so PIR can be
disarmed seperately with double press key on the remote control.)
Coding Door sensor: “#9*90+pass ord+03+3+1 + # ” (03 defense zone, arm mode)
Coding Smoke detector: “#9*90+pass ord+04+4+4 + # ” (04 defense zone, 24hrs
emergency alarm mode)
Coding Gas detector: “#9*90+pass ord+05+5+4 + # ” (05 defense zone, 24hrs emergency
alarm mode)
C. Delete all the remote controls
When main panel is in standby status, input “#9*91+pass ord + # ” on the wireless keypad,
main panel will BEEP when you press every key. Two BEEP indicate delete all the remote
controls ok.
D. Delete all the ireless sensors
When main panel is in standby status, input “#9*92+pass ord + # ” on the wireless keypad,
main panel will BEEP when you press every key. Two BEEPs indicate delete all the wireless
sensors ok.
E. Setting ireless siren ID:
When main panel is in standby status, input “#9*93+8 digits ID Code + # ” on the wireless
keypad, Two BEEP indicate setting successfully.
E.g. Wireless siren ID code: 12100000, input #9*9312100000#.
If you would like to delete wireless siren, please set the ID as 00000000: #9*93 00000000#
4. Siren’s hooting time setting
When main panel is in standby status, input “#9*52+(00 ~ 30 ) # ” on the wireless keypad,
main panel will BEEP when you press every key. Two BEEP indicate siren’s hooting time
setting ok.
Note: 00~30 is the siren’s hooting time(Unit:minutes)
1) if you set siren’s hooting time over 30m, the siren won’t stop hooting until you disarm the
system;
2) if you set siren’s hooting time is 00, the siren will be mute alarm;
5. Siren accompany sound ON/OFF setting
17

When main panel is in standby status, input “#9* 2 (1/0) # ” on the wireless keypad, main panel
will BEEP when you press every key. Two BEEP indicate this function setting ok.
Note: 1) #9* 2 1 # Turn ON the Remote control opration audio
2) #9* 2 0 # Turn OFF the Remote control opration audio
3) Then when you press any key on the remote control, the mini siren will sound at the
same time.
6. Pass ord changing setting
When main panel is in standby status, input “#7*ne pass ord+ne pass ord+#” on the
wireless keypad, main panel will BEEP when you press every key. Two BEEP indicate new
password changing ok.
For example, if you want to change the original password 1234 into 5678, you can input
“#7*56785678#”
7. Time delay to Arm function setting
When main panel is in standby status, input “#9*50+(01 ~ 99 ) # ” on the wireless keypad,
main panel will BEEP when you press every key. Two BEEP indicate time delay to arm
setting ok.
Note: 01~99 is the arm delay time(Unit:seconds)
8. Time delay to Alarm function setting
When main panel is in standby status, input “#9*51+(01 ~ 99 ) # ” on the wireless keypad,
main panel will BEEP when you press every key. Two BEEP indicate time delay to alarm
setting ok.
Note: 01~99 is the alarm delay time(Unit:seconds)
9. Remote control pass ord protection function setting
To protect user’s privacy or someone else operate the alarm system randomly, when you dial-
in, you should input the necessary right password. You only have 3 times to input password in
total, or the system will hang up.
When main panel is in standby status, input “#9*31 #” on the wireless keypad to turn on the
password protection function; input “#9*30 #” to turn off this function.
10. Image and video TF card storage function hen alarming
Turn ON/OFF Image and video TF card storage function:
When main panel is in standby status, input “#9*15#” on the wireless keypad, main panel will
BEEP when you press every key. Two BEEP indicate TF card storage function is ON. When
system alarms, images and videos will be stored into TF card.(TF card format: FAT)
If you choose to turn on this function, it will take 3 photos and record for 5s to TF flash card
when alarm happens.
If you want to turn OFF this function, you can input “#9*14#” on the wireless keypad when
main panel is in standby status. Default setting: function OFF
11. Device installation and image & video direction setting
18

If the device is lying installed and you want to get correct image and video, you should input
“#9*60#” on the wireless keypad when main panel is in standby status.
If the device is hung installed and you want to get correct image and video, you should input
“#9*61#” on the wireless keypad when main panel is in standby status.
12. 3G net ork searching
The 3 system default set 3 automatically, if the 3 signal is weak, the 3 system will
switch to 2 network automatically. As you know, if using 2 network, it can call out video
call. At this moment, users can choose 3 Only, you can operate on keypad like this: "# 9*13
# ", the main host will sound "BB" to indicate operation successfully.
(Please note: If choosing 3 Only, if there is no 3 signal, the main host won't switch to 2
network.)
If setting 3 automatically(When there is no 3 signal, it will switch to 2 signal), operate like
this: "# 9*12 # ", the main host will sound "BB" to indicate operation successfully.
13. Setting AC po er failure alarm function
It is set to be ON by default setting. When AC power off or external power stop, the main host
will alarm immediately.
Close this function: operate on wireless keypad like this: "# 9* 40 # ", the main host will sound
"BB" to indicate operation successful.
Start this function: operate on wireless keypad like this: "# 9* 41 # " , the main host will sound
"BB" to indicate operation successful.
14. Start Record hen arm function
This function is closed from default setting. When press button " " on remote controller, the
3 main host will record to TF Flash card, when press " " on remote controller, the 3 main
host stop recording.
Start this function: Input " # 9* 81 # " on keypad, the main host will sound "BB' to indicate
operation successful.
Close this function: Input " # 9* 80 # " on keypad, the main host will sound "BB' to indicate
operation successful.
15. Come back to factory default setting
When main panel is in standby status, input “#9*69+pass ord+#” on the wireless keypad,
main panel will BEEP when you press every key. Two BEEP indicate new password changing
ok.
Note: When the system come back to factory default setting, all the functions ill be:
1) Siren accompany sound: ON
2) Alarm calling quantity is: 15
3) Time delay to arm is:0s
4) Time delay to alarm is:0s
5) Alarm phone numbers,SMS numbers and MMS number is blank
6) Arm/disarm SMS remind function is: OFF
19

16. Formatting TF card
Input "#9*67 + pass ord+ #" on wireless keypad, main panel will BEEP when setting is over.
Two BEEP indicate operation successful. After operating this command, the main panel will
delete all the file in TF card.
17. Ho to set disarm indication tone of door sensor
Start disarm indication tone of door sensor, Input: “ #9*17+# ” on wireless keypad, main
panel will BEEP when operation finished. Two BEEP indicate operation successful. Enable
this function, the main panel will sound voice to indicate when door is opened in disarmed
state.
Close disarm indication tone of door sensor, Input: “ #9*16+# ” on wireless keypad, main
panel will BEEP when operation finished. Two BEEP indicate operation successful.
18. Main host language setting
Set to be in English: Input “ #9*56+pass ord+# ” on wireless keypad, main panel will BEEP
when operation finished.Two BEEP indicate operation successful and the voice call menu and
SMS will auto switch to English.
Set to be in Chinese: Input “ #9*55+pass ord+# ” on wireless keypad, main panel will BEEP
when operation finished.Two BEEP indicate operation successful and the voice call menu and
SMS will auto switch to Chinese.
Chapter Six: Ho to operate the alarm main panel
1. Remote control operation
A. The master can lock the door and press to arm the system and then go out.
B. When master return home, he should press to disarm the system firstly, then enter the
house.
C. Any emergency happens, master can press to send out emergency alarm, siren will hoot
and main panel will auto dial alarm phone numbers whether main panel is armed or disarmed.
D. Some specific sensors can be disarmed seperately with double press key on the remote
control when the main panel is armed, it is called BYPASS.
E. Once the main panel is power on and setting ok, smoke detector and gas detector will be
in arm status all the time, no matter main panel is armed or disarmed.
2. Working steps after alarm happens:
When main host take place alarming:
1) Siren hooting
2) If TF card insert in advance, it will take 3 photos to TF card, then start recording to TF card.
3) Sending SMS to alarm SMS phone number preset, e.g.: 03 zone door sensor alarm, it will
send SMS like this: Wireless Alarm in zone NO.03!! (Door sensor)
4) Sending one MMS picture to alarm MMS phone number preset, MMS title like this: "3
Alarm".
5) Auto dial 1st group visual or voice alarm phone number.
20
Table of contents
Popular Security System manuals by other brands

nnB Technology
nnB Technology DefenX360 Series Installation & operating manual

AIR SYSTEMS
AIR SYSTEMS ALMSTH120 operating instructions

OCCLY
OCCLY Blinc user guide

Safelincs
Safelincs UltraFire UBCO1D user manual

Hitachi
Hitachi SPX-WDC7 Installation & operation manual

Honeywell
Honeywell Galaxy Dimension user guide