3M PELTOR Tactical XP User manual

3M™PELTOR™ Tactical XP
MT1H7*2 Series
The Sound Solution
FP3739_Tactical_XP_rev b_8 sidigt omslag_A5.indd 2 2016-03-24 15:08:37

The Sound Solution
A)
(A:1)
(A:2)
(A:4)
(A:5)
(A:6)
(A:6)
(A:3)
(A:8)
(A:7)
(A:9)
(A:10)
(A:11) (B:1) (B:2)
(B:3) (B:4)
B)
FP3739_Tactical_XP_rev b_8 sidigt omslag_A5.indd 3 2016-03-24 15:08:39

C:9 C:10 C:11 C:12
C)
C:6 C:8
C:7
C:1 C:2 C:3 C:4
6) 411g
MT1H7F2* 1
SNR=33 dB H=35 dB M=31 dB L=23 dB
Frequency(Hz) 2) 125 250 500 1000 2000 4000 8000
Mean attenuation (dB) 3) 17.0 25.6 34.0 37.4 36.4 38.6 38.2
Std deviation (dB) 4) 2.4 3.0 3.4 3.2 3.2 3.6 3.4
Assumed Protection Value (dB) 5) 14.6 22.6 30.6 34.2 33.2 35.0 34.8
D)
E)
F)
G)
E:1 E:2 E:3
C:5
FP3739_Tactical_XP_rev b_8 sidigt omslag_A5.indd 4 2016-03-24 15:08:43

Mode2/ Volume3Input4
(mV)
SPL5
(dB A)
St dev6
(dB A)
82 dBA7
(mV)
1 / N 80 68,8 1,9 354
154 73,6 1,9
260 78,6 1,9
460 82,3 1,5
820 84,2 1,3
2 / N 14 67,1 1,7 76
25 71,8 1,6
45 76,4 1,6
80 80,8 1,8
145 83,7 1,9
3 / N 7 65,8 1,0 40
14 73,6 1,8
25 78,0 1,8
45 80,8 1,9
145 83,6 1,8
2 / H 7 66,7 2,4 34
14 72,5 2,4
25 77,2 2,5
45 82,2 2,6
80 85,8 1,9
MT1H7F2*, MT1H7B2*, MT1H7P3*2* 1
Mode2/ Volume3Input4
(mV)
SPL5
(dB A)
St dev6
(dB A)
82 dBA7
(mV)
1 / N 46 68,2 1,6 194
81 73,3 1,7
146 78,5 1,7
260 82,9 1,6
464 86,6 1,6
2 / N 8 67,3 1,7 43
14 72,1 1,9
25 76,7 1,5
46 81,4 1,2
81 84,9 1,2
3 / N 4 68,9 1,3 20
8 74,6 1,3
14 79,0 1,2
26 82,6 1,1
46 84,6 1,0
2 / H 4 66,9 1,7 20
8 73,1 1,9
14 78,0 1,9
25 82,3 1,6
45 86,6 1,3
MT1H7F2*-50, MT1H7B2*-50, MT1H7P3*2*-50 1
0 / 0 82 68,5 1,9 393
145 73,9 1,8
261 78,5 1,4
466 82,9 1,7
831 88,2 1,4
I) H 119 dB(A)
M 105 dB(A)
L 90 dB(A)
6) 370 g
MT1H7B2* 1
Frequency(Hz) 2) 125 250 500 1000 2000 4000 8000
Mean attenuation (dB) 3) 17.1 25.2 33.4 36.2 33.4 38.5 37.6
Std deviation (dB) 4) 3.0 2.8 3.1 2.6 4.2 4.4 3.7
Assumed Protection Value (dB) 5) 14.1 22.4 30.3 33.6 29.2 34.1 33.9
SNR=31 dB H=32 dB M=30 dB L=22 dB
6) 406 g
MT1H7P3*2* 1
Frequency(Hz) 2) 125 250 500 1000 2000 4000 8000
Mean attenuation (dB) 3) 17.4 23.5 31.6 36.6 33.1 37.6 34.9
Std deviation (dB) 4) 2.7 3.9 3.9 2.9 2.8 2.8 4.6
Assumed Protection Value (dB) 5) 14.7 19.6 27.7 33.7 30.3 34.8 30.3
SNR=31 dB H=32 dB M=29 dB L=21 dB
H)
MT1H7F2*, MT1H7B2*, MT1H7P3*2* 1
H 115 dB(A)
M 109 dB(A)
L 92 dB(A)
MT1H7F2*-50, MT1H7B2*-50, MT1H7P3*2*-50 1
FP3739_Tactical_XP_rev b_8 sidigt omslag_A5.indd 5 2016-03-24 15:08:43

1) Helmet Manufacturer 2) Helmet Model 3) Attachment 4) Head size: S=small, N=medium, L=large
3M 1465 P3E NL
3M Airstream AH1, AH4, AH7, HT-701,
HT-702, HT-705, HT-707
P3AE NL
3M Mistral M-106, M-107, M-306, M-307 P3AF NL
3M G500 Headgear P3E SNL
3M G2000 P3K SNL
3M G22 P3E NL
3M G3000 P3E SNL
Auboueix Brennus P3F SNL
Auboueix Fondelec P3F SNL
Auboueix Iris P3E NL
Auboueix Iris 2 P3E NL
Sofop Taliaplast Oceanic P3E NL
Sofop Taliaplast Opus P3E NL
Berendsen Safety, Balance HD P3N SNL
Centurion 1125/ARCO plus P3H SNL
Centurion 1100/ARCO type 2 P3H NL
Centurion 1540/ARCO P3A NL
Evert Larsson Robust P3E SNL
Evert Larsson Balance P3E NL
Evert Larsson Balance AC/3M 1465 P3E NL
Kemira Top Cap P3A SNL
LAS LP2002 P3E SNL
LAS LP2006 P3E SNL
MSA Super V-Gard II P3E SNL
MSA V-Gard P3E SNL
Petzl Vertex P3E SNL
Protector Style 300 P3E SNL
Protector Style 600 P3G SNL
Protector Tuffmaster II P3E, P3G NL
Römer Bravo 2 Nomaz P3B SNL
Römer Marcus Top 2 Atlas Nomaz P3B SNL
Römer N2 Atlas Nomaz P3BB SNL
Römer Pro Expo P3E SNL
Römer Pro Nomaz P3E SNL
Römer Top Expo Atlas P3B SNL
Schuberth BEN P3BB SNL
Schuberth BER80/WPC80 P3EA SNL
Schuberth BER S P3E SNL
Schuberth BOP R P3B SNL
Schuberth PIONIER P3B SNL
Schuberth SH 91/WPL 91 P3EB SNL
Schuberth SW1 P3EB NL
UVEX Airwing P3E SNL
Voss Inap 88 P3E SNL
Voss Inap Master P3E NL
Voss Inap Star P3E NL
Voss Inap PCG P3G NL
J)
FP3739_Tactical_XP_rev b_8 sidigt omslag_A5.indd 6 2016-03-24 15:08:43

FP3739_Tactical_XP_rev b_8 sidigt omslag_A5.indd 7 2016-03-24 15:08:43

FP3739_Tactical_XP_rev b_8 sidigt omslag_A5.indd 8 2016-03-24 15:08:43

9
3M™PELTOR™Tactical XP
GB, IE, ZA, AE 10-12
FR, CH, BE 13-16
DE, CH, AT 17-20
IT, CH 21-23
ES 24-26
NL, BE 27-29
SE 30-32
DK 33-35
NO 36-38
IS 39-41
FI 42-44
PT 45-47
PL 48-51
HU 52-54
CZ 55-57
SK 58-60
SI 61-63
GR 64-67
EE 68-70
LV 71-73
LT 74-76
RO 77-79
RS 80-82
HR 83-85
BG 86-89
TR 90-92
RU 93-95
FP3739_Tactical_XP_rev b_8 sidigt omslag_A5.indd 9 2016-03-24 15:08:43

10
GB
3M™ PELTOR™ Tactical XP Headset
Hearing protector with level-dependent function for ambient
listening and versions with option to connect external
equipment.
Intrinsically safe approved models available, see separate
folder for further information.
Read these instructions carefully before use and save for
future reference.
1. COMPONENTS
A:1 Foldable headband (stainless steel sheet, leather)
A:2 Cup supporting arm (stainless steel)
A:3 Two-point fasteners (POM)
A:4 Ear cushion (PVC foil, PUR foam)
A:5 Cup
A:6 Microphone for ambient listening function
A:7 On/Off/Mode
A:8 +
A:9 –
A:10 Battery lid
A:11 Speech microphone/external source input (J22)
B:1 Neckband (stainless steel, TPO)
B:2 Helmet attachment (stainless steel, POM)
B:3 Headset cable (PUR)
B:4 Connector for separate ex cable
2. FITTING AND ADJUSTMENT
Note! Brush aside hair around your ears so the ear cushions
t snugly.
Spectacle frames should be as thin as possible and t close
to the head to minimize acoustic leakage.
2:1 Headband and foldable headband
(C:1)(C:2) Slide out the cups and tilt the top of the cup out, as
the cable must be on the outside of the headband.
(C:3) Adjust the height of the cups by sliding them up or down
while holding the headband in place.
(C:4) The headband should be positioned across the top of
your head.
(C:5) When small size range or medium size range is needed
to give the correct t, attach the self-adhesive pad on the
inside of the headband to t between the top of the head and
the headband.
2:2 Neckband
(C:6) Place the cups in position over the ears.
(C:7) Keep the hearing protector in position and place the
head strap on top of your head and lock it tight in position.
(C:8) The head strap should be positioned across the top of
your head.
2:3 Helmet attachment
(C:9) Insert the helmet attachment in the slot on the helmet
and snap it into place.
(C:10) Work mode. To switch the unit from ventilation mode
to work mode, press the headband wires inwards until you
hear a click on both sides. Make sure that the cups and the
headband wires do not press on the edge of the helmet when
in work mode as this can cause noise leakage.
(C:11) Ventilation mode. Avoid placing the cups against the
helmet as this prevents ventilation (C:12).
2:4 Microphone (Fig. D)
For maximum noise cancelling, the speech microphone
should be positioned very close to your mouth (3 mm).
2:5 Replacing helmet attachment plate Z3E with Z3G
or Z3K
A screwdriver is needed.
1. Loosen the screw holding the Z3E plate.
2. Replace the plate with Z3G or Z3K, ensure the plate is
turned the right way.
3. Tighten the screw.
3. USAGE/FUNCTIONS
3:1 Inserting batteries
Insert batteries (2 x AA) in the battery compartment. Tighten
the screw.
Low battery level is indicated by three tones, repeated at
decreasing intervals.
3:2 Switching the headset on and off
Press and hold the On/Off/Mode button for two seconds
to switch the headset on or off. A tone will conrm that the
unit has been switched on or off. The last setting is always
saved when the headset is switched off, except for the high
volume mode on external input. The headset is automatically
powered off after two hours of inactivity. This is indicated by
tone signals for the last minute, then the headset switches
off.
3:3 Menu
To browse through the menu, press the On/Off/Mode button
briey. The menu steps are:
Volume, Balance, Equalizer, Release time, External input
volume and External input mode.
At each menu step the + (increase) or – (decrease) buttons
are used to change the setting.
By pressing and holding the – button for two seconds, some
functions can be switched off. To turn back on again, press
the + button briey. Each step and setting change in the
menu is conrmed by a voice message.
3:4 Volume
This volume setting adjusts the level-dependent function
for ambient sound in 6 levels and an off mode. The volume
is limited to 82 dB. The amplication is reduced when an
external signal comes in through the external input.
Note! When this function is switched off the ambient sound
will not be attenuated, which could be hazardous.
3:5 Balance
The balance between the right and left ear can be adjusted to
9 different settings. Centre balance can be found by pressing
the + and – buttons at the same time.
FP3739_Tactical_XP_rev b_8 sidigt omslag_A5.indd 10 2016-03-24 15:08:44

11
GB
3:6 Equalizer
The Equalizer adjusts the tone and has a choice of four
settings: Low, Neutral, High and Extra High.
3:7 Release Time (level-dependent function for ambient
sound)
The release time setting adjusts the time before the limiter for
the level-dependent function opens after activation. Available
settings are Normal and Slow.
3:8 External Input Mode (headset only)
The external input can be set to one of three modes. Try the
three levels until you nd the ideal one for your connected
device.
3:9 External Input Volume (headset only)
The volume of the external input can be set to normal or high.
WARNING! At the high setting the volume may exceed 82 dB.
4. IMPORTANT USER INFORMATION
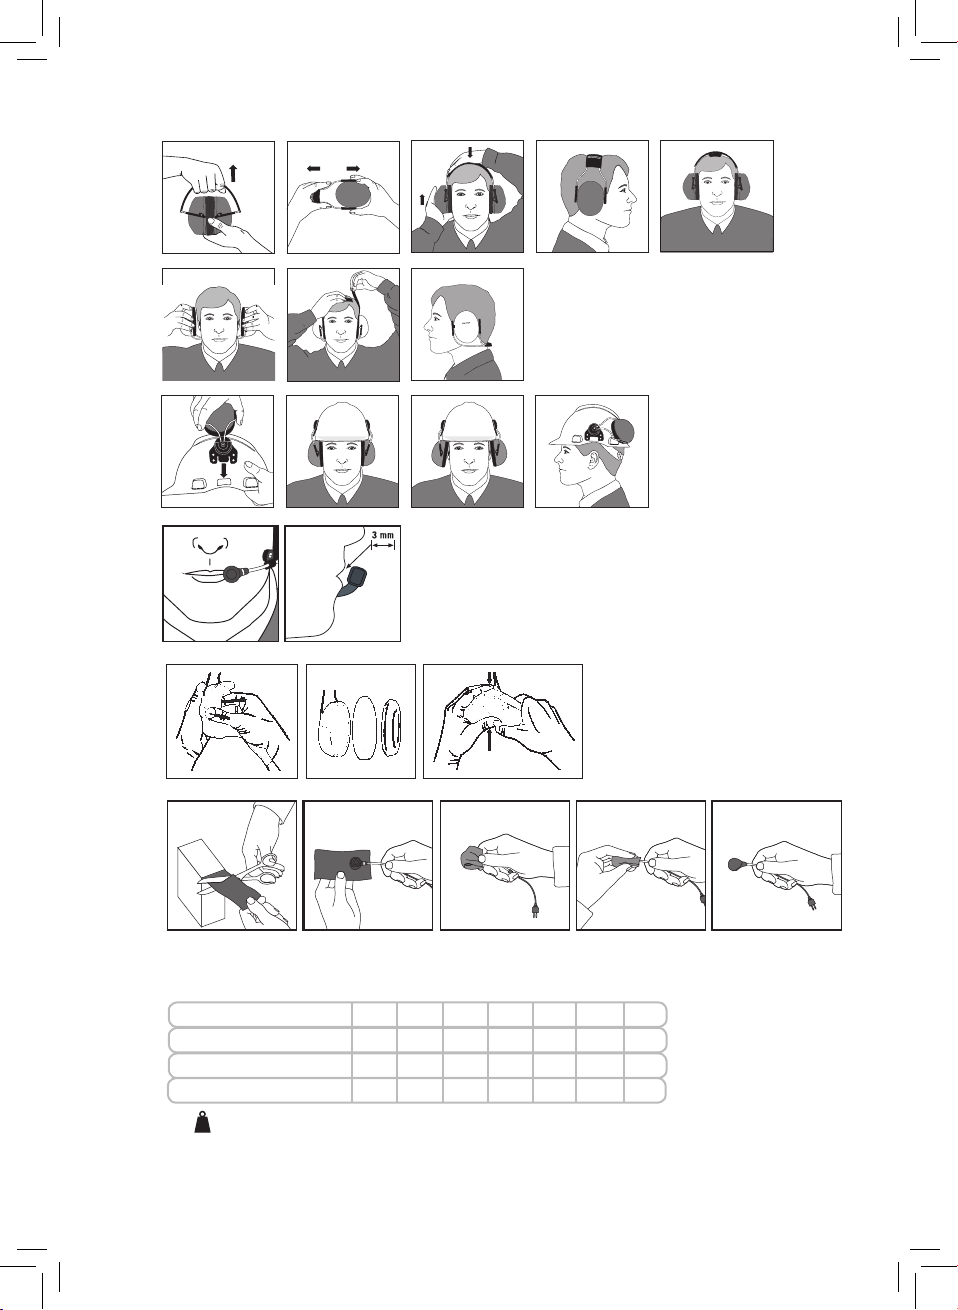
It is recommended that the wearer ensures that:
• The ear-muffs are tted, adjusted and maintained in
accordance with the manufacturer’s instructions.
• The ear-muffs are worn at all times in noisy surroundings.
• The ear-muffs are regularly inspected for serviceability.
Warning!
If the recommendations above are not adhered to, the
protection afforded by the ear-muffs will be severely impaired.
• This product may be adversely affected by certain
chemical substances. Further information should be
sought from the manufacturer.
• Ear-muffs, and in particular cushions, may deteriorate
with use and should be examined at frequent intervals for
cracking and leakage, for example.
• The tting of hygiene covers to the cushions may affect
the acoustic performance of the ear-muffs.
• This ear-muff is provided with level-dependent attenuation.
The wearer should check correct operation before use.
If distortion or failure is detected, the wearer should
refer to the manufacturer’s advice for maintenance and
replacement of the battery.
• This ear-muff is provided with electrical audio input. The
wearer should check correct operation before use. If
distortion or failure is detected, the wearer should refer to
the manufacturer’s advice.
Follow the advice in this manual on maintaining and replacing
batteries.
Warning!
• Performance may deteriorate with battery usage. The
typical period of continuous use that can be expected from
the ear-muff battery is 1000 hours.
• The output of the level-dependent circuit of this hearing
protector may exceed the external sound level.
• The output of the electrical audio circuit of this hearing
protector may exceed the daily limit sound level.
5. MAINTENANCE
5:1 Replacing the ear cushions
(E:1) Slide your ngers under the edge of the ear cushion
and pull straight out.
(E:2) Insert the new foam and ear cushion.
(E:3) Press until it snaps into place.
5:2 Cleaning
Remove the ear cushions and attenuation cushions (g. E)
if you have been wearing the hearing protector for a long
time or if moisture has gathered inside the cups. Clean and
disinfect the cups, headband and ear cushions regularly with
soap and warm water. Make sure the soap is known not to
be harmful to the wearer. Allow the hearing protector to dry
before you use it again. Do not immerse the hearing protector
in water!
5:3 Use and Storage conditions
Remove the batteries before storing the product. Do not store
the hearing protector at temperatures above +55°C, (for
example on a dashboard, parcel shelf or window sill), or at
temperatures below –20°C. Do not use the hearing protector
at temperatures above +55°C, or below –20°C.
5:4 Microphone protection
To protect the speech microphone from humidity and dirt,
use microphone protector HYM1000. To attach the protector,
see g F.
5:5 WEEE (Waste Electrical and
Electronic Equipment) Symbol:
Below requirement applies in the European Union.
Do NOT dispose your product as unsorted municipal waste!
The crossed-out wheeled-bin symbol indicates that all
EEE (Electrical and Electronic Equipment), batteries and
accumulators must be disposed of according to local law by
the use of available return and collection systems.
6. TECHNICAL DATA
6:1 Standard and Approval
3M Svenska AB hereby declares that this 3M™ PELTOR™
Tactical XP Headset is in compliance with the essential
requirements and other provisions set out in the appropriate
directives. Thereby it fulls the requirements for CE marking.
A copy of the declaration of conformity and additional
information required in the directives can be obtained by
contacting 3M in the country of purchase. For contact
information, see last pages of this user instruction. The
product has been tested and approved in accordance with
EN 352-1:2002 / EN 352-3:2002, EN 352-4:2001,
EN 352-6:2002.
This product contains electrical and electronic components
and must not be disposed of using standard refuse collection.
Please consult local directives for disposal of electrical and
electronic equipment.
FP3739_Tactical_XP_rev b_8 sidigt omslag_A5.indd 11 2016-03-24 15:08:44

12
Notied Body Statement of Opinion offered by:
FIOH, Finnish Institute of Occupational Health,
Topeliuksenkatu 41 a A, FI-00250, Helsinki, Finland. Notied
body #0403.
6:2 Explanation of the attenuation data tables (Table G)
1. Model designation
2. Frequency (Hz)
3. Mean attenuation (dB)
4. Standard deviation (dB)
5. Assumed Protection Value, APV
6. Weight (g)
6:3 Explanation of the table of electrical audio input level
(Table H, headsets only)
1. Model designation.
2. External Input Mode (see 3:8) mode 1–3, 0=product
switched off.
3. External Input Volume (see 3:9) N=Normal, H=High
0=product switched off.
4. Input signal level U (mV, RMS).
5. Mean sound pressure level dB(A).
6. Sound pressure standard deviation, (dB)
7. Input signal level for which the mean plus one standard
deviation equals 82 dB(A).
The failsafe mode, where input signals can also be heard in
off mode, is available only on *-50 models.
6:4 Explanation of the table of criterion levels (Table I)
The criterion level is the sound pressure level in dB(A) of the
noise environment resulting in 85 dB(A) effective to the ear
while wearing the hearing protectors. Three different criterion
levels are dened related to the frequency content of the
noise.
1. Model designation.
H = criterion level for high-frequency noise.
M = criterion level for medium-frequency noise.
L = criterion level for low-frequency noise.
6:5 Industrial safety helmet attachment (Table J)
These ear-muffs should be tted to, and used only with, the
industrial safety helmets listed in table J.
Explanation of the industrial safety helmet attachment table
1. Helmet manufacturer.
2. Helmet model.
3. Helmet attachment.
4. Head sizes: S = Small, M = Medium, L = Large.
7. SPARE PARTS/ACCESSORIES
3M™ PELTOR™ HY79, Hygiene kit
Replaceable hygiene kit. Replace at least twice a year to
ensure constant attenuation, hygiene and comfort.
3M™ PELTOR™ HY100A, Single-use protectors
Single-use protector that is easy to t to the ear cushions.
3M™ PELTOR™ HYM1000, Microphone protector
Moisture and wind-resistant tape that protects the speech
microphone.
3M™ PELTOR™ M41/2 Wind protection for the
microphones
Wind protection for the microphones.
Important Notice
3M does not accept liability of any kind, be it direct or
consequential (including, but not limited to, loss of prots,
business and/or goodwill) arising from reliance upon any
information herein provided by 3M. The user is responsible
for determining the suitability of the products for their
intended use. Nothing in this statement will be deemed to
exclude or restrict 3M’s liability for death or personal injury
arising from its negligence.
GB
FP3739_Tactical_XP_rev b_8 sidigt omslag_A5.indd 12 2016-03-24 15:08:44

13
FR
3M™ PELTOR™ Tactical XP Headset
Protection auditive à modulation sonore électronique
permettant d’entendre les bruits ambiants et versions avec
possibilité de connecter un équipement externe.
Modèles approuvés à sécurité intrinsèque disponibles, voir
dossier séparé pour plus d’information.
Lisez attentivement ces instructions avant toute utilisation et
conservez-les à titre de référence.
1. COMPOSANTS
A:1 Serre-tête pliable (acier inoxydable, cuir)
A:2 Supports de coquilles (acier inoxydable)
A:3 Fixations bipoints (POM)
A:4 Anneau d’étanchéité (feuille PVC, mousse PUR)
A:5 Coquille
A:6 Microphone pour la fonction d’écoute ambiante
A:7 On/Off/Mode
A:8 +
A:9 –
A:10 Couvercle du boîtier à pile
A:11 Entrée du microphone pour parler/source externe (J22)
B:1 Serre-nuque (acier inoxydable, TPO)
B:2 Attaches pour casque (acier inoxydable, POM)
B:3 Câble Headset (PUR)
B:4 Connecteur pour câble Flex séparé
2. INSTALLATION ET RÉGLAGE
Remarque : écartez les cheveux autour des oreilles de sorte
que les anneaux d’étanchéité s’appliquent parfaitement
contre la tête. Les branches de lunettes doivent être aussi
nes que possible et aussi près que possible de la tête.
2:1 Serre-tête et serre-tête pliable
(C:1)(C:2) Faites glisser les coquilles vers l’extérieur en tour-
nant leur partie supérieure vers l’extérieur, le cordon devant
être à l’extérieur du serre-tête.
(C:3) Réglez la hauteur des coquilles en les faisant glisser
vers le haut ou vers le bas, tout en maintenant le serre-tête
en place.
(C:4) Le serre-tête doit être placé au-dessus de la tête.
(C:5) Lorsque le modèle de petite taille ou de taille moyenne
est nécessaire pour le montage, xez la bande auto-adhésive
sur l’intérieur du serre-tête pour l’ajuster entre le sommet de
la tête et le serre-tête.
2:2 Serre-nuque
(C:6) Positionnez les coquilles sur les oreilles.
(C:7) Maintenez le headset en position, placez la sangle sur
votre tête et xez-la bien.
(C:8) La sangle doit être placée au-dessus de la tête.
2:3 Attaches pour casque
(C:9) Montez les attaches pour casque sur la fente du casque
jusqu’à « l’encliquetage ».
(C:10) Position travail. Appuyez sur les arceaux du serre-tête
vers l’intérieur jusqu’à ce que vous entendiez un clic des
deux côtés, pour passer de la position d’aération à la position
de travail. Assurez-vous que les coquilles ou les arceaux
n’appuient pas sur le bord du casque, ce qui pourrait provo-
quer une perte d’atténuation.
(C:11) Position aération. Évitez de placer les coquilles contre
votre casque car cela empêche une bonne aération (C:12).
2:4 Microphone (Fig. D)
Pour obtenir une suppression maximale des bruits, le micro-
phone doit être placé très près de la bouche (3 mm).
2:5 Remplacement de la plaque de xation pour casque
Z3E par une plaque Z3G ou Z3K
Un tournevis est nécessaire.
1. Desserrez la vis qui maintient la plaque Z3E.
2. Remplacez la plaque par le modèle Z3G ou Z3K, en
veillant à ce qu’elle soit correctement orientée.
3. Serrez la vis.
3. UTILISATION/FONCTIONS
3:1 Insertion des piles
Insérez les piles (2XAA) dans le compartiment prévu à cet
effet. Serrez la vis.
Faible tension des piles indiquée par trois signaux
d’avertissement. L’intervalle entre les signaux diminue au fur
et à mesure de l’affaiblissement des piles.
3:2 Mise sous tension et hors tension du headset
Appuyez sur la touche On/Off/Mode pendant 2 secondes
pour activer ou désactiver le headset. Une tonalité conrme
que l’appareil a été activé ou désactivé. Les derniers
réglages sont mémorisés lors de la mise hors tension, à
l’exception du volume supérieur de l’entrée externe. Coupure
automatique après deux heures si aucune fonction n’est
utilisée. Deux signaux d’avertissement sont émis toutes les
dix secondes pendant une minute après 1H59 d’utilisation
pour indiquer que l’unité va se couper.
3:3 Menu
Pour parcourir le menu, appuyez brièvement sur la touche
On/Off/Mode. Les étapes du menu sont :
Volume, Balance, Equalizer (égaliseur), Release time
(réglage du temps de déclenchement), External input volume
(volume pour entrée externe) et External input mode (mode
d’entrée externe).
À chaque étape de menu, les touches + (augmentation)
ou – (diminution) sont utilisées pour modier le réglage.
Certaines fonctions peuvent être désactivées en appuyant
sur la touche – pendant deux secondes. Pour les réactiver,
appuyez brièvement sur la touche +. Chaque changement
d’étape et de réglage dans le menu est conrmée par un
message vocal.
3:4 Volume
Ce réglage de volume ajuste la fonction de modulation sonore
permettant d’entendre les bruits ambiants en 6 niveaux et un
mode arrêt. Le volume est limité 82 dB. L’amplication est
atténuée quand un signal externe entre par l’entrée externe.
Remarque : lorsque cette fonction est désactivée, les bruits
ambiants ne sont pas atténués, ce qui peut être dangereux.
FP3739_Tactical_XP_rev b_8 sidigt omslag_A5.indd 13 2016-03-24 15:08:44

14
FR
3:5 Balance
La balance entre les oreilles droite et gauche se règle selon 9
modes différents. Appuyez en même temps sur les touches +
et – pour une balance centrale.
3:6 Égaliseur
L’égaliseur permet de régler la tonalité et est réglable selon
quatre paramètres : Low (bas), Neutral (neutre), High (haut)
et Extra High (très haut).
3:7 Réglage du temps de déclenchement de la fonction à
modulation sonore
Le réglage du temps de déclenchement permet de régler le
temps avant l’ouverture du limiteur de la fonction à modulation
sonore, après activation. Les réglages disponibles sont :
Normal et Slow (lent).
3:8 Mode d’entrée externe (headset uniquement)
L’entrée externe peut être réglée dans trois modes. Essayez
les trois niveaux jusqu’à ce que vous trouviez la solution
optimale pour votre appareil connecté.
3:9 Volume d’entrée externe (headset uniquement)
Le volume de l’entrée externe peut être réglé sur Normal ou
High (haut).
AVERTISSEMENT ! En mode haut, le volume peut dépasser
82 dB.
4. INFORMATIONS IMPORTANTES POUR
L’UTILISATEUR
Il est conseillé à l’utilisateur de s’assurer que :
• Les protections auditives sont portées, réglées et entrete-
nues selon les instructions du fabricant.
• Les protections auditives sont toujours portées dans des
environnements bruyants.
• L’aptitude à l’usage des protections auditives est régulière-
ment vériée.
Avertissement !
Si les présentes recommandations ne sont pas observées,
la protection fournie par les coquilles antibruit risque d’être
gravement compromise.
• Ce produit peut être endommagé par certaines substances
chimiques. Consultez le fabricant pour de plus amples
renseignements.
• Le casque, en particulier les anneaux d’étanchéité, peut
se détériorer avec le temps et devra être examiné avant
utilisation, an de détecter tout signe de ssure ou de fuite.
• L’utilisation de kits d’hygiène sur les coussins peut modier
les performances des protections auditives.
• Ce casque est équipé d’une fonction d’atténuation dépen-
dant du niveau. Il est recommandé à l’utilisateur de vérier
le bon fonctionnement du produit avant son utilisation.
En cas de distorsion ou de tout autre dysfonctionnement,
suivez les instructions du fabricant relatives à l’entretien et
au remplacement des piles.
• Cette protection auditive comporte une entrée audio élec-
trique. Il est recommandé à l’utilisateur de vérier le bon
fonction-nement du produit avant son utilisation. En cas de
distorsion ou de tout autre dysfonctionnement, suivez les
instructions du fabricant.
• Suivez les conseils dans ce manuel concernant l’entretien
et le remplacement des piles.
Avertissement :
• Les performances peuvent se détériorer avec l’usure des
piles. La durée d’utilisation continue habituelle des piles du
produit est de 1000 heures.
• La sortie du circuit dépendant du niveau de la protection
auditive peut dépasser le niveau sonore externe.
• Le niveau de sortie du circuit audio électrique de cette
protection auditive peut dépasser le niveau limite d’exposition
quotidienne.
5. ENTRETIEN
5:1 Remplacement des anneaux d’étanchéité
(E:1) Glissez vos doigts sous le bord de l’anneau d’étanchéité
et tirez droit vers vous.
(E:2) Insérez la nouvelle mousse et le nouvel anneau
d’étanchéité.
(E:3) Appuyez sur l’anneau jusqu’à ce qu’il s’enclenche.
5:2 Nettoyage
Après une utilisation prolongée, ou lorsque l’intérieur des
coquilles du headset est humide, retirez les anneaux
d’étanchéité et les mousses d’atténuation (g. E). Nettoyez
et désinfectez régulièrement le headset, le serre-tête et les
anneaux d’étanchéité à l’aide de savon et d’eau chaude.
Assurez-vous que le savon utilisé n’est pas dangereux pour
l’utilisateur. Laissez sécher le headset avant la prochaine
utilisation. N’immergez pas la protection auditive dans l’eau.
5:3 Conditions d’utilisation et de stockage
Retirez les piles avant de ranger le produit. Ne conservez pas
la protection auditive dans des endroits où la température
peut dépasser +55 °C (comme sur le tableau de bord d’un
véhicule ou derrière une fenêtre), ou être inférieure à -20 °C.
N’utilisez pas la protection auditive dans des endroits où la
température peut dépasser +55 °C ou descendre en dessous
de -20 °C.
5:4 Protection du microphone
Pour protéger le microphone de l’humidité et de la saleté,
utilisez une protection pour microphone HYM1000. Pour
savoir comment attacher la protection, consultez la Fig. F.
5:5 Symbole DEEE (Déchets d’équipements
électriques et électroniques)
L’exigence ci-dessous s’applique aux pays de
l’Union européenne.
NE jetez PAS vos produits avec les déchets municipaux non
triés.
Le symbole de la poubelle sur roues barrée signie que tous
les EEE (équipements électriques et électroniques), les piles
et les accumulateurs font l’objet d’une collecte sélective en n
de vie, conformément à la législation locale.
FP3739_Tactical_XP_rev b_8 sidigt omslag_A5.indd 14 2016-03-24 15:08:44

15
FR
6. CARACTÉRISTIQUES TECHNIQUES
6:1 Normes et homologations
Par la présente, 3M Svenska AB déclare que ce casque
3M™ PELTOR™ Tactical XP Headset est conforme aux
exigences essentielles et aux autres dispositions énoncées
dans les directives appropriées. Il répond ainsi aux exigences
de marquage CE. Une copie de la déclaration de conformité,
ainsi que les informations supplémentaires exigées par les
directives, peuvent être obtenues en prenant contact avec
3M dans le pays d’achat. Pour obtenir les coordonnées de
contact, voir les premières pages de ce mode d’emploi. Le
produit a été testé et approuvé selon les normes EN 352-
1:2002/EN 352-3:2002, EN 352-4:2001, EN 352-6:2002.
Ce produit contient des composants électriques et électroni-
ques et ne doit pas être éliminé en ayant recours au système
de collecte habituel pour les ordures ménagères. Prière de
consulter les réglementations locales concernant l’élimination
des équipements électriques et électroniques.
Avis qualié d’organisme notié établi par :
FIOH, Finnish Institute of Occupational Health (Institut
nlandais de la santé sur le lieu de travail),
Topeliuksenkatu 41 a A, FI-00250 Helsinki, Finlande.
Organisme notié N° 0403.
6:2 Explication des tableaux des données d’atténuation
(tableau G)
1. Désignation du modèle
2. Fréquence (Hz)
3. Atténuation moyenne (dB)
4. Écart type (dB)
5. Valeur de protection théorique, APV
6. Poids (g)
6:3 Explication du tableau du niveau de l’entrée audio
électrique (tableau H, headset uniquement)
1. Désignation du modèle
2. Mode entrée externe (voir 3:8) mode 1–3,
0=produit désactivé
3. Volume entrée externe (voir 3:9) N=Normal,
H=Haut, 0=produit désactivé
4. Niveau de signal d’entrée U (mV, RMS)
5. Niveau moyen de pression acoustique, dB(A)
6. Écart type de pression acoustique, dB
7. Niveau de signal d’entrée pour lequel la valeur moyenne
plus un écart type est égale à 82 dB(A)
Le mode de sécurité, où les signaux d’entrée peuvent être
entendus aussi en mode off, est disponible uniquement sur
les modèles *-50.
6:4 Explication du tableau des niveaux de critère
(tableau I)
Les niveaux de critères répertoriés dans le tableau I
représentent l’exposition au bruit critique lors de laquelle
l’atténuation combinée passive et dynamique dépasse
85 dB(A). Trois niveaux de critère différents sont dénis
en fonction de la fréquence du bruit.
1. Désignation du modèle
H = niveau de critères hautes fréquences.
M = niveau de critères fréquences moyennes.
L= niveau de critères basses réquences.
6:5 Attaches pour casques de sécurité industriels
(tableau J)
Ces protections auditives doivent être montées et utilisées
uniquement avec les casques de sécurité industriels énu-
mérés dans le tableau J.
Explication du tableau des attaches pour casques de sécurité
industriels
1. Fabricant du casque
2. Modèle de casque
3. Attaches pour casque
4. Tailles : S = Small (petit), M = Medium (moyen), L = Large
(grand)
7. PIÈCES DE RECHANGE/ACCESSOIRES
3M™ PELTOR™ HY79, Kit d’hygiène
Kit d’hygiène remplaçable. À remplacer tous les six mois
au moins pour assurer un niveau constant d’atténuation,
d’hygiène et de confort.
3M™ PELTOR™ HY100A, Protection à usage unique
Protection à usage unique qui se xe facilement sur les
anneaux d’étanchéité.
3M™ PELTOR™ HYM1000, Protection du microphone
Protection hygiénique étanche au vent et à l’humidité qui
protège efcacement et augmente la durée de vie du microp-
hone pour parler.
3M™ PELTOR™ M41/2, Protection antivent pour
microphones d’ambiance
Protection contre le sifement du vent pour microphones
d’ambiance
Remarque importante
3M ne pourra en aucun cas être tenu responsable, de
manière directe ou indirecte, de tout dommage (incluant,
sans s’y limiter, toute perte de prots, d’affaire et/ou de
bonne réputation) résultant de la conance accordée aux
informations fournies dans le présent document. L’utilisateur
doit s’assurer de l’adéquation des produits avec leur mise en
œuvre. Aucun élément de la présente déclaration ne pourra
exclure ou restreindre la responsabilité de 3M en cas de
décès ou de blessure résultant d’une négligence.
FP3739_Tactical_XP_rev b_8 sidigt omslag_A5.indd 15 2016-03-24 15:08:44

16
FR
FP3739_Tactical_XP_rev b_8 sidigt omslag_A5.indd 16 2016-03-24 15:08:44

17
DE
3M™ PELTOR™ Tactical XP Headset
Gehörschutz mit stufenabhängiger Funktion für
Umgebungsgeräusche und Ausführungen mit Option zum
Anschluss externer Ausrüstung.
Auf Eigensicherheit geprüfte Modelle sind erhältlich, siehe
gesondertes Faltblatt für weitere Informationen.
Bitte lesen Sie diese Bedienungsanleitung vor der Benutzung
des Produkts gründlich durch und heben Sie sie für
zukünftigen Bedarf auf.
1. BESTANDTEILE
A:1 Zusammenfaltbarer Kopfbügel (Edelstahlbogen, Leder)
A:2 Kapselbügel (Edelstahl)
A:3 Zweipunkt-Aufhängung (POM)
A:4 Dichtungsringe (PVC-Folie, PUR-Schaum)
A:5 Kapsel
A:6 Mikrofon für Umgebungsgeräusche
A:7 On/Off/Mode (Ein/Aus/Modus)
A:8 +
A:9 –
A:10 Batteriefachdeckel
A:11 Eingang Sprechmikrofon / externe Quelle (J22)
B:1 Nackenbügel (Edelstahl, TPO)
B:2 Helmbefestigung (Edelstahl, POM)
B:3 Headset-Kabel (PUR)
B:4 Anschluss für separates Spiralkabel
2. ANPASSUNG UND EINSTELLUNG
Bitte beachten! Die optimale Dämmwirkung wird nur erreicht,
wenn die Dichtungsringe um die Ohren dicht anliegen. Das Haar
zurückstreichen. Brillenbügel sollten möglichst dünn sein und
ebenfalls dicht am Kopf anliegen, damit keine undichten Stellen
entstehen.
2:1 Kopfbügel und zusammenfaltbarer Kopfbügel
(C:1)(C:2) Die Kapseln nach außen schieben und die
Oberseite der Schale nach außen neigen. Dabei muss das
Kabel an der Außenseite des Kopfbügels entlanggeführt
werden.
(C:3) Die Höhe der Kapseln einstellen, bis sie dicht und
bequem sitzen. Dabei den Kopfbügel mit der einen Hand
festhalten.
(C:4) Der Bügel soll über die Kopfmitte verlaufen.
(C:5) Wenn nur die Größe Small oder Medium passt, das
selbstklebende Polster auf der Innenseite des Kopfbügels so
anbringen, dass es zwischen Kopf und Kopfbügel sitzt.
2:2 Nackenbügel
(C:6) Die Kapseln auf die Ohren setzen.
(C:7) Das Headset festhalten und den Kopfbügel über den
Kopf ziehen und eng anziehen.
(C:8) Der Kopfbügel soll über die Kopfmitte verlaufen.
2:3 Helmbefestigung
(C:9) Die Helmbefestigung in den Schlitz am Helm schieben,
bis sie einrastet.
(C:10) Betriebsstellung. Zur Benutzung die Drahtbügel aus
der Lüftungs- in die Betriebsstellung nach innen drücken, bis
auf beiden Seiten ein Klicken zu hören ist. Sicherstellen, dass
Kapseln und Bügeldrähte in Betriebsstellung nicht gegen
die Kante des Schutzhelms anliegen, damit keine undichten
Stellen entstehen können.
(C:11) Lüftungsstellung. Die Kapseln sollten nicht am Helm
anliegen, weil sie dann nicht richtig auslüften können (C:12).
2:4 Mikrofon (Abb. D)
Damit Umgebungslärm optimal unterdrückt werden kann,
sollte das Mikrofon nur wenige Millimeter (3 mm) vom
Mundwinkel entfernt sein.
2:5 Ersetzen der Helmbefestigungsplatte Z3E durch Z3G
oder Z3K
Ein Schraubendreher wird benötigt.
1. Schraube lösen, die die Z3E-Platte hält.
2. Die Platte gegen Z3G oder Z3K austauschen, dabei
sicherstellen, dass die Platte richtig herum gedreht ist.
3. Schraube anziehen.
3. GEBRAUCH/FUNKTIONEN
3:1 Einlegen der Batterien
Batterien in das Batteriefach einlegen (2 X AA). Schraube
anziehen.
Ein niedriger Ladezustand der Batterie wird durch drei Töne
angezeigt, die mit abnehmenden Intervall wiederholt werden.
3:2 Ein- und Ausschalten des Headsets
Zum Ein- oder Ausschalten des Headsets die Taste On/
Off/Mode zwei Sekunden lang drücken. Das Ein- und
Ausschalten der Einheit wird durch einen Ton bestätigt.
Die letzte Einstellung wird beim Ausschalten des Headsets
mit Ausnahme der Lautstärkeeinstellung für den externen
Eingang immer gespeichert. Wenn keine Funktionen aktiviert
werden, wird das Headset automatisch nach zwei Stunden
ausgeschaltet. Dies wird in der letzten Minute vor dem
Ausschalten durch Tonsignale angezeigt.
3:3 Menü
Die On/Off/Mode-Taste kurz drücken, um durch das Menü zu
blättern. Die Menü-Schritte sind:
Volume (Lautstärke), Balance, Equalizer, Release time
(Auslösedauer), External input volume (Lautstärke für
externen Eingang) und External input mode (externer
Eingangsmodus).
Bei jedem Menüschritt werden die Tasten + (erhöhen) oder –
(verringern) zur Änderung der Einstellungen verwendet.
Durch 2 Sekunden langes Drücken der Taste – können
einige Funktionen ausgeschaltet werden. Um Sie wieder
einzuschalten, die Taste + kurz drücken. Jeder Schritt
und Einstellungswechsel im Menü wird durch eine
Sprachmitteilung bestätigt.
3:4 Lautstärke
Mit der Lauststärkeeinstelllung wird die stufenabhängige
Funktion für Umgebungsgeräusche in 6 Stufen und einer
Aus-Stellung eingestellt. Die Lautstärke ist auf 82 dB
begrenzt. Die Verstärkung wird abgeschwächt, wenn durch
FP3739_Tactical_XP_rev b_8 sidigt omslag_A5.indd 17 2016-03-24 15:08:44

18
DE
den externen Eingang ein Eingangssignal kommt.
Bitte beachten! Wenn diese Funktion ausgeschaltet ist,
werden die Umgebungsgeräusche nicht abgeschwächt, was
gefährlich sein kann.
3:5 Balance
Die Balance zwischen dem rechten und dem linken Ohr wird
in 9 verschiedenen Modi eingestellt. Center Balance kann
durch gleichzeitiges Drücken der Tasten + und – gefunden
werden.
3:6 Equalizer
Der Equalizer regelt den Ton und ist in vier Stufen einstellbar:
Low (Niedrig), Neutral, High (Hoch) und Extra High (Extra
Hoch).
3:7 Auslösedauer (stufenabhängige Funktion für
Umgebungsgeräusche)
Die Einstellung der Auslösedauer regelt die Zeit, bevor
der Begrenzer für die stufenabhängige Funktion nach der
Aktivierung durchschaltet. Verfügbare Einstellungen sind
Normal und Slow (Langsam).
3:8 Modus des externen Eingangs (nur Headset)
Der externe Eingang kann in drei Modi eingestellt werden.
Die drei Modi sind auszuprobieren, um den für das
angeschlossene Gerät optimalen zu nden.
3:9 Lautstärke des externen Eingangs (nur Headset)
Die Lautstärke des externen Eingangs kann auf Normal oder
High (Hoch) eingestellt werden.
WARNUNG! In der Einstellung Hoch kann die Lautstärke
82 dB überschreiten.
4. WICHTIGE BENUTZERINFORMATION
Es wird empfohlen, dass der Benutzer Folgendes sicherstellt:
• Der Gehörschutz wird gemäß den Anweisungen des
Herstellers eingeführt, angepasst und gewartet.
• Der Gehörschutz wird während des Aufenthalts in
lärmbelasteter Umgebung ununterbrochen getragen.
• Durch regelmäßige Kontrollen sollte sichergestellt werden,
dass sich der Gehörschutz in einem einwandfreien Zustand
bendet.
Warnung!
Wenn die obigen Empfehlungen nicht befolgt werden,
verschlechtert sich die Schutzwirkung des Gehörschutzes
erheblich.
• Dieses Produkt kann durch bestimmte chemische Stoffe
beeinträchtigt werden. Weitere Informationen können beim
Hersteller angefordert werden.
• Der Gehörschutz und besonders die Dichtungsringe
können im Laufe der Zeit Alterungserscheinungen zeigen.
Sie sollten regelmäßig beispielsweise auf Risse und
Undichtigkeiten untersucht werden.
• Hygiene-Auagen auf den Dichtungsringen können die
akustische Leistung des Gehörschutzes beeinträchtigen.
• Dieser Gehörschutz ist mit einer niveauabhängigen
Dämmfunktion ausgestattet. Der Benutzer sollte vor
dem Gebrauch die korrekte Funktion kontrollieren. Wenn
Verzerrungen oder Fehler auftreten, sollte der Benutzer
die Empfehlungen des Herstellers zu Wartung und
Batteriewechsel beachten
• Dieser Gehörschutz ist mit einem elektrischen
Audioeingang ausgestattet. Der Benutzer sollte vor dem
Gebrauch die korrekte Funktion kontrollieren. Wenn
Verzerrungen oder Fehler entdeckt werden, sollte der
Benutzer die Empfehlungen des Herstellers beachten.
• Der Hinweis zur Pege und zum Austauschen der
Batterien ist zu beachten.
Warnung!
• Die Leistung kann sich mit der Batteriebetriebsdauer
verschlechtern. Die typisch zu erwartende Lebensdauer
der Gehörschutzbatterie beträgt 1000 Stunden.
• Das Ausgangssignal vom niveauabhängigen Schaltkreis
in diesem Gehörschutz kann den externen Schallpegel
übersteigen.
• Das Ausgangssignal vom elektrischen Audio-Schaltkreis
dieses Gehörschutzes kann das tägliche Schallpegellimit
übersteigen.
5. PFLEGE
5:1 Ersetzen der Dichtungsringe
(E:1) Mit den Fingern unter die Kante des Dichtungsrings
fassen und diesen gerade herausziehen.
(E:2) Den neuen Schaum- und Dichtungsring einfügen.
(E:3) Bis zum Einschnappen eindrücken.
5:2 Reinigung
Nachdem der Gehörschutz längere Zeit getragen wurde
oder wenn sich Feuchtigkeit in den Kapseln angesammelt
hat, Dichtungsringe und Dämmkissen (Abb. E) entfernen.
Kapseln, Kopfbügel und Dichtungsringe regelmäßig mit
Seife und warmem Wasser reinigen/desinzieren. Dabei
sicherstellen, dass die Seife für den Benutzer unschädlich
ist. Den Gehörschutz vor dem nächsten Gebrauch trocknen
lassen. Den Gehörschutz nicht in Wasser tauchen!
5:3 Voraussetzungen für die Verwendung und
Aufbewahrung
Vor dem Aufbewahren die Batterien herausnehmen.
Den Gehörschutz nicht bei Temperaturen über +55 °C
(z. B. auf einem Armaturenbrett, einer Hutablage oder
einer Fensterbank) oder bei Temperaturen unter –20 °C
aufbewahren. Den Gehörschutz nicht bei Temperaturen über
+55 °C oder unter –20 °C verwenden.
5:4 Mikrofonschutz
Zum Schutz des Sprechmikrofons vor Feuchtigkeit und
Schmutz Mikrofonschutz HYM1000 verwenden. Für das
Aufsetzen des Schutzes, siehe Abb. F.
5:5 WEEE-Symbol (Waste Electrical and Electronic
Equipment, Elektro- und Elektronik-Altgeräte):
Die folgende Anforderung gilt in den Ländern der EU.
FP3739_Tactical_XP_rev b_8 sidigt omslag_A5.indd 18 2016-03-24 15:08:44

19
DE
Dieses Produkt darf NICHT als unsortierter Restmüll entsorgt
werden!
Das durchgestrichene Mülltonnensymbol bedeutet, dass alle
Elektro- und Elektronikgeräte, Batterien und Akkus gemäß
den lokalen gesetzlichen Vorschriften über die zur Verfügung
stehenden Rückgabe- und Sammelsysteme entsorgt werden
müssen.
6. TECHNISCHE DATEN
6:1 Standard und Zulassung
3M Svenska AB erklärt hiermit, dass dieses 3M™ PELTOR™
Tactical XP-Headset mit den wesentlichen Anforderungen
und anderen Bestimmungen der anwendbaren Richtlinien
übereinstimmt. Die Anforderungen für die CE-Kennzeichnung
sind damit erfüllt. Eine Kopie der Konformitätserklärung und
weitergehende in den Richtlinien geforderte Informationen
können Sie erhalten, wenn Sie sich im Land des Erwerbs an
3M wenden. Kontaktinformationen nden Sie auf den ersten
Seiten dieser Bedienungsanleitung. Das Produkt wurde
geprüft und zugelassen in Übereinstimmung mit EN 352-
1:2002/EN 352-3:2002, EN 352-4:2001, EN 352-6:2002.
Dieses Produkt enthält elektrische und elektronische
Komponenten und darf nicht über den Restmüll entsorgt
werden. Die lokalen Vorschriften zur Entsorgung von
elektrischen und elektronischen Ausrüstungen sind zu
beachten.
Stellungnahme der benannten Stelle:
FIOH, Finnish Institute of Occupational Health,
Topeliuksenkatu 41 a A, FI-00250, Helsinki, Finnland.
Benannte Stelle Nr. 0403.
6:2 Erklärungen zur Dämmwertetabelle (Tabelle G)
1. Modellbezeichnung
2. Frequenz (Hz)
3. Mittelwert Dämpfung (dB)
4. Standardabweichung (dB)
5. Angenommene Schutzwirkung, APV
6. Gewicht (g)
6:3 Erklärungen zur Tabelle Elektrischer Audio-
Eingangspegel (Tabelle H, nur Kopfhörer)
1. Modellbezeichnung
2. Externer Eingangsmodus (siehe 3:8) Modus 1–3,
0=Produkt ausgeschaltet
3. Lautstärke externer Eingang (siehe 3:9) N=Normal,
H=Hoch, 0=Produkt ausgeschaltet
4. Eingangssignalpegel U (mV, RMS)
5. Mittlerer Schalldruckpegel, dB(A)
6. Schalldruckpegel, Standardabweichung, dB
7. Eingangssignalstärke, bei der Mittelwert plus eine
Standardabweichung 82 dB(A) beträgt.
Der abgesicherte Modus, bei dem Eingangssignale auch im
ausgeschalteten Zustand gehört werden können, steht nur
bei den Modellen *-50 zur Verfügung.
6:4 Erklärungen zur Kriterienniveautabelle (Tabelle I)
Das Kriterienniveau ist der Schalldruckpegel in dB(A) der
Geräuschumgebung, der beim Tragen des Gehörschutzes
am Ohr effektive 85 dB(A) erzeugt. Drei unterschiedliche
Kriterienniveaus sind bezogen auf den Frequenzinhalt des
Geräusches deniert.
1. Modellbezeichnung
H = Kriterienniveau für hochfrequente Geräusche.
M = Kriterienniveau für mittelfrequente Geräusche.
L = Kriterienniveau für tieffrequente Geräusche.
6:5 Befestigung für Industrieschutzhelme (Tabelle J)
Dieser Gehörschutz sollte ausschließlich in Kombination mit
den in Tabelle J aufgelisteten Industrieschutzhelmen benutzt
werden.
Erklärung zur Tabelle für die Befestigungen für
Industrieschutzhelme
1. Helmhersteller
2. Helmmodell
3. Helmbefestigung
4. Kopfgrößen: S = Small, M = Medium, L = Large
7. ERSATZTEILE/ZUBEHÖR
3M™ PELTOR™ HY79, Hygienesatz
Auswechselbarer Hygienesatz. Mindestens zweimal pro Jahr
auswechseln, damit Dämmwirkung, Hygiene und Komfort auf
einem gleichmäßig hohen Niveau erhalten bleiben.
3M™ PELTOR™ HY100A – Einmalschutz
Hygienischer Einmalschutz, als Auage auf dem
Dichtungsring. Einfach anzubringen.
3M™ PELTOR™ HYM1000, Mikrofonschutz
Feuchtigkeits- und windfestes Klebeband zum Schutz des
Sprechmikrofons.
3M™ PELTOR™ M41/2 Windschutz für Mikrofone
Windschutz für Mikrofone.
Wichtiger Hinweis
Unter keinen Umständen übernimmt 3M eine Haftung
gleich welcher Art für unmittelbare oder Folgeschäden
(einschließlich, aber nicht begrenzt auf, Verluste von Prot,
Geschäften und/oder Goodwill), die sich aus der Befolgung
der hierin von 3M gegebenen Information ergeben. Es
obliegt dem Anwender, vor Verwendung des Produktes
selbst zu prüfen, ob es sich für den von ihm vorgesehenen
Verwendungszweck eignet. Kein Teil dieser Erklärung darf
dahingehend ausgelegt werden, dass sie die Haftung von
3M für Tod oder Körperverletzungen, verursacht durch
Fahrlässigkeit, ausschließt oder beschränkt.
FP3739_Tactical_XP_rev b_8 sidigt omslag_A5.indd 19 2016-03-24 15:08:44

20
DE
FP3739_Tactical_XP_rev b_8 sidigt omslag_A5.indd 20 2016-03-24 15:08:44

21
IT
3M™ PELTOR™ Tactical XP Headset
Protezione acustica con funzione dipendente dal livello di
rumore per i suoni circostanti e versioni con possibilità di
collegamento a un dispositivo esterno.
Modelli omologati intrinsecamente sicuri, per maggiori
informazioni vedere il foglio separato.
Leggere attentamente le istruzioni prima dell’uso e
conservarle per riferimento futuro.
1. COMPONENTI
A:1 Bardatura temporale ripiegabile (acciaio inox, pelle)
A:2 Braccio di supporto della coppa (acciaio inox)
A:3 Attacco a due punti (POM)
A:4 Auricolare (rivestimento in PVC e schiuma di PUR)
A:5 Coppa
A:6 Microfono per i suoni circostanti
A:7 On/Off/Mode (Accensione/Spegnimento/Modalità)
A:8 +
A:9 –
A:10 Copribatteria
A:11 Ingresso per microfono/dispositivo esterno (J22)
B:1 Bardatura nucale (acciaio inox, TPO)
B:2 Attacco per elmetto (acciaio inox, POM)
B:3 Cavo headset (PUR)
B:4 Connettore per cavo ex separato
2. MONTAGGIO E REGOLAZIONE
Nota! Allontanare i capelli dalla zona intorno alle orecchie
afnché gli auricolari aderiscano perfettamente alla testa.
Le astine degli occhiali devono essere più sottili possibili e
aderire perfettamente alla testa per minimizzare le inltrazioni
di rumore.
2:1 Bardatura temporale e bardatura temporale
ripiegabile
(C:1)(C:2) Estrarre le coppe e inclinare la parte superiore
delle coppe verso l’esterno in modo che il cavo non sia
d’intralcio alla bardatura temporale.
(C:3) Regolare l’altezza delle coppe nella posizione più
comoda tenendo ferma la bardatura temporale.
(C:4) La bardatura temporale deve poggiare saldamente
sulla testa.
(C:5) Per adattare la bardatura temporale alla taglia Medium
o Small, attaccare l’imbottitura adesiva all’interno della
bardatura temporale.
2:2 Bardatura nucale
(C:6) Sistemare le coppe in posizione sulle orecchie.
(C:7) Mantenere l’headset in posizione, sistemare la cinghia
in posizione sulla testa e bloccarla.
(C:8) La cinghia deve poggiare saldamente sulla testa.
2:3 Attacco per elmetto
(C:9) Agganciare l’attacco per elmetto alla scanalatura
sull’elmetto.
(C:10) Modalità di lavoro. Per passare dalla modalità di
aerazione a quella di lavoro, premere i li della bardatura
temporale verso l’interno nché non scattano su entrambi i
lati. Accertarsi che le coppe e i li della bardatura temporale
non premano contro il bordo dell’elmetto nella modalità di
lavoro per prevenire inltrazioni di rumore.
(C:11) Modalità di aerazione. Evitare di collocare le coppe
contro l’elmetto per non compromettere l’aerazione (C:12).
2:4 Microfono (Fig. D)
Per la massima attenuazione del rumore, tenere il microfono
molto vicino alla bocca (3 mm)!
2:5 Sostituzione della piastra dell’attacco per elmetto
Z3E con Z3G o Z3K
È necessario un cacciavite.
1. Allentare la vite di ssaggio della piastra Z3E.
2. Sostituire la piastra con Z3G o Z3K, accertandosi che la
piastra sia orientata correttamente.
3. Serrare la vite.
3. USO/FUNZIONI
3:1 Inserimento delle batterie
Inserire le batterie (2xAA) nell’apposito vano. Serrare la vite.
L’esaurimento delle batterie è indicato da tre segnali acustici
ripetuti a intervalli ravvicinati.
IT
3:2 Accensione/spegnimento dell’headset
Tenere premuto il pulsante On/Off/Mode per due secondi
per accendere o spegnere l’headset. All’accensione e
allo spegnimento viene emesso un segnale acustico. Allo
spegnimento viene memorizzata l’ultima impostazione,
tranne che in caso di volume elevato sull’ingresso esterno.
L’headset si spegne automaticamente dopo due ore di
inattività. Lo spegnimento è preceduto da segnali acustici
nell’ultimo minuto di attività.
3:3 Menu
Per scorrere il menu, premere brevemente il pulsante On/Off/
Mode. Le opzioni del menu sono:
Volume, Balance (bilanciamento), Equalizer (equalizzatore),
Release time (tempo di disattivazione), External input volume
(volume ingresso esterno) e External input mode (modalità
ingresso esterno).
In ogni opzione del menu, i pulsanti + (aumenta) e –
(diminuisci) consentono di modicare le impostazioni.
Tenendo premuto il pulsante – per due secondi, si possono
disattivare alcune funzioni. Per riattivarle, premere
brevemente il pulsante +. Ogni opzione e ogni modica
delle impostazioni nel menu è confermata da un messaggio
vocale.
3:4 Volume
Questa impostazione del volume regola la funzione
dipendente dal livello di rumore per i suoni circostanti
in 6 livelli e in modalità Off. Il volume è limitato a 82 dB.
L’amplicazione viene attenuata al ricevimento di un segnale
esterno tramite l’ingresso esterno.
Nota! Quando la funzione è disattivata, i suoni circostanti
non sono attenuati e di conseguenza potrebbero insorgere
situazioni di pericolo.
FP3739_Tactical_XP_rev b_8 sidigt omslag_A5.indd 21 2016-03-24 15:08:44
Other manuals for PELTOR Tactical XP
2
This manual suits for next models
7
Table of contents
Languages:
Other 3M Headphones manuals

3M
3M WORKTUNES WIRELESS User manual

3M
3M Peltor WS ProTac XP MT15H7WS5 Instruction Manual

3M
3M WORKTUNES WIRELESS Assembly instructions

3M
3M WORKTUNES WIRELESS User manual

3M
3M E-A-RTONE 3A User manual

3M
3M PELTOR HT 79 Series User manual

3M
3M Quiet SPace User manual

3M
3M Quiet Space QuietSP-SIOC User manual

3M
3M Peltor WS ProTac XP MT15H7AWS5 Series User manual

3M
3M Peltor X Series User manual