DE
I. Sicherheitshinweise
-Schützen Sie das Gerät vor Schmutz, Feuchtigkeit,
Überhitzung und extremen Temperaturen und
verwenden Sie es nur in trockenen Räumen.
-Öffnen Sie das Gerät nicht und betreiben Sie es bei
Beschädigungen nicht weiter.
-Wenden Sie beim Einstecken des Gerätes und bei
evtl. eingesetzten Adaptern niemals Gewalt an.
-Lassen Sie das Produkt nicht fallen und setzen Sie
es keinen heftigen Erschütterungen aus.
-Laden Sie bei längerer Lagerung regelmäßig (mind.
Vierteljährig) nach.
-Dieses Produkt ist kein Spielzeug, geben Sie es
daher nicht in Kinderhände.
-Schließen Sie defekte Geräte wie beispielsweise
USB-Kabel nicht an dieses Produkt an.
-Beachten Sie, dass sicherheitsrelevante Komponen-
ten des Fahrzeugs und Ihre Sicht durch elektroni-
sche Geräte nicht eingeschränkt werden dürfen.
-Achten Sie bei der Benutzung stets auf die StVo des
jeweiligen Landes.
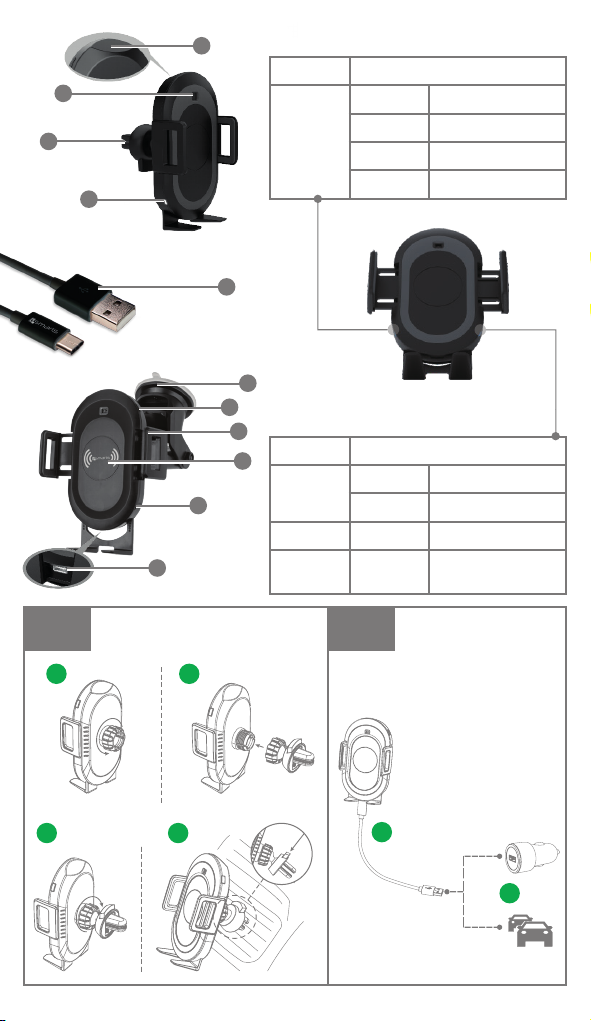
II. Lieferumfang
-Ladekabel
-Ladestation
-Halterung für das Lüftungsgitter
-Saugnapf-Halterung
III. Technische Daten
-Eingang USB: 9V/1,67A; 9V/1,34A
-Ausgangsleistung: 10W/7,5W
-Kapazität: 250mAh
-Akku-Typ: Li-Ion
-Anschluss: USB Typ-C
-Betriebstemperatur: -10°-60°
-Maximale Lade-Distanz: 6mm
IV. Bildbeschreibung
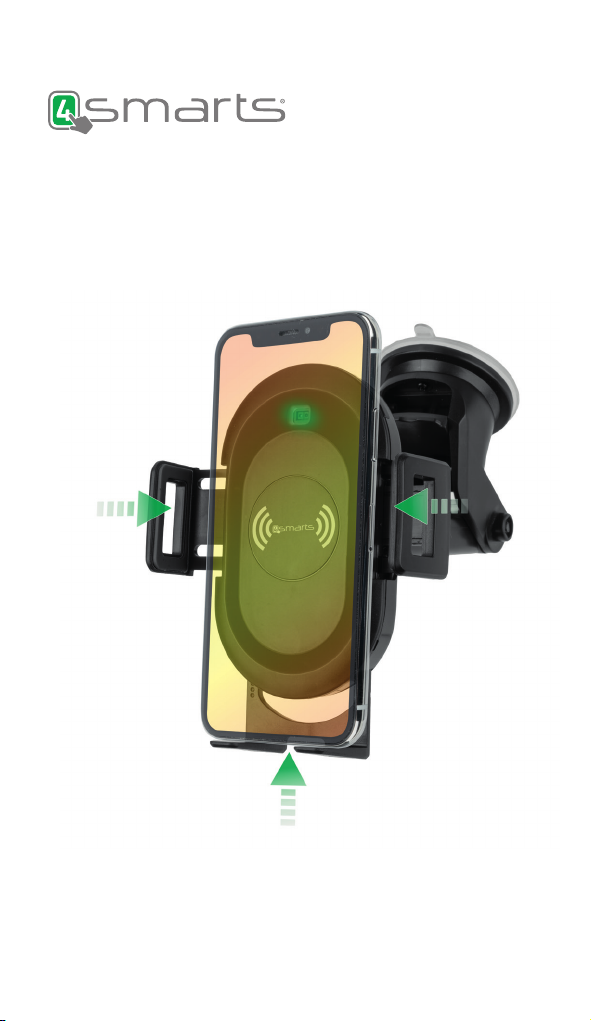
1. Touch-Taste
2. Bewegungssensor
3. Halterung für das
Lüftungsgitter
4. LED-Statusanzeige
(für Energie)
5. Ladekabel
V. Inbetriebnahme
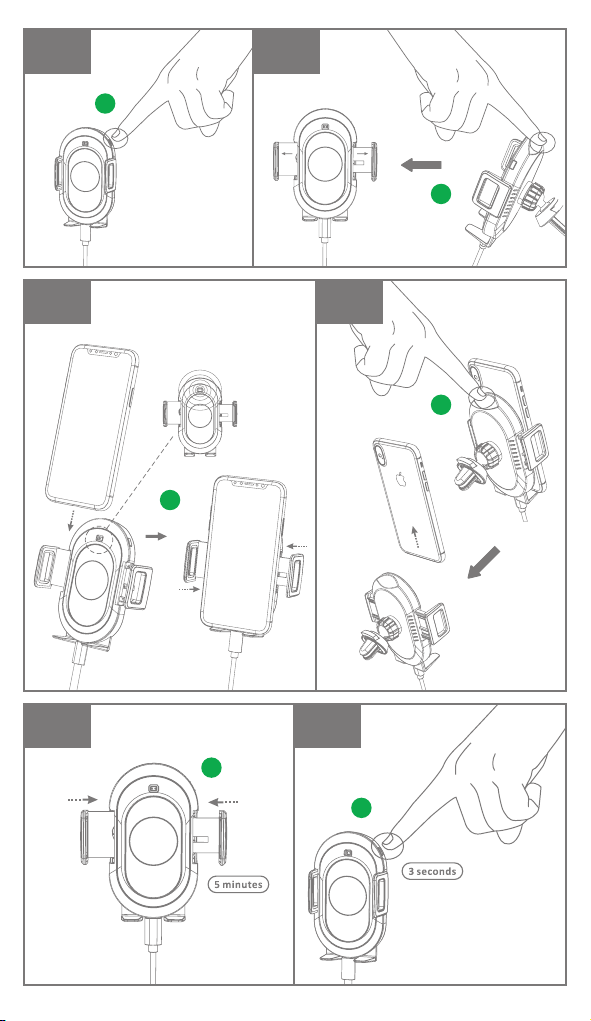
-Drehen Sie die Mutter entgegen des Uhrzeigersinns
vom Gewinde (A).
-Schieben Sie die Halterung durch die Mutter (B).
-Schrauben Sie die Mutter mit der Halterung fest auf
das Gewinde (C).
-Drücken Sie fest auf den Öffnungsknopf und befesti-
gen Sie die Halterung an den Lüftungsgittern (D).
-Verbinden Sie den Stecker des mitgelieferten Kabels
mit dem entsprechenden Lade-Anschluss (E).
-Verbinden Sie die andere Seite des Kabels mit einer
geeigneten Stromquelle. Achten Sie hierbei stets auf
die genannten Spannungs- und Leistungsangaben
Ihrer Geräte (F).
-Drücken Sie den An-/Ausschalter zum Einschalten
des Geräts (G).
-Drücken Sie die Touch-Taste zum Öffnen der
Halteklammern (H).
-Legen Sie das Smartphone wie beschrieben auf die
Lade-Fläche (I).
-Drücken Sie die Touch-Taste zum Entfernen des
Smartphones aus der Halterung (J).
-VI. Hinweise zur Funktion
Nach 5 Minuten mit geöffneten Halteklammern schlie-
ßen sich diese automatisch (K).
VII. Fehlerbeseitigung
-Das Gerät lädt nicht ordnungsgemäß:
• Stellen Sie sicher, dass die maximale Lade-Di-
stanz, die unter Technische Daten spezifiziert
wurde, nicht überschritten wird. Entfernen Sie
gegebenenfalls Schutzhüllen und andere Objekte
vom Smartphone, die zu dick sein könnten.
• Prüfen Sie, ob die in den technischen Angaben
genannte Betriebstemperatur gegeben ist.
• Starten Sie das Gerät im Falle eines Fehlers über
den An-/Ausschalter neu (L).
-Das Ladegerät lädt langsam:
• Benutzen Sie ein schnellladefähiges Ladegerät
mit z.B. Qualcomm Quick Charge, Power Delivery
oder Samsung Adaptive Fast Charge (separat
erhältlich).
• Prüfen Sie, ob das aufgelegte Smartphone kompa-
tibel zum schnellen, kabellosen Aufladen ist.
VIII. Wartung & Pege
Verwenden Sie zur Reinigung nur trockene, weiche
Tücher.
IX. Gewährleistung
Die 4smarts übernimmt keinerlei Haftung oder
Gewährleistung für Schäden, die aus unsachgemäßer
Installation, Montage und unsachgemäßem Gebrauch
des Produktes oder einer Nichtbeachtung der
Bedienungsanleitung und/oder der Sicherheitshinweise
resultieren.
X. Hinweis zum Umweltschutz
Elektrische und elektronische Geräte sowie
Batterien dürfen nicht mit dem Hausmüll ent-
sorgt werden. Der Verbraucher ist gesetzlich
verpflichtet, elektrische und elektronische Geräte sowie
Batterien am Ende ihrer Lebensdauer an den dafür
eingerichteten, öffentlichen Sammelstellen oder an die
Verkaufsstelle zurückzugeben.
XI. Service und Support
Bei defekten Produkten oder Problemen während der
Installation wenden Sie sich bitte an Ihren Händler
oder an die 4smarts Produktberatung auf:
http://www.4smarts.com/contact
6. Saugnapf-Halterung
7. An-/ Ausschalter
8. Motorisierte Halteklammern
9. Lade-Fläche
LED-Statusanzeige
(kabelloses Laden)
USB Typ-C Anschluss
10.
11.
4 5