4x4 TOUGH 15-50222 User manual

jump
starter
with compressor
USER GUIDE
4WD ACCESSORIES
Version 2
June, 2015

2
Page
FEATURES ............................................................................................................................................................ 3
IMPORTANT ........................................................................................................................................................ 3
OVERVIEW........................................................................................................................................................... 3
IMPORTANT SAFEGUARDS............................................................................................................................ 4
CHARGING YOUR JUMP STARTER ............................................................................................................... 4
CHARGING WITH AC ADAPTOR ................................................................................................................... 5
CHARGING WITH DC ADAPTOR................................................................................................................... 5
BUILT IN SOLAR PANEL - BATTERY TRICKLE CHARGER......................................................................... 5
JUMP STARTING ................................................................................................................................................ 5
USING THE AIR COMPRESSOR...................................................................................................................... 6
USB POWER PORT ............................................................................................................................................ 6
12 VOLT DC POWER PORT ............................................................................................................................. 6
3 X LED WORK LIGHTS .................................................................................................................................... 6
DETACHABLE TORCHES.................................................................................................................................. 7
MAINTENANCE & STORAGE .......................................................................................................................... 7
DISPOSALE.......................................................................................................................................................... 7
SPECIFICATIONS................................................................................................................................................ 7
FAQ ........................................................................................................................................................................ 7
WARRANTY DETAILS........................................................................................................................................ 8
REPAIR AND REFURBISHED GOODS OR PARTS NOTICE ...................................................................... 8
Contents

3
FEATURES
• 900 AMP Peak / 400 AMP Crank Jump Starter
• Built In Solar Panel - Battery Trickle Charger
• 260 PSI Air Compressor
• 12V DC Power Port
IMPORTANT
Please read the user guide before use and ensure that you have understood all warnings and cautions included
in this user guide.
Retain this user guide for future reference by storing in a safe place.
When using the 4x4 Tough Jump Starter, ensure you read the vehicles handbook you intend to use the jump
starter with.
OVERVIEW
• USB Power Port
• 3 X LED Work Lights
• 2 X Detatchable LED Torches
• Rubberised High Impact Housing
AC/DC charging jack
Reverse polarity indicator
Battery status button
3 x LED work light on/o switch
Heavy duty
booster clamps
Jumpstart on/o
power switch
10 LED battery
level indicators
USB power
indicator
USB power
switch
12V DC
power port
USB power port
3 X LED
work lights
2 X Detachable
LED torches
High impact
resistant rubberised
housing
In built solar panel -
Battery trickle charger
260 PSI air compressor
Air hose compartment
AC Charger
DC Charger

4
IMPORTANT SAFEGUARDS
• To protect against electrical hazards or shock, do not immerse charger, adaptors, or unit in water or other liquid.
• Close supervision is necessary when used near children.
• Do not use unit for applications other than its intended use.
• This unit has a built-in rechargeable lead acid battery. Jump starter will be partially charged, it should be
fully charged prior to its initial use.
• Recharge battery after each use, or every 3 months to maximise the life of the battery. DO NOT use
whilst charging.
• Avoid touching your eyes when working with batteries - always wear eye protection when working with batteries.
• If battery acid comes in contact with skin or eyes, immediately ush with water and seek medical attention.
• Keep battery terminal clean. Be careful to prevent corrosion from terminals coming in to contact with your eyes.
• Remove metal jewellery or other metal objects from your body before using the jump starter.
• Do not operate this device while wearing vinyl clothing. Static electricity may be generated when vinyl
clothing is rubbed.
• Never allow the red and black battery clamps to touch each other or to touch the some metal object at
same time.
• Always connect the red (+) clamp to the positive terminal rst.
• Do not connect black (-) clamp to the negative battery terminal, connect it to a non-moving, earthed
metal part of your vehicle.
• Use only the provided chargers, cables and clamps. Unauthorised parts may damage the unit.
• Always keep the clamps in their storage holders to prevent sparking when they are not in use.
• Jump start your vehicle in a well ventilated area only.
• Never charge or jump start a frozen battery.
• Avoid dropping metal tools on to the vehicle’s battery. It may spark or short-circuit the battery or other
electrical parts that may cause short circuits or an explosion.
• Do not open the jump starter unit. There are no user serviceable parts in the unit. Unqualied auto
electrical persons should not open the jump starter. Failure to use a qualied person will void the warranty.
• Always turn the jump starter o when not in use. Store in cool & dry place.
• If the unit is damaged by a heavy impact or it has been dropped, seek professional guidance from a
qualied engineer before using again.
• If the external exible cable or cord of the charger (or this jump starter) is damaged, it should be replaced
by a qualied person.
• The battery must be removed from the appliance before it is disposed of.
• The battery must be disconnected from the supply mains when removing the battery.
• This device contains a sealed, non-spillable rechargeable lead acid battery and must be disposed of properly at
the end of the product’s life. Contact your local authority for advice on the correct disposal/recycling procedure.
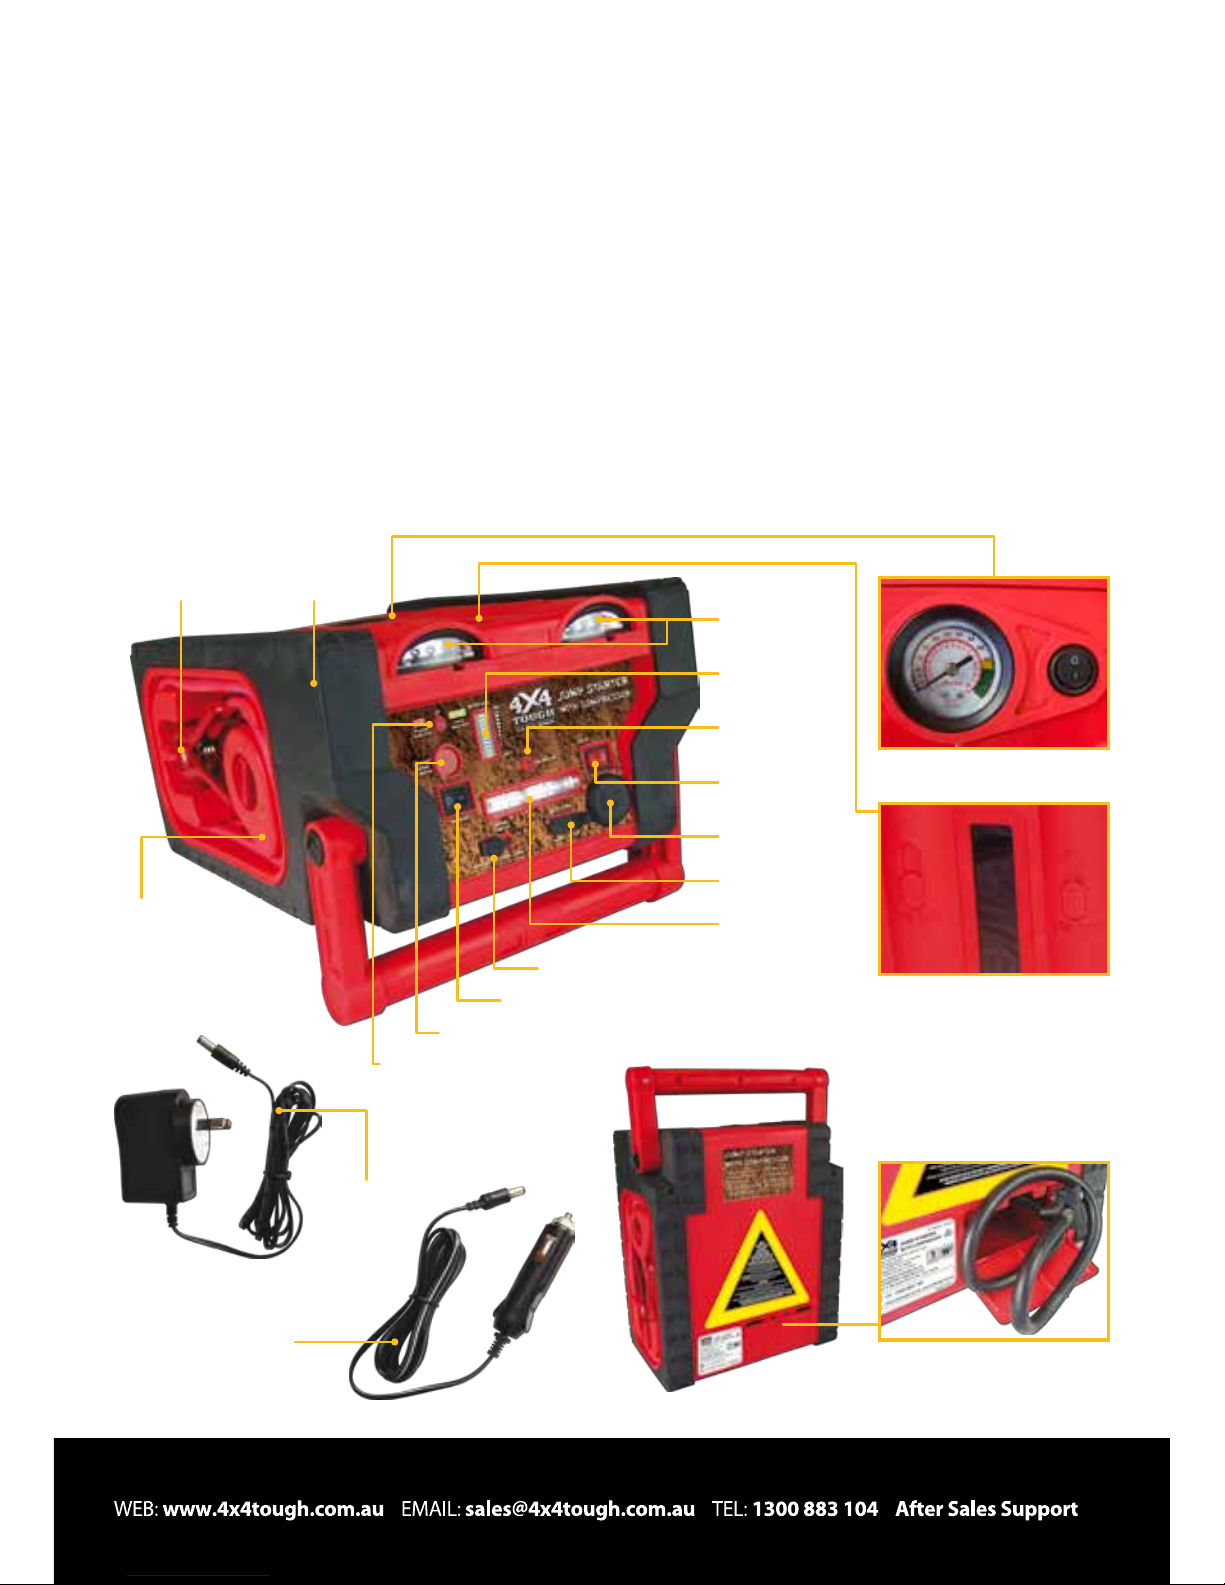
• When using the air compressor always monitor the pressure gauge during use. Be careful not to
over-inate objects.
CHARGING YOUR JUMP STARTER
This unit has a maintenance free, built-in sealed rechargeable lead acid battery. Although the jump starter
arrives partially charged from the factory, it must be fully charged for 55 hours before rst use, even if the battery
status lights indicate a“Full” charge This initial charge pre-conditions the battery and will provide optimum
performance in the future. Failure to follow this procedure may permanently damage the battery.

5
CHARGING WITH AC ADAPTOR
1. Use a standard 240 volt AC power outlet to charge the jump starter.
2. Only use the charger provided with the unit.
3. Keep the power on/o switch in the OFF position whilst charging.
4. Plug the AC charger into a standard 240 volt AC POWER outlet and the input plug into the jump starters
charging jack.
5. A full charge from a 240 volt AC source takes approximately 55 hours.
6. Recharge the unit when the battery status indicator is displaying less than 5 bars.
7. The red LED charging indicator will be illuminated whilst charging. When charging is completed, unplug
the charger from the AC power outlet and then remove the AC input socket. Remove the AC charger from
the charging jack, press the LED indicator button and check that the 10 LED battery level indicator lights
stay illuminated to indicate a full charge has been completed.
Note:
a) The 10 LED battery level indicator lights will ash until the unit is fully charged.
b) It is important to remove the charger from the unit before pressing the battery status button to obtain a true
battery level reading.
CHARGING WITH DC ADAPTOR
1. Keep the power on/o switch in the OFF position whilst charging.
2. Plug the DC charging adaptor into any 12V DC vehicle socket and the input plug into the jump starters
charging jack.
3. The red charging LED indicator will illuminate while charging. Once the vehicle’s engine is turned o the
unit will cease charging
4. A full charge from DC takes approximately 15 hours, while the car engine is running.
5. When charging is complete, unplug the charger.
6. Press the battery status button. The 10 LED indicator lights will stay illuminated indicating a full charge has
been completed.
BUILT IN SOLAR PANEL - BATTERY TRICKLE CHARGER
The solar panel will provide trickle charging which will assist in reducing over-discharging of the built in battery.
Note: In order to achieve the maximum amount of solar charge energy, position the jump starter in a place that
provides sucient light.
JUMP STARTING
WARNING:
Vehicles equipped with on-board computers may be aected if the engine battery is jump-started. Read your
vehicle owner’s manual before attempting to start the vehicle to determine if external starting assistance can
be used. Failure to follow these instructions may cause damage or explosion. Use safety glasses to protect eyes
while jump-starting a battery.
1. Turn the vehicle ignition OFF. Turn o all your car’s accessories such as lights, radio, air conditioning, etc. to
avoid further drain of the battery.
2. Engage the handbrake or for vehicles with automatic transmission engage the PARK position.
3. Make sure all switches on the jump starter are turned OFF.
4. Securely connect the Red (+) clamp to your vehicle battery’s positive (+) battery terminal.
5. Do not connect a clamp to the negative vehicle battery terminal. Connect the black (-) clamp to a
non-moving, earthed metal part of the vehicle.

6
6. If the jump starter LED light is green this indicates battery polarity connection is correct. WARNING: If the
jump starter LED light is red and an alarm sounds this indicates reverse battery polarity which is
incorrect. STOP! Carefully disconnect the jump starter clamps. Reconnect the jump starter clamps
correctly. Refer to points 4 & 5 above.
7. Turn the jump starter ON/OFF Switch to the ON position.
8. Try to start your vehicle. If your vehicle does not start after the rst attempt, wait 3 minutes before trying
again. (Failure to wait may damage the jump starter).
CAUTION: Excessive engine cranking can damage the vehicles starter motor. If the engine turns but
fails to start after several attempts, there may be other technical problems with the vehicle. Stop
cranking the engine until other possible problems are determined and corrected.
9. If the vehicle starts, turn the jump starter OFF. Disconnect the black negative clamp rst and then the red
positive clamp. Place the clamps back in to the storage recesses on the jump starter.
USING THE AIR COMPRESSOR
WARNING:
Check item to be inated for manufacturer’s maximum recommended ination pressure. Avoid over ination.
Most tyres are fully inated between 24-35 PSI. Some truck and bicycle tyres could require 40 PSI or more.
1. Open compartment door at the back of the jump starter and pull out the air hose. Make sure the nozzle
lever is in the UP position.
2. Attach the valve adaptor to the valve stem of the tyre and push the valve adaptor lever down to lock it
into place.
3. Turn the compressor power switch to the ON position
4. Monitor the pressure gauge whilst inating, do not exceed the recommended pressure for the tyre/device
you are inating. It is recommended that you use a separate air gauge to check the actual ination pressure
for accuracy. When the desired pressure level is reached, turn o the compressor, turn the valve adaptor
lever to the up position and remove the adaptor from the valve stem and disconnect the hose.
5. When using the air compressor, you must wait a minimum of 10 minutes before inating the next
tyre / item.
USB POWER PORT
Note: Prior to connecting an accessory, make sure that the USB port On/O power switch is in the OFF position.
Accessory Connection (MP3 Players, Mobile Phone, etc.)
1. Remove the protective cover of the USB outlet on the jump starter. Connect the USB interface cable
(provided with the accessory)
2. Press the USB Port On/O switch to the ON position. Turn on the accessory.
12 VOLT DC POWER PORT
Important: The 12 volt DC power port is rated at 10 Amp. DO NOT connect device(s) that require higher
amperage to operate. This device(s) will cause the internal circuit breaker to open.
1. Remove the protective cover from the 12 volt DC accessory socket.
2. Plug in your 12 volt accessory.
3. The length of time for which a connected device can be powered will depend on the battery charge status
of your jump starter and also the amount of current required by the device which you are powering.
3 x LED WORK LIGHTS
1. Turn the work light power switch to the ON position.
2. The 3 x LED will illuminate.
3. Turn OFF when not in use.

7
2 x DETACHABLE TORCHES
1. To detach the torches, slide in an upward motion from the front
of the jump starter (see gure A).
2. Turn the battery cover at the end of the torch anti-clockwise to
“open”and t it with 3 x AAA sized battery and turn clockwise
to close the cover (6 x AAA sized batteries are required for 2 x
torches). Press the lens of the torch to turn to torch ON and OFF.
3. The two torches can be combined together to form a larger torch.
MAINTENANCE & STORAGE
This unit may be stored in any position. Make sure the clamps are
secure inside the booster cable storage holders. Store at room
temperature.
If not used for a prolonged period of time, recharge it every
3 months to maximise the life of the battery.
DISPOSAL
• Please consider when disposing of electronic products such
as a jump starter that some components can by recycled and
recovered for re-use. Do not attempt to dissemble any electronic
product unless you are a trained electronics technician.
• Many councils hold e-waste (electronic waste) collections.
Contact your nearest council to enquire about the best method
of disposal in your area.
SPECIFICATIONS
1. Dimensions: 310 x 260 x 163
2. Product Weight: 8Kg
3. Built-in Battery : 12-volt 17Ah Rechargeable lead
4. Compressor : 260 PSI with reading gauge
5. 12 Volt Power Port Rating : 12-volt 10A max.
6. USB Power Port Rating : 5-volt 500mA
7. Solar Panel Rating : 0.5 Watt
8. Work Lights: 3 X LED
9. Torch: 2 (4 LED) X Detachable Torches (operated by 6 x AAA sized battery)
10. Charging time : 55 hours via AC power outlet
15 hours via DC in-vehicle charger
FAQ
Q. What is the USB port used for?
A. Charging USB compatible devices.
Q. Is it important regularly keep your jump starter battery charged?
A. Yes, best practice is to recharge after every use and at 3 month intervals to ensure battery does not discharge fully.
Q. Why might an appliance connected to the jump starters 12V DC socket not work?
A. Check the appliance does not exceed the rated output current of the jump starters 12V DC socket.
Figure A

Warranty Details
The product is guaranteed to be free from defects in workmanship and parts for a period of 12 months from the date
of purchase. Defects that occur within this warranty period, under normal use and care, will be repaired, replaced or
refunded at our discretion. The benets conferred by this warranty are in addition to all rights and remedies in respect of
the product that the consumer has under the Competition and Consumer Act 2010 and similar state and territory laws.
Our goods come with guarantees that cannot be excluded under the Australian Consumer Law. You are entitled to a
replacement or refund for a major failure and for compensation for any other reasonably foreseeable loss or damage. You
are also entitled to have the goods repaired or replaced if the goods fail to be of acceptable quality and the failure does
not amount to a major failure.
Jump Starter with Compressor
Repair and Refurbished Goods
or Parts Notice
Unfortunately, from time to time, faulty products are manufactured which need to be returned to the Supplier for repair.
Please be aware that if your product is capable of retaining user-generated data (such as les stored on a computer
hard drive, telephone numbers stored on a mobile telephone, songs stored on a portable media player, games saved
on a games console or les stored on a USB memory stick) during the process of repair, some or all of your stored data
may be lost.
We recommend you save this data elsewhere prior to sending the product for repair.
You should also be aware that rather than repairing goods, we may replace them with refurbished goods of the same
type or use refurbished parts in the repair process.
Please be assured though, refurbished parts or replacements are only used where they meet ALDI’s stringent
quality specications.
If at any time you feel your repair is being handled unsatisfactorily, you may escalate your complaint. Please telephone
us on 1300 883 104 or write to us at:
Natural Product Solutions Pty Ltd
Unit 3 60 Box Road, TAREN POINT 2229
Telephone: 1300 883 104
Website: www.4x4tough.com.au
8
Table of contents