A/DA LIGHT SCREEN 60 User manual

ライトスクリーン使用説明書
LIGHT SCREEN
発売元:
新潟県新潟市西蒲区漆山8554-
1
〒
953-0054
8554-1 Urushiyama, Nishikan-ku, Niigata 953-0054, Japan
お問い合わせ先:ADAサービスセンター
0256-72-
1994(平日10:30〜17:30)
E-mail/[email protected]
408140S14JEC20B14
発光パネルの使用方法
①付属の専用フックを使用し、水槽の背面に発光パネルを図のように設置します。
※発光パネルの発光面(ADAロゴのない面)を水槽側に向けてください。専用フックの取り付け穴は、
ライトスクリーン60には2箇所、ライトスクリーン90には3箇所あります。
※専用フックは必ずパッキンを挟んで取り付けてください。パッキンには上下があります(穴の上が
狭く、下が広い)。発光パネル内部への水の浸入を防ぐため、パッキンは取り付け穴をふさぐ位置で
固定してください。
※ソーラーⅠ専用スタンドまたはソーラーⅡ専用スタンドを使用している場合、スタンドの取り付け
金具に発光パネルのコードブッシュがぶつかります。無理に設置すると破損する恐れがありますので、
取り付け金具の位置をずらしてから設置してください。
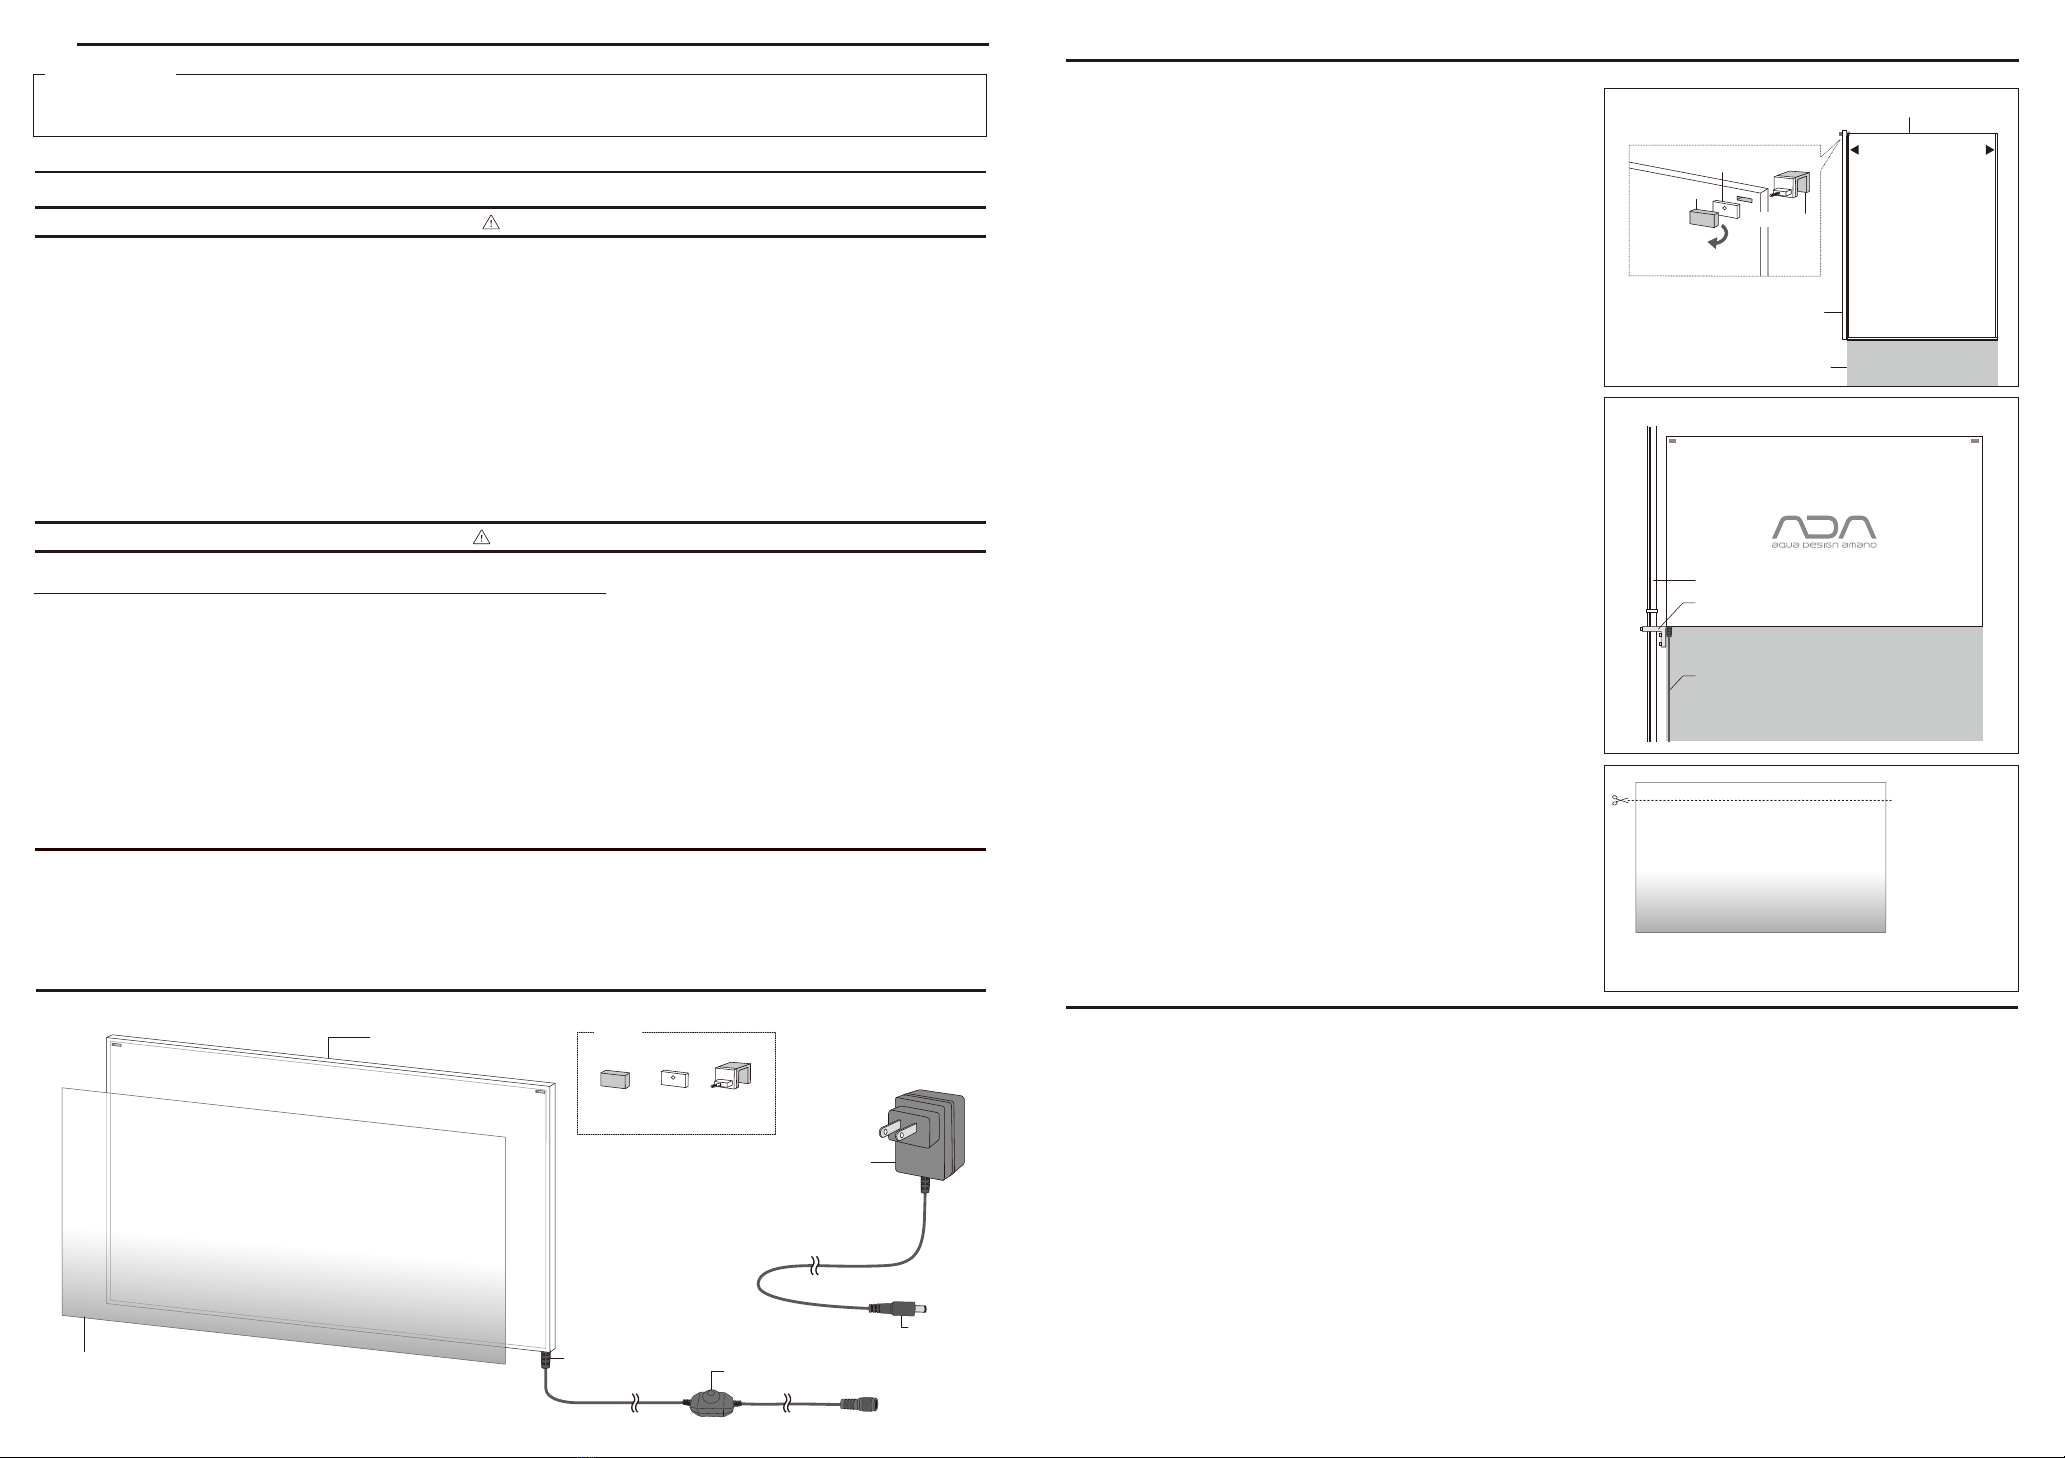
②本体パネルとACアダプターの電源プラグをしっかりと接続し、ACアダプターをコンセントに
差し込みます。
③調光スイッチのボリュームをON側に回して点灯します(お好みの明るさに調光が可能です)。消
灯する場合は、ボリュームをカチッと音のするところまでOFF側に回してください。
グラデーションシートの使用方法
①付属のグラデーションシートは静電吸着シートです。剥離紙からはがして吸着面(光沢の強い面)を
水槽のガラス面に密着させます。最初は動きやすいので、動かなくなるまでしばらく手で押さえて
ください。時間が経過すると、よりしっかり吸着します。
※水槽のガラス面は、グラデーションシートを吸着させる前に乾いた布で汚れをよく拭き取ってきれい
な状態にしてください。ガラス面が汚れているとグラデーションシートの吸着力が低下します。
※グラデーションシートは繰り返し使用できますが、しだいに吸着力が弱くなります。吸着力が弱く
なった場合、水槽のガラス面に密着させた後、背面を乾いた布で擦ると吸着力が回復します。
※下が青のグラデーションで使用する場合は、底床の厚さに応じてグラデーションシートの透明な
部分をカットしてください。
②水槽に吸着させたグラデーションシートの上から発光パネルを設置してください。
※グラデーションシートは発光パネルには吸着しません。発光パネルを設置する前にグラデーション
シートを水槽に吸着させてください。
※グラデーションシートと水槽の間に水が入った場合、乾いた布で速やかに拭き取ってください。
③グラデーションシートを使用しない場合には、剥離紙の光沢の強い面とグラデーションシートの
吸着面(光沢の強い面)を張り合わせて保管してください。
※グラデーションシートをはがした後の剥離紙は捨てずに保管しておくことをおすすめします。
日本語
●本製品をご使用になる前に、必ずこの説明書をよく読み、正しい使用方法を理解した上でご使用ください。正しい使用方法がわからないままでのご使用は、絶対におやめください。
●この説明書は、読み終った後も大切に保管し、必要なときにお読みください。
ご使用になる前に
●安全上の注意
※この製品を使用する前に、必ず以下の注意事項を読んでください。以下の注意事項を守らないと、感電や火災、やけどなど重大な事故の原因になります。
警告
○分解、改造は絶対にしないでください。火災・感電・故障の原因となります。
○誤って落下させた製品は使用しないでください。火災・感電・故障の原因となります。
○製品の作動環境温度以外の環境で使用しないでください。また、直射日光の当たる場所、著しく湿気のある場所、振動のある場所、水・雨・風が直接当たる場所では使用しないでください。
火災・感電・故障の原因となります。
○製品に水がかからないように注意して使用してください。感電・故障の原因となります。水がかかった場合、使用を中止してください。
○電源は、絶対にぬれた手で抜き差ししないでください。感電する恐れがあります。
○布や紙など燃えやすいもので覆ったり、かぶせたりしないでください。燃えやすい物の近くで使用しないでください。火災の原因となります。
○器具の隙間に、金属類や燃えやすいものなどを差し込まないでください。火災・感電・故障の原因となります。
○子どもの手の届く場所で使用しないでください。感電・ケガの恐れがあります。
○電源コードを無理に曲げたり、ねじったり、引っ張ったりしないでください。コードの破損により火災・感電の原因となります。
○電源コードが傷んだ場合(芯線の露出や断線など)には、直ちに使用を中止してください。そのまま使用すると、火災・感電の原因になります。
○ACアダプターに水がかかったり、水がコードを伝ってぬれると火災、感電の原因となります。水槽より低い位置のコンセントを仕様するときは、ACアダプターより下にコードをたるま
せてください。
○水中への落下、水没には十分注意してください。
○発光パネルやACアダプター、スイッチ、電源プラグなどには水をかけないでください。防水仕様ではありません。
○通電したまま発光パネルを直接床やその他の場所に置かないでください。
○発光パネルの下部は点灯時、放熱のため熱くなりますが異常ではありません。
○LEDは交換できません。
○
接着テープ類を貼ったり直射日光に当てたりしないでください。変色、劣化する恐れがあります。
○電源事情の悪い場所では使用しないでください。ランプのちらつきや消灯が発生する場合があります。
○製品の近くで、ラジオ・テレビなどを使用しないでください。雑音が入る場合があります。
○電源を抜く際には、コードを引っ張らずにアダプターまたはコンセントプラグを持って抜いてください。故障の原因となります。
○お手入の際には必ず電源を抜いてください。
○お手入れの際、40℃以上のお湯やアルコール、シンナー、ベンジンなどは使用しないでください。変質や変形、ヒビが入る場合があります。
○発光パネルの色は樹脂の性質により時間の経過とともに黄ばみ、色の変化が生じる場合があります。
ご注意
1.ライトス クリーンの 特 長
対応する水槽に手軽に設置できる、水景観賞用LEDバックライトです。薄型で狭いスペースにも設置でき、場所を選びません。また、水景を明るく演出するベーシックな白バックに加え、
付属のグラデーションシート(静電吸着シート)を併用することで水景を爽やかに演出する青のグラデーションバック(上または下)も可能です。調光スイッチ付きでトップライトに合わ
せて明るさを調整でき、ソーラー RGBやアクアスカイRGBと組み合わせると水景撮影に最適なライティングになります。
製品ラインナップ ○ライトスクリーン60 W60×D30×H36cm水槽(ガラス厚6mm)対応
○ライトスクリーン90 W90×D45×H45cm水槽(ガラス厚10mm)対応
2.各部名称
パーツ
専用フックパッキンネジ止め
※ライトスクリーン60には2個、
ライトスクリーン90には3個付属。
発光パネル
グラデーションシート
(静電吸着シート)
ACアダプター
調光スイッチ
コードブッシュ
電源プラグ
3.使用方法
○W60cm用
寸法 W600×H360×D7(mm)
入力電圧 AC100〜240V 50/60Hz
消費電力 10W±10%
定格電力 12W
光束 900〜1,000lm
色温度約6,500〜7,000K(LEDの特性上、色温度には高低のばらつきがあります)
LED 69灯
LED寿命 30,000時間以上(使用環境によって異なります)
使用環境温度 0〜35℃
○W90cm用
寸法 W900×H450×D7(mm)
入力電圧 AC100〜240V 50/60Hz
消費電力 14W±10%
定格電力 18W
光束 1,300〜1,450lm
色温度 約6,500〜7,000K(LEDの特性上、色温度には高低のばらつきがあります)
LED 105灯
LED寿命 30,000時間以上(使用環境によって異なります)
使用環境温度 0〜35℃
4.仕様
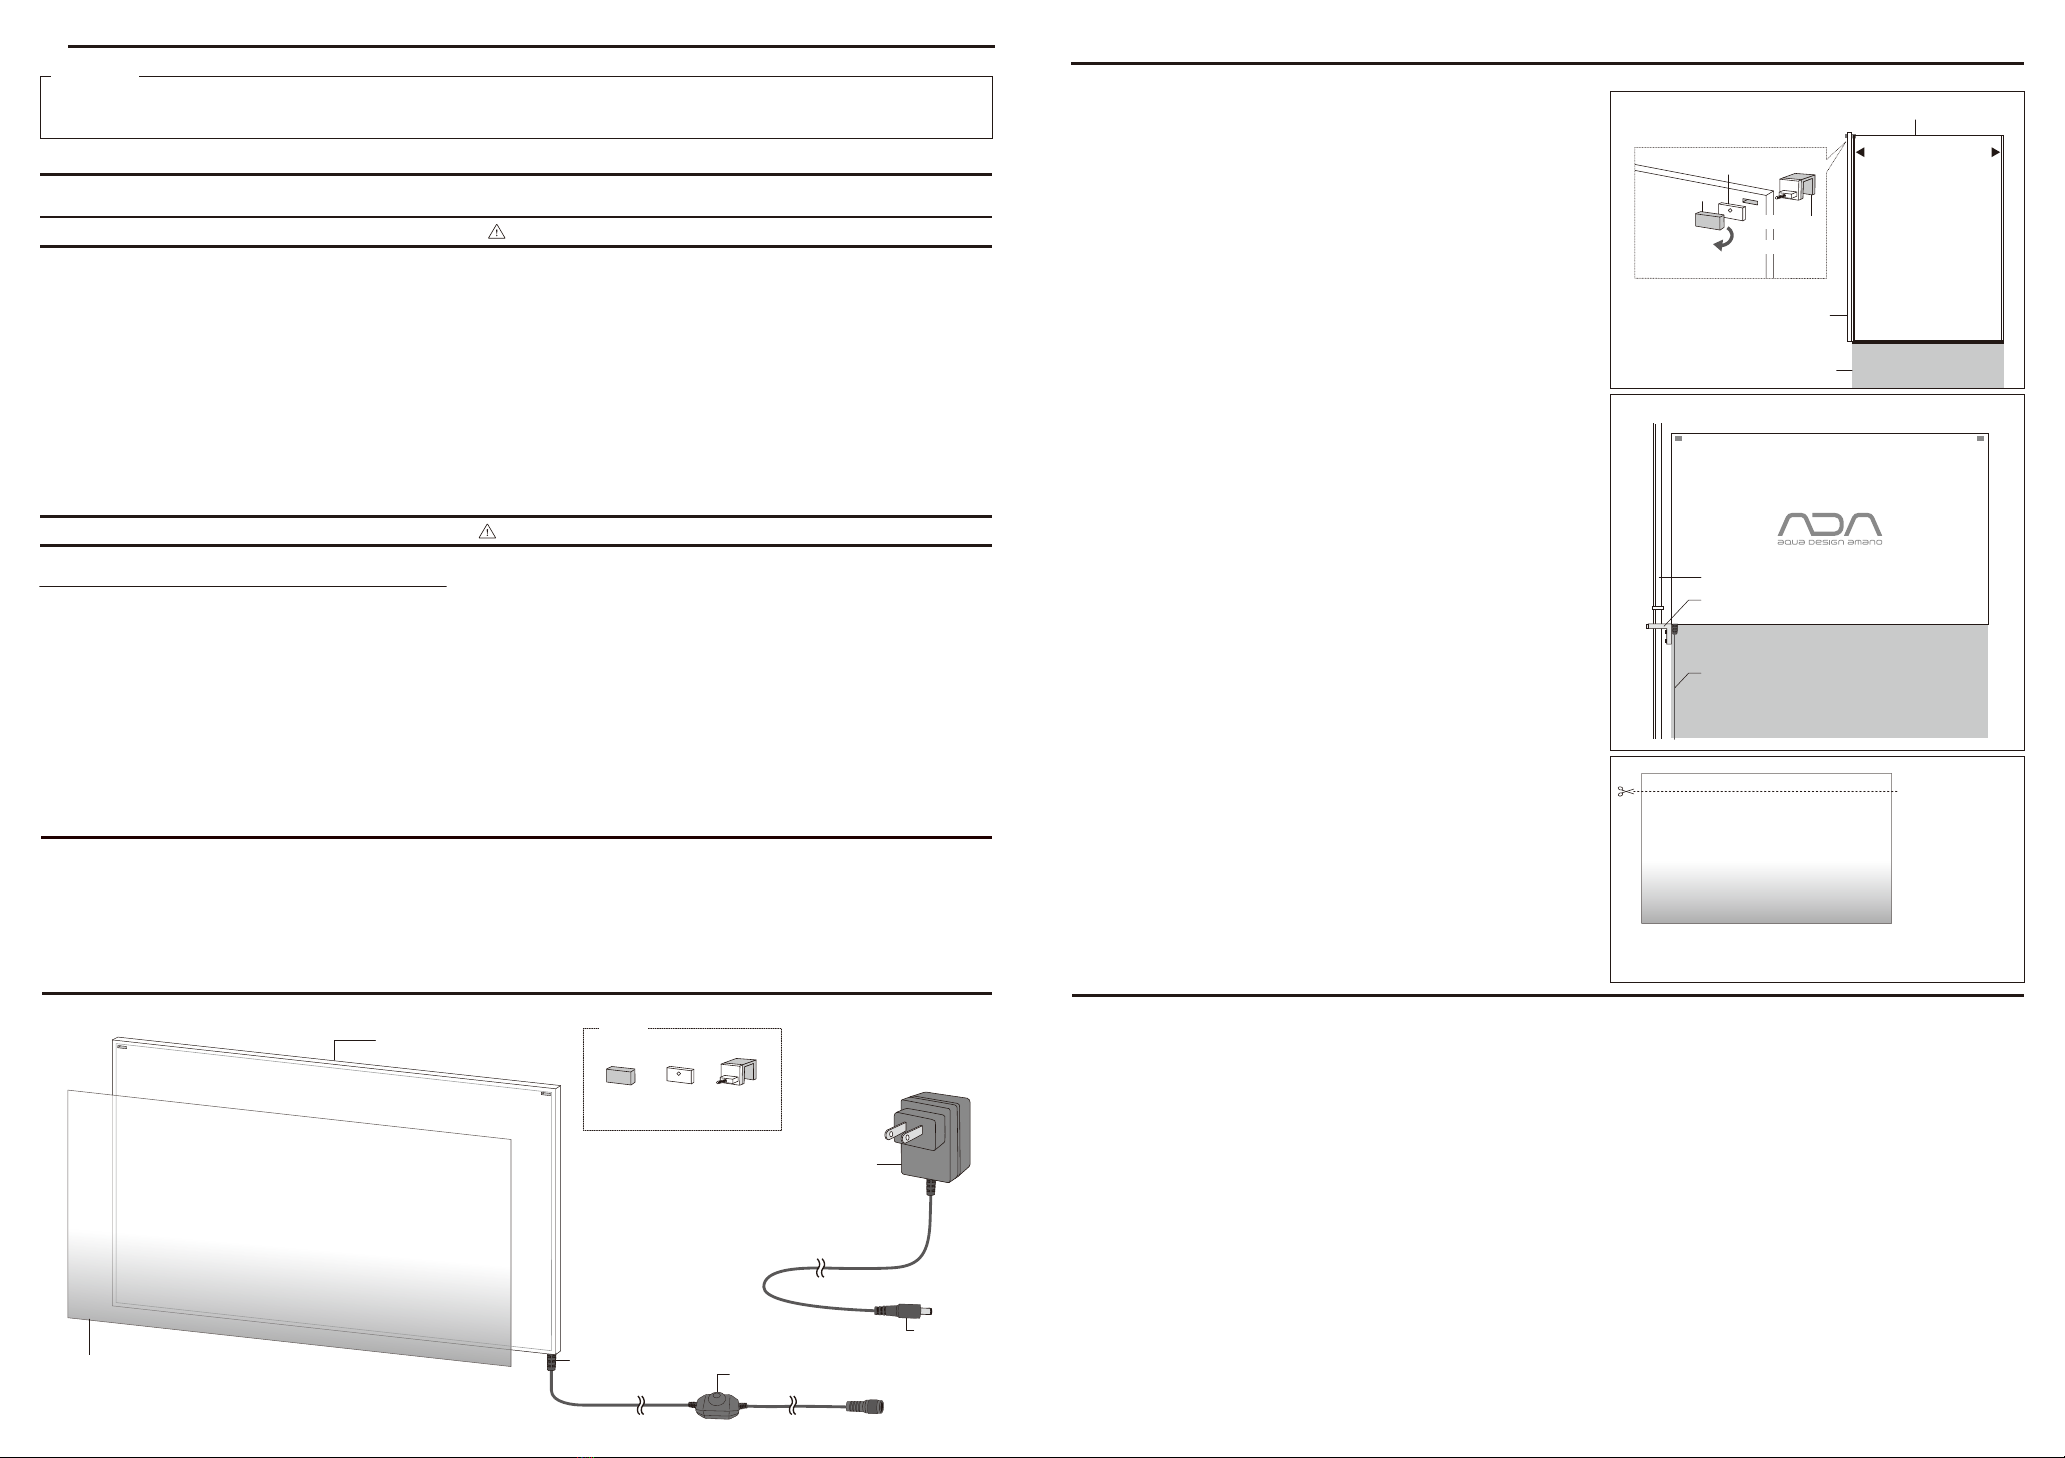
発光パネル
パッキン
ネジ止め
回す
ADAロゴ面
水槽
背面 前面
水槽台
側面図
専用フック
グラデーションシート
下が青のグラデージョンで使用する場合は、底床の厚さに応じて
カットしてください。
背面図
コード
ソーラーRGB専用スタンド
取り付け金具

○Do NOT disassemble nor modify this product. It can cause fire, electric shock or malfunction of the product.
○Do NOT use this product if accidentally dropped to floor. It can cause fire, electric shock or malfunction of the product.
○Use this product in the operating temperature range specified in this instruction manual. Do NOT use this product in a place where the product is directly exposed to sunlight,
water, rain, wind or frequent vibration, or in high humidity. It can cause fire, electric shock or malfunction of the product.
○Avoid water. It can cause electric shock or malfunction of the product. Stop using this product immediately if the product gets wet.
○Do NOT touch the AC adapter or Power Plug with wet hands. It can cause electric shock.
○Do NOT cover this product with any flammable materials including a cloth or paper. Do NOT use this product near flammable materials. It can cause fire.
○Do NOT insert any metals or flammable materials inside this product. It can cause fire, electric shock or malfunction of the product.
○To prevent electric shock and injury, KEEP OUT OF REACH OF CHILDREN.
○Do NOT forcefully bend, twist or pull the Power Supply Cord. If the Power Supply Cord is damaged, it can cause fire or electric shock.
○Stop using this product immediately if the Power Supply Cord is damaged (exposed cable core, disconnection of the cord etc.) It can cause fire or electric shock.
○Keep the AC adapter away from water. It can cause fire or electric shock. In case of using an electrical outlet located below the aquarium, keep the Power Supply Cord
running under the AC adapter.
LIGHT SCREEN is an easy-to-install LED back light designed for aquarium tanks. Slim body design, easy to storage. You can choose from two background colors: a basic
white color which brightens up a whole aquascape and a cool refreshing blue gradation background using the included Gradation sheet (electrostatic film).
*Install the Gradation sheet depending on your preference(both up and down sides). It also has a dimmer function which allows you to adjust the strength of the background
light according to the brightness of the main lighting system. Installed with SOLAR RGB or AQUASKY RGB, it will provide optimal lighting conditions for photography.
Product Lineup
○LIGHT SCREEN 60 W60×D30×H36cm (Glass thickness 6mm)
○LIGHT SCREEN 90 W90×D45×H45cm (Glass thickness 10mm)
●Safety Instruction
1. Product Features of LIGHT SCREEN
2. Names of Product Parts
English
※Read the following safety instructions thoroughly before using this product. A failure to adhere to
the following safety instructions can result in electrical shock, fire, burns and other serious accident.
●Before the installation of this product, make sure to read this instruction manual carefully and understand all of its directions.
●Please keep this instruction manual even after reading it and refer back to it when needed.
IMPORTANT
Parts
HookPacking pieceClamp
* LIGHT SCREEN 60 contains two (2) sets.
* LIGHT SCREEN 90 contains three (3) sets.
Light emitting screen
Gradation sheet
AC adapter
Dimmer switch
Cord bushing
Power supply plug
WARNING
○Be cautious not to drop this product into water or off the ground.
○Keep the Light emitting screen, AC adapter, Power Supply Switch and Power Supply Plug away from water. This product is not waterproofed.
○Do NOT leave the Light emitting screen directly on the floor or any places other than an aquarium tank during use.
○The Light emitting screen becomes hot due to heat radiation during use. It is not a malfunction of the product.
○LED light of the lighting unit is not replaceable.
○Do NOT use any kind of adhesion tape on this product nor expose the product to direct sunlight. It can cause discoloration or deterioration of the product.
○Do NOT use this product in a place with poor electrical connections. It may cause flickering light or black out.
○Do NOT use this product near a radio or television. It can cause noise problems.
○Do NOT pull the Power Supply Cord while unplugging this product. Always hold the adapter when plugging it off.
○Always unplug the AC adapter or Power Plug before maintenance.
○Do NOT apply hot water of 40 or above, alcohol, paint thinner or benzene. It can cause deterioration or deformation of the product.
○Due to the nature of resin, yellowing of the Light emitting screen may occur over the course of time.
CAUTION
Operating Instruction on Light emitting screen
①Using the hooks, install Light emitting screen on the back of an aquarium tank as
illustrated.
*Place the light emitting side of the screen (the one without ADA logo mark)toward the
tank. There are two (2)mounting holes on LIGHT SCREEN 60 and three (3)mounting
holes on LIGHT SCREEN 90.
*Make sure to insert a packing piece in the right orientation to the hook before installation.
(A hole is located on the upper section of the Packing piece.)Place a packing piece over a
mounting hole in order to prevent water from getting into the Light emitting screen.
*When installed with SOLARⅠSTAND or SOLARⅡSTAND, the Cord bushing of the Light
emitting screen may hit on the stand mounting bracket. Do not forcefully place the screen
to avoid damaging the Cord bushing. Install the screen after moving the location of the
stand mounting bracket.
②Connect the Light emitting screen to the AC adapter’s Power supply plug and plug into wall
outlet.
③Turn the Dimmer switch to the ON position for the brightest setting. (It’s adjustable to your
needs.)
Operating Instruction on Gradation sheet
①Gradation sheet is an electrostatic film. Peel off the release paper and affix the sheet
(the glossy side) to the glass surface of the aquarium tank. Keep placing your hands
on the sheet until it completely sticks to the glass surface. The sheet will hold up
nicely over time.
*Wipe the glass surface clean with a dry cloth before affixing the Gradation sheet. The
sheet may not stick well on a dirty glass surface.
*Gradation sheet can be repeatedly used, but then it will decrease the efficiency. In such
a case, affix the sheet on a glass surface and rub the back of the sheet with a dry cloth.
It will restore its efficiency.
*When placing the Gradation sheet with the blue color side down, you may cut the clear
side of the sheet according to the height of the substrate section.
②Install the Light emitting screen on the aquarium tank, affixed with the Gradation sheet.
*Gradation sheet does not stick to the Light emitting screen. Affix the sheet to the aquarium
tank before installing the screen.
*If water gets in between the Gradation sheet and the tank, immediately wipe it off with a
dry cloth.
③For storage, place the Gradation sheet (the glossy side) on the release film (the glossy
side).
*Keep the release film for later use.
Light emitting screen
Packing piece
Clamp
turn
ADA logo mark side
Aquarium tank
back side front side
aquarium cabinet
side view
Hook
Gradation sheet
3. Operating Instruction
○LIGHT SCREEN 60
Size W600×H360×D7 (mm)
Input voltage AC100〜240V 50/60Hz
Power consumption 10W±10%
Rated Power 12W
Luminous flux 900〜1,000lm
Color temperature 6,500〜7,000(Due to the nature of LED lighting, there are variation in color temperature.)
LED 69
LED lifetime Over 30,000hrs (subject to operating environment)
Operating temperature range 0〜35
○LIGHT SCREEN 90
Size W900×H450×D7 (mm)
Input voltage AC100〜240V 50/60Hz
Power consumption 14W±10%
Rated Power 18W
Luminous flux 1,300〜1,450lm
Color temperature 6,500〜7,000(Due to the nature of LED lighting, there are variation in color temperature.)
LED 105
LED lifetime Over 30,000hrs (subject to operating environment)
Operating temperature range 0〜35
4. Product Specification
*When placing the Gradation sheet with the blue color side down, you
may cut the clear side of the sheet according to the height of the
substrate section.
Cord bushing
SOLAR RGB STAND
Mounting bracket
发光灯体的使用方法
①使用附属的专用挂钩,在鱼缸的背面,按照图示安装。
※发光灯体的发光面(没有ADA标的那面)朝向鱼缸。背景灯60有两个安装孔安装附属的专用
挂钩。背景灯90有三个安装孔安装附属的专用挂钩。
※安装专用挂钩时,必须使用附属的胶垫。胶垫有上下之分(与圆孔距离小的一侧是上面,与圆孔
距离大的一侧是下面)。为了防止水进入发光灯体的内部,请把胶垫固定在堵住安装孔的位置。
※使用索拉一代或二代专用架时,金属固定件与发光灯体的电线绝缘头的位置重合。如果强行安
装会有产品破损的可能。请把金属固定件的位置稍微错开一些后,再安装。
②把电源连接头与灯体连好后,再把AC电源插头插入电源插座。
③调光开关转向ON的位置,就开灯了(可以根据需要调节灯的亮度)。关灯时,向OFF方向转动
至听到“咔嚓”一声,就关灯了。
蓝色渐变背景膜的使用方法
①附属的蓝色渐变背景膜是静电吸附膜。剥离底膜,把吸附面一侧(光泽强的一面)贴到鱼缸的玻
璃上。开始时蓝色渐变背景膜很容易移动。用手压住稍等一会儿,就会贴得紧密了。
※在贴蓝色渐变背景膜前,先用干布把鱼缸的玻璃面擦干净。如果玻璃有污渍会降低蓝色渐变背
景膜的吸附力。
※蓝色渐变背景膜虽然是可以反复使用的。但是随着使用次数的增加,吸附力会有所降低。如果
吸附力不强时,把它贴到鱼缸玻璃上后用干布轻轻擦其背面,吸附力就会恢复。
※蓝色朝下时,可以根据底床的厚度,把上面透明的部分剪切至大小合适。
②蓝色渐变背景膜贴好后,再安装发光灯体。
※蓝色渐变背景膜不能吸附到发光灯体上,所以安装发光灯体前,请先安装蓝色渐变背景膜。
※如果蓝色渐变背景膜与鱼缸玻璃之间有水进入,请立即用干布擦净。
③如果暂时不使用蓝色渐变背景膜,请把它和底膜光泽强的一面相贴,保管好。
※使用蓝色渐变背景膜时,我们建议保管好底膜,不要废弃。
中文
●在使用本产品之前,请一定仔细阅读本说明书,在理解了正确的使用方法以后再使用。如果不明白正确的使用方法的话,请不要使用。
●本说明书,在阅读之后,请妥善保管。必要的时候请再次阅读。
使用前必读
●安全注意事项
※在使用本产品前,请仔细阅读以下的注意事项。不遵守以下注意事项的话,有可能会发生触电、火灾或烧伤等重大事故。
警 告
○请绝对不要对产品进行分解、改造等。否则有可能发生火灾、触电、故障等事故。
○不慎将本产品掉落在地面上等,使灯体受到剧烈撞击后,请停止使用。否则有可能造成火灾,触电,故障等事故的发生。
○请不要在产品使用环境温度规定以外的情况下使用。此外,请不要使用于阳光直射的地方、湿度极高的地方、有振动的地方或直接与水、雨、风相接触的地方。否则有可能发生火灾、
触电、故障等事故。
○使用时请注意不要使产品沾到水。否则有可能发生触电、故障等事故。产品沾到水后,请停止使用。
○请绝对不要用湿手插入或拔出电源插头。否则有触电的危险。
○请不要在产品上覆盖布或纸类等易燃物品。请不要在易燃物的周围使用。否则有可能会引起火灾。
○请不要在产品的缝隙处插入金属类或易燃物。否则有可能发生火灾、触电、故障等事故。
○请不要使用于孩子的手可以摸得到的地方。否则有触电、受伤的危险。
○请不要强行折、拧、拉电源线。电源线破损会引起火灾、触电等事故。
○电源线损坏后(露出芯线、断线等),请立即停止使用。继续使用会引起火灾、触电等事故。
○AC电源沾水后,水会导致电源线潮湿,进而造成火灾,触电等事故。插座的位置低于鱼缸时,请使电源线下垂,低于AC电源的位置。
○请注意不要落入或浸入水中。
○灯体、调光开关和AC电源插头等请不要使其沾水。各部件不具备防水功能。
○在通电的状态下请不要将灯体直接放置在地板或其他地方。
○点灯后灯体发热属于正常情况,并非异常。
○LED灯珠无法更换。
○请不要在灯体上粘贴胶带或让阳光直射灯体。否则有变色或老化的危险。
○请不要在电压不稳的场所使用。否则有可能会导致灯光闪烁、灭灯的情况发生。
○产品的周围请不要使用收音机、电视等产品。否则有可能会有噪音。
○拔掉电源时,禁止直接拉电源线,请手持电源插头拔掉,以免造成产品损坏。
○清洁时请一定拔掉电源。
○清洁本品时,请不要使用40℃以上的热水,酒精,有机溶剂,石油挥发油等擦拭。有变质,变形的危险。
○由于树脂的性质,发光灯体的颜色有可能会随着时间的推移发黄,变色。
注 意
1. 背景灯的特长
非常容易安装在大小合适的鱼缸上。是观赏水景用的LED背景灯。超薄的灯体可以安装在狭小的空间。以白色为背景的照明可以让水景更加明亮。同时使用附属的蓝色渐变背景膜(静
电吸附膜),可以演绎出蓝色渐变的清爽水景(根据需要背景膜可上下颠倒使用)。具调光功能的开关,可以根据其他照明灯具的光线调节所需亮度。与索拉RGB或水之天空RGB一起
使用,是水景摄影最适用的照明组合。
产品分类 ○背景灯60 适用于W60×D30×H36cm鱼缸(玻璃厚度6mm)
○背景灯90 适用于W90×D45×H45cm鱼缸(玻璃厚度10mm)
2. 各部件名称
零部件
专用挂钩胶垫螺丝固定件
※背景灯60中含有2个。背景灯90中含有3个。
发光灯体
蓝色渐变背景膜(静电吸附膜)
AC电源插头
调光开关
电线绝缘头
电源连接头
3. 使用方法
○背景灯60
产品尺寸 W600×H360×D7(mm)
电压 AC100~240V 50 / 60Hz
实际功率 10W±10%
额定功率 12W
光通量 900~1,000lm
色温 約6,500~7,000K(由于LED的特性,色温值会出现些许的浮动。)
LED数量 69灯
LED寿命 30,000小时以上(根据使用环境,数据也会有所变动)
使用环境温度
0~35℃
○背景灯90
产品尺寸 W900×H450×D7(mm)
电压 AC100~240V 50 / 60Hz
实 际 功 率 14 W±10 %
额定功率 18W
光通量 1,300~1,450lm
色温 約6,500~7,000K(由于LED的特性,色温值会出现些许的浮动。)
LED 数量 105 灯
LED寿命 30,000小时以上(根据使用环境,数据也会有所变动)
使用环境温度
0~35℃
4. 产品规格
发光灯体
胶垫
螺丝固定件
ADA标的一面
鱼缸
背面 前面
鱼缸底柜
側面图
背面图
专用挂钩
蓝色渐变背景膜
蓝色渐变背景膜的蓝色部分朝下时,可以根据底床的厚度,
把上面透明的部分剪切至大小合适。
电线
索拉RGB专用灯架
固定件
旋转安装
This manual suits for next models
1
Table of contents
Languages:
Other A/DA Aquarium manuals


