A&D HR-250AZ User manual

HR-AZ / HR-A SERIES
HR-250AZ/ HR-251AZ/ HR-150AZ/ HR-100A
Z
HR-250A/ HR-251A/ HR-150A/ HR-100A
Analytical Balance
1WMPD4002375A
INSTRUCTION MANUAL

© 2013 A&D Company, Limited. All rights reserved.
No part of this publication may be reproduced, transmitted, transcribed, or translated
into any language in any form by any means without the written permission of A&D
Company, Limited.
The contents of this manual and the specifications of the instrument covered by this
manual are subject to change for improvement without notice.
Windows, Word and Excel are the registered trademarks of the Microsoft Corporation.

1
CONTENTS
Basic Operation
1. INTRODUCTION.............................................................................................................................3
1-1 About This Manual.............................................................................................................................. 3
1-2 Features ............................................................................................................................................. 3
1-3 Compliance......................................................................................................................................... 4
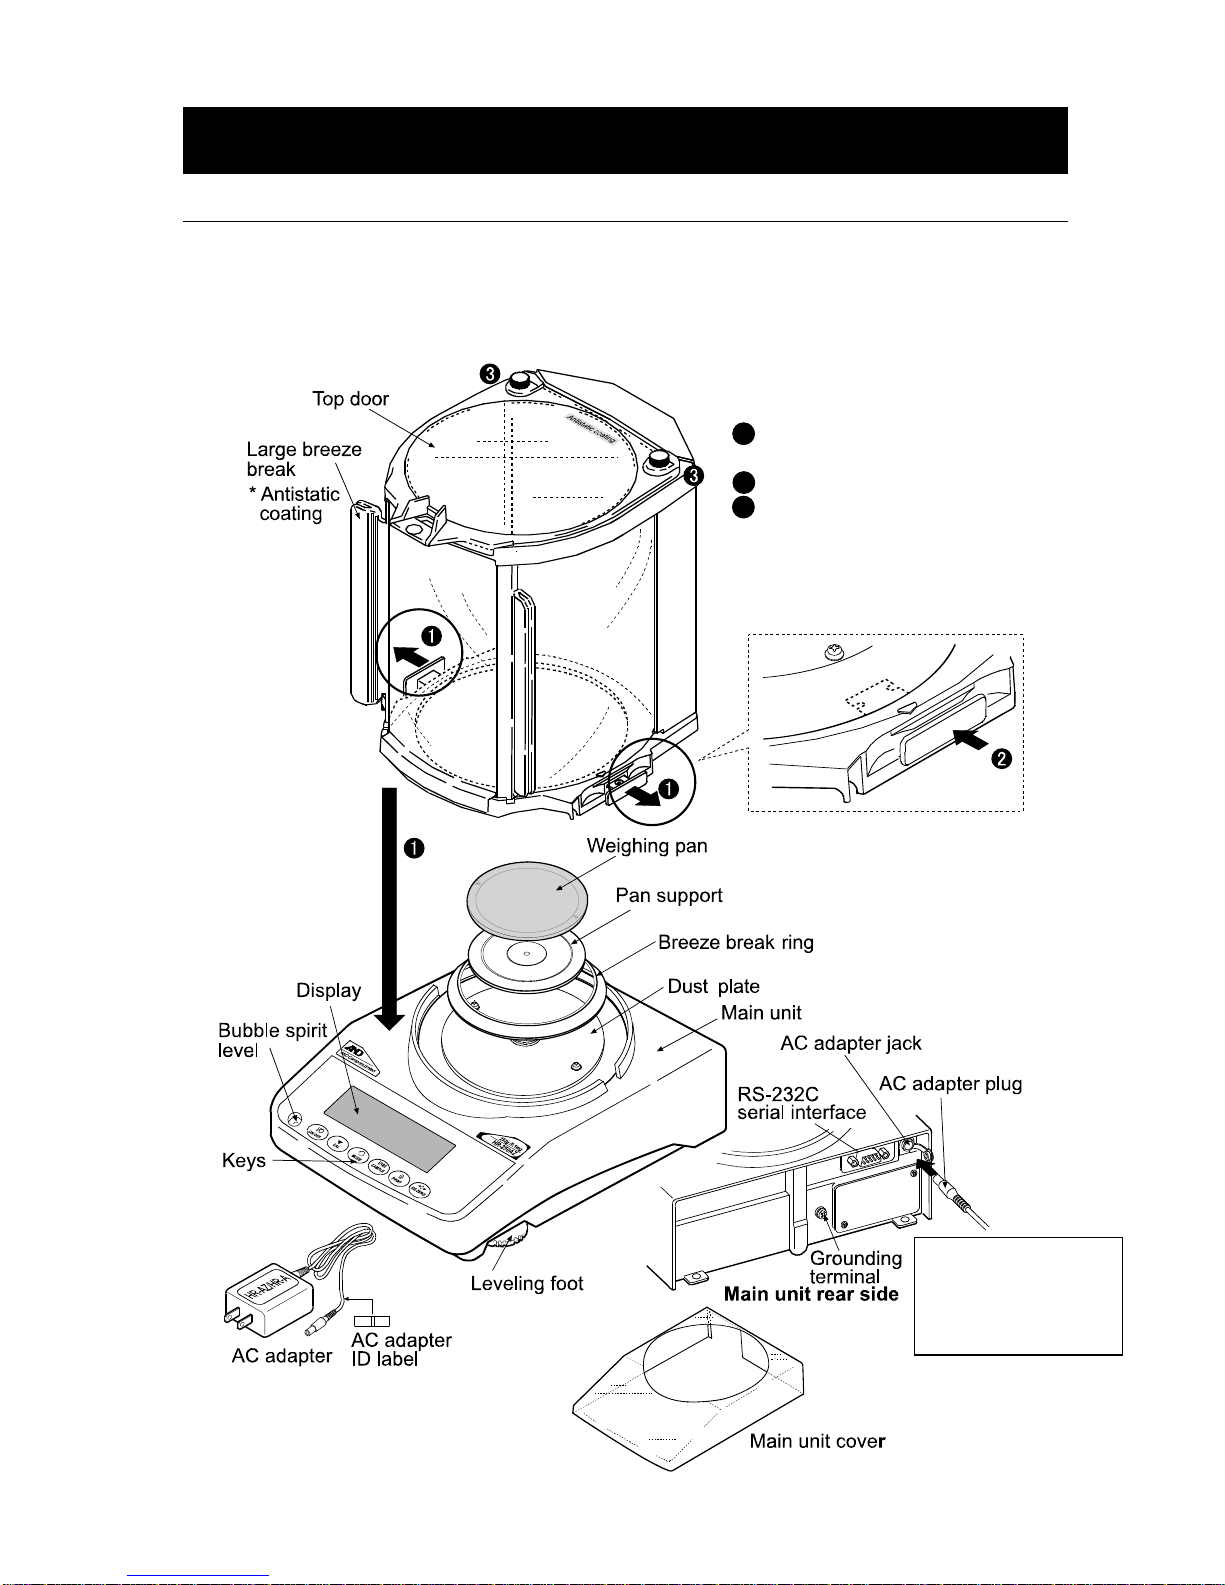
2. UNPACKING THE BALANCE ........................................................................................................5
2-1 Unpacking........................................................................................................................................... 5
2-2 Installing the Balance ......................................................................................................................... 6
3. PRECAUTIONS ..............................................................................................................................7
3-1 Before Use.......................................................................................................................................... 7
3-2 During Use.......................................................................................................................................... 8
3-3 After Use............................................................................................................................................. 9
3-4 Power Supply ..................................................................................................................................... 9
4. DISPLAY SYMBOLS AND KEY OPERATION..............................................................................10
5. WEIGHING UNITS ........................................................................................................................11
5-1 Units...................................................................................................................................................11
5-2 Storing Units..................................................................................................................................... 13
6. WEIGHING....................................................................................................................................14
6-1 Basic Operation (Gram Mode) ......................................................................................................... 14
6-2 Smart Range .................................................................................................................................... 15
6-3 Counting Mode (PCS) ...................................................................................................................... 16
6-4 Percent Mode (%)............................................................................................................................. 18
6-5 Statistical Calculation Mode ............................................................................................................. 19
6-6 Statistical Calculation Mode (Example of Use) ................................................................................ 23
Adapting to the Environment
7. RESPONSE ADJUSTMENT .........................................................................................................25
8. CALIBRATION..............................................................................................................................26
8-1 Calibration Mode .............................................................................................................................. 26
8-2 Calibration Using the Internal mass
(One-Touch
Calibration, only for the
HR-AZ series
)
....................................... 27
8-3 Calibration Test Using the Internal Mass
(Only for the HR-AZ series)
................................................................. 28
8-4 Correcting the Internal Mass Value: 1
(Only for the HR-AZ series)
.............................................................. 29
8-5 Correcting the Internal Mass Value: 2
(Only for the HR-AZ series)
.............................................................. 30
8-6 Calibration Using an External Weight............................................................................................... 31
8-7 Calibration Test Using an External Weight....................................................................................... 33
9. FUNCTION SWITCH AND INITIALIZATION.................................................................................35
9-1 Permit or Inhibit ................................................................................................................................ 35
9-2 Initializing the Balance...................................................................................................................... 36

2
Functions
10. FUNCTION TABLE.....................................................................................................................37
10-1 Structure and Sequence of the Function Table .............................................................................. 37
10-2 Display and Keys............................................................................................................................ 37
10-3 Details of the Function Table .......................................................................................................... 38
10-4 Description of the Class “Environment, Display”............................................................................41
10-5 Description of the Item “Data Output Mode”................................................................................... 43
10-6 Description of the Item “Data Format”............................................................................................ 44
10-7 Data Format Examples................................................................................................................... 46
10-8 Description of the Item “Application Function”................................................................................ 47
10-9 Clock and Calendar Function (
Only for the HR-AZ series)
................................................................... 48
10-10 Comparator Function.................................................................................................................... 50
11. ID NUMBER AND GLP REPORT................................................................................................51
11-1 Setting the ID Number.................................................................................................................... 51
11-2 GLP Report..................................................................................................................................... 51
12. UNDERHOOK.............................................................................................................................55
13. Density Measurement (Specific gravity)..................................................................................56
14. PROGRAMMABLE-UNIT ...........................................................................................................61
RS-232C Serial Interface
15. RS-232C SERIAL INTERFACE ..................................................................................................62
16. CONNECTION TO PERIPHERAL EQUIPMENT........................................................................63
16-1 Connection to the AD-8121B Printer .............................................................................................. 63
16-2 Connection to a Computer.............................................................................................................. 64
16-3 Using Windows Communication Tools (WinCT)............................................................................. 64
Maintenance
17. COMMANDS...............................................................................................................................66
17-1 Command List................................................................................................................................. 66
17-2 Acknowledge Code and Error Codes ............................................................................................. 67
17-3 Settings Related to RS-232C ......................................................................................................... 69
18. MAINTENANCE..........................................................................................................................70
19. TROUBLESHOOTING................................................................................................................70
19-1 Checking the Balance Performance and Environment................................................................... 70
19-2 Error Codes .................................................................................................................................... 71
19-3 Asking For Repair........................................................................................................................... 72
20. OPTIONS....................................................................................................................................73
21. SPECIFICATIONS.......................................................................................................................76
22. EXTERNAL DIMENSIONS .........................................................................................................78
23. TERMS/INDEX............................................................................................................................79

3
1. INTRODUCTION
This manual describes how the HR-AZ /HR-A series balance works and how to get the most out of it
in terms of performance.
Read this manual thoroughly before using the balance and keep it at hand for future reference.
1-1 About This Manual
This manual consists of the following five parts:
Basic operation........................Describes precautions on handling the balance, balance
construction and basic balance operation.
Adapting to the environment....Describes response adjustment and calibration.
Functions.................................Describes various functions of the balance.
RS-232C serial interface.......... Describes the interface which transmits data and controls the balance.
Maintenance............................Describes maintenance, error codes, troubleshooting,
specifications and options.
1-2 Features
The HR-AZ series balance is equipped with an internal mass for one-touch calibration.
Casing construction, strong protection against dust and moisture.
Multiple weighing units with most of the common units used around the world.
Standard RS-232C serial interface to communicate with a computer and to output the Good
Laboratory Practice (GLP) / Good Manufacturing Practice (GMP) compliant report.
Statistical calculation mode to statistically calculate the weight data, and display or output the
sum, maximum, minimum, range (maximum-minimum), average, standard deviation and
coefficient of variation.
Comparator Indicators, displaying the comparison results.
Hold Function, provided for weighing a moving object such as an animal.
Breeze break, provided for better stability if drafts are present.
Underhook, provided for suspended weighing.
As options, the USB interface (HRA-02), the Ethernet interface (HRA-08) and the built-in
battery unit (HRA-09) are available.
Connecting the USB interface, by cable to a Windows computer, allows transmission of the weight
data to Excel or Word. The Ethernet interface allows connection of the balance to a personal
computer through a LAN. The battery unit allows use of the balance where a power source is not
available.
The AD-8920A remote display, that is sold separately, allows reading the weight value in a
place away from the balance.
The optional AD-1688 data logger provides easy weighing data management.
●The optional AD-1687 weighing environment logger provides easy management of the
weighing data, such as environmental data for the weighing and so on.

4
1-3 Compliance
Compliance with FCC Rules
Please note that this device generates, uses and can radiate radio frequency energy. This
device has been tested and has been found to comply with the limits of a Class A computing
device pursuant to Subpart J of Part 15 of FCC rules. These rules are designed to provide
reasonable protection against interference when this device is operated in a commercial
environment. If this unit is operated in a residential area, it may cause some interference and
under these circumstances the user would be required to take, at his own expense, whatever
measures are necessary to eliminate the interference.
(FCC = Federal Communications Commission in the U.S.A.)
Compliance With EMC Directives
This device features radio interference suppression and safety regulation in compliance with
the following Council Directives
Council directive 2004/108/EC EN61326 EMC directive
Council directive 2006/95/EC EN60950 Safety of Information Technology Equipment
The CE mark is an official mandatory European marking.
Please note that any electronic product must comply with local laws and regulations when
sold or used anywhere outside Europe.

5
2. UNPACKING THE BALANCE
2-1 Unpacking
The balance is a precision instrument. Unpack the balance carefully. Keep the packing
material to be used for transporting the balance in the future.
See the illustrations to confirm that everything is included.
Install the large breeze break when drafts are present
Note
Please confirm that the AC adapter
type is correct for your local voltage
and receptacle type.
The AC adapter plug is
protected against dust
and may be difficult to
insert. When inserting
the plug, turn the plug
while pushing on it.
Confirm that both of the locking
handle hooks are under the dust
plate.
How to install the large breeze break
Follow the numbered sequence.
1Pull out the locking handles, and install
the large breeze break on the main unit.
2Push in the locking handles.
3How to open the top door
If removing either of the securing
screws (3) on the top door, the top
door may be pivoted on the
remaining screw.

6
2-2 Installing the Balance
Install the balance as follows:
1. Place the balance on a solid weighing table. Refer to “3. PRECAUTIONS” for installing the balance.
2. Assemble the pan support, weighing pan, breeze break ring and breeze break, on the balance
as shown in the illustration on page 5.
3. Adjust the leveling feet to level the balance. Confirm it using the bubble spirit level.
4. Confirm that the AC adapter type is correct for the local voltage and power receptacle type.
5. Connect the AC adapter to the balance. Warm up the balance for at least one hour with
nothing on the weighing pan.
Note
The AC adapter plug is protected against dust and may be difficult to insert. When inserting
the plug, turn the plug while pushing on it.

7
3. PRECAUTIONS
To get the optimum performance from the balance and acquire accurate weight data, note the following:
3-1 Before Use
Install the balance in an environment where the temperature and humidity are not excessive.
The best operating temperature is about 20°C / 68°F at about 50% relative humidity.
Install the balance where it is not exposed to direct sunlight and it is not affected by heaters or
air conditioners.
Install the balance where it is free of dust.
Install the balance away from equipment which produces magnetic fields.
Install the balance in a stable place avoiding vibration and shock. Corners of rooms on the first
floor are best, as they are less prone to vibration.
The weighing table should be solid and free from vibration, drafts and as level as possible.
Level the balance by adjusting the leveling feet and confirm it using the bubble spirit level.
Make sure that the bubble is in the center of the red circle.
Ensure a stable power source when using the AC adapter.
Plug in the AC adapter and warm up the balance for at least one hour.
Calibrate the balance before use or after having moved it to another location.
Caution: Do not install the balance where flammable or corrosive gas is present.

8
3-2 During Use
Discharge static electricity from the material to be
weighed (hereinafter referred to as the sample). When
a sample could have a static charge, the weight data is
influenced. Ground the balance and try the following:
Eliminate static electricity using the optional
AD-1683 DC static eliminator.
Try to keep the ambient humidity above 45%RH.
Use a metal shield case for a charged sample.
Wipe charged plastic samples with a moistened
cloth.
This balance uses a strong magnet as part of the
balance assembly, so please use caution when
weighing magnetic materials such as iron. If there is a
problem, use the underhook on the bottom of the
balance to suspend the material away from the
influence of the magnet.
Eliminate the temperature difference between a sample and the environment. When a sample
is warmer (cooler) than the ambient temperature, the sample will be lighter (heavier) than the
true weight. This error is due to a rising (falling) draft around the sample.
Make each weighing gently and quickly to avoid errors caused by the evaporation of moisture
from the sample or the absorption of moisture by the sample.
Do not drop things upon the weighing pan, or place a sample on the pan that is beyond the
balance weighing capacity. Place a sample in the center of the weighing pan.
Do not use a sharp instrument such as a pencil to press the keys. Use your finger only.
Press the RE-ZERO key before each weighing to eliminate possible errors.
Calibrate the balance periodically so as to eliminate possible errors.
Take into consideration the affect of air buoyancy on a sample when more accuracy is required.
Keep the balance interior free of dust and foreign materials.
The breeze break (The HR-AZ /HR-A series) is provided as a standard accessory. An anti-static
treatment has been applied to the breeze break components, but they may be charged with
static electricity when they are unpacked or when the humidity is low. If the weight value is
unstable even when there are no drafts or the balance has a problem with repeatability, remove
the breeze break. Or wipe the clear plates with a moistened cloth, use the optional AD-1683 DC
static eliminator or apply an anti-static spray.

9
3-3 After Use
Avoid mechanical shock to the balance.
Do not disassemble the balance. Contact the localA&D dealer if the balance needs service or repair.
Do not use organic solvents to clean the balance. Clean the balance with a lint free cloth that
is moistened with warm water and a mild detergent.
The edge of the weighing pan is sharp. Use much care when cleaning the pan.
Avoid dust and water so that the balance weighs correctly. Protect the internal parts from liquid
spills and excessive dust.
The breeze break parts have an antistatic coating. Washing these parts with water, etc., will
diminish the antistatic coating function.
3-4 Power Supply
When the AC adapter is connected, the balance is in the standby mode if the standby
indicator is on (refer to “4. DISPLAY SYMBOLS AND KEY OPERATION”). This is a normal
state and does not harm the balance. For accurate weighing, allow the balance to reach
equilibrium with room temperature, and then warm up the balance for at least one hour before
use.

10
4. DISPLAY SYMBOLS AND KEY OPERATION
Key operation
Key operation affects how the balance functions. The basic key operations are:
“Press and release the key immediately” or “Press the key”
= normal key operation during measurement
“Press and hold the key”
Display symbols
Each key, when pressed or when pressed and held, functions as follows:
Key When pressed When pressed and held
Turns the display on or off. The standby indicator is displayed when the display is
turned off. The weighing mode is enabled when the display is turned on.
This key is available anytime. Pressing the key during operation will interrupt the
operation and turn the display off.
In the weighing mode, turns the minimum
weighing value on or off.
In the counting or percent mode, enters
the sample storing mode.
Enters the function table mode.
Refer to “10. FUNCTION TABLE”.
Switches the weighing units stored in the
function table.
Refer to “5. WEIGHING UNITS”.
Enters the response adjustment mode.
Cancels the operation when performing
settings. With the HR-AZ series, enters
the calibration mode using the internal
mass. (One-touch calibration)
Enters the calibration mode.
Outputs the weight data to a printer or
personal computer using the RS-232C
serial interface, depending on the
function table settings.
Confirms the operation when performing
settings.
No function at the factory setting
By changing the function table:
Outputs “Title block” and “End block” for
GLP/GMP compliant report.
(Refer to “11-2 GLP Report”.)
Sets the display to zero.

11
5. WEIGHING UNITS
5-1 Units
With the HR-AZ
/
HR-A series balance, the following weighing units and weighing modes are
available:
A unit or mode can be selected and stored in the function table as described on page 13.
If a weighing mode (or unit of weight) has been turned off, that mode or unit will be missing in the
sequence. Tael has four varieties, one of which can be selected and installed at the factory.
To select a unit or mode for weighing, press the MODE key.
For details about the units and modes, see the table below:
Name (unit, mode) Display Function table
(Storing mode) Conversion factor
1 g =
Gram g g 1 g
Milligram mg mg 0.001g
Counting mode
Percent mode % %
Ounce (Avoir) 28.349523125 g
Troy Ounce 31.1034768 g
Metric Carat 0.2 g
Momme 3.75 g
Pennyweight 1.55517384 g
Grain (UK) 0.06479891 g
Tael (HKgeneral,Singapore) 37.7994 g
Tael (HK jewelry) 37.429 g
Tael (Taiwan) 37.5 g
Tael (China)
31.25 g
Tola (India) 11.6638038 g
Messghal 4.6875 g
Density mode
Programmable-unit(Multi-unit)
Percent mode
Programmable-unit (No unit displayed. For details, refer to "14. PROGRAMMABLE-UNIT".)
Counting mode

12
The tables below indicate the weighing capacity and the minimum display for each unit, depending
on the balance model.
Capacity
Unit HR-100AZ
HR-100A HR-150AZ
HR-150A HR-250AZ
HR-250A Minimum display
Gram 102 152 252 0.0001
Ounce (Avoir) 3.59 5.36 8.88 0.00001
Troy Ounce 3.27 4.88 8.10 0.00001
Metric Carat 510 760 1260 0.001
Momme 27.2 40.5 67.2 0.0001
Pennyweight 65.5 97.7 162.0 0.0001
Grain (UK) 1574 2346 3889 0.002
Tael (HK general, Singapore) 2.69 4.02 6.66 0.00001
Tael (HK jewelry) 2.72 4.06 6.73 0.00001
Tael (Taiwan) 2.72 4.05 6.72 0.00001
Tael (China) 3.26 4.86 8.06 0.00001
Tola (India) 8.74 13.0 21.6 0.00001
Messghal 21.7 32.4 53.7 0.0001
HR-251AZ / HR-251A
Precision range Standard range
Unit
Capacity Minimum display Capacity Minimum display
Gram 62 0.0001 252 0.001
Ounce (Avoir) 2.18 0.00001 8.88 0.0001
Troy Ounce 1.99 0.00001 8.10 0.0001
Metric Carat 310 0.001 1260 0.01
Momme 16.5 0.0001 67.2 0.001
Pennyweight 39.8 0.0001 162.0 0.001
Grain (UK) 956 0.002 3889 0.01
Tael (HK general, Singapore) 1.64 0.00001 6.66 0.0001
Tael (HK jewelry) 1.65 0.00001 6.73 0.0001
Tael (Taiwan) 1.65 0.00001 6.72 0.0001
Tael (China) 1.98 0.00001 8.06 0.0001
Tola (India) 5.31 0.00001 21.6 0.0001
Messghal 13.2 0.0001 53.7 0.001

13
5-2 Storing Units
The units or modes can be selected and stored in the function table. The sequence of displaying the
units or modes can be arranged in the function table so as to fit the frequency of use.
Select a unit or mode and arrange the sequence of display
as follows:
1 Press and hold the SAMPLE key until ba5fnc of
the function table is displayed.
2 Press the SAMPLE key several times to display
1Unit .
3 Press the PRINT key to enter the unit selection mode.
4 Specify a unit or mode in the order to be displayed
using the following keys.
SAMPLE key To sequentially display the
units.
RE-ZERO key To specify a unit or mode. The
stabilization indicator appears
when the displayed unit or mode
is specified.
5 Press the PRINT key to store the units or modes. The
balance displays end and then displays the next
menu item of the function table.
6 Press the CAL key to exit the function table. Then the
balance returns to the weighing mode with the unit
specified first in step 4.
Notes
When the power is turned on, the scale displays the unit
specified first in step 4.
In the weighing mode, to select a unit or mode for weighing,
press the MODE key.

14
6. WEIGHING
6-1 Basic Operation (Gram Mode)
1 Place a container on the weighing pan, if necessary.
Press the RE-ZERO key to cancel the weight (tare). The
balance displays 0.0000 g. (The decimal point position
depends on the balance model.)
2 Place a sample on the pan or in the container.
3 Wait for the stabilization indicator to turn on. Read the
value.
While the stabilization indicator is on, pressing the PRINT
key will output the weight value, using the RS-232C serial
interface.
Note
Peripheral equipment, that is sold separately , such as a
printer or a personal computer is required.
4 Remove the sample and container from the pan.
Notes
To use other units, press the MODE key and select an
appropriate unit.
Press the SAMPLE key to turn on or off the minimum
weighing value.
When the ON:OFF key is pressed with a container placed
on the weighing pan, the balance displays 0.0000 g and
weighing is started,
Sample
Remove the
sample
Weighing
pan
Container

15
6-2 Smart Range
The smart range for the HR-251AZ/HR-251A consists of the standard range and precision
range (high resolution).
Smart range function
The range switches automatically, depending on the value displayed.
Pressing the RE-ZERO key allows weighing in the precision range, regardless of the tare
value.
The range can be fixed to the standard range by pressing the SAMPLE key.
Precision range and standard range for the HR-251AZ/HR-251A
Unit Precision range Standard range
Gram 0.0000 g to 62.0009 g 62.001 g to 252.008 g
Milligram 0.0 mg to 62000.9 mg 62001 mg to 252008 mg
Refer to page 12 for other units.
Example
1 Press the RE-ZERO key to use the precision range.
The balance displays zero.
2 Place a container (tare) on the weighing pan.
When the weight value displayed exceeds the
precision range value, the balance will switch to the
standard range.
3 Press the RE-ZERO key.
The balance displays zero and switches to the
precision range.
4 Place a sample in the container.
When the weight value displayed is within the
precision range value, the balance will perform a
weighing, using the precision range.

16
6-3 Counting Mode (PCS)
This is the mode to determine the number of objects in a sample based on the standard sample unit
mass. The unit mass means the mass of one piece of the sample. The smaller the variables in each
sample unit mass are, the more accurate the counting will be. The balance is equipped with the
Automatic Counting Accuracy Improvement (ACAI) function to improve the counting accuracy.
Notes
For counting, use samples with a unit mass of at least ten or more times the minimum
weighing value of the balance.
If the sample unit mass variable is too large, it may cause a counting error.
To improve the counting performance, use the ACAI function frequently or divide the samples
into several groups and count each group.
Selecting the counting mode
1 Press the MODE key to select (counting mode).
Storing a sample unit mass
2 Press the SAMPLE key to enter the sample unit mass
storing mode.
Even in the storing mode, pressing the MODE key will
switch to the next mode.
3 To select the number of samples, press the SAMPLE key
several times. It may be set to 10, 25, 50 or 100.
Note
A greater number of samples will yield more accurate
counting result.
4 Place a container on the weighing pan, if necessary.
Press the RE-ZERO key to cancel the weight (tare). The
number specified in step 3 appears.
e.g.: 25 0 is displayed if 25 is selected in step 3.
5 Place the number of samples specified on the pan. In this
example, 25 pieces.
6 Wait for the stabilization indicator to turn on. Press the
PRINT key to calculate and store the unit mass. The
balance displays (counting mode) and is set to
count samples with this unit mass.
To improve the accuracy of the unit mass, go to step 8.
Weighing
pan
Container
Sample
(25 pieces)
The counting result
Place sample
to be counted

17
Notes
If the balance judges that the mass of the samples is too light and is not adequate to be used
as the unit mass, it displays lo . In that case, store the mass by some quantity. For example,
when the model with the minimum weighing value of 0.0001 g is used and 10 pieces of
samples weigh 0.0005 g. Store 100 pieces of samples as 10 and multiply the weighing result
by 10.
If the balance judges that the mass of the samples is too light to aquire accurate weighing, it
displays an error requiring the addition of more samples to the specified number. For
example, 150- appears to require 25 more samples. Add 25 samples and press the PRINT
key. When the unit mass is stored correctly, the balance proceeds to the counting mode.
For a more accurate counting operation, use samples with a unit mass of at least ten or more
times the minimum weighing value of the balance. For example, when a balance with a
mimimum weighing value of 0.0001 g is used, the recommended sample unit mass is 0.001 g
or more.
The sample unit mass stored, even if the AC adapter is removed, is maintained in non-volatile
memory.
Counting operation
7 Place the samples to be counted on the pan.
While the stabilization indicator is on, pressing the PRINT
key will output the weight value (number of objects),
using the RS-232C serial interface.
Note
Peripheral equipment, that is sold separately , such as a
printer or a personal computer is required.
Counting mode using the ACAI function
The ACAI is a function that improves the accuracy of the unit
mass automatically by increasing the number of samples
and averaging the unit mass variable to minimize the
weighing error, as the counting process proceeds.
8 If a few more samples are added, the processing indicator turns on. To prevent an error, add
three or more. The processing indicator does not turn on if overloaded. Try to add the same
number of samples as displayed.
9 The balance re-calculates the unit mass while the processing indicator is blinking. Do not
touch the balance or samples on the pan until the processing indicator turns off.
10 Counting accuracy is improved when the processing indicator turns off.
Each time the above operation is performed, a more accurate unit mass will be obtained.
There is no definite upper limit of ACAI range for the number of samples exceeding 100. Try
to add the same number of samples as displayed.
11 Remove all the samples used in ACAI and proceed with the counting operation using the
improved unit mass.
Processing indicator

18
6-4 Percent Mode (%)
This is the mode to display the weight value in percentage compared to a 100% reference mass and
is used for target weighing or checking the sample variable.
Selecting the percent mode
1 Press the MODE key to select % (percent mode).
Storing the 100% reference mass
2 Press the SAMPLE key to enter the 100% reference
mass storing mode.
Even in the storing mode, pressing the MODE key will
switch to the next mode.
3 Place a container on the weighing pan, if necessary.
Press the RE-ZERO key to cancel the weight (tare). The
balance displays 100 0 %.
4 Place the sample to be set as the 100% reference mass
on the pan or in the container.
5 Press the PRINT key to store the reference mass. The
balance displays 100.00 %. (The decimal point position
depends on the reference value.)
Notes
If the balance judges that the mass of the sample is too
light to be used as a reference, it displays lo . Do not use
the sample.
The reference mass stored, even if the AC adapter is
removed, is maintained in non-volatile memory
6 Remove the sample.
Reading the percentage
7 Place a sample to be compared to the reference mass on
the pan. The displayed percentage is based on the 100%
reference mass.
While the stabilization indicator is on, pressing the PRINT
key will output the weight value, using the RS-232C serial
interface.
Note
Peripheral equipment, that is sold separately , such as a
printer or a personal computer is required.
This manual suits for next models
7
Table of contents
Other A&D Scale manuals