Abbott Eterna 16000 User manual

Charging System
Eterna™ Spinal Cord Smulaon System
Model 16000
User's Guide

CAUTION: Federal (USA) law restricts this device to sale by or on the order of a physician.
WARNING: This product can expose you to chemicals including ethylene oxide, which is known to
the State of California to cause cancer and birth defects or other reproducve harm. For more
informaon, go to www.P65Warnings.ca.gov.
™ Indicates a trademark of the Abbo group of companies.
‡ Indicates a third-party trademark, which is property of its respecve owner.
Bluetooth and Bluetooth logo are registered trademarks of Bluetooth SIG, Inc.
Pat. hp://www.abbo.com/patents
© 2023 Abbo. All Rights Reserved.

Contents
About This Guide. . . . . . . . . . . . . . . . . . . . . . . . . . . . . . . . . . . . . . . . . . . . . . . . . . . . . . . . . . . . . . . . . . . . 1
Prescripon and Safety Informaon. . . . . . . . . . . . . . . . . . . . . . . . . . . . . . . . . . . . . . . . . . . . . . . . . . . . 1
Intended Use. . . . . . . . . . . . . . . . . . . . . . . . . . . . . . . . . . . . . . . . . . . . . . . . . . . . . . . . . . . . . . . . . . . . . . . . . . . . . . . 1
Indicaon for Use. . . . . . . . . . . . . . . . . . . . . . . . . . . . . . . . . . . . . . . . . . . . . . . . . . . . . . . . . . . . . . . . . . . . . . . . . . . 1
Contraindicaons. . . . . . . . . . . . . . . . . . . . . . . . . . . . . . . . . . . . . . . . . . . . . . . . . . . . . . . . . . . . . . . . . . . . . . . . . . . 1
Addional Prescripon Informaon. . . . . . . . . . . . . . . . . . . . . . . . . . . . . . . . . . . . . . . . . . . . . . . . . . . . . . . . . . . . 1
MRI Safety Informaon. . . . . . . . . . . . . . . . . . . . . . . . . . . . . . . . . . . . . . . . . . . . . . . . . . . . . . . . . . . . . . . . . . . . . . 1
Warnings. . . . . . . . . . . . . . . . . . . . . . . . . . . . . . . . . . . . . . . . . . . . . . . . . . . . . . . . . . . . . . . . . . . . . . . . . . . . . . . . . . 1
Precauons. . . . . . . . . . . . . . . . . . . . . . . . . . . . . . . . . . . . . . . . . . . . . . . . . . . . . . . . . . . . . . . . . . . . . . . . . . . . . . . . 2
Adverse Eects. . . . . . . . . . . . . . . . . . . . . . . . . . . . . . . . . . . . . . . . . . . . . . . . . . . . . . . . . . . . . . . . . . . . . . . . . . . . . 3
Product Descripon. . . . . . . . . . . . . . . . . . . . . . . . . . . . . . . . . . . . . . . . . . . . . . . . . . . . . . . . . . . . . . . . . 3
Charger Indicators . . . . . . . . . . . . . . . . . . . . . . . . . . . . . . . . . . . . . . . . . . . . . . . . . . . . . . . . . . . . . . . . . . 5
Using Your Charger . . . . . . . . . . . . . . . . . . . . . . . . . . . . . . . . . . . . . . . . . . . . . . . . . . . . . . . . . . . . . . . . . . 6
Pairing the Charger with the Paent Controller . . . . . . . . . . . . . . . . . . . . . . . . . . . . . . . . . . . . . . . . . . . . . . . . . . 6
When to Charge Your Generator. . . . . . . . . . . . . . . . . . . . . . . . . . . . . . . . . . . . . . . . . . . . . . . . . . . . . . . . . . . . . . . 6
Charging Your Charger . . . . . . . . . . . . . . . . . . . . . . . . . . . . . . . . . . . . . . . . . . . . . . . . . . . . . . . . . . . . . . . . . . . . . . . 7
Seng Up the Charging Apparel. . . . . . . . . . . . . . . . . . . . . . . . . . . . . . . . . . . . . . . . . . . . . . . . . . . . . . . . . . . . . . . 8
Charging Your Generator. . . . . . . . . . . . . . . . . . . . . . . . . . . . . . . . . . . . . . . . . . . . . . . . . . . . . . . . . . . . . . . . . . . . 12
Caring for and Maintaining Your Charger and Charging Apparel . . . . . . . . . . . . . . . . . . . . . . . . . . . . . . . . . . . . 13
Traveling with Your Charging System . . . . . . . . . . . . . . . . . . . . . . . . . . . . . . . . . . . . . . . . . . . . . . . . . . . . . . . . . . 14
Troubleshoong. . . . . . . . . . . . . . . . . . . . . . . . . . . . . . . . . . . . . . . . . . . . . . . . . . . . . . . . . . . . . . . . . . . 14
Troubleshoong Charging Issues . . . . . . . . . . . . . . . . . . . . . . . . . . . . . . . . . . . . . . . . . . . . . . . . . . . . . . . . . . . . . 15
Service and Ordering Informaon. . . . . . . . . . . . . . . . . . . . . . . . . . . . . . . . . . . . . . . . . . . . . . . . . . . . . 17
Appendix A: Regulatory Statements. . . . . . . . . . . . . . . . . . . . . . . . . . . . . . . . . . . . . . . . . . . . . . . . . . . 18
Disposal Guidelines for Baery-Powered Devices. . . . . . . . . . . . . . . . . . . . . . . . . . . . . . . . . . . . . . . . . . . . . . . . 18
Statement of FCC Compliance. . . . . . . . . . . . . . . . . . . . . . . . . . . . . . . . . . . . . . . . . . . . . . . . . . . . . . . . . . . . . . . . 18
Product Classicaon Statement (CISPR 11, Class B). . . . . . . . . . . . . . . . . . . . . . . . . . . . . . . . . . . . . . . . . . . . . . 19
Idencaon Informaon for Product Registraon . . . . . . . . . . . . . . . . . . . . . . . . . . . . . . . . . . . . . . . . . . . . . . 19
Wireless Technology Informaon. . . . . . . . . . . . . . . . . . . . . . . . . . . . . . . . . . . . . . . . . . . . . . . . . . . . . . . . . . . . . 19
Quality of Service for Wireless Technology. . . . . . . . . . . . . . . . . . . . . . . . . . . . . . . . . . . . . . . . . . . . . . . . . . . . . . 20
Wireless Security Measures. . . . . . . . . . . . . . . . . . . . . . . . . . . . . . . . . . . . . . . . . . . . . . . . . . . . . . . . . . . . . . . . . . 21
Troubleshoong for Wireless, Coexistence, or Interference Issues. . . . . . . . . . . . . . . . . . . . . . . . . . . . . . . . . . 21
Appendix B: Product Specicaons. . . . . . . . . . . . . . . . . . . . . . . . . . . . . . . . . . . . . . . . . . . . . . . . . . . . 21
Appendix C: Technical Specicaons . . . . . . . . . . . . . . . . . . . . . . . . . . . . . . . . . . . . . . . . . . . . . . . . . . 22
Appendix D: Electromagnec Compability Guidelines. . . . . . . . . . . . . . . . . . . . . . . . . . . . . . . . . . . 23
Appendix E: Symbols and Denions. . . . . . . . . . . . . . . . . . . . . . . . . . . . . . . . . . . . . . . . . . . . . . . . . . 26
i

ii

About This Guide
This guide explains how to use the charging system (Model 16000 and charging system
accessories). Follow the informaon in this guide to correctly use your charging system.
If you have any quesons about your system, contact Technical Support.
Prescripon and Safety Informaon
Read this secon to gather important prescripon and safety informaon.
Intended Use
The charging system is intended to be used to charge the Eterna™ implantable pulse
generator (IPG), also referred to as a generator.
Indicaon for Use
Refer to the user's guide for the appropriate neurosmulaon system.
Contraindicaons
Refer to the user's guide for the appropriate neurosmulaon system.
Addional Prescripon Informaon
Refer to the user’s guide for your paent controller for instrucons for use and other
important informaon, including indicaons for use, contraindicaons, warnings,
precauons, adverse eects, and the personal idencaon card related to your
neurosmulaon system.
MRI Safety Informaon
Do not bring your charger into the scanner magnet room. It can be aected by the
magnec resonance imaging (MRI) magnet, may present a projecle hazard, and is
considered MR Unsafe.
Warnings
The following warnings apply to this charging system.
Device inspecon. Before using the charging system, check the charger, charging cable,
and power adapter for visible damage or indicaon of prior disassembly. If any damage
or prior disassembly is observed, do not use the charging system and contact Technical
Support.
Device modicaon. This charger is not serviceable by the customer. To prevent injury
to yourself or damage to the charging system, do not modify the charger. If needed,
return the charger to Abbo Medical for service.
Baery warning. The charger contains a lithium‑ion baery and other potenally
hazardous materials. Do not crush, puncture, or burn the charger because explosion or
re may result.
1

Baery care. Baeries should not come in contact with metal or be exposed to high
temperature or re. Baeries can explode, leak, or melt if disassembled, shorted (when
baery connecons contact metal), or exposed to high temperature or re.
Power adapter and charging cable compability. Use only power adapters and
charging cables that meet the rangs specied in the appendix for technical
specicaons. Use of accessories, transducers, and cables other than those specied or
provided by Abbo Medical could result in increased electromagnec emissions or
decreased electromagnec immunity and result in improper operaon of the system.
Power adapter handling. Do not posion the power adapter in such a way that it is
dicult to disconnect from an electrical outlet.
Explosive or ammable gases. Do not use your charger around explosive or ammable
gas fumes or vapors. This includes oxygen-enriched environments such as hyperbaric
chambers. Operang the device near gas fumes or vapors could cause them to catch
re. If gas fumes or vapors catch re, it could cause severe burns, injury, or death.
Strangulaon. The cords in this charging system pose a strangulaon risk. Keep cords
out of the reach of children.
Choking. Small parts in this charging system pose a choking risk. Keep small system
parts out of the reach of children.
Keep dry to avoid damage. Your charger is not waterproof. Keep it dry to avoid damage.
Never use the charger in or around water. If the charger becomes wet, allow it to dry
completely before use.
Precauons
The following precauons apply to this charging system.
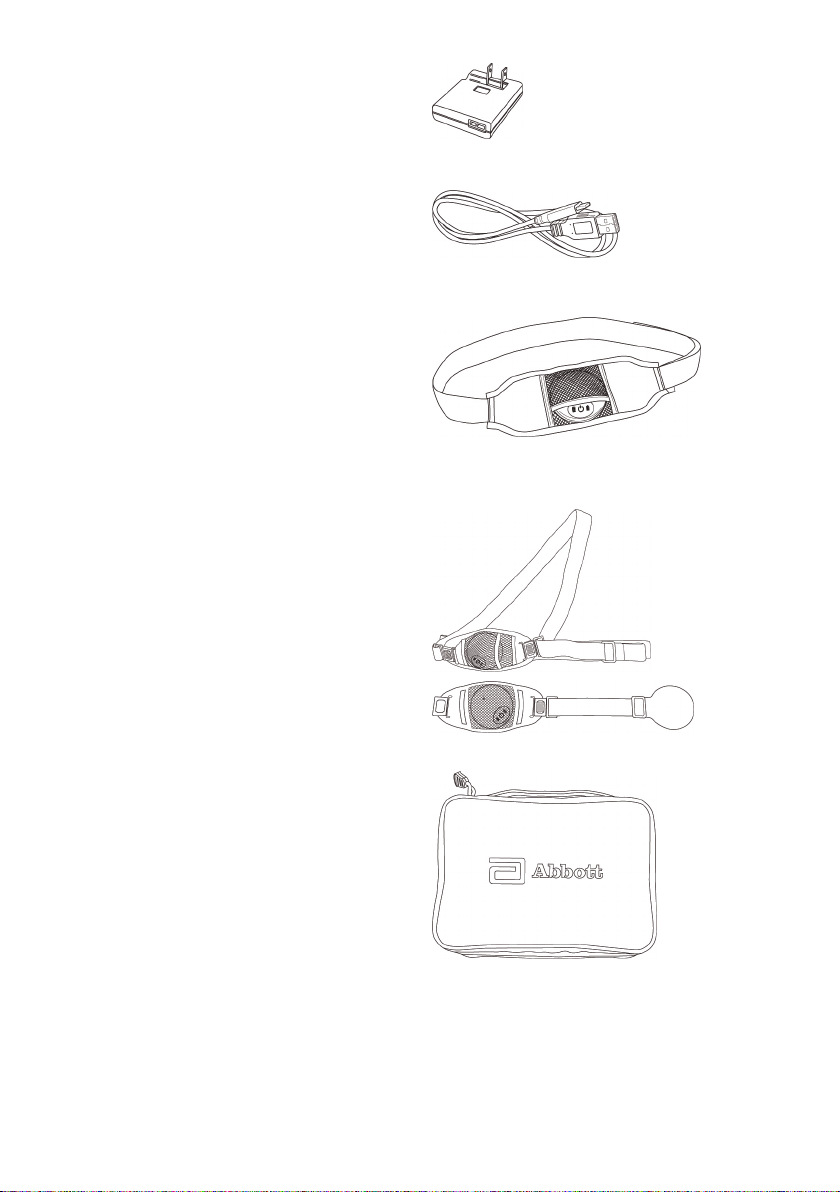
Device components. The charging system is for use with the Eterna™ implantable pulse
generator only. You may use a commercially available power adapter and charging cable
as long as it meets the technical specicaons listed in the appendix.
Handle the device with care. The charger is a sensive electronic device that can be
damaged by rough handling, such as dropping it on the ground.
Review your user’s guide. Before using your charger, review the system informaon in
the applicable paent controller user’s guide.
Infecon. Follow proper infecon control procedures. Also avoid showering and
touching the bandages while your incisions are healing. If you need to charge your
generator before your incisions have healed completely, take care not to disturb the
bandages and follow your physician’s guidance on charging.
Home use. This product is intended for home use per clinician instrucon. To avoid
damage and other potenal hazards, keep this product away from children and pets.
Pain-relief patches. Avoid using pain-relief patches or topical anesthecs, such as
pain‑relieving creams or medicated balms, over your generator site before or during
charging. These pain-relief patches or topical anesthecs may reduce your ability to
perceive discomfort due to charging.
Alcohol consumpon. Avoid drinking alcoholic beverages before or during charging
because they may reduce your ability to perceive discomfort due to charging.
Charging system immunity. Wireless communicaon equipment, such as wireless home
network devices, mobile and cordless telephones, and walkie-talkies, can interfere with
2

the charging system. To correct the eects of typical system interference, keep the
charging system at least 0.5 m (1.6 ) from these types of wireless communicaon
equipment. If you connue to have problems with interference, further increase the
distance between the equipment and your charging system.
Charge your charger. The charger should be fully charged aer every generator charging
session.
Unplug the cable carefully. To avoid damaging the charging cable, do not pull on cable
when unplugging it from the charger or power adapter. Grasp the connector and pull
carefully.
Paent training. Paents should use their neurosmulaon system only aer an
authorized clinician has programmed their generator and has trained them on how to
safely control smulaon and to charge the system.
Adverse Eects
The following adverse eects are associated with using this charging system. Refer to
the paent controller user’s guide for a complete list of adverse eects related to the
use of the Eterna™ SCS system.
▪Heang or discomfort at the pocket while charging. If you feel discomfort at the▪
implant site while charging your generator, stop using the charger. Use your paent
controller to change the charging mode or contact your physician.
▪Heang or discomfort at surgical staples while charging. Charging should not be▪
carried out while surgical staples are in place.
▪Interference with another implanted medical device. This equipment generates,
▪
uses, and can radiate radiofrequency (RF) energy that may interfere with other
electronic devices, including other implanted medical devices. To try to correct the
eect of any interference with other devices, turn o the charging equipment or
increase the distance between the charging equipment and the device being
aected.
Product Descripon
The charging system consists of a charger, a charging cable, a power adapter, charging
apparel, and a travel case for storing the charging system. The charger is used to charge
the Eterna™ implantable pulse generator wirelessly. The charger interfaces with the
paent controller applicaon wirelessly through Bluetooth® wireless technology. The
paent controller applicaon allows you to modify charger sengs, view the baery
level of your charger and generator, and view the charging status of your charger and
generator.
Charger
The charger is used to wirelessly charge
your Eterna™ implantable pulse generator.
3

Power adapter
The power adapter connects with an
electrical outlet and with the charging cable
to charge the charger baery.
Charging cable
The charging cable connects with the
power adapter and with the charger to
charge the charger baery.
Charging apparel – lumbar
Charging apparel is used to posion and
stabilize the charger over your generator
and charge the generator without having to
manually hold the charger in place. The
lumbar apparel is worn like a belt around
your waist.
Charging apparel – pectoral
Charging apparel is used to posion and
stabilize the charger over your generator
and charge the generator without having to
manually hold the charger in place. The
pectoral apparel can be worn in mulple
conguraons using the double strap or the
counterweight.
Charger travel case
The travel case is used to store the parts of
the charging system.
4

Charger Indicators
The charger has a power icon, a baery icon, and a paent controller alert icon as
shown in the gure below. The charger provides indicator lights and sounds that show
the charger status and the acon being performed.
▪PC Alert icon. The PC alert icon illuminates when the charger has encountered an▪
error. You may view more informaon about the error on your paent controller.
▪Power icon. The power icon illuminates when the charger is turned on. When the
▪
charger is charging the generator, the power icon blinks slowly. When the charger is
in pairing mode, the power icon blinks quickly.
▪Baery icon. The baery icon illuminates in segments to indicate the charger
▪
baery level. While the charger is being charged, a segment of the baery icon
blinks.
NOTE: The indicator lights on the charger may be dicult to see if under direct
sunlight.
Figure 1. Charger icons
1. PC Alert icon1.
2. Power icon2.
3. Baery icon3.
Table 1. Charger sounds
Event Charger sound
Power on 1 beep
Volume on 1 beep
Power o 2 beeps
Error 3 beeps every 5 seconds
Low baery 3 beeps every 5 minutes
Generator found Short, repeang beeps
Generator charging started 2 beeps
low tone then high tone
Generator charging stopped
(not aligned)
2 beeps
high tone then low tone
Generator charging complete
(fully charged)
3 beeps
low tone, high tone, then low tone
5

Using Your Charger
The instrucons in this secon explain how to use your charging system to charge your
generator baery and charger baery, how to use the charging apparel, and how to care
for and travel with your charging system.
NOTE: Each me before using the system, inspect the device and its accessories for
damage. Avoid using a damaged device or accessory. If your device is damaged,
contact Technical Support.
Pairing the Charger with the Paent Controller
Before you use your charger for the rst me, you may want to pair the charger with
your paent controller. Pairing refers to seng up communicaon between the charger
and the paent controller. When these devices are paired, you can use your paent
controller to monitor charging sessions, adjust charger sengs, such as volume control,
and perform charger soware updates. Refer to your paent controller user guide for
more informaon.
NOTE: Your charger and paent controller do not need to be paired or connected to
Bluetooth® wireless technology in order to charge your generator.
To prepare the charger for pairing, do the following:
1. Ensure that your paent controller and charger are charged.1.
2. Place the paent controller near the charger.2.
3. Turn on the charger.3.
4. Press and hold the power icon on the charger for 5 seconds, and then release the4.
buon. The power icon and the baery icon blink once. Then the power icon blinks
quickly, indicang the charger is in the pairing state.
5. On the paent controller, select the charger you are pairing. Refer to your paent5.
controller manual for more informaon.
NOTE: If the pairing does not occur within 5 minutes, the charger exits pairing
mode and then automacally turns o aer 90 seconds of inacvity.
When to Charge Your Generator
Your clinician will help you plan a charging schedule that will work best for you to
maintain eecve therapy. For example, you may establish a charging roune of once per
week.
The following are addional consideraons to help you decide when to charge your
generator:
▪Prior to an MRI
▪
▪Prior to an upcoming surgery
▪
▪In ancipaon of travel
▪
▪When the next charging opportunity is uncertain
▪
▪When the paent controller applicaon displays a low baery nocaon for your
▪
generator
6

▪When smulaon has stopped due to generator baery depleon▪
Your paent controller indicates the baery level of your generator. The level ranges from
0% charge to 100% charge. The paent controller also indicates the approximate
smulaon me remaining based on the generator’s current baery level and therapy
sengs.
When your implanted generator baery is low, your paent controller displays a low
baery message. When this message appears, you should charge your generator at your
earliest convenience. If you do not charge your generator aer the low baery message
appears, your smulaon will eventually stop. When smulaon stops, your controller
will display an alert indicang therapy was turned o due to a low generator baery. You
should charge your generator baery so that therapy can be restored.
NOTE:
▪ To maintain therapy without interrupon and improve baery longevity, always▪
charge your generator before it is depleted completely. If your generator is
repeatedly allowed to deplete completely, its performance or longevity may be
reduced over me.
▪ If your generator is depleted completely, it will take a few minutes for the generator▪
to turn on again and communicate with your paent controller once you start
charging.
Charging Your Charger
Like your generator, your charger contains a rechargeable baery that needs to be
charged on a regular basis. The baery icon on the charger displays the charger baery
level. The paent controller also displays the charger baery level. If the charger is in
range of the paent controller or connected to it, the baery level is indicated by a
baery icon with colored lights. See the following gure.
Figure 2. Charger baery level
1. Three gray bars: charger is o or1.
charger baery is depleted
2. One yellow bar: charger will not fully2.
charge a depleted generator
3. One green bar: charger may not be3.
able to fully charge a depleted
generator
4. Two green bars: charger can fully4.
charge a depleted generator
5. Three green bars: charger can fully5.
charge a depleted generator
NOTE:
▪ One yellow bar indicates you have 30 minutes or less remaining before the charger▪
turns o due to low baery.
▪ When the charger baery is low, the charger beeps three mes every 5 minutes▪
unl the baery is depleted.
7

To charge your charger, follow these steps:
1. If the charger is in the charging apparel, remove the charger from the apparel before1.
charging.
NOTE: The charging apparel is not intended to be used while charging the charger.
2. Plug the power adapter into an electrical outlet.2.
NOTE: While the charger is charging, it should be placed on a stable surface, such
as a table, counter, or oor.
3. Connect the charging cable and power adapter.3.
4. Plug the charging cable into the charger. If the charger is connected successfully to4.
the charging cable and power adapter, the charger beeps once and a segment of the
baery icon blinks and then turns o. Once the charger is fully charged, all the
segments of the baery icon illuminate for 60 seconds and then turn o.
Figure 3. Connecng components to charge the charger
1. Charger1.
2. Charging cable2.
3. Power adapter3.
NOTE:
▪ While the charger is charging, it cannot be used to charge the generator.▪
▪ If your charger is not charging, you may be using an incorrect cable or power▪
adapter. Refer to the appendix for technical specicaons.
5. When you are ready to use the charger, unplug the charging cable from the charger.5.
The power adapter connected to the charging cable can remain plugged into the
electrical outlet.
While the charger is being charged, the charger is able to communicate with the paent
controller. The paent controller indicates the charger baery level and when the
charger is being charged.
Seng Up the Charging Apparel
Your charging system comes with reusable charging apparel that you can use, if desired,
to help stabilize the charger over your generator during a charging session. Depending on
the implant locaon of your generator, you will receive either pectoral charging apparel
or lumbar charging apparel. The charging apparel can be congured to be worn in
dierent ways, depending on your preference and implant locaon. For example,
8

paents with generators implanted in the lower back may choose to use the lumbar
charging apparel like a belt. If you choose to use your charging apparel, you should adjust
it for comfort and t before charging your generator.
Your clinician will help you nd the conguraon that is most comfortable and suitable
for your generator charging sessions.
NOTE: The charger and accessories are to be used with light clothing (<5 mm). If your
clothing is very thick, the charger may not eecvely charge your generator.
Placing Lumbar Charging Apparel
To set up your lumbar charging apparel, gather the charger and the charging apparel and
follow these steps:
1. If the charger is connected to the charger cable, disconnect it.1.
NOTE: While the charger is charging, it cannot be used to charge the generator.
2. Press the power icon to turn on the charger. The three charger icons illuminate2.
briey and the charger beeps once if sound is enabled.
3. Insert the charger fully into the mesh pocket of the charging apparel with the icons3.
facing the opening of the pocket.
4. Ensure the elasc edges of the pocket overlap, fully covering the charger.4.
5. Wrap the charging apparel around your waist so the charger is over your generator.5.
6. Adjust the velcro strap so the apparel is secure around your waist and the charger is6.
on top of your generator.
NOTE:
▪ When the generator enters the charging zone, it beeps connuously unl▪
charging begins.
▪ If the charger does not nd the generator within 90 seconds, the charger turns▪
o automacally. You can press the power icon through the mesh pocket to turn
on the charger and align the charger over your generator.
7. Once you have adjusted the charging apparel to a comfortable t around your waist,7.
you can trim the excess strap length, if desired.
Placing Pectoral Charging Apparel
To set up your pectoral charging apparel, gather the charger and the charging apparel
and follow these steps:
1. If the charger is connected to the charging cable, disconnect it.1.
NOTE: While the charger is charging, it cannot be used to charge the generator.
2. Press the power icon to turn on the charger. The three charger icons illuminate2.
briey and the charger beeps once if sound is enabled.
3. With the charger icons facing the opening of the pocket, insert the charger into the3.
mesh pocket of the charging apparel by liing one side of the opening and then
pulling the other side over the charger.
9

4. Ensure the elasc edges of the pocket overlap, fully covering the charger.4.
NOTE:
▪ When the generator enters the charging zone, it beeps connuously unl▪
charging begins.
▪ If the charger does not nd the generator within 90 seconds, the charger beeps▪
two mes and then turns o automacally. You can press the power icon
through the mesh pocket to turn on the charger and align the charger over your
generator.
Counterweight conguraons
1. If connected, release the long strap from the charger pocket. The counterweight1.
should remain buckled to the charger pocket.
2. Posion the charger over your generator.2.
3. Place the counterweight over your shoulder so it rests on your back or around your3.
neck so the counterweight rests on your opposite shoulder.
NOTE: You may need to adjust the length of the strap to t properly.
Figure 4. Charger posioned over generator (le); counterweight posioned over
opposite shoulder (right)
Single-strap conguraons
1. Release the counterweight from the charger pocket.1.
2. Wrap the charging apparel around your chest or over your shoulder and fasten the2.
buckle.
NOTE: If needed, use the excess strap near the buckle to ghten or loosen the
apparel.
3. Adjust the strap unl the charger is comfortably posioned over your generator.3.
Figure 5. Single-strap around chest (le); single-strap around one shoulder (right)
10

Double-strap conguraons
Opon 1 – Loop and charger on opposite sides
1. Release the counterweight from the charger pocket.1.
2. Grasp the plasc buckle so the charger pocket is hanging toward your feet.2.
NOTE: If your generator is located on the right side of your body, grasp the buckle
with your right hand. If your generator is on your le side, grasp the buckle with
your le hand.
3. Put the arm on the opposite side of your generator through the loop.3.
Figure 6. Arm through loop on opposite side of generator
4. Adjust the charging apparel so that a strap is comfortably over your shoulder and the4.
other strap is under your armpit. The buckle should be in front of you.
5. Ensure that the charger is posioned over your generator.5.
6. Fasten the buckle.6.
NOTE: If needed, use the excess strap near the buckle to ghten or loosen the
apparel.
Opon 2 – Loop and charger on same side
1. Release the counterweight from the charger pocket.1.
2. Grasp the charger pocket so the long strap is hanging toward your feet.2.
NOTE: If your generator is located on the right side of your body, hold the pocket
with le hand. If your generator is on your le side, hold the pocket with your
right hand.
3. Insert the opposite arm (the arm that is not holding the charger pocket) through the3.
loop.
Figure 7. Arm through loop on same side as generator
4. Adjust the charging apparel so that a strap is comfortably over your shoulder and the4.
other strap is under your armpit. The buckle should be in front of you.
5. Ensure that the charger is posioned over your generator.5.
11

6. Fasten the buckle.6.
NOTE: If needed, use the excess strap near the buckle to ghten or loosen the
apparel.
Charging Your Generator
Aer you have charged your charger and have set up the charging apparel (if desired),
you are ready to charge your generator. It is recommended to charge your generator
frequently and to charge before smulaon turns o due to a low baery.
NOTE:
▪ You can receive smulaon while charging your generator. The paent controller can▪
sll communicate with the generator while charging. However, the charger soware
cannot be updated while the generator is charging.
▪ If you have more than one Eterna™ implantable pulse generator implanted, you can▪
use the same charger to charge your generators.
WARNING: You may perceive an increase in temperature at the generator site
while you charge. Ensure that the area around the charger is well venlated and
not covered by an insulang material such as a blanket. If you feel discomfort
while recharging your generator, stop using the charger and refer to
“Troubleshoong” (page 15). If the discomfort persists, contact your clinician.
Only charge your generator while you are awake so that you can stop the
charger if charging becomes uncomfortable.
To charge your generator, follow these steps:
1. Ensure the charger is not connected to an electrical outlet.1.
NOTE: If the charger is connected to an electrical outlet, it will not charge the
generator.
2. Turn on the charger. The three icons on the charger illuminate and the charger beeps2.
once if the sound is enabled in the paent controller.
3. Place the charger directly over the generator, using the charging apparel to hold the3.
charger in place if desired. Charging begins automacally when the charger is
posioned correctly over the generator. If charging has not begun, try the following,
one at a me, unl charging begins:
– Ensure the charger and charging apparel are used with light clothing (<5 mm). If–
the clothing over the generator is very thick, the charger may not eecvely
charge the generator.
– Ensure that the charger is centered over the top half of your generator.–
– Move the charger slowly in a circular moon over the generator locaon, slowly–
increasing the size of the circle unl you hear the beeps begin, indicang the
charger is aligned with the generator and charging has begun.
– Slowly swipe the charger across the generator in a single direcon unl you hear–
the beeps begin, indicang the charger is aligned with the generator and charging
has begun.
12
–
–
–
–

4. To conrm charging is occurring, note the following. If you do not note any of the4.
indicators listed below, charging is not occurring.
– If the charger sound is enabled in the charger sengs on the paent controller,–
the charger beeps when charging begins. When charging is in progress, the
charger will not beep.
– The charger power icon begins blinking slowly.–
– The paent controller displays the charging status and the generator baery level.–
NOTE: If the charger loses alignment with the generator for 10 seconds, the
charger will beep unl alignment with the generator is restored or the charger is
turned o. Try reposioning the charger so it is posioned over the generator.
5. Verify that charging is complete. When the generator is fully charged, the charger5.
beeps 3 mes every 10 seconds if the sound is enabled. You can also view charging
status on the paent controller.
NOTE:
▪ The charger automacally turns o aer 90 seconds once charging is complete.▪
▪ While the charger is charging the generator, the charger cannot be turned o. If▪
you need to turn o the charger while it is charging the generator, move it away
from the generator site.
6. Turn o the charger and remove the charging apparel.6.
Caring for and Maintaining Your Charger and Charging
Apparel
To keep your charger running its best, follow these guidelines:
▪Keep the charger dry. Do not use the charger in or around water.
▪
▪Clean the charger as needed. You can use a dry cloth or a cloth slightly dampened
▪
with water or isopropyl alcohol. Ensure the charger is completely dry before use.
NOTE: To avoid damaging the charger, do not insert anything in the speaker holes.
▪Clean the charging apparel as needed.
▪
– Hand wash in cold water.–
– Use mild soap.–
– Lay at to dry.–
NOTE: Do not machine wash or machine dry.
▪Charge your charger and store your charging system in the travel case aer each use.
▪
▪Store and use your charging system within the range of condions as shown in the
▪
following table.
Table 2. Storage, transportaon, and operang condions
Storage and transportaon condions
Long term storage
temperature
23°C (73°F)
13
–
–
–
–
–
–

Table 2. Storage, transportaon, and operang condions
Temperature excursions Excursions below 15°C (59°F) or above 30°C (86°F) should be
<24 hours in duraon
Temperature excursion
limits
-20°C (-4°F) to 60°C (140°F)
Humidity 5% to 90% RH
Pressure 70 kPa to 106 kPa
Operang condions
Temperature 5°C (41°F) to 35°C (95°F)
Humidity 10% to 90% RH
Pressure 70 kPa to 106 kPa
NOTE: If the charger was stored in an environment that is outside of normal operang
temperature, allow it to acclimate to the current environment for approximately
30 minutes.
▪When the charger is approaching its end of service, an alert message displays on the▪
paent controller. This message indicates that you should contact your physician for
a replacement charger.
Traveling with Your Charging System
If traveling with your charging system, follow these guidelines:
▪Use the travel case to store your charging system.
▪
▪Be sure to pack the charging cable and power adapter.
▪
NOTE: For short trips, if you plan to travel without the charging cable and power
adapter, check the baery level of the generator and the charger to ensure
connued therapy during your trip.
▪If you are traveling to an internaonal locaon, you may need a country-specic
▪
power adapter.
▪The charger contains a lithium-ion baery. If traveling by air, the charger should be
▪
placed and kept in your carry-on baggage during ight, not in your checked baggage.
▪When traveling, follow all guidelines and restricons for use of electronic devices.
▪
Troubleshoong
This secon provides informaon for solving problems you may have using your charging
system.
NOTE:
▪ If the PC Alert icon illuminates, check your paent controller for more informaon.▪
▪ If problems occur other than those described in this secon, contact Technical▪
Support.
14

▪ Refer to the terms and condions for repair or replacement of Abbo Medical▪
neurosmulaon system components as stated in the Limited Warranty card
included in your product documentaon.
Troubleshoong Charging Issues
The following table lists possible charging system problems and possible soluons.
Table 3. Troubleshoong charging issues
Problem Possible Soluon
The charger will not
turn on.
Ensure the power cable is disconnected from the charger.
Ensure the charger has sucient charge.
The charger is not able to
establish or maintain
charging of the generator.
Use light clothing to reduce the distance between the
charger and the surface of the skin as much as possible.
Posion the charger at against your clothing.
Locate the generator under your skin and center the
charger over the top of your generator.
Enable sound on the charger to use audible tones while
aligning the charger over the generator. A series of tones
will indicate that charging has begun.
Avoid sing on or against hard surfaces that may push
the charger out of posion during charging.
Ensure the charger is not plugged into an electrical outlet.
If you do not feel the generator close to your skin, center
the charger over the generator site and move the charger
in small circles unl the charger emits a tone and charging
begins.
If none of the charger icons are illuminated, ensure the
power cable is disconnected and turn the charger o
and on.
The temperature of the
generator becomes
uncomfortable during
charging.
Stop charging unl the discomfort subsides and then
resume charging.
If your clinician has enabled the Charging mode feature,
change the Charging mode to low. See the paent
controller manual for more informaon about this
feature.
Ensure the area around your generator is well venlated.
15

Table 3. Troubleshoong charging issues
Problem Possible Soluon
Reposion the charger, aligning the boom of the charger
with the boom edge of the generator.
Ensure the charging apparel is centered over the
generator.
Tighten the charging apparel to ensure the charger is
posioned correctly over the generator.
If you can feel the generator close to your skin, try adding
a thin material on your skin over the implant site.
Consider recharging more frequently for less me.
If the temperature connues to be uncomfortable,
contact your physician.
The charger is not charging. Ensure the charging cable is fully inserted and USB‑IF
cered. To determine if a cable is USB-IF cered, look
for markings such as the following:
Ensure the power adapter is fully inserted and has one or
more of the following cercaon markings:
The charger is not making
sounds.
The charger volume may be set too low. Turn the volume
up. See your paent controller user’s guide for
instrucons.
The charger volume may be turned o. Turn the volume
on. See your paent controller user’s guide for
instrucons.
The charger is too loud. The charger volume may be set too high. Turn the volume
down. See your paent controller user’s guide for
instrucons.
16
Table of contents