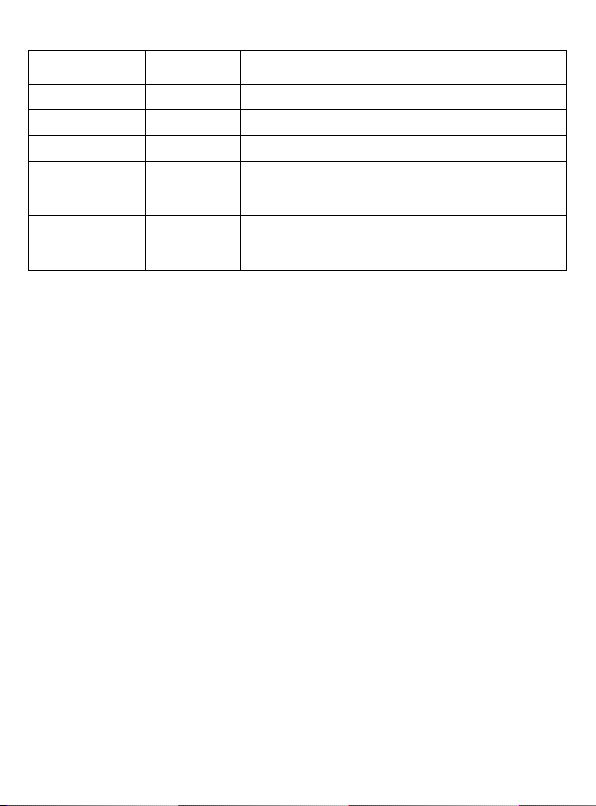
PIXO C-USB User manual

PIXO C-USB
Instruction manual
PIXO C-USB Universal Charger
Bedienungsanleitung
PIXO C-USB Universal-Ladegerät
Mode d’emploi
Chargeur universel PIXO C-USB
Istruzioni per l’uso
Caricatore universale PIXO C-USB
Instrucciones de uso
Cargador universal PIXO C-USB
Manual de instruções
Carregador universal PIXO C-USB
www.pixo.de
of GERMANY

B/CD/T
Caution! Info / Data / Security Li-Ion / Li-Po battery packs have more then two contacts.
Only the positive and negative poles should be contacted for charging. The other contacts
should not be contacted. Contacting the Info / Data / Security contacts B / C / D / T can
damage the battery pack. Pixo and the dealer does not accept any liability for damage
caused by incorrect setting of the charger contacts.
Achtung! Info / Data / Security Li-Ion / Li-Po Accupacks haben mehr als zwei Kontakte.
Für den Ladevorgang dürfen nur der Pluspol und der Minuspol kontaktiert werden. Die
anderen Kontakte dürfen nicht kontaktiert werden. Eine Kontaktierung der Info / Data /
Security Kontakte B / C / D / T kann den Accupack beschädigen. Pixo oder der Händler
haftet nicht für Schäden die durch fehlerhafte Einstellung der Kontakte entstanden sind.
Attention! Les batteries Li-Ion / Li-Po Info / Data / Security ont plus de deux contacts.
Seuls les pôles positif et négatif doivent être connectés pour la charge. Les autres con-
tacts ne doivent pas être connectés. Une connexion des contacts Info / Data / Security B / C
/ D / T risque d’endommager la batterie. Pixo ou le revendeur décline toute responsabili-
té pour les dommages résultant d’un réglage incorrect des contacts.
Attenzione! Info / Data / Security Le batterie Li-Ion / Li-Po dispongono di più di due con-
tatti. Per il ciclo di carica vengono messi a contatto solo il polo positivo e quello negativo.
Gli altri contatti non sono necessari. Un contatto dei contatti Info / Data / Security B / C / D
/ T può danneggiare la batteria. Pixo o il commerciante non rispondono dei danni causati
da un'errata impostazione dei contatti.
¡Atención! Info / Data / Security Los packs de baterías Li-Ion / Li-Po disponen de más de
dos contactos. Para la operación de carga, sólo deben hacer contacto el polo positivo y el
polo negativo. Los otros contactos no deben hacer contacto. Un contacto de los contactos
Info / Data / Security B / C / D / T puede dañar el pack de baterías. Pixo o el distribuidor no
se harán responsables por los daños ocasionados por un ajuste erróneo de los contactos.
Atenção! Informação / Dados / Segurança As baterias Li-Ion / Li-Po têm mais de dois
contactos. Para o processo de carregamento deve ser usados apenas o pólo positivo e
o pólo negativo. Não devem ser usados os outros contactos. A utilização dos contactos
Informação/ Dados / Segurança B / C / D / T pode danicar a bateria. A Pixo ou o seu
distribuidor não se responsabilizam por danos provocados por uma utilização incorrecta
dos contactos.


Caution! Move contacts very carefully! Use only a pen to move the contacts!
Do not use your ngers to move the contacts! Violence can damage the con-
tacts! Damaged contacts are out of guarantee!
Achtung! Die Ladekontakte dürfen nur sehr vorsichtig mit einem Stift
verschoben werden! Verschieben Sie die Ladekontakte nicht mit den
Fingern! Gewaltsames Verschieben oder Drücken beschädigt die
Kontakte! Beschädigte Kontakte sind kein Garantiefall!
Attention ! Déplacez les contacts de charge très prudemment et unique-
ment avec un crayon ! N’utilisez pas les doigts pour déplacer les contacts !
L’emploi de la force endommage les contacts ! Les contacts endommagés
sont exclus de la garantie !
Attenzione! I contatti di carica vanno spostati con molta cautela utilizzando
una matita! Non spostarli utilizzando le dita! Lo spostamento forzato o la
pressione danneggia i contatti! I contatti danneggiati non sono coperti da
garanzia!
¡Atención! Los contactos de carga sólo deben ser movidos cuidadosamente con
un lápiz. ¡No mueva los contactos de carga con los dedos! ¡Un desplazamiento o
una presión a la fuerza dañaría los contactos! ¡Los contactos dañados no entran
dentro de la garantía!
Atenção! Os contactos de carregamento só podem ser ajustados com muito
cuidado com uma caneta! Não ajuste os contactos de carregamento com
os dedos! O ajuste ou pressão com o uso da força danica os contactos! Os
contactos danicados não são abrangidos pela garantia!


Instruction manual
PIXO C-USB Universal Charger
Congratulations on purchasing the Pixo C-USB. The charger is powered via
the USB 2.0 / 1.1 or USB 3.0 interface. There is no data communication between
the computer and the charger.
You can use also a optional USB wall charger / power supply or a USB car
cigarette lighter charger / adapter to power the charger. The generic wall
charger / power supply / adapter should have the following output power:
USB 2.0 / 1.1 Mode VDC 5V min. 500 mA. USB 3.0 Mode VDC 5V min. 900 mA.
You can charge the following batteries with the C-USB:
All* 3.6-3.7 V or 7.2-7.4 V Li-Ion / Li-Po Battery Packs from Digital Cameras,
Camcorders and all removeable batterie packs from mobile phones, PDAs
and other devices
*The following battery packs cannot be charged:
Battery packs which communicate with the camera or the original charger.
For example Canon BP-809, BP-819,
BP-827 or Canon LP-E6. Battery packs with different voltage. For example
CR-V3 und CR123A with 3V or Nikon EN-EL4 with 11.1V. Battery packs with
special contacts. For example Koyocera BP-800/1000 or Leica M8.
Please visit www.pixo.de for up-to-date information
1-2 NiMH / NiCd 1.2 V AA Mignon or AAA Micro Rechargeable Batteries

Technical specication
Li-Ion / Li-Po charge function
• Unique snap-in support and contact method without additional adapter
plates
• Special microprocessor to control voltage conversion and all charge
processes
• Short circuit protection with automatic polarity and voltage detection
• Smart Vmax charge with faulty battery pack detection, top-up charge and
overcharge protection
• Battery Activator function to revive deep discharged Li-Ion batteries
• Charging times 2-8 hours depending on USB-Mode, battery charge status,
voltage and capacity
• Li-Ion / Li-Po charge output rating: 4.2 VDC / 8.4 VDC 200-600mA
NiMH / NiCd charge function
• Unique snap-in support and contact method for 1-2 NiMH / NiCd 1.2 V AA
Mignon or AAA Micro batteries
• Special microprocessor to control voltage conversion and all charge
processes
• Smart deltaV low temperature pulse charge methode, trickle charge and
overcharge protection
• Charging times 4-8 hours depending on USB-Mode, battery charge status,
voltage and capacity
• NiMH / NiCd charge output rating: 2 x 1.4 VDC 300-500 mA
Generic technical specications
• Use it where ever you go. At home or mobile. USB is a world standard.
• USB 2.0 / 1.1 compatible with a limited power consumption of 5 VDC 500 mA
• USB 3.0 compatible with a limited power consumption of 5 VDC 900 mA
• Compact and light base unit with 125 x 65 x 27 mm and 85 grams
• Two LEDs for visual indication of charge process
• eco-design with < 0.1 Watt stand-by mode PC grid power consumption
Scope of supply (what is in the box)
Base Unit, USB cable, Users Manual

USB-Mode
The charger factory setting is for the USB 2.0 / 1.1 interface. It can be switched
to be used on the USB 3.0 interface. USB 3.0 Mode charge times are shorter.
The USB Mode must be selected before the beginning of the charge process.
If you do not know the interface type of your computer, use the charger only
in USB 2.0 / 1.1 Mode.
Caution! The higher power consumption of the USB 3.0 Mode can damage
your computer! Damages caused by a wrong setting of the USB Mode are
out of guarantee!
Charging process
The batteries can be charged during several PC working sessions. The
charger works with a overcharge protection. The charger can be permanently
connected to the USB interface. However, it is better to remove the fully charged
batteries, since every charge process reduces battery life time.
Please connect the charger to the USB interface. The charger is ready to use
when the red Power LED is on. You can charge 1-2 NiMH / NiCd batteries or
one Li-Ion battery pack.
Caution! You can not charge NiMH / NiCd batteries and Li-Ion battery
packs at the same time!
Caution! Do not charge 9 V NiMH / NiCd battery packs!
Caution! Do not charge generic dry batteries! Danger of explosion!
Charge only high quality and fast rechargeable batteries.
Damages from leaked and low quality batteries are out of gu-
arantee!
NiMH / NiCd charge process
The batteries are xed and contact is made with the snap-in support. Take
care to have the right polarity. The charge process starts automatically after
battery insertation. The green LED indicates the charge process. LED func-
tions are explained in the list below.

Li-Ion / Li-Po charge process
All Li-Ion battery packs have at least two or more contacts. For the charging
process you will need only the contacts with the positive pole and the nega-
tive pole. The positive and the negative pole are marked on the battery pack.
The other contacts are not needed for the charge process and should not be
used. The charger detects the polarity and the battery voltage automatically.
You do not have to worry about the right polarisation. You only have to make
sure of full contact. The Pixo C-USB has a short circuit protection for Li-Ion
batteries.
1. Fix the battery pack provisionally in the snap-in support. The battery pack
can be inserted from the horizontal left side, from the horizontal right side
or vertically to be xed on top of the battery charger contacts. Position is
at 0 degree, 90 degrees or 180 degrees. The battery contacts must be lined
up in the direction of the battery charger contacts.
2. Battery charger contacts must be adjusted to the distance between
the battery pack positive and negative poles.
Caution! Move contacts very carefully! Use only a pen to move the
contacts! Do not use your ngers to move the contacts! Vio-
lence can damage the contacts! Damaged contacts are out of
guarantee!
3. Now you can denitely x the battery pack on top of the battery charger
contacts. The battery pack does not have to lie on the oor plate of the
charger. A oating position is sufcient.
The steps 1 to 3 must be repeated for every battery type. The green LED will
be on or ashes if the battery is contacted correctly. If the green LED is off,
the battery pack is not contacted correctly. Please check the contacts once
more. If the contact is ok, you have inserted the wrong battery type or a faulty
battery pack. LED functions are explained in the list below.
The Battery Activator Function for deep discharged Li-Ion batteries works
with delay and starts the charge process after a longer test stage. If it does
not start after some minutes, check contacting and try again. Mostly all
deep discharged Li-Ion batteries can be revived this way.

LED functions
CHARGE grün POWER rot
Off Off No or faulty power source.
Flashing On Charge process is going on.
On On Battery fully charged.
Off On Main power from USB interface, power supply or car
cigarette lighter plug ok. No battery pack inserted. Faulty
contact. Wrong or faulty battery pack.
Flashing Flashing Charge process was stopped by 10 hours AA/AAA safety
timer. Battery pack could not be fully charged. Battery pack
faulty. Process error. Remove batteries and try again.
Safety Notes
The battery pack and the charger become warm when charging. This is not a
technical defect. Batteries must be charged only under supervision. Remove
the battery pack if it is fully charged. Handle your charger carefully. Do not
subject your charger to physical shocks, high or low temperature, humidity,
dirt, dust or liquids. Keep the unit away from children. Use only in dry rooms
Handling precautions for batteries
Charge new batteries before rst use. New NiMH / NiCd batteries must be
used (charged and discharged) several times to reach full capacity. Batteries
must be removed from the device, if you do not use it for a long time. Li-Ion
batteries must be stored in a discharged state, but not below < 3V / < 6V
(deep-discharged state). NiMH / NiCd must be stored in a fully charged state.
Charge and discharge the battery every 6 months. Batteries are consumable
parts and must be replaced at low capacity. Handle your battery carefully.
Do not subject your battery to physical shocks, high or low temperatures,
humidity, dirt, dust or liquids. Do not short circuit, solder, disassemble or
put in re. Batteries may become warm when charging and discharging. This
is not a technical defect. Take care when disposing of the batteries. In some
countries there are special requirements for battery disposal. Keep batteries
away from children.
Technical specications are subject to be changed without prior notice.
All trademarks are property of their respective owners.

Bedienungsanleitung
PIXO C-USB Universal-Ladegerät
Wir beglückwünschen Sie zum Erwerb des Pixo C-USB. Das Ladegerät wird
über die USB 2.0 / 1.1 oder die USB 3.0 Schnittstelle mit Strom versorgt. Eine
Datenkommunikation ndet nicht statt.
Alternativ kann das Gerät auch über ein optionales und handelsübliches USB-
Netzgerät / Ladegeräte oder ein USB-KFZ-Netzgerät / Ladegerät betrieben
werden. Die Netzgeräte sollten folgende Ausgangsleistungen haben:
USB 2.0 / 1.1 Modus VDC 5V min. 500 mA. USB 3.0 Modus VDC 5V min. 900
mA.
Mit dem C-USB Universal-Ladegerät können folgende Accus laden:
Alle* Li-Ion / Li-Po Accupacks mit 3.6-3.7 V oder 7.2-7.4 V aus Digitalkameras,
Videokameras und alle herausnehmbaren Accupacks aus Mobiltelefonen, PDAs
und sonstigen Geräten
* Die folgende Typen können nicht geladen werden:
Accus, die mit der Kamera oder dem Original-Ladegerät Daten austauschen.
Zum Beispiel Canon BP-809, BP-819, BP-827 oder Canon LP-E6. Accus mit
anderen Spannungen. Zum Beispiel CR-V3 und CR123A mit 3V oder Nikon
EN-EL4 mit 11.1V. Accus mit besonderen Kontaktierungen. Zum Beispiel
Koyocera BP-800/1000 oder Leica M8.
Aktuelle Informationen nden Sie auf www.pixo.de
1-2 Standard 1.2 V NiMH / NiCd AA Mignon oder AAA Micro Rundzellen

Technische Daten
Li-Ion / Li-Po Ladefunktionen
• Einzigartige Klemmvorrichtung und Kontaktierung ohne zusätzliche
Adapterplatten
• Spezial-Microcontroller zur Steuerung der Spannungswandler und Über-
wachung aller Ladevorgänge
• Absolut kurzschlußfest durch automatische Erkennung der Polarität und
der Accuspannung
• Intelligente Vmax Ladung mit Accudefekterkennung, Nachladephase und
Überladeschutz
• Battery Activator Funktion zur Wiederbelebung von tiefentladenen Li-Ion Accus
• Ladezeiten von 2-8 Stunden je nach USB-Modus, Ladezustand, Spannung
und Kapazität des Accus
• Li-Ion / Li-Po Ladeausgang: 4.2 / 8.4 VDC 200-600 mA
NiMH / NiCd Ladefunktion
• Klemmvorrichtung und Kontaktierung für 1-2 NiMH / NiCd 1.2 V AA
Mignon oder AAA Micro Accus
• Spezial-Microcontroller zur Steuerung der Spannungswandler und Über-
wachung aller Ladevorgänge
• Intelligente Niedertemperatur-DeltaV Pulsladung mit Erhaltungsladung
und Überladeschutz
• Ladezeiten von 4-8 Stunden je nach USB-Modus, Ladezustand, Spannung
und Kapazität des Accus
• NiMH / NiCd Ladeausgang: 2 x 1.4 VDC 300-500 mA
Allgemeine Technische Daten
• Überall einsetzbar. Zu Hause oder Unterwegs. Die USB-Schnittstelle ist welt-
weit genormt.
• USB 2.0 / 1.1 kompatibel mit einer maximalen Leistungsaufnahme von 5 VDC
500 mA
• Umschaltbar auf USB 3.0 mit einer maximalen Leistungsaufnahme von 5 VDC
900 mA
• Kompakte und leichte Ladeeinheit mit 125 x 65 x 27 mm und 85 Gramm
Gewicht
• Optische Anzeige der Ladevorgänge durch zwei Leuchtdioden
• eco-design mit einem PC-Netzstromverbrauch von < 0.1 Watt im
Bereitschaftsmodus

Lieferumfang
Ladeeinheit, USB Kabel, Anleitung
USB Modus
Das Ladegerät ist ab Werk auf dem Betrieb an USB 2.0 / 1.1 Schnittstellen
eingestellt. Das Gerät kann zum Betrieb an USB 3.0 Schnittstellen umge-
schaltet werden. Die Ladezeiten werden dadurch verkürzt. Das Gerät darf
jedoch nur vor dem Beginn des Ladevorgangs umgeschaltet werden. Wenn
Sie sich nicht sicher sind, ob Ihr Computer über eine USB 3.0 Schnittstelle
verfügt, betreiben Sie das Gerät nur im USB 2.0 / 1.1 Modus.
Achtung!
Die höhere Leistungsaufnahme im USB 3.0 Modus kann Ihren PC beschädigen!
Schäden, die durch falsche Einstellungen des USB Modus verursacht wurden,
sind kein Garantiefall!
Ladevorgänge
Die Accus können über mehrere PC-Sitzungen geladen werden, da das Gerät
über einen Überladeschutz verfügt. Das Gerät kann also permanent an der
USB-Schnittstelle angeschlossen bleiben. Es ist aber ratsam die vollständig
geladenen Accus aus dem Gerät zu entfernen, da jeder Ladevorgang die
Lebensdauer des Accus verringert.
Verbinden Sie das Ladegerät mit der USB-Schnittstelle. Das Gerät ist
betriebsbereit, wenn die rote Power-Leuchtdiode aueuchtet. Danach können
Sie entweder 1-2 NiMH / NiCd Rundzellen oder ein Li-Ion Accupack laden.
Achtung! Gleichzeitiges Laden von NiMH / NiCd Rundzellen und Li-Ion
Accus ist nicht möglich!
Achtung! 9 V NiMH / NiCd Block-Accus dürfen nicht geladen werden!
Achtung! Keine Trockenbatterien auaden. Explosionsgefahr! Laden Sie
nur hochwertige und schnellladefähige Accus. Schäden, die durch
ausgelaufene Accus minderer Qualität verursacht wurden, sind
kein Garantiefall!

NiMH / NiCd Ladevorgang
Die Rundzellen werden in der Klemmvorrichtung kontaktiert. Achten Sie
beim Einlegen der NiMH / NiCd Rundzellen auf die richtige Polarität. Nach
dem Einlegen der Accus wird der Ladevorgang automatisch gestartet. Der
Ladevorgang wird durch die grüne Charge-Leuchtdiode angezeigt. Die Funk-
tion der Leuchtdioden wird nachfolgend in der Tabelle erklärt.
Li-Ion / Li-Po Ladevorgang
Alle Li-Ion Accupacks verfügen über mindestens zwei oder mehr Kontakte.
Für den Ladevorgang werden jedoch nur die Kontakte mit dem Pluspol und
dem Minuspol benötigt. Der Pluspol und der Minuspol sind auf dem Li-Ion
Accupack entsprechend gekennzeichnet. Die anderen Kontakte werden für
den Ladevorgang nicht benötigt und sollten daher auch nicht kontaktiert
werden. Das Ladegerät erkennt automatisch die Polarität und die Accuspan-
nung von Li-Ion Accus. Es ist daher egal wie das Li-Ion Accupack eingelegt
wird. Wichtig ist nur eine sichere Kontaktierung. Die Li-Ion Ladefunktion des
C-USB ist absolut kurzschlußfest.
1. Fixieren Sie das Li-Ion Accupack zunächst provisorisch in der Klemmvor-
richtung. Das Accupack kann von links liegend, von rechts liegend oder
senkrecht über den Ladegerätekontakten xiert werden. Also bei 0 Grad,
90 Grad oder 180 Grad. Die Accukontakte müssen dabei in Richtung der
Ladegerätekontakte ausgerichtet werden.
2. Danach müssen die Ladegerätekontakte auf die Abstände des Plus- und
des Minuspols des Li-Ion Accupacks angepasst werden.
Achtung! Die Ladekontakte dürfen nur sehr vorsichtig mit einem Stift
verschoben werden! Verschieben Sie die Ladekontakte nicht
mit den Fingern! Gewaltsames Verschieben oder Drücken
beschädigt die Kontakte! Beschädigte Kontakte sind kein
Garantiefall!
3. Danach wird das Li-Ion Accupack dann entgültig über den Ladegeräte-
kontakten xiert. Das Accupack muss dabei nicht auf der Bodenplatte des
Ladegerätes auiegen. Eine schwebende Fixierung ist ausreichend und
schont die Kontakte.

Die Schritte 1 bis 3 müssen für jeden Li-Ion Accutyp wiederholt werden. Ist
das Accupack richtig kontaktiert, leuchtet oder blinkt die grüne Charge-
Leuchtdiode. Leuchtet oder blinkt die grüne Leuchtdiode nicht, ist das Ac-
cupack fehlerhaft kontaktiert. Überprüfen Sie bitte erneut die Kontaktierung.
Ist die Kontaktierung in Ordnung wurde ein falscher Accutyp oder ein defek-
tes Accupack eingelegt.
Die Battery Activator Funktion zur Wiederbelebung von tiefentladenen Li-
Ion Accus arbeitet mit Verzögerung. Es kann einige Minuten dauern, bis der
Ladevorgang gestartet wird. Im Zweifelsfall überprüfen Sie die Kontaktie-
rung und wiederholen den Rettungsversuch mehrfach. Fast alle tiefentla-
denen Accus lassen sich so wiederbeleben.
Funktion der Leuchtdioden
CHARGE grün POWER rot
Aus Aus Keine oder fehlerhafte Stromversorgung.
Blinken Ein Ladevorgang läuft..
Ein Ein Accu vollständig geladen.
Aus Ein Stromversorgung über USB-Schnittstelle, Netzteil oder
Autoadapter. Kein Accu eingelegt. Accu fehlerhalt kontak-
tiert. Falscher Accutyp oder defekter Accu.
Blinken Blinken Ladevorgang nach 10 Stunden durch AA/AAA Sicherheits-
timer abgebrochen. Accu konnte nicht vollständig geladen
werden. Accu defekt. Programmfehler. Accu entnehmen
und einfach erneut versuchen.
Sicherheitshinweise
Der Accu und das Gerät erwärmen sich während des Ladens. Die Erwärmung
ist kein technischer Defekt. Accus dürfen nur unter Aufsicht geladen werden.
Entnehmen Sie den Accu aus dem Ladegerät wenn der Ladevorgang been-
det ist. Behandeln Sie das Ladegerät mit Sorgfalt. Setzen Sie das Ladegerät
keinen mechanischen Belastungen, hohen oder niedrigen Temperaturen,
Feuchtigkeit, Schmutz, Staub oder Flüssigkeiten aus. Das Gerät gehört nicht
in Kinderhände. Das Gerät nur in trockenen Räumen verwenden. Achtung!
Keine Trockenbatterien auaden. Explosionsgefahr!

Handhabung der Accus
Ein neuer Accu sollte direkt nach dem Kauf geladen und benutzt werden.
Der NiMH / NiCd Accu erreicht seine volle Kapazität erst nach mehrfacher
Benutzung (Lade- und Entladevorgänge). Entfernen Sie den Accu aus den
Geräten, wenn Sie diese längere Zeit nicht benutzen. Lagern Sie Li-Ion Accus
in entladenem, aber nicht in tiefentladenem
(< 3 V / 6 V) Zustand. NiMH / NiCd Accus sollten jedoch in geladenem Zu-
stand gelagert werden. Benutzen Sie den Accu alle 6 Monate. Accus sind
Verschleißteile und müssen bei nachlassender Kapazität durch einen Neuen
ersetzt werden. Behandeln Sie den Accu mit Sorgfalt. Setzen Sie den Accu
keinen mechanischen Belastungen, hohen oder niedrigen Temperaturen,
Feuchtigkeit, Schmutz, Staub oder Flüssigkeiten aus. Den Accu nicht kurz-
schließen, nicht zerlegen oder ins Feuer werfen. Der Accu erwärmt sich wäh-
rend des Ladens und Entladens. Die Erwärmung ist kein technischer Defekt.
Unbrauchbare Accus gehören in die Sammelbehälter des Handels oder der
Gemeinde, nicht in den Hausmüll. Accus gehören nicht in Kinderhände.
Technische Änderungen und Irrtümer vorbehalten. Alle Warenzeichen sind
Eigentum der jeweiligen Inhaber.

Mode d’emploi
Chargeur universel PIXO C-USB
Toutes nos félicitations pour avoir acheté le Pixo C-USB. Ce chargeur est
alimenté en courant via un port USB 2.0 / 1.1 ou USB 3.0. Il n’y a pas de com-
munication de données entre l’ordinateur et le chargeur.
L’appareil peut aussi fonctionner par l’intermédiaire d’un adaptateur / char-
geur secteur USB optionnel du commerce ou d’un adaptateur / chargeur USB
sur prise allume-cigares de véhicule. Les adaptateurs doivent avoir les puis-
sances de sortie suivantes: mode USB 2.0 / 1.1 : VCC 5 V min. 500 mA ; mode
USB 3.0 : VCC 5 V min. 900 mA.
Le chargeur universel C-USB permet de charger les batteries suivantes :
Toutes* les batteries Li-Ion / Li-Po 3,6-3,7 V ou 7,2-7,4 V d'appareils photo
et de caméscopes numériques et tous les packs batterie amovibles de télé-
phones mobiles, PDA et autres appareils
* Les batteries suivantes ne peuvent pas être chargées :
Batteries qui échangent des données avec l’appareil photo ou le chargeur
d’origine. Par exemple : Canon BP-809, BP-819, BP-827 ou Canon LP-E6.
Batteries d’autres tensions. Par exemple : CR-V3 et CR123A de 3 V ou Nikon
EN-EL4 de 11,1 V. Batteries avec contacts spéciaux. Par exemple : Koyocera
BP-800/1000 ou Leica M8.
Visitez le site www.pixo.de pour des informations à jour
1 à 2 piles rechargeables standard 1,2 V NiMH / NiCd AA Mignon ou AAA Micro

Caractéristiques techniques
Fonctions de charge Li-Ion / Li-Po
• Dispositif unique de serrage et de contact sans plaques d’adaptation sup-
plémentaires
• Microcontrôleur spécial pour la commande et la supervision de tous les
cycles de charge
• Protection absolue contre les courts-circuits par détection automatique
de la polarité et de la tension de la batterie
• Charge Vmax intelligente avec détection de batterie défectueuse, phase
de charge d’entretien et protection contre la surcharge
• Fonction Battery Activator pour la régénération de batteries Li-Ion com-
plètement déchargées
• Temps de charge de 2 à 8 heures selon le mode USB, l’état de charge et la
capacité de la batterie
• Sortie de charge Li-Ion / Li-Po : 4,2 / 8,4 VCC 200-600 mA
Fonction de charge NiMH / NiCd
• Dispositif de serrage et de contact pour 1 ou 2 batteries NiMH / NiCd 1,2 V
AA Mignon ou AAA Micro
• Microcontrôleur spécial pour la commande et la supervision de tous les
cycles de charge
• Charge delta V basse température intelligente avec charge d’entretien et
protection contre la surcharge
• Temps de charge de 4 à 8 heures selon le mode USB, l’état de charge, la
tension et la capacité de la batterie
• Sortie de charge NiMH / NiCd : 2 x 1,4 VCC 300-500 mA
Caractéristiques techniques générales
• Utilisable partout, à la maison ou en déplacement. L’interface USB est une
norme internationale.
• Compatible USB 2.0 / 1.1 avec une consommation maximale de 5 VCC 500 mA
•
Commutable sur USB 3.0 avec une consommation maximale de 5 VCC 900 mA
• Unité de charge compacte et légère de 125 x 65 x 27 mm et 85 grammes
• Indication visuelle des cycles de charge par deux diodes électrolumines-
centes (LED)
• Eco-design avec une consommation de courant secteur < 0,1 watt en
mode veille

Matériel fourni
Unité de charge, câble USB, mode d’emploi
Mode USB
Le chargeur est réglé en usine pour fonctionner sur des ports USB 2.0 / 1.1. Il
peut être commuté pour fonctionner sur des ports USB 3.0, ce qui raccourcit
les temps de charge. Cette commutation ne doit toutefois avoir lieu qu’avant
le début du cycle de charge. Si vous n’êtes pas sûr que votre ordinateur dis-
pose d’une interface USB 3.0, utilisez le chargeur uniquement en mode USB
2.0 / 1.1.
Attention ! La consommation de puissance plus élevée en mode USB 3.0
peut endommager votre PC ! Les dommages causés par un
mauvais réglage du mode USB sont exclus de la garantie !
Cycles de charge
Les batteries peuvent être chargées sur plusieurs sessions du PC car l’appa-
reil dispose d’une protection contre la surcharge. L’appareil peut aussi rester
connecté au port USB en permanence. Il est cependant conseillé de sortir les
batteries complètement chargées de l’appareil car chaque cycle de charge
diminue la durée de vie de la batterie.
Connectez le chargeur au port USB. L’appareil est prêt à l’emploi quand la
LED rouge "Power" est allumée. Vous pouvez maintenant charger 1 ou 2 piles
rechargeables NiMH / NiCd ou une batterie Li-Ion.
Attention ! Il n’est pas possible de charger en même temps des piles
rechargeables NiMH / NiCd et des batteries Li-Ion !
Attention ! Il est interdit de charger des blocs de batteries 9 V NiMH / NiCd !
Attention ! Ne pas charger des piles sèches. Risque d’explosion ! Recharger
uniquement des batteries de qualité acceptant une recharge
rapide. Les dommages provoqués par des batteries de qualité
inférieure qui ont coulé sont exclus de la garantie !

Cycle de charge NiMH / NiCd
Les piles rechargeables sont contactées dans le dispositif de serrage. Res-
pectez la polarité correcte en insérant les piles rechargeables NiMH / NiCd.
Le cycle de charge démarre automatiquement après l’insertion des batteries.
La LED verte "Charge" indique que la charge est en cours. La fonction des
LED est expliquée dans le tableau ci-dessous.
Cycle de charge Li-Ion / Li-Po
Toutes les batteries Li-Ion possèdent au moins deux contacts, parfois plus.
Pour le cycle de charge, vous n’aurez besoin que des contacts correspon-
dant au pôle positif et au pôle négatif. Le pôle positif et le pôle négatif sont
identiés sur la batterie. Les autres contacts ne sont pas nécessaires pour
la charge et ne doivent donc pas être utilisés. Le chargeur détecte automati-
quement la polarité et la tension des batteries Li-Ion. Vous n’avez donc pas à
vous soucier de la polarité, il suft d’assurer un bon contact. La fonction de
charge Li-Ion du chargeur C-USB dispose d’une protection absolue contre
les courts-circuits.
1. Fixez la batterie Li-Ion d’abord provisoirement dans le dispositif de ser-
rage. La batterie peut être insérée horizontalement du côté gauche, hori-
zontalement du côté droit ou verticalement pour être xée au-dessus des
contacts du chargeur. Elle est donc positionnée à 0 degré, 90 degrés ou
180 degrés. Les contacts de la batterie doivent être alignés dans la direc-
tion des contacts du chargeur.
2. Ensuite, il faut adapter les contacts du chargeur à la distance entre le pôle
positif et le pôle négatif de la batterie.
Attention ! Déplacez les contacts de charge très prudemment et unique-
ment avec un crayon ! N’utilisez pas les doigts pour déplacer
les contacts ! L’emploi de la force endommage les contacts !
Les contacts endommagés sont exclus de la garantie !
3. Maintenant, vous pouvez xer dénitivement la batterie Li-Ion au-dessus
des contacts du chargeur. Il n’est pas nécessaire que la batterie repose
sur la plaque de base du chargeur. Une xation ottante est sufsante et
préserve les contacts.
Table of contents
Languages:
Other PIXO Batteries Charger manuals