Abee V71G User manual

V71G FHD Car Recorder User Manual
1
TABLE OF CONTENT
SAFETY REMINDING .........................................................................................................3
FEATURES.................................................................................................................4
WHAT’S IN THE BOX .................................................................................................4
CONTROLS & INDICATORS................................................................................................5
V71G INSTALLATION & SETUP ..........................................................................................6
INSTALLING V71G .....................................................................................................6
Installation Safety Warnings .....................................................................................6
Installation Considerations .......................................................................................7
Installation Procedure ..............................................................................................7
Remove the Bracket .................................................................................................8
Connect to Power.....................................................................................................8
INITIAL SETUP ..................................................................................................................9
Language Setting ......................................................................................................9
Set Date and Time .................................................................................................... 9
Set Automatic Recording ..........................................................................................9
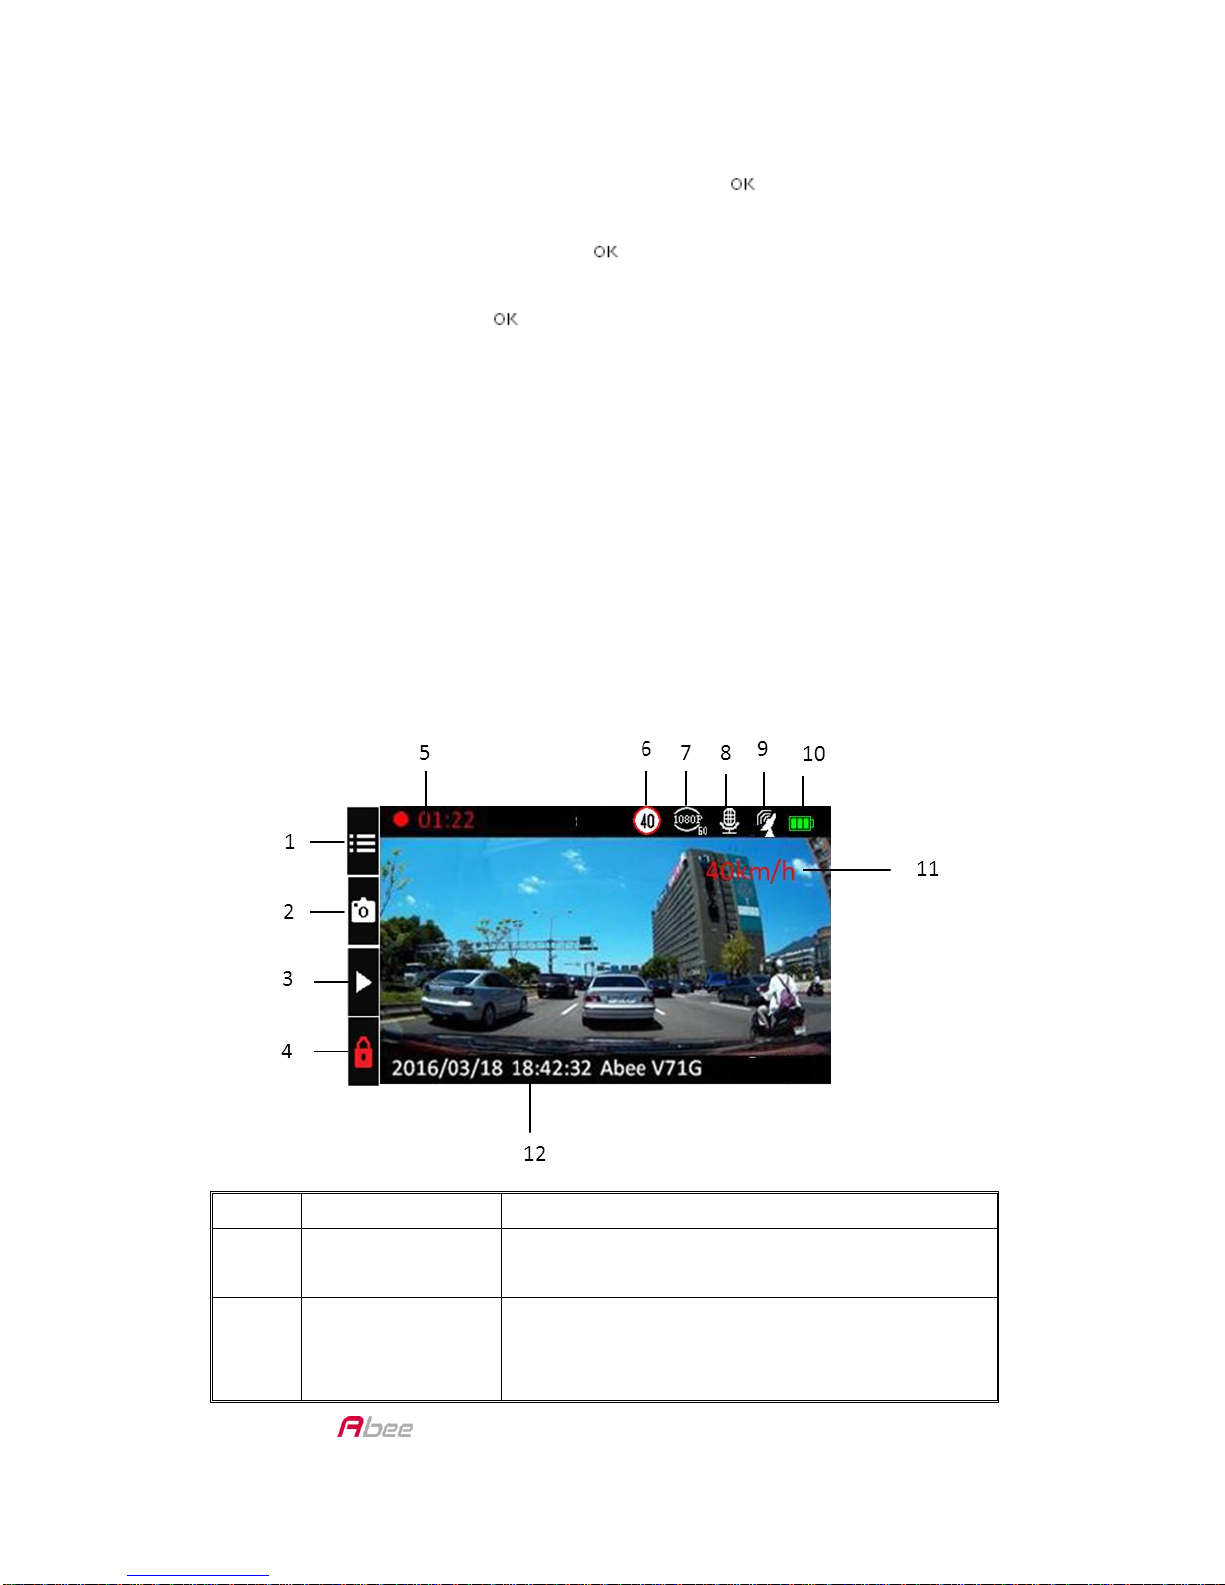
SCREEN INFORMATION .................................................................................................. 10
Basic Screen Information ........................................................................................ 10
Rear Camera Screen Switch..................................................................................... 11
OPERATION ................................................................................................................... 13
USING THE MENUS ................................................................................................. 13
BASIC RECORDING OPERATION............................................................................... 15
Automatic/Manual Recording................................................................................. 15
Emergency Recording ............................................................................................. 15
Collision Detection ................................................................................................. 16
Parking Mode......................................................................................................... 16
PLAY VIDEOS .......................................................................................................... 16
View on the Device................................................................................................. 16

V71G FHD Car Recorder User Manual
2
GPS ........................................................................................................................ 17
Red Light/Speed Cam Alert ..................................................................................... 17
MAINTENANCE .............................................................................................................. 17
SPECIFICATION............................................................................................................... 18

V71G FHD Car Recorder User Manual
3
SAFETY REMINDING
This product is not waterproof. Do not expose it to rain or moisture.
This product is intended for use in a motor vehicle. Don’t install the
device where it will block the driver’s view of the road or side mirrors.
Do not install it where it will interfere with airbag deployment
Pay attention to the road! Don’t operate or focus on any device while
driving.
Be sure the camera lens is kept clean and there is nothing blocking it.
Don’t leave the device in direct sunlight or where temperatures could go
above 140°F (60°C) for a long period of time.

V71G FHD Car Recorder User Manual
4
FEATURES
●Support Dual Camera Recording (Rear camera is an optional)
●SONY Exmor Sensor
●Plug and Play
●FHD 1080P @ 60fps
●155°wide angle
●3”LCD screen size
●G-Sensor with Collision Detection
●F/1.8 Lens
●Loop Recording
●Built-in Microphone
●Record to Micro SD card
●Parking Assist Mode
●Drivers’ Safety Functions, including LDWS, FCWS, Headlight Reminder
and Driver Fatigue Reminder
●Built-in GPS
●GPS Location Recording
●Speed Cam Alert
●Dedicated PC Software (including DVR player and G-Sensor Display)
WHAT’S IN THE BOX
Camera/Recorder
Car Adapter
Windshield Mount
Users’Manual

V71G FHD Car Recorder User Manual
5
CONTROLS & INDICATORS
ITEM
FUNCTION
USB Port
Connect the device to the power source or PC.
Menu
Access the Menu.
UP ()
●In Menu:
Moves selection up in the list.
●In Playback Mode:
Selects the previous files.
●In Standby Mode:
Takes a snapshot of the current image.
●While Recording:
(1) Press to take a snapshot of the current image.
(2) Press and hold to add a GPS position to the
list of manual added position.
DOWN ()
●In Menu:
Select next item in the list.
●In Playback Mode:

V71G FHD Car Recorder User Manual
6
Selects the next files.
●In Standby Mode:
Access File Management menu.
●While Recording:
Stop recording.
Recording/OK
()
●In Menu:
Press to accept selection.
●In Playback Mode:
Pause and unpause video replay.
●In Standby Mode:
Press to start recording.
●While Recording:
(1) Enter into Emergency recording.
(2) Press and hold to calibrate LDWS.
●While viewing snapshot:
Press to zoom.
MicroSD Card
Slot
Insert MicroSD card here to record video files.
Power
Push the bar above the MicroSD Card Slot to close
the slot and switch on the device at the same time.
Rear Camera
Switch
Press the switch to switch the image on the screen
between PIP, front image and rear image.
V71G INSTALLATION & SETUP
INSTALLING V71G
Installation Safety Warnings
Failure to comply with the following warnings could result in an accident
or collision, resulting in death or serious injury.
1. Do not obstruct the driver’s view or the operation of the vehicle
itself.

V71G FHD Car Recorder User Manual
7
2. Do not place it unsecured on the dashboard or in front/above an
airbag.
3. Do not mount the camera where it will become a distraction if it
becomes loose.
4. Do not attempt to operate the camera while driving. If you need to
access the device to change setting, etc., pull off the road in a safe
manner to do so.
5. Some country or state laws prohibit drivers from mounting anything
on the windshield, or restrict mounting to specific areas of the
windshield. It is the user’s responsibility to mount the device in
compliance with local laws.
Installation Considerations
1. Install the device in the area around the rear view mirror.
2. Be sure the device is installed where the windshield wipers can clear
the windshield in front of the lens.
3. Do not install on colored or heavily tinted windshield. The coloring
effect may affect recording quality.
4. Clean the windshield area where you plan to install the bracket. Be
sure it is clear of dust or dirt.
Installation Procedure
1. Insert MicroSD card into device.
2. Format MicroSD card. (Menu/File Management/Format)
3. Slide the bracket connector into the bracket slot on the camera until
you hear it click in place.

V71G FHD Car Recorder User Manual
8
4. Lift the suction clamp on the bracket. Place the bracket’s suction cup
on the windshield and press down on the suction clamp to secure the
bracket.
5. Two knobs adjust the camera’s position. Loosen the top knob on the
side of the bracket to adjust the camera’s vertical position. Loosen
the bottom knob to adjust the camera’s horizontal position.
Remove the Bracket
To remove the bracket from the windshield, release the suction cup,
hold the camera securely, and lift the suction clamp.
Connect to Power
1. Connect the car adapter’s USB plug to the device’s USB port.
2. Connect the cigarette lighter adapter plug to the vehicle’s cigarette
lighter port.
3. The device turns on. Red light indicates the device being recording,
while the green light indicates the device in standby mode.
NOTE
In certain models of cars, the cigarette lighter keeps providing power
even when the engine is off. Be sure to remove the car charger or

V71G FHD Car Recorder User Manual
9
disconnect the device when leaving the vehicle to prevent draining the
vehicle battery. Check your vehicle’s owner’s manual to determine if this
applies to your vehicle.
INITIAL SETUP
Language Setting
Follow these procedures if you need to change the language on your
device.
1. Press M (Menu) to access the Menu system.
2. Press ▼to scroll to System Setting if necessary and then press .
3. Press ▼to scroll to Language then press .
4. Press ▲/▼to scroll to the desired language and press to select it.
5. Press M to leave that Menu page.
Set Date and Time
This device receives date and time information from the GPS satellite if
the time zone setting (UTC) is NOT set to OFF. If the UTC is set to OFF,
the device will then look for a manually-set date and time. Set the date
and time through System Setting/Date Time.
Set Automatic Recording
Activate the Automatic Recording function to have the device start
recording when the vehicle’s engine is turned on. Activate the function
before using the device.
1. Press M to access the Menu system.

V71G FHD Car Recorder User Manual
10
2. Press ▼to scroll to Video Settings and press .
3. Scroll to Auto Record and press .
4. Scroll to On and press .
5. Press M to leave that Menu page.
SCREEN INFORMATION
Basic Screen Information
The following image describes the areas and icons seen on the recording
screen. The 4 icons on the bottom of the screen correspond to the 4
keys on the device.
Nr.
ITEM
DESCRIPTION
1
Menu
After stopping recording, press this to
access Menu.
2
Snapshot
(1) Press to take a snapshot of the current
image.
(2) Press and hold to add a GPS position to

V71G FHD Car Recorder User Manual
11
the list of manual added position.
3
Stop
Press to stop recording.
4
Emergency
Recording
Press to start emergency recording.
5
Duration
Mark the recording duration.
6
Custom Speed
Limit
Show the custom speed limit (set by the
user).
7
Resolution
Mark the resolution of the video.
8
Microphone
Show if the microphone is active.
9
GPS
Indicate if GPS is active and the signal
strength.
10
Power
Source/Battery
Show if the device using power source or
built-in battery.
11
Current Speed
Show the current speed
12
Date, Time and
Model
Current date, time and model (from left to
right).
Rear Camera Screen Switch
V71G supports rear camera recording.
Please purchase rear camera (model
No. H21) and connect to V71G to
record the image in back of the vehicle.
The device records both front and rear
image at the same time.
To view the rear image on V71G screen, please press the Rear Camera
Switch to switch the image on the screen.
1. PIP (Picture-in-picture) image is the preset when H21 (Rear Camera)
is connected.

V71G FHD Car Recorder User Manual
12
2. Press Rear Camera Switch to switch the screen from PIP to front
camera image only.
3. Press Rear Camera Switch again to switch the screen from front
camera image only to rear camera image only.
4. Press Rear Camera Switch again to switch the screen from rear
camera image only to PIP.

V71G FHD Car Recorder User Manual
13
OPERATION
USING THE MENUS
Press M to access the Menu system. Use ▲and ▼to scroll through the
selections and press to accept that selection.
SYSTEM SETTING
Date Time
Adjust the device’s date/time
Screen Setting
Set when the screen goes into Sleep mode.
Voice
Adjust notification volume and turns voice
record ON or OFF.
Language
Set the language shown on the device.
Default Setting
Return the device to default setting.
GPS SETUP
Satellite Setting
•Adjusts the time zone.
• Turn Time Sync off by setting time zone to OFF
(device receives date and time information from
manual entry).
Camera Alert
Adjust speed alert notification style (Tone, Voice,
or Off).
Speed Unit
Set speed measurement to miles per hour or
kilometers per hour.
DST
Turn Daylight Saving Time ON or OFF.
Current Speed
Display
Turn on to show current speed on LCD screen.
Over Speed Alert
Tolerance
Turn on to activate Over Speed Alert Tolerance.
My Locations
Add/delete speed camera points.
Over Speed Alert
Management
Turn on to activate the sound alert when driving
over certain speed.
VIDEO SETTING

V71G FHD Car Recorder User Manual
14
Image Size
Choose recording resolution.
Auto Record
If set to On, automatic recording starts when the
engine turns on.
Record Time
Select 2/3/5-minute recording interval for
circular recording purposes.
Date Stamp
Turn time stamp in files On or Off.
WDR
Choose to turn on or off WDR function.
FUNCTION SETTING
Collision Detection
Adjust G-Sensor sensitivity. When the device in
normal recording mode, if a collision occurs at
the minimum G-Sensor level set, then the device
begins recording and tags that recording as an
emergency file. (If the device is already
recording, it will tag that video fragment as an
emergency file.)
Parking Mode
When the vehicle is parked and Parking mode is
set to either Motion Detection or Collision
Recording, the device monitors motion or
collision. When recording an event, it will include
5-10 seconds prior to the event on the saved file
and record for 15 seconds.
LDWS
Switching this function on, the device would use
sound and message alerts if the distance
between the front vehicle is too close.
FCWS
Switching this function on, the device would use
sound and message alerts if it detects the vehicle
astray from the traffic lane.
Headlight
Reminder
Switching this function on, the device would use
sound and message alerts if it detects low light
environment (like tunnels, undergoes, rainy days
or at the night) and the driver hasn’t switched on
the headlight.
Driver Fatigue
Reminder
Switching this function on, the device would use
sound and message alerts to remind the driver
taking a brief rest when the recording lasts 1
hour. After that, the alert would be triggered

V71G FHD Car Recorder User Manual
15
again every 30 minutes if the device isn’t
shutdown or the vehicle still runs.
EV
Set the EV value.
Delay Shutdown
Delays shutdown after the vehicle turns off for
10 seconds if turned ON.
Frequency Setting
Set frequency to either 50Hz or 60Hz.
TPMS
Setting
•Set tire pressure and temperature unit for front
and rear wheel, and the position of each
measuring system as well.
•Provide Learning Mode.
Tire Pressure Value
Show the current tire pressure.
FILE MANAGEMENT
Playback
Play recorded videos and display snapshots.
File Delete
Delete recorded videos and snapshots.
Format
Erase all files in memory card and format this
memory card.
Version
Display firmware version.
BASIC RECORDING OPERATION
Automatic/Manual Recording
You can set the device to start recording when the vehicle’s engine turns
on, or you can turn off that function and begin record manually. Go
through the Menu system (Menu/Video Settings/Auto Record) to turn
this function ON or OFF.
Emergency Recording
At any given time, you may come across a situation such as an accident
where you want to start recording. Press to start emergency recording if
you are already recording. (Press twice if you are not already recording.)
The device saves emergency files in the microSD card’s Video folder with

V71G FHD Car Recorder User Manual
16
the filename starts with “S”. The folder only holds 10 emergency files,
regardless of the file size. If there are 10 emergency files saved, any new
emergency file records over the oldest emergency files.
Collision Detection
You can determine how strong a collision needs to be for automatic
collision recording to start. Set the G-Sensor level in Menu/Function
Setting/Collision Detection. The device saves the currently recording file
to the Emergency folder as an emergency file.
Collision Detection applies to vehicles that are moving. It does not apply
to vehicles in Parking Mode, where the vehicle’s engine is turned off and
Parking Mode is active.
Parking Mode
Parking Mode lets you set recording parameters for a parked car
(Menu/Function Setting/Parking Mode). The Parking Mode menu
provides 3 options:
• Off. Turn off Parking Mode and no recordings will be triggered.
• Parking Monitor. Select this to allow collision recording for the parked
vehicle. Files are saved as video files in the Video folder.
• Motion Detection. Select this to allow motion detection for the parked
vehicle. Files are saved as video files in the Video folder. After the
vehicle engine stops (turns off), the device begins recording at that point
regardless of motion is detected. Recording stops after about 10 seconds
and the file becomes a reference to motion detection.
PLAY VIDEOS
View on the Device
Play back video files and view photos through Menu/File

V71G FHD Car Recorder User Manual
17
Management/Playback. The screen displays 2 folders: Video and Photo.
The Video folder contains video images you’ve taken. Emergency files
are stored separately from normal video files with the filename starts
with “S”and are only copied over when there are already 10 emergency
files stored in the Video folder.
When you select a photo and the image displays on the screen, press
to zoom up to 3 times.
GPS
This feature provides the GPS location where the device is. As the
vehicle moves, that position is continuously updated. When GPS is
turned on, displays.
Red Light/Speed Cam Alert
The DC4GT has a built-in database containing red light and speed
camera locations (points). As you approach one of these points, the
device alerts you according to how the alert notification is set
(Menu/GPS Setup/Camera Alert).
You may also manually add new red light and speed camera locations.
While recording, press and hold ▲to add the current GPS location to
the database.
You may also delete the manually added points. Delete all
manually-added points from the database through Menu/GPS Setup/My
Location.
MAINTENANCE
Use common sense when caring for your device. Be sure the lens
remains clean and free of debris.

V71G FHD Car Recorder User Manual
18
Do not leave the camera exposed to high temperatures. Remove it and
store out of the heat.
Because the camera has an internal Lithium Polymer battery, contact
your local waste disposal department to dispose of it according to local
laws and regulations.
Clear out unwanted recordings to free up space in your MicroSD card
through Menu/File Management/Delete.
SPECIFICATION
Abee V71G FHD Car Cam Recorder
Image
Processor
New Generation WDR Low Noise Image Processing
Chip
Image Sensor
SONY Exmor CMOS Sensor
GPS
USA Satellite Receiving Mode 25mmx25mm Ceramics
Antenna
Lens
155°6G All-glass with IR Filter
Aperture
F/1.8
LCD Screen
3“TFT Capacitive Color Screen
Resolution
1080P / 60 & 30 fps
720P / 60 fps
Video File
Format
.MOV
Compression
H.264
Loop
Recording
2/3/5 Minutes Loop Recording
Power Supply
Car cigarette charger (INPUT: 12V~24V; OUTPUT:
DC5V/1A)
Built-in high temperature resistant lithium polymer
battery
USB Format
USB2.0
External
Micro SD Card (8GB~32GB, SDHC Class 10 or above)

V71G FHD Car Recorder User Manual
19
Memory
LED Indicator
Green: On
Red: Recording
International
Certification
BSMI/FCC/CE/RoHS
Operation
Temperature
-20~60℃
Storage
Temperature
-20~80℃
Dimension
8.2 (L)* 3.6 (W)* 5.2 (H) cm
Weight
Around 90g
NOTE:
All specifications are subject to change. Abee reserves the right to
modify the specification without prior notice to customer.
Table of contents
Other Abee Dashcam manuals