Ablerex Buck 1000W User manual

Photovoltaic Charger
User’s Manual
Buck – 1000W/1500W
12/24/36/48 Vdc

2
Content
IMPORTANT NOTES..............................................................................................................3
1.0
I
NTRODUCTION
...........................................................................................................4
1.1
I
NSTALLATION
S
ITE
....................................................................................................5
1.2
I
NSTALLATION
............................................................................................................6
1.3
A
CCESSORIES
..............................................................................................................7
1.4
LED
I
NDICATION
E
XPLANATIONS
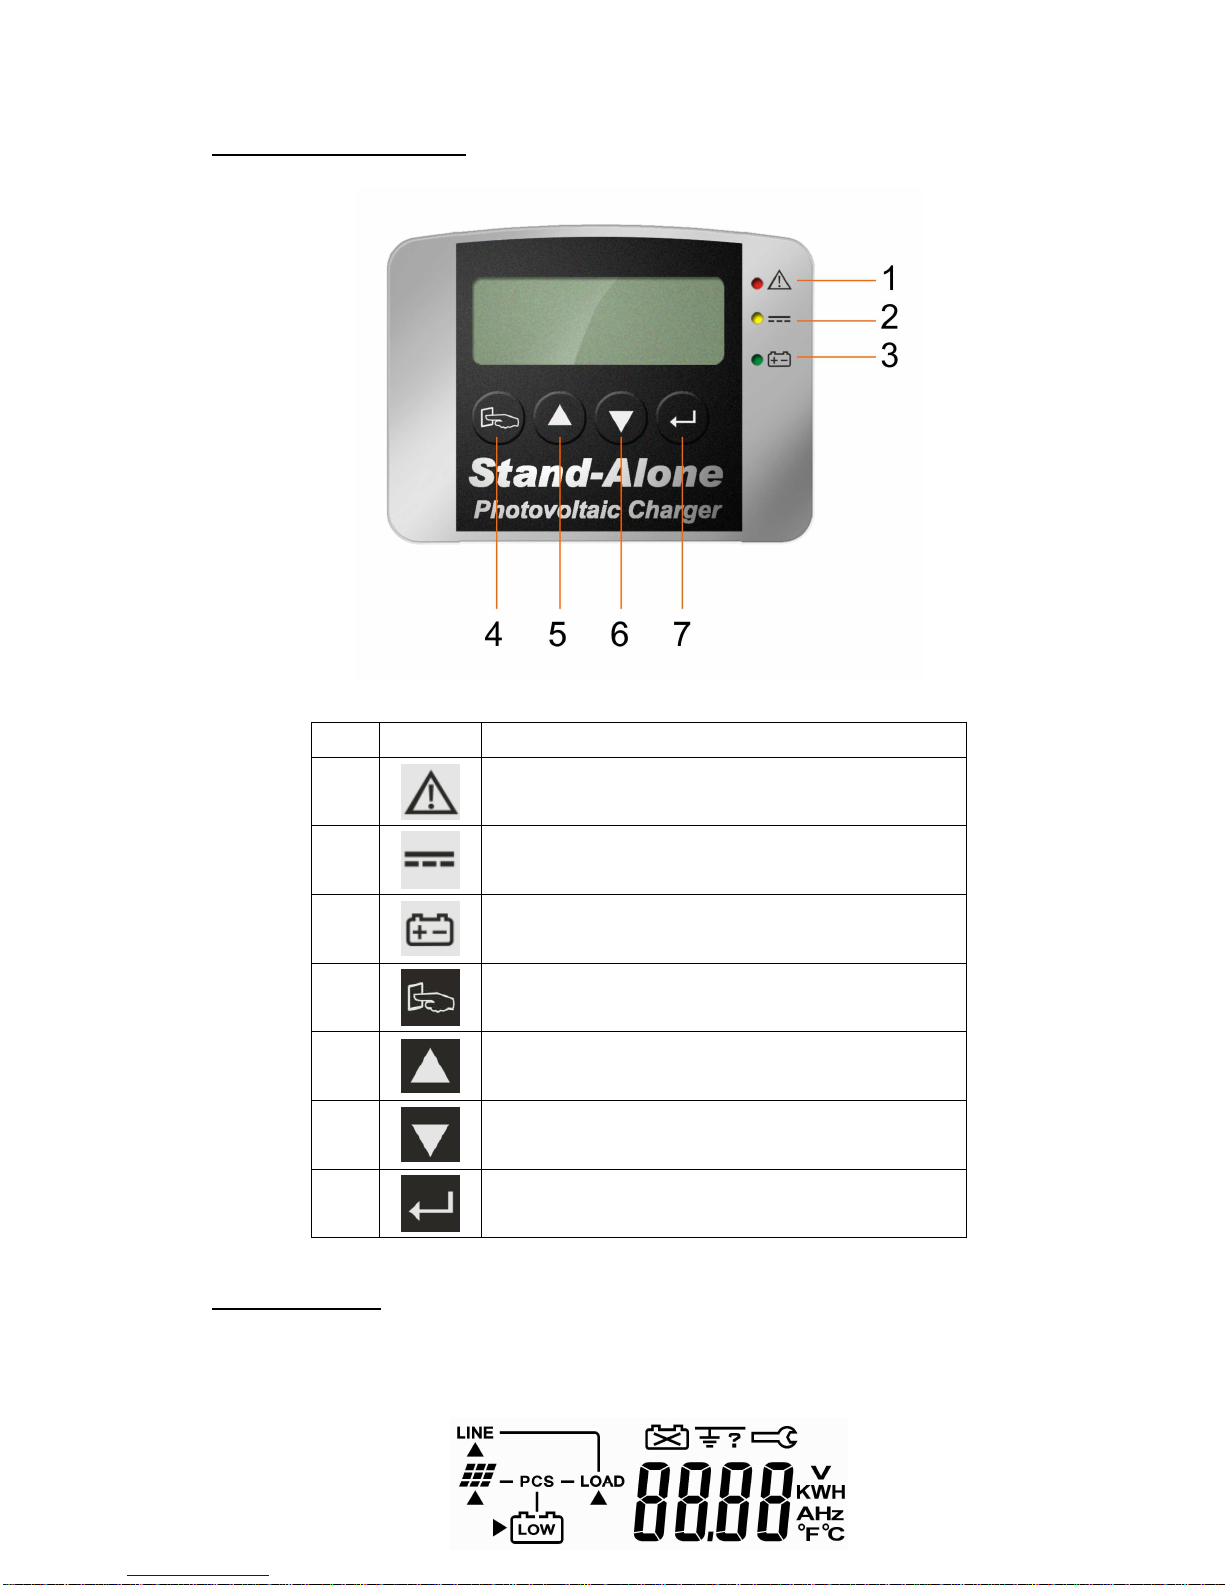
..............................................................................8
2.0
LCD
D
ESCRIPTION
.....................................................................................................9
2.1
O
PERATION
.................................................................................................................9
2.1.1Enter into Setting Mode.......................................................................................................................12
2.1.2Battery Capacity(AH) Setting..............................................................................................................13
2.1.3Battery Voltage Setting........................................................................................................................13
2.1.4 Battery Over-voltage Limit Setting.....................................................................................................14
2.1.5 Battery Under-Voltage Limit Setting..................................................................................................15
2.1.6 Pulse Charge Setting...........................................................................................................................15
2.1.7 Parallel Address Setting......................................................................................................................16
2.1.8 Total Input Power(KWH)Setting:.......................................................................................................16
2.1.9 Parameters Displayed..........................................................................................................................17
2.2
LCD
D
ISPLAY
E
XPLANATIONS
.................................................................................17
2.3
E
RROR
C
ODES
..........................................................................................................19
3.0
P
RODUCT
S
PECIFICATIONS
........................................................................................20

3
1.Keep this user’s manual and follow all instructions indicated in the
manual.
2.Don’t overload the charger.
3.Don’t split the charger apart; otherwise, your warranty is void.
4.Only authorized technician may repair or replace the interior components.
5.Make sure the ground of the load is connected properly. Otherwise, you
may get electrical shock.
6.Keep the PV charger clean and dry.
7.Make sure all the contacts with correct polarity to avoid from short
circuit.
8.
Following the instruction of the user’s manual to use or configure the
charger.
Important Notes

4
1.0 Introduction
BUCK-1000/1500W photovoltaic charger is to convert the energy from solar panel to
load or batteries connected. With different load or batteries connected, it can be set as 12V,
24V, 36V or 48V system. The solar charger can get max. efficiency up to 95%. The solar
cells can get the highest efficiency by means of Maximum Power Point Tracking(MPPT) and
pulse charge method.. Via LCD display, it is easy to get input voltage/current, output
voltage, battery temperature(with battery temperature compensation feature)…etc.. Through
RS232 communication port, our monitoring software may provide output voltage setting or
record all relative parameters from the PV charger.
Figure 1: The front view of the PV charger
Standard features of the PV Charger:
Maximum Power Point Tracking(MPPT) maximizes energy harvest from the PV array.
Auto-selection Four-stage (Bulk/Pulse/Float1/Float2) charge mode to reduce 1~3 times
charge time and maximize system performance.
Easy-to-read LCD and four functional key pads for configuration and system monitoring.
Maximum efficiency up to 95%.
Input over-voltage and under-voltage protection, output over-current protection and
back-feed protection with warning messages appeared on LCD and LED.
Over-temperature protection and power derating when output power and ambient
temperature are high.

5
Battery temperature sensor automatically provides temperature compensated battery
charging.
Provide communication software to monitor the status of the charger.
Smart fan speed Control according to the load connected.
This intelligent charger may set output voltage automatically or user may select output
voltage 12/ 24 /36/ 48 V via LCD panel。
Allow multi devices in parallel.
1.1 Installation Site
Figure 2: Installation Environment
Notice!
1.Inspect the charger upon receipt. This product is designed to be with robust packaging.
However, accidents and damage may occur during transportation. Notify the forwarder
or dealer if there is damage occurred. The packaging is recyclable; save it for reuse or
dispose of it properly.
2.It is designed to be installed and commissioned in a sheltered controlled environment as
follows:
--Operating temperature -20°C ~60°C.
--Always avoid from contact with direct sunlight.
--Install it away from objects that give off excessive heat and areas that are excessively
wet. .
--Install it indoors as it is not designed for installation outdoors.
This manual suits for next models
1
Table of contents