AbodeFit WalkSlim 810 User manual

WalkSlim 810
TREADMILL • USER MANUAL

DE
DEUTSH
PG XX
FR
FRANÇAIS
PG XX
EN
ENGLISH
PG 3
ES
ESPAÑOL
PG XX
IT
ITALIANO
PG XX
Congratulations on your purchase of the AbodeFit Health™
WalkSlim 810.
Please read the user manual carefully before using,
pay special attention to the safety precautions and keep
for future reference.
WARNING
Keep young children away from this treadmill at all times.
Contact with the moving surface may result in severe friction burns.
Please contact AbodeFit Health’s warranty provider,
Vitality 4 Life, (details on back page) if any malfunction
occurs and a qualified technician will assist you.
Unauthorised dismantling of the treadmill will void
warranty.
Stop using the treadmill immediately if:
• Water comes into contact with the treadmill or
the controller
• Any foreign bodies have been lodged inside the
treadmill
• Power failure
• Thunder / lightning weather
• If you feel unwell
• If the power cord has any damage

Safety Precautions 4
Parts and Features 6
Operating Instructions 7
Warm-Up Exercises 9
Maintenance 10
Troubleshooting 12
Warranty 15
EN
3

EN
4
Safety Precautions
• The WalkSlim 810 is only suitable for adults over the age of 18. It is not a toy and
should not be used by children.
• The WalkSlim 810 is for personal use only and is unsuitable for professional training,
testing or medical purposes.
• The WalkSlim 810 is designed for indoor use only. Do not use in areas of strong light
or heat (including direct exposure to the sun), when temperatures exceed 40°C or
near water.
• Do not use the WalkSlim 810 in humid or dusty environments to avoid any risk of
electric shock.
• To avoid any injury, warm up exercises are advised prior to using the treadmill.
It is not recommended to use your WalkSlim 810 for walking or running within
40 minutes of eating.
• Only use if you are in good health. If you feel uncomfortable (dizzy, headache or have
physical problems such as ligament injuries or joint replacements) stop using the
treadmill immediately and seek professional advice.
• The WalkSlim 810 is not suitable for use by individuals with reduced physical,
sensory or mental capabilities unless professional guidance has been given.
• Always wear appropriate footwear when using the treadmill, avoid exercising
barefoot or wearing any loose jewellery or clothing with belts or strings.
• Do not insert hands or feet or any body parts into the treadmill or in areas between
the running belt and foot rails.
• Stop for 30 minutes after each one hour running or walking session to avoid any
damage to the motor as a result of overheating.
• Ensure the WalkSlim 810 is on a flat and dry surface before use and there are no
sharp items close by.
• The WalkSlim 810 is not suitable for using on every carpet type, therefore if you
intend to use the treadmill on any carpeted areas, it is strongly advised that a hard-
mat type material is placed beneath the treadmill.
• Only connect the WalkSlim 810 to a power outlet that is the correct size for the
power plug and do not use if the power plug is damaged.
• Do not use force to disassemble any parts or attempt to turn off the power while
in use.
• Do not insert foreign objects into any of the parts or use unauthorised parts.

EN
5
• Do not apply pressure or stand on the display or motor cover.
• Do not exceed the treadmill’s maximum weight capacity of 110kgs, the treadmill is
only suitable for individual use.
• Keep a distance of 1 metre between the treadmill and the rear space and on
both sides.
• Unplug the WalkSlim 810 when it is not likely to be used for long periods of time.
• Do not let cord contact any other parts such as tread belt.
• Make sure the cord is undamaged and located where it cannot be damaged.
• Please turn off and dry any spilt liquid before cleaning the treadmill.
• Do not fold the handle frame down while the power is on. Switch the power off to
allow the tread belt to come to a complete stop before folding. A folded treadmill
should not be operated.
• Unplug the power cord when the treadmill is not in use.
BEFORE USING THE WALKSLIM 810
• Wait an appropriate time after eating
• Ensure children and pets are kept away from the treadmill
• Make sure no fingers or foreign bodies are near the gap between the cover and the
base of the treadmill whilst in operation
• Always supervise young and elderly people whilst on the treadmill
• Only one person may be on the tread belt at a time
CONSULT YOUR DOCTOR PRIOR TO USE IF ANY OF THE FOLLOWING APPLIES:
• you are undergoing medical treatment or have any medical concerns
• you are pregnant
• you have heart disease
• you have osteoporosis
• you have a pacemaker or other medical electronic instrument implanted
• you have artificial limb/s

EN
6
Parts and Features
Tread Belt
Touch Screen
Frame
Locking
Knob
Safety Key
TOUCH SCREEN
DISPLAY 1:
Displays Time (0 - 99:59 Min/Sec)/
Steps/Speed (0-12.8Km)
SPEED INCREASE/DECREASE:
Increases or decreases the speed when
the treadmill is in running state
START/STOP:
Starts the treadmill in stopping state
Stops the treadmill in running state
DISPLAY 2:
Displays Distance (0-99.9Km)/
Heart Rate/Calories (0-999KCal).
This Screen will also display error message codes if
the treadmill is not functioning properly.
QUICK SPEEDS:
Automatically sets the speed at
5Km/Hr or 8Km/Hr
Safety
Clip
Foldable
Handles
Footrail
Silicone Oil Lubricant
& Allen Key

EN
7
Operating Instructions
STARTING YOUR WALKSLIM 810
• First find the right spot for your WalkSlim 810, ensuring you choose a location that is
flat and open, free of sharp objects, with a sufficient 1 metre clear space around the
treadmill.
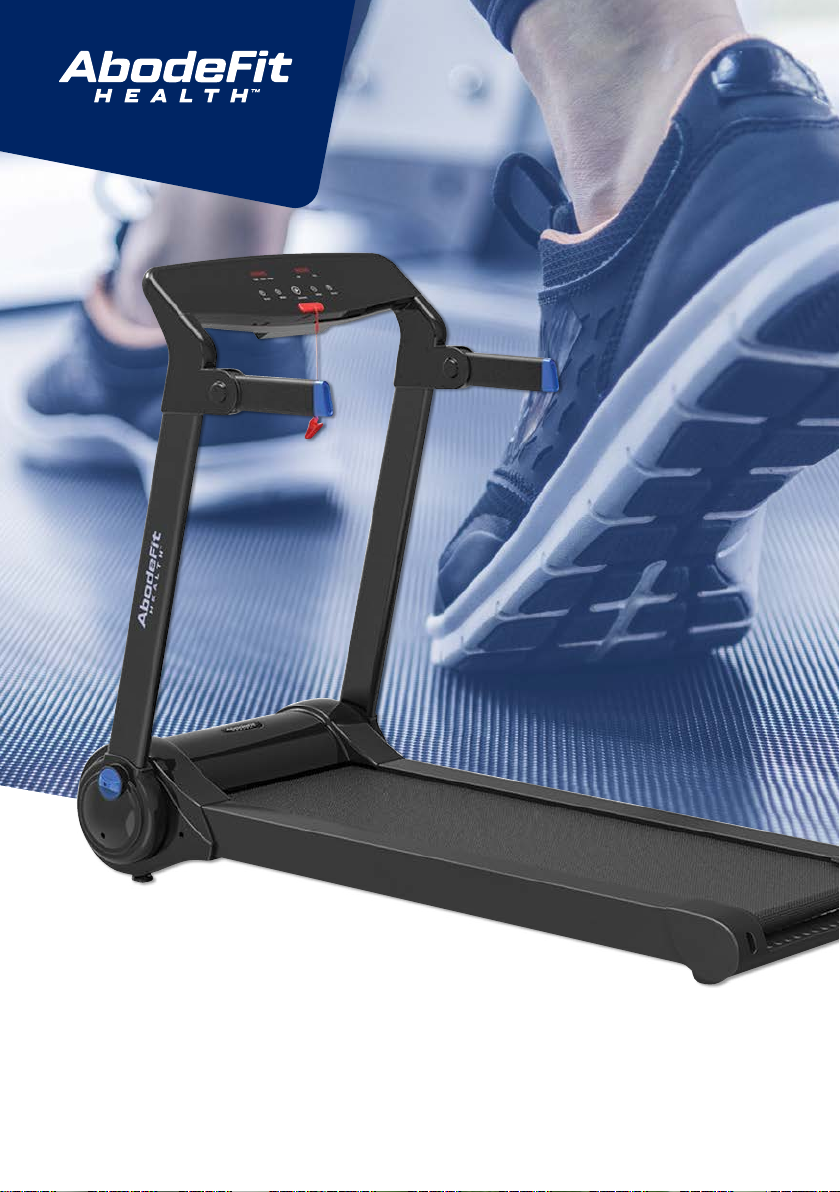
• Remove the WalkSlim 810 from its packaging and place face up on the floor, clear of
sharp objects or anything likely to scratch its surface.
• Before you use the WalkSlim 810 the tread belt must be lubricated with the oil
provided.
HOW TO LUBRICATE THE TREAD BELT
• Lubricating your WalkSlim 810 treadmill is essential before starting to use it for the
first time along with during normal use.
• During normal use, friction marks may appear between the tread belt surface and
the treadmill base. To avoid unnecessary friction and to maximize the life of your
treadmill, it is recommended to lubricate the tread belt surface with lubricant after
every 10-15 times or according to the following schedule:
• Lightweight users (less than 3 hours/week) – Lubricate once every 3 months
• Moderate users (3-6 hours/week) – Lubricate once every 2 months
• Heavyweight users (more than 7 hours/week) – once every month
Do not lubricate too much.
The following is a step-by-step guide
1. Make sure the treadmill is unplugged and place it on an even,
non-slippery surface.
2. Lift the tread belt surface up starting from the upper corner.
3. Apply the lubricant by squeezing droplets on the underside
of the tread belt surface, ensuring the lubricant is applied at
least 10-15cm towards the middle of the tread belt.
Remember proper lubrication is an important factor in
maintaining the treadmill. To check if you need to add lubricant,
make sure the treadmill is turned off at the
power outlet. Run your hand under the tread belt from
the top to the bottom. If your hand is slightly damp with silicone
oil there is no need to lubricate. If your hand is completely dry, it
is time to add lubricant.

EN
8
STARTING THE WALKSLIM 810 USING THE ON-BOARD PROGRAMS
1. Place the Walkslim 810 on a level surface and lift the frame up from the side of the
treadmill until the safety lock is positioned correctly. Insert the Frame Locking Knobs
and turn the handles in the direction of the centre of the treadmill.
NOTE: If you cannot insert the locking knobs , give the frame a slight shake to allow
the knobs to turn. It might tight due to shipping
2. Insert the Safety Key in the yellow Safety Key insert on the Display Screen
NOTE: If the Safety Key is not inserted in the correct position, the treadmill and
the touch screen will stop operating and Screen 2 will display error code E07. After
inserting the Safety Key into the Safety Key Insert correctly, the display screen will light
up after approximately 2 seconds and enter default working mode.
3. Lift the frame up and turn the Locking Knobs to the lock position.
4. Turn on the Power Switch, the buzzer will sound once.
5. Press the START button. The touch screen will display 3333 - 2222 - 1111 and the
buzzer will sound each time.
6. The motor will start operating with a starting speed of 1.0Km/Hr. To adjust the Speed
press the Speed Increase/ Decrease buttons or 5Km/Hr and 8Km/Hr Quick Speed
buttons.
Frame Locking
Knobs
32

EN
9
Warm-Up Exercises
It is recommended to warm up for 5 to 10 minutes before exercise to prevent sports
injuries. Refer to the following stretching exercises and repeat after your treadmill
exercise program.
1. Stretch down: Keep knees slightly flexed and your body slowly bent forward, relax
your back and shoulders, touch your toes with your hands as much as possible, and
keep for 10~15 seconds, then relax. Repeat 3 times.
2. Foot tendon stretch: Sit on a clean seat cushion, straighten one leg and keep the
other leg inward to fit the inner side of the straight leg. Try to touch your toes with
your hands for 10 to 15 seconds, then relax. Repeat 3 times for each leg.
3. Stretch the calves and Achilles tendon: Stand close to a wall with your hands on
it, with one foot behind, keep the back leg upright and heels touching the ground,
incline to the wall and keep for 10 to 15 seconds, then relax. Repeat 3 times for each
leg.
4. Stretch the quadriceps: Balance yourself with the left hand holding a wall or a desk,
then extend your right hand backwards, grab your right heel and slowly pull it to your
buttocks until you feel the muscles on the front of the thighs in tension, keep for 10 to
15 seconds, then relax. Repeat 3 times for each leg.
5. Stretch the sartorius muscle (muscle inside the thigh): Keep the soles opposite and
sit with the knees outwards. Grasp your feet with your hands and pull in the direction
of your groin, keep for 10 to 15 seconds, then relax. Repeat 3 times.

EN
10
Maintenance
Daily Maintenance
• Regular comprehensive cleaning will extend the life of your WalkSlim 810.
• Always turn the power off at the power outlet and make sure there is no moisture
before daily cleaning and maintenance.
• Clean dust out regularly and ensure the exposed parts of the tread belt are clean.
• Wear clean sports shoes to avoid any dust or impurities getting into the tread belt
and board.
• Use a damp cloth with soap or detergent to clean the tread belt. Do not use
excessive water and avoid leakage to the electrical components and underneath the
running belt
• Disconnect the power cord when the WalkSlim 810 will not be used for a long time.
• Do not store the treadmill in the bathroom or outside and avoid areas with a lot
of moisture.
Tread Belt Adjustments
While each treadmill tread belt has been finely adjusted, after transport and installation
it may need to be adjusted. Adjustment may also be required throughout the life of the
treadmill. Reasons for this may be:
1. The treadmill has been on an uneven surface.
2. When in operation, the user walks / runs unevenly (to one side) on the belt.
3. The users on the treadmill have different physical weight and force.
Tread belt deviations will seriously damage the tread belt and must be found in time and
corrected.
NOTE: Correct maintenance of the treadmill is important and issues arising from
ongoing tread belt misalignment will not be covered under warranty.
How to adjust alignment on left side: tighten
the bolt (clockwise) on the left side if the belt is
deviating to left side or loosen bolt on the right
side (counter clockwise).
How to adjust alignment on right side:
tighten the bolt (clockwise) on the right side if
the belt is deviating to right side or loosen bolt
on the left side (counter clockwise).

EN
11
Motor Belt Adjustments
While each treadmill motor belt has been finely adjusted, after transport and installation
it may need to be adjusted again and also throughout the life of the treadmill.
Adjustment Steps:
1. Adjust the balance of the motor with the allen key. Turn the bolt half a turn counter
clockwise.
2. Turn the belt tightening bolts clockwise half a circle.
NOTE: Clean belt and pulley grooves regularly.
Folding Instructions
1. Lift the handles upwards and turn the locking knobs to the unlock position.
2. Then slowly fold the frame down towards the the tread belt
WARNING
Unplug the treadmill before performing maintenance.
Front Roller
Belt tightness
bolts Motor balance
adjustment bolts
Motor
Belt
Locking Knob
Handles

EN
12
Troubleshooting
The treadmill is
not working
•Make sure the power cord is properly secured into the power
outlet and that the switch is turned to the ‘ON’ position.
•Check the Safety Key is inserted in the correct position.
The tread belt is
not working
• Insufficient lubrication. Add silicone oil lubricant.
• Tread belt is too tight which will reduce performance and
increase wear of rollers and tread belt. Adjust tread belt
tightness to the correct tension. The tread belt should be able
to be lifted from the base by about 5-7.5cm by hand.
The tread belt is
slipping
•Tread belt is too loose or too tight. Adjust the tread belt
tightness to the correct tension. An example of when the
belt is too loose is when you have pressed the STOP Button
to Stop the treadmill and the tread belt begins to slip instead
of uniformly slowing down. Adjust the tightness of the tread
belt by using the Allen Key and turn 180 degrees at a time on
both sides of the treadmill. Do not overtighten the tread as it
will increase the load on the motor and may cause damage to
motor, tread belt and roller.
The Treadmill
will not speed up
slow down
• Please contact our Customer Service Centre.
The Display
Screen does not
work
• Please contact our Customer Service Centre.
The Treadmill is
losing speed
• Add lubricant oil to the underside of the tread belt as per
instructions on page 7 of this manual.
Display Screen
is on but the
Treadmill does
not start
• The treadmill has not been started according to the
instructions on pages 7-11 of this manual. If the treadmill still
does not start please contact our Customer Service Centre.
Unreadable
/ Incoherent
Display Screen
• Motor is overheating. Turn the power off, unplug and leave for
one hour then restart. If it does not restart please contact our
Customer Service Centre.

EN
13
The belt is
running to the left
1. Tighten the bolt clockwise on the left side or loosen bolt on
the right side counter clockwise using the Allen Key.
2. Start the WalkSlim 810 to check the new position of the belt.
3. If the belt is still not in the middle repeat the action until
adjusted to a central middle position.
4. After adjusting the belt to the middle, start the WalkSlim 810
for 1-2 minutes and observe the tread belt to ensure that
is running smoothly. If it’s not centralised, then repeat the
adjustment steps again.
The belt is
running to the
right
1. Tighten the bolt clockwise on the right side or loosen bolt on
the left side counter clockwise using the Allen Key.
2. Start the WalkSlim 810 to check the new position of the belt.
3. If the belt is still not in the middle repeat the action until
adjusted to a central middle position.
4. After adjusting the belt to the middle, start the WalkSlim 810
for 1-2 minutes and observe the tread belt to ensure that
is running smoothly. If it’s not centralised, then repeat the
adjustment steps again.
The belt is
skidding
• Turn the left and right screw half a turn clockwise at the same
time and then repeat the adjustment until running normally.
Do not tighten the screw excessively.

EN
14
Error Message Codes
Error
Code Fault Description Solution
E01 Communication
Issue
Change remote control batteries and then restart. If it
does not restart please contact our Customer Service
Centre.
E02 Power Issue Turn the power off, unplug and leave for one hour
then restart. If it does not restart please contact our
Customer Service Centre.
E03 Overvoltage
protection
Please contact our Customer Service Centre.
E05 Overload
Protection
Turn the power off, unplug and leave for one hour
then restart. If it does not restart please contact our
Customer Service Centre.
E07 Safety Key Issue Please insert safety key into the safety key insert in the
correct position. If it does not restart please contact
our Customer Service Centre.
Abnormal Display
Screen
Turn the power off and turn back on after 1 minute.
If it does not display correctly please contact our
Customer Service Centre.

EN
15
ABODEFIT HEALTH™ WALKSLIM 810 WARRANTY
Warranty Period: Lifetime Frame, 5 Years Motor, 2 Years Parts & Labour. Vitality 4 Life are the warranty
providers for AbodeFit Health™ products. Vitality 4 Life warrant this product to be free from defects in
materials and workmanship while in normal domestic use for a period of five years on the motor and two
years on other parts (with the exception of a life warranty on the frame) from the original date of purchase.
DO NOT RETURN THE PRODUCT TO THE STORE.
LODGING A WARRANTY CLAIM
Should you experience any issues with your product, please follow
these steps to lodge a warranty claim:
1. Contact your local Vitality 4 Life Service Centre with the
following details: Your warranty details including name, email
and phone number
– Product name and model number
Product serial number, found on the rating label of the
product
Explanation of how the damage occurred
Photos of the damage or issue is highly beneficial to
expediting your claim
2. Vitality 4 Life will assess your claim and respond within 24-48
hours.
3. In the event the product is required to be sent to the Service
Centre, the customer is liable for all packing, freight and
insurance costs for transit of the product to Vitality 4 Life.
Subject to the applicable consumer laws in your jurisdiction.
4. If the product, or one of its parts, qualifies for replacement or
service within the 30-Day period after date of purchase, Vitality
4 Life will arrange the shipping at no cost to you.
5. Any product sent to a Vitality 4 Life Service Centre must include
a Return Authorization Form. Failure to include this form may
result in the product being rejected from our warehouse or a
delayed service time.
6. Vitality 4 Life will contact you with a quote prior to undertaking
any service work outside of the warranty coverage.
7. Typical turn-around times to address warranty claims can be
between 10-14 business days, plus shipping, depending on
location and type of damage or warranty claim.
TERMS OF PRODUCT WARRANTY COVERAGE
Vitality 4 Life provides the Product Warranty coverage as further
described below and limited to the terms and conditions hereof:
1. If the Product exhibits a defect while in normal domestic use,
within the warranty period; we will, at our option, either repair
or replace the product or defective part free of charge. The
Product must be delivered by insured mail, in proper packaging
to your Service Centre as indicated on the back of the manual
as a condition to any warranty service obligation.
2. In the event that the warranty period for a product has expired,
or if a Product does not qualify for warranty service, repair
or replacement, consumers may still buy replacement parts
or have products repaired by one of Vitality 4 Life’s Service
Centres. Please contact Vitality 4 Life for further information.
3. Do not send the product back to the Service Centre without a
Return Authorization Form.
4. In no event shall our liability exceed the retail value of the
product. We make no warranty with respect to parts, from a
source other than Vitality 4 Life.
5. In the event that warranty parts or products are provided, the
customer must cover the related shipping costs to receive
goods.
6. All exchanged or substitute parts and products replaced
under warranty service will become the property of Vitality
4 Life. Repaired or replaced products or parts thereof will
be warranted by Vitality 4 Life for the balance of the original
warranty period.
7. (Australia only) Our goods come with guarantees that cannot
be excluded under the Australian Consumer Law. You are
entitled to a replacement or refund for a major failure and
compensation for any other reasonably foreseeable loss or
damage. You are also entitled to have the goods repaired or
replaced if the goods fail to be of acceptable quality and the
failure does not amount to a major failure.
WARRANTY DOES NOT COVER
1. Damage, accidental or otherwise, to the Product, not caused by
direct defect in factory workmanship or materials.
2. Damage due to abuse, mishandling, alteration, misuse,
commercial service, tampering, accident, failure to follow care,
operating and handling provisions indicated in the instructions.
3. Damage caused by parts or service not authorized or
performed by Vitality 4 Life.
4. ‘Normal’ wear and tear that naturally and inevitably occurs as a
result of normal use or aging.
5. Some states do not allow the exclusion or limitation of
incidental or consequential damages. Therefore, the above
limitations may not apply to you in the case of damage
in shipment. If your product was damaged in shipment:
Immediately report this type of damage to the parcel carrier
and have them file an inspection report to contact the
distributor from whom you purchased the product for further
instructions.
6. You have rights and benefits under the consumer laws in
your jurisdiction. Without detracting from these rights or
benefits, Vitality 4 Life excludes all liability in respect of this
product for any other loss which is not reasonably foreseeable
from a failure of this product, which may include liability for
negligence, loss of expenditure associated with the product and
loss of enjoyment.

Support & Service Centres
Contact your local distributor for warranty & service
Vitality 4 Life – Australia & New Zealand
W: www.vitality4life.com.au
Vitality 4 Life – United Kingdom
E: [email protected].uk
W: www.vitality4life.co.uk
Vitality 4 Life - United States
W: www.vitality4life.com
Vitality 4 Life – France
E: support@vitality4life.fr
W: www.vitality4life.fr
Vitality 4 Life – Deutschland
W: www.vitality4life.de
Vitality 4 Life – Italia
E: servizioclienti@vitality4life.it
W: www.vitality4life.it
Vitality 4 Life – España
E: atencionclien[email protected]
W: www.vitality4life.es
Vitality 4 Life – Netherlands
E: info@vitality4life.co.nl
W: www.vitality4life.co.nl
Table of contents
Other AbodeFit Treadmill manuals

AbodeFit
AbodeFit WalkSlim WalkPad 630 User manual

AbodeFit
AbodeFit WalkSlim 410 User manual

AbodeFit
AbodeFit WalkSlim 920 User manual

AbodeFit
AbodeFit WalkSlim Mini Walk 670 User manual

AbodeFit
AbodeFit WalkSlim Mini Walk 670 User manual

AbodeFit
AbodeFit WalkSlim 610 User manual

AbodeFit
AbodeFit WalkSlim 830 User manual

AbodeFit
AbodeFit WalkSlim 470 User manual

AbodeFit
AbodeFit WalkSlim 540 User manual