AbodeFit WalkSlim Mini Walk 670 User manual

WalkSlim Mini Walk 670
TAPIS ROULANT • MANUALE UTENTE

Congratulazioni per il tuo acquisto dell’AbodeFit Health™
WalkSlim Mini Walk 670
Ti preghiamo di leggere attentamente il manuale utente prima
dell’uso, prestando particolare attenzione alle precauzioni di
sicurezza e di conservarlo per future consultazioni.
Ti preghiamo di contattare il fornitore della garanzia di
AbodeFit Health, Vitality 4 Life, (dettagli sul retro della
pagina) se si verificasse un malfunzionamento ed un
tecnico qualificato sarà lieto d’assisterti. Lo smontaggio
non autorizzato del tapis roulant renderà nulla la garanzia.
Interrompi immediatamente l’uso del tapis roulant se:
• Acqua entra in contatto con il tapis roulant o il
telecomando
• Eventuali corpi estranei sono stati inseriti nel tapis
roulant
• Interruzione di corrente
• Precipitazioni temporalesche
• Se non ti senti bene
• Se il cavo d’alimentazione è danneggiato
ATTENZIONE
Mantieni sempre i bambini lontani dalla portata del tapis roulant.
Il contatto con la superficie in movimento può provocare gravi ustioni da attrito.

Precauzioni di sicurezza 4
Parti e funzioni 6
Istruzioni per l’uso 7
Come usare il tuo Walkslim Mini Walk 670 8
Esercizi di riscaldamento 11
Manutenzione 12
Risoluzione dei problemi 12
Garanzia 15
.
3
IT

Precauzioni di sicurezza
• Il WalkSlim Mini Walk 670 è adatto solo per persone d’età superiore ai 18 anni. Non è
un giocattolo e non dovrebbe essere usato dai bambini. La modalità con sensore a 3
Zone potrebbe essere attivata da bambini piccoli.
• Il WalkSlim Mini Walk 670 è pensato solamente per l’uso personale e non è adatto per
un allenamento professionale, test o scopi medici.
• Il WalkSlim Mini Walk 670 è progettato solo per l’uso interno. Non utilizzare in zone
caratterizzate da una forte luce o calore (inclusa l’esposizione diretta al sole), quando
la temperatura supera i 40°C o in prossimità dell’acqua.
• Non usare il WalkSlim Mini Walk 670 in ambienti umidi o polverosi per evitare il rischio
si shock elettrici.
• Per evitare infortuni, ti consigliamo d’eseguire alcuni esercizi di riscaldamento prima
d’utilizzare il tapis roulant. Non è consigliato usare il tuo WalkSlim Mini Walk 670 per
camminare o correre se hai mangiato da meno di 40 minuti.
• Da utilizzare solo se l’utente è in buone condizioni di salute. Se non ti senti bene
(vertigini, mal di testa o hai problemi fisici come infortuni ai legamenti o sostituzione
di articolazioni) interrompi immediatamente l’uso del tapis roulant e richiedi una
consulenza professionale.
• Il WalkSlim Mini Walk 670 non è adatto per l’uso da parte d’individui con ridotte abilità
mentali, sensoriali o fisiche salvo che non sia fornita loro una guida professionale.
• Indossa sempre calzature adeguate quando usi il tapis roulant, evita d’esercitarti a
piedi nudi o di indossare gioielli pendenti, indumenti con cinture o corde.
• Non inserire mani, piedi o altre parti del corpo nel tapis roulant o nelle zone tra la
cinghia di corsa ed il guardapiedi.
• Fai una pausa di 30 minuti dopo ogni sessione di corsa o di camminata della durata di
un’ora per evitare danni al motore a causa del surriscaldamento.
• Per motivi di sicurezza, il WalkSlim Mini Walk 670 si arresterà dopo 100 minuti
d’utilizzo continuato.
• Assicurati che il WalkSlim Mini Walk 670 sia poggiato su una superficie piana e
asciutta prima dell’uso e che non ci siano oggetti appuntiti nelle vicinanze.
• Il WalkSlim Mini Walk 670 non è adatto per l’uso su ogni tipo di moquette. Se intendi
utilizzare il tapis roulant su un’area con moquette, ti consigliamo di collocare un
materiale duro sotto il tapis roulant.
IT
4

• Collega il WalkSlim Mini Walk 670 solo ad una presa di corrente delle dimensioni
corrette per la spina d’alimentazione e non utilizzarlo se la spina è danneggiata.
• Non usare la forza per smontare le parti o tentare di spegnere l’alimentazione durante
l’uso.
• Non inserire oggetti estranei in nessuna delle parti e non utilizzare pezzi non
autorizzati.
• Non applicare pressione e non stare in piedi sul display.
• Non superare la capacità massima di peso del tapis roulant di 110 kg, il tapis roulant è
adatto solo per uso individuale.
• Scollega il WalkSlim Mini Walk 670 quando è probabile che non sarà utilizzato per
lunghi periodi.
• Non lasciare che il cavo entri in contatto con altre parti come il cilindro, il nastro di
corsa, ecc.
• Assicurati che il cavo non sia danneggiato e che sia sistemato in un luogo sicuro.
• Ti preghiamo di spegnere ed asciugare eventuali liquidi versati prima di pulire il tapis
roulant.
PRIMA D’UTILIZZARE IL WALKSLIM MINI WALK
• Attendi il momento opportuno dopo aver mangiato
• Assicurati che bambini ed animali domestici siano ben lontani dal tapis roulant
• Assicurati che durante il funzionamento non vi siano dita o corpi estranei in prossimità
della fessura tra il coperchio e la base del tapis roulant
• Sorveglia sempre i giovani e gli anziani mentre sono sul tapis roulant
• Solo una persona alla volta può salire sul tapis roulant
CONSULTA IL TUO MEDICO PRIMA DELL’USO SE UNA DELLE SEGUENTI CONDIZIONI SI
APPLICANO ALLA TUA PERSONA
• Stai seguendo cure mediche o hai problemi di salute
• Sei incinta
• Soffri di patologie cardiache
• Soffri di osteoporosi
• Hai un pacemaker o un altro dispositivo medico elettronico impiantato
• Hai arti artificiali
5
IT

Parti e funzioni
AVVIO DEL DISPLAY
All’avvio del tapis roulant
appariranno 6 corti
trattini nel centro del
pannello.
Il tapis roulant si è
avviato con successo
quando appariranno
3 linee. Il tapis roulant
inizierà a registrare i dati.
2 corti trattini al centro
indicano che il tapis
roulant è in modalità di
riposo.
Tempo/Velocità
Mostra il tempo e la
velocità.
Passi
Mostra il numero
di passi
Distanza
Mostra la distanza
percorsa e le calorie
bruciate.
PANNELLO DEL DISPLAY
LED display
Ruote di
trasporto
Guardapiedi
Cinghia di corsa
Telecomando, 2 flaconi
di lubrificante e chiave a
brugola
IT
6

Istruzioni d’uso
AVVIARE IL TUO WALKSLIM MINI WALK
• Per prima cosa trova il punto giusto per il tuo WalkSlim Mini Walk 670, assicurandoti
di scegliere una posizione che sia piana ed aperta, priva di oggetti appuntiti, con uno
spazio libero di almeno 1 metro intorno al tapis roulant.
• Rimuovi il WalkSlim Mini Walk 670 dalla sua confezione e piazzalo a faccia in giù sul
pavimento, distante da oggetti appuntiti o qualsiasi altro oggetto che possa graffiare
la sua superficie.
• Prima d’utilizzare il WalkSlim Mini Walk 670, il nastro di corsa dev’essere lubrificato
con l’olio fornito.
COME LUBRIFICARE IL NASTRO DI CORSA
–Lubrificare il tuo tapis roulant WalkSlim Mini Walk 670 è essenziale sia prima del
primo utilizzo sia durante il normale uso.
–Durante l’uso normale, potrebbero comparire segni d’attrito tra la superficie del
nastro di corsa e la base del tapis roulant. Per evitare inutili attriti e massimizzare la
durata del tuo tapis roulant, ti consigliamo di lubrificare la superficie del nastro di
corsa con il lubrificante ogni 10-15 utilizzi.
Di seguito è riportata una guida passo-passo.
1. Assicurati che il tapis roulant sia scollegato e piazzalo su una superficie piana e non
scivolosa.
2. Appoggia il tapis roulant in modo che il lato sinistro sia rivolto verso l’alto.
3. Solleva la superficie del nastro di corsa iniziando dall’angolo superiore.
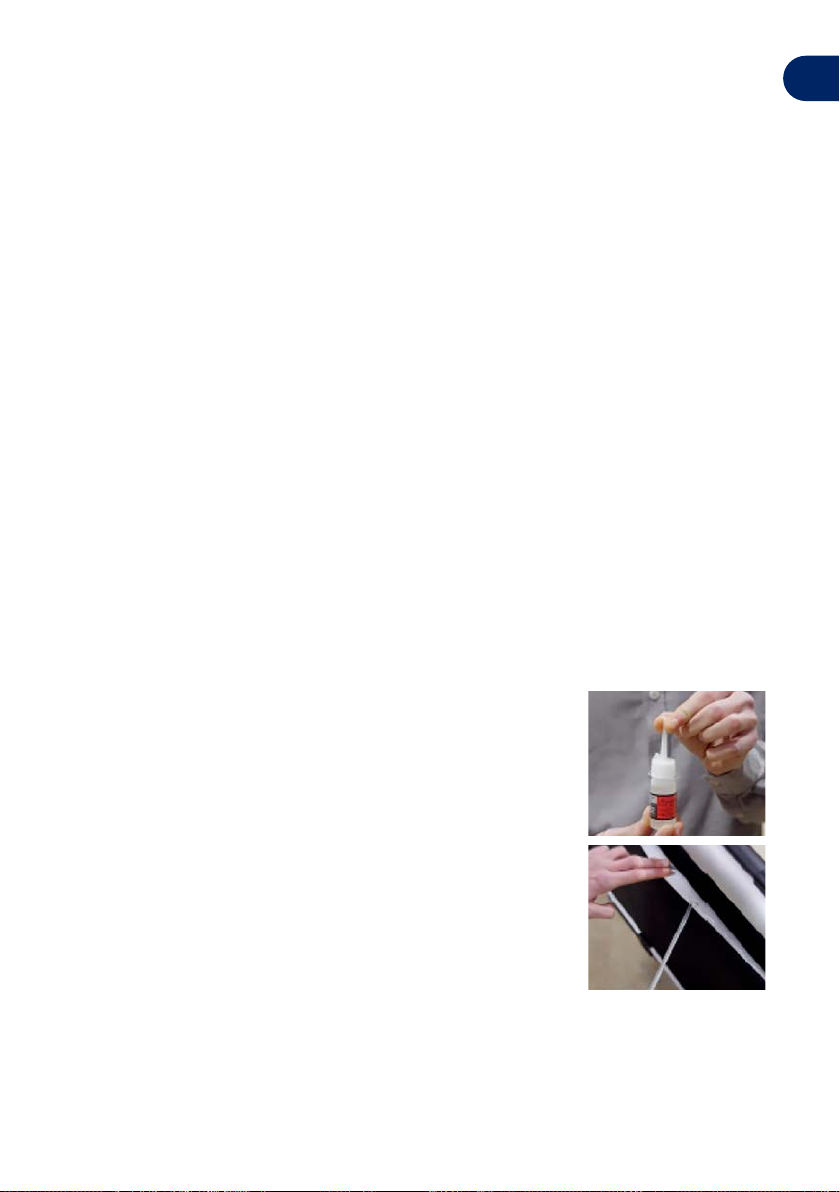
4. Applica il lubrificante sotto la superficie del nastro di corsa,
assicurandoti che il lubrificante sia applicato almeno 10-15
cm verso il centro del nastro di corsa.
5. Solleva nuovamente il tapis roulant ed appoggialo in modo
che il lato destro sia rivolto verso l’alto.
6. Solleva la superficie del nastro di corsa ed applica il
lubrificante al di sotto come spiegato nei passi 3 e 4.
7. Riporta il tapis roulant in posizione di funzionamento.
Ricorda che una corretta lubrificazione è un fattore
fondamentale per la manutenzione del tapis roulant. Per
controllare se sia necessario aggiungere lubrificante, assicurati
che il tapis roulant sia spento e staccato dalla presa di corrente.
Scorri la mano sotto il nastro di corsa dall’alto verso il basso. Se
la tua mano è leggermente umida con olio di silicone, non c’è bisogno di lubrificare. Se la
tua mano è totalmente asciutta, è il momento d’aggiungere lubrificante.
Una volta lubrificato, sarà facile riavviare il tapis roulant poiché non è necessario alcun
montaggio.
7
IT

Usare il tuo Walkslim Mini Walk 670
1. La modalità sensore a 3 zone
Questa modalità utilizza la tecnologia d’induzione ad infrarossi per controllare e
regolare automaticamente la velocità rilevando la posizione dei piedi in base alle zone di
rallentamento, accelerazione e camminata costante sul nastro di corsa.
The Tread Belt is divided into 3 Zones:
Speed Up, Constant &Slow Down.
1. Stand on the treadmill, starting from the Slow Down
Zone and step forward in each zone. After these 3
steps the tread belt will begin to start moving.
2. Keep a steady pace for at least 2 minutes.
3. The display will illuminate as shown below:
4. Continue to walk in the Constant Zone.
Within 5 seconds of steady movement the speed
and intensity will be set.
HOW TO SPEED UP
Walk or run in the Speed Up Zone. The speed will gradually increase until it reaches the
max speed of 6km/h
INCORRECT WAY TO START
• Using 1 foot to step forward.
• Time interval between 2 steps cannot be longer than 1.5 seconds.
The treadmill cannot be started if steps are not continuous.
• The treadmill will not work if it hasn’t woken up while in sleep mode.
SPEED UP
CONSTANT
SLOW DOWN
1st step
2nd step
3rd step
IT
8

HOW TO MAINTAIN A CONSTANT SPEED
Walk or run in the Constant Zone to maintain a steady uniform speed.
HOW TO SLOW DOWN
• From the Speed Up Zone, slow your speed gradually from jogging to fast walking and
move to the Constant Zone. Keep walking for about 5 seconds and the speed will
steadily reduce.
• From the Constant Zone, slow down gradually from fast walking to walking with wide
steps and move to the Slow Down Zone. Keep walking for about 5 seconds and the
WalkSlim Mini Walk 670 will slow down and stop automatically.
HOW TO STOP
• From the Speed Up Zone, keep walking for about 5 seconds, slowing down gradually
from fast walking to walking with wide steps and move to the
Slow Down Zone. Keep walking in the Slow Down Zone for about 5 seconds. It is safe
to get off once the WalkSlim Mini Walk 670 has stopped.
• From the Constant Zone, slow down gradually from fast walking to walking with wide
steps and move to the Slow Down Zone. Keep walking in the Slow Down Zone. It is safe
to get off once the WalkSlim Mini Walk 670 has stopped.
SLEEP MODE
• The WalkSlim Mini Walk 670 enters Sleep Mode when it is idle for more than 10
minutes. Two continuous lines will be displayed in the middle of the screen.
WAKE UP
• Step or tap 3 times within 5 seconds in the Slow Down Zone of the tread belt. Keep
heels in touch with the tread belt while you step or tap 3 times.
• The display will illuminate as shown below.
2 brackets gradually become further spaced apart
INCORRECT WAY TO WAKE UP
• If you do not step or tap in the Slow Down Zone
• If you inconsistently step or tap or finish 3 steps or taps in more than 5 seconds.
9
IT

2. The Manual Remote Control Mode
This mode will use the Remote Control to adjust your speed
• Stand in the Constant Zone and hold the Start/Stop Button on the Remote Control
for more than 1 second to start the treadmill.
• Press the Increase Speed Button to speed up increasing speed by 0.1km/hr
• Press the Decrease Speed Button to slow down decreasing speed by 0.1km/hr
• When the speed is reduced down to 1km/hr, the treadmill will stop running automatically.
• To stop the treadmill while walking/running, press the Start/Stop Button for more
than 1 second to stop the treadmill.
SYNCING YOUR WALKSLIM MINI WALK WITH THE REMOTE CONTROL
Your remote control is synced to the treadmill during manufacture so a re-sync is only
necessary if you are replacing the first remote with another one.
To re-sync your new remote control
1. Remove the battery cover on the backside of the remote, remove the battery out of
the remote and place it back in again into its correct position.
2. Switch the treadmill on by pressing the Start/Stop Button, once the display panel is
lit, press the Mode Switch Button.
3. If the re-sync is not successful, switch the treadmill off, and repeat steps 1 & 2 again.
• The Display Screen will indicate when the Remote Control Mode is used to start
the treadmill
• During your exercise session, the Mode Switch Button can be used to switch
between the 3 Zone Sensor and the Remote Control modes
AUTOMATIC PROTECTION
• If the treadmill is used consistently for more than 99 minutes the unit will turn
off as a safety feature.
Start/Stop
Powers on and off the treadmill
Mode
Switch between the Automatic
(3 Zone Sensor) Mode and the
Manual Remote Control Mode
Increase/Decrease Speed
Increase speed by 0.1km/hr
Decrease speed by 0.1km/hr
IT
10

Warm-Up Exercises
It is recommended to warm up for 5 to 10 minutes before exercise to prevent sports injuries.
Refer to the following stretching exercises and repeat after your treadmill exercise program.
1. Stretch down: Keep knees slightly flexed and your body slowly bent forward, relax
your back and shoulders, touch your toes with your hands as much as possible, and
keep for 10~15 seconds, then relax. Repeat 3 times.
2. Foot tendon stretch: Sit on a clean seat cushion, straighten one leg and keep the
other leg inward to fit the inner side of the straight leg. Try to touch your toes with
your hands for 10 to 15 seconds, then relax. Repeat 3 times for each leg.
3. Stretch the calves and Achilles tendon: Stand close to a wall with your hands on it, with
one foot behind, keep the back leg upright and heels touching the ground, incline to
the wall and keep for 10 to 15 seconds, then relax. Repeat 3 times for each leg.
4. Stretch the quadriceps: Balance yourself with the left hand holding a wall or a desk,
then extend your right hand backwards, grab your right heel and slowly pull it to your
buttocks until you feel the muscles on the front of the thighs in tension, keep for 10 to
15 seconds, then relax. Repeat 3 times for each leg.
5. Stretch the sartorius muscle (muscle inside the thigh): Keep the soles opposite and
sit with the knees outwards. Grasp your feet with your hands and pull in the direction
of your groin, keep for 10 to 15 seconds, then relax. Repeat 3 times.
Storing your Walkslim Mini Walk 670
• The maximum ground clearance is 9cm and the minimum is 4.5cm so you can easily
store the treadmill under a bed/coach or other places that are suitable for its size
(L145 x W62 x H9cm)
• If you prefer to store it upright, the WalkSlim Mini Walk 670 comes with a magnetic
base which holds up to 110kg.
• Magnets are fitted at the end of the footrails. Place the round steel discs (which
are provided) in a suitable position on the wall where you would like to store it, the
magnets will join when out together ensuring the WalkSlim Mini Walk 670 is safely in
position against the wall.
11
IT

Maintenance
Daily Maintenance
• Regular comprehensive cleaning will extend the life of your WalkSlim Mini Walk 670
• Always turn the power off at the power outlet and make sure there is no moisture
before daily cleaning and maintenance.
• Clean dust out regularly and ensure the exposed parts of the tread belt are clean.
• Wear clean sports shoes to avoid any dust or impurities getting into the tread belt
and board.
• Use a damp cloth with soap or detergent to clean the tread belt. Do not use excessive
water and avoid leakage to the electrical parts.
• Disconnect the power cord when the WalkSlim Mini Walk 670 will not be used for a
long time.
• Do not store the treadmill in the bathroom or outside and avoid areas with a lot of
moisture.
Troubleshooting
The treadmill
is not working
• Make sure the power cord is properly secured into the power
outlet and that the switch is turned to the ‘ON’ position.
• Check the Safety Lock is in the correct position.
• Ensure you are completing the three steps forward procedure
to start your Walkslim Mini Walk 670, as explained on Page 8
of this manual.
• Ensure you are not starting too slowly. The interval between
steps cannot be longer than 1.5 seconds and must be
continuous.
• Ensure the Walkslim Mini Walk 670 is not in sleep mode.
• Ensure you have not been using the Walkslim Mini Walk
670 for more than 100 minutes continuously. It will stop
automatically after this time.
The tread belt
is not working
• Insufficient lubrication. Add silicone oil lubricant.
• Tread belt is too tight. This will reduce motor performance
and increase wear of rollers and tread belt. Adjust tread belt
tightness to the correct tension. The tread belt should be able
to be lifted from the base by about 5-7.5cm by hand.
IT
12

The tread belt
is slipping
Tread belt is too loose or too tight. Adjust the tread belt tightness
to the correct tension. The tread belt should be able to be lifted
from the base by about 5-7.5cm by hand. If you observe there
are occassional pauses as you are walking normally, it means the
belt has become loose. Over time the tread belt will loosen due to
wear or stretching and an adjustment must be made.
The Treadmill
will not speed
up slow down
Please call our Customer Service Centre on
1800 802 924.
The Display
Screen does
not work
Please call our Customer Service Centre on
1800 802 924.
The Treadmill
is losing speed
Add lubricant oil to the underside of the tread belt as per
instructions on page 7 of this manual.
Display Screen
is on but the
Treadmill does
not start
The treadmill has not been started according to the instructions
on pages 7-11 of this manual. If the treadmill still does not start
please call our Customer Service Centre on 1800 802 924.
Unreadable
/ Incoherent
Display Screen
Motor is overheating. Turn the power off, unplug and leave for one
hour then restart. If it does not restart please call our Customer
Service Centre on 1800 802 924.
The belt is
running to
the left
4. Turn the right screw clockwise or the left screw anticlockwise
by half a turn using the allen key. Start the WalkSlim Mini
Walk 670 to check the new position of the belt.
5. If the belt is still not in the middle repeat the action until
adjusted to a central middle position.
6. After adjusting the belt to the middle, start the WalkSlim Mini
Walk 670, set to the maximum speed and observe the tread
belt to ensure that is running smoothly. If it’s not centralised,
then repeat the adjustment steps again.
Tread belt adjustment holes
13
IT

The belt is
running to
the right
1. Turn the left screw clockwise or the right screw anticlockwise
by half turn using the Allen key. Start the WalkSlim Mini Walk
670 to check the new position of the belt.
2. If the belt is still not in the middle repeat the action until
adjusted to a central middle position.
3. After adjusting the belt to the middle, start the WalkSlim Mini
Walk 670, set to the maximum speed and observe the tread
belt to ensure that is running smoothly. If it’s not centralised,
then repeat the adjustment steps again.
The belt is
skidding
Turn the left and right screw half a turn clockwise at the same
time and then repeat the adjustment until running normally. Do
not tighten the screw excessively.
Error Messages
E0 Power Supply Issue Unplug the WalkSlim Mini Walk 670, leave for
several minutes and then restart. If it does not
restart please
call our Customer Service Centre on
1800 802 924.
E02 Motor fan is damaged /
motor is overheating
Turn the power off, unplug and leave for one
hour then restart. If it does not restart please
call our Customer Service Centre on
1800 802 924.
E05 Weight is overloaded Follow instructions for the maximum weight
limit (110kgs) and do not overload.
Running belt is too dry Add lubricant into the underside of the tread
belt (Please refer to the instructions on page
7 of this manual)
The motor is wearing
out
Please call our Customer Service Centre on
1800 802 924.
E06 High Current Detected Add lubricant into the underside of the tread
belt (Please refer to the instructions on page
7 of this manual).
IT
14

ABODEFIT HEALTH™ WALKSLIM MINI WALK WARRANTY
Warranty Period: Lifetime Frame, 5 Years Motor, 2 Years Parts & Labour. Vitality 4 Life are the warranty
providers for AbodeFit Health™ products. Vitality 4 Life warrant this product to be free from defects in
materials and workmanship while in normal domestic use for a period of five years on the motor and two
years on other parts (with the exception of a life warranty on the frame) from the original date of purchase.
DO NOT RETURN THE PRODUCT TO THE STORE.
LODGING A WARRANTY CLAIM
Should you experience any issues with your product, please
follow these steps to lodge a warranty claim:
1. Contact your local Vitality 4 Life Service Centre with the
following details:
– Your warranty details including name, email and phone
number
– Product name and model number
– Product serial number, found on the rating label of the
product
– Explanation of how the damage occurred
– Photos of the damage or issue is highly beneficial to
expediting your claim
2. Vitality 4 Life will assess your claim and respond within
24-48 hours.
3. In the event the product is required to be sent to the
Service Centre, the customer is liable for all packing,
freight and insurance costs for transit of the product to
Vitality 4 Life. Subject to the applicable consumer laws in
your jurisdiction.
4. If the product, or one of its parts, qualifies for replacement
or service within the 30-Day period after date of purchase,
Vitality 4 Life will arrange the shipping at no cost to you.
5. Any product sent to a Vitality 4 Life Service Centre must
include a Return Authorization Form. Failure to include this
form may result in the product being rejected from our
warehouse or a delayed service time.
6. Vitality 4 Life will contact you with a quote prior to
undertaking any service work outside of the warranty
coverage.
7. Typical turn-around times to address warranty claims
can be between 10-14 business days, plus shipping,
depending on location and type of damage or warranty
claim.
TERMS OF PRODUCT WARRANTY COVERAGE
Vitality 4 Life provides the Product Warranty coverage
as further described below and limited to the terms and
conditions hereof:
1. If the Product exhibits a defect while in normal domestic
use, within the warranty period; we will, at our option,
either repair or replace the product or defective part free
of charge. The Product must be delivered by insured mail,
in proper packaging to your Service Centre as indicated
on the back of the manual as a condition to any warranty
service obligation.
2. In the event that the warranty period for a product has
expired, or if a Product does not qualify for warranty
service, repair or replacement, consumers may still buy
replacement parts or have products repaired by one of
Vitality 4 Life’s Service Centres. Please contact Vitality 4
Life for further information.
3. Do not send the product back to the Service Centre
without a Return Authorization Form.
4. In no event shall our liability exceed the retail value of the
product. We make no warranty with respect to parts, from
a source other than Vitality 4 Life.
5. In the event that warranty parts or products are provided,
the customer must cover the related shipping costs to
receive goods.
6. All exchanged or substitute parts and products replaced
under warranty service will become the property of Vitality
4 Life. Repaired or replaced products or parts thereof
will be warranted by Vitality 4 Life for the balance of the
original warranty period.
7. (Australia only) Our goods come with guarantees that
cannot be excluded under the Australian Consumer
Law. You are entitled to a replacement or refund for a
major failure and compensation for any other reasonably
foreseeable loss or damage. You are also entitled to have
the goods repaired or replaced if the goods fail to be of
acceptable quality and the failure does not amount to a
major failure.
WARRANTY DOES NOT COVER
1. Damage, accidental or otherwise, to the Product, not
caused by direct defect in factory workmanship or
materials.
2. Damage due to abuse, mishandling, alteration, misuse,
commercial service, tampering, accident, failure to follow
care, operating and handling provisions indicated in the
instructions.
3. Damage caused by parts or service not authorized or
performed by Vitality 4 Life.
4. ‘Normal’ wear and tear that naturally and inevitably occurs
as a result of normal use or aging.
5. Some states do not allow the exclusion or limitation of
incidental or consequential damages. Therefore, the above
limitations may not apply to you in the case of damage
in shipment. If your product was damaged in shipment:
Immediately report this type of damage to the parcel
carrier and have them file an inspection report to contact
the distributor from whom you purchased the product for
further instructions.
6. You have rights and benefits under the consumer laws
in your jurisdiction. Without detracting from these rights
or benefits, Vitality 4 Life excludes all liability in respect
of this product for any other loss which is not reasonably
foreseeable from a failure of this product, which may
include liability for negligence, loss of expenditure
associated with the product and loss of enjoyment.
15
IT

Support & Service Centres
Contact your local distributor for warranty & service
Vitality 4 Life – Australia & New Zealand
W: www.vitality4life.com.au
Vitality 4 Life – United Kingdom
W: www.vitality4life.co.uk
Vitality 4 Life - United States
W: www.vitality4life.com
Vitality 4 Life – France
E: support@vitality4life.fr
W: www.vitality4life.fr
Vitality 4 Life – Deutschland
W: www.vitality4life.de
Vitality 4 Life – Italia
E: servizioclienti@vitality4life.it
W: www.vitality4life.it
Vitality 4 Life – España
E: atencioncliente@vitality4life.es
W: www.vitality4life.es
Vitality 4 Life – Netherlands
E: info@vitality4life.co.nl
W: www.vitality4life.co.nl
Other manuals for WalkSlim Mini Walk 670
1
Table of contents
Languages:
Other AbodeFit Treadmill manuals

AbodeFit
AbodeFit WalkSlim 470 User manual

AbodeFit
AbodeFit WalkSlim 540 User manual

AbodeFit
AbodeFit WalkSlim Mini Walk 670 User manual

AbodeFit
AbodeFit WalkSlim 830 User manual

AbodeFit
AbodeFit WalkSlim WalkPad 630 User manual

AbodeFit
AbodeFit WalkSlim 610 User manual

AbodeFit
AbodeFit WalkSlim 920 User manual

AbodeFit
AbodeFit WalkSlim 810 User manual

AbodeFit
AbodeFit WalkSlim 410 User manual