ABSINA 52-230-1002 User manual

Part no.: 52-230-1002
OPERATING MANUAL
EV CHARGING CABLE
MODE 2 |max. 3.7kW
8A –10A –13A –16A

HINWEIS
Dieses Ladekabel verfügt über einen
Lademodus mit 13A und 16A Ladestrom.
Diesen Lademodus nur verwenden,
wenn die verwendete Netzsteckdose
von einer Fachkraft für einen 13A oder
16A Dauerstrom als geeignet erklärt
wurde.
Deutsch . English . Français . Español . Italiano

Bedienungsanleitung beachten!
Nicht direkter Sonneneinstrahlung aussetzen!
BESTIMMUNGSGEMÄSSERGEBRAUCH
Das Kabel ausschließlich zum Laden von Elektro-und
Hybridfahrzeugen mit Wechselstrom (AC) an haus-
haltsüblichen Netzsteckdosen mit 16ABelastbarkeit
verwenden.Das Ladekabel darf nur zusammen mit
normgerechten und dafür vorgesehenen Fahrzeug-
Inlets nach IEC 62196-2 (Typ 2Stecker) eingesetzt
werden.
Die Einhaltung aller Angaben in dieser Bedienungs-
anleitung gehören ebenso zur bestimmungsgemäßen
Verwendung.Jede darüberhinausgehende oder
andersartige Benutzung gilt als Fehlgebrauch und kann
zu gefährlichen Situationen führen.Für Schäden bei
nicht bestimmungsgemäßer Verwendung haftet der
Benutzer.
SICHERHEITSHINWEISE
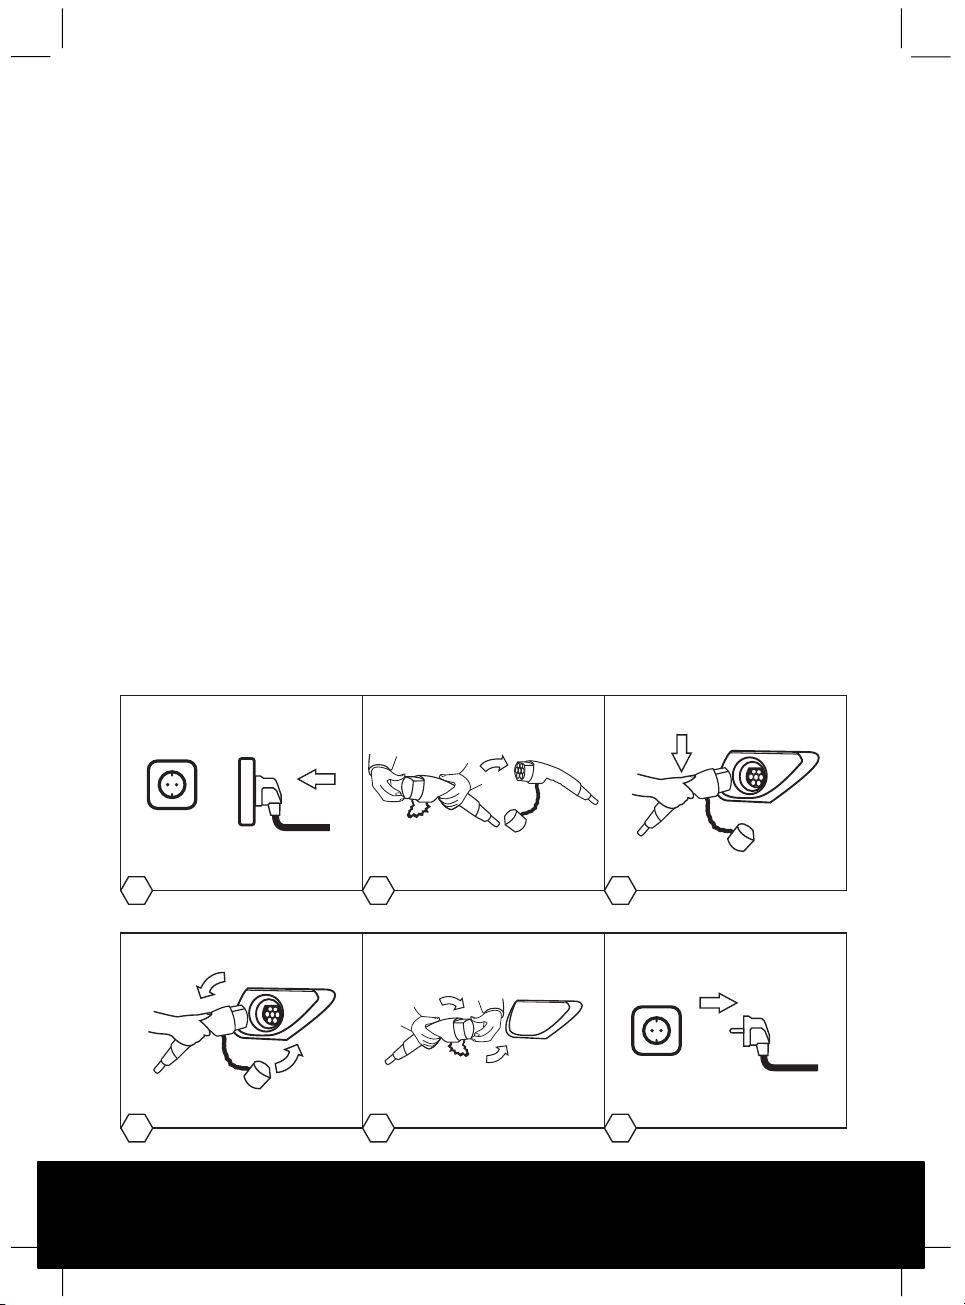
•Nur an fehlerfreie und geeignete Infrastruktur an-
schließen (Netzsteckdose 16A).Im Zweifelsfall durch
eine Fachkraft auf Tauglichkeit prüfen lassen.
Darauf achten, dass die Sicherung nicht überlastet
wird und keine anderen Verbraucher auf diese
Sicherung geschaltet sind.
•Ein unsachgemäßer Umgang mit dem Ladekabel
kann Explosionen, Stromschläge und Kurzschlüsse
verursachen.Allgemein gültigen Sicherheitsvor-
kehrungen und die Hinweise beachten.
•Vor jeder Benutzung das Ladekabel und die
Kontakte auf Schäden und Verschmutzung prüfen.
•Niemals mit einem beschädigten Ladekabel, einem
Fahrzeug-Inlet,einer Kontrollbox oder einer
beschädigten Haushaltssteckdose laden.
•Niemals mit Kontakten, die verschmutzt oder feucht
geworden sind, laden.
•Stecker niemals mit Gewalt abziehen. Gefährliche
Lichtbögen können zum Tod oder schweren
Verletzungen führen.
Deutsch . English . Français . Español . Italiano
WILLKOMMEN
Vielen Dank für den Kauf Ihres neuen ABSINA EV
Ladekabels Mode 2. Mithilfe der Bedienungsanleitung
können Sie die Funktionen Ihres Ladekabels optimal
nutzen.Wir wünschen Ihnen viel Freude mit Ihrem
neuen Ladekabel.
Ihr ABSINA-Team.
SYMBOLERKLÄRUNG
Das Produkt entspricht den Anforderungen
der EU-Richtlinie.
Das Produkt nicht in den Hausmüll werfen!
Das Produkt über einen zugelassenen Ent-
sorgungsbetrieb oder über die kommunale
Entsorgungseinrichtung entsorgen. Aktuell
geltenden Vorschriften beachten.Im Zwei-
felsfall mit der Entsorgungseinrichtung in
Verbindung setzen.
Achtung! Eine gefährliche Situation kann
eintreten,wenn die Maßnahmen nicht
eingehalten werden. Gefahr von Tod,
schweren Verletzungen und Verbrennungen!
Keine Verwendung von Ladekabeln, die an
Gehäuse, Stecker oder Leitung beschädigt sind!
Keine Verlängerungskabel jeglicher Art
verwenden!
Keine Mehrfachsteckdosen verwenden!
Keine Reiseadapter verwenden!
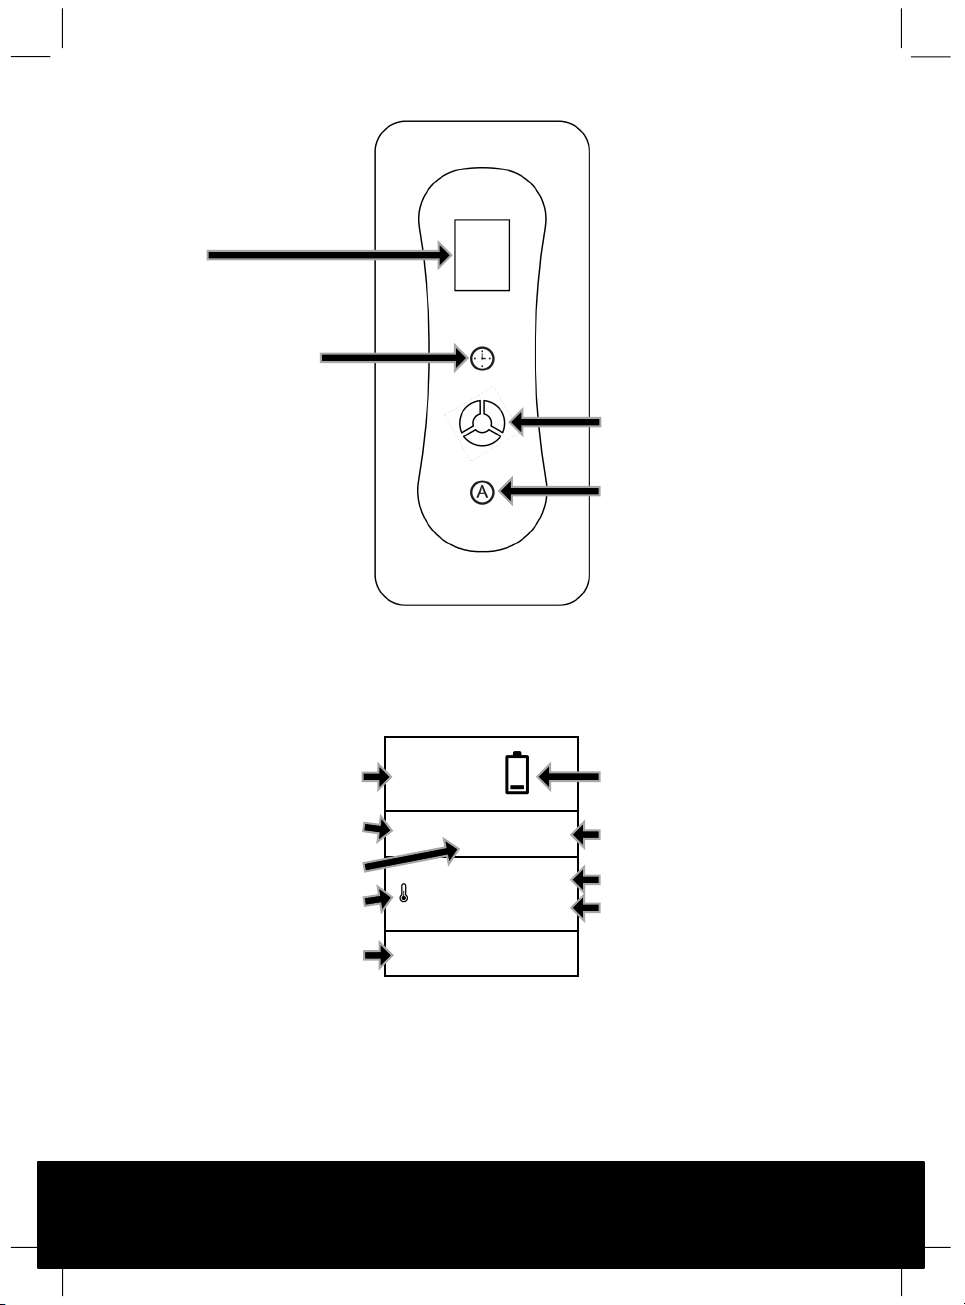
Fahrzeugkupplung Typ 2

SchuKo
Typ2 auf Typ2
123
32
1
A
RFID
WALLBOX
32
1
WALLBOX
A
RFID
32
1
•Das Ladekabel nur an Fahrzeug-Inlets und Haus-
haltssteckdosen anschließen, die vor Wasser, direkt-
er Sonneneinstrahlung, Feuchtigkeit und anderen
Flüssigkeiten geschützt sind.
•Es gibt Elektrofahrzeuge, die ein Starten des
Fahrzeuges mit gestecktem Ladekabel erlauben.
Immer darauf achten, das Ladekabel vor dem Los-
fahren zu lösen.
•Das Ladekabel nicht mit einem Verlängerungskabel
oder einem Adapter verwenden.Modifikationen oder
Veränderungen sind lebensgefährlich und führen
zum sofortigen Ausschluss der Gewährleistung.
•Falls die Steckverbindung raucht oder schmilzt,
niemals das Ladekabel anfassen.Wenn möglich,
den Ladevorgang abbrechen.Die betreffende
Netzsteck-dose stromlos schalten (Sicherung, FI,
Schalter).
•Darauf achten,dass das Ladekabel für Kinder nicht
zugänglich ist.Nur Personen mit einer gültigen
Fahrerlaubnis für Kraftfahrzeuge dürfen das Lade-
kabel bedienen.
•Das Kabel nur im geschützten Außenbereich ein-
setzen.
Ladevorgang beginnen
Ladevorgang beenden
BEDIENUNG
1. Die Anleitung des Ladekabels und des Fahrzeuges
vollständig und sorgfältig durchlesen.
2. Den Fahrzeugmotor abstellen und den Schalthebel
auf Parken stellen.
3. Den Netzstecker des Ladekabels mit einer ge-
eigneten Steckdose (230V16A) verbinden.
4. Das Leuchten der grünen LED signalisiert die
Ladebereitschaft.
5. Die Schutzkappe vom Ladestecker ziehen den
Stecker mit der Ladebuchse des Fahrzeuges ver-
binden.
6. Der Ladevorgang startet automatisch, sobald die
blaue LED anfängt zu blinken.
7. Der Ladevorgang ist beendet, wenn die grüne LED
und die blaue LED dauerhaft leuchten.
8. Bei Beendung des Ladevorgangs den den Lade-
stecker aus der Ladebuchse des Fahrzeuges ziehen
und anschließend den Netzstecker aus der Netz-
steckdose (Fahrzeug muss entriegelt sein) ziehen.
9. Die Schutzkappe auf den Ladestecker stecken und
das Kabel knickfrei aufrollen.
SchuKo
Typ2 auf Typ2
123
32
1
A
RFID
WALLBOX
32
1
WALLBOX
A
RFID
32
1
Deutsch . English . Français . Español . Italiano

BEDIENELEMENTE
LCD LADESTATUSANZEIGE
10A
Ready
230V 0.0kW 00A
00:00:00
0.000kWh
25°C
Sensortaste A
Durch mehrmaliges Berühren der
Taste wird der Ladestrom eingestellt.
Die Ladestromanzeige wechselt
hierbei zwischen 8A-10A-13A-16A.
Der Ladestrom kann während des
Ladevorgangs nicht umgestellt
werden.
Sensortaste Zeit
Über die Sensortaste kann die
Startzeit des Ladevorgangs
stundenweise von 1h bis 10h
eingestellt werden, falls der
Ladevorgang nicht sofort
gestartet werden soll.
LCD Display
LED Anzeige
Eingestellter Ladestrom in A Ladeanzeige
Aktueller Ladestrom in A
Versorgungsspannung in V
Gerätetemperatur in °C
Aktuelle Ladeleistung in kW
Statusanzeige
Zeiteinstellung
Eingeladene Energie in kWh
Deutsch . English . Français . Español . Italiano

LED ROT BESCHREIBUNG ERKLÄRUNG
Standby Ruhemodus.
Kontaktiert Ladekabel ist mit dem Fahrzeug verbunden.
Ladevorgang Akku wird aufgeladen.
Ladevorgang
beendet Akku ist voll aufgeladen.
Selbsttest Fehler
Die Kontrollbox kann keine Kommunikation mit dem Fahrzeug aufbauen.Die Steck-
verbinder auf korrekten Sitz überprüfen und im stromlosen Zustand auf Verschmutzung
überprüfen.Kann der Fehler nicht behoben werden, das Ladekabel zur Überprüfung an
den Hersteller senden.
Unterspannung Die Versorgungsspannung liegt außerhalb des Toleranzbereiches.Netzspannung
überprüfen.
Überspannung Die Versorgungsspannung liegt außerhalb des Toleranzbereiches.Netzspannung
überprüfen.
Fehlerstrom Die Kontrollbox erkennt einen Fehlerstrom.Ladevorgang abbrechen, Ladekabel vom
Fahrzeug trennen und Verkabelung /Fahrzeug überprüfen.Fachwerkstatt aufsuchen.
Überstrom Der Ladestrom liegt über dem Maximalwert.Ladevorgang abbrechen und Kompatibilität
des Ladekabels überprüfen.
Überhitzung
Die Kontrollbox ist überhitzt.Dies kann z.B. durch direkte Sonneneinstrahlung während
des Ladevorganges entstehen.Der Ladevorgang wird unterbrochen.Nach Abkühlung
startet der Ladevorgang automatisch.
PE Fehler Die Kontrollbox erkennt einen Fehler in der PE Leitung.Netzsteckdose /Netzanschluss
überprüfen.
= AN = BLINKT
FEHLERMEDLUNG
Das Ladekabel verfügt über mehrere Überwachungsfunktionen, welche durch die LEDs angezeigt werden.
= AUS
LED
GRÜN
LED
BLAU
2x
3x
4x
5x
6x
7x
Deutsch . English . Français . Español . Italiano

TECHNISCHE DATEN
Input:
220
-240V AC 50Hz
Ladestecker:
IEC62196
-2 Typ 2
Netzsteckdose
:
Schuko
Typ E & F
RCD:
30mA AC
Nennleistung:
max.
3.7kW
Output:
8A
–10A –13A –16A
Anzahl
Phasen:
1
-phasig
Kontaktwiderstand:
≤0.3m
Ω (L/N)
Isolationswiderstand:
500M
Ω (1.000V AC)
Hoc
hspannungs-
festigkeit:
2
.600V AC
K
ontakttemperatur-
anstieg:
≤50K
Lademodus:
IEC
62196-2, IEC 61851-1
Betriebsfeuchtigkeit:
5%
-95% nicht kondensierend
Schutzklasse:
IP55 (Fahrzeugstecker in
gestecktem
Zustand)
IP54
(Kontrollbox)
Brennbarkeitsklasse:
UL94
V-0
Schutzfunktionen:
Überspannungs
-,
Unterspannungs
-, Überlade-
und
Überhitzeschutz (Laden bei
+85
°C unterbrechen,
fortsetzten
bei 55°C),
Fehlerstrom,
PE-Kontrolle
Abziehungskraft:
45N…80N
Steckzyklen:
≥10
.000x (Lastfrei)
A
bmessungen
Kontrollbox:
240x107x61mm
Betriebstemperatur:
-
20°C...+50°C
Kabel:
5+1
mLänge, 3*2.5mm2+0.75mm
2
Gewicht:
2
.100g
LADEDAUER
Die Dauer des Ladevorgangs ist abhängig von der
Kapazität,vom Ladezustand der Hochvoltbatterie des
Fahrzeuges und von der zulässigen Ladeleistung des
Ladekabels und der Netzsteckdose.Der Ladestrom
(max.16A) wird durch das Fahrzeug reguliert (Lade-
leistung kann variieren).Bei sehr niedrigen und sehr
hohen Temperaturen kann die Ladeleistung be-
einträchtigt werden.
REINIGUNG UND LAGERUNG
Kabel nur reinigen, wenn es nicht am Fahrzeug und
nicht an der der Steckdose angeschlossen ist.
Ladekabel und die verschmutzten Kontakte nur mit
einem trockenen Tuch reinigen.Niemals scharfe
Reinigungsmittel, Wasser-oder Dampfstrahlreiniger
verwenden.Das Produkt niemals in Flüssigkeiten
eintauchen.Das Ladekabel mit aufgesteckten Schutz-
kappen an einem trockenen und sauberen Ort
aufbewahren.
HINWEISE ZUM UMWELTSCHUTZ
Informationen nach dem Elektrogesetz (ElektroG):
Seit dem 24.März 2006 dürfen alte Elektrogeräte nicht
über den Hausmüll entsorgt werden.Diese Elektro-
und Elektronikgeräte sind durch die durchgestrichene
Mülltonne gekennzeichnet.Besitzer von Altgeräten aus
privaten Haushalten können diese bei den Sammel-
stellen der öffentlich-rechtlichen Entsorgungsträger
oder bei den von Herstellern oder Vertreibern im Sinne
des ElektroG eingerichteten Rücknahmestellen abge-
ben.
GARANTIE
Auf das Produkt besteht 2Jahre Garantie.Bei
Schäden,die infolge Nichtbeachtung der Bedienungs-
anweisung entstehen, kann keine Garantie gewährt
werden.
Deutsch . English . Français . Español . Italiano

NOTE
This charging cable has a charging
mode with 13A and 16A charging current.
Only use this charging mode if the mains
socket used has been declared suitable
for a 13A or 16A continuous current by a
specialist.
Deutsch . English . Français . Español . Italiano

Follow the operating instructions!
Do not expose to direct sunlight!
INTENDED USE
Use the cable exclusively for charging electric and
hybrid vehicles with alternating current (AC) at
household mains sockets with 16Aload capacity.The
cable may only be used in conjunction with
standardised and designated vehicle inlets according
to IEC 62196-2 (type 2plug).
Compliance with all the information in these operating
instructions is also part of the intended use.Any other
use or use beyond this is considered misuse and can
lead to dangerous situations.The user is liable for any
damage caused by improper use.
SAFETY INSTRUCTIONS
•Only connect to afault-free and suitable
infrastructure (16Amains socket).If in doubt,have a
specialist check the suitability.Make sure that the
fuse is not overloaded and that no other loads are
connected to this fuse.
•Improper handling of the charging cable can cause
explosions,electric shocks and short circuits.
Observe the generally applicable safety precautions
and the instructions.
•Before each use,check the charging cable and the
contacts for damage and dirt.
•Never charge with adamaged charging cable,vehicle
inlet,control box or household socket.
•Never charge with contacts that have become dirty
or damp.
•Never pull off the plug by force.Dangerous electric
arcs can cause death or serious injury.
Deutsch . English . Français . Español . Italiano
WELCOME
Thank you for purchasing your new ABSINA EV charging
cable mode 2. With the help of the operating
instructions,you will be able to use the functions of
your charging cable optimally.We hope you enjoy using
your new charging cable.
Your ABSINA team.
EXPLANATION OF SYMBOLS
The product complies with the requirements
of the EU Directive.
Do not dispose of the product in household
waste!Dispose of the product at an
authorised waste disposal company or at a
municipal waste disposal facility.Observe
the currently valid regulations.In case of
doubt,contact the disposal facility.
Attention! Adangerous situation may occur
if the measures are not observed.
Risk of death,serious injury and burns!
Do not use charging cables that are damaged at
the housing,plug or cable!
Do not use extension cables of any kind!
Do not use multiple sockets!
Do not use travel adapters!
Vehicle coupling type 2

SchuKo
Typ2 auf Typ2
123
32
1
A
RFID
WALLBOX
32
1
WALLBOX
A
RFID
32
1
•Only connect the charging cable to vehicle inlets and
household sockets that are protected from water,
direct sunlight,moisture and other liquids.
•Some electric vehicles allow the vehicle to be started
with the charging cable plugged in.Always make
sure to disconnect the charging cable before driving
off.
•Do not use the charging cable with an extension
cable or an adapter.Modifications or alterations are
dangerous to life and will immediately void the
warranty.
•If the plug connection smokes or melts,never touch
the charging cable.If possible, stop the charging
process.Disconnect the relevant mains socket from
the power supply (fuse,FI, switch).
•Make sure that the charging cable is not accessible
to children.Only persons with avalid driving licence
for motor vehicles may operate the charging cable.
•Only use the cable in protected outdoor areas.
Start charging
End charging
OPERATION
1. Read the instructions for the charging cable and
the vehicle completely and carefully.
2. Switch off the vehicle engine and put the gear
lever in park.
3. Connect the mains plug of the charging cable to a
suitable socket (230V16A).
4. The green LED lights up to indicate that the vehicle
is ready for charging.
5. Remove the protective cap from the charging plug
and connect the plug to the vehicle's charging
socket.
6. The charging process starts automatically as soon
as the blue LED starts ashing.
7. Charging is complete when the green LED and the
blue LED light up continuously.
8. When the charging process is nished,pull the
charging plug out of the charging socket of the
vehicle and then pull the mains plug out of the
mains socket (vehicle must be unlocked).
9. Put the protective cap on the charging plug and
roll up the cable without kinks.
SchuKo
Typ2 auf Typ2
123
32
1
A
RFID
WALLBOX
32
1
WALLBOX
A
RFID
32
1
Deutsch . English . Français . Español . Italiano

OPERATING ELEMENTS
LCD CHARGING STATUS INDICATOR
10A
Ready
230V 0.0kW 00A
00:00:00
0.000kWh
25°C
Sensor button A
Touch the button several times to
set the charging current.
The charging current display
changes between 8A-10A-13A-16A.
The charging current cannot be
changed during the charging
process.
Sensor button Time
The sensor button can be used
to set the start time of the
charging process by the hour
from 1h to 10h, if the charging
process is not to be started
immediately.
LCD display
LED display
Set charge current in A Charge indicator
Current charge current in A
Supply voltage in V
Unit temperature in °C
Current charge power in kW
Status indicator
Time setting
Charged energy in kWh
Deutsch . English . Français . Español . Italiano

LED RED DESCRIPTION DECLARATION
Standby Sleep mode.
Normal connection Charging cable is connected to the vehicle.
Charging Battery is charging.
Charging
completed Battery is fully charged.
Failed self-test
The control box cannot establish communication with the vehicle.Check that the
connectors are correctly seated and check for dirt in the de-energised state.If the fault
cannot be rectified,send the charging cable to the manufacturer for inspection.
Low voltage The supply voltage is outside the tolerance range.Check the mains voltage.
Over voltage The supply voltage is outside the tolerance range.Check the mains voltage.
Leakage current The control box detects afault current.Stop charging,disconnect the charging cable
from the vehicle and check the wiring /vehicle.Visit aspecialist workshop.
Over current The charging current is above the maximum value.Stop charging and check the
compatibility of the charging cable.
Charger
overheated
The control box is overheated.This can be caused,for example,by direct sunlight during
the charging process.The charging process is interrupted.After cooling down, the
charging process starts automatically.
PE error The control box detects afault in the PE line.Check mains socket /mains connection.
= ON = FLASH
ERROR
The charging cable has several monitoring functions that are indicated by the LEDs.
= OFF
LED
GREEN
LED
BLUE
2x
3x
4x
5x
6x
7x
Deutsch . English . Français . Español . Italiano

TECHNICAL DATA
Input:
220
-240V AC 50Hz
Charging
plug:
IEC62196
-2 Type 2
Power socket
:
Schuko
Type E & F
RCD:
30mA AC
Rated
power:
max.
3.7kW
Output:
8A
–10A –13A –16A
Number
of phases:
1
-phase
Contact
resistance:
≤0.3m
Ω (L/N)
Isolation
resistance:
500M
Ω (1.000V AC)
High
voltage
strength
:
2
.600V AC
Contact
temperature
rise:
≤50K
Charging
mode:
IEC
62196-2, IEC 61851-1
Operating
humidity:
5%
-95% non condensing
Protection
class:
IP55 (
Vehicle plug in
mated
condition)
IP54
(Control box)
Flammability
class:
UL94
V-0
Protective
functions:
Overvoltage
, undervoltage,
overcharging
and overheating
protection
(charge at
+85
°C interrupt,
continue
at 55°C), residual
current
, PE control
Pull
-off force:
45N…80N
Plugging
cycles:
≥10
.000x (Load-free)
Dimensions
control
box:
240x107x61mm
Operating temperature:
-
20°C...+50°C
Cable
:
5+1
mlength,3*2.5mm2
+0.75mm2
Weight
:
2
.100g
LOADING TIME
The duration of the charging process depends on the
capacity,the state of charge of the vehicle's high-
voltage battery and the permissible charging power of
the charging cable and the mains socket.The charging
current (max.16A) is regulated by the vehicle (charging
power may vary). At very low and very high
temperatures,the charging performance may be
impaired.
CLEANING AND STORAGE
Only clean the cable when it is not connected to the
vehicle and not to the socket.Only clean the charging
cable and the dirty contacts with adry cloth.Never use
harsh cleaning agents,water or steam cleaners.Never
immerse the product in liquids.Store the charging
cable with the protective caps on in adry and clean
place.
ENVIRONMENTAL PROTECTION
Information according to the Electrical and Electronic
Equipment Act (ElektroG):
Since 24 March 2006,old electrical appliances may not
be disposed of with household waste.These electrical
and electronic appliances are marked with acrossed-
out dustbin.Owners of old appliances from private
households can dispose of them at the collection
points of the public waste management authorities or
at the take-back points set up by manufacturers or
distributors in accordance with the ElektroG.
WARRANTY
The product is guaranteed for 2years.No guarantee
can be given for damage resulting from non-
observance of the operating instructions.
Deutsch . English . Français . Español . Italiano

NOTE
Ce câble de charge dispose d'un mode
de charge avec un courant de charge de
13A et 16A. N'utilisez ce mode de charge
que si la prise de courant utilisée a été
déclarée adaptée à un courant continu
de 13A ou 16A par un spécialiste.
Deutsch . English . Français . Español . Italiano

Suivez les instructions d'utilisation !
Ne pas exposer àla lumière directe du soleil !
UTILISATION PRÉVUE
Utilisez le câble exclusivement pour charger les
véhicules électriques et hybrides en courant alternatif
(CA) sur des prises de courant domestiques d'une
capacité de charge de 16A. Le câble ne doit être utilisé
qu'en liaison avec des prises pour véhicules
normalisées et désignées conformément àla norme
CEI 62196-2 (fiche de type 2).
Le respect de toutes les informations contenues dans
ce mode d'emploi fait également partie de l'utilisation
prévue.Toute autre utilisation ou toute utilisation
dépassant ce cadre est considérée comme une
mauvaise utilisation et peut conduire àdes situations
dangereuses.L'utilisateur est responsable de tout
dommage causé par une utilisation inappropriée.
INSTRUCTIONS DE SÉCURITÉ
•Ne raccordez l'appareil qu'à une infrastructure
adaptée et sans défaut (prise de courant 16A).En cas
de doute,faites vérifier l'adéquation par un
spécialiste.Veillez àce que le fusible ne soit pas
surchargé et qu'aucune autre charge ne soit
connectée àce fusible.
•Une manipulation incorrecte du câble de charge peut
provoquer des explosions,des chocs électriques et
des courts-circuits.Respectez les mesures de
sécurité généralement applicables et les
instructions.
•Avant chaque utilisation,vérifiez que le câble de
charge et les contacts ne sont pas endommagés ni
encrassés.
•Ne chargez jamais avec un câble de charge,une
entrée de véhicule,un boîtier de commande ou une
prise domestique endommagés.
•Ne chargez jamais avec des contacts qui sont
devenus sales ou humides.
Deutsch . English . Français . Español . Italiano
BIENVENUE
Nous vous remercions d'avoir acheté votre nouveau
câble de charge ABSINA EV mode 2. A l'aide du mode
d'emploi,vous pourrez utiliser les fonctions de votre
câble de chargement de manière optimale.Nous vous
souhaitons une bonne utilisation de votre nouveau
câble de charge.
Votre équipe ABSINA.
EXPLICATION DES SYMBOLES
Le produit est conforme aux exigences de la
directive européenne.
Ne pas jeter le produit dans les ordures
ménagères !Déposez le produit auprès
d'une entreprise d'élimination des déchets
agréée ou d'un centre d'élimination des
déchets municipal.Respectez les
réglementations en vigueur.En cas de
doute,contactez le centre d'élimination.
Attention !Une situation dangereuse peut se
produire si les mesures ne sont pas
respectées.Risque de mort,de blessures
graves et de brûlures !
N'utilisez pas de câbles de charge endommagés
au niveau du boîtier,de la fiche ou du câble !
N'utilisez pas de rallonge,quelle qu'elle soit !
N'utilisez pas de prises multiples !
N'utilisez pas d'adaptateurs de voyage !
Type d'accouplement du véhicule 2

SchuKo
Typ2 auf Typ2
123
32
1
A
RFID
WALLBOX
32
1
WALLBOX
A
RFID
32
1
•Ne retirez jamais la fiche en forçant.Des arcs
électriques dangereux peuvent causer la mort ou
des blessures graves.
•Ne branchez le câble de charge qu'aux entrées du
véhicule et aux prises domestiques protégées de
l'eau,des rayons directs du soleil,de l'humidité et
d'autres liquides.
•N'utilisez pas le câble de charge avec une rallonge ou
un adaptateur.Les modifications ou altérations sont
dangereuses pour la vie et annulent immédiatement
la garantie.
•Si la connexion de la fiche fume ou fond,ne touchez
jamais le câble de chargement.Si possible, arrêtez le
processus de charge.Débranchez la prise
correspondante de l'alimentation électrique (fusible,
FI, interrupteur).
•Veillez àce que le câble de charge ne soit pas
accessible aux enfants.Seules les personnes
titulaires d'un permis de conduire valide pour les
véhicules àmoteur peuvent utiliser le câble de
chargement.
•N'utilisez le câble que dans des zones extérieures
protégées.
Commencez à charger
Fin de la charge
OPÉRATION
1. Lisez entièrement et attentivement les
instructions relatives au câble de charge et au
véhicule.
2. Coupez le moteur du véhicule et mettez le levier de
vitesse en position de stationnement.
3. Branchez la fiche secteur du câble de charge sur
une prise de courant appropriée (230V16A).
4. La LED verte s'allume pour indiquer que le véhicule
est prêt àêtre chargé.
5. Retirez le capuchon de protection de la fiche de
charge et connectez la fiche àla prise de charge
du véhicule.
6. Le processus de charge commence
automatiquement dès que la LED bleue commence
àclignoter.
7. La charge est terminée lorsque le voyant vert et le
voyant bleu s'allument en continu.
8. Lorsque le processus de charge est terminé,
retirez la fiche de charge de la prise de charge du
véhicule,puis retirez la fiche secteur de la prise
secteur (le véhicule doit être déverrouillé).
9. Mettez le capuchon de protection sur la fiche de
charge et enroulez le câble sans le plier.
SchuKo
Typ2 auf Typ2
123
32
1
A
RFID
WALLBOX
32
1
WALLBOX
A
RFID
32
1
Deutsch . English . Français . Español . Italiano

ÉLÉMENTS DE TRAVAIL
INDICATEUR D'ÉTAT DE CHARGE LCD
10A
Ready
230V 0.0kW 00A
00:00:00
0.000kWh
25°C
Bouton du capteur A
Appuyez plusieurs fois sur le bouton
pour régler le courant de charge.
L'affichage du courant de charge
change entre 8A-10A-13A-16A.
Le courant de charge ne peut pas
être modifié pendant le processus
de charge.
Bouton du capteur Temps
Le bouton du capteur peut être
utilisé pour régler l'heure de
début du processus de charge
par heure de 1h à 10h, si le
processus de charge ne doit pas
être lancé immédiatement.
Affichage LCD
Affichage LED
Régler le courant de charge en A Indicateur de charge
Courant de charge en A
Tension d'alimentation en V
Température unitaire en °C
Puissance de charge actuelle en kW
Indicateur d'état
Réglage de l'heure
Énergie chargée en kWh
Deutsch . English . Français . Español . Italiano

DESCRIPTIF DÉCLARATION
Standby Mode veille.
Connexion normale Le câble de charge est connecté au véhicule.
Chargement La batterie est en cours de chargement.
Chargement
terminé La batterie est entièrement chargée.
Échec de l'auto-
test
Le boîtier de commande ne peut pas établir la communication avec le véhicule.Vérifiez
que les connecteurs sont correctement mis en place et vérifiez l'absence de saleté à
l'état hors tension.S'il n'est pas possible de remédier au problème,envoyez le câble de
charge au fabricant pour contrôle.
Basse tension La tension d'alimentation est en dehors de la plage de tolérance.Vérifiez la tension du
réseau.
Surtension La tension d'alimentation est en dehors de la plage de tolérance.Vérifiez la tension du
réseau.
Courant de fuite
Le boîtier de commande détecte un courant de défaut.Arrêtez la charge,débranchez le
câble de charge du véhicule et vérifiez le câblage /le véhicule.Rendez-vous dans un
atelier spécialisé.
Surintensité Le courant de charge est supérieur àla valeur maximale.Arrêtez la charge et vérifiez la
compatibilité du câble de charge.
Le chargeur a
surchauffé
Le boîtier de commande est en surchauffe.Cela peut être causé,par exemple, par la
lumière directe du soleil pendant le processus de charge.Le processus de charge est
interrompu.Après refroidissement,le processus de charge démarre automatiquement.
Erreur PE Le boîtier de commande détecte un défaut dans la ligne PE.Vérifiez la prise de courant /
le raccordement au réseau.
= ON = FLASH
ERREUR
Le câble de chargement dispose de plusieurs fonctions de surveillance qui sont indiquées par les LED.
= OFF
LED
VERT
LED
BLEU
2x
3x
4x
5x
6x
7x
Deutsch . English . Français . Español . Italiano
LED ROUGE

DONNÉES TECHNIQUES
Entrée
:
220
-240V AC 50Hz
Prise de
charge:
IEC62196
-2 Type 2
Prise de courant:
Schuko
Type E & F
RCD:
30mA AC
Puissance
nominale:
max.
3.7kW
Sortie
:
8A
–10A –13A –16A
Nombre
de phases:
1
-phase
Résistance de
contact
:
≤0.3m
Ω (L/N)
Résistance à l'isolement
500M
Ω (1.000V AC)
Résistance à la
haute
tension:
2
.600V AC
Mode de
chargement:
IEC
62196-2, IEC 61851-1
Humidité
de
fonctionnement
:
5%
-95% sans condensation
Classe de
protection:
IP55 (
Fiche du véhicule
en
état accouplé)
IP54
(Boîte de contrôle)
Classe d'inflammabilité:
UL94
V-0
Fonctions
de
protection
:
Protection
contre la surtension
,
la
sous-tension, la surcharge
et
la
surchauffe (charge à
+85
°C interruption,
continue
à 55°C), courant
résiduel
, contrôle PE
Cycles
de
branchement:
≥10
.000x (Sans charge)
Dimensions
du
boîtier de
commande
:
240x107x61mm
Température
de
fonctionnement
:
-
20°C...+50°C
Câble
:
5+1m de
longueur,
3*2.5mm2+0.75mm2
Poids
:
2
.100g
TEMPS DE CHARGEMENT
La durée du processus de charge dépend de la
capacité,de l'état de charge de la batterie haute
tension du véhicule et de la puissance de charge
admissible du câble de charge et de la prise secteur.
Le courant de charge (max.16A) est régulé par le
véhicule (la puissance de charge peut varier). À des
températures très basses et très élevées,la
performance de charge peut être altérée.
NETTOYAGE ET STOCKAGE
Ne nettoyez le câble que lorsqu'il n'est pas connecté au
véhicule et pas àla prise.Nettoyez le câble de charge
et les contacts sales uniquement avec un chiffon sec.
N'utilisez jamais de produits de nettoyage agressifs,
d'eau ou de nettoyeurs àvapeur.Ne plongez jamais le
produit dans un liquide.Rangez le câble de chargement
avec les capuchons de protection dans un endroit sec
et propre.
PROTECTION DE L'ENVIRONNEMENT
Informations selon la loi sur les équipements
électriques et électroniques (ElektroG) :
Depuis le 24 mars 2006,les anciens appareils
électriques ne peuvent plus être jetés avec les ordures
ménagères.Ces appareils électriques et électroniques
sont marqués d'une poubelle barrée.Les propriétaires
de vieux appareils provenant de ménages privés
peuvent les déposer aux points de collecte des
autorités publiques de gestion des déchets ou aux
points de reprise mis en place par les fabricants ou les
distributeurs conformément àl'ElektroG.
GARANTIE
Le produit est garanti pendant 2ans.Aucune garantie
ne peut être accordée pour les dommages résultant du
non-respect du mode d'emploi.
Deutsch . English . Français . Español . Italiano

NOTA
Este cable de carga tiene un modo de
carga con una corriente de carga de 13A
y16A. Utilice este modo de carga sólo si
la toma de corriente utilizada ha sido
declarada adecuada para una corriente
continua de 13A o 16A por un
especialista.
Deutsch . English . Français . Español . Italiano
Table of contents
Languages:
Other ABSINA Cables And Connectors manuals