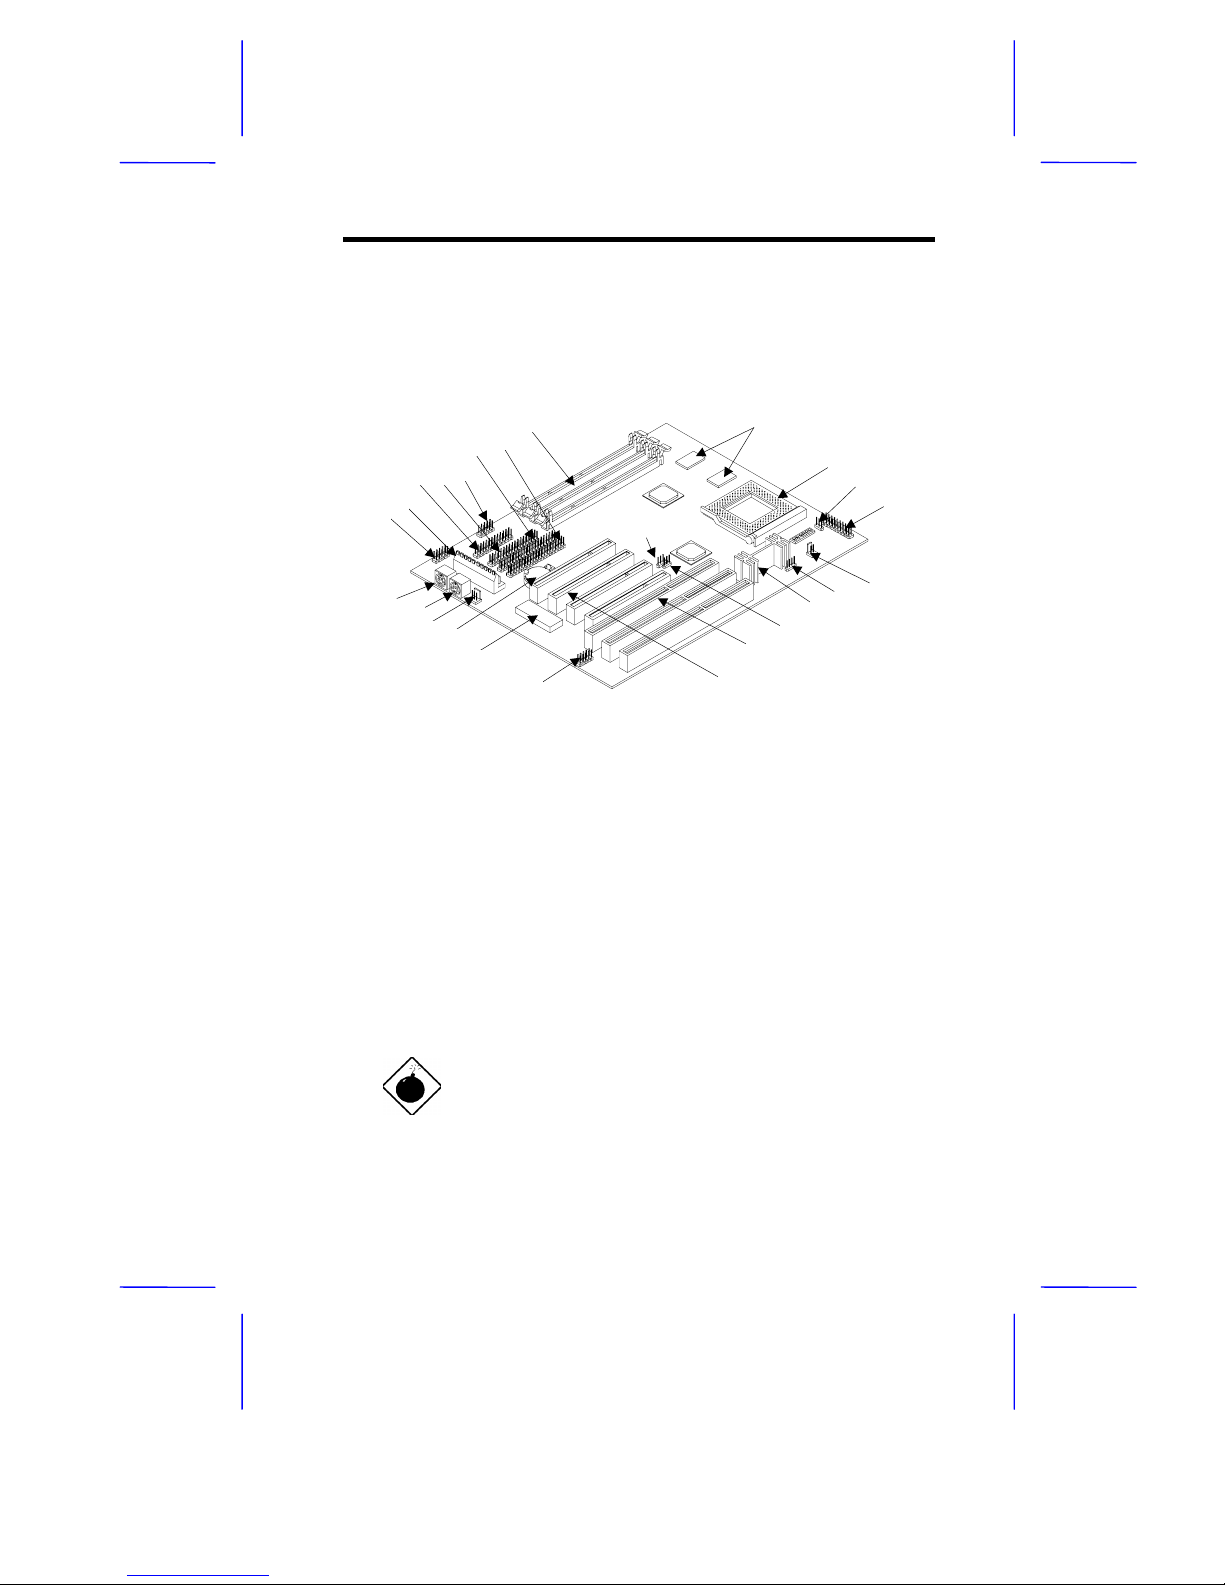
Acer V58 User manual

& K DSWHU
System Board
System Board 1-1
1.1 Features
The V58 is a Pentium-based system board that utilizes the PCI local
bus architecture. It supports Intel Pentium P54C/P55C, Cyrix M1/M2,
and AMD K5/K6 processors. It has three ISA and four PCI slots for
future expansion. The system memory is expandable to 192 MB via
three onboard 168-pin DIMM (double in-line memory module) sockets.
The board also comes with either 256- or 512-KB pipelined-burst
second-level cache.
Onboard I/O interfaces include two UART 16C550 serial ports, a
parallel port with Enhanced Parallel Port (EPP)/Extended Capabilities
Port (ECP) feature, PS/2 keyboard and mouse ports, and VGA port. A
Universal Serial Bus (USB) interface is added to the design to enable
the system to support more peripherals.
Other special features supported are Wireless communication,
Hardware monitoring and Wake-on ring-in functions. These features
are discussed in the later part of this chapter.
The system is fully compatible with Windows 95, Windows NT,
NetWare, MS-DOS v6.X, OS/2, and UNIX operating systems.

1-2 User’s Guide
1.2 Major Components
The system board has the following major components:
•A ZIF (zero insertion force) socket that supports 3.3V Intel
Pentium P54C/P55C processor running at 90/60, 100/66, 120/60,
133/66, 150/60, 166/66, 200/66, or 233/66 MHz. Also supports
Cyrix M1/M2 or AMD K5/K6 processor
•Three 168-pin DIMM sockets that accept SDRAMs with 16-, 32-,
64-, and 128-MB capacities (192-MB maximum system memory)
•256-KB or 512-KB pipelined-burst second-level cache
•Three ISA slots and four PCI slots for future expansion
•Enhanced PCI local bus IDE controller
•APM-compliant DMI BIOS
•Ultra I/O controller
•Two IDE interfaces capable of supporting a maximum of four IDE
devices
•Two 16C550 buffered serial connectors
•One SPP/ECP/EPP parallel connector
•USB interface
•IrDA interface
•Modem ring-in interface for Wake-on ring-in feature
•PS/2 mouse and keyboard interface

System Board 1-3
1.3 Layout
Figure 1-1 shows the board layout and the locations of the important
components.
1 COM1 connector 14 HDD LED connector
2 Power connector 15 Voltage regulator with heatsink
3 Parallel/Printer connector 16 InfraRed (IrDA) connector
4 Floppy disk drive connector 17 ISA slots
5 COM2 connector 18 PCI slots
6 IDE2 connector 19 USB connector
7 IDE1 connector 20 BIOS chip
8 DIMM sockets 21 Battery
9 Second-level cache 22 Resume Power connector
10 CPU socket 23 PS/2 mouse port
11 Power button connector 24 PS/2 keyboard port
12 Multifunction connector 25 Ring-in connector
13 2-pin fan connector
Figure 1-1 System Board Layout
The heatsink becomes very hot when the
system is on. NEVER touch the heatsink with
any metal or with your hands.
1 2
345
6789
10 11 12
13
14
15
16
17
18
19
20
21
23
24
22
25

1-4 User’s Guide
1.4 Jumpers and Connectors
1.4.1 Jumper and Connector Locations
Figure 1-2 shows the jumper and connector locations.
Figure 1-2 Jumper and Connector Locations
The shaded pin indicates pin 1.

System Board 1-5
1.4.2 Jumper Settings
The following tables list the jumper settings and their corresponding
functions:
Table 1-1 Jumper Settings
Jumper Setting Function
JP1 1-3, 2-4
3-5, 4-6 *
Power Supply Type
Traditional power supply
Resume power supply
JP4 1-2
2-3 *
L2 Burst Mode
Linear burst
Interleave / 1+4 mode
JP5 1-2
2-3
3-4 *
BIOS Programming Voltage
12V for MX2 2MB
5V for SST, ATMEL
Normal operation
JP7
JP9
JP10
1-2
3-4
5-6 *
1-2
3-4 *
1-2
2-3 *
Hardware Monitoring
Vcore
3.2V
2.9V
2.8V
VI/O
3.5V
3.3V
Thermal Event
Disabled
Enabled
JP8 1-3, 2-4
3-5, 4-6
CPU Type
Dual-voltage CPU (P55C)
Single-voltage CPU (P54C)
*Default

1-6 User’s Guide
Table 1-1 Jumper Settings (continued)
Jumper Setting Function
JP11 1-2 *
3-4
5-6
7-8
9-10
CPU Core Voltage
3.3V
2.8V
2.9V
3.2V
3.5V
S2 of SW1 On
Off
Boot Logo
OEM
Acer
S3 of SW1 On
Off
Password Check
Check password
Bypass password
Table 1-2 Host Bus Frequency Select
JP2 JP3 Host Bus
1-3, 2-4 3-5, 4-6 60 MHz
3-5, 4-6 * 3-5, 4-6 * 66 MHz *
1-3, 2-4 1-3, 2-4 75 MHz
3-5, 4-6 1-3, 2-4 83.3 MHz
Table 1-3 CPU/Host Bus Frequency Ratio
SW1 Switch No. Ratio
S4 S5
(BF1/X34
)
S6
(BF0/Y33) Intel M2 6x86L K6
Off Off Off 1.5/3.5 3.5 3 3.5
Off Off On 2 2 2
Off On On 2.5 2.5 2 2.5
OffOnOff3333

System Board 1-7
1.4.3 Onboard Connectors
Table 1-4 lists the onboard connectors.
Table 1-4 Onboard Connectors
Connector Function
CN1 COM1 connector
CN2 COM2 connector
CN3 AT keyboard connector (optional)
CN4 PS/2 keyboard port
CN5 PS/2 mouse port
CN6 Resume power connector
CN7 Main power connector
CN8 Printer/parallel connector
CN9 Floppy disk drive connector
CN10 IDE channel 2 connector
CN11 IDE channel 1 connector
CN12 Connector for clearing CMOS
CN13 WOL (wake-on LAN) connector
CN15 IrDA (InfraRed) connector
CN16 Modem ring-in connector
CN17 USB (Universal Serial Bus) connector
CN18 Power button connector
CN19 Multifunction connector
CN20 HDD LED connector
CN21 CPU fan connector
CN22 CPU fan and H/W monitoring connector

1-8 User’s Guide
1.4.4 Front Panel Connectors
The following figure shows the pin orientation of the front panel
connectors available on board:
Figure 1-3 Front Panel Connectors

System Board 1-9
1.5 Installation Precautions
Before you install any system component, we recommend that you
read the following sections. These sections contain important ESD
precautions, pre- and post installation instructions.
1.5.1 ESD Precautions
Electrostatic discharge (ESD) can damage your processor, disk drives,
expansion boards, and other components. Always observe the
following precautions before you install a system component.
1. Do not remove a component from its protective packaging until
you are ready to install it.
2. Wear a wrist grounding strap and attach it to a metal part of the
system unit before handling components. If a wrist strap is not
available, maintain contact with the system unit throughout any
procedure requiring ESD protection.
1.5.2 Pre-installation Instructions
Always observe the following before you install a system component:
1. Turn off the system power and all the peripherals connected to
the unit before opening it.
2. Open the system according to the instructions in the housing
installation manual.
3. Follow the ESD precautions in section 1.5.1 before handling a
system component.
4. Remove any expansion boards or peripherals that block access
to the DIMM sockets or CPU socket.
5. See the following sections for specific instructions on the
component you wish to install.

1-10 User’s Guide
Do not attempt the procedures described in
the following sections unless you are a
qualified service technician.
1.5.3 Post-installation Instructions
Observe the following after installing a system component:
1. See to it that the components are installed according to the step-
by-step instructions in their respective sections.
2. Make sure you have set all the required jumpers. See section
1.4.2. for the correct jumper settings.
3. Replace any expansion boards or peripherals that you removed
earlier.
4. Replace the system cover.
5. Connect the necessary cables and turn on the system.

System Board 1-11
1.6 Installing Memory
The system memory is upgradable to a maximum of 192 MB via three
168-pin DIMM sockets onboard. These DIMM sockets accept 16-,
32-, 64-, and 128-MB, 3.3V SDRAMs. See Figure 1-1 for the location
of the DIMM sockets. Section 1.6.1 tells how to install DIMMs.
Table 1-5 lists the possible memory configurations.
Table 1-5 Memory Configurations
DIMM1 DIMM2 DIMM3 Total Memory
16 MB 16 MB
16 MB 16 MB 32 MB
16 MB 16 MB 16 MB 48 MB
32 MB 32 MB
32 MB 32 MB 64 MB
32 MB 32 MB 32 MB 96 MB
64 MB 64 MB
64 MB 64 MB 128 MB
64 MB 64 MB 64 MB 192 MB
128 MB 128 MB
128 MB 32 MB 32 MB 192 MB
128 MB 64 MB 192 MB
The listed configurations are only some of
the available memory combinations. You
can use other combinations as long as
you follow the above rules for upgrading
memory.

1-12 User’s Guide
1.6.1 Installing a DIMM
Follow these steps to install a DIMM:
1. Align pin 1 of the DIMM with pin 1 of the socket. Pin 1 is labeled
1 on both of the DIMM and the socket.
2. Gently push the DIMM until the holding clips lock the DIMM into a
vertical position.
Figure 1-4 Installing a DIMM
Be careful when inserting DIMMs. Forcing a
DIMM in or out of a socket can damage the
socket or the DIMM (or both).
12

System Board 1-13
1.6.2 Removing a DIMM
To remove a DIMM:
1. Press the holding clips on both sides of the socket outward to
release the DIMM.
2. Gently pull the DIMM out of the socket.
Figure 1-5 Removing a DIMM
1.6.3 Reconfiguring the System
The system automatically detects the amount of memory installed.
Run Setup to view the new value for total system memory and make a
note of it.
1
2

1-14 User’s Guide
1.7 Second-level Cache
The board may come with either 256-KB or 512-KB pipelined-burst
second-level cache. Refer to the following table for the possible cache
configurations.
Table 1-6 Second-level Cache Configurations
Cache
Size Data RAM
(12 ns) Location Tag RAM
(12 ns) Cacheable
Memory
256 KB 32K x 32 x 2 pcs. U6, U7 32K x 8 x 1 pc 64 MB
512 KB 64K x 32 x 2 pcs. U6, U7 32K x 8 x 1 pc 64 MB
1.8 Upgrading the CPU
1.8.1 Removing the CPU
In case you want to replace or upgrade your CPU, you need to remove
the previously installed CPU first.
Follow these steps to remove the CPU:
1. Locate the CPU socket with CPU mounted on the system board.
2. Detach the fan cable connector.
3. Remove the fan and heatsink attached to the CPU.

System Board 1-15
Figure 1-6 Removing the Fan and Heatsink
4. Pull up the socket lever. The CPU pins will be automatically
released from the socket holes.
5. Detach the CPU from the socket.
Figure 1-7 Removing the CPU
45

1-16 User’s Guide
1.8.2 Installing the Upgrade CPU
Observe the ESD precautions when installing
components. See section 1.5.1.
Before you proceed, make sure that there is no CPU installed in the
CPU socket.
Follow these steps to install the upgrade CPU:
1. Pull up the socket lever.
2. Insert the CPU, making sure that pin 1 (indicated by a notched
corner) of the CPU connects to hole 1 of the socket.
3. Pull down the socket lever to lock the CPU into the socket.
Figure 1-8 Installing a CPU
notched corner
hole 1

System Board 1-17
5. Place the heatsink with fan on top of the CPU and attach the
spring clips to the socket flanges.
Figure 1-9 Attaching the Heatsink and Fan to the CPU
6. Plug the fan cable to the fan connector on the system board.
1.9 IDE Hard Disk Support
The system board supports four IDE hard disks, or any other IDE
devices, through the two onboard PCI IDE interfaces. See Figure 1-2
for the location of the IDE interfaces.
Follow the instructions in the housing installation manual on how to
install a hard disk in the system. Connect the cables according to the
IDE hard disk configuration in Table 1-7.
Table 1-7 IDE Hard Disk Configuration
IDE Connector Master Slave
IDE Channel 1 Hard disk 0 Hard disk 1
IDE Channel 2 Hard disk 2 Hard disk 3 /
IDE CD-ROM drive

1-18 User’s Guide
1.10 Expansion Cards
1.10.1 Installing the PCI Cards
To install PCI cards:
1. Locate the PCI slot(s) on the slot board.
2. Remove the bracket on the housing opposite to the empty PCI
slot.
3. Insert a PCI card into the slot. Make sure that the card is properly
seated.
4. Secure the card to the housing with a screw.
When you turn on the system, BIOS automatically detects and assigns
resources to the PCI devices.
Figure 1-10 Installing a PCI Card

System Board 1-19
1.10.2 Installing the ISA Cards
Both PnP and non-PnP ISA cards require specific IRQs. When
installing ISA cards, make sure that the IRQs required by these cards
are not previously assigned to PCI devices to avoid resource conflicts.
Follow these steps when installing ISA cards:
1. Remove all PnP cards installed in the system, if any.
2. Turn on the system, enter BIOS utility and set the Reset
Resource Assignments parameter to Yes to clear the resource
data assigned to the PnP devices. Refer to section 2.4.7.
3. Install non-PnP ISA cards.
4. Turn on the system.
5. Use Windows 95 or ICU to manually assign the appropriate IRQs
to the cards. This ensures that BIOS will not use the resources
assigned to the non-PnP ISA cards.
BIOS detects and configures only PnP cards.
6. Turn off the system.
7. Locate the expansion slots and install the PnP ISA and PCI cards.
8. Turn on the system. This time PnP BIOS automatically
configures the PnP ISA and PCI cards with the available
resources.

1-20 User’s Guide
Figure 1-11 Installing an ISA Card
1.11 USB
USB is a new serial bus design that is capable of cascading
low-/medium-speed peripherals (less than 12Mbps) such as keyboard,
mouse, joystick, scanner, printer and modem/ISDN. With USB,
complex cable connections at the back panel of your PC can be
eliminated.
See Figure 1-1 for the location of the USB interface on the system
board.
1.12 Wireless Communication Support
The system supports wireless communication via onboard infrared
interface (see Figure 1-2 for the location of the IrDA connector). This
feature enables the system to communicate with SIR-aware
peripherals without the aid of cables.
The onboard infrared interface is IrDA-compliant, allowing data
transfer at a rate of 115.2 kilobits per second (Kbps) at a maximum
distance of one meter.
Other manuals for V58
1
Table of contents
Other Acer Motherboard manuals

Acer
Acer V56LA User manual

Acer
Acer AcerPower Flex4000 Series User manual

Acer
Acer Veriton 9100 User manual

Acer
Acer M11E User manual

Acer
Acer AcerPower 6200 User manual

Acer
Acer Altos 1100 Series User manual

Acer
Acer V35N User manual

Acer
Acer AcerPower 3000 User manual

Acer
Acer M1A User manual

Acer
Acer V60N Installation instructions
Popular Motherboard manuals by other brands

HOLT
HOLT HI-8428-R quick start guide

Honeywell Home
Honeywell Home resideo FP134 Installation and user guide

ASROCK
ASROCK 880G EXTREME3 - V1.0 user manual

ON Semiconductor
ON Semiconductor AR0331SR user manual

VIA Technologies
VIA Technologies P4X266-PE11-SA user manual

Infineon
Infineon XMC4800 Getting started