ACO 6226 User manual

Integrating Sound Level Meter
TYPE 6226
Instruction Manual
(Version 1.5Pc)
CO Co.,Ltd.

1
Safety precautions
To prevent bodily injury or damage to property, the following safety precautions must be
observed.
This manual contains important safety and operating instructions for Integrating Sound
Level Meter TYPE 6226.
Read all instructions, before using the instrument.
fter reading all instructions, keep this manual for quick reference
1.Expressions of safety instructions
W RNING
Calls attention to a procedure, practice, or condition that could possibly cause death or
bodily injury.
C UTION
Calls attention to a procedure, practice, or condition that could possibly cause bodily
injury or damage to instrument.

2
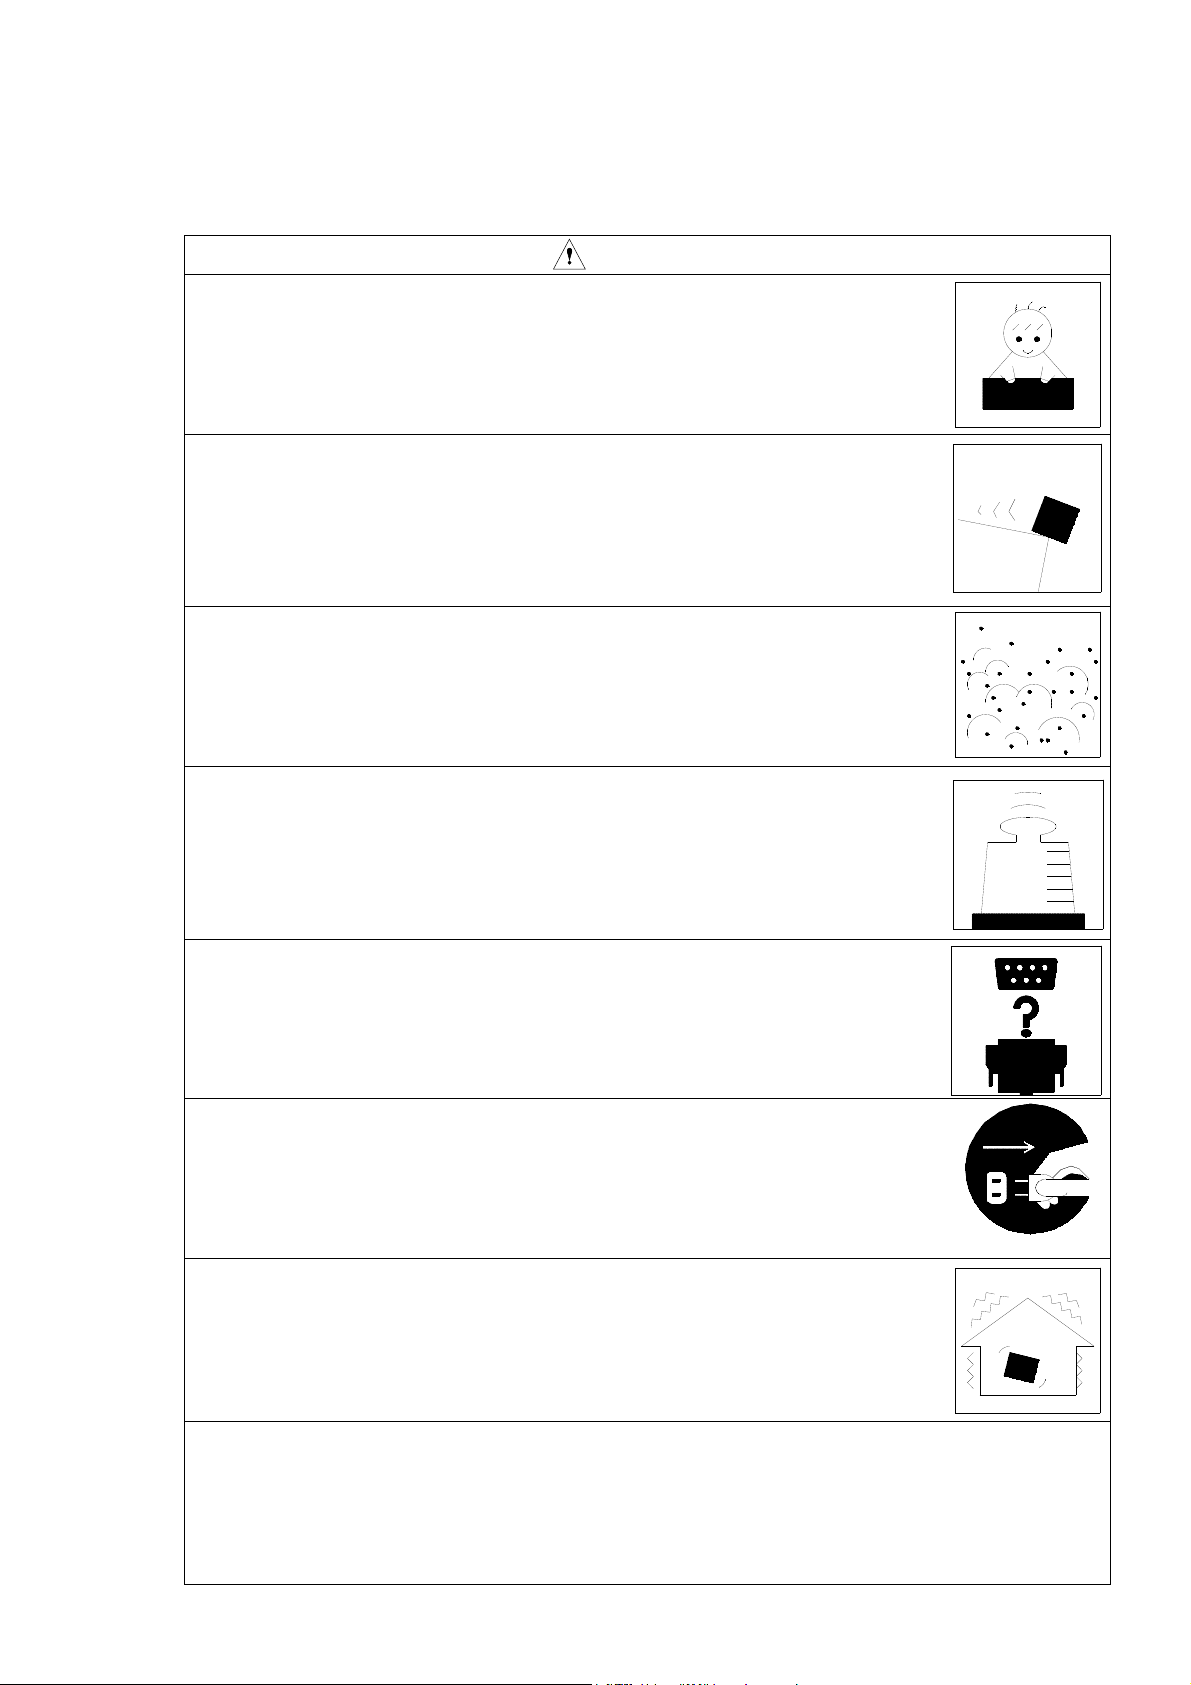
2.Important safety instructions
W RNING
Stop using the instrument, when producing smoke, bad smell or noise.
It causes fire or shock hazard.
Turn off the POWER switch and unplug the C adaptor (optional)
from outlet as soon as possible.
To reduce risk of injury, take it to a qualified serviceman when
service or repair is required.
Please contact CO co. or the dealer when service or repair is required.
Do not substitute parts or modify instrument.
It causes bodily injury, fire or shock hazard.
Do not use the C power adaptor except the optional C-1026.
Other type of adaptor may cause damage to the instrument.
Do not touch the plug of C adaptor ( C-1026) with wet hands.
It causes shock hazard.
Stop using the instrument, when an object or liquid falls/spills into
the instrument.
It causes fire or shock hazard.
Turn off the POWER switch and unplug C adaptor (optional)
from outlet as soon as possible.
To reduce risk of injury, take it to a qualified serviceman
when service or repair is required.
Please contact CO co. or the dealer when service or repair is required.
3
3.Cautions for usage
Integrating Sound Level Meter TYPE 6226 is assembled with precision parts.
To prevent bodily injury or damage to the instrument, the following cautions must be observed.
C UTION
Keep the instrument away from the children.
If the instrument falls down, it is very dangerous.
Do not place it on an unstable place (shaky table or sloping place).
If the instrument falls down, it is very dangerous.
Do not expose the instrument to moisture or dust.
It causes fire or shock hazard.
Do not put heavy objects on the instrument.
It causes damage to the instrument.
Connect cable properly, it is instructed in this manual.
Wrong connection causes fire hazard.
Before you move the instrument to other place, turn off the POWER
switch and remove all wiring.
Do not put the instrument on the vibrating place.
If the instrument falls down, it is very dangerous.
For avoiding liquid spill, remove alkaline dry batteries
when you don’t use for long period of time.
It is recommended to remove alkaline dry batteries after each use.

4
Introduction
1. Overview
Integrating Sound Level Meter TYPE 6226 has been designed for environmental noise
measurement. TYPE 6226 can measure Equivalent continuous -weighted sound pressure
level (L
eq), Single event sound exposure level (L
E
), Percentile level (Lx) and Wave form peak
hold (Lpeak).
pplications include automobile, airplane and factory noise, quality control or some other tests.
TYPE 6226 has a RS-232C interface to connect with a printer or a personal computer. (To
connect to a personal computer, an optional firmware version-up is needed.)
Results of measurements are displayed on a LCD screen as a bar graph and numerical values.
TYPE 6226 can display wide dynamic range of 100dB, so that you don’t need to change ranges.
It is easy to use.
2.Features
1. Percentile level (Lx: L
5
, L
10
, L
50
, L
90
, L
95
), L
max
and L
min
can be measured at the same time.
2. Equivalent continuous -weighted sound pressure level (L
eq) can be measured.
Environmental noise important to industrial health can be measured.
3. Wave form peak hold (Lpeak) can be measured (L
C
peak included).
4. Wide linearity range of 100dB
5. Built-in RS-232C interface:
Data processing with a personal computer is available (optional).
6. Built-in memory: pproximately 10,000 samples : 1000 sets of results
7. Large LCD screen with back-light. The display is clear to see and easy to understand.
3.Configuration
(1) Integrating Sound Level Meter TYPE 6226 1
(2) 1/2”electretcondenser microphone TYPE 7052N 1
(3) Wind breaking screen (φ50) N -0304 1
(4) Hand strap 1
(5) Carrying case 1
(6) Instruction manual 1
(7) Option
・ C adaptor C-1026
・Tripod exclusively for sound level meter N -0333
・Extension cable(2m~30m) BC-0046-2~30
・Output cable(BNC pin cord) BC-0071
・Interface cable BC-0026PC
・Data management software N -0226-4
(with Instruction manual)

5
Contents
Section 1 Setting up
1. Locations and their functions P. 6
2. Battery installation P. 7
3. C power adaptor P. 7
4. LCD adjustment P. 8
5. Calendar adjustment P. 9
6. LCD back-light P.10
Section 2 Basic Operation
1. Changing Display mode P.11
2. Operation of panel switches and their function P.14
3. Calibration P.15
Section 3 Measuring Procedure
1. -weighted sound pressure level (L
) measurement P.17
2. Sound pressure level (L
C
/L
f
) measurement P.18
3. Equivalent continuous -weighted sound pressure level (L
eq)
measurement P.19
4. Single event sound exposure level (L
a
e) and
Percentile level (Lx) measurement P.20
5. Maximum -weighted Sound pressure Level (Lmax) Measurement P.21
6. C-weighted waveform peak hold measurement (LCPeak) P.22
Section4 Menu
1. How to use Menu P.23
2. Menu (1/2) P.24
3. Mode Set (2/2) P.25
Section 5 C、DC Output
1. C Output P.26
2. DC Output P.26
Section 6 Data Transfer to a Personal Computer
P.27
Section 7 Specifications
P.28
Pin Connections and How to Conect the Extension cable
P.29
ppendix ppearance diagram
P.30

6
Section 1 Setting up
1. Locations and their functions
Microphone
Preamplifier
Threaded retaining ring
Front panel
Female screw
for tripod
Battery cover
Display
Side panel
Female screw for tripod
Side panel
Calibration potentiometer
C OUT connector
DC OUT connector
POWER switch
C power adaptor connector
External Input/Output connector

7
2. Battery installation
When LCD display tells low battery, install new batteries.
For long-term measurement, install new batteries in advance.
The following displays tell you the condition of the batteries.
Full Low Replace batteries.
To install new batteries:
1)Turn off the POWER switch.
2)The slide is done while pushing the battery lid by the thumb.( Refer to the figure below)
3)Put the new batteries in the case, then shut the cover. The inside of the case shows you the
direction of the batteries.
C UTION
Do not put the batteries in the wrong direction. These
four batteries should be replaced at the same time.
・Battery life is approximately:
20 hours ( lkaline batteries, continuous operation)
10 hours (Manganese batteries, continuous operation)
・Use of LCD back-light shortens the life of the batteries (approximately 1/3).
3. C power adaptoTurn off the POWER switch.
1)Turn off the POWER switch.
2)Connect the optional C power adaptor to the C power adaptor connector.
3)Put the C plug in the C 100V outlet.
Power consumption pprox.2.1V
C UTION
Do not use the C power adaptor other than the one
recommended. Other type of adaptor may cause damage
to the instrument.
C power adaptor connector
“OPEN” pushing and slide in
the direction of the arrow.

8
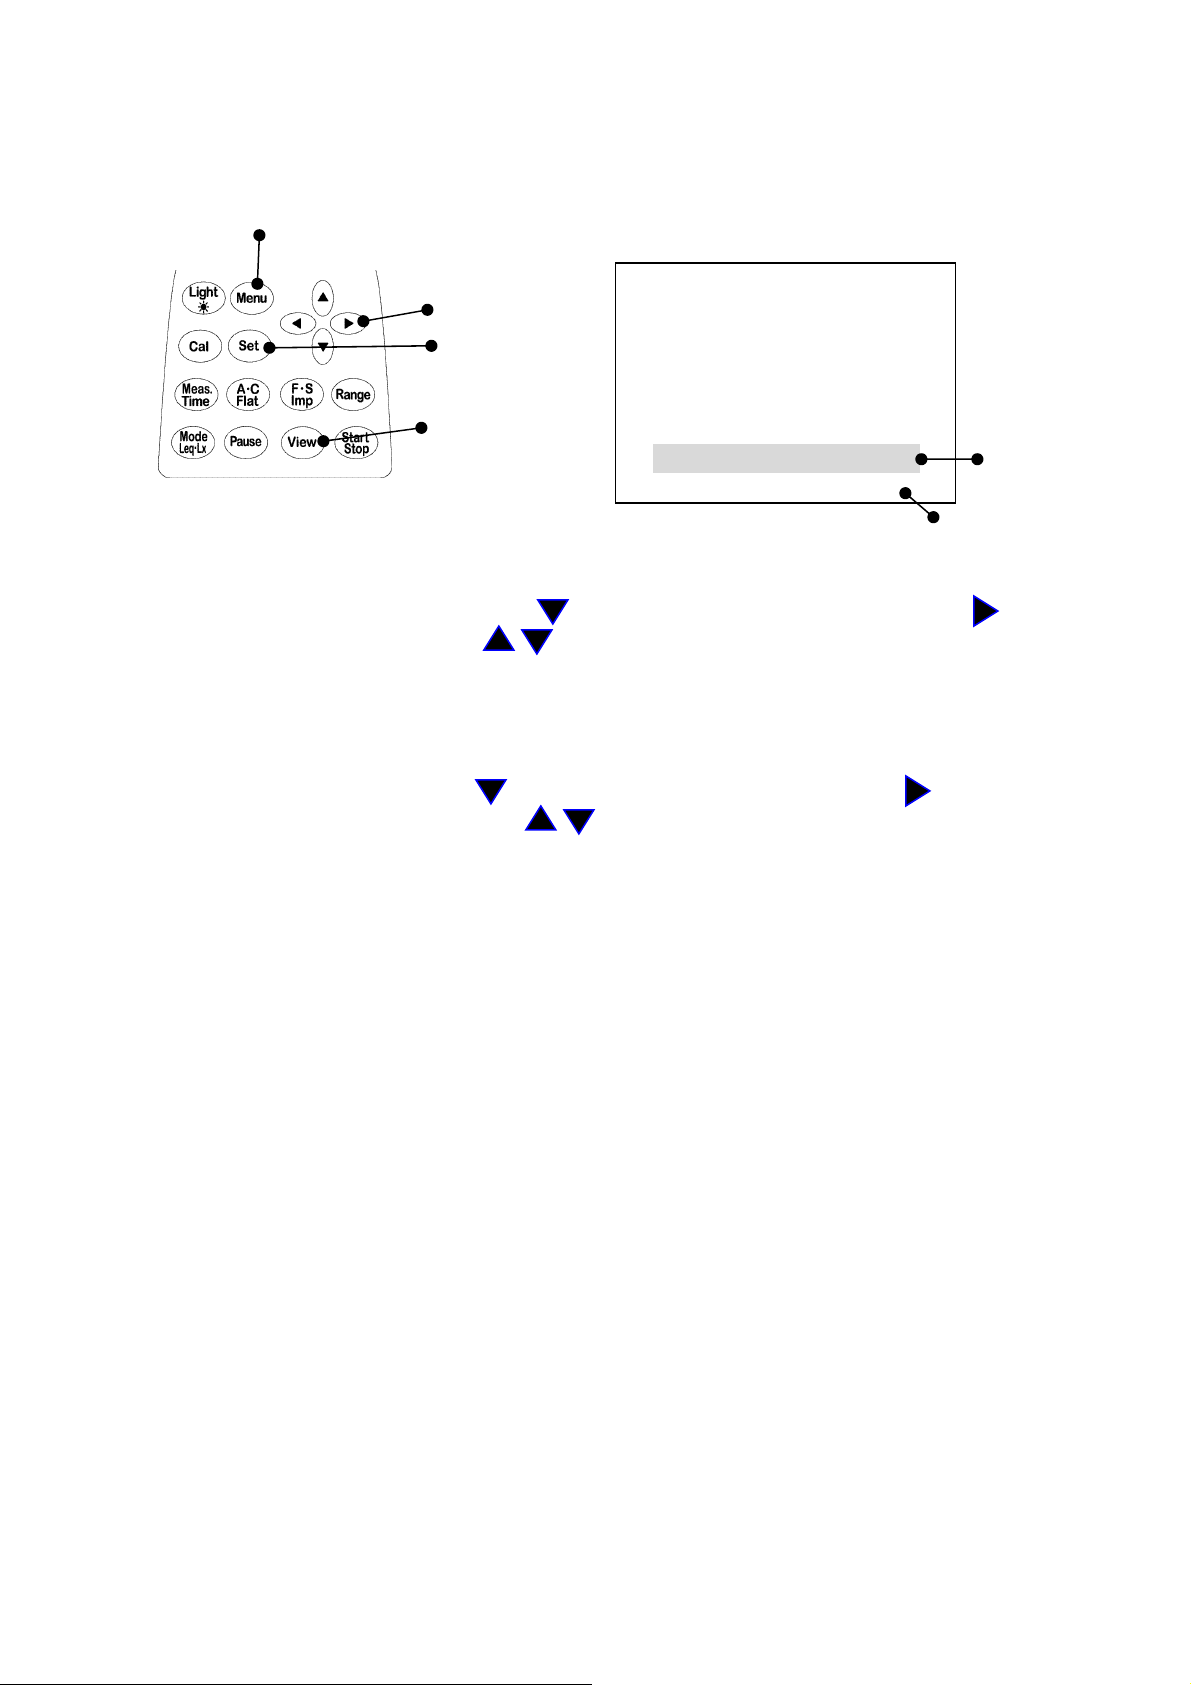
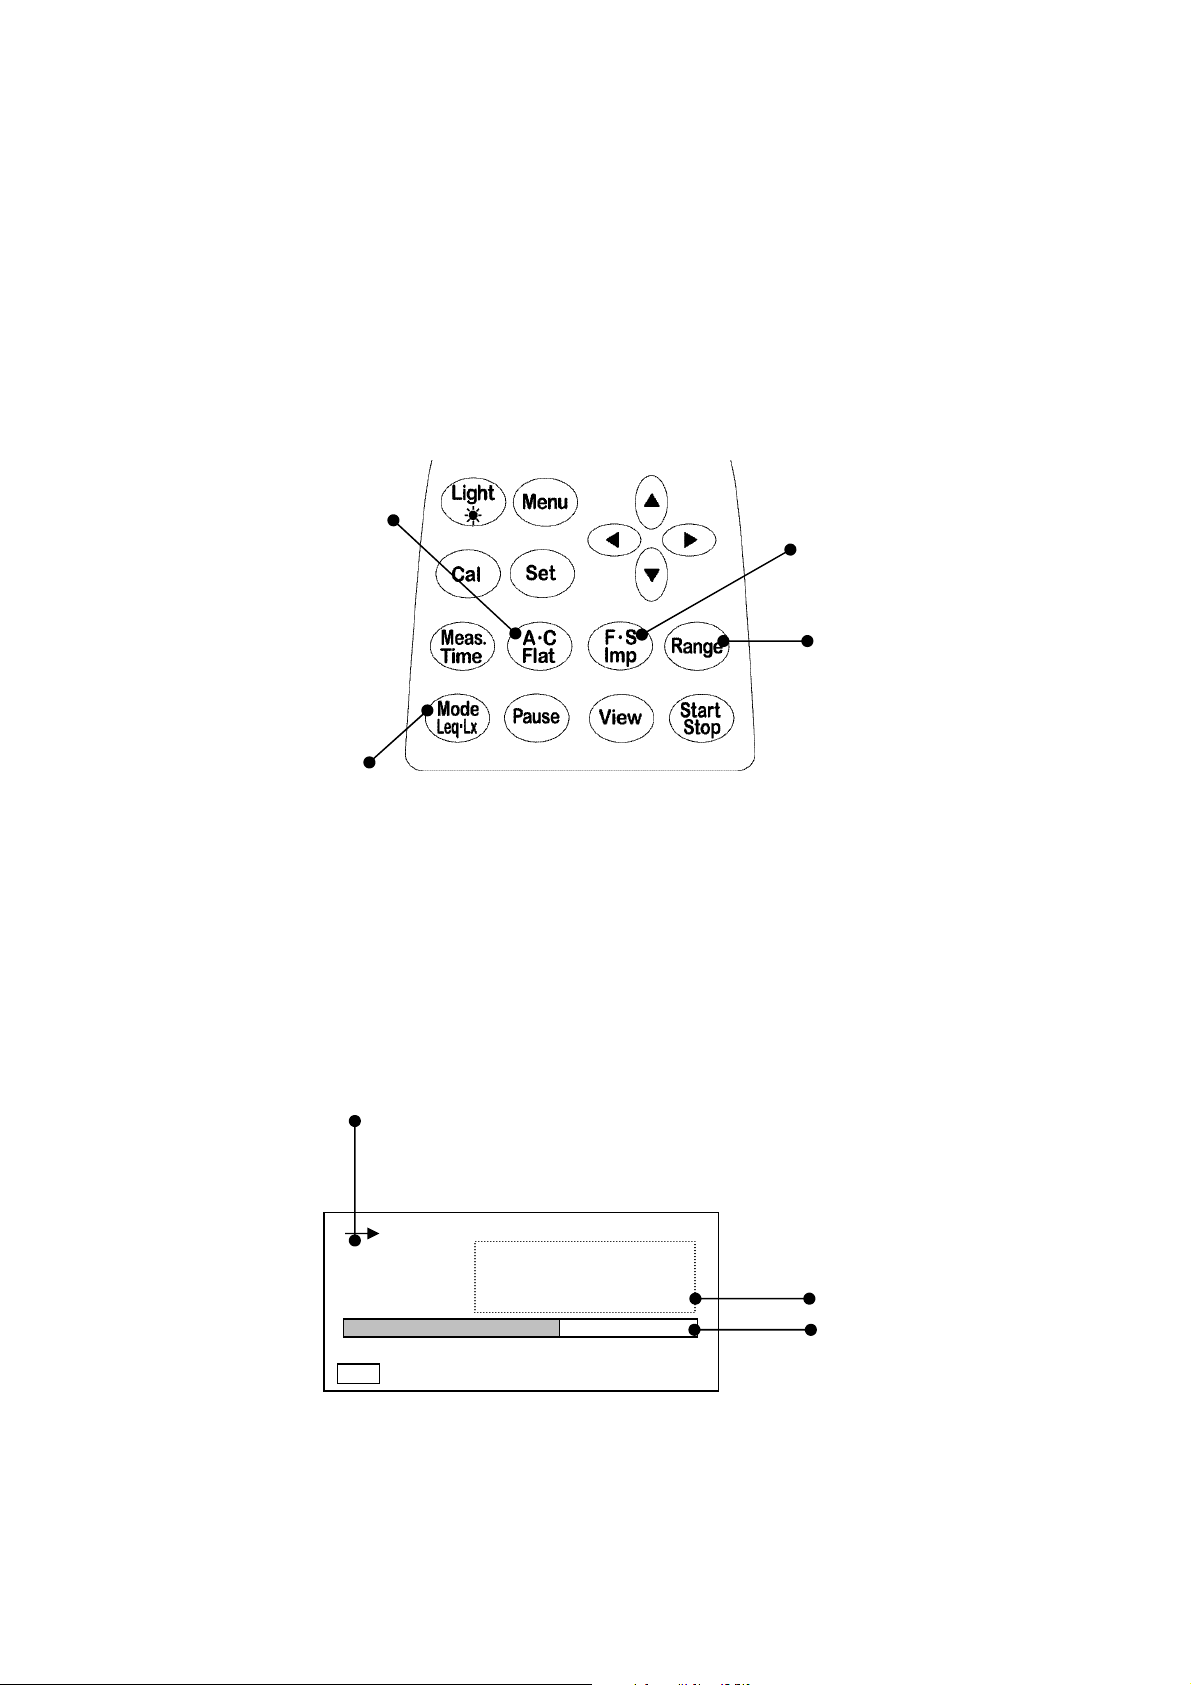
4. LCD adjustment
You can adjust LCD contrast, when the batteries were low, or when the new batteries were
installed.
The procedure is as follows.
Menu key
Cursor key
Set key
View key
1) When you press the Menu key, the following screen appears.
<menu> 1/2
Meas Mode : Manu
Interval : Single
I/O : OFF
Data delet : OFF
LCD cont : *****
date y/m/d : 00/01/01
time : 00:00:00
2) Select LCD cont with Cursor key , then move the cursor rightward with key.
3) djust the LCD contrast with key, then press Set key to save the setting.
fter pressing Set key, the cursor moves to leftward.
4) If you want to go back to measurement mode, press View key.
C UTION
There can be a temporary appearance of a line on the LCD
when the Power switch is turned OFF. It is a normal
phenomenon and not a problem or failure.
9
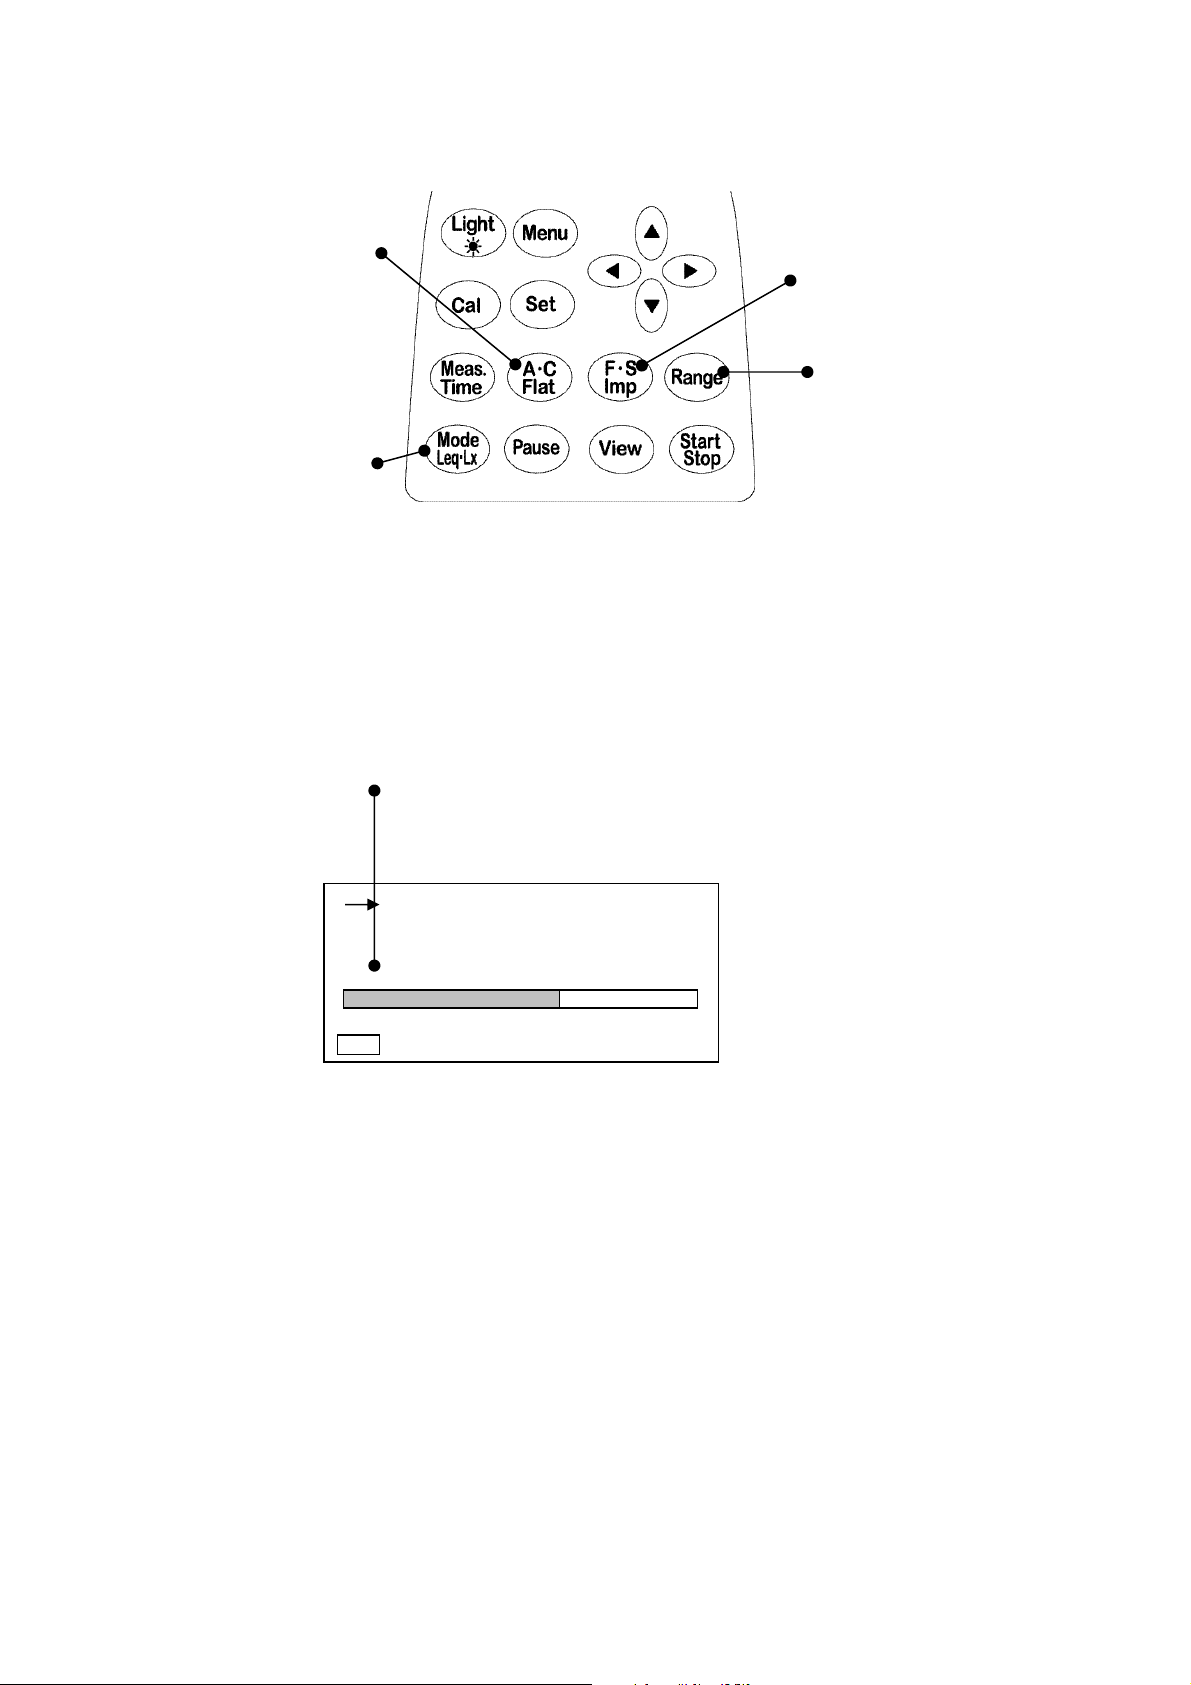
5. Calendar adjustment
To adjust the calendar (time), operate as follows.
You can adjust calendar in the Menu mode in the same way as LCD adjustment.
Menu key 1)When you press the Menu key, the
following screen appears.
<menu> 1/2
Cursor key Meas Mode : Manu
Set key Interval : Single
I/O : OFF
Data delet : OFF
View key LCD cont : ***** Date
date y/m/d : 00/01/01 adjustment
time :00:00:00
Time adjustment
【Calendar adjustment】
1) Select date y/m/d with Cursor key , then move the cursor rightward with key.
2) Set the year/month/day with key, then press Set key to save the setting.
fter pressing Set key, the cursor moves to leftward.
3) If you want to go back to the measurement mode, press View key.
【Time adjustment】
1) Select time with Cursor key , then move the cursor rightward with key.
2) Set the hour:minute:second with key, then press Set key to save the setting.
fter pressing Set key, the cursor moves leftward.
3) If you want to go back to the measurement mode, press View key.
【Caution】
Be sure to enter the date (date y/m/d) in the order of “year → month → day.”
Input any figure of; y(year): 00 – 99, m(month):01 – 12, and d(day): 01 – 31.
Ex.) For November 30, 2003
Correct) 03/11/30
Incorrect) 11/30/03 30 has been entered for m(month). Input any figure of
01 through 12.
Be sure to enter the time in the order of “hour → minute → second.”
Input any figure of; h(hour): 00 – 24, m(minute): 00 – 59, s (second) 00 – 59.
Ex.) For 23:58:32
Correct) 23/58/32
Incorrect) 32/58/23 32 has been entered for h(hour). Input any figure of
00 through 24.
<Entry of incorrect date and time>
The instrument has a function for outputting data that was measured or is being measured
to a personal computer.
During recovery of data, if an incorrect date and time are entered, an error message “Econver
Error” is displayed on the screen and data recovery cannot be carried out.

10
6. LCD back-light
You can use LCD back-light, when your measurement is carried out in the dark situations.
Light key
(ア)Press Light key, LCD back-light goes on.
(イ)If you press Light key again, LCD back-light goes out.
The light automatically goes out in about 30 seconds after the light goes on.
(ウ)When the batteries is low, LCD back-light dims.
C UTION
Use of LCD back
-
light shortens the life of the batteries.

11
130.0
00h 000h00m00s
FAST
L
A
dB
Manu
Section 2 Basic Operation
1. Changing Display mode
1-1 How to change the display mode
Display has three modes (normal, magnified and list mode).
You can change them with View key.
You can use View key to go back to this display mode from any other menu screen.
View
key
Normal display mode
Magnified display mode
List display mode
00h 000h00m00s
FAST
L
A dB
130.0
40 130
Manu
00h 000h00m00s
FAST
Manu
Lap : 140.0dB La05:140.0dB
Laeq : 140.0dB La10:140.0dB
Lae : 140.0dB La50:140.0dB
LMin : 140.0dB La90:140.0dB
LMax : 140.0dB La95:140.0dB
dB
Only normal display can show
when “Peak measurement” is
selected.
12
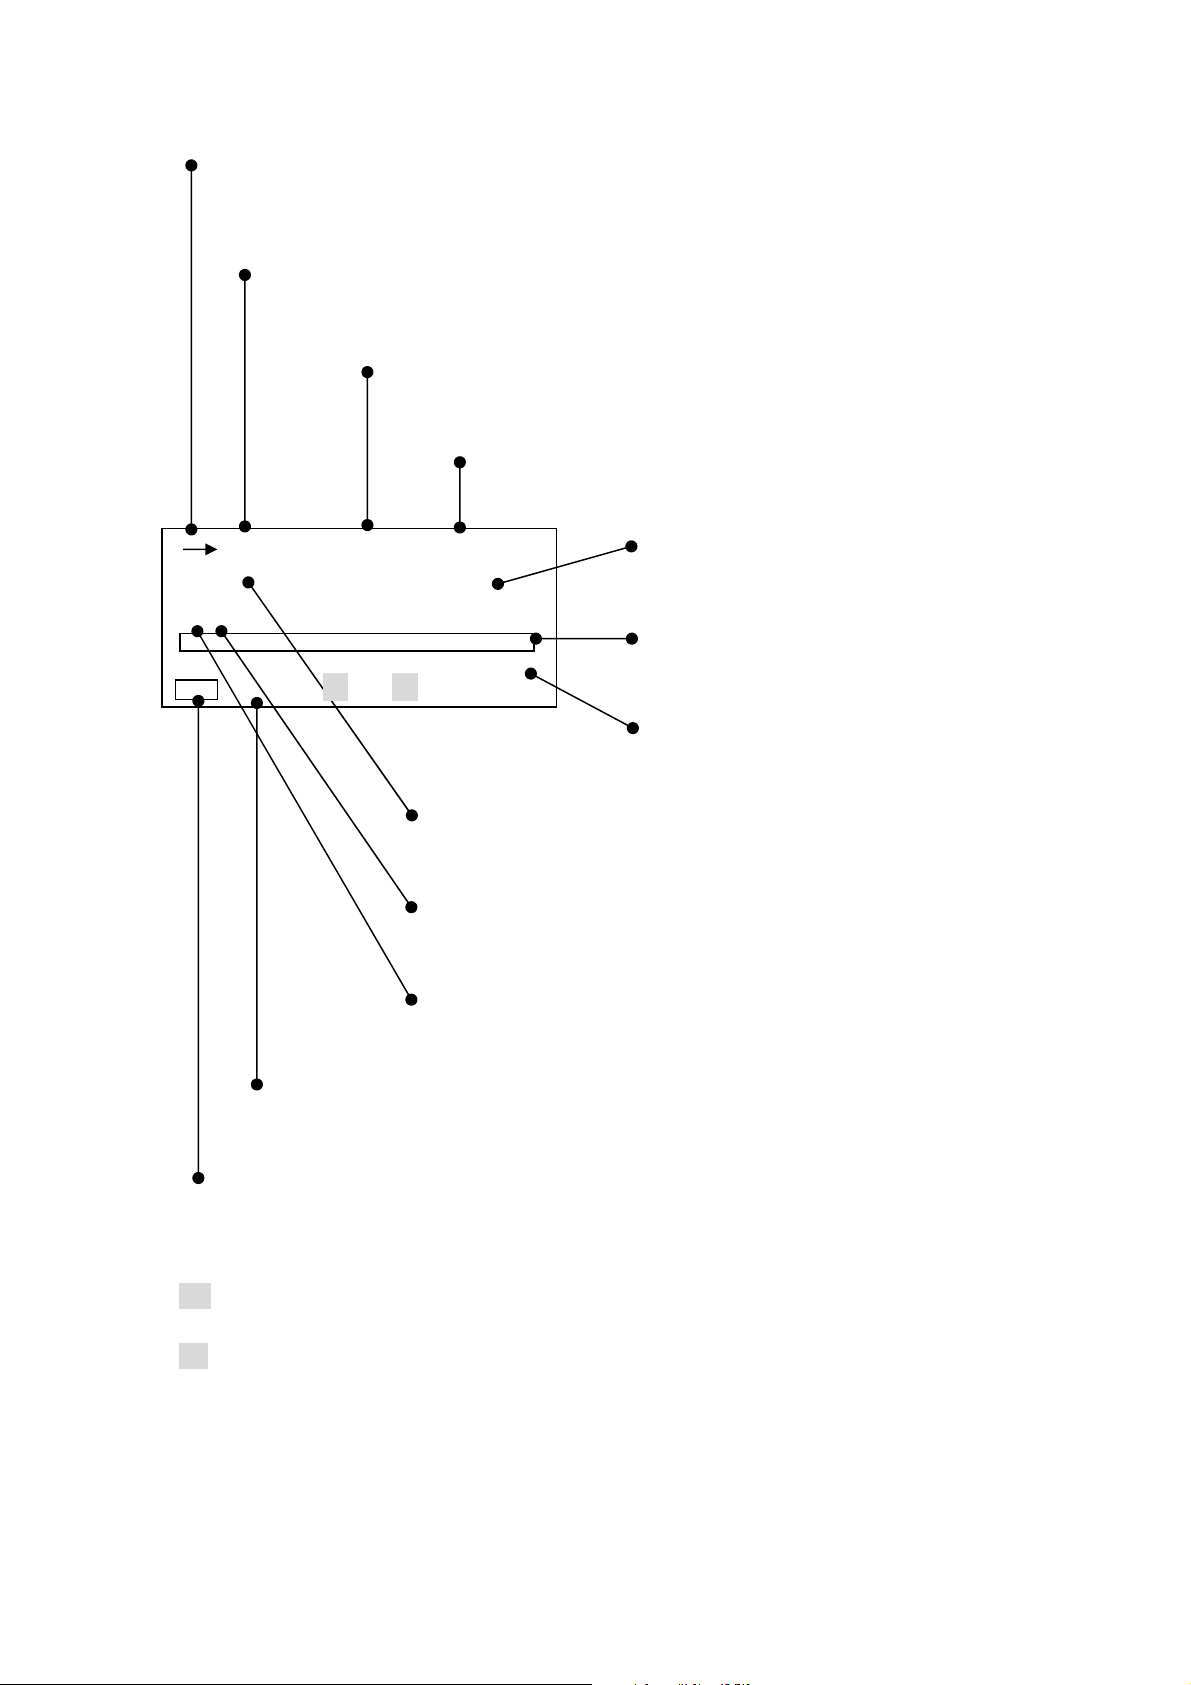
1-2 Normal display mode
→: Operation indicator
→ Blinking : in operation (by pressing Start key)
■ : Pause (by pressing Pause key).
When Data deletion mode is set, this symbol does not appear.
E : Data deletion mode
E appears when Data delet was selected in Menu.
When Meas Time is 1, 3 or 5s, E does not appear.
00h : Measurement time:
Shows the time set with Meas Time.
000h 00m 00s : Time counter
This counter starts by pressing Start key.
Digital display:
Shows a present value.
Bar display:
Shows an instantaneous value with bar graph.
Range:
Shows a range selected with Range key.
Time weighting:
Shows time weighting(Fast ・Slow, Impulse) when “general
measurement” is selected
Frequency weighting:
Shows frequency weighting ( ・C, Flat).
Mode of Measurement
Shows the selected mode (L, Leq, Le or Lx) with Mode key
when “general measurement” is selected
Basic setting:
Manu: General measurement Peak: Peak measurement Cal: calibration mode
Battery condition:
Shows four level display of battery condition.
・When the input signal level is lower –0.6dB than the limited scale of selected range,
Un appears.
・When the input signal level is higher +3dB then the limited scale of selected range,
Ov aqqears.
・Digital display shows the time-weighted or frequency-weighted value.
・Digital display is updated once per second.
・Bar display is updated 10 times per second.
130.0
00h 000h00m00s
E
FAST
L
A dB
40 130
Manu Un Ov

13
1-3 Magnified display mode
In magnified display mode, bar graph does not appear. nd the numerical characters are
magnified in the digital display.
fter you have changed to the magnified display mode, you can change measurement mode
( -weighted sound pressure level [or sound pressure level] measurement or the equivalent
continuous -weighted sound pressure level measurement) with Mode key.
The other contents in this mode are the same as in normal display mode. This mode is disabled
when “Peak measurement” is selected.
Magnified display
1-4 List display mode
ll the measured data are shown in list mode.
Ten items (including Leq) are shown in this mode. This mode is disabled when “Peak
measurement” is selected.
Data display
130.0
00h 000h00m00s
FAST
L
A
dB
Manu
00h 000h00m00s
E
FAST
Manu
Lap : 140.0dB La05:140.0dB
Laeq : 140.0dB La10:140.0dB
Lae : 140.0dB La50:140.0dB
LMin : 140.0dB La90:140.0dB
LMax : 140.0dB La95:140.0dB
dB

14
2. Operation of panel switches and their function
Cursor key
● Light : LCD back-light key
See “LCD adjustment” on Page 11.
● Menu : Menu key
● Set : Set key
● Cursor key : is used to move a cursor to select a item.
● Cal : Calibration key
See “Calibration“ on Page 16.
● Meas. Time : Measurement time selection key
● ・C , Flat : Frequency weighting key
● F ・S , Impulse : Time weighting key
● Range : Range selection key
● Mode : Mode selection key
● Pause : Pause key
● View : Display mode key
● Start Stop : Start and Stop key
View key is used to switch displays or return to normal display from Menu screen.
See “Section 2, 1-1 How to change the display mode” for detail.
See “Section 4 Menu”
on Page **.
See “Section 3
Measuring procedure”
on Page **.
15
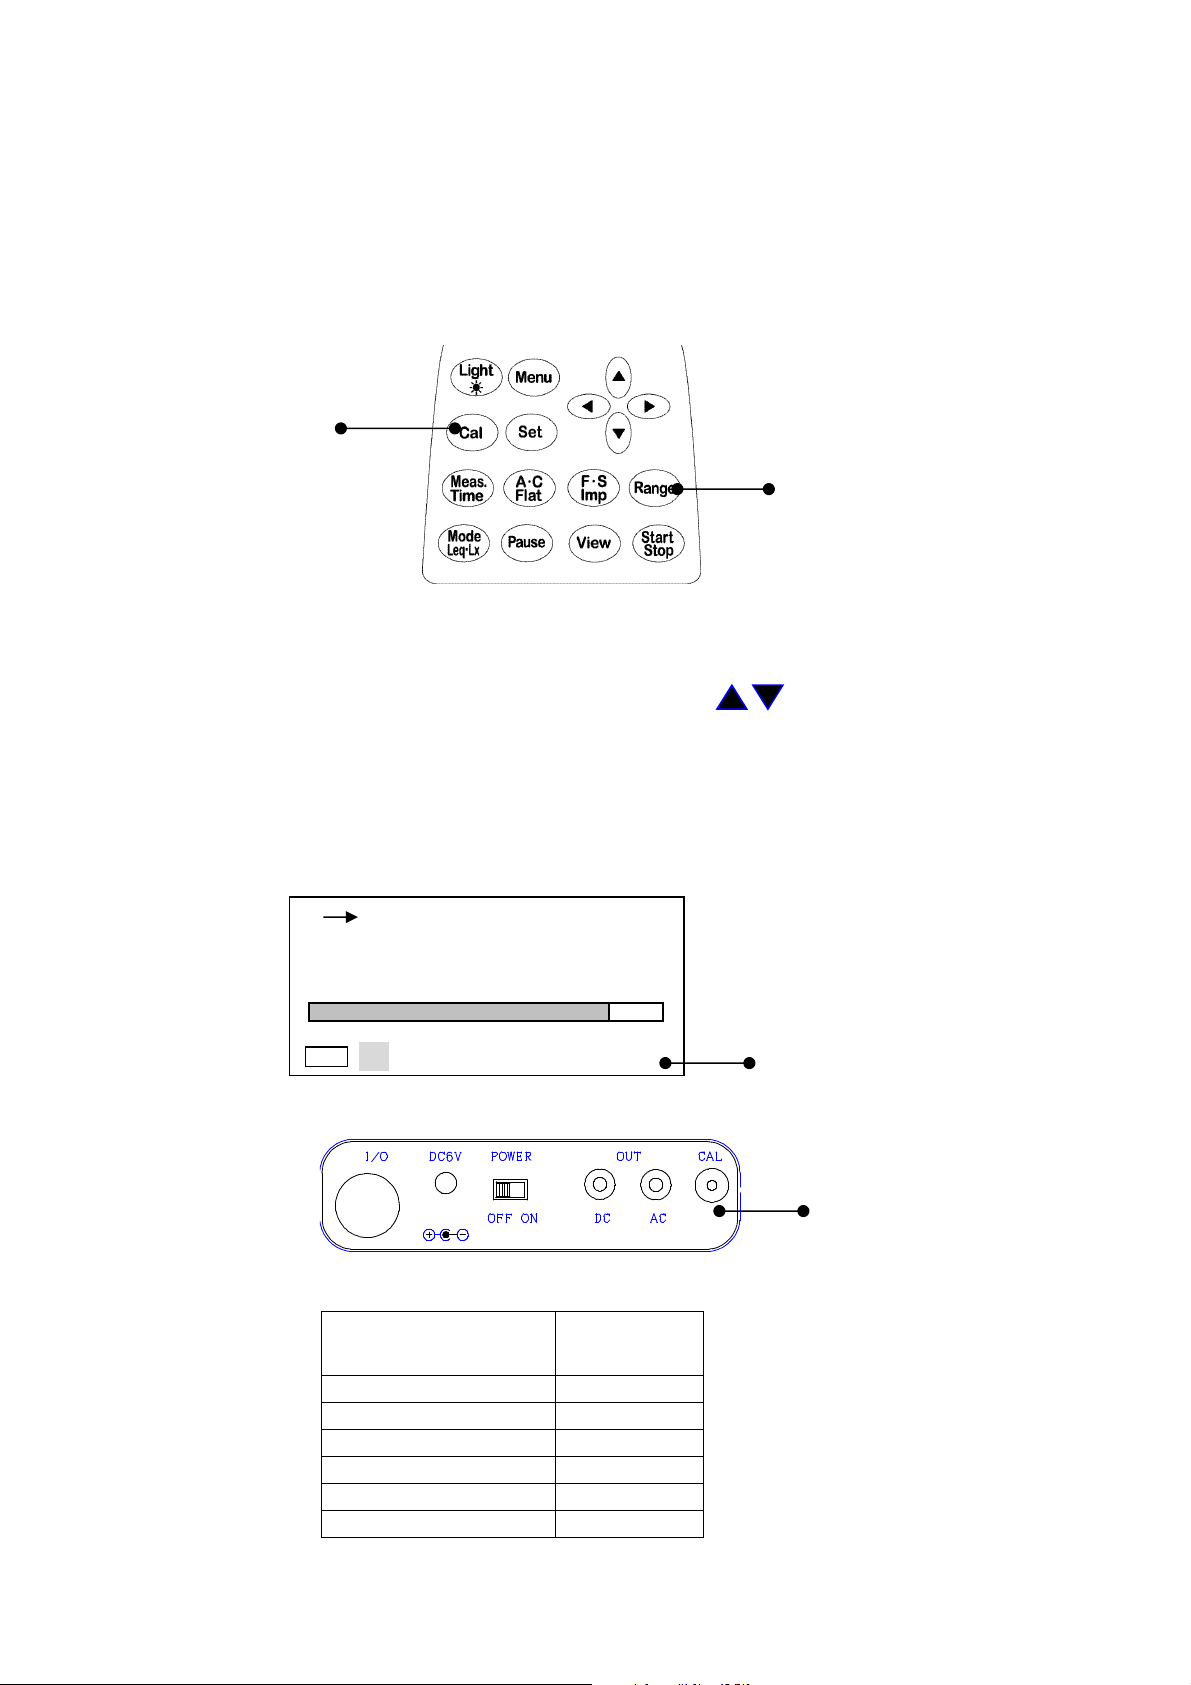
3. Calibration
You need to calibrate the instrument regularly before you start taking measurements.
There are two types of calibration. One is the way using the internal generator, the other is the
way using the pistonphone. Note that calibration is disabled when “Peak measurement” is
selected.
3-1 Calibration using internal generator
You can calibrate the instrument using the internal generator (1kHz, sine wave)
Cal key
Range key
1) Turn on the POWER switch and check basic setting is Manu. When peak is on display,
change it to Manu mode (to change the setting ,see page P.23〈Display〉).
2) Press Cal key.
3) Press Range key, and choose ‘100dB’ by cursor keys , and press Range key again to
register.
4) djust the calibration potentiometer on the side panel until the display shows 94.0dB.
5) If Cal key is pressed once again, the calibration is completed.
< Calibration display >
By switching the Rang key,
the figure of 100 blinks.
< Side panel >
Calibration potentiometer
< Reference> Full scale range and Cal(the display shows)
Full scale Range
(dB)
C L
(dB)
80 74.0
90
84.0
100
94.0
110
104.0
120
114.0
130
124.0
00h 000h00m00s
FAST
L
A
dB
20 100
Cal
94.0

16
<Reference> Relation between the display value of each range, and output voltage
DISPL Y V LUE(dB) OUTPUT VOLT GE(V)
R NGE C OUT
DC OUT
40~130
30~120
20~110
20~100
20~90 20~80
130
120
110
100
90
80
1.00000
2.50000
120 110 100 90 80 70 0.31623 2.25000
110
100
90
80
70
60
0.10
000
2.00000
100
90
80
70
60
50
0.03162
1.75000
90 80 70 60 50 40 0.01000 1.50000
80 70 60 50 40 30 0.00316 1.25000
70
60
50
40
30
20
0.00100
1.00000
60 50 40 30 20 - 0.00032 0.75000
50 40 30 20 - - 0.00010 0.50000
40 30 20 - - - 0.00003 0.25000
3-2 Calibration using pistonphone
Frequency weighting key
Time weighting key
Range key
1) Turn on the POWER switch and check basic setting is Manu. When peak is on display,
change it to Manu mode (to change the setting ,see page P.23〈Display〉).
2) Set the frequency weighting to C with Frequency weighting key.
3) Set the time weighting to Fast with Time weighting key.
4) Set the range to 40~130dB with Range key.
5) Switch on the pistonphone.
6) djust the calibration potentiometer on the side panel until the display shows a output level
of the pistonphone (standard value is 124.0dB).
For the detail of pistonphone output level, please see shipping inspection data sheet of
the pistonphone.
< Calibration display >
※fter the calibration of the pistonphone, perform calibration per 3.1 “Calibration using
internal generator” in Page 15. If there is a difference of more than ±0.5 dB for 94.0 dB,
the instrument shall be checked. Please contact CO or authorized dealer.
00h 000h00m00s
FAST
L
C dB
40 130
124.0
Menu
17
Section 3 Measuring Procedure
This meter has two major basic settings. One is “General measurement” which is for general
environmental noise measurement; the other is “Peak measurement” which indicates waveform
peak hold. The 1st to 5th section of following measurements is on “General measurement”
setting. Only 6th section is measured on “Peak measurement” setting.
Factory default is “General measurement” and the screen shows Manu under the level figures.
It shows Peak when “Peak measurement” is selected. For changing the basic setting, see “6.
C-weighted waveform peak hold measurement.”
1. -weighted sound pressure level (L
) measurement
Frequency weighting key
( ・C , Flat) Time weighting key
(Fast ・Slow, Impulse)
Range key
Measurement mode key
< Parameter setting >
Turn on the POWER switch and check basic setting is Manu. When peak is on display,
change it to Manu mode (to change the setting ,see page P.23〈Display〉).
Range key: Select a range that Bar display indicates approximately 2/3 of the full scale.
Time weighting key: Fast or Slow
Frequency weighting key:
Measurement mode key: L
< Display >
Indicates Time weighting.
(Fast or Slow)
Digital display
Bar display
1) Displayed L
level is updated once per second.
2) Bar display is updated 10 times per second.
3) You don’t need to press Start key.
00h 000h00m00s
FAST
L
A dB
30 120
Manu
66.0
18
2. Sound pressure level (L
C
/L
f
) measurement
(Sound pressure level measurements except -weighted sound pressure level.)
Frequency weighting key
( ・C , Flat) Time weighting key
(Fast ・Slow, Impulse)
Range key
Measurement mode key
< Parameter setting >
Range key: Select a range that Bar display indicates approximately 2/3 of the full scale.
Time weighting key: Fast or Slow
Frequency weighting key: C or F
Measurement mode key: L
C
or L
f
< Display >
Indicates Time weighting.
(L
C
: frequency weighting is C ; L
f
: frequency weighting is FL T.)
・Displayed level is updated once per second.
・Bar display is updated 10 times per second.
・You don’t need to press Start key.
00h 000h00m00s
FAST
L
C dB
30 120
Manu
66.0

19
In this sound level meter, L
A
eq computation is
made at high sampling rate (20.8μs) for input
pressure waveform, which then offers high
precision short-term measurement with least
influence of dynamic response.
3. Equivalent continuous -weighted sound pressure level (L
eq) measurement
Frequency weighting key
( ・C , Flat) Time weighting key
Measurement time (Fast ・Slow, Impulse)
Range key
Measurement mode key
< Parameter setting >
Range key: Select a range that Bar display indicates approximately 2/3 of the full scale.
Time weighting key: Fast or Slow
Frequency weighting key: (C,F)
Measurement time key: 1s, 3s, 5s, 10s, 1m, 5m, 10m, 15m, 30m, 1h, 8h, 24h,
and ***.
(***: Measurement continues until Stop key is pressed.)
Measurement mode key: L
eq
< Display >
Indicates Time weighting.
(Fast or Slow)
Indicates Measurement time.
・Measurement starts by pressing Start key, and automatically stops in the measurement
time. Digital display indicates a calculated data at that time
・If you press Stop key in measurement, the digital display indicates the calculated data at
that time.
・When Interval is set to Repeat in <Menu> display, the measurement is repeated in every
measurement time. (This function is useful for printings and data transfer to computer.)
・If you press Pause key in measurement, the digital display indicates the calculated data
from start to 3 or 5 seconds before that time. This function deletes preceding 3 or 5 sec.
Data when Pause key is pressed.
・To set this function, See the description of data delete in “Section 4 Menu 2.Menu(1/2) ” on
Page **.
・When *** is selected, the digital display indicates the calculated data at the time when Stop
key is pressed. If Stop key is not pressed, the measurement continues in 199 hours 59
minutes 59 second.
00h 000h00m00s
FAST
L
Aeq dB
30 120
Manu
66.0
Table of contents
Other ACO Measuring Instrument manuals


Popular Measuring Instrument manuals by other brands


Hanna Instruments
Hanna Instruments HI99151 instruction manual

Endress+Hauser
Endress+Hauser Cerabar M operating instructions

HT Instruments
HT Instruments HT4011 user manual

LOGIKODIGIT
LOGIKODIGIT DM595 instruction manual

Granite River Labs
Granite River Labs GRL-USB-PD-A1 user manual

Siemens
Siemens MicroSAM operating instructions


