Acom 500S User manual

OUTSTANDING HF POWER PRODUCTS
ACOM 500S
160-4 m
Linear Power Amplifier
User's Manual
Installation, Operation
and Maintenance
March 2023

User's Manual | ACOM 500S | 160-4m Linear Power Amplifier
Page 2 of 66 | S e c t i o n ABOUT DOCUMENTATION
March 2023
This manual is for electronic distribution mainly.
If you have it on paper and you no longer need it, please, recycle it!
The latest versions of our User's Manuals are available at
www.acom-bg.com

User's Manual | ACOM 500S | 160-4m Linear Power Amplifier
March 2023
S e c t i o n ABOUT DOCUMENTATION | Page 3 of 66
ABOUT DOCUMENTATION
All ACOM documentation (including manuals, brochures, specifications, descriptions, presentations, video
materials, etc.) are based on the latest available information at the time of creation of our documents.
As we always strive to constantly improve and update our products, ALL PRODUCTS, PRODUCT
SPECIFICATIONS AND DATA ARE SUBJECT TO CHANGE. ACOM reserves the right to make changes and
improvements at any time without further notice or obligation to notify any person or organization of such
revisions or changes, made in order to improve the reliability, function, quality and design, and/or
performance of the ACOM products and services.
Further, this User's Manual is provided AS IS and ACOM shall not be liable for possible errors contained
herein.
ACOM company creates and distributes its documentation in ENGLISH language only.
Any translations in other languages made by our dealers, partners, distributors, etc. cannot
be related to ACOM company in any way.
ACOM is not liable for non-English documentation correctness in any way.
This manual supersedes all previous editions, which thereby become invalid.
The cover images used in the manual are illustrative only.
We are continuously striving to improve our documentation, but nobody is perfect.
And our documentation is not an exception of this rule.
Have you found any errors or would you like to suggest changes in our documentation?
Please help us by sending your suggestions to the following e-mail address:
documentation@acom-bg.com
The latest versions of our User's Manuals are available at
www.acom-bg.com
We highly recommend you to use this manual in electronic form as PDF-file instead of printed version. The
PDF-file is easy to read on any computer, tablet, smart phone or other similar device. In the PDF file you will
find the necessary information very fast due to context-oriented links (marked in orange) inside the file,
including context-linked Table of Content.
To open PDF-files you can use any free PDF viewer, for example:
•Adobe Acrobat Reader DC (https://get.adobe.com/reader);
•Foxit Reader (https://www.foxitsoftware.com/pdf-reader);
•Your web browser. Web browsers like Google Chrome, Firefox and Safari all have integrated
PDF readers.

User's Manual | ACOM 500S | 160-4m Linear Power Amplifier
Page 4 of 66 | S e c t i o n ABOUT DOCUMENTATION
March 2023
Title of Documentation
ACOM 500S 160-4 m Linear Power Amplifier
User's Manual
Installation, Operation and Maintenance
Type of Documentation
User's Manual
Purpose of Documentation
This manual explains Installation, Operation and Maintenance of the
ACOM 500S 160-4 m Linear Power Amplifier.
Record of Revisions
Description
Release Date
Notes
ACOM 500S User's Manual
29.03.2023
First edition, R01
Validity
The specified data is for product description purposes only and may not be
deemed to be guaranteed unless expressly confirmed in the contract. All
rights are reserved with respect to the content of this manual and the
availability of the product.
Copyrights
© 2023 ACOM Ltd.
Copying this document, giving it to others and the use or communication
of the contents thereof without express authority, are forbidden.
Offenders will be held liable for infringement of any intellectual property
of ACOM Ltd. and all damages which may rise as a result.
Trademarks
ICOM, KENWOOD, YAESU, ELECRAFT, and other product names or brands
mentioned in this documentation are either registered trademarks or
trademarks of their respective holders.
Published by
ACOM Ltd.
Bulgaria | Bozhurishte 2227
Sofia-Bozhurishte Industrial Park | 6 Valeri Petrov Str.
GPS coordinates: 42.748616о| 23.209801о
Web: www.acom-bg.com
E-mail: documentation@acom-bg.com
Note
This manual has been printed on chlorine-free bleached paper.

User's Manual | ACOM 500S | 160-4m Linear Power Amplifier
March 2023
S e c t i o n ABOUT DOCUMENTATION | Page 5 of 66
Contents
ABOUT DOCUMENTATION ................................................................................................................................ 3
1. GENERAL INFORMATION........................................................................................................................... 8
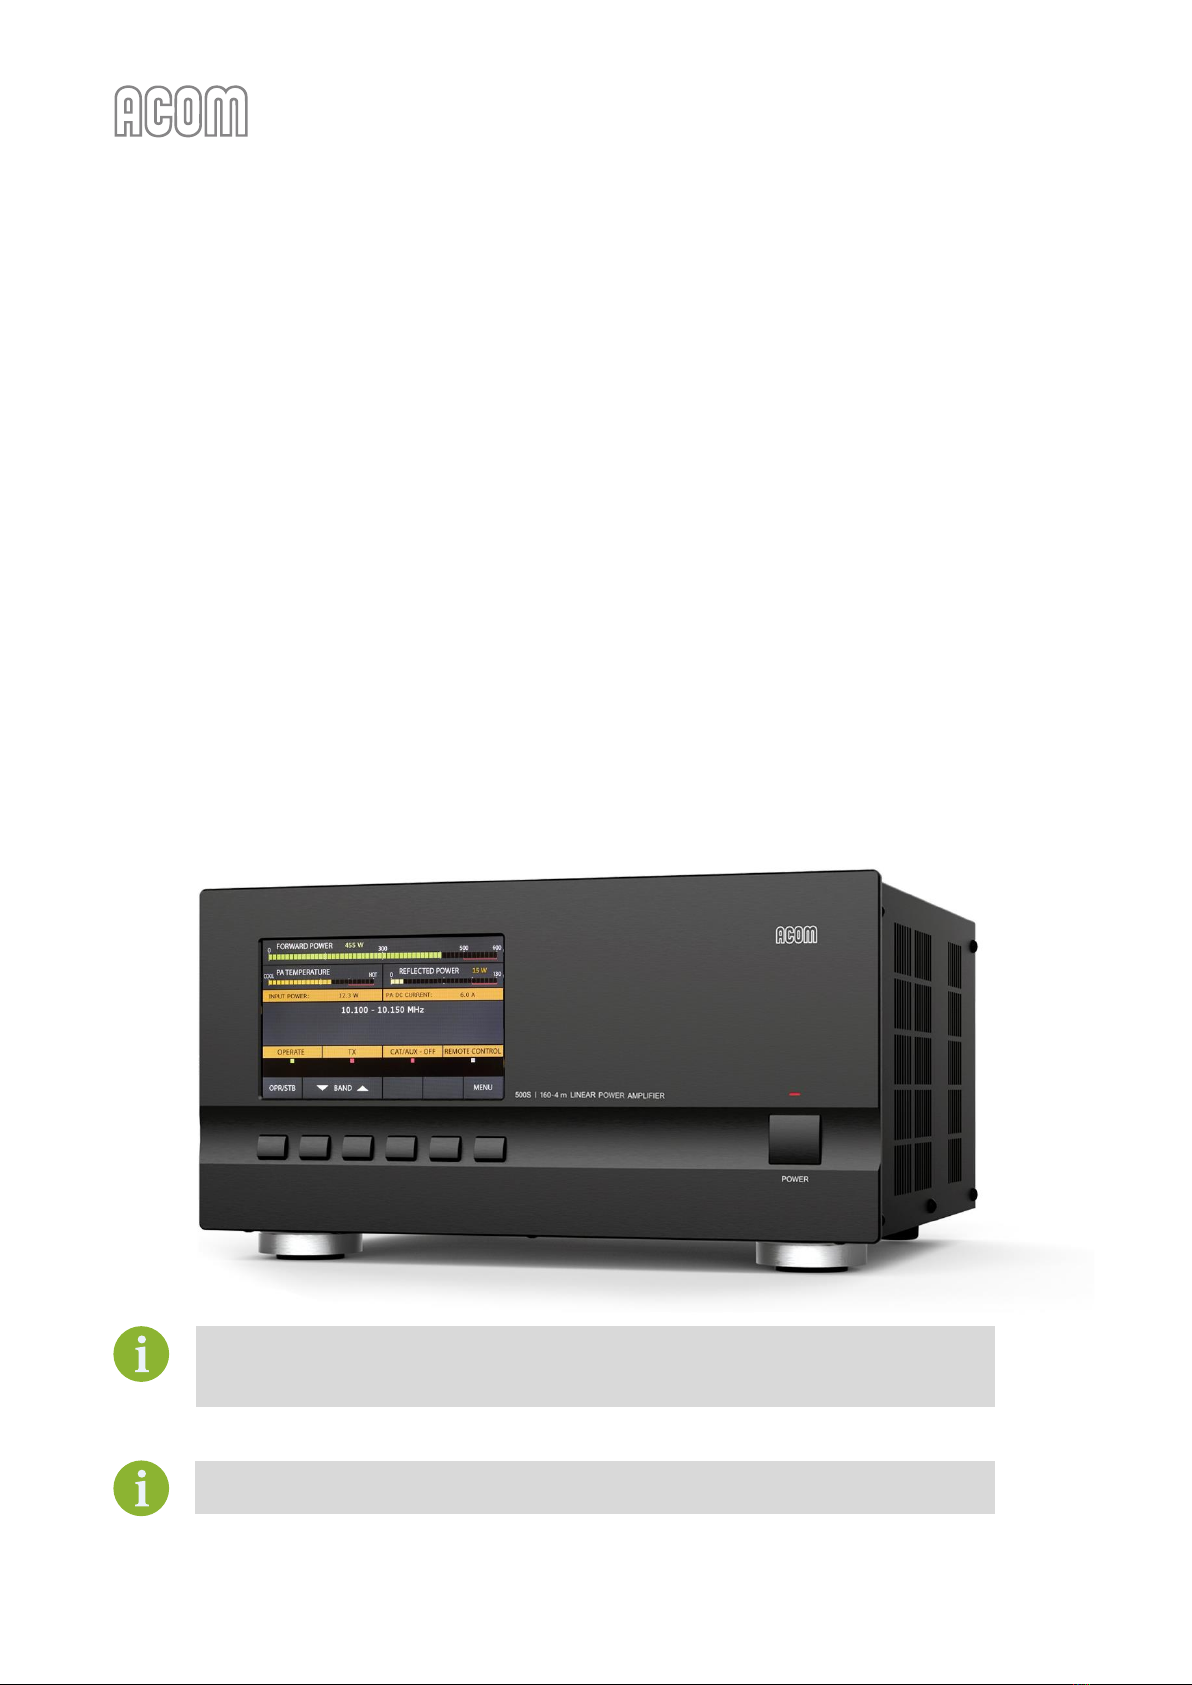
1.1. Introduction and Description.......................................................................................................... 8
1.2. Product History and Documentation Validity ................................................................................. 9
1.3. To the Reader of this Manual.......................................................................................................... 9
1.4. Additional Documentation............................................................................................................ 10
1.5. Owner Assistance.......................................................................................................................... 10
1.6. Product Identification ................................................................................................................... 11
1.7. Equipment Supplied...................................................................................................................... 11
1.8. Features......................................................................................................................................... 12
1.9. Safety Considerations, Explicit Definitions.................................................................................... 13
2. INSTALLATION.......................................................................................................................................... 16
2.1. Unpacking and Initial Inspection................................................................................................... 16
2.2. Line Voltage Selection................................................................................................................... 18
2.3. Amplifier Location Selection ......................................................................................................... 18
2.4. Connections................................................................................................................................... 19
2.5. Connecting to External Devices (transceiver, computer, etc.) and User Settings ........................ 24
3. FIRST POWER-ON, CONTROL SYSTEM, AND INITIAL CHECK.................................................................... 26
3.1. Low Energy Standby Mode of the Power Supply.......................................................................... 26
3.2. Front Panel.................................................................................................................................... 27
3.3. Initial Turning On........................................................................................................................... 27
3.4. Basic Screen................................................................................................................................... 28
3.5. Control System - Buttons and Menus ........................................................................................... 29
3.5.1. OPR/STB and BAND buttons............................................................................................ 29
3.5.2. Menu button.................................................................................................................... 30
3.6. Test Transmission.......................................................................................................................... 30
4. OPERATION.............................................................................................................................................. 34
4.1. Change of Modes RX/TX and OPERATE/STANDBY; AUTO OPERATE User Setting........................ 34
4.2. Band Change, Standard and Expanded Frequency Coverage ....................................................... 35
4.3. Antenna Change............................................................................................................................ 36
4.4. Operation with an External Antenna Tuner.................................................................................. 37

User's Manual | ACOM 500S | 160-4m Linear Power Amplifier
Page 6 of 66 | S e c t i o n ABOUT DOCUMENTATION
March 2023
4.5. Automatic Protection System ....................................................................................................... 39
5. MENUS - SETTINGS AND OPTIONS .......................................................................................................... 41
5.1. Menu AMP MEASURE (Amplifier Measurements)........................................................................ 42
5.2. Menu AMP SERVICE (Amplifier Service Functions)....................................................................... 43
5.3. Menu CAT/AUX SETTINGS (Selection of CAT/AUX interface) ....................................................... 44
5.4. Menu USER PREFERENCES ............................................................................................................ 46
5.5. Menu FAULTS LOG ........................................................................................................................ 47
5.6. Menu RESTORE DEFAULT SETTINGS.............................................................................................. 48
6. REMOTE CONTROL .................................................................................................................................. 49
6.1. Remote Control via ACOM eBox ................................................................................................... 49
6.2. Remote Control via RS-232 interface............................................................................................ 49
7. MAINTENANCE ........................................................................................................................................ 50
7.1. Periodic Maintenance ................................................................................................................... 50
7.2. Cleaning......................................................................................................................................... 50
7.3. Fuse Replacement......................................................................................................................... 51
7.4. Using the Fault Codes (signatures) for Diagnostics....................................................................... 52
7.5. Firmware ....................................................................................................................................... 53
7.5.1. Firmware Versions........................................................................................................... 53
7.5.2. Prequistments.................................................................................................................. 53
7.5.3. Firmware Updates ........................................................................................................... 53
8. SPECIFICATIONS....................................................................................................................................... 56
8.1. Parameters.................................................................................................................................... 56
8.2. Functions....................................................................................................................................... 58
8.3. Regulatory Requirements ............................................................................................................. 59
8.4. Storage and Shipment................................................................................................................... 61
8.4.1. Storage Environment....................................................................................................... 61
8.4.2. Shipping Size and Weight ................................................................................................ 61
8.4.3. Transportation................................................................................................................. 61
8.4.4. Returning to the Service Provider ................................................................................... 62
8.5. Information on Disposing and Recycling of Old Electrical and Electronic Equipment.................. 63
NOTES.............................................................................................................................................................. 64

User's Manual | ACOM 500S | 160-4m Linear Power Amplifier
March 2023
S e c t i o n ABOUT DOCUMENTATION | Page 7 of 66
Figures
Figure 1-1 | ID (identification) label/plate, example....................................................................................... 11
Figure 2-1 | Packaging carton (outside view).................................................................................................. 16
Figure 2-2 | ACOM 500S packaged in a cardboard box .................................................................................. 17
Figure 2-3 | Rear panel - Connections............................................................................................................. 20
Figure 3-1 | Front panel - Controls and Readouts........................................................................................... 26
Figure 3-2 | Basic screen ................................................................................................................................. 28
Figure 4-1 | ACOM 04AT tuner mounting possibilities ................................................................................... 37
Figure 4-2 | ACOM 06AT antenna tuner and switch (shown near 500S amplifier) ........................................ 37
Figure 4-3 | ACOM 500S amplifier screen with ACOM 04AT or 06AT antenna tuner installed...................... 38
Figure 4-4 | Appearance of an alarm message ............................................................................................... 39
Figure 5-1 | MENU SELECTION........................................................................................................................ 41
Figure 5-2 | Menu AMP MEASURE.................................................................................................................. 42
Figure 5-3 | Menu AMP SERVICE..................................................................................................................... 43
Figure 5-4 | Menu CAT/AUX SETTINGS ........................................................................................................... 44
Figure 5-5 | Menu USER PREFERENCES........................................................................................................... 46
Figure 5-6 | Menu FAULTS LOG....................................................................................................................... 47
Figure 5-7 | Menu RESTORE DEFAULT SETTINGS............................................................................................ 48
Figure 6-1 | ACOM eBox Ethernet Remote Control device............................................................................. 49
Figure 7-1 | ACOM Terminal S screenshot...................................................................................................... 54
Figure 8-1 | Packaging cardboard box............................................................................................................. 61
Tables
Table 1-1 | Production versions history............................................................................................................ 9
Table 1-2 | Package contents.......................................................................................................................... 11
Table 2-1 | Signals and pin out of the CAT/AUX connector ............................................................................ 25
Table 2-2 | Signals and pin out of the RS-232 connector................................................................................ 25
Table 5-1 | Transceiver interface .................................................................................................................... 45
Table 7-1 | ACOM 500S firmware versions history......................................................................................... 53

User's Manual | ACOM 500S | 160-4m Linear Power Amplifier
Page 8 of 66 | S e c t i o n GENERAL INFORMATION
March 2023
1. GENERAL INFORMATION
Congratulations on purchasing one of the finest solid-state 160-4 m linear amplifiers in the world today.
ACOM is pleased that you have chosen one of our products, and we will endeavor to provide you with the
information and support you need to enjoy your purchase for many years.
We urge you to read all of the following materials before you embark on operating your new amplifier.
1.1. Introduction and Description
This manual explains:
•Installation
•Operation and
•Maintenance
of the ACOM 500S solid-state 160-4 m linear power amplifier.
The ACOM 500S is a state-of-the art linear power amplifier that covers all amateur bands from 1.8 through
70.5 MHz and provides 500 W rated output power (PEP or digital). The amplifier operating information is
shown on a multi-functional, high-resolution color display. ACOM 500S can be controlled either by the six
front-panel buttons or remotely.
The ACOM 04AT and 06AT Automatic Antenna Tuners with four-way Antenna Switches are
designed to work with our transistor (solid state) amplifier series, including the ACOM 500S
(see Section 4.4 Operation with an External Antenna Tuner).
Remote control of ACOM 500S is provided by ACOM eBox Ethernet Remote control device
or RS-232 port (see Section 6 REMOTE CONTROL).

User's Manual | ACOM 500S | 160-4m Linear Power Amplifier
March 2023
S e c t i o n GENERAL INFORMATION | Page 9 of 66
1.2. Product History and Documentation Validity
The ACOM 500S amplifier serial production started in February 2023.
This manual refers to the ACOM 500S amplifiers and describes the operating possibilities of all amplifiers
produced till the publishing date of this manual.
This manual is valid till a new manual is issued.
Table 1-1 | Production versions history
Production Version
Release Date
Notes
02.2022
Basic design;
Table 1-1 | Production versions history
1.3. To the Reader of this Manual
This document is written for the technically qualified users who will use the ACOM amplifier.
To ensure your safety in accordance with safety standards, read this manual carefully and follow the steps
described in it.
Everyone who will use the amplifier must read this manual, and follow the instructions in it, and other
accompanying ACOM documentation (see Section 1.4 Additional Documentation), and consider also the
appropriate safety precautions.
Informational notes
Observe the informational notes provided in this manual to ensure reliable and efficient operation of the
amplifier. In this manual, you will find the following informational notes:
The information symbol highlights operating procedures or practices that may improve
equipment reliability and/or personnel performance, or to emphasize a concept.
The book symbol represents a cross reference to external documentation, e.g., other
ACOM manual.

User's Manual | ACOM 500S | 160-4m Linear Power Amplifier
Page 10 of 66 | S e c t i o n GENERAL INFORMATION
March 2023
Symbols and fonts used for marking text
In this manual the following symbols and fonts are used for marking text:
Format
Meaning
Orange bold text
Identifies all internal links in the document between Sections, Figures,
Tables, etc. for your convenience.
BOLD TEXT IN
CAPITAL LETTERS
Identifies the connectors, switches, and button names and labels.
TEXT IN CAPITAL
LETTERS
Identifies the amplifier operating modes, menu names, etc.
1.4. Additional Documentation
For further important information, please, refer to the following documentation:
•ACOM 500S Brochure;
•ACOM CAT cables Technical Information;
•ACOM 04AT User's Manual;
•ACOM 06AT User's Manual;
•ACOM eBox User's Manual.
The documentation is available for download at www.acom-bg.com.
1.5. Owner Assistance
If assistance is needed, you should contact your local dealerfirst. If necessary, your dealer will contact ACOM
for additional guidance.
If you still have an issue you need to discuss with one of ACOM's specialists, the contact information is as
follows:
ACOM Ltd.
E-mail: support@acom-bg.com
Bulgaria | Bozhurishte 2227
Sofia-Bozhurishte Industrial Park | 6 Valeri Petrov Str.
GPS coordinates: 42.748616о| 23.209801о
Including the ACOM equipment's model name, serial number, and a detailed problem
description in your service assistance request is mandatory. Without this information, we
cannot proceed with your request, or the proceeding will take longer.

User's Manual | ACOM 500S | 160-4m Linear Power Amplifier
March 2023
S e c t i o n GENERAL INFORMATION | Page 11 of 66
1.6. Product Identification
Every ACOM product features an ID (identification) label/plate. On this label, you can find data identifying
the device. Which product identification data are important?
•Model designation - The model designation is the name of the device;
•Serial Number - Most products have their own serial number. The serial number is a
consecutive number for unique identification of products with the same model designation. It
serves to ensure traceability of a product after it has been put in circulation, e.g., to find the
date of invoice that is required to determine guarantee and warranty periods. The term serial
number is mostly abbreviated to SN or S/N.
Figure 1-1 | ID (identification) label/plate, example
1.7. Equipment Supplied
The ACOM 500S amplifier is shipped as package, consisting of:
Table 1-2 | Package contents
Nr.
PACKAGE CONTENTS
Pcs.
1
Amplifier ACOM 500S
1
2
Quality Inspection Certificate (hard copy)
1
Table 1-2 | Package contents
The User's Manual is available as PDF-file only.
The latest version of the User's Manual is available at www.acom-bg.com.

User's Manual | ACOM 500S | 160-4m Linear Power Amplifier
Page 12 of 66 | S e c t i o n GENERAL INFORMATION
March 2023
1.8. Features
•Easy to operate
The overall operation of ACOM 500S is extremely simplified: the screen menus are intuitive and easy to
follow, and no special skill is required from the operator when changing frequency bands.
•User-friendly automatic control
When connected to a transceiver with CAT capability, the amplifier will track the operating frequency
and will change bands accordingly.
Even if not CAT connected, the amplifier monitors the input signal frequency through the built-in
frequency counter and automatically switches bands.
•High-resolution color display
All amplifier status indications are explained via detailed text displayed on the 5" high-resolution color
display (108x65 mm, 800x480 pixels, and 24-bit color).
•Transceiver-independent
Compatible with all transceiver models available on the market - does not need any special signals:
"ground on transmit" and less than 25 W of RF drive power is sufficient.
•LDMOS transistor technology
The ACOM 500S amplifier uses a rugged LDMOS transistor.
•Broadband input circuit
Broadband input circuit, providing transceiver load with SWR below 1.5 without retuning throughout
the whole frequency range from 1.8 to 70.5 MHz.
•Intelligence
Takes care of itself via continuously working protection circuits in all modes.
The operator can monitor numerically more than 10 parameters of the amplifier in operation.
•Remote control capabilities
Remotely controlled by RS-232 port and via the Internet by the ACOM eBox Ethernet Remote Control
device (function in development).
•Easy maintenance
Detailed data (55 parameters) about each of the last 28 hard-fault protection trips is stored in the
amplifier's non-volatile memory.
•Compact and lightweight construction
Convenient for expeditions and field operation due to the extremely compact and lightweight
construction and the built-in switching-mode power supply (SMPS). SMPS operates with extended mains
voltage range of 100-240 VAC, with no internal switch over. The consumed current is purely sinusoidal,
Power Factor Corrected (PFC) and inrush limited. This makes the operation of unstable mains and
generators easy and trouble-free.
•Electromagnetic compatibility
Perfect electromagnetic compatibility (EMC) with both highly sensitive devices and the powerful devices
in the radio station (receivers, computers, other amplifiers) exceeds the standard EMC requirements
due to the use of built-in radio-frequency filters.

User's Manual | ACOM 500S | 160-4m Linear Power Amplifier
March 2023
S e c t i o n GENERAL INFORMATION | Page 13 of 66
1.9. Safety Considerations, Explicit Definitions
The ACOM 500S linear amplifier is a Safety Class I unit regarding protection against electric shock. The third
grounding lead of its mains cord (which is colored yellow with two green stripes) and the ground stud on the
rear panel of the amplifier (marked GND, see Figure 2-3 | Rear panel - Connections, Pos. (a)) must be connected
to the station's grounding system for safe operation.
The amplifier is designed to meet international safety standards and complies with CE safety and
electromagnetic compatibility requirements, as well as FCC regulations.
This User's Manual contains information, warnings (signal words Danger, Warning, Caution and Notice) and
instructions, related to hazards, that should be followed by the user in order to ensure safe operation and to
keep the amplifier in a safe working condition at all times.
The EXPLICIT DEFINITIONS described below apply to this User's Manual:
DANGER
These notes call attention to a procedure or instructions which, if not correctly performed,
will result in serious personal injuries and even death.
WARNING
These notes call attention to a procedure or instructions which, if not correctly performed,
could result in serious personal injuries and even death.
CAUTION
These notes call attention to a procedure or instructions which, if not correctly performed,
could result in minor or moderate personal injuries.
NOTICE
These notes call attention to a procedure or instructions which, if not correctly performed,
could result in property damage or equipment damage not exclusively to the amplifier
but also to connected equipment.

User's Manual | ACOM 500S | 160-4m Linear Power Amplifier
Page 14 of 66 | S e c t i o n GENERAL INFORMATION
March 2023
Information notes described below apply to this User's Manual:
These notes highlight operating procedures or practices that may improve equipment
reliability and/or personnel performance, or to emphasize a concept.
ORANGE TEXT as LINKS
marks all internal links in the document between Sections, Figures, Tables, etc. for your
convenience.
The safety instructions contained in this User's Manual feature specific signal words
(Danger, Warning, Caution and Notice) and, where required, a safety alert symbol, in
accordance with actual standards ISO 3864 or ANSI Z535.

User's Manual | ACOM 500S | 160-4m Linear Power Amplifier
March 2023
S e c t i o n GENERAL INFORMATION | Page 15 of 66
PRECAUTIONS:
DANGER
Both the mains voltage and the high DC voltage up to 500 V inside the ACOM 500S
amplifier are LETHAL!
For your safety, pull the amplifier power plug out of the mains wall outlet and WAIT AT
LEAST 3 minutes EACH TIME BEFORE you remove the cover of the amplifier.
DANGER
Never allow anyone, ESPECIALLY CHILDREN, to push or put anything into holes in the case
- this will cause electric shock. NEVER TOUCH AN ANTENNA or antenna insulators during
transmission or tuning - this may result in an electric shock or burn. NEVER EXPOSE the
amplifier to rain, snow, or any liquids. AVOID placing the amplifier in excessively dusty
environments or in direct sunlight. DO NOT OBSTRUCT COOLING ducts or vents. Keep a
minimum clearance distance of 10 cm (4 inches) to any other devices or objects.
WARNING
Do not undertake on your own repairs or changes in hardware or software of the amplifier
in order not to endanger your or other's health and life and not to damage the amplifier
and the equipment connected with it, not covered by warranty. The manufacturer is not
liable for another's actions and responsibility shall be assumed by the doer.
WARNING
To avoid damage (not covered under warranty) read the Section 2 INSTALLATION of this
User's Manual carefully. If you have any doubts about the installation, operation, or safety
of the amplifier, please consult your dealer.
WARNING
NEVER operate the equipment if you notice an abnormal odor, sound, or smoke.
Immediately turn off the power and contact your dealer for assistance (see Section
1.5 Owner Assistance).
WARNING
To be in compliance with the RF exposure requirements, please, read Section 8.3.c) RF
Exposure Information.

User's Manual | ACOM 500S | 160-4m Linear Power Amplifier
Page 16 of 66 | S e c t i o n INSTALLATION
March 2023
2. INSTALLATION
2.1. Unpacking and Initial Inspection
Before you install your amplifier, thoroughly read this manual.
First, carefully inspect the cardboard carton and its contents for physical damage.
ACOM ships amplifiers in highly protected containers, but it cannot assure that
mistreatment by shippers will not occur. If damage is evident, notify your dealer
immediately. Delay may void the carrier's warranty.
CAUTION
The packaged weight is about 12 kg and can be handled by a single person.
Keep all packing materials for possible future amplifier shipment (see Section 8.4.4 Returning to the Service
Provider).
Figure 2-1 | Packaging carton (outside view)
Unpack the amplifier as described below:
•Open the cardboard carton (see Figure 2-1 | Packaging carton (outside view) and Figure 2-2 | ACOM
500S packaged in a cardboard box, Pos. 1);
•Take out the top secure element (see Figure 2-2 | ACOM 500S packaged in a cardboard box, Pos. 2);
•Open the internal cardboard carton (see Figure 2-2 | ACOM 500S packaged in a cardboard box,
Pos. 3);

User's Manual | ACOM 500S | 160-4m Linear Power Amplifier
March 2023
S e c t i o n INSTALLATION | Page 17 of 66
•Take out the amplifier using handles of the middle secure element (see Figure 2-2 | ACOM 500S
packaged in a cardboard box, Pos. 4);
•Take out the amplifier (Pos. 8) from the middle secure element and remove top, bottom and
sides flat secure elements (see Figure 2-2 | ACOM 500S packaged in a cardboard box, Pos. 5, 6 and
7);
•Now, the amplifier is ready for installation.
Figure 2-2 | ACOM 500S packaged in a cardboard box
It is not necessary to take out the bottom secure element (see Figure 2-2 | ACOM 500S
packaged in a cardboard box, Pos. 9).
1
3
4
5
6
2
8
9
7

User's Manual | ACOM 500S | 160-4m Linear Power Amplifier
Page 18 of 66 | S e c t i o n INSTALLATION
March 2023
2.2. Line Voltage Selection
The ACOM 500S amplifier is supplied with built-in switching-mode power supply (SMPS).
The amplifier operates in an extended mains voltage range of 100-240 VAC, with no internal switch over. The
consumed current is purely sinusoidal, Power Factor Corrected (PFC) and inrush limited. This makes the
operation from unstable mains and generators easy and trouble free.
Thanks to the built-in SMPS, the ACOM 500S has no mains line voltage selector to take
care of!
2.3. Amplifier Location Selection
CAUTION
The unit's weight is about 8 kg and can be handled by a single person.
Position the amplifier near the place where it will be used. You will need an easy access to the command
knobs and indicator's area, as well as to the rear panel cabling.
NOTICE
The ACOM 500S is forced air cooled. Keep a minimum clearance distance of 10 cm
(4 inches) to any other devices or objects.
The exhaust air can reach 65 oC (150 oF) and if the surrounding devices are sensitive to heating from outside
or use forced air cooling themselves, increase the distances accordingly.
NOTICE
Do not leave accidental paper, cloth or other lightweight pieces around and under the
amplifier. They may be drawn in by the cooling air stream and block the vents. This will
lead to overheating and accelerated material aging, not covered by the warranty.

User's Manual | ACOM 500S | 160-4m Linear Power Amplifier
March 2023
S e c t i o n INSTALLATION | Page 19 of 66
2.4. Connections
Please, see Figure 2-3 | Rear panel - Connections.
Connection to your station must be accomplished in the order described below, before you apply mains
voltage to the amplifier.
Before you connect the amplifier to external grounding, you should advise with a licensed
electrician and confirm such kind of connection is allowed by your national and local
electrical code, safety rules, and regulations in force. Simultaneous connection to the
earth grounding and protective earth may be inadmissible or may fall under special
requirements in some countries!
DANGER
Never use the gas installation pipes for grounding. This can cause an EXPLOSION!
DANGER
Do not use the steam-heating or water-supply network pipes for grounding! You may
expose to dangerous voltage not only yourself but also other people using the same
installation.
NOTICE
To avoid any damage (not covered by the warranty), never connect or disconnect cables
while power is applied at either end of the cable.
Hot-plugging is technically incorrect and is a bad practice to connect or disconnect any
piece of equipment while it is powered on. Make sure the device is switched off before
connecting or disconnecting any cable.

User's Manual | ACOM 500S | 160-4m Linear Power Amplifier
Page 20 of 66 | S e c t i o n INSTALLATION
March 2023
Figure 2-3 | Rear panel - Connections
a) GND stud
First, connect the wing-nut grounding stud of the amplifier (on the rear panel, marked GND) to the station's
grounding system (see Figure 2-3 | Rear panel - Connections, Pos. (a)).
WARNING
Note that the grounding system may have to withstand currents over 15 A with
insignificant voltage drop on it. Therefore, it may be necessary to improve it considerably,
i.e., to become less resistive, with heavier leads and lower-resistive ground path. The
grounding leads should be at least 4 mm²(AWG 11 or SWG 13).
For details and recommendations on the grounding and RF counterpoise system concerning the
electromagnetic compatibility see also Section 3.6.f) Elimination of electromagnetic compatibility (EMC)
problems.
b) KEY IN connector
This is the amplifier's input for receive/transmit control from the transceiver.
The transceiver switches the amplifier from receive mode into transmit mode (RX/TX) by grounding of the
KEY IN input.
Run a shielded cable from the "ground on transmit" connector or terminal on your transceiver to the
amplifier rear panel KEY IN connector (see Figure 2-3 | Rear panel - Connections, Pos. (b)). The KEY IN connector
uses a standard RCA phono plug.
d)
a)
e)
1
g)
h)
3
4
c)
b)
f)
Table of contents
Other Acom Amplifier manuals