ActionTec WCB3000N User manual

Dual-Band
Wireless Network
Extender
Model #: WCB3000N
User Manual
Ver 1.0

Table of Contents
Table of Contents 1
Introduction 3
Features 4
Getting to Know the WCB3000N 5
Front Panel 5
Back Panel 5
Accessing the Extender’s GUI 7
System Preferences 9
Status 9
Wireless Setup 10
Advanced Setup 15
Specications 18
Notices 21
1

Wireless Network Extender
Warranty 21
GPL Info 21
EU CE Declaration of Conformity 22
Technical Support 22
2
Introduction
e WCB3000N is a Wireless Extender with dual concurrent radios
supporting both 2.4GHz and 5GHz operation. is allows the WECB to
connect to everything from legacy wireless laptops, computers and
gaming platforms up to the most current Apple and Android tablets,
laptops, media platforms and smart
phones.
!
e WCB works by being placed in
a central location of the home, or
in a location where the existing
wireless signal is weak, and then
being physically connected directly
to your Telus gateway/modem.
is physical connection not only
extends the signal, but allows the
WCB3000 to import and
automatically congure itself with
the same network ID/SSID and password that is currently in use and
congured on your existing gateway/modem. is means that wherever
you are in your house, your WiFi tablet, laptop or phone will
automatically connect to Internet without you having to nd a new
network name or enter security keys.
!
For users with newer mobile devices, tablets and laptops, connections
through the 5GHz radio can markedly increase the performance and
speed of your WiFi connection while freeing up the 2.4GHz band for
legacy or older devices.!
3

Wireless Network Extender
!
Features
• 2.4 and 5 gigahertz dual concurrent WiFi radios
• Two Gigabit Ethernet ports
• Integrated wireless networking with 2x2 802.11n access point
• Multiple security offerings: MAC address ltering, WEP, and WPA
• Other options: WMM and IP address management!
4
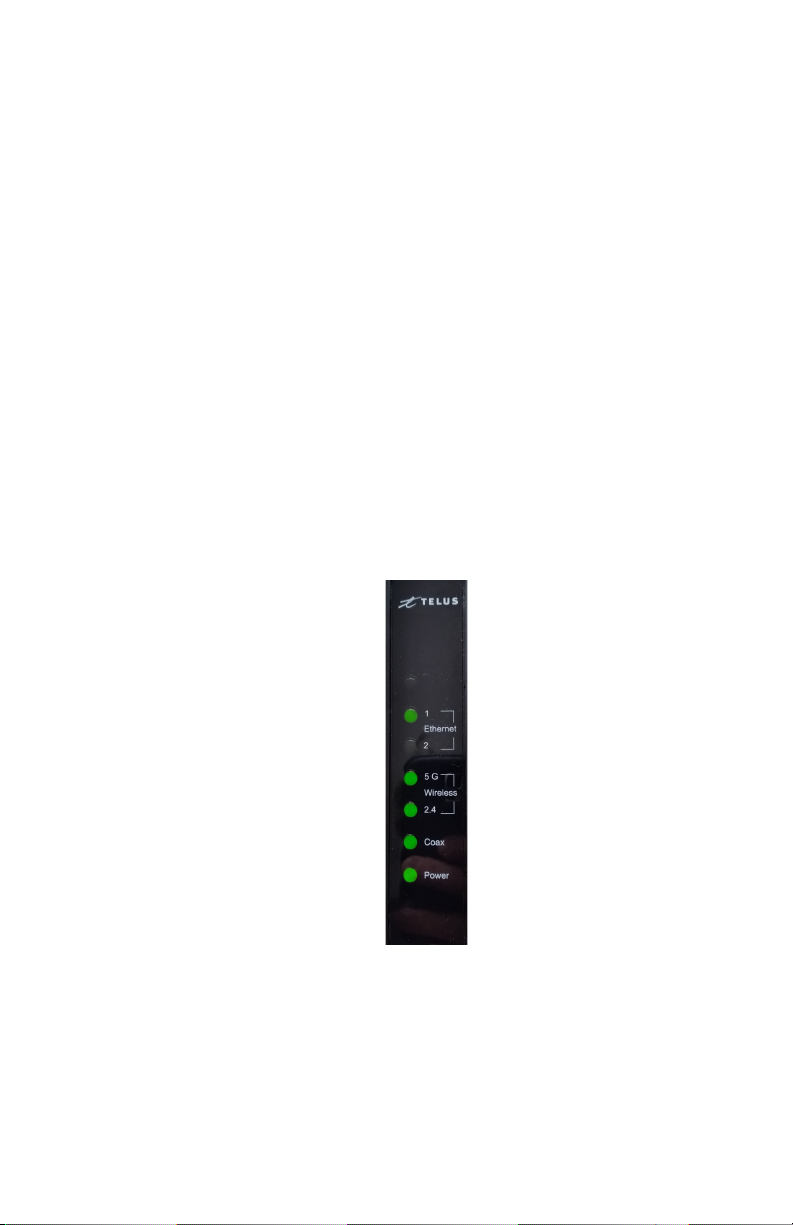
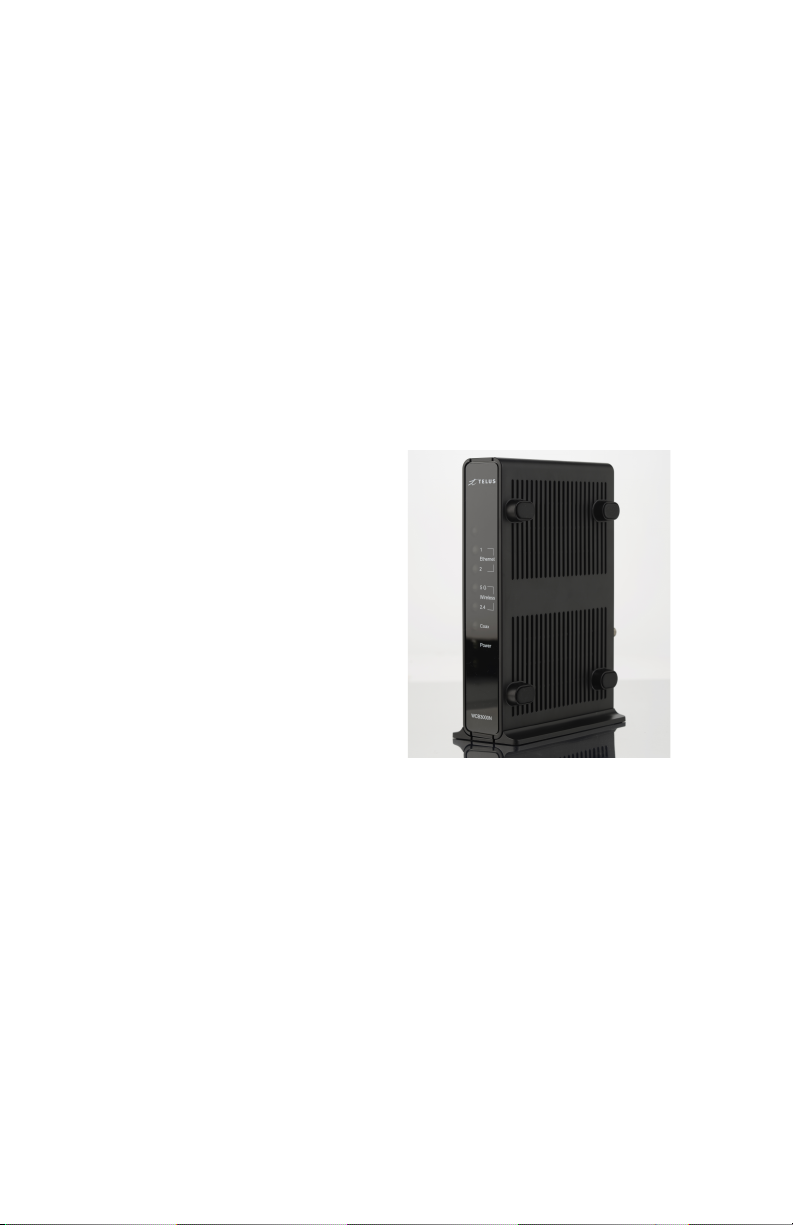
Getting to Know the
WCB3000N
Front Panel
e front panel features LEDs that illuminate in green when the
operation of power, available ports and wireless bands are functioning
and in use.
!
!
!
!
!
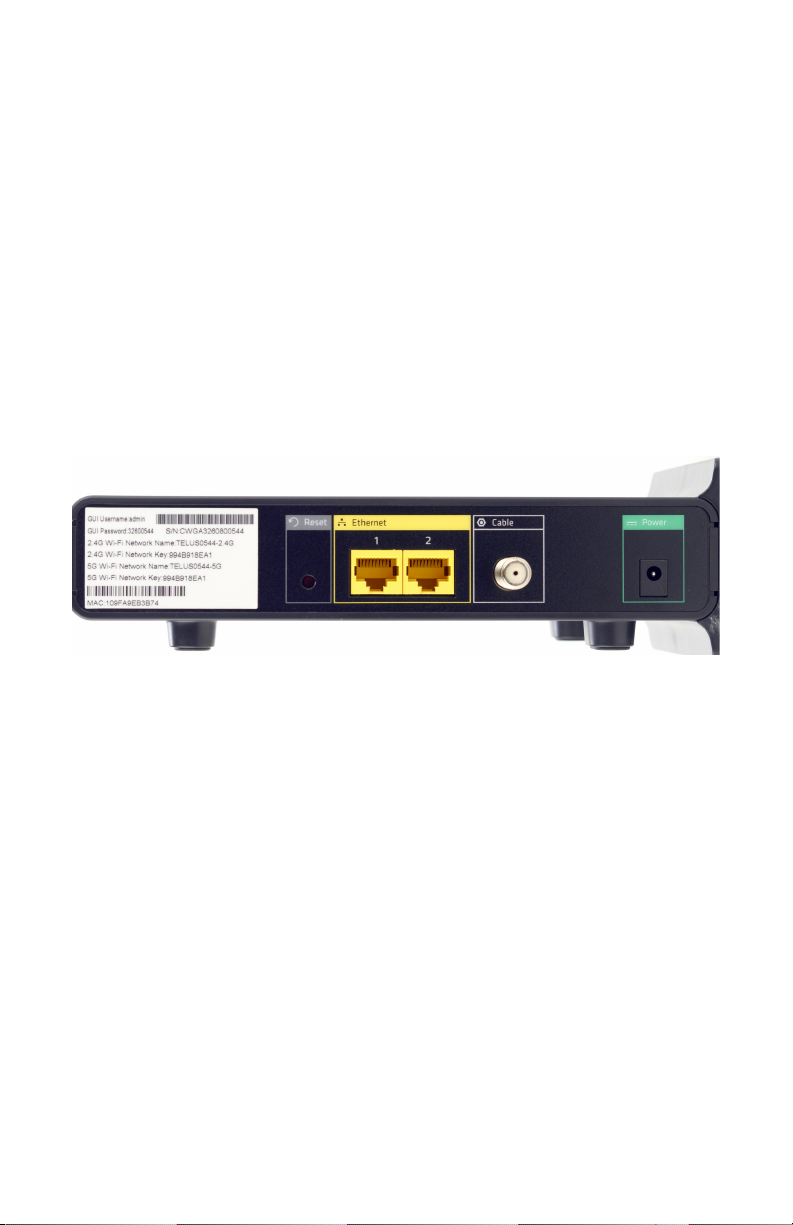
Back Panel
•e WCB3000N has a 2 Port Gigabit Ethernet Switch utilized for
Ethernet installation of the device.
5
Wireless Network Extender
•e Coax/MoCA connector is not used nor supported for Telus
installation.
•Reset Button: Holding the reset button down for 10 seconds will restore
the unit back to the original factory default settings.
•e Power port is used to connect the Power Cord to the WCB3000N.
•e label indicates the factory default GUI access username, password,
Network SSID names and security keys.
!
!
!
6
Accessing the Extender’s GUI
!
To congure the settings of your WCB3000N Wireless Extender:
1. Ensure that your WCB3000 WiFi Extender is connected to your
Actiontec or Zyxel gateway/modem, and that both units are powered
on.
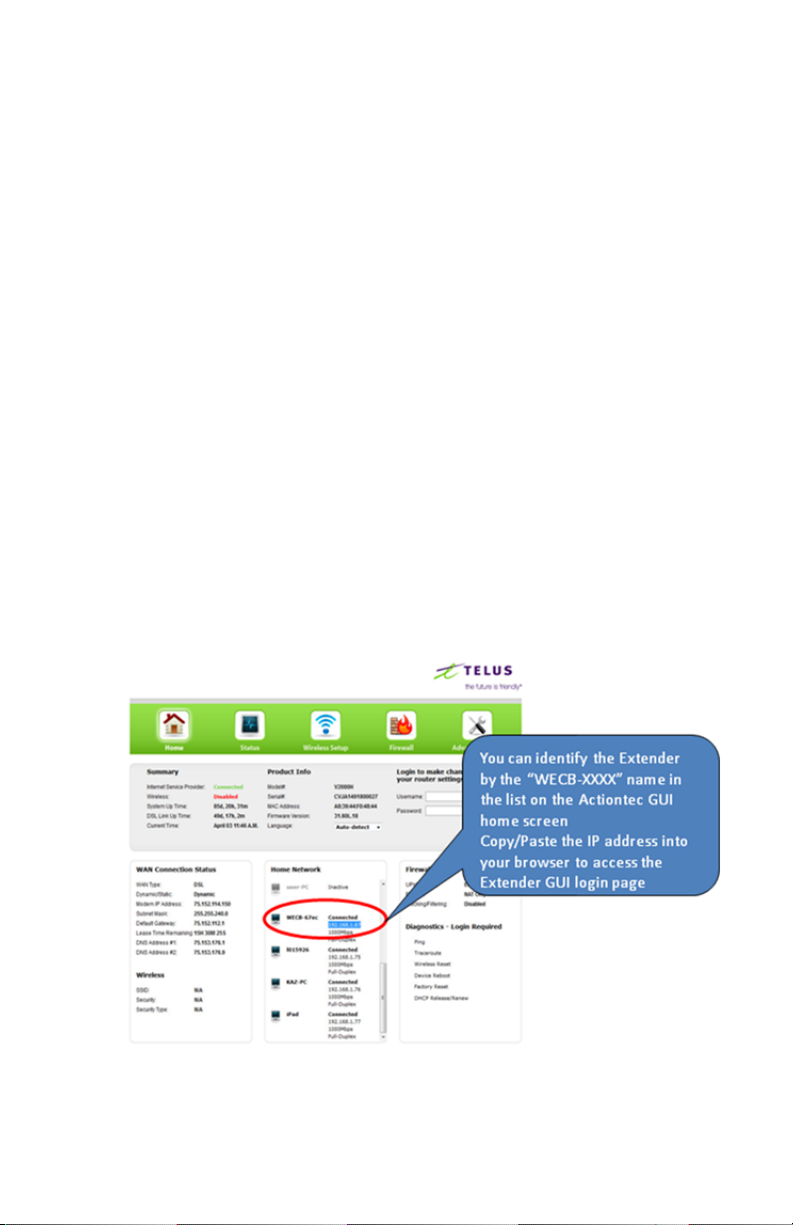
2. Log in to your Actiontec or Zyxel gateway/modem by entering
192.168.1.254 into the address bar of your Internet browser. e IP
address of your WCB3000N should be displayed on the main or
Home page of the Actiontec and on the Status page of the Zyxel.
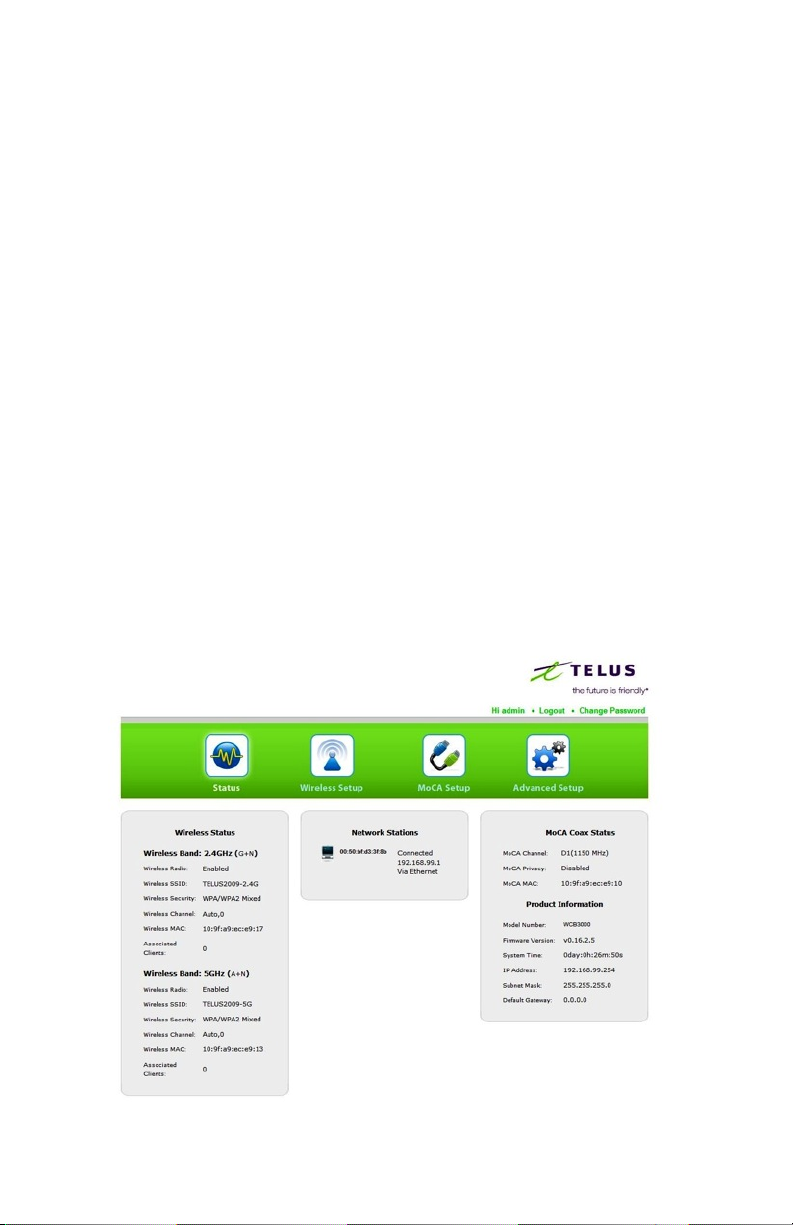
3. e Extender’s GUI “Status” screen appears, as shown below.
!
7

Wireless Network Extender
!
4. When you determine the IP address assigned to your WCB3000 and "
then enter that IP address into the address bar of your browser, you "
will be led to the WCB3000N graphical user interface (GUI) Login "
page.
5. Enter “admin” (all lower case) for the User Name and for the "
Password, enter the password indicated on the label located on the "
back of the WCB3000N.
!
8
System Preferences
System Preferences
e Wireless Network Extender features an onboard graphical user
interface (GUI) that includes user-congurable settings. Some of these
settings should be accessed by experienced users only.
Status
e rst GUI screen that appears is the “Status” screen. is screen
contains basic information about the Extender’s wireless connection,
network status, MoCA status, and information about the Extender’s
rmware. ere are no congurable settings available in this screen.!
9
Other manuals for WCB3000N
2
Table of contents
Other ActionTec Extender manuals

ActionTec
ActionTec WCB5200 User manual

ActionTec
ActionTec WEB5500 User manual

ActionTec
ActionTec W B6 00Q Series User manual

ActionTec
ActionTec WCB6200Q User manual

ActionTec
ActionTec HPAP108T User manual

ActionTec
ActionTec WCB3000N Installation guide

ActionTec
ActionTec WEB6000Q User manual

ActionTec
ActionTec W B6 40Q Series User manual

ActionTec
ActionTec MoCA 2.5 User manual

ActionTec
ActionTec WCB6200Q02 User manual


