ACV 381094-29-1 User manual
Installation Manual
• Fiat Ducato 06/2006 ->
(open dash) Type 250*
*Not for models with SONY OEM head unit
Colour: Part-No.:
black: 381094-29-1
piano-black: 381094-29-2
Compatible with Double-DIN devices
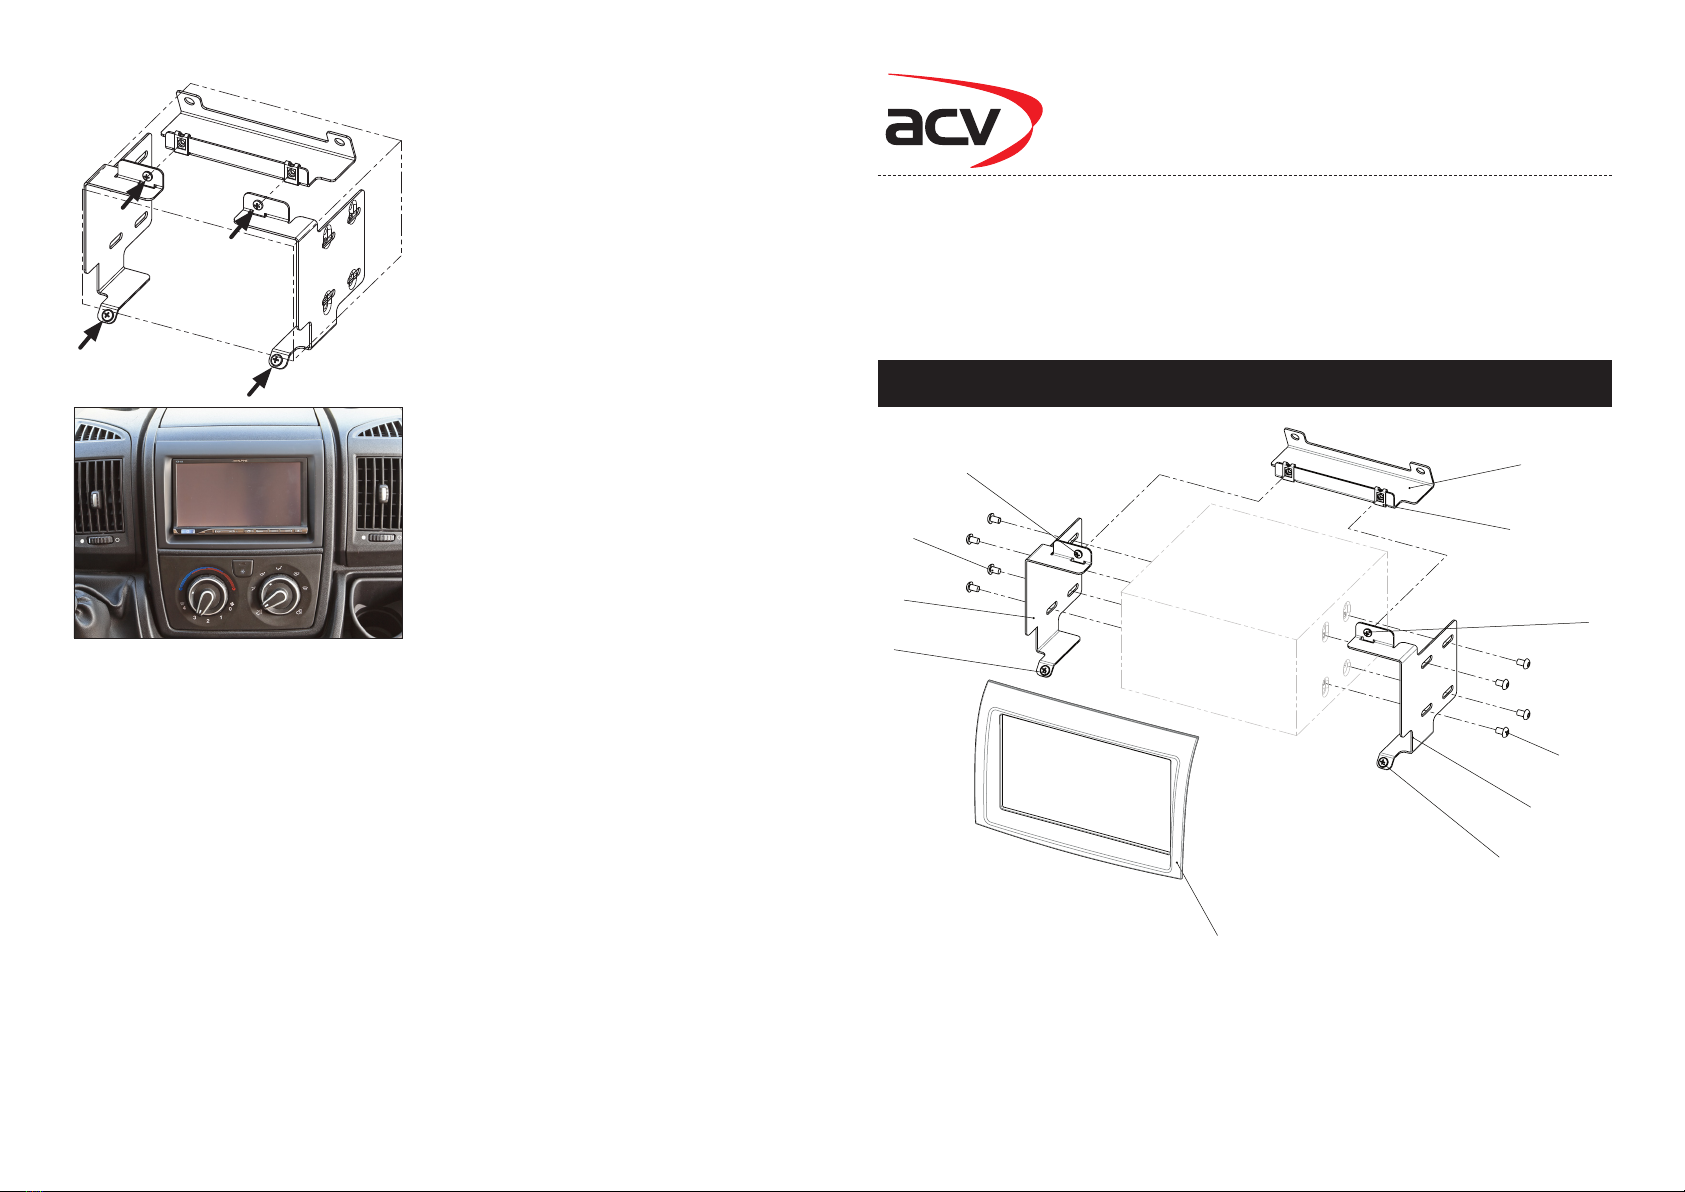
Double DIN navigation
(1) facia plate
(2) mounting bracket right
(3) mounting bracket left
(4) mounting plate
(5) at headed screw
(6) self-tapping convex llister head screw
(7) self-tapping screw with collar
(8) speed nut
1
2
5
3
5
7
7
4
8
6
6
Kit Content
7. Clip facia plate to dash board
until it snaps in.
All installation work must be performed by a qualied professional installer only.
The manufacturer / dealer is not liable for any kind of incidential or indirect damages.
6. Connect all required circuit points
Place head unit on dash board
Fix it with 4 screws
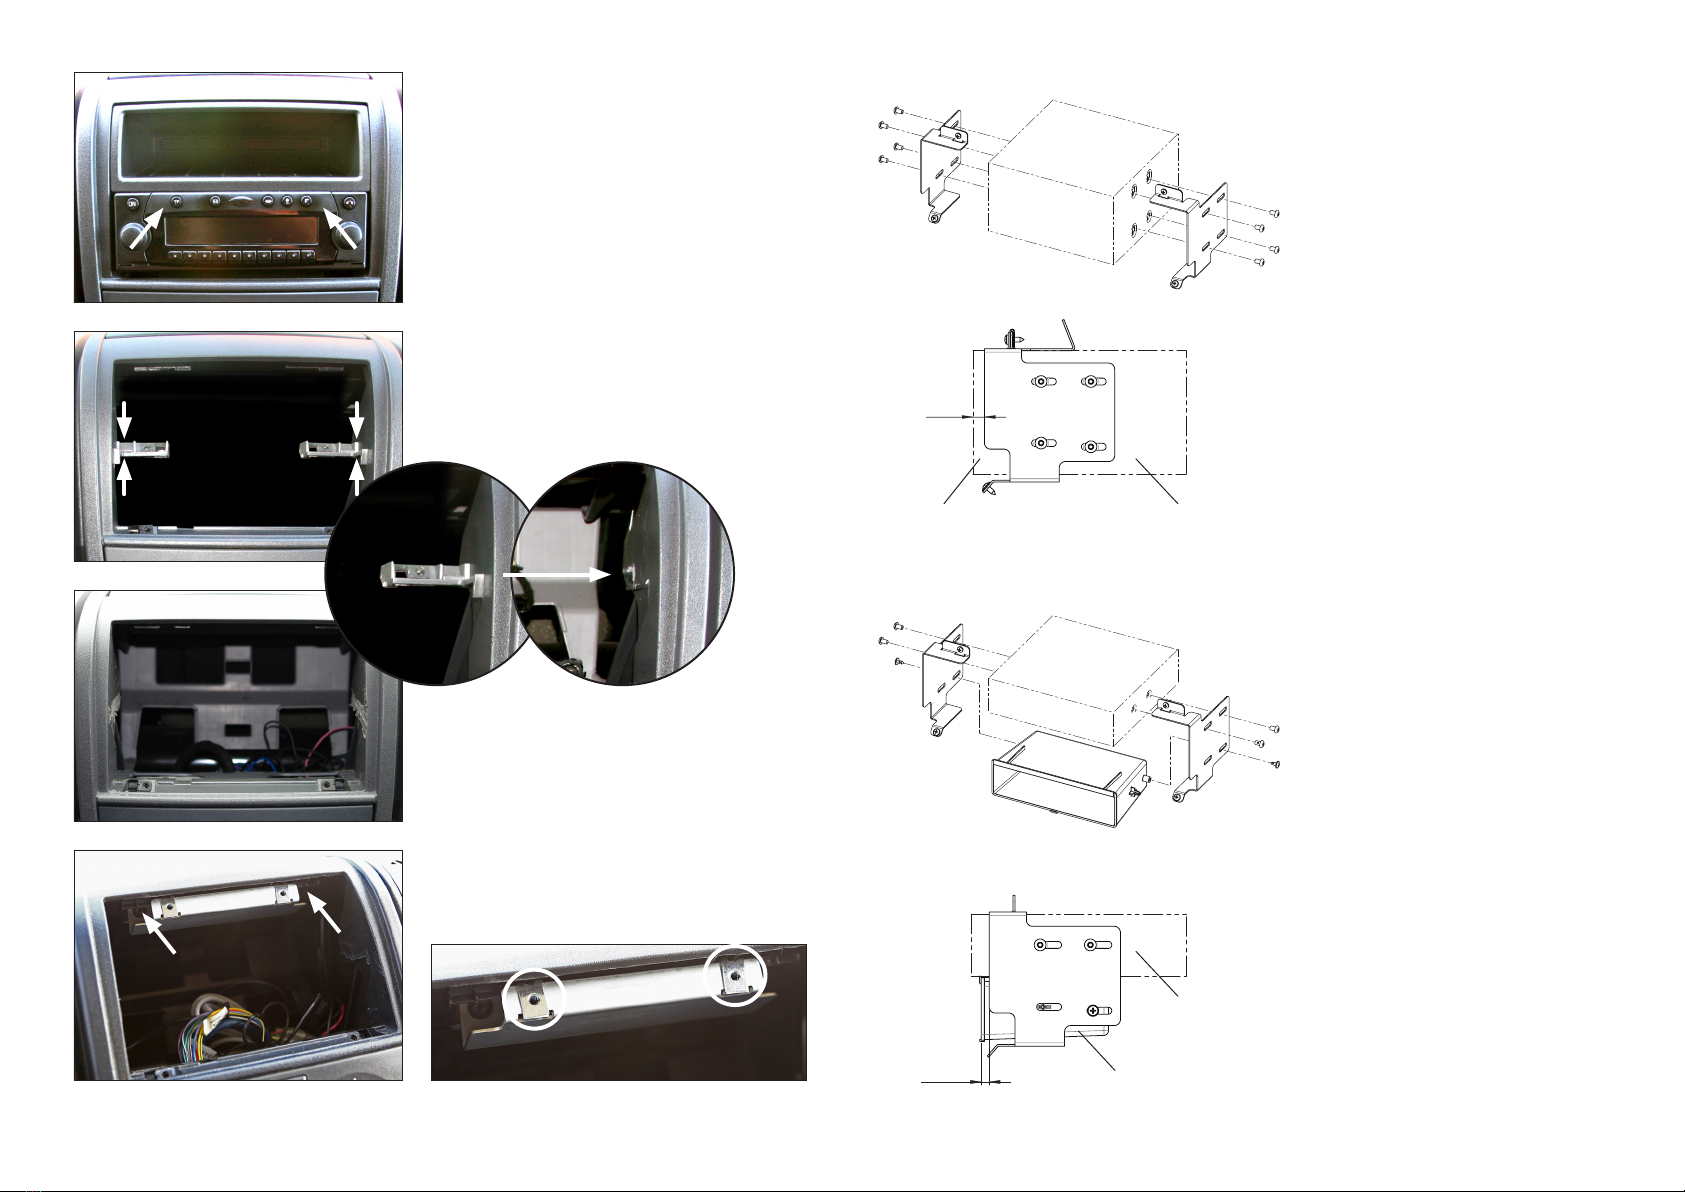
1. Remove OEM head unit
and pocket
Special tools like radio release keys
may be required.
5. 2-DIN version only:
Attach mounting brackets to
Double-DIN head unit as shown
in the sample graphic
We recommend to leave
app. 10 mm space to the
unit front surface
We recommend to leave
app. 6 mm space to pocket
5a. 1-DIN version only:
Attach mounting brackets to pocket
and 1-DIN head unit as shown in the
sample graphic
2. Cut away original brackets (mar-
ked with arrows) with appropriate
tools to clear space
3. Ducato dashboard after cutting
away brackets
4. Assemble speed nuts on mounting plate
Install mounting plate on
top of dash board hole.
~10 mm
© 09/2014 ALL RIGHTS RESERVED. Technical changes possible. No liability for misprints.
~6mm
pre-assembly Brackets
pocket
1-DIN unit
2-DIN unitunit front surface

ACV Auto Communications Fon (02431) 9645 –0 Art.-Nr.: 42sfa016
Vertriebsgesellschaft mbH Fax (02431) 9645 –55 Stand: 01/2017
41812 Erkelenz Web: www.acvgmbh.de Seite: 1/2

ACV Auto Communications Fon (02431) 9645 –0 Art.-Nr.: 42sfa016
Vertriebsgesellschaft mbH Fax (02431) 9645 –55 Stand: 01/2017
41812 Erkelenz Web: www.acvgmbh.de Seite: 2/2

Mit dem 42ctmultilead haben Sie die Möglichkeit, jegliches
spezifische Lenkradfernbedienungsanschlusskabel, im
folgenden „lead“ genannt, zu konfigurieren.
Ausnahmen sind hier leads für Radios von
BECKER, BLAUPUNKT oder auch PARROT
(Asteroid), welche spezifisch bestellt werden müssen:
(42ctbeckerlead / 42ctasteroidlead).
BLAUPUNKT muss unterschieden werden: Herstellung bis
2010 (42ctblaupunktlead), Herstellung nach 2010 je nach
Gerät mit dem 42ctmultilead konfigurieren (Klinke oder
Key1/Key2 und Massekabel, Konfiguration der Brücken
wie bei China-Headunits).
With a 42ctmultilead you can configure any specific lead
with one special cable harness! Exceptions are BECKER,
BLAUPUNKT or PARROT (Asteroid), where specific leads
are used. (42ctbeckerlead / 42ctasteroidlead).
BLAUPUNKT has to be differentiated between models
before 2010 (42ctblaupunktlead) or after 2010 where you
can configure the device with a 42ctmultilead (3,5mm jack
or key1/key2 with Ground).
Bitte beachten Sie, das die spezifischen „Leads“ bzw.
„Radioanschlusskabel Lenkradfernbedienung“ nur Daten
bzw. geringe elektrische Spannungsänderungen übertragen.
Diese Leitungen dürfen keinesfalls mit dem 12V-Stromnetz
verbunden werden, dies würde die Interfaces zerstören!
Please note that the specific “leads“or “stalk harness cable“
are only designed to transfer data respectively low voltage
changes. These harnesses must not be connected to the
12V power supply, this would harm the interface and most
likely destroy it!
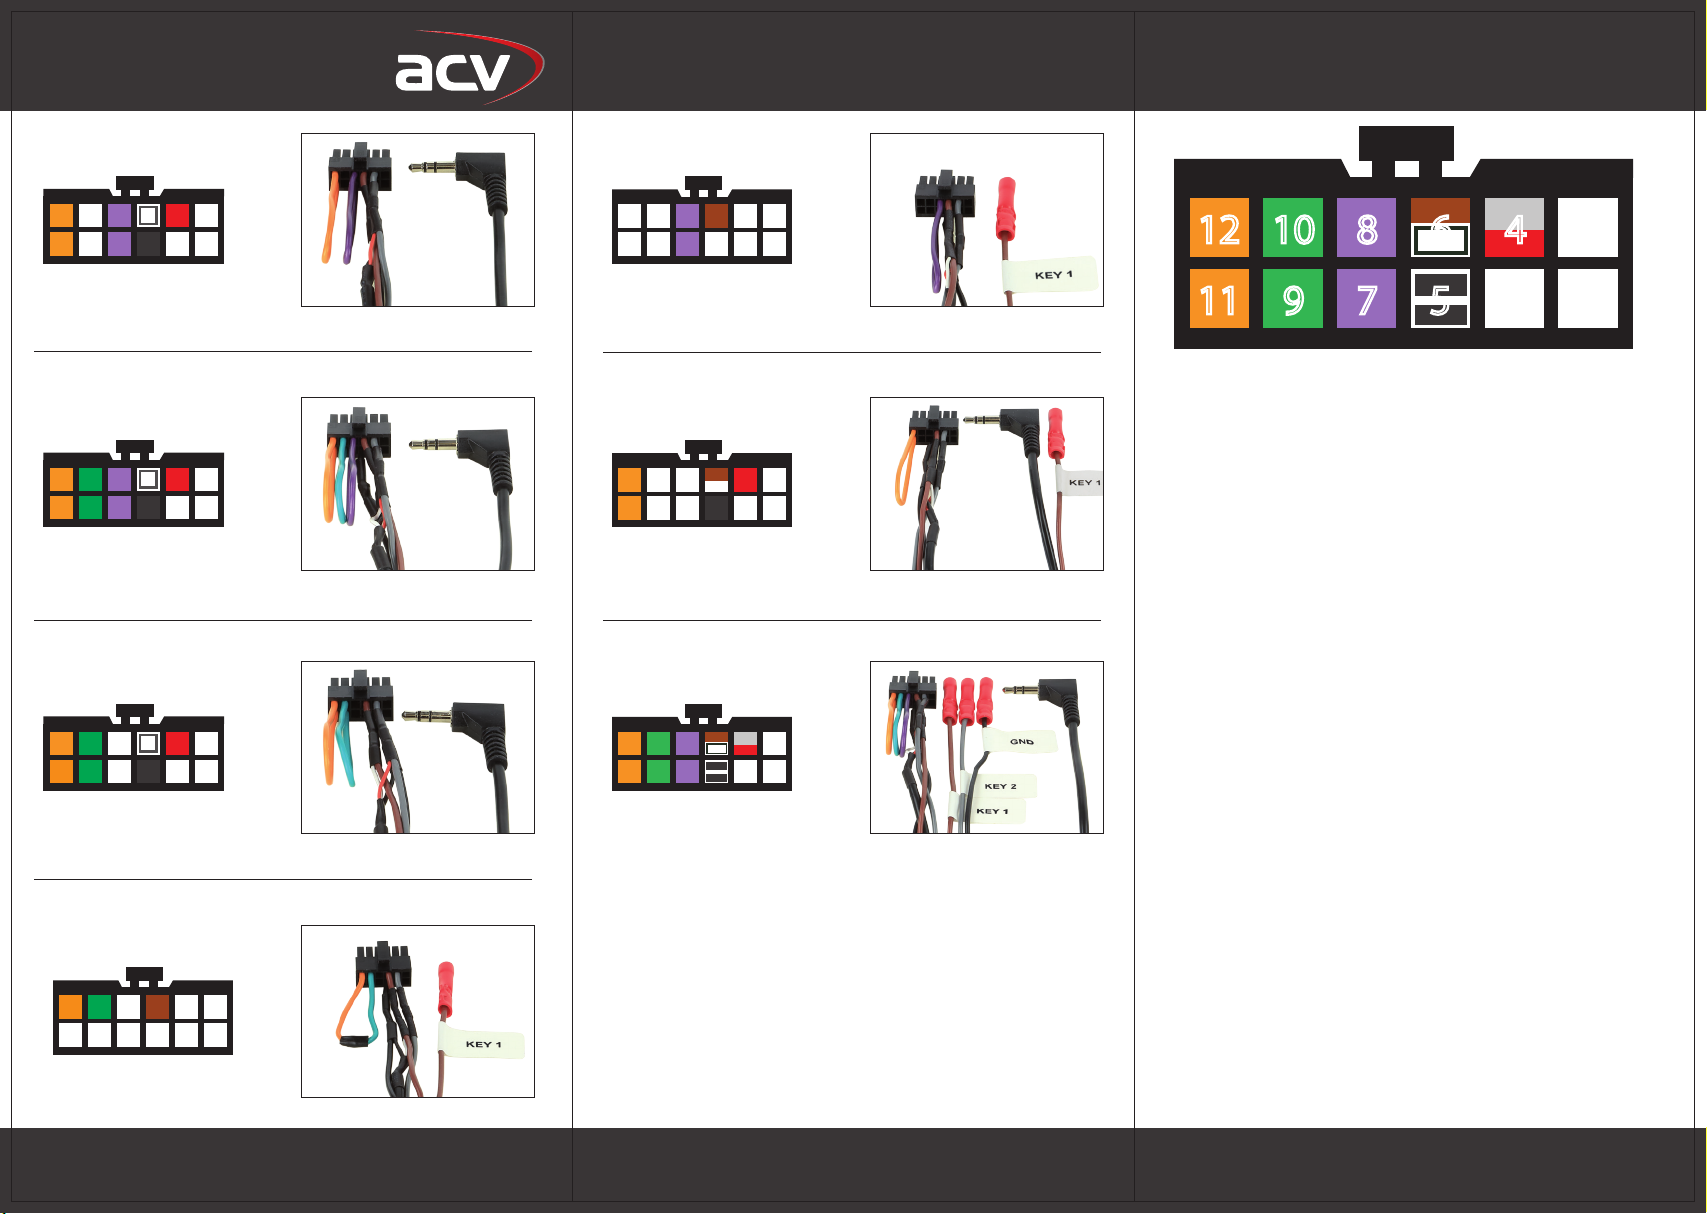
Universelles Anschlusskabel / universal patch lead
Konfigurationsanweisung / Configuration Assignments
(1= Link made, 0= No Link)
ACV GmbH
Straßburger Allee 10-12
41812 Erkelenz
Mit diesem 42ctmultilead haben Sie die Möglichkeit, jegliches spezifische „Lead“ mit einem Kabelsatz
zu konfigurieren. Ausnahmen sind hier Becker- oder Parrot-Leads, diese müssen spezifisch
angefordert werden (42ctbeckerlead / 42ctasteroidlead).
With a 42ctmultilead you are able to configure any specific lead with one special cable harness.
Exceptions are Becker or Parrot, where specific leads are used (42ctbeckerlead / 42ctasteroidlead).
Konfigurationsanweisung / Configuration Assignments (1= Link made, 0= No Link)
J1
J2
J3
Systeme /
Systems
Anschluss /
Connector
1 0 0 JCV Klinke/Jack/Key1
1 1 1 Blaupunkt Key1/Key2/GND/Klinke/Jack
1 1 0 Clarion Klinke/Jack
0 0 1 KENWOOD Key1
1 0 1 ALPINE Klinke/Jack
0
1
1
Panasonic
Key1
1 1 1 Sony/Pioneer Klinke/Jack
1 (Pin12) 1 (Pin10) 0 ZENEC Key1
1 1 1
Chinese Learning
Brands
Key1/Key2/GND
Pin Konfiguration / Pin Configuration
Pin 1
Beschreibung /
Description
1
nicht
belegt /
r
eserved
2 nicht belegt / reserved
3 nicht belegt / reserved
4
Analog 2 Swc
5
GND Swc
6
Analog 1 Swc
7
Link J3
8
Link J3
9
Link J2
10
Link J2
11
Link J1
12
Link J1
12
10
8
6
4
2
11
9
7
5
3
1
ACV GmbH
Straßburger Allee 10-12
41812 Erkelenz
Mit diesem 42ctmultilead haben Sie die Möglichkeit, jegliches spezifische „Lead“ mit einem Kabelsatz
zu konfigurieren. Ausnahmen sind hier Becker- oder Parrot-Leads, diese müssen spezifisch
angefordert werden (42ctbeckerlead / 42ctasteroidlead).
With a 42ctmultilead you are able to configure any specific lead with one special cable harness.
Exceptions are Becker or Parrot, where specific leads are used (42ctbeckerlead / 42ctasteroidlead).
Konfigurationsanweisung / Configuration Assignments (1= Link made, 0= No Link)
J1
J2
J3
Systeme /
Systems
Anschluss /
Connector
1 0 0 JCV Klinke/Jack/Key1
1 1 1 Blaupunkt Key1/Key2/GND/Klinke/Jack
1 1 0 Clarion Klinke/Jack
0 0 1 KENWOOD Key1
1 0 1 ALPINE Klinke/Jack
0
1
1
Panasonic
Key1
1 1 1 Sony/Pioneer Klinke/Jack
1 (Pin12) 1 (Pin10) 0 ZENEC Key1
1 1 1
Chinese Learning
Brands Key1/Key2/GND
Pin Konfiguration / Pin Configuration
Pin 1
Beschreibung /
Description
1
nicht
belegt /
r
eserved
2 nicht belegt / reserved
3 nicht belegt / reserved
4
Analog 2 Swc
5
GND Swc
6
Analog 1 Swc
7
Link J3
8
Link J3
9
Link J2
10
Link J2
11
Link J1
12
Link J1
12
10
8
6
4
2
11
9
7
5
3
1
EINBAUANLEITUNG
INSTALLATION INSTRUCTIONS
INSTRUCCIONES DE MONTAJE
INSTRUCTIONS DE MONTAGE
ISTRUZIONI DI MONTAGGIO
INSTRUÇÕES DE MONTAGEM
INBOUW-INSTRUCTIE
MONTERINGSVEJLEDNING
MONTERINGSVEILEDNING
MONTERINGSANVISNING
ASENNUSOHJE
CZ NÁVOD K MONTÁŽI
BESZERELÉSI UTASÍTÁS
PL INSTRUKCJA ZABUDOWY
INSTRUCȚIUNI DE MONTAJ
D
GB
E
F
I
P
NL
DK
N
S
SF
CZ
H
PL
RO
Technische Änderungen vorbehalten
Subject to alteration without notice
Reservadas modificaciones técnicas
Sous réserve de modifications techniques
Con riserva di apportare modifiche tecniche
Reservamo nos o direito a alteracões técnicas
Technische wijzigingen voorbehouden
Med forbehold for tekniske Índringer
Tekniske forendringer forbeholdes
Med reservation för tekniska ändringar
Tekniset muutokser pidätetään
Technické zmeny vyhrazeny
A változtatások technika jogát fenntartjuk
Zmniany techniczne zastrzezeone
Ne rezervam dreptul la modificari tehnice
Montage durch Fachwerkstatt erforderlich
Expert Fitment Required
Montaje sólo por el concesionario
Montage par spécialiste nécessaire
E’ necessario in officina specializzata
Especialista em montagem requerido
Montage door vakman nodig
Montage ved professionelt værksted päkrævet
Nødvendig med montering fra fagvegverksted
Verkstadsmontage erfordras
Asennus tarpeen merkkikorjaamossa
Montáž ve specializované dÍlne nutná
A szereléshez szakmuhely kell
Konieczny montaz przez warsztat specjalistyczny
Montajul trebuie efectuat de un atelier de specialitate
Pin 1 Beschreibung / Description
42ctmultilead
Artikel-Nr.: | part-no
ACV GmbH · Straßburger Allee 10-12 · 41812 Erkelenz Tel.: 02431-96450 · Fax: 02431-964555
MULTILEAD
E-Mail: info@acvgmbh.de · Web: www.acvgmbh.de
J1
6
5
10 4
9
J2
3
8 2
7
J3
1
12
11
KENWOOD
JVC
CHINA HEADUNITS
ZENEC
Beispiel / Example ZENEC
Entfernen Sie Brücke J3. Trennen Sie Brücke J1 und J2
mittig und löten P12 (orange) und P10 (grün) zusammen.
Bitte isolieren Sie die Lötstelle fachmännisch. Verbinden
Sie das Kabel (Key1) mit dem dazugehörigen Kabel des
Radios (siehe Installationsanleitung des Herstellers ZENEC).
Please remove link J3. Cut the orange (J1) and green
(J2) link, then solder top row together (P12 and P10)
and insulate. Use the Wire connector to radio.
Beispiel / Example ALPINE
Entfernen Sie die Brücke J2 (grün) und nutzen Sie den
Klinkenstecker zur Verbindung mit der dazugehörigen
Klinkenbuchse der ALPINE Headunit
(siehe Installationsanleitung des Herstellers ALPINE).
Please remove link J2 (green) then connect the jack
connector into the jack socket of the ALPINE head unit.
Beispiel / Example KENWOOD
Entfernen Sie die Brücken J1 (orange) und J2 (grün).
Schließen Sie das Kabel (Key1) an das dazugehörige
Anschlusskabel der KENWOOD Headunit
(siehe Installationsanleitung des Herstellers KENWOOD)
Please remove link J1 (orange) and J2 (green).
Then connect the wire (Key1) to the proper wire
of the KENWOOD head unit.
J1
6
5
10 4
9
J2
3
8 2
7
J3
1
12
11
ALPINE
PIONEER/SONY
CLARION
MULTILEAD
ACV GmbH · Straßburger Allee 10-12 · 41812 Erkelenz Tel.: 02431-96450 · Fax: 02431-964555 E-Mail: info@acvgmbh.de · Web: www.acvgmbh.de
This manual suits for next models
1
Other ACV Car Video System manuals

Popular Car Video System manuals by other brands

Sune Technology
Sune Technology QVI-LVTX-1CH-V7 Specifications & installation

Valor
Valor RM-921C user guide

Boss Audio Systems
Boss Audio Systems BV9568BI user manual

Bravo
Bravo SOS-102 user manual

Blaupunkt
Blaupunkt MMP440 instruction manual

Blaupunkt
Blaupunkt Chicago 600 Operating and installation instruction


