ADAPT SOLUTIONS ASENTO EV-ACA17R User manual

ASENTO
INSTALLATION MANUAL
EV-ACA17R
GMC ACADIA 2017 & UP
PASSENGER SIDE
19
20
21
2
17
18
16
1
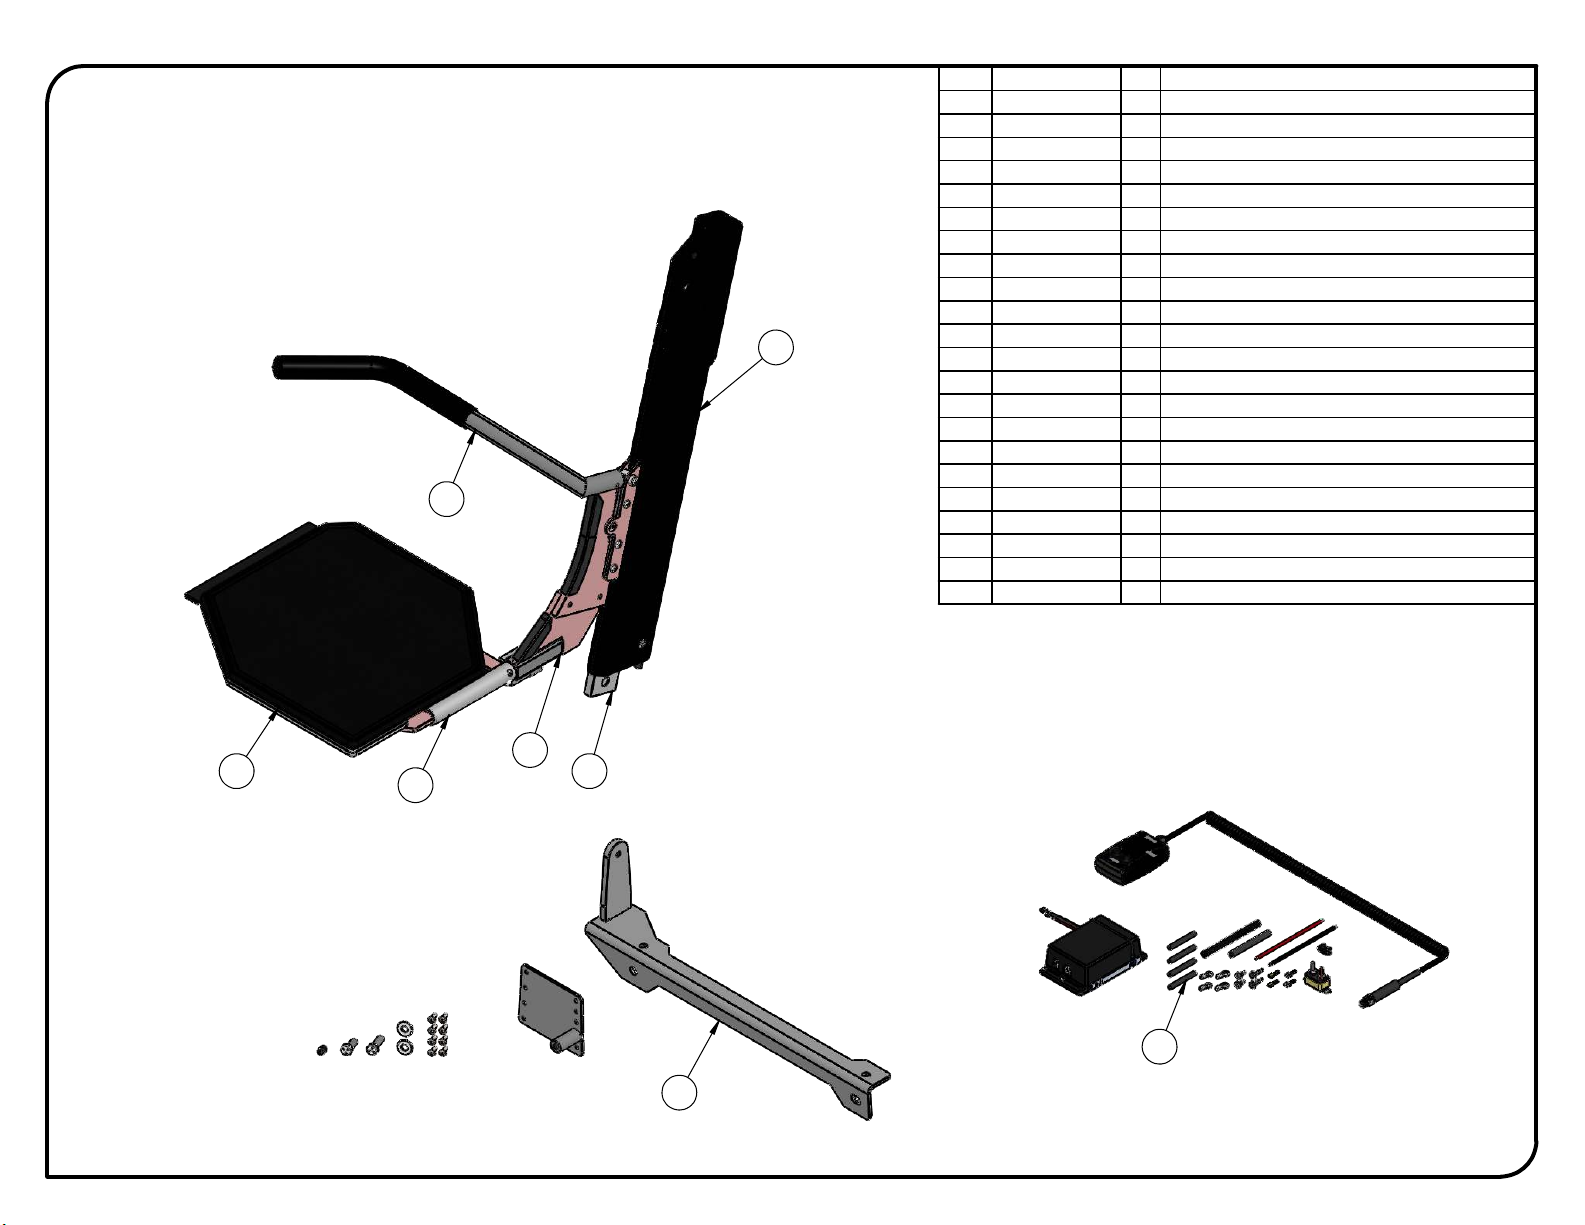
POWER SEAT
ITEM
PART NUMBER
QTY
DESCRIPTION
1
EV000-01
1
Support Assembly
2
EV100-07R
1
Slider -Right-
3
L-EV113-01
1
Slider Spacer
4
L-EV141-01
1
Front Slider
5
U-EV-UNI-01
1
Machined Socket Shoulder Screw
6
MC 90594A027P
3
Tab base weld nut with barrel zinc plated 1/4 x 9/16
7
PRD 333-107M
1
Nylon Insert Locknut 5/16-18 Thin
8
PRD 337-194P
3
Socket Head Cap Screw Zinc Plated 1/4-20 UNC x 7/8"
9
PRD 333-105
1
Nylon Insert Locknut 1/4-20
10
PRD 338-169P
1
Flat Head Socket Cap Screw Zinc Plated 1/4-20 x 1
11
PRD 341-103P
2
Flat Washer Zinc Plated I.D. 3/16 USS
12
PRD 400-289
1
Nylon Insert Locknut Stainless 10-24
13
PRD 400-583
1
Pan Head Machine Screw Phillips Stainless 10-24 x 5/8
14
PRD 192-153
1
Spring Tension Pin 1/4 x 1
15
SN 190-025
1
Binder Slot Head Post & Screw Black ,250 x ½"Lg
16
EV300-01R
1
Safety Arm -Right-
17
EV400-01R
1
Transfert Platform -Right-
18
XLS430B-01R
1
Transfer Plate Cushion -Right- Black
19
EV600B-01
1
Pillar Trim -Black-
20
EV700-AL
1
Electrical Kit
21
EV-ACA17R-00
1
Installation Kit -Right-
22
EV122-01
1
Spring Rod
EV-ACA17R
ADAPT SOLUTIONS
|[email protected]|866.641.0419|418.889.9838 fax
PART NUMBER
ASENTO GMC ACADIA 2017 & UP -Right-
DESCRIPTION
ASENTO GMC ACADIA 2017 & UP

20
21
24
2
18
19
17
1
MANUAL SEAT
23
22
ITEM
PART NUMBER
QTY
DESCRIPTION
1
EV000-01
1
Support Assembly
2
EV100-07R
1
Slider -Right-
3
L-EV113-01
1
Slider Spacer
4
EV122-01
1
Spring Rod
5
L-EV141-01
1
Front Slider
6
U-EV-UNI-01
1
Machined Socket Shoulder Screw
7
MC
90594A027P
3
Tab base weld nut with barrel zinc plated 1/4 x 9/16
8
PRD 333-107M
1
Nylon Insert Locknut 5/16-18 Thin
9
PRD 337-194P
3
Socket Head Cap Screw Zinc Plated 1/4-20 UNC x 7/8"
10
PRD 333-105
1
Nylon Insert Locknut 1/4-20
11
PRD 338-169P
1
Flat Head Socket Cap Screw Zinc Plated 1/4-20 x 1
12
PRD 341-103P
2
Flat Washer Zinc Plated I.D. 3/16 USS
13
PRD 400-289
1
Nylon Insert Locknut Stainless 10-24
14
PRD 400-583
1
Pan Head Machine Screw Phillips Stainless 10-24 x 5/8
15
PRD 192-153
1
Spring Tension Pin 1/4 x 1
16
SN 190-025
1
Binder Slot Head Post & Screw Black ,250 x ½"Lg
17
EV300-01R
1
Safety Arm -Right-
18
EV400-01R
1
Transfert Platform -Right-
19
XLS430B-01R
1
Transfer Plate Cushion -Right- Black
20
EV600B-01
1
Pillar Trim -Black-
21
EV700-AL
1
Electrical Kit
22
EV-TER18R-03
1
Seat Back Reclining Arm -Right-
23
EV-UNI-100
1
Safety Belt Rubber Band
24
EV-ACA17R-00
1
Installation Kit -Right-
EV-ACA17R
ADAPT SOLUTIONS
|[email protected]|866.641.0419|418.889.9838 fax
PART NUMBER
ASENTO GMC ACADIA 2017 & UP -Right-
DESCRIPTION
ASENTO GMC ACADIA 2017 & UP
7
1
11
5
2
3
9
4
12
10
8
6
,250
11
3 of 6
ITEM
PART NUMBER
DESCRIPTION
1
EV000-01
1
Support Assembly
2
EV100-07R
1
Slider -Right-
3
L-EV113-01
1
Slider Spacer
4
L-EV141-01
1
Front Slider
5
U-EV-UNI-01
1
Machined Socket Shoulder Screw
6
MC 90594A027P
3
Tab base weld nut with barrel zinc plated 1/4 x 9/16
7
PRD 333-107M
1
Nylon Insert Locknut 5/16-18 Thin
8
PRD 337-194P
3
Socket Head Cap Screw Zinc Plated 1/4-20 UNC x 7/8"
9
PRD 333-105
1
Nylon Insert Locknut 1/4-20
10
PRD 338-169P
1
Flat Head Socket Cap Screw Zinc Plated 1/4-20 x 1
11
PRD 192-153
1
Spring Tension Pin 1/4 x 1
12
EV122-01
1
Spring Rod
EV-ACA17R
ADAPT SOLUTIONS
|[email protected]|866.641.0419|418.889.9838 fax
PART NUMBER
ASENTO GMC ACADIA 2017 & UP -Right-
DESCRIPTION
ASENTO GMC ACADIA 2017 & UP

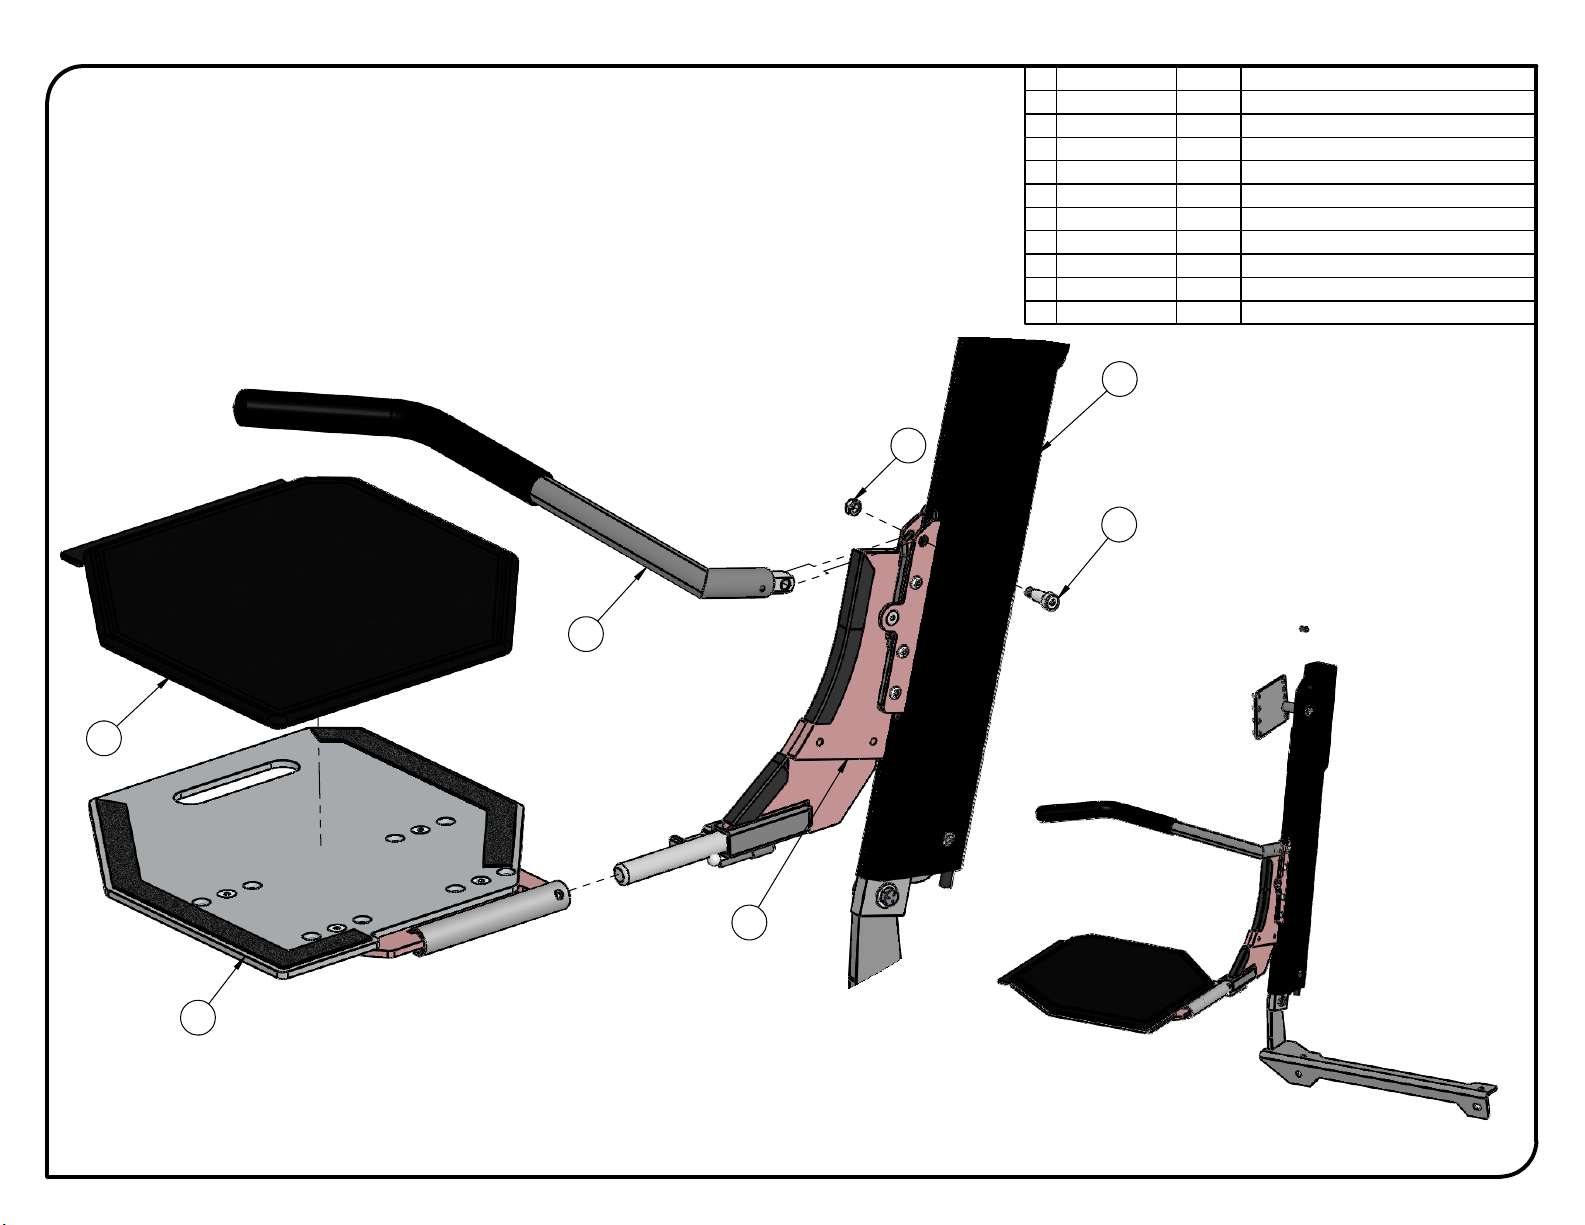
13
16
18
1
17
11
12
15
11
4 of 6
2 of 6
ITEM
PART NUMBER
DESCRIPTION
1
EV000-01
1
Support Assembly
2
EV100-07R
1
Slider -Right-
3
L-EV113-01
1
Slider Spacer
4
L-EV141-01
1
Front Slider
5
U-EV-UNI-01
1
Machined Socket Shoulder Screw
6
MC 90594A027P
3
Tab base weld nut with barrel zinc plated 1/4 x 9/16
7
PRD 333-107M
1
Nylon Insert Locknut 5/16-18 Thin
8
PRD 337-194P
3
Socket Head Cap Screw Zinc Plated 1/4-20 UNC x 7/8"
9
PRD 333-105
1
Nylon Insert Locknut 1/4-20
10
PRD 338-169P
1
Flat Head Socket Cap Screw Zinc Plated 1/4-20 x 1
11
PRD 341-103P
2
Flat Washer Zinc Plated I.D. 3/16 USS
12
PRD 400-289
1
Nylon Insert Locknut Stainless 10-24
13
PRD 400-583
1
Pan Head Machine Screw Phillips Stainless 10-24 x 5/8
14
PRD 192-153
1
Spring Tension Pin 1/4 x 1
15
EV600B-01
1
Pillar Trim -Black-
16
PRD 302-177P
1
Hex Cap Bolt Zinc Plated 3/8-16 x 1 1/4 G5
17
PRD 341-107P
1
Flat Washer Zinc Plated I.D. 5/16 USS
18
EV-ACA17R-01
1
Floor Adapter - Right -
19
EV122-01
1
Spring Rod
EV-ACA17R
ADAPT SOLUTIONS
|[email protected]|866.641.0419|418.889.9838 fax
PART NUMBER
ASENTO GMC ACADIA 2017 & UP -Right-
DESCRIPTION
ASENTO GMC ACADIA 2017 & UP

24
23
21
15
26
20
SET SCREW TO DRILL PLASTIC TRIM
19
5 of 6
ITEM
PART NUMBER
DESCRIPTION
1
EV000-01
1
Support Assembly
2
EV100-07R
1
Slider -Right-
3
L-EV113-01
1
Slider Spacer
4
L-EV141-01
1
Front Slider
5
U-EV-UNI-01
1
Machined Socket Shoulder Screw
6
MC 90594A027P
3
Tab base weld nut with barrel zinc plated 1/4 x 9/16
7
PRD 333-107M
1
Nylon Insert Locknut 5/16-18 Thin
8
PRD 337-194P
3
Socket Head Cap Screw Zinc Plated 1/4-20 UNC x 7/8"
9
PRD 333-105
1
Nylon Insert Locknut 1/4-20
10
PRD 338-169P
1
Flat Head Socket Cap Screw Zinc Plated 1/4-20 x 1
11
PRD 341-103P
2
Flat Washer Zinc Plated I.D. 3/16 USS
12
PRD 400-289
1
Nylon Insert Locknut Stainless 10-24
13
PRD 400-583
1
Pan Head Machine Screw Phillips Stainless 10-24 x 5/8
14
PRD 192-153
1
Spring Tension Pin 1/4 x 1
15
SN 190-025
1
Binder Slot Head Post & Screw Black ,250 x ½"Lg
16
EV300-01R
1
Safety Arm -Right-
17
EV400-01R
1
Transfert Platform -Right-
18
XLS430B-01R
1
Transfer Plate Cushion -Right- Black
19
EV600B-01
1
Pillar Trim -Black-
20
PRD 149-563
1
Socket set screw cone point 3/8-16 x 3/4
21
PRD 302-175P
1
Hex Cap Bolt Zinc Plated 3/8-16 x 1 G5
22
PRD 302-177P
1
Hex Cap Bolt Zinc Plated 3/8-16 x 1 1/4 G5
23
PRD 341-107P
2
Flat Washer Zinc Plated I.D. 5/16 USS
24
PRD BTT66
8
Button Head Stainless 3/16 x 9/16
25
EV-ACA17R-01
1
Floor Adapter - Right -
26
EV-ACA17R-02
1
Pilar Adapter -Right-
27
EV122-01
1
Spring Rod
EV-ACA17R
ADAPT SOLUTIONS
|[email protected]|866.641.0419|418.889.9838 fax
PART NUMBER
ASENTO GMC ACADIA 2017 & UP -Right-
DESCRIPTION
ASENTO GMC ACADIA 2017 & UP
2
6
7
5
3
4
8
6 OF 6
ITEM
PART NUMBER
DESCRIPTION
1
EV000-01
1
Support Assembly
2
EV100-07R
1
Slider -Right-
3
U-EV-UNI-01
1
Machined Socket Shoulder Screw
4
PRD 333-107M
1
Nylon Insert Locknut 5/16-18 Thin
5
EV300-01R
1
Safety Arm -Right-
6
EV400-01R
1
Transfert Platform -Right-
7
XLS430B-01R
1
Transfer Plate Cushion -Right- Black
8
EV600B-01
1
Pillar Trim -Black-
9
EV-ACA17R-01
1
Floor Adapter - Right -
10
EV122-01
1
Spring Rod
EV-ACA17R
ADAPT SOLUTIONS
|[email protected]|866.641.0419|418.889.9838 fax
PART NUMBER
ASENTO GMC ACADIA 2017 & UP -Right-
DESCRIPTION
ASENTO GMC ACADIA 2017 & UP
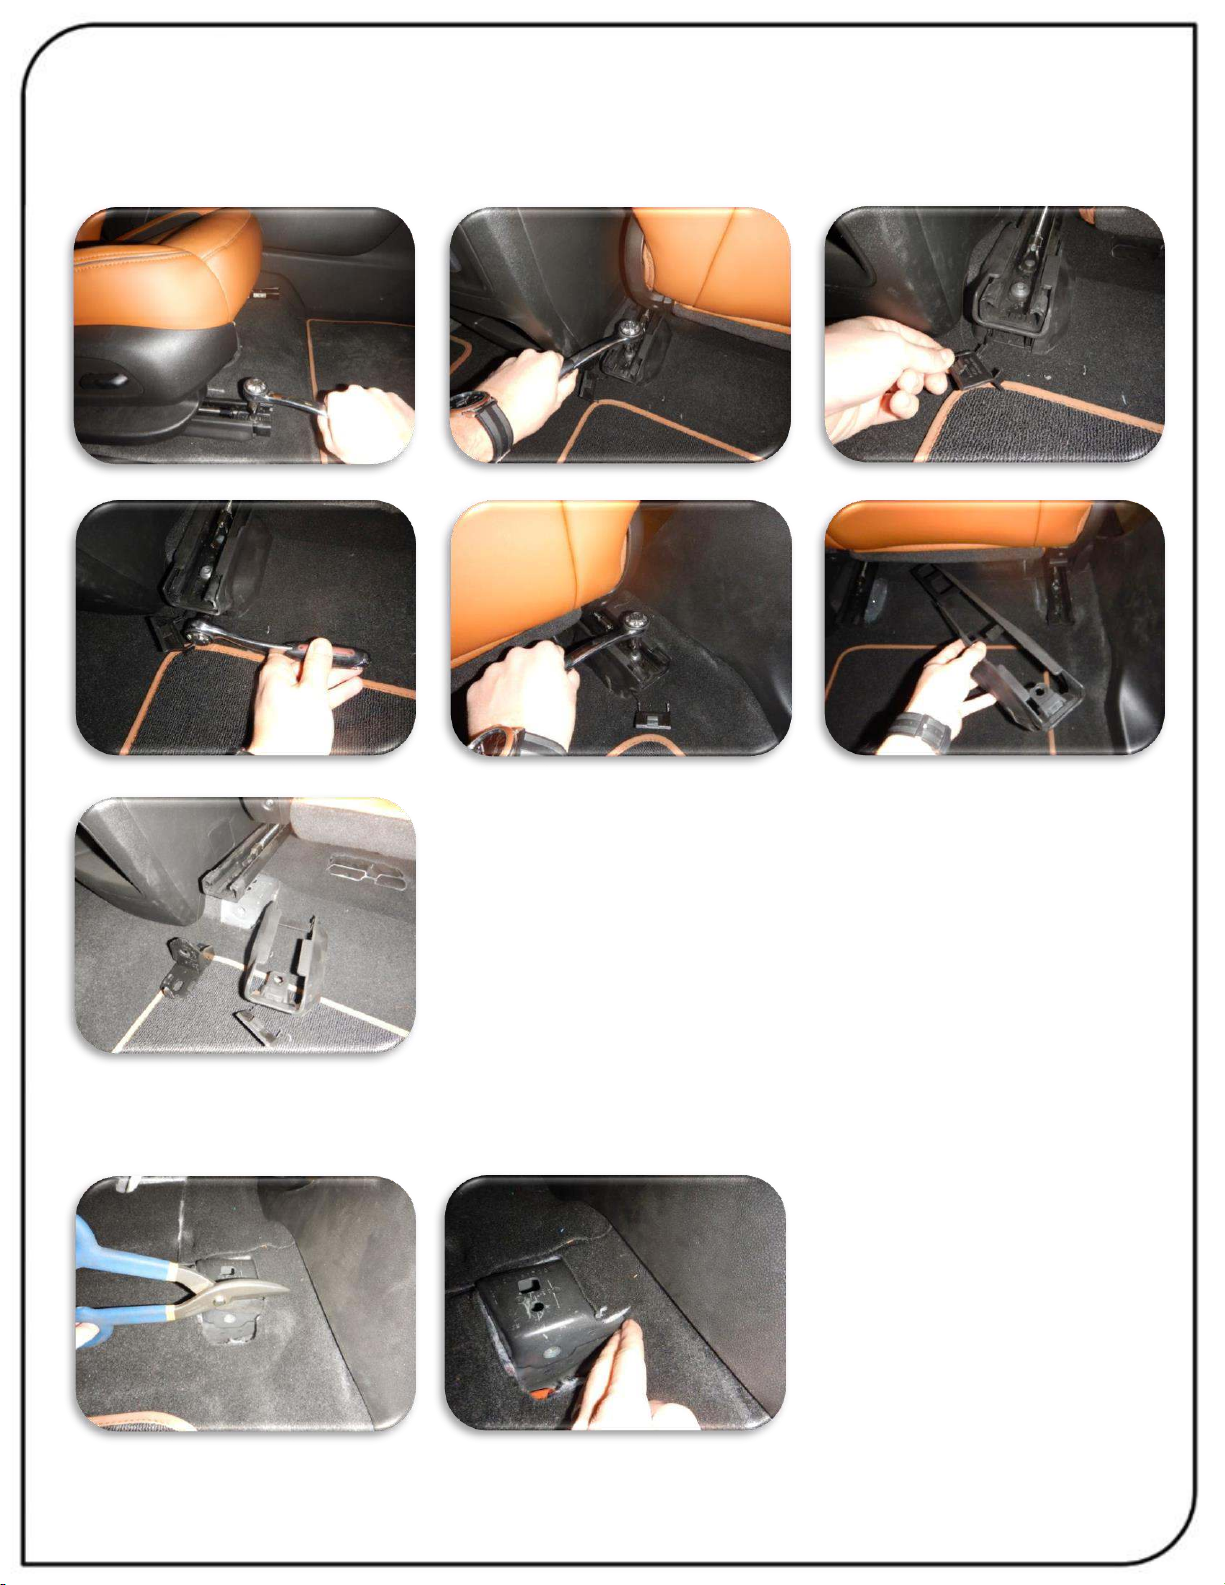
1. Slack the front seat bolts. Remove the top and bottom rear seat bolts on both sides. Remove the
lower brackets and plastic trims from the seat rail. Keep the OEM bolts for reinstallation of the
ASENTO floor adapter.
2. Cut a notch in the carpet at the right hand seat mount to facilitate the installation of the floor
bracket.

3. Install the ASENTO floor adapter #EV-ACA17R-01 using the OEM bolts.
4. Remove the lower b pillar trim.
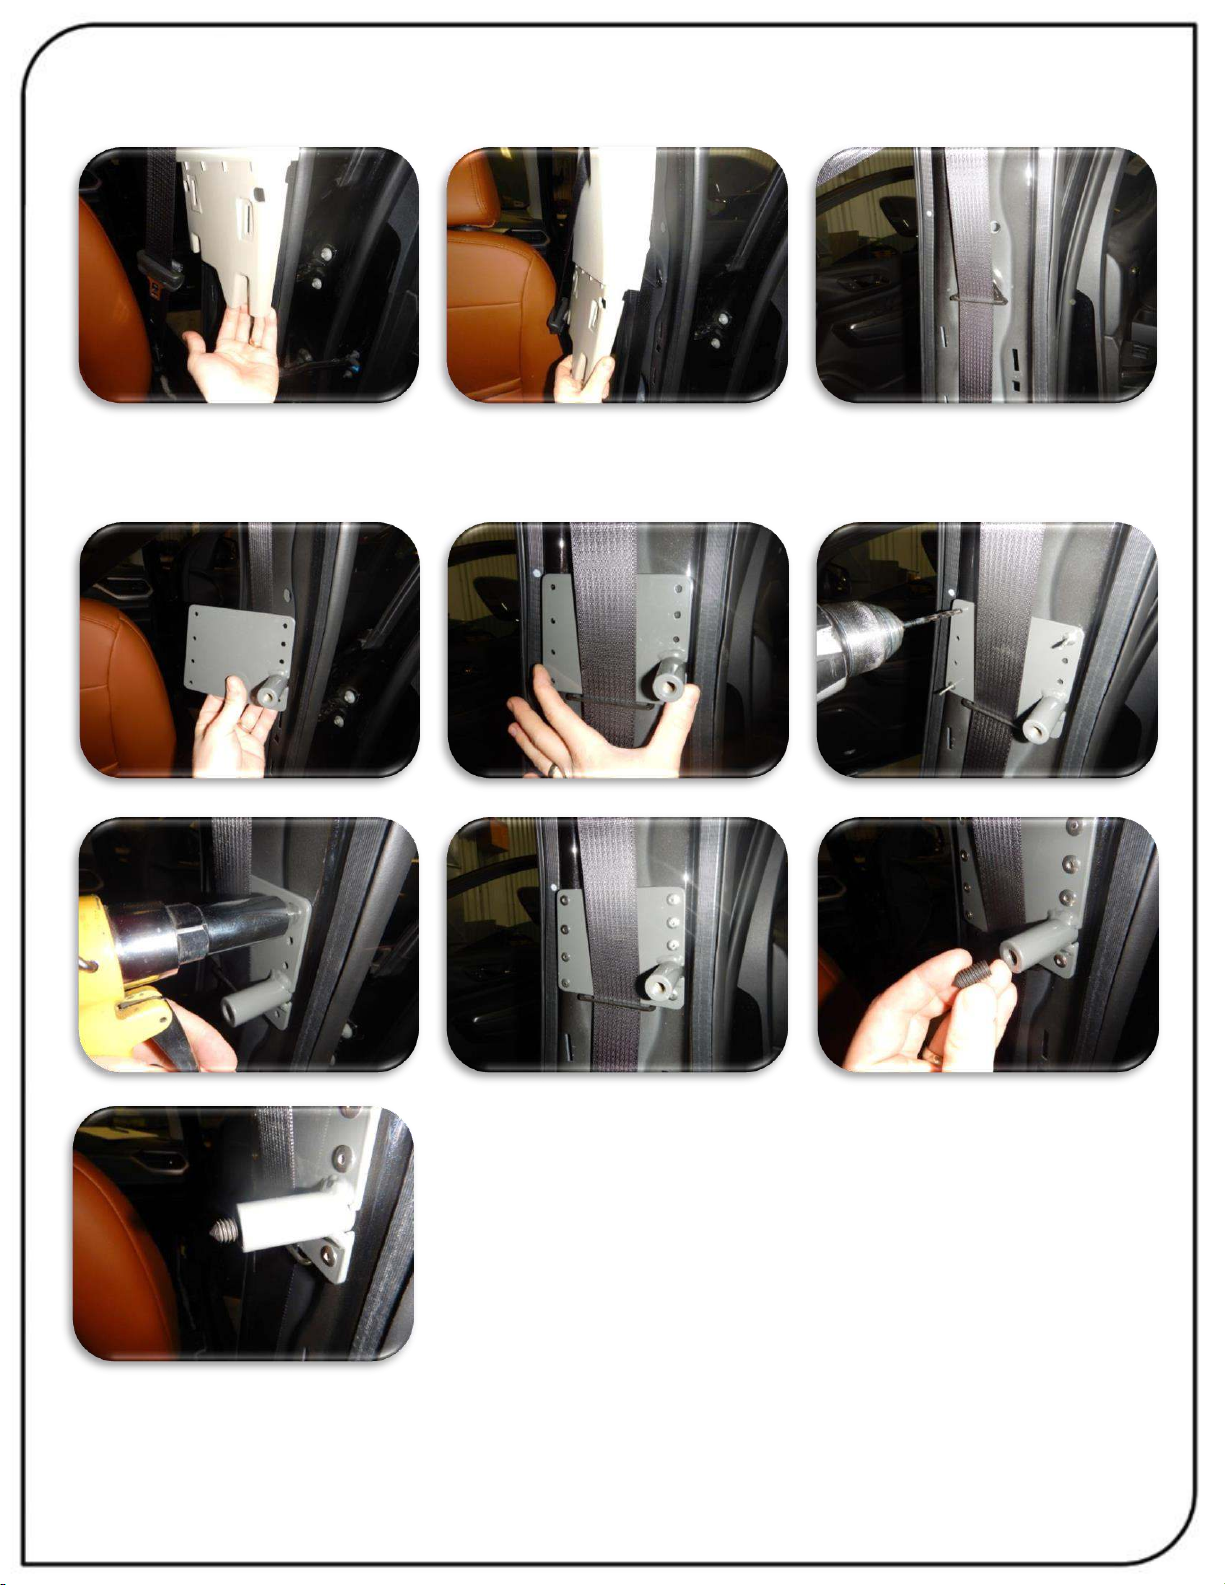
5. Remove the upper b pillar trim.
6. Install the b pillar adapter #EV-ACA17R-02 to the b pillar using the eight provided pop rivets. (NOTE:
drill slowly high strength steel)Then install the pointed allen screw into the b pillar adapter.
7. A ¾ inch hole will have to be drilled in both the top and bottom b pillar trims to be able to bolt the
ASENTO to the b pillar bracket. The plastic stopper on the upper b pillar trim will have to be
removed. Mark the hole by partially installing the upper and lower b pillar trims one at a time and
hitting them against the pointed allen screw to mark them for drilling.
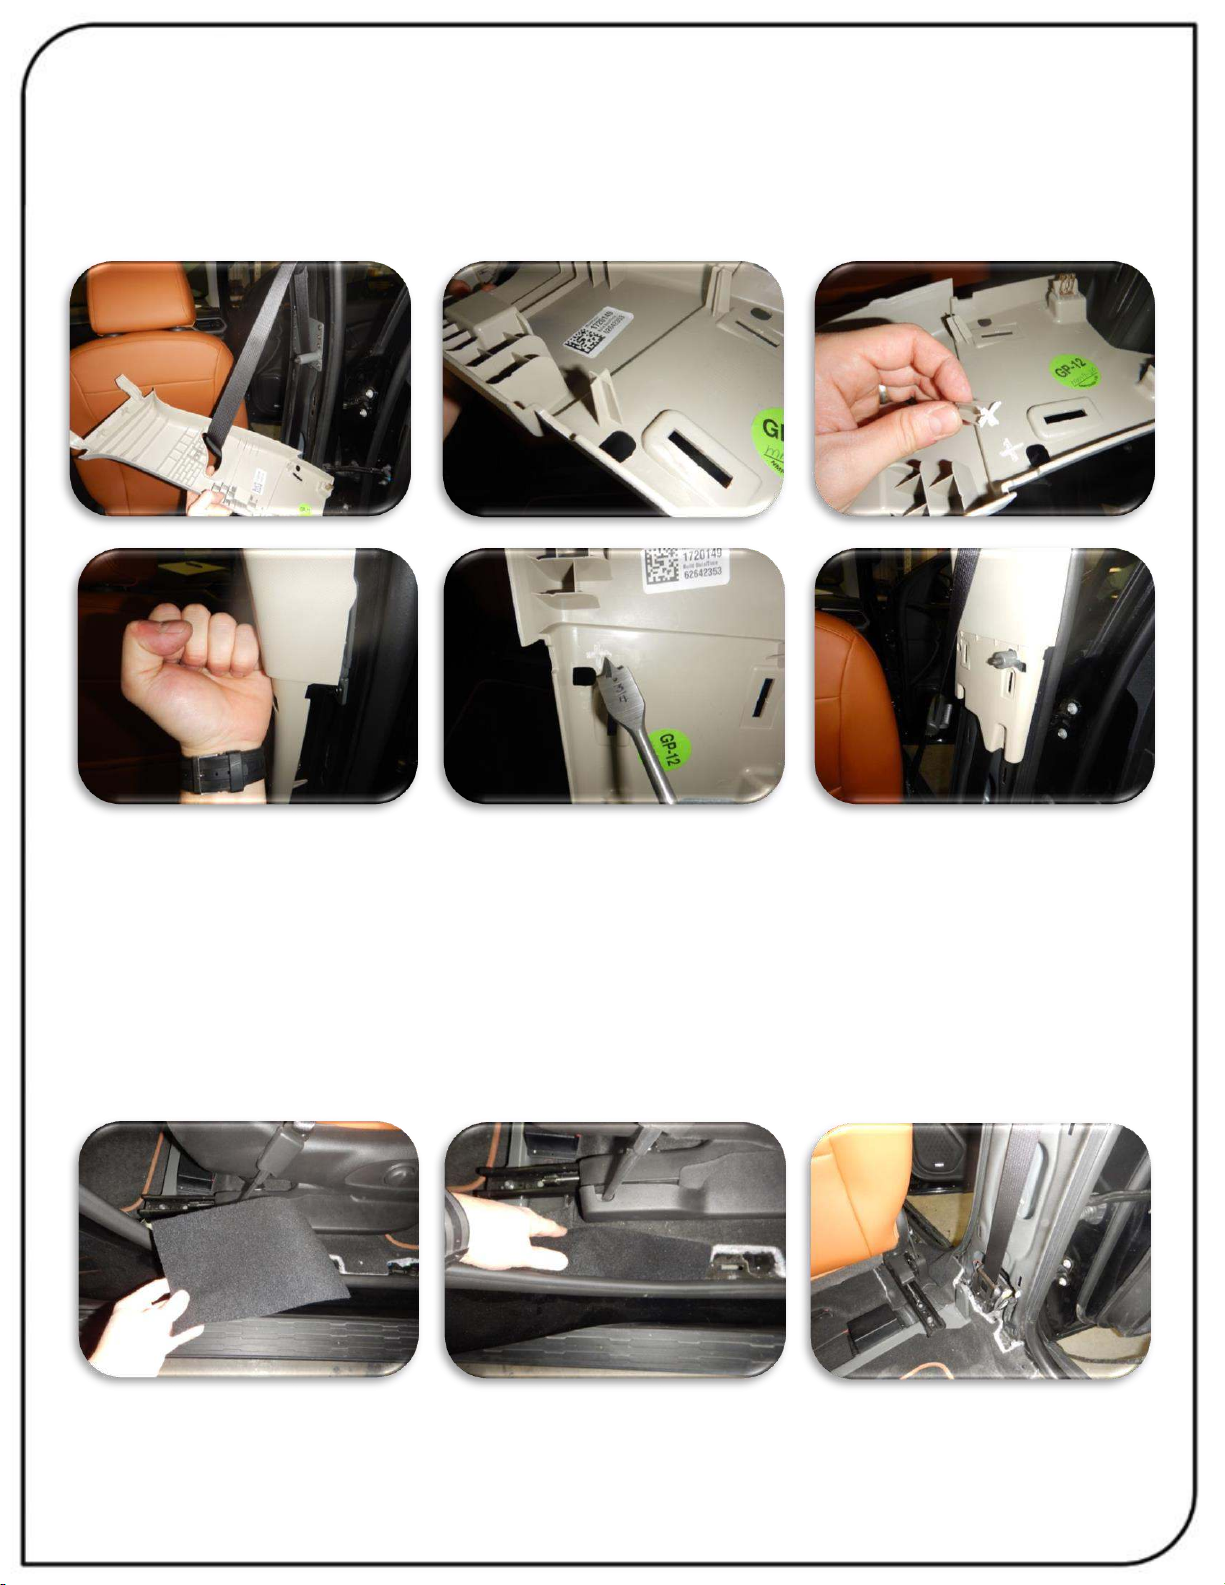
8. Run the power and ground cable for the ASENTO. Follow the instructions as detailed in the
attached document: ELECTRICAL INSTALLATION (Found at the end of this manual)
9. Install the provided fabric cover that is provided to cover the slot that will have to be made in the
bottom in of the b pillar trim.
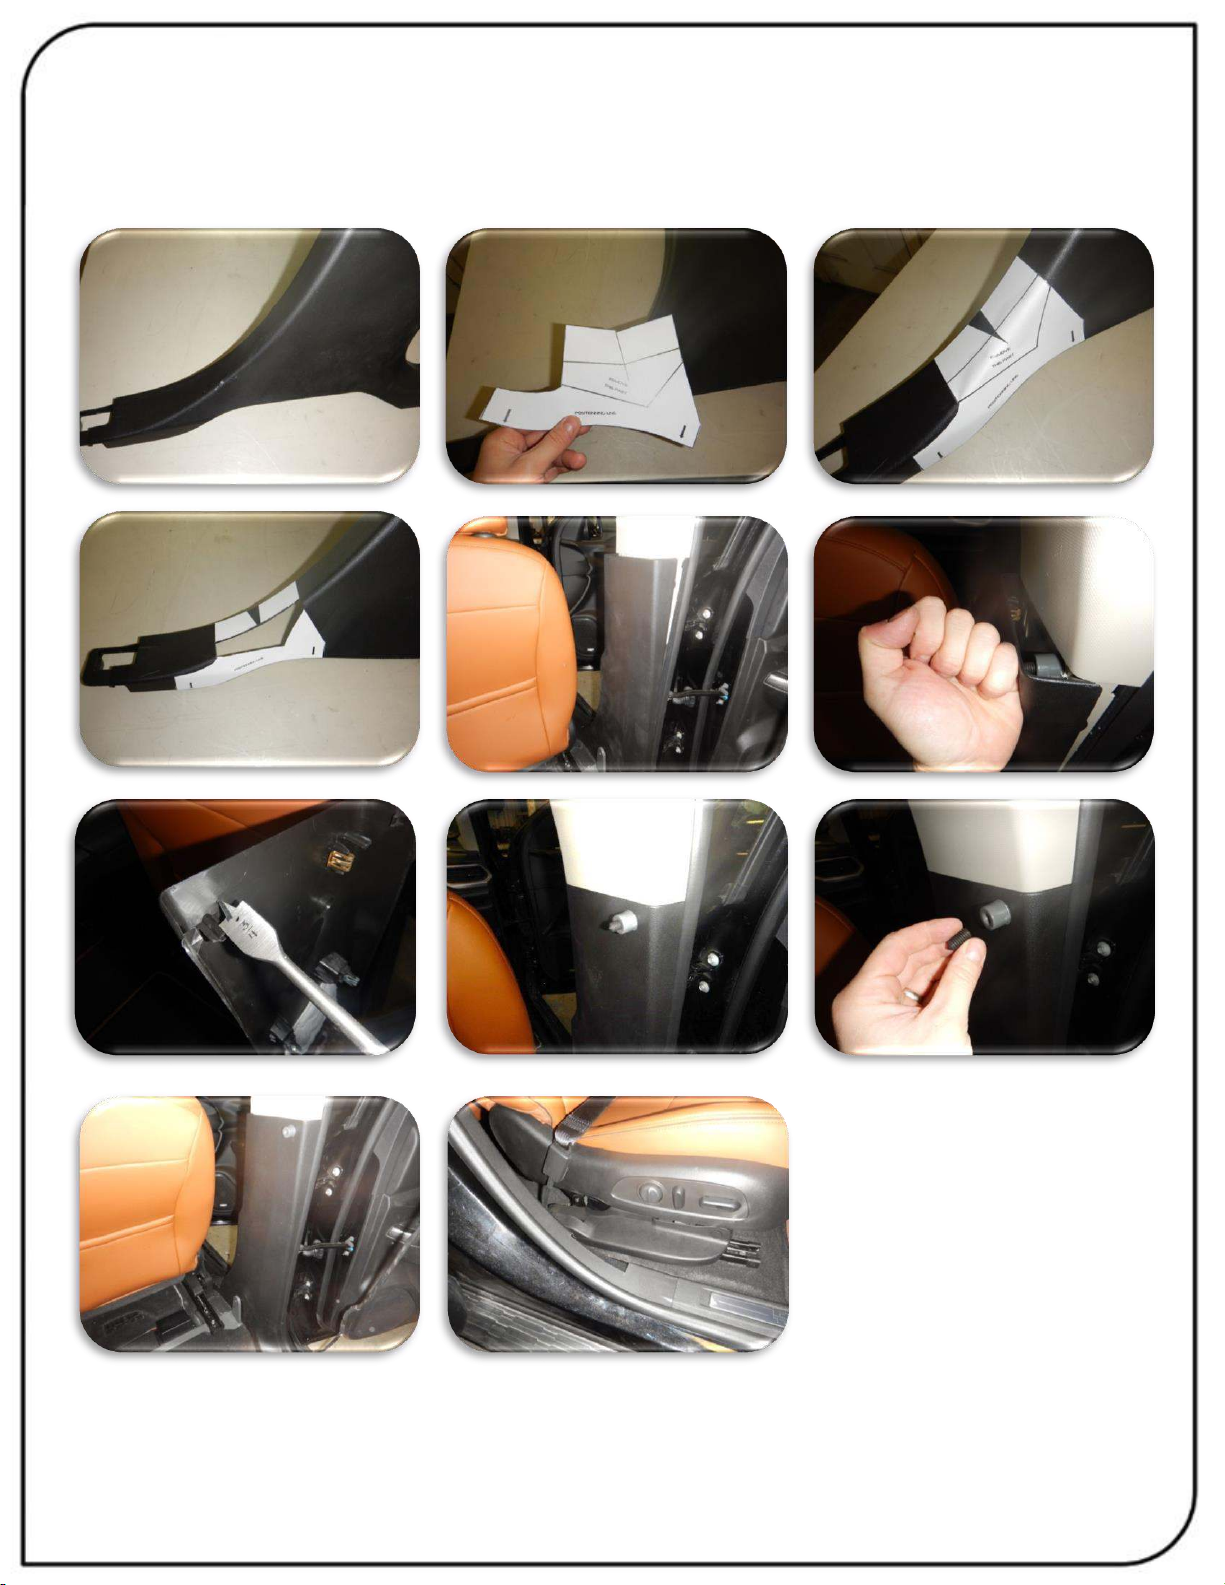
10. The lower b pillar trim will have to be modified to allow clearance for the ASENTO. Use the
provided stencil to cut out the hole. Now install the lower trim and mark the hole to be drilled, reinstall
the rims and remove the pointed allen screw.

11. On vehicles with a manual seat the recline lever will have to be replaced with the one provided #EV-
TER18R-03 and the seat belt retention elastic installed to hold the seat belt in place.

12. Install the ASENTO to the floor adapter and b pillar adapter. Use the 3/8-16x1’’ bolt and flat washer
at the floor adapter and the 3/8-16x1’’1/4 bolt and flat washer at the b pillar.

13. Connect the ASENTO control box to the ASENTO. Connect the control box to the pendant and
to the 12 volt power supply. Then attach the control box under the seat in a place where it cannot be
damaged by the seat moving. Place the hand pendant in a place convenient to the client. NOTE: Once
the 12 volt power is connected the ASENTO will beep to signify that it is ready to be programed.
PROGRAMMING ASENTO
14. Before the ASENTO can be used it will have to be programmed. Once the control
box is connected to the 12 volt power supply and has beeped to signify that it is
active, the ASENTO will be in a reduced power mode. To program, press the up
button until the ASENTO stops and beeps then press the down button until it stops
and beeps. The ASENTO will now leave the reduced power mode and be fully
functional.
15. Install the transfer board by sliding it onto the chrome shaft of the ASENTO. Make
sure that it slides all the way onto the shaft.
Final Inspection
Make sure all bolts are all properly fastened.
Make sure that ASENTO works well with and without a passenger.
Make sure the door closes properly.
(Note: It is normal for the ASENTO to touch the door panel trim.)
Please note that our Technical Support Department is available Monday thru Friday
from 7:30 am to 5:00 pm. (Eastern Standard Time) Toll free 1-866-641-0419 or by e-mail.

ELECTRICAL INSTALLATION FOR ASENTO
1. Thread the lead power cable (red +) under the doorstep moulding and through the
firewall. WARNING: Pass through a grommet in the firewall to prevent the cable from
chaffing.
2. Install the circuit breaker near the battery and then
connect the battery to the circuit breaker.
3. Attach the ground wire (black -) to the vehicle’s frame,
under the doorstep moulding using a self-tapping screw.
(NOTE: It is preferable to locate it in a spot where the sheet
metal is doubled-up to insure a better ground.)
4. Connect the power cable (red+) and the ground cable
(black -) to the electronic module (black box). Place the
electronic module under the seat and secure it in place
using “Velcro”. Secure all the wires in a loom. Reconnect
the battery.
5. Thread the flat hand held control wire (black telephone wire) under
the doorstep molding and up under the dash. Secure the wire in place
under the dash with a tie wrap and secure the hand held control on the
dash using “Velcro”.
WARNING: Place the hand held control in a safe place so that the door
does not risk cutting off the wire.
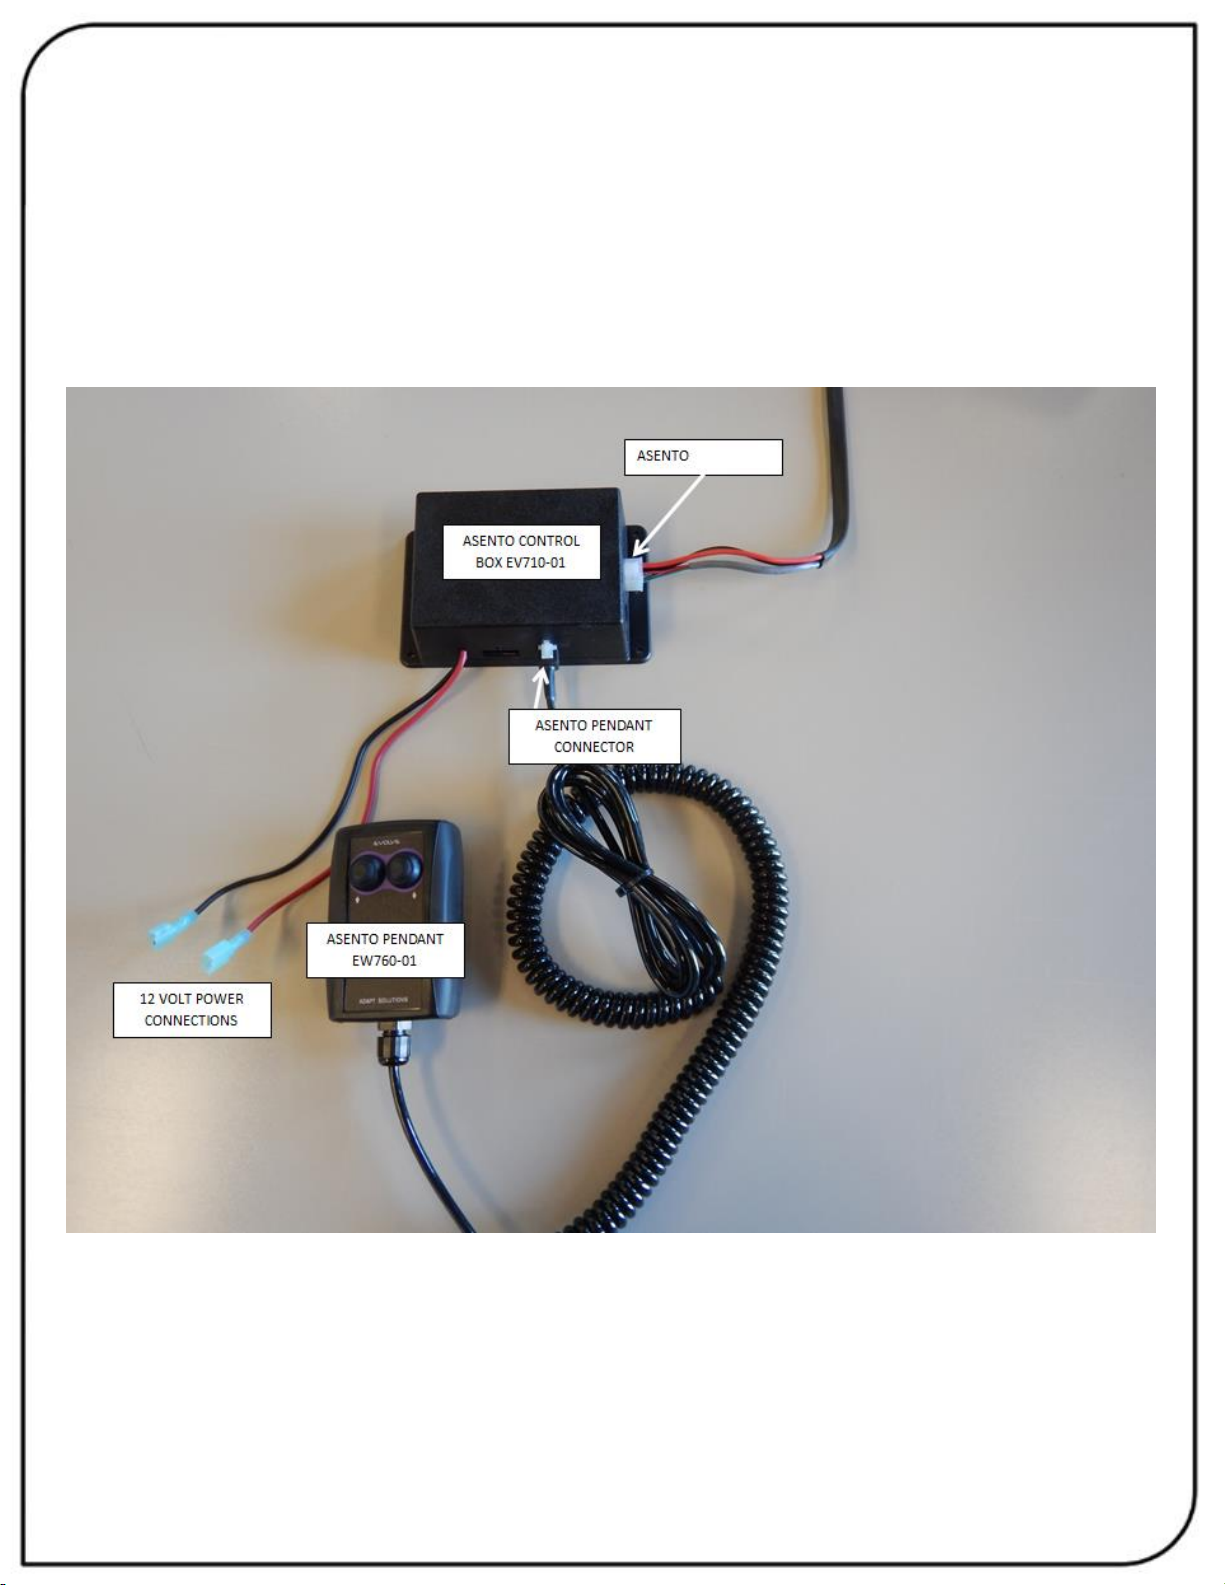
ELECTRICAL BOX CONNECTIONS
ASENTO

ASENTO WITH SPEEDY LIFT
WARNING DECALS
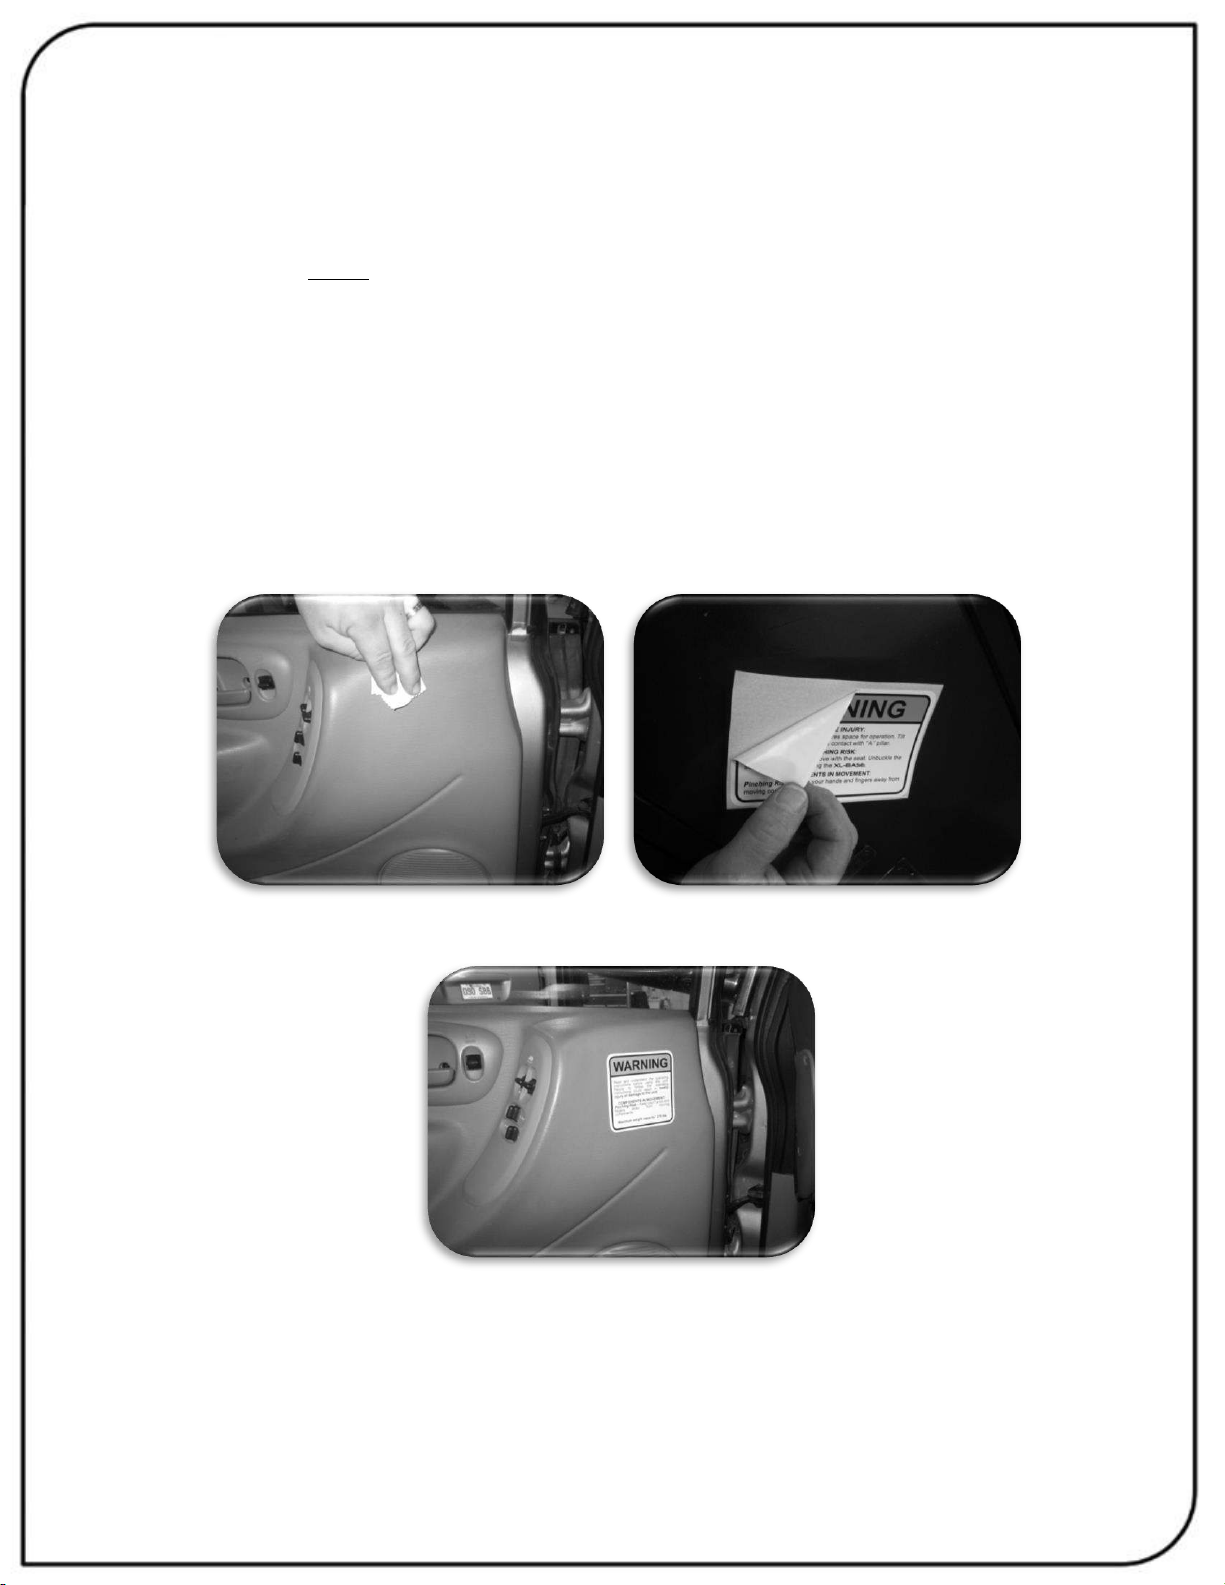
After completing the installation of the ASENTO, please take time to install the
warning decals. NOTE: The surface must be clean, dry and at ambient temperature for
the sticker to stick to the surface.
Start by locating a position to install the decals.
Clean the surface with the provided alcohol swab.
Peel off the backing of the sticker and then stick it to the cleaned surface.
Table of contents
Other ADAPT SOLUTIONS Automobile Accessories manuals

ADAPT SOLUTIONS
ADAPT SOLUTIONS SPEEDY-LIFT SP-CHR17L User manual

ADAPT SOLUTIONS
ADAPT SOLUTIONS SPEEDY-LIFT SP-HDA05 User manual

ADAPT SOLUTIONS
ADAPT SOLUTIONS XL-SEAT XLS-DAKC05L User manual

ADAPT SOLUTIONS
ADAPT SOLUTIONS SP-HDA18 User manual

ADAPT SOLUTIONS
ADAPT SOLUTIONS XL-Seat XLS-DAKQ05R User manual

ADAPT SOLUTIONS
ADAPT SOLUTIONS LINK LK-SILC14L User manual

ADAPT SOLUTIONS
ADAPT SOLUTIONS ASENTO EV-COLC15R User manual

ADAPT SOLUTIONS
ADAPT SOLUTIONS ASENTO EV-EXP18R User manual

ADAPT SOLUTIONS
ADAPT SOLUTIONS XL-SEAT XLS-COLX04R User manual

ADAPT SOLUTIONS
ADAPT SOLUTIONS Power-Pull User manual


