ADEEPT Ultimate Sensor Kit for Raspberry Pi User manual
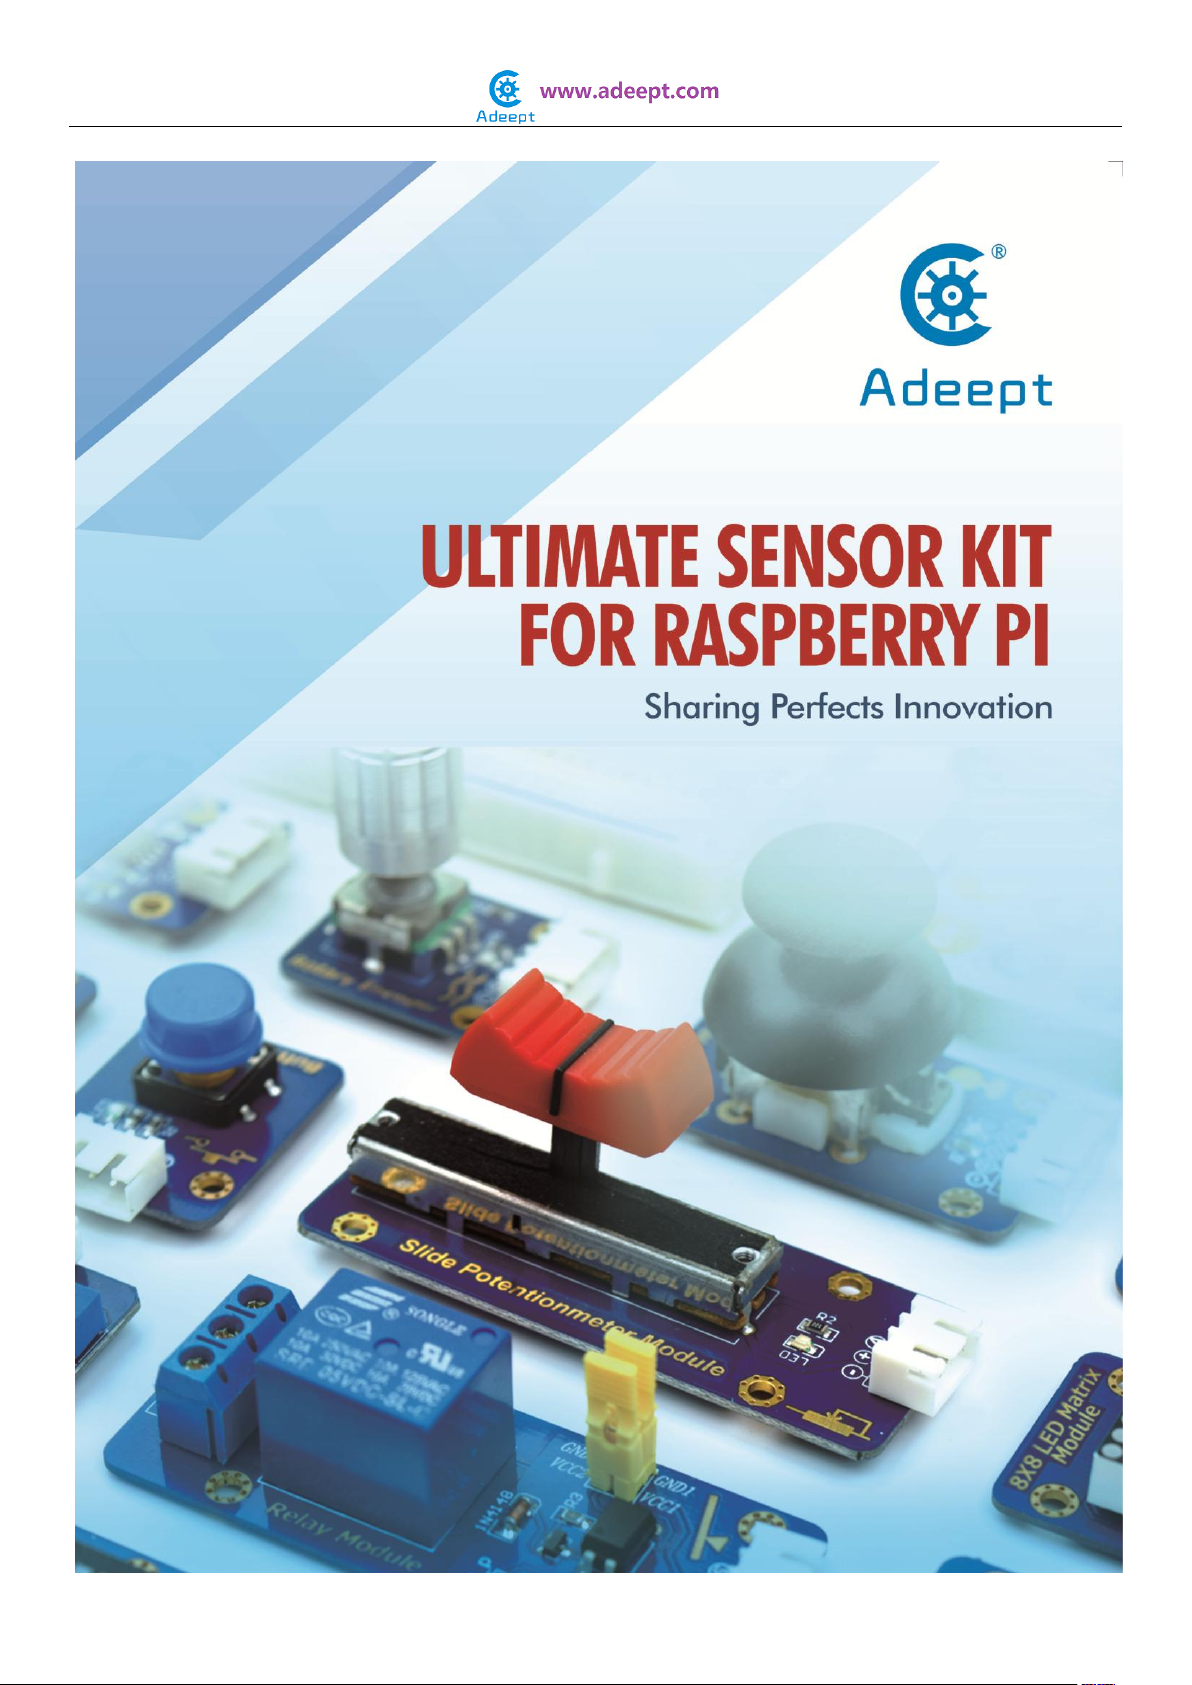
Package List
No.
Name
Picture
Qty
1
LCD1602
1
2
I2C Interface Module
1
3
DHT-11 Temperature and
humidity Sensor
1
4
DS18B20 Digital temperature
Sensor
1
5
Ultrasonic Distance Sensor
Module
1
6
ADC0832 Module
1
7
BMP180 Barometer Sensor
1
8
ADXL345 Accelerometer
1
9
PS2 Joystick Module
1
10
Relay Module
1
11
DC Motor Module
1
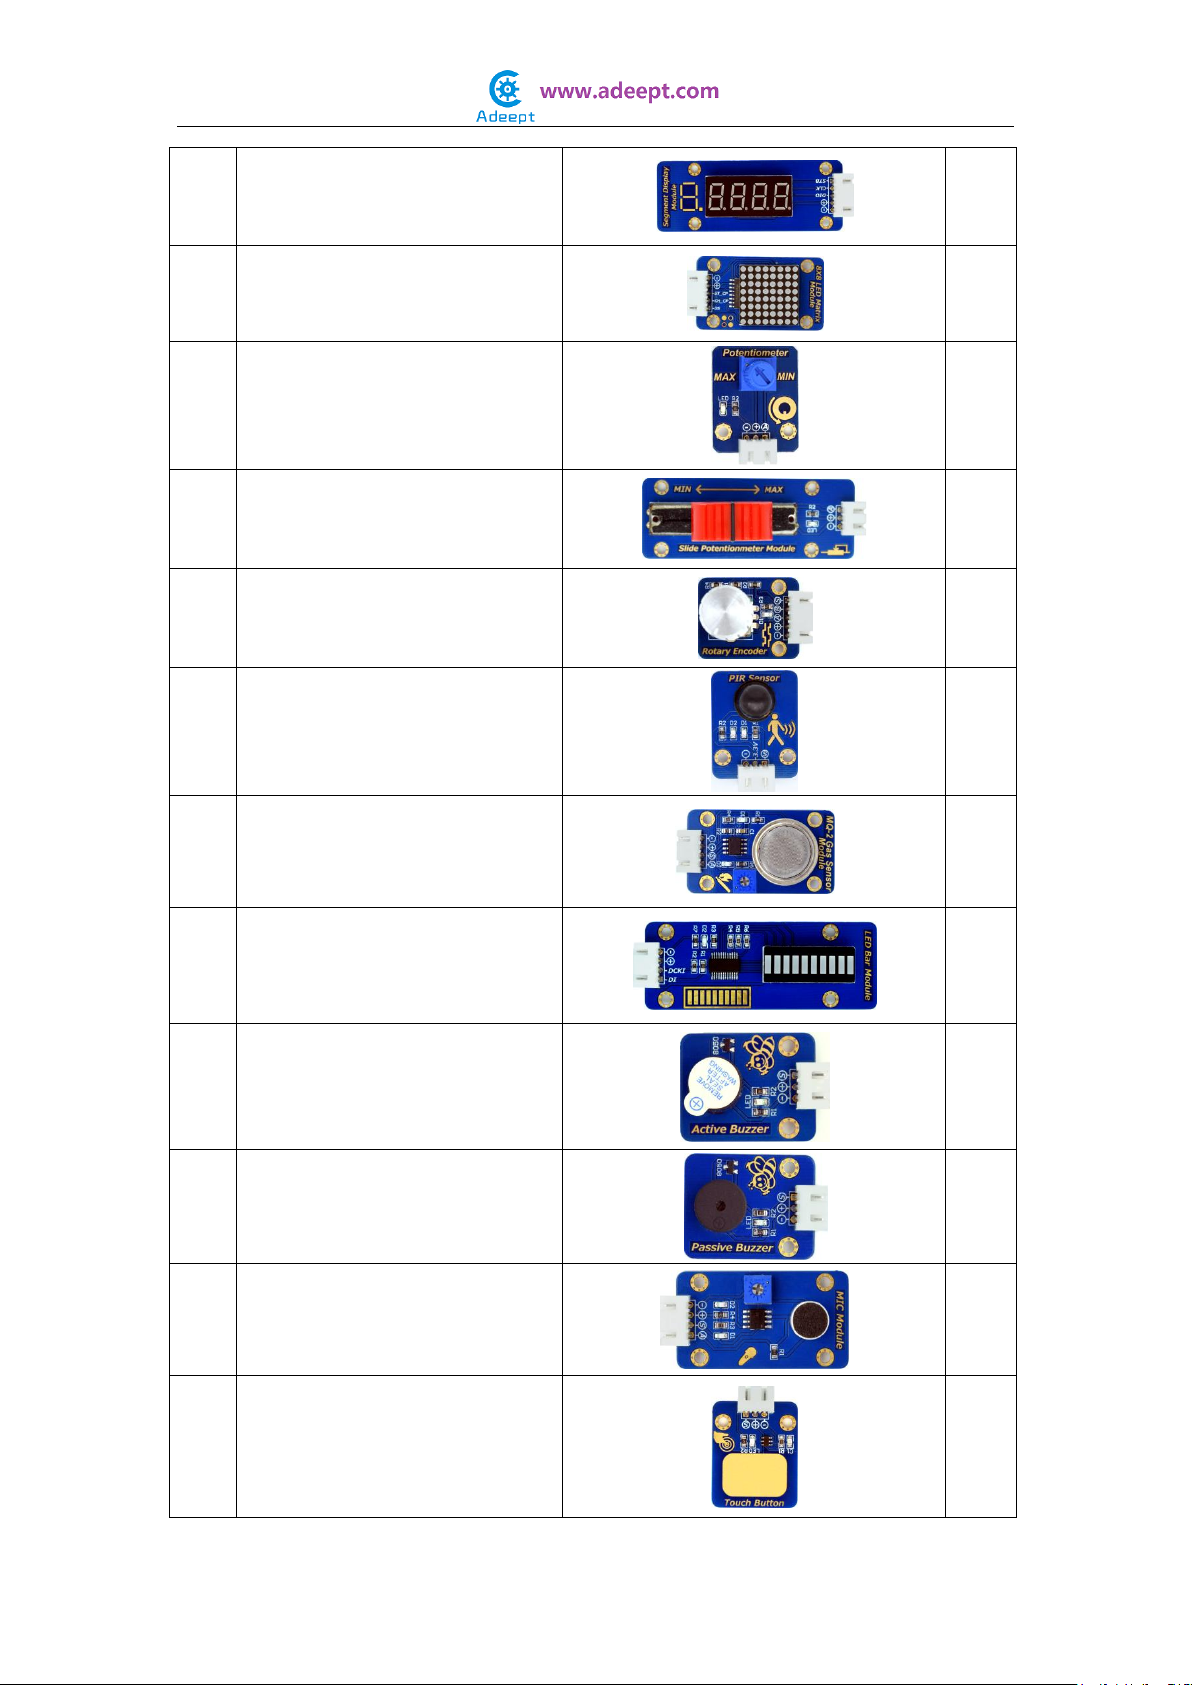
12
Segment Display Module
1
13
8x8 LED Matrix Module
1
14
Potentiometer Module
1
15
Slide Potentiometer Module
1
16
Rotary Encoder Module
1
17
PIR Sensor Module
1
18
MQ-2 Gas Sensor Module
1
19
LED Bar Graph Module
1
20
Active Buzzer Module
1
21
Passive Buzzer Module
1
22
MIC Module
1
23
Touch Button Module
1

24
Line Finder Module
1
25
Flame Sensor Module
1
26
Vibration Sensor Module
1
27
CM Module
1
28
Water Level Sensor Module
1
29
Soil Moisture Sensor Module
1
30
Photoresistor Module
1
31
Analog Temperature
Sensor(Thermistor Module)
1
32
Hall Sensor Module
1
33
Limit Switch Module
1
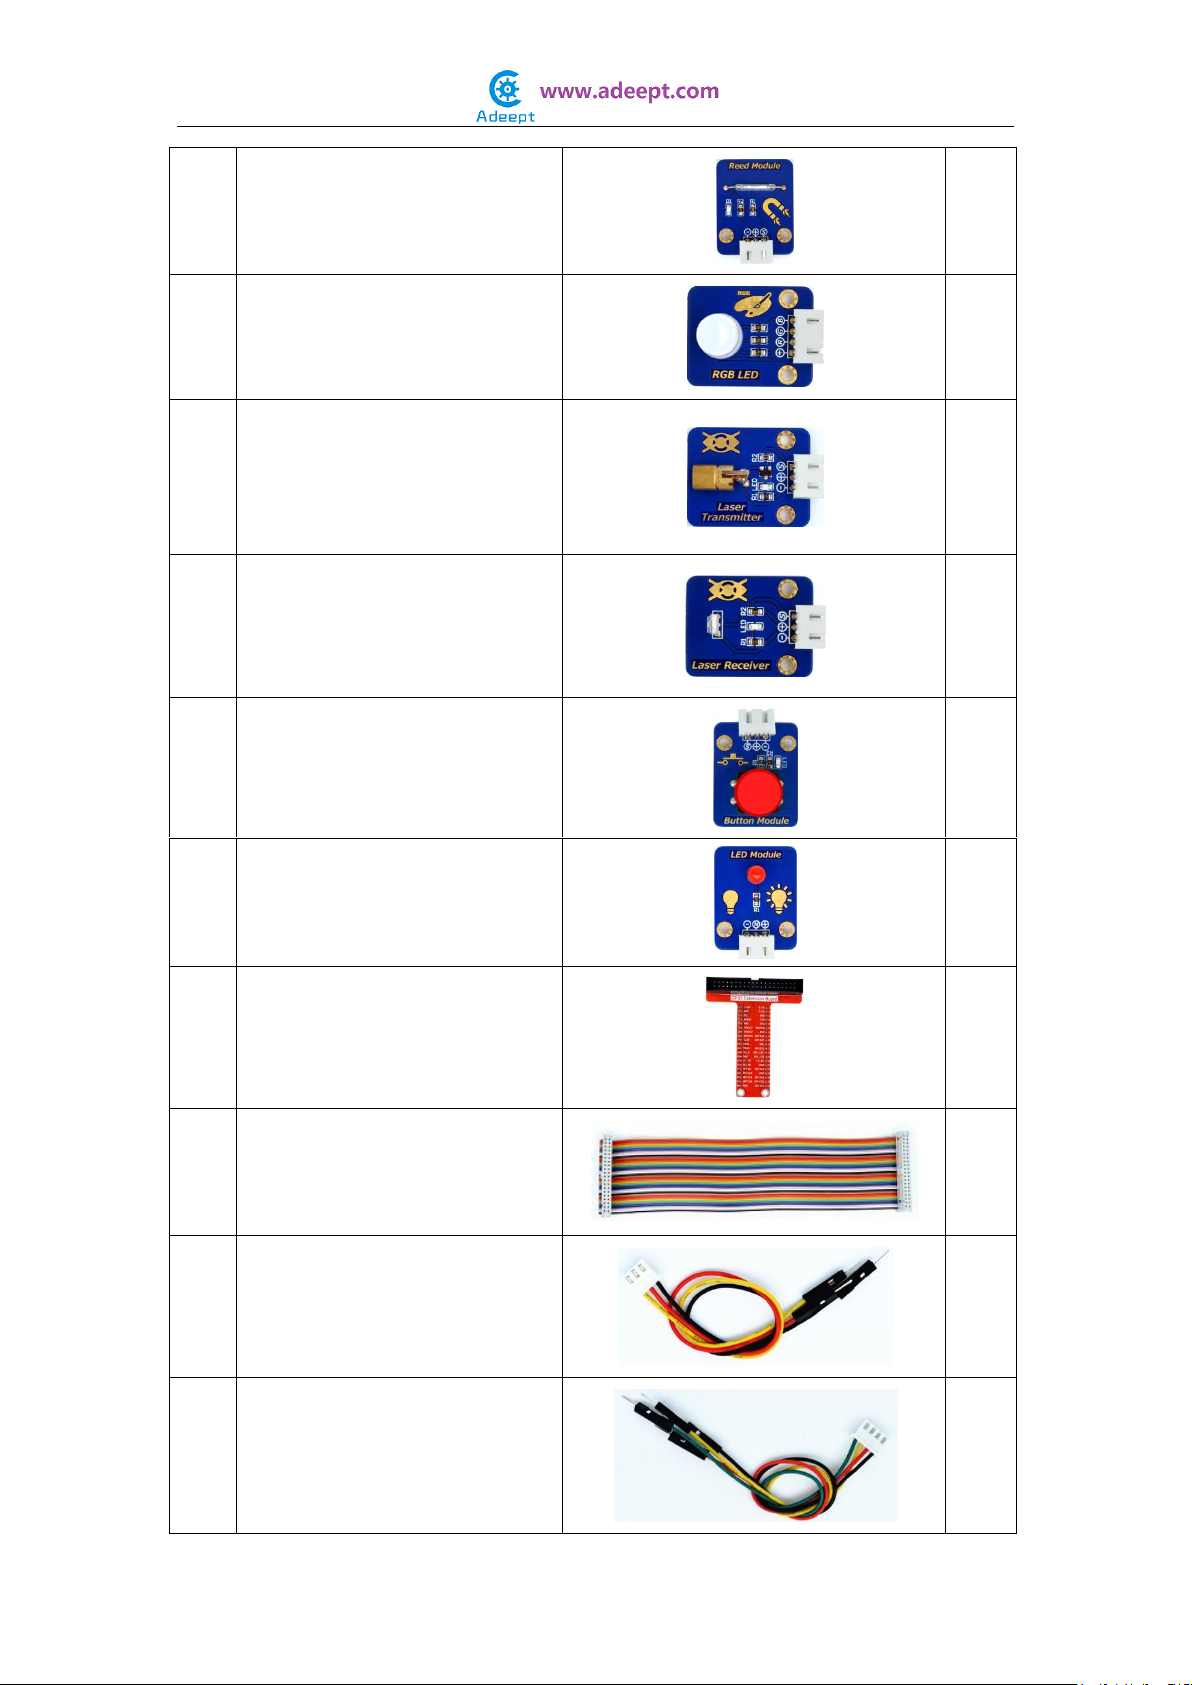
34
Reed Module
1
35
RGB LED Module
1
36
Laser Transmitter Module
1
37
Laser Receiver Module
1
38
Button Module
4
39
LED Module
4
40
GPIO Extension Board
1
41
40P GPIO Cable
1
42
3-Pin Wires
8
43
4-Pin Wires
5

44
5-Pin Wires
3
45
Hookup Wire Set
1
46
2-Pin Female to Female Wires
1
47
Male to Female Jumper Wires
20
48
Breadboard
1
49
Band Resistor Card
1

Preface
About Adeept
Adeept is a technical service team of open source software and hardware.
Dedicated to applying the Internet and the latest industrial technology in
open source area, we strive to provide best hardware support and software
service for general makers and electronic enthusiasts around the world. We
aim to create infinite possibilities with sharing. No matter what field you are in,
we can lead you into the electronic world and bring your ideas into reality.
If you have any problems for learning, please contact us at
[email protected], or please ask questions in our forum
www.adeept.com. We will do our best to help you solve the problem.

Content
About the Raspberry Pi............................................................................................10
Raspberry Pi Pin Numbering Introduction ..................................................................11
Raspberry Pi GPIO Library Introduction.....................................................................13
How to Use wiringPi and RPi.GPIO ............................................................................15
Lesson 1 Blinking LED.............................................................................................19
Lesson 2 Controlling an LED by Button ......................................................................22
Lesson 3 Controlling an RGB LED by PWM..................................................................25
Lesson 4 Active Buzzer............................................................................................28
Lesson 5 Passive Buzzer ..........................................................................................31
Lesson 6 Controlling an LED by Hall Sensor ................................................................34
Lesson 7 Controlling an LED by Reed .........................................................................37
Lesson 8 How to Use a Relay ....................................................................................40
Lesson 9 Laser Transmitter......................................................................................43
Lesson 10 Laser Receiver.........................................................................................46
Lesson 11 How to Control a DC Motor........................................................................49
Lesson 12 Controlling an LED by Limit Switch.............................................................52
Lesson 13 Controlling an LED by Vibration Switch .......................................................55
Lesson 14 Rotary Encoder .......................................................................................59
Lesson 15 Controlling an LED by Touch Button ...........................................................63
Lesson 16 Movement Detection Based on PIR .............................................................67
Lesson 17 Flame Sensor ..........................................................................................71
Lesson 18 Line Finder .............................................................................................74
Lesson 19 Measuring the Temperature via DS18B20....................................................77
Lesson 20 Temperature & Humidity Sensor - DHT-11 ..................................................82
Lesson 21 Measuring the Distance.............................................................................85
Lesson 22 Acceleration Sensor - ADXL345 ..................................................................88
Lesson 23 Barometric Pressure Sensor - BMP180 ........................................................91
Lesson 24 Dot-matrix Display...................................................................................94
Lesson 25 LED Bar Graph.........................................................................................97
Lesson 26 How to Drive the Segment Display ............................................................ 100
Lesson 27 Potentiometer ....................................................................................... 103
Lesson 28 Photoresistor ........................................................................................ 108
Lesson 29 Thermistor ........................................................................................... 111
Lesson 30 Water Level Detection ............................................................................ 115

Lesson 31 Soil Moisture Detection........................................................................... 118
Lesson 32 MQ-2 Gas Sensor.................................................................................... 121
Lesson 33 Sound Sensor ........................................................................................ 125
Lesson 34 PS2 Joystick .......................................................................................... 128
Lesson 35 LCD1602 Display ................................................................................... 131
Lesson 36 How to Make a Simple Thermometer(1) .................................................... 137
Lesson 37 How to Make a Simple Thermometer(2) .................................................... 139
Lesson 38 Make a Distance Measuring Device ........................................................... 142
Lesson 39 How to Make a Simple Voltmeter(1).......................................................... 145
Lesson 40 How to Make a Simple Voltmeter(2).......................................................... 148

About the Raspberry Pi
The Raspberry Pi is a low cost, credit-card sized computer that plugs into a
computer monitor or TV, and uses a standard keyboard and mouse. It is a
capable little device that enables people of all ages to explore computing, and
to learn how to program in languages like Scratch and Python. It’s capable of
doing everything you’d expect a desktop computer to do, from browsing the
internet and playing high-definition video, to making spreadsheets, word-
processing, and playing games.
What’s more, the Raspberry Pi has the ability to interact with the outside world,
and has been used in a wide array of digital maker projects, from music
machines and parent detectors to weather stations and tweeting birdhouses
with infra-red cameras. We want to see the Raspberry Pi being used by kids all
over the world to learn to program and understand how computers work.
Learn more at:
https://www.raspberrypi.org/help/what-is-a-raspberry-pi/

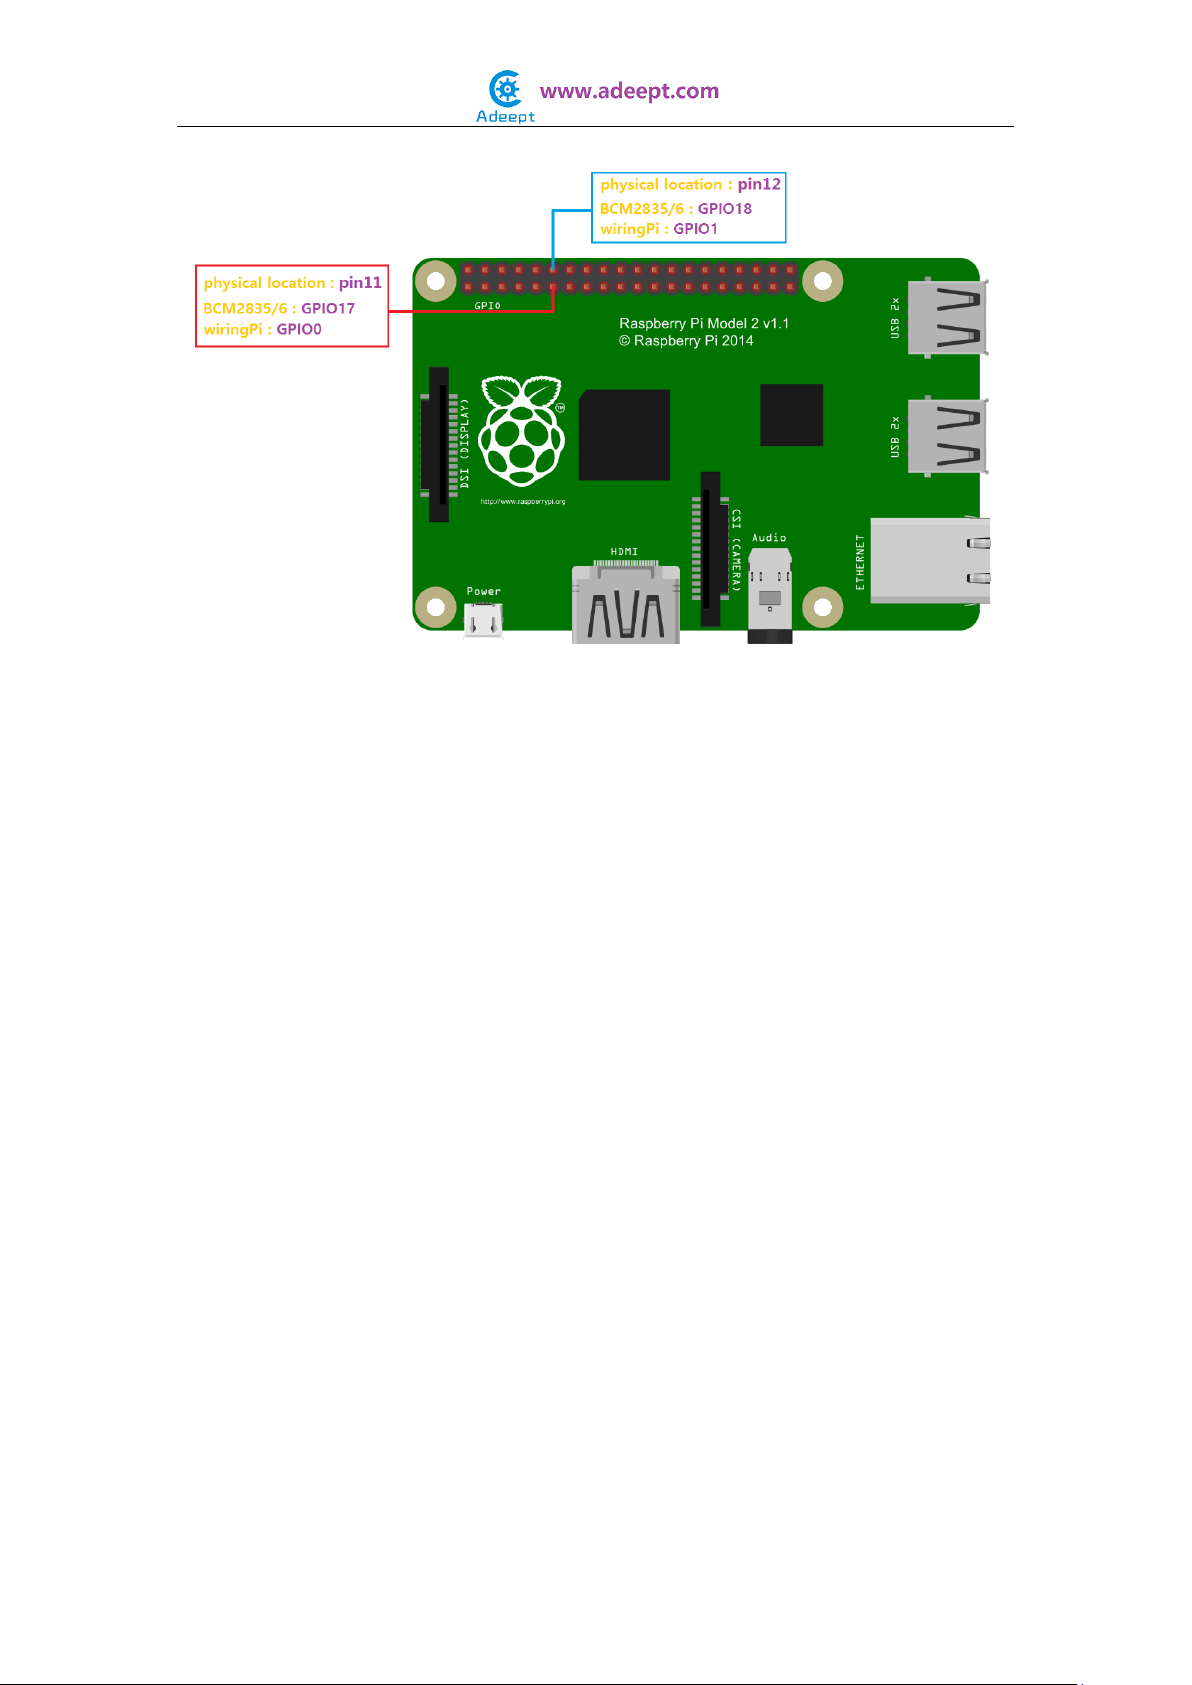
Raspberry Pi Pin Numbering Introduction
There are three methods for numbering Raspberry Pi’s GPIO:
1. Numbering according to the physical location of the pins, from left to right,
top to bottom –the left is odd and the right is even.
2. Numbering according the GPIO registers of BCM2835/2836/2837 SOC.
3. Numbering according the GPIO library wiringPi.

Raspberry Pi GPIO Library Introduction
Currently, there are two major GPIO libraries for Raspberry Pi: RPi.GPIO and
wiringPi.
RPi.GPIO:
RPi.GPIO is a python module to control Raspberry Pi GPIO channels. For more
information, please visit:
https://pypi.python.org/pypi/RPi.GPIO/
For examples and documentation:
http://sourceforge.net/p/raspberry-gpio-python/wiki/Home/
The RPi.GPIO module is pre-installed in the official Raspbian operating system,
thus you can use it directly.
wiringPi:
The wiringPi is a GPIO access library written in C language for BCM2835/6/7
SOC used in the Raspberry Pi. It’s released under the GNU LGPLv3 license and
usable from C and C++ and many other languages with suitable wrappers. It’s
designed familiar to people who have practiced the wiring system in the
Arduino software.
For more information about wiringPi, please visit: http://wiringpi.com/
Install wiringPi:
Step 1: Get the source code
$ sudo git clone git://git.drogon.net/wiringPi
Step 2: Compile and install
$ cd wiringPi
$ git pull origin
$ sudo ./build
Press Enter and the script build will automatically compile wiringPi source
code and then install it to the Raspberry Pi.
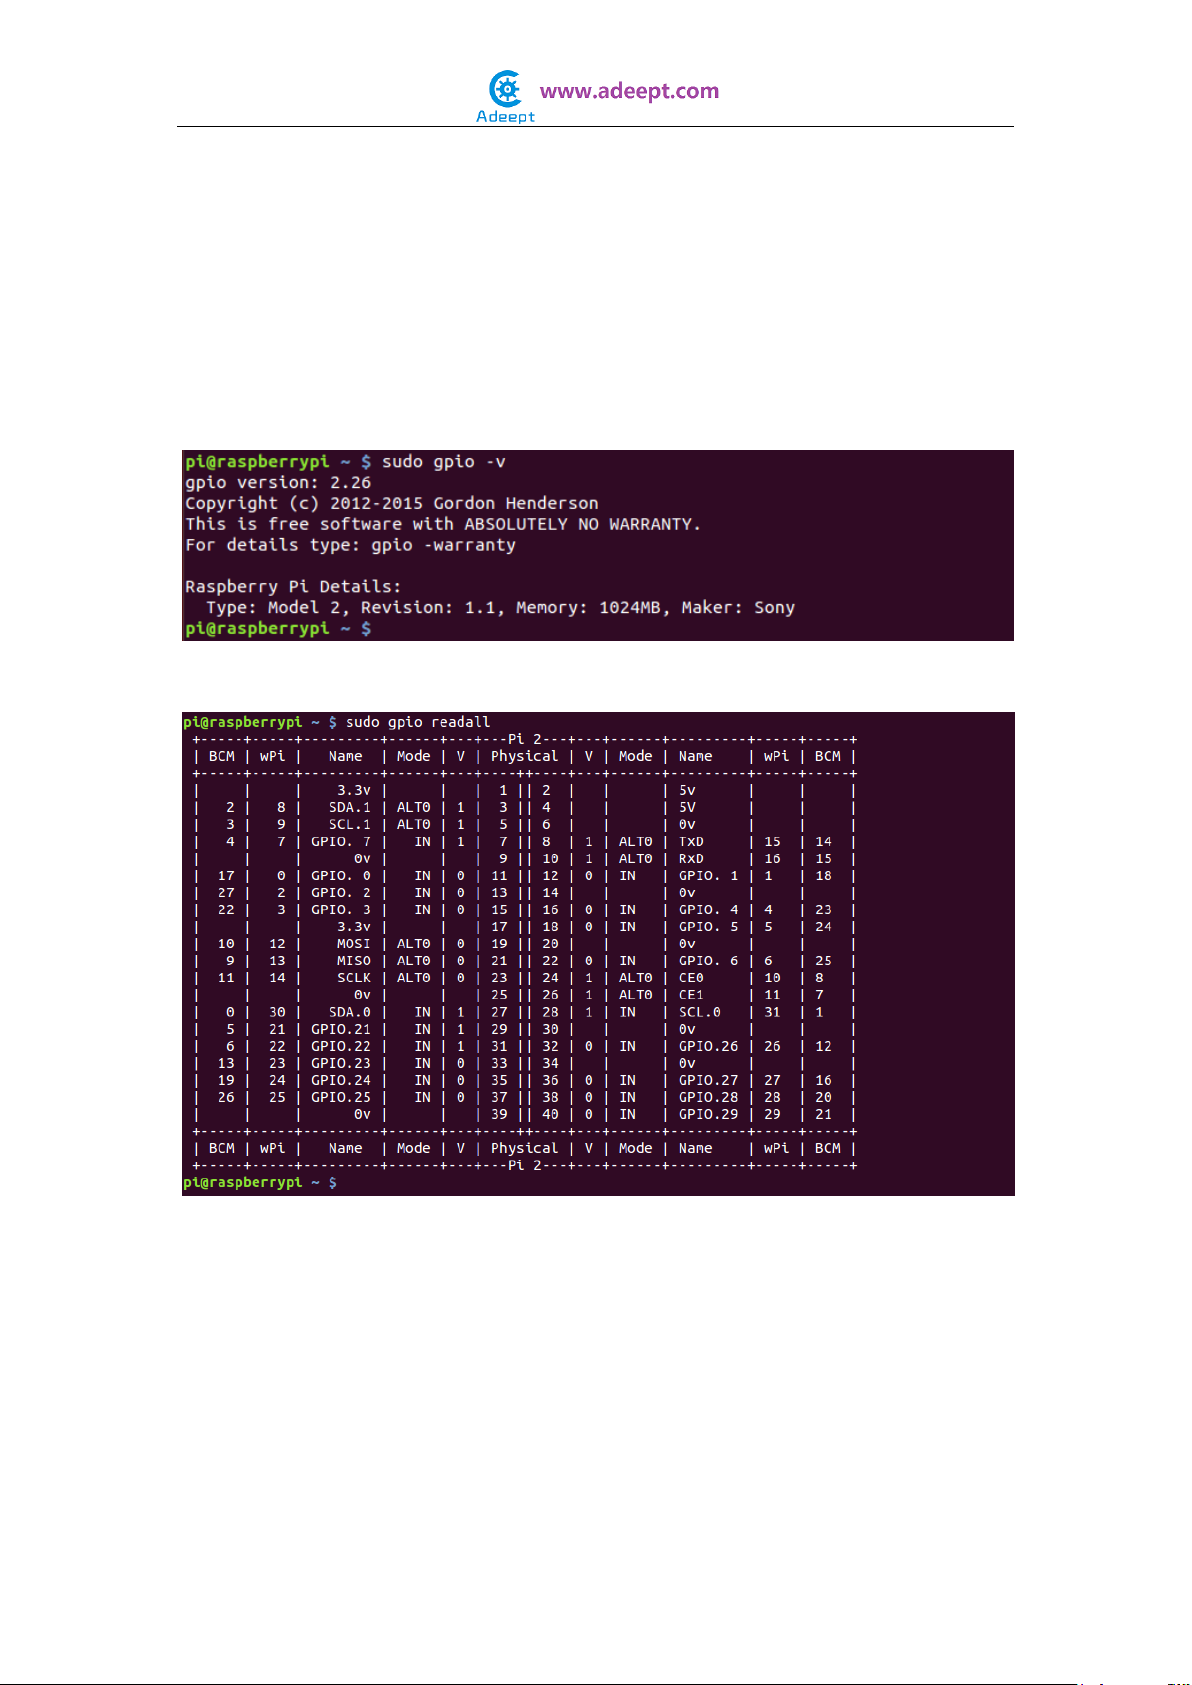
Next, verify whether the wiringPi is installed successfully or not:
wiringPi includes a command-line utility gpio which can be used to program
and set up the GPIO pins. You can use it to read and write the pins or even
control them from shell scripts.
You can verify whether the wiringPi is installed successfully or not by the
following commands:
$ sudo gpio -v
$ sudo gpio readall
If the information above is shown, it indicates that the wiringPi has been
installed successfully.
How to Use wiringPi and RPi.GPIO
For how to use the wiringPi C library and RPi.GPIO Python module, here we
take blinking an LED for example.
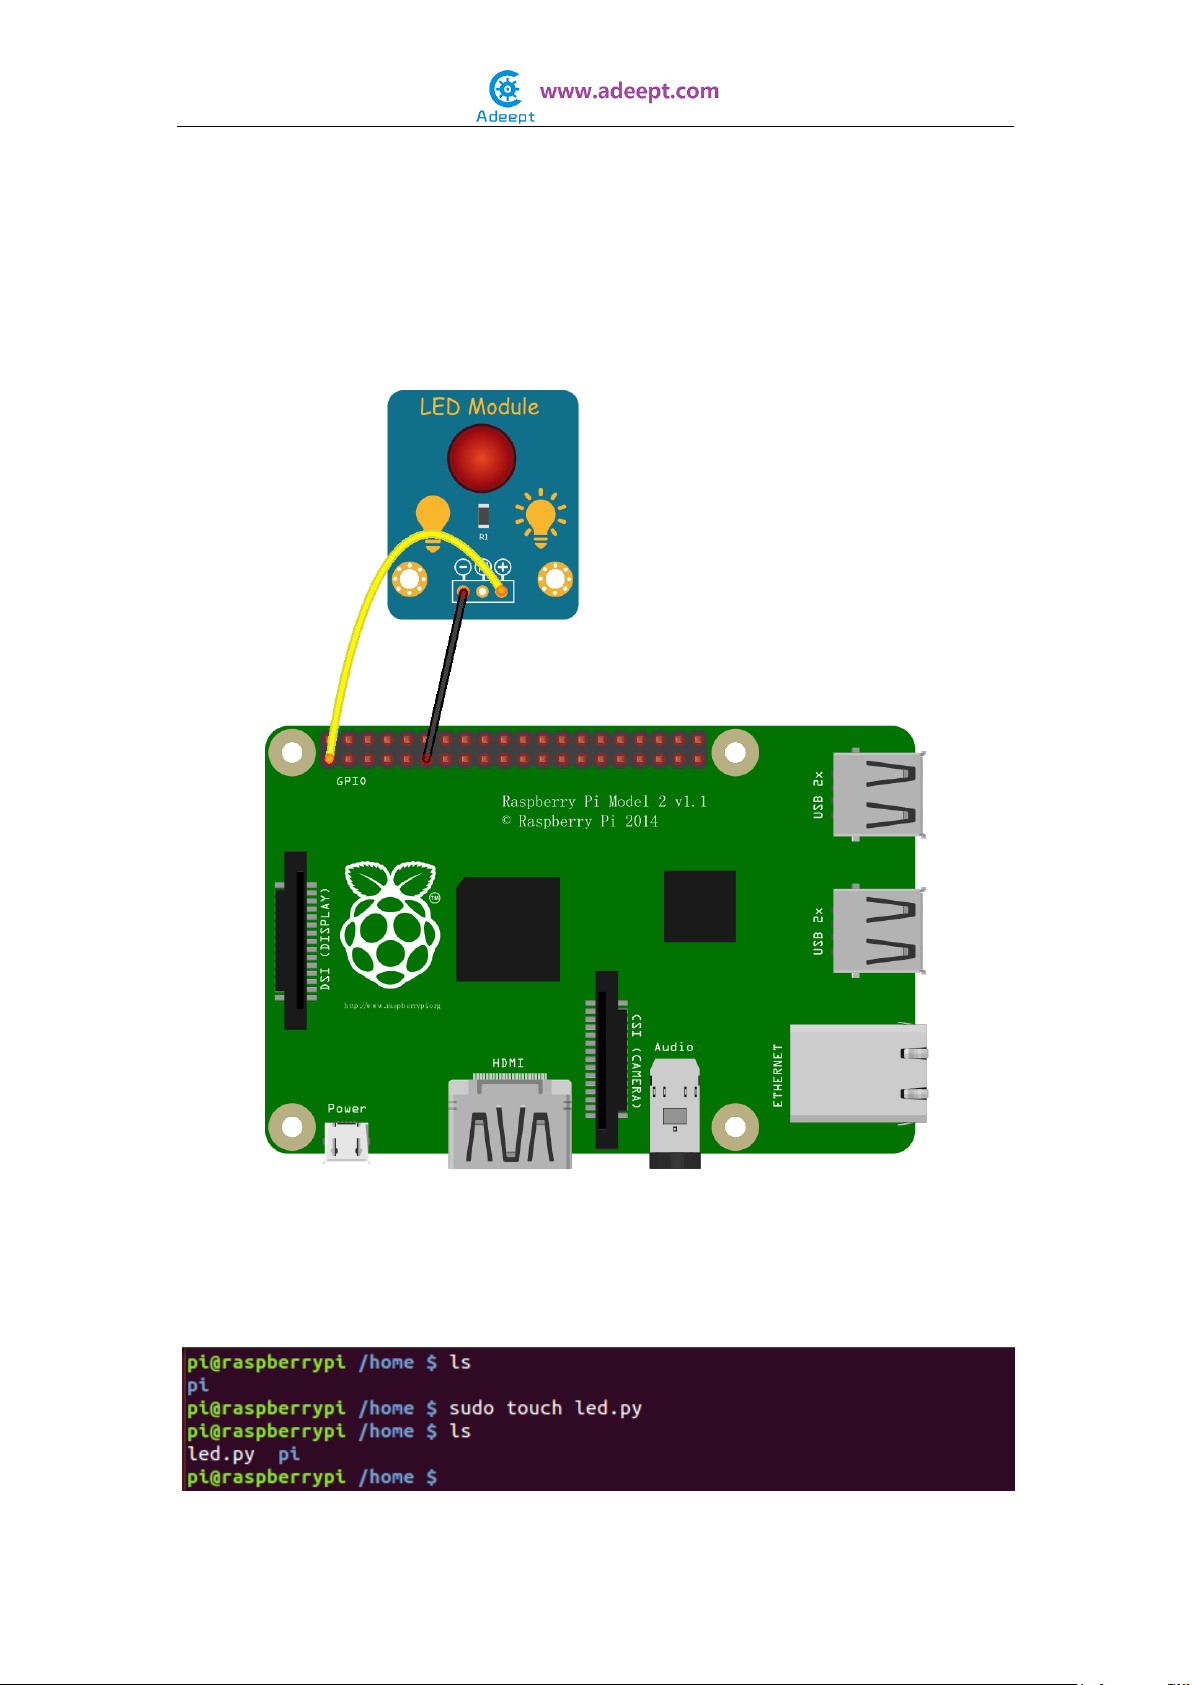
Step 1: Build the circuit according to the following schematic diagram
For Python users:
Step 2: Create a file named led.py
$ sudo touch led.py
Step 3: Open the file led.py with vim or nano
$ sudo vim led.py
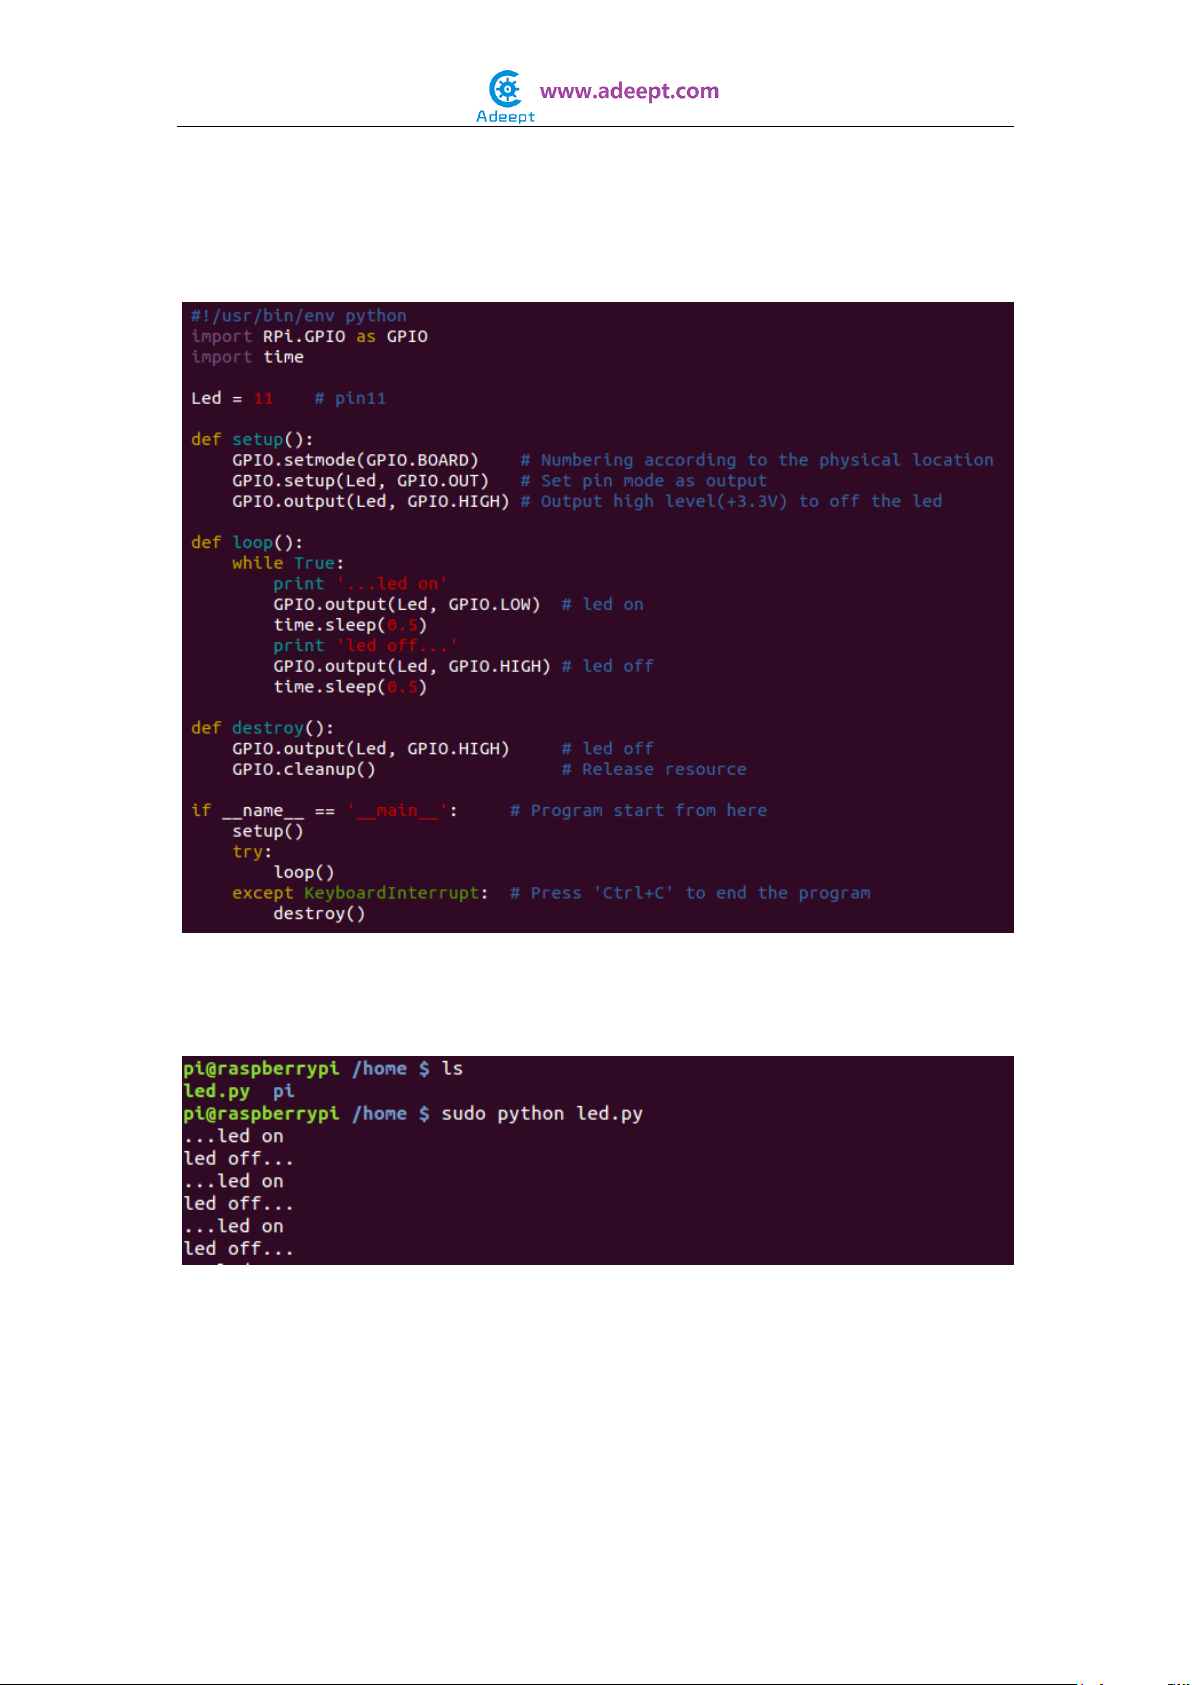
Write the following source code, then save and exit.
Step 4: Run
$ sudo python led.py
Now you should see the LED blinking. Press ‘Ctrl+C’and the program
execution will be terminated.
For C language users:
Step 2: Create a file named led.c
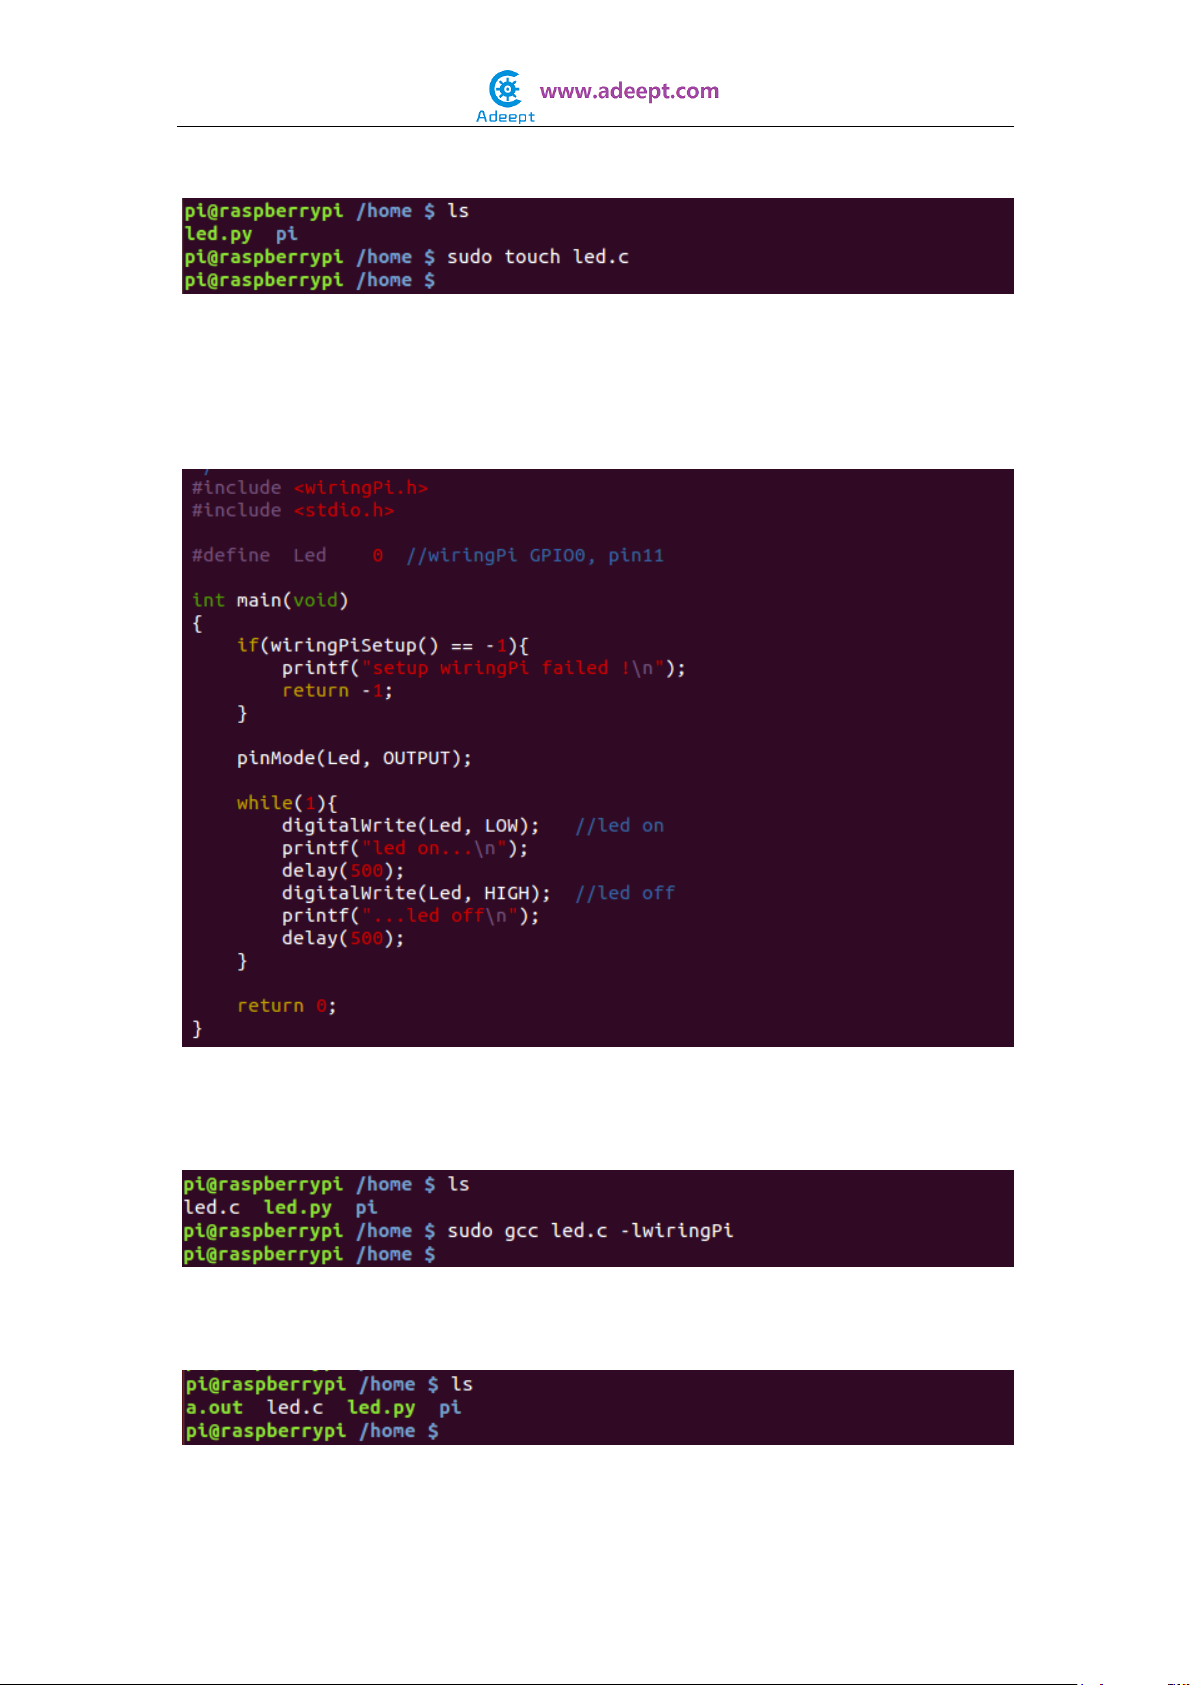
$ sudo touch led.c
Step 3: Open the file led.c with vim or nano
$ sudo vim led.c
Write the following source code, then save and exit.
Step 4: Compile the code
$ sudo gcc led.c -lwiringPi
After the command is executed, you'll find a file named a.out appear in the
current directory. It is an executable program.
Step 5: Run

$ sudo ./a.out
Now you should see that the LED is blinking. Press ‘Ctrl+C’and the program
execution will be terminated.
Resources:
http://sourceforge.net/p/raspberry-gpio-python/wiki/Examples/
http://wiringpi.com/reference/
NOTE:
Before you continue learning, please copy the source code provided with the
kit to your Raspberry Pi's /home/ directory, or download the source code
directly from our github repository:
C Language Source Code:
$ git clone https://github.com/adeept/Adeept_Sensor_Kit_for_RPi_C_Code
Python Source Code:
$ git clone https://github.com/adeept/Adeept_Sensor_Kit_for_RPi_Python_Code

Lesson 1 Blinking LED
Introduction
LED is usually used in office lighting, furniture, decoration, sign board, streetlight, etc.
Components
- 1 * Raspberry Pi
- 1 * GPIO Extension Board
- 1 * 40-Pin GPIO Cable
- 1 * Breadboard
- 1 * LED Module
- 1 * 3-Pin Wires
Experimental Principle
The Fritzing images:
The Physical picture:
The schematic diagram:
In this experiment, we make the pin 11 of the Raspberry Pi output High/Low by
programming, to control the LED to blink in a certain frequency.
Experimental Procedures
220Ω
R1
D1
LED_P
1
2
3
P1
Header
+
-
NC

Step 1: Build the circuit
For C language users:
Step 2: Edit and save the code with vim or nano.
(code path: /home/Adeept_Sensor_Kit_for_RPi_C_Code/01_LED/blinkingLed.c)
Step 3: Compile
$ sudo gcc blinkingLed.c -o led -lwiringPi
Step 4: Run
$ sudo ./led
For Python users:
Step 2: Edit and save the code with vim or nano.
(code path: /home/Adeept_Sensor_Kit_for_RPi_Python_Code/01_LED/blinkingLed_1.py)
Step 3: Run
$ sudo python blinkingLed_1.py
Now you can see the LED blinking.
Table of contents
Other ADEEPT Educational Equipment manuals


Popular Educational Equipment manuals by other brands

fischertechnik
fischertechnik STEM Coding Pro Assembly instruction

LVI
LVI MagniLink S Student Addition user manual

Nasco Healthcare
Nasco Healthcare SmartScope instruction manual

hand2mind
hand2mind PAWZ The Calming Pup manual

Rompa
Rompa Snoezelen SenStation manual

Pretorian
Pretorian Kinetic for SimplyWorks instructions


